
Word for Microsoft 365 Word 2021 Word 2019 Word 2016 Word 2013 More…Less
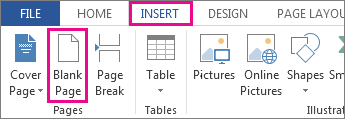
To put a blank page into your Word document, place the cursor where you want the new page to begin and then click Insert > Blank Page. The blank page opens, ready for whatever you want to add.
Another option when you need a little space is to insert a page break. The difference is that Insert > Blank Page puts an entire blank page into your document, and Insert > Page Break doesn’t. Instead, it pushes whatever comes after the break to the top of the next page. See Add a page break for more about page breaks.
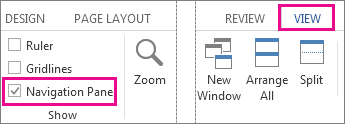
Tip: If you’re formatting a complex document and you quickly want to add or look for blank pages, page breaks, or other elements, click View > Navigation Pane > Pages to see what’s where.
To remove a blank page from your document, see Delete a blank page.
Need more help?
Want more options?
Explore subscription benefits, browse training courses, learn how to secure your device, and more.
Communities help you ask and answer questions, give feedback, and hear from experts with rich knowledge.
При наборе текста в приложении Microsoft Word бывают случаи, когда внутри документа оказываются пустые страницы, которые нужно удалить. Причин появления пустых страниц может быть множество. В частности, могут быть виноваты особенности форматирования документа. В тексте могут обнаружиться пустые абзацы, разрывы страниц и прочие элементы форматирования.
Эти элементы обычно невидимые, поэтому пользователь может не обратить на них внимания. Однако, когда документ нужно распечатать или кому-то показать, требуется привести его в надлежащий вид. Тогда и возникает необходимость убрать ненужные пустые страницы, которые могут располагаться в разных частях документа.
Обычно они находятся в конце документа. Нередко такие страницы возникают под таблицами, иногда они бывают в начале и значительно реже в середине документа.
В версиях приложения Word 2007-2019 пустые страницы появляются чаще всего по следующим причинам:
- Наличие в тексте скрытых символов.
- Перенос таблицы внутри документа.
- Ненужные переносы и пробелы.
В данной статье описано несколько методов удаления пустых страниц в нескольких версиях приложения Word.
Способ 1
Проще всего удалить пустую страницу, если она в документе идёт последней. Для этого достаточно начать кнопку мыши и кнопку на клавиатуре.
- Нажмите курсором мыши на пустой странице в Word.
- На клавиатуре нажмите Backspace или Delete.
Это позволит убрать ненужные абзацы. Если в документе несколько пустых абзацев, нажимайте на кнопки на клавиатуре несколько раз, пока они все не будут удалены.
Способ 2
Пустые страницы могут появляться по причине наличия в тексте невидимых символов – новых абзацев. Чтобы понять это, придётся включить просмотр непечатаемых символов.
- На клавиатуре нажмите и удерживайте сочетание клавиш Ctrl + Shift + 8.
Или откройте вкладку Home (Главная) и нажмите на кнопку «Отобразить все знаки» (Ctrl + *).
- В документе будут показаны невидимые прежде символы абзаца.
- Теперь можно удалять пустые страницы.
Мышью выделите символы абзаца.
- Используйте кнопку Delete на клавиатуре для удаления этих символов.
Кроме символов абзаца, в документе могут обнаружиться символы «Разрыв страницы». Выделите и удалите и их.
Способ 3
Другой причиной возникновения пустых страниц в Word могут быть элементы «Разрыв раздела» и «Разрыв страницы». От них тоже придётся избавляться.
- На вкладке Home (Главная) нажмите на кнопку «Отобразить все знаки» (Ctrl + *).
- На пустой странице вы увидите элемент «Разрыв страницы».
- Выделите этот элемент указателем мыши и удалите кнопкой Del на клавиатуре.
Способ 4
Если описанные выше методы не помогли избавиться от пустых страниц, это может означать, что в конце документа находится таблица. После таблицы всегда по умолчанию ставится пустой абзац. Если таблица располагается внизу страницы, пустой абзац оказывается на следующей странице. Это и становится причиной появления ненужной пустой страницы.
Можно исправить ситуацию изменением размера шрифта в невидимом абзаце.
- На вкладке Home (Главная) нажмите на кнопку «Отобразить все знаки» (Ctrl + *).
- На пустой странице под таблицей нажмите на изображение абзаца (¶).
- На вкладке Home (Главная) в разделе «Шрифт» измените размер шрифта. Если поставить значение 1, пустая страница пропадёт.
- Отключите отображение всех знаков.
Способ 5
Бывает, что пустая страница находится в середине документа. Это может происходить из-за редактирования.
Причиной могут стать «Разрыв страницы» или «Разрыв раздела». Вот как удалить пустую страницу в таком случае.
- На клавиатуре нажмите и удерживайте сочетание клавиш Ctrl + Shift + 8 для включения непечатаемых символов.
- Нажмите курсором мыши перед «Разрывом раздела».
- На клавиатуре нажмите Del.
Способ 6
Пустая страница может обнаружиться в начале документа, перед основным текстом или оглавлением.
Вот как избавиться от неё.
- Нажмите на клавиатуре Ctrl + G.
- В окне «Найти и заменить» на вкладке «Перейти» в поле «Введите номер страницы» вставьте page.
- Нажмите «Перейти».
- Первая страницы будет выделена.
- Нажмите на клавиатуре Del.
Способ 7
Вставка разрыва страницы иногда создаёт пустую страницу в режиме макета печати. Тогда следует просмотреть строку разрыва страницы для её удаления.
- Откройте вкладку «Вид», в разделе «Режимы просмотра документа» нажмите «Черновик». Или в нижнем правом углу страницы нажмите миниатюру «Черновик».
- Выберите строку разрыва страницы и удалите её.
Способ 8
Разрывов пустых страниц может быть несколько, если документ длинный.
- В Word 2007/2013 нажмите «Редактирование» на вкладке Home (Главная), затем выберите «Заменить» в раскрывающемся списке. В Word 2010 нажмите «Заменить» в группе «Редактирование» на вкладке Home. Или используйте сочетание клавиш Ctrl + F.
- В окне «Найти и заменить» откройте вкладку «Заменить», нажмите «Больше», чтобы развернуть параметры.
- Нажмите кнопку «Специальный» и выберите в списке «Разрыв страницы».
- Ничего не вводите в поле «Заменить на», нажмите «Заменить все» для удаления нескольких разрывов страниц.
Подсказка: как показать разрыв страницы в Word, если он скрыт в режиме черновика? В Word 2010/2013/2016 перейдите к Файл> Параметры > Показать. Установите флажок «Показывать все метки форматирования» в разделе «Всегда показывать эти метки форматирования на экране». Или используйте сочетание клавиш Ctrl + Shift + 8.
Способ 9
Если таблица занимает всю страницу, появляется следующая страница, которую нельзя удалить.
- Откройте вкладку «Разметка страницы», нажмите «Поля» в разделе «Параметры страницы». Выберите «Настраиваемые поля» в конце раскрывающегося списка.
- В окне «Параметры страницы» уменьшите поля для удаления пустой страницы.

TrashExpert Staff
Над статьей работал не только один автор, но и другие члены команды TrashExpert: администратор, редакторы или коллектив авторов.
![]()
Download Article
![]()
Download Article
This wikiHow article teaches you how to remove stubborn blank pages from anywhere in your Word document. Blank pages in the middle of your document are usually the result of hidden extra paragraphs or page breaks. If the blank page is at the end, it could be the same situation—however, it’s also may be due to Word’s hidden end paragraph feature. You can get rid of blank pages by making paragraph and page breaks markers visible and editing or deleting them manually.
-

1
Go to the blank page in your document. If a strange blank page appears in the middle of your Word document, it’s likely due to an unintentional page break or extra paragraph markers that you can’t see.
-
2
Press Ctrl+⇧ Shift+8 on Windows or ⌘ Cmd+8 on Mac. This displays paragraph markers (¶) at the beginning of each blank line, as well as at the end of every paragraph. If there are any page breaks on this page, you’ll see them marked by dotted lines and the word «Page Break.»
Advertisement
-
3
Look for a small black square next to a paragraph marker. You’ll want to look for this on both the blank page and the page after it. If you see a paragraph marker with a black square beside it, the paragraph has the «Page break before» setting turned on. You’ll want to turn this off. To do so:
- Click the Home tab at the top of Word.
- Right-click the paragraph marker ¶ that has the corresponding black bullet point.
- Select Paragraph… on the menu.
- Click the Lines and Page Breaks tab.
- Remove the check next to «Page break before» (if there is one) and click OK.
-
4
Highlight the ¶ marks and/or Page Break lines with your mouse. If you see both (or more than one of each), highlight it all at once.
- Also check the page right before your blank one for extra page breaks and delete those as well.
- Don’t select paragraph markers that appear on lines that contain actual content.
-
5
Hit the Delete key. This should delete all the ¶ marks and page breaks, which should delete the blank page.
- If the blank page is still there, double-check the pages before for page breaks.
-
6
Press Ctrl+⇧ Shift+8 on Windows or ⌘ Cmd+8 on Mac again. This hides the paragraph markers again.


Advertisement
-
1
Go to the blank last page in your document. If a strange blank page appears at the end of your Word document, it could be due to Word’s hidden undeletable end paragraph.[1]
According to Microsoft, the most reliable way to get rid of that blank page is to make the hidden paragraph very small.- The undeletable hidden paragraph usually occurs when the content of your last real page (not the blank page) goes all the way to the bottom of that page.
-
2
Press Ctrl+⇧ Shift+8 on Windows or ⌘ Cmd+8 on Mac. This displays paragraph markers (¶) at the beginning of each blank line, as well as at the end of every paragraph. Since you have a blank page at the end of your document, you’ll see at least one paragraph marker on that page.
-
3
Delete all of the paragraph markers on the blank page (if there are multiple). If more than one paragraph marker appears on the blank page, deleting all of them will get usually get rid of the blank page. Try that first.
- If there’s only one paragraph marker at the top of the page, deleting it won’t help—continue with this method, if so.
-
4
Change the font size of the paragraph marker to 01. Here’s how:
- Click the Home tab if you’re not already there.
- Highlight the paragraph marker.
- Click the font size next to the font’s name.
- Replace it with 01 and press Enter or Return.
-
5
Press Ctrl+⇧ Shift+8 on Windows or ⌘ Cmd+8 on Mac again. This hides the paragraph markers again, which should delete the blank page at the end by fitting the hidden paragraph on the last page that contains content.
- If you still have a blank page after this, you can reduce the size of the bottom margin instead. To do this, click the Layout tab, select Margins, click Custom Margins, and change the bottom margin to 0.3 inches.


Advertisement
-
1
Click the File menu and choose Save as. If you still have a blank page at the end of your document after fixing hidden end paragraphs, you can omit the last page when saving your document as a PDF.
- This only works on the desktop version of Word—the web version doesn’t let you choose which pages to include in a PDF.
- If your file is synced to One Drive, you won’t see Save as. Click Save as copy instead.
- If the document must be in the Word format, you can convert the PDF back to the Word format after you save it as a PDF.
-
2
Select PDF as the file format. Depending on your version of Word, the file type menu may be in the upper-right corner of the page, or in the «Save as type» menu toward the bottom.
-
3
Click Options or More options. You’ll see one of these two options near the menu from which you selected PDF.
-
4
Click the radio option next to «Page(s).» This allows you to select a range of include in your PDF.
-
5
Enter the page range, minus the last page. Type «1» in the «From» box, and the last real page (before the blank page) into the «To» box.
-
6
Click Ok and then save the document. This saves your document as a PDF, minus the blank page(s) at the end.


Advertisement
Add New Question
-
Question
How can I delete an Excel page copied to Word?

You can usually highlight the entire pasted table and hit the Delete key. If that doesn’t work, try this: highlight the entire table, then right-click on it and select «Cut.»
-
Question
What if the methods described above still don’t work? What can I do then?
A far better and easier way is to save the doc as a pdf, delete the page from the pdf (which is super easy by clicking on «organize pages»), and then resave as a doc.
-
Question
How can I create a word document I can later fill in blanks such as names or other info in a contract?
If it’s for a printed document, just string underscores together to make the blanks for filling in.
See more answers
Ask a Question
200 characters left
Include your email address to get a message when this question is answered.
Submit
Advertisement
Thanks for submitting a tip for review!
About This Article
Article SummaryX
1. Open your document in Microsoft Word.
2. Press «Ctrl + Shift + 8» on Windows or «Command + 8» on Mac to display line break symbols in the document
3. Scroll down to the blank page.
4. Highlight any Page break or Paragraph symbols (¶) on the page.
5. Press «Delete«.
Did this summary help you?
Thanks to all authors for creating a page that has been read 2,351,071 times.
Is this article up to date?

This tutorial shows how to insert a blank page in Microsoft Word (without repeatedly pressing the Enter or Return key on your keyboard). We will also look at how to delete a blank page.
Quick Links:
- How to Insert a Blank Page
- How to Delete a Blank Page
This tutorial is also available as a YouTube video showing all the steps in real time.
Watch more than 100 other videos about Microsoft Word and Adobe Acrobat on my YouTube channel.
The images below are from Word for Microsoft 365. These steps will also work for Word 2019, Word 2016, Word 2013, and Word for Mac.
- Place your cursor where you would like to insert the blank page.
- Select the Insert tab in the ribbon.

- Select Blank Page in the Pages group.

Your blank page should be inserted into your document.
How to Delete a Blank Page in Microsoft Word
These steps show how to delete a blank page inserted using the steps above. If this method doesn’t work for you, please see the bonus section below for two additional deletion methods.
- Select the Home tab in the ribbon.

- Select the Show/Hide button in the Paragraph group to show the hidden formatting marks in your document.

- Place your cursor at the start of the page break automatically created when you inserted your blank page.
Important Note: Mac users may have to place their cursor at the end of the page break rather than the start in order to delete the break.

- Press the Delete key on your keyboard to delete the page break.
- (Optional) If your blank page was inserted between existing content rather than at the end of your document, also delete the page break automatically created after the existing content.
Your blank page should be deleted.
Two More Ways to Delete Blank Pages
Blank pages can be created by several other issues, including leftover section breaks and unnecessary paragraph marks.
Delete Blank Pages Created by Section Breaks
If your unwanted blank page was created by a section break, you must delete the section break to delete the blank page.
- Select the Show/Hide button in the Home tab (see figure 4) to locate the section break.
- Place your cursor at the start of the break and press the Delete key on your keyboard. (Mac users may have to place their cursor at the end of the break in order to delete it.)
Delete Blank Pages Created by Paragraph Marks
Blank pages can be created by unnecessary paragraph marks.
- Select the Show/Hide button in the Home tab (see figure 4) to locate the paragraph marks.
- Select the paragraph mark or place your cursor directly in front of it, and then press the Delete key on your keyboard until the blank page is removed.
Related Resources
How to Create a Cover Page in Microsoft Word (Built-In and Custom)
How to Create Newspaper-Style Columns in Microsoft Word
How to Insert Headers and Footers in Microsoft Word
MS Word is a very user-friendly as well as easy tool provided by Microsoft. It is easy to use and with the help of this, you can create documents and projects easily. It is efficient and easy to work with.
Inserting Blank Pages
Working in MS-Word for creating projects or making documents you will, need more than one page most of the time, and sometimes you need to add (insert) pages in between when you are modifying your document or project. It is easy to insert a page in between, or anywhere you need. We will learn step by step that how to insert a blank page in MS-Word with the help of images and instructions.
Insertion of pages at different positions:
A user needs to insert a page at different positions as per the requirement. So, basically, 3 common situations or conditions can arise like
- To insert a page at the start of a Word file,
- To insert a page in the middle of a Word file (i.e. between any two pages)
- And to insert a page in last or at the end of a Word file
Steps to follow for Inserting a blank Page at the start of a Word file:
Step 1: Open MS Word on your PC.
Step 2: Now, Open the document or create a new one in which you want to Insert a Blank page
Step 3: Now, choose where you want to insert a blank page. (For e.g: you want to Insert a page at the start of a Word File)
Step 4: Now, Go to the insert tab above. (marked in a circle)

Step 5: Now, if you want to insert a page in starting, then take your cursor to the start of the current First page. And Select the Blank Page option from the Pages section.

Step 6: Now, click on Blank Page to insert a Blank page in starting.

Step 7: So, a new page is inserted at the start of a document.
Steps to follow for Inserting a blank Page in the middle of a Word file (i.e. between any two pages):
Step 1 and Step 2 are the same as above.
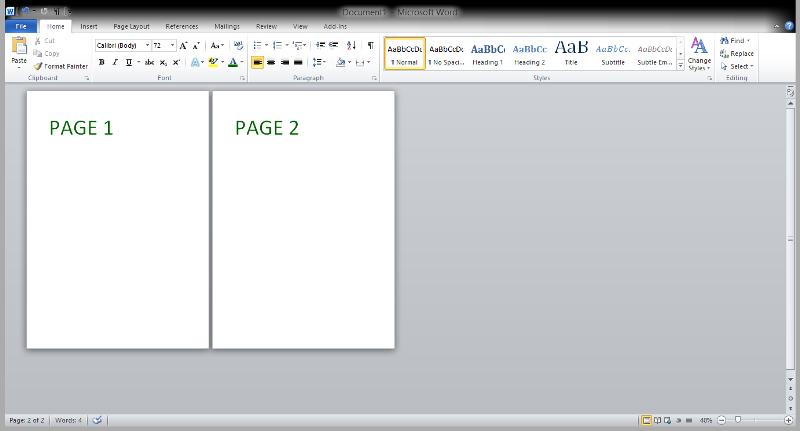
Step 3: Now, if you want to insert a page in the middle of a document (For e.g.:- you want to Insert a page in between PAGE 1 And PAGE 2), then take your cursor to the end of the previous page where you want to insert a new page and Select Blank Page option from the Pages section.
Step 4: Page gets inserted as before

Step 5: So, a new page is inserted in the middle of a document.
Steps to follow for Inserting a blank Page at last or at end of a Word file:
Step 1 and Step 2 are the same as above.
Step 3: Now, if you want to insert a page at end of a document (For e.g.:- you want to Insert a page after PAGE 2), then take your cursor to the end of PAGE 2 where you want to insert a new page and Selects Blank Page option from the Pages section.
Step 4: New page gets inserted as before

Step 5: So, a new page is inserted at the last or at end of a document.
So, in this way, we can easily insert a new blank page at any required place.