
by Michael Szul on Tue Nov 26 2019 13:47:15
No ads, no tracking, and no data collection. Enjoy this article? Buy us a ☕.
Online-only isn’t truly a thing, and sometimes when you’re building a web application, you need to be able to offer your users the ability to download content in different formats. Most common is probably providing a list in Excel format. Also common is providing content in PDF format.
Sometimes, however, you get the semi-odd request, and you might be asked to let users download content in Microsoft Word format. What’s more: They often want the content to resemble what was on the page—at least as far as text formatting goes. This means converting HTML to Word on the fly.
For this, we can use the HTML DOCX package.
Start by installing the package:
npm install html-docx-js --save
Next, include it in your code:
const htmlDocx= require('html-docx-js');
Now we just need some HTML to convert. Commonly, you might have rich text editors that allow you to capture rich content from users, and this content is stored in a database with HTML intact. It’s just a matter of you pulling that content out of the database and passing it to the module’s function.
For example, let’s say you’re pulling records from a database table, and you want to combine the content areas, and then push that out to the browser as a download.
Note: I’m using Express as the front-end JavaScript framework here.
app.get('/course/:name/:id'), async (req, res) => {
          const { name, id } = req.params;
          const pages = await getCoursePages(id);
          let html = '';
          for(let i = 0; i < pages.length; i++) {
                  html += pages[i].page;
          }
          const docx = htmlDocx.asBlob(html);
          res.setHeader('Content-Type', 'application/vnd.openxmlformats-officedocument.spreadsheetml.sheet');
          res.setHeader('Content-Disposition', `attachment; filename=${ sluggify(name) }.docx`);
          res.setHeader('Content-Length', docx.length);
          res.send(docx);
      });
In the above code, you can see that we simply loop over the records from the getCoursePages() method, and concatenate the page property of the individual record. Once we have this concatenated string (which contains HTML), we pass it to the asBlob() method of the html-docx-js package. This creates the necessary Microsoft Word DOCX format, and once you have that, you can send it to the browser after setting the appropriate headers.
В этой статье мы создадим приложение, которое позволит пользователям вводить свой данные в текстовом редакторе и генерировать из него документ Word. Мы будем использовать Express для внутреннего интерфейса и React для внешнего интерфейса.
Back End
Мы начнем с серверной части. Для начала мы создадим папку проекта с папкой backendbackendnpx express-generatornpm i
Мы устанавливаем все это, выполнив:
npm i @babel/cli @babel/core @babel/node @babel/preset-env cors html-docx-js sequelize sqlite3 multerПосле этого мы изменим package.json start и babel-node:
"start": "nodemon --exec npm run babel-node - ./bin/www",
"babel-node": "babel-node"
Таким образом мы запускаем наше приложение с Babel вместо обычной среды выполнения Node.
Затем создайте файл .babelrcbackend
{
    "presets": [
        "@babel/preset-env"
    ]
}
чтобы указать, что мы запускаем наше приложение с последней версией JavaScript.
Далее мы добавляем код нашей базы данных. Запустите npx sequelize-cli init backend
В config.js
{
  "development": {
    "dialect": "sqlite",
    "storage": "development.db"
  },
  "test": {
    "dialect": "sqlite",
    "storage": "test.db"
  },
  "production": {
    "dialect": "sqlite",
    "storage": "production.db"
  }
}
Затем создайте нашу модель и выполните миграцию, запустив:
npx sequelize-cli model:create --name Document --attributes name:string,document:text,documentPath:string
создать модель DocumentDocuments
Затем мы запускаем:
npx sequelize-cli db:migrate
Далее мы создаем наши маршруты. Создайте файл document.jsroutes
var express = require("express");
const models = require("../models");
var multer = require("multer");
const fs = require("fs");
var router = express.Router();
const htmlDocx = require("html-docx-js");
const storage = multer.diskStorage({
  destination: (req, file, cb) => {
    cb(null, "./files");
  },
  filename: (req, file, cb) => {
    cb(null, `${file.fieldname}_${+new Date()}.jpg`);
  }
});
const upload = multer({
  storage
});
router.get("/", async (req, res, next) => {
  const documents = await models.Document.findAll();
  res.json(documents);
});
router.post("/", async (req, res, next) => {
  const document = await models.Document.create(req.body);
  res.json(document);
});
router.put("/:id", async (req, res, next) => {
  const id = req.params.id;
  const { name, document } = req.body;
  const doc = await models.Document.update(
    { name, document },
    { where: { id } }
  );
  res.json(doc);
});
router.delete("/:id", async (req, res, next) => {
  const id = req.params.id;
  await models.Document.destroy({ where: { id } });
  res.json({});
});
router.get("/generate/:id", async (req, res, next) => {
  const id = req.params.id;
  const documents = await models.Document.findAll({ where: { id } });
  const document = documents[0];
  const converted = htmlDocx.asBlob(document.document);
  const fileName = `${+new Date()}.docx`;
  const documentPath = `${__dirname}/../files/${fileName}`;
  await new Promise((resolve, reject) => {
    fs.writeFile(documentPath, converted, err => {
      if (err) {
        reject(err);
        return;
      }
      resolve();
    });
  });
  const doc = await models.Document.update(
    { documentPath: fileName },
    { where: { id } }
  );
  res.json(doc);
});
router.post("/uploadImage", upload.single("upload"), async (req, res, next) => {
  res.json({
    uploaded: true,
    url: `${process.env.BASE_URL}/${req.file.filename}`
  });
});
module.exports = router;
Мы выполняем стандартные операции CRUD для таблицы DocumentsDocumentsDocumentDocumentDocumentdocument
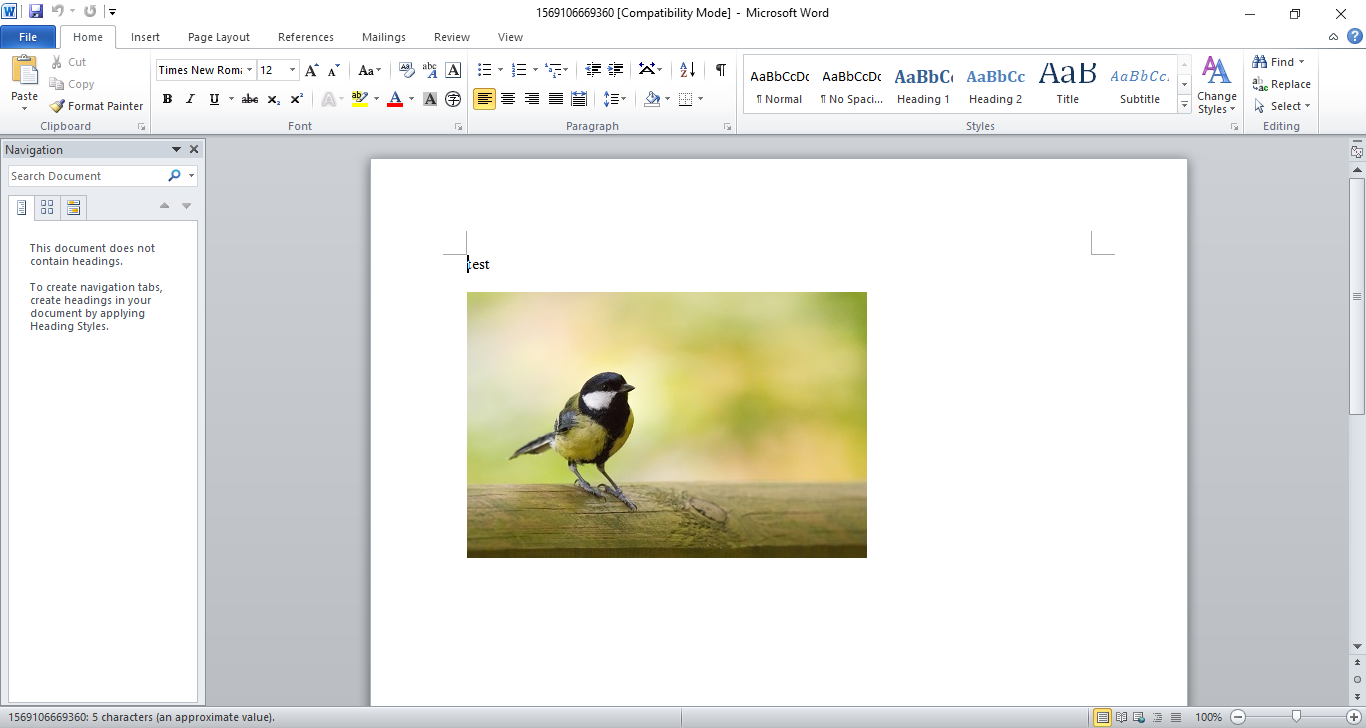
Маршрут generate для создания документа Word. Мы получаем идентификатор из URL, а затем используем пакет HTML-DOCX-JS для создания документа Word. Мы генерируем документ Word путем преобразования документа HTML в объект файлового потока с помощью пакета HTML-DOCX-JS, а затем записываем поток в файл и сохраняем путь к файлу в Document
У нас также есть маршрут uploadImageuploadedurl
Затем нам нужно добавить папку filesbackend
Далее в app.js
require("dotenv").config();
var createError = require("http-errors");
var express = require("express");
var path = require("path");
var cookieParser = require("cookie-parser");
var logger = require("morgan");
var cors = require("cors");
var indexRouter = require("./routes/index");
var documentRouter = require("./routes/document");
var app = express();
// view engine setup
app.set("views", path.join(__dirname, "views"));
app.set("view engine", "jade");
app.use(logger("dev"));
app.use(express.json());
app.use(express.urlencoded({ extended: false }));
app.use(cookieParser());
app.use(express.static(path.join(__dirname, "public")));
app.use(express.static(path.join(__dirname, "files")));
app.use(cors());
app.use("/", indexRouter);
app.use("/document", documentRouter);
// catch 404 and forward to error handler
app.use(function(req, res, next) {
  next(createError(404));
});
// error handler
app.use(function(err, req, res, next) {
  // set locals, only providing error in development
  res.locals.message = err.message;
  res.locals.error = req.app.get("env") === "development" ? err : {};
// render the error page
  res.status(err.status || 500);
  res.render("error");
});
module.exports = app;
Мы открываем папку с файлом:
app.use(express.static(path.join(__dirname, "files")));
и устанавливаем маршрут document
var documentRouter = require("./routes/document");
app.use("/document", documentRouter);
Внешний интерфейс
Теперь наше API готово, мы можем перейти к работе с интерфейсом. Создайте приложение React с помощью команды «Create React App». Запускаем npx create-react-app frontend
Затем мы устанавливаем наши пакеты. Мы будем использовать CKEditor для нашего текстового редактора, Axios для выполнения HTTP-запросов, Bootstrap для стилей, MobX для простого управления состоянием, React Router для маршрутизации URL-адресов к компонентам, а также Formik и Yup для обработки значений формы и проверки формы соответственно.
Установите все пакеты, запустив:
npm i @ckeditor/ckeditor5-build-classic @ckeditor/ckeditor5-react axios bootstrap formik mobx mobx-react react-bootstrap react-router-dom yupПосле установки пакетов мы можем заменить существующий код в App.js
import React from "react";
import HomePage from "./HomePage";
import { Router, Route } from "react-router-dom";
import { createBrowserHistory as createHistory } from "history";
import TopBar from "./TopBar";
import { DocumentStore } from "./store";
import "./App.css";
const history = createHistory();
const documentStore = new DocumentStore();
function App() {
  return (


         (

          )}
        />


  );
}
export default App;
добавить наш верхний бар и маршрут к домашней странице.
В App.css
.page {
  padding: 20px;
}
.content-invalid-feedback {
  width: 100%;
  margin-top: 0.25rem;
  font-size: 80%;
  color: #dc3545;
}
nav.navbar {
  background-color: green !important;
}
добавить некоторые отступы на нашу страницу и стилизовать сообщение проверки для редактора Rich text, а также изменить цвет navbar
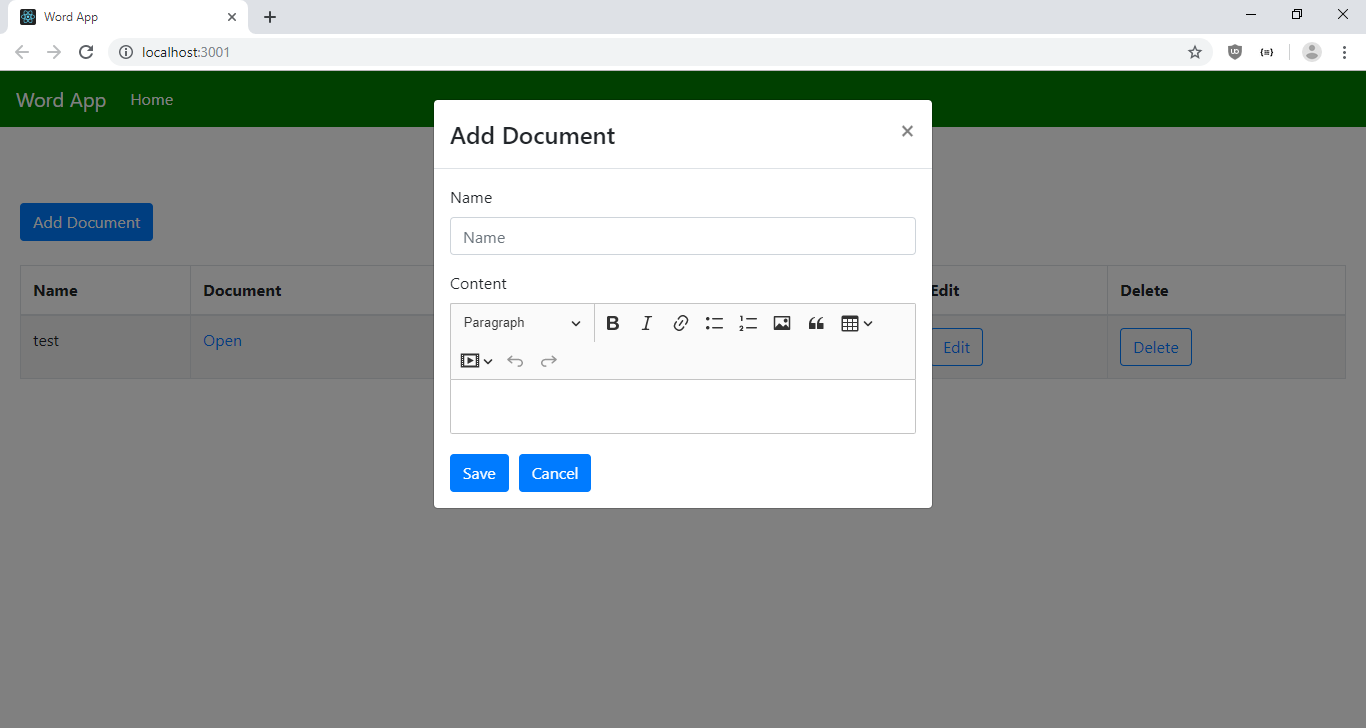
Далее мы создаем форму для добавления и редактирования документов. Создайте файл DocumentForm.js src
import React from "react";
import * as yup from "yup";
import Form from "react-bootstrap/Form";
import Col from "react-bootstrap/Col";
import Button from "react-bootstrap/Button";
import { observer } from "mobx-react";
import { Formik, Field } from "formik";
import { addDocument, editDocument, getDocuments, APIURL } from "./request";
import CKEditor from "@ckeditor/ckeditor5-react";
import ClassicEditor from "@ckeditor/ckeditor5-build-classic";
const schema = yup.object({
  name: yup.string().required("Name is required")
});
function DocumentForm({ documentStore, edit, onSave, doc }) {
  const [content, setContent] = React.useState("");
  const [dirty, setDirty] = React.useState(false);
  const handleSubmit = async evt => {
    const isValid = await schema.validate(evt);
    if (!isValid || !content) {
      return;
    }
    const data = { ...evt, document: content };
    if (!edit) {
      await addDocument(data);
    } else {
      await editDocument(data);
    }
    getAllDocuments();
  };
  const getAllDocuments = async () => {
    const response = await getDocuments();
    documentStore.setDocuments(response.data);
    onSave();
  };
  return (
    <>

        {({
          handleSubmit,
          handleChange,
          handleBlur,
          values,
          touched,
          isInvalid,
          errors
        }) => (


                Name


                  {errors.name}


                Content
                 {
                    if (edit) {
                      setContent(doc.document);
                    }
                  }}
                  onChange={(event, editor) => {
                    const data = editor.getData();
                    setContent(data);
                    setDirty(true);
                  }}
                  config={{
                    ckfinder: {
                      uploadUrl:
                        `${APIURL}/document/uploadImage`
                    }
                  }}
                />

                  {dirty && !content ? "Content is required" : null}


        )}


  );
}
export default observer(DocumentForm);
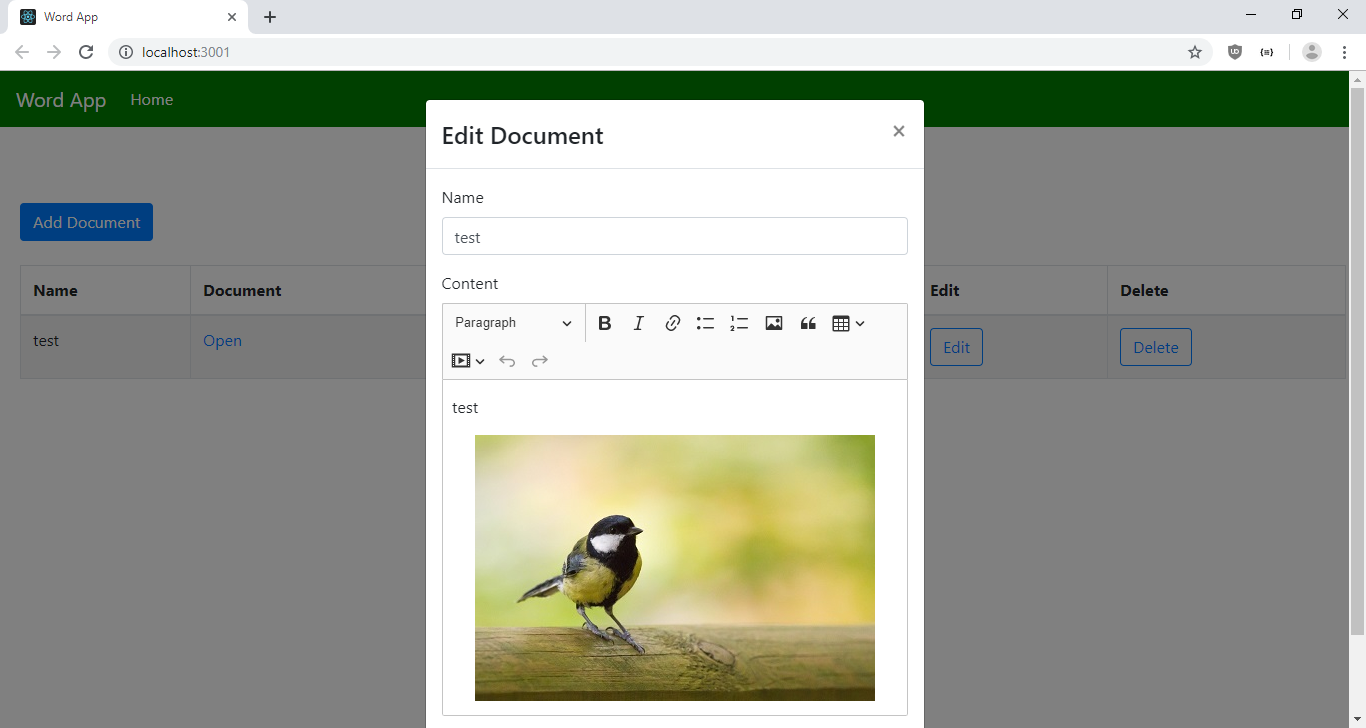
Мы обертываем нашу React Bootstrap Form в компоненту Formik, чтобы получить функцию обработки формы от Formik, которую мы используем непосредственно в полях формы React Bootstrap. Мы не можем сделать то же самое с CKEditor, поэтому мы пишем свои собственные обработчики форм для редактора форматированного текста. Мы устанавливаем data в, CKEditor чтобы установить значение ввода редактора форматированного текста. Эта функция onInit используется, когда пользователи пытаются редактировать существующий документ, поскольку мы должны установить параметр data с помощью редактора, который инициализируется при запуске setContent(doc.document);. Метод onChange является функция обработчика для установки content всякий раз, когда он обновляется, так что параметр data будет иметь последнее значение, которое мы будем представлять, когда пользователь нажимает кнопку Сохранить.
Мы используем плагин CKFinder для загрузки изображений. Чтобы это работало, мы устанавливаем URL загрузки изображения на URL маршрута загрузки в нашем бэкэнде.
Схема проверки формы предоставляется объектом Yup schema, который мы создаем в верхней части кода. Мы проверяем, заполнено ли поле name.
Функция handleSubmit предназначена для обработки представления данных в заднюю часть. Мы проверяем оба объекта content и evt, чтобы проверить оба поля, поскольку мы не можем включить обработчики форм Formik непосредственно в CKEditor компонент.
Если все верно, то мы добавляем новый документ или обновляем его в зависимости от того, является ли реквизит верным или нет.
Затем, когда сохранение getAllDocuments прошло успешно, мы вызываем, чтобы заполнить последние документы в нашем хранилище MobX, запустив documentStore.setDocuments(response.data);.
Далее мы делаем нашу домашнюю страницу, создав HomePage.js в папке src и добавив:
import React, { useState, useEffect } from "react";
import { withRouter } from "react-router-dom";
import DocumentForm from "./DocumentForm";
import Modal from "react-bootstrap/Modal";
import ButtonToolbar from "react-bootstrap/ButtonToolbar";
import Button from "react-bootstrap/Button";
import Table from "react-bootstrap/Table";
import { observer } from "mobx-react";
import { getDocuments, deleteDocument, generateDocument, APIURL } from "./request";
function HomePage({ documentStore, history }) {
const [openAddModal, setOpenAddModal] = useState(false);
const [openEditModal, setOpenEditModal] = useState(false);
const [initialized, setInitialized] = useState(false);
const [doc, setDoc] = useState([]);
const openAddTemplateModal = () => {
setOpenAddModal(true);
};
const closeAddModal = () => {
setOpenAddModal(false);
setOpenEditModal(false);
};
const cancelAddModal = () => {
setOpenAddModal(false);
};
const cancelEditModal = () => {
setOpenEditModal(false);
};
const getAllDocuments = async () => {
const response = await getDocuments();
documentStore.setDocuments(response.data);
setInitialized(true);
};
const editDocument = d => {
setDoc(d);
setOpenEditModal(true);
};
const onSave = () => {
cancelAddModal();
cancelEditModal();
};
const deleteSingleDocument = async id => {
await deleteDocument(id);
getAllDocuments();
};
const generateSingleDocument = async id => {
await generateDocument(id);
alert("Document Generated");
getAllDocuments();
};
useEffect(() => {
if (!initialized) {
getAllDocuments();
}
});
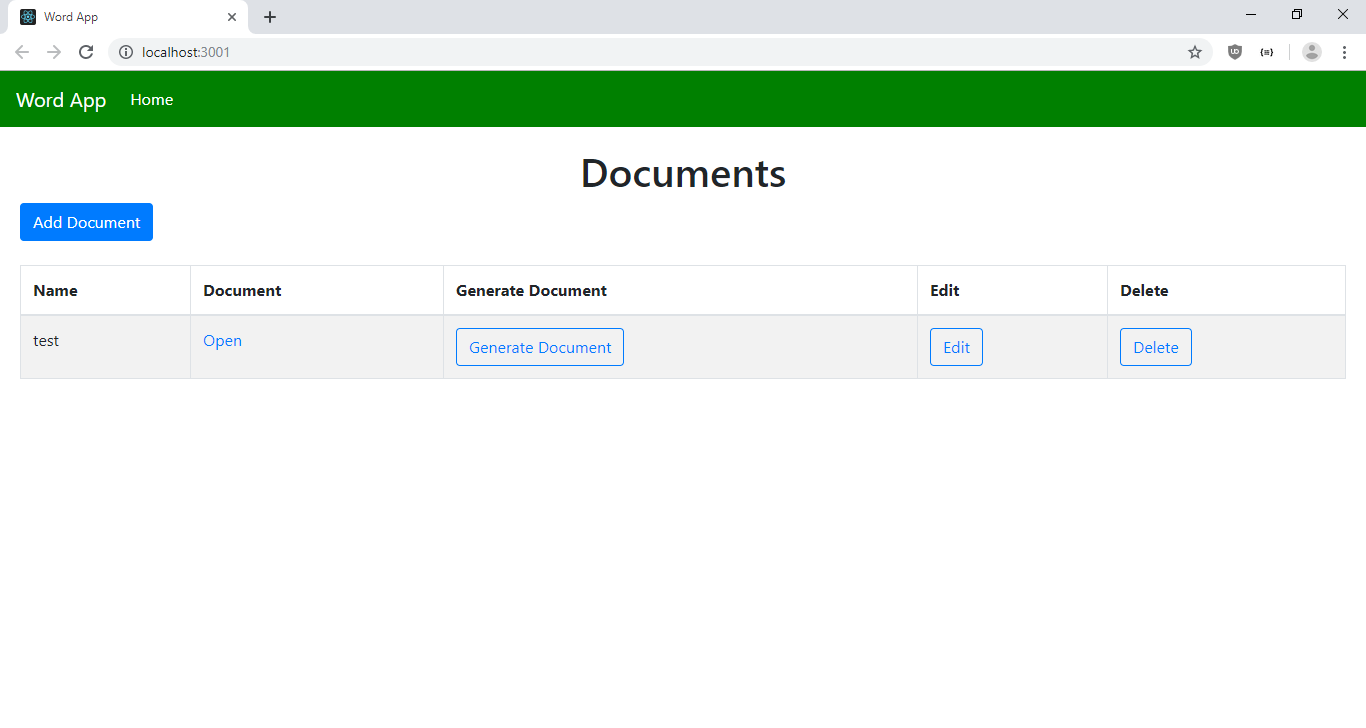
return (
Documents
Add Document
Edit Document
{documentStore.documents.map(d => {
return (
);
})}
Name
Document
Generate Document
Edit
Delete
{d.name}
Open
);
}
export default withRouter(observer(HomePage));
У нас есть таблица React Bootstrap для перечисления документов с кнопками для редактирования, удаления документов и создания документа Word. Кроме того, в каждой строке есть ссылка Open для открытия документа Word. У нас есть кнопка создания в верхней части таблицы.
Когда страница загружается, мы вызываем getAllDocuments и заполняем их в хранилище MobX.
Далее создайте request.js в папке src и добавьте:
export const APIURL = "http://localhost:3000";
const axios = require("axios");

export const getDocuments = () => axios.get(`${APIURL}/document`);

export const addDocument = data => axios.post(`${APIURL}/document`, data);
export const editDocument = data => axios.put(`${APIURL}/document/${data.id}`, data);

export const deleteDocument = id => axios.delete(`${APIURL}/document/${id}`);
export const generateDocument = id => axios.get(`${APIURL}/document/generate/${id}`);
Добавив функции для отправки запросов к нашим маршрутам в серверной части.
Затем мы создаем наше хранилище MobX. Создайте store.js в папке src и добавьте:
import { observable, action, decorate } from "mobx";

class DocumentStore {
  documents = [];
  setDocuments(documents) {
    this.documents = documents;
  }
}

DocumentStore = decorate(DocumentStore, {
  documents: observable,
  setDocuments: action
});

export { DocumentStore };
Мы имеем функцию, setDocuments чтобы поместить данные в хранилище, который мы использовали в HomePageDocumentForm и мы инстанцировали его перед экспортом , так что мы должны сделать это только в одном месте.
Этот блок:
DocumentStore = decorate(DocumentStore, {
  documents: observable,
  setDocuments: action
});
обозначает массив documents в DocumentStore в качестве объекта, который может отслеживаться компонентами на предмет изменений. setDocuments обозначается как функция , которая может быть использована для установки массива documents в хранилище.
Затем мы создаем верхнюю панель, создав файл TopBar.js в папке src и добавив:
import React from "react";
import Navbar from "react-bootstrap/Navbar";
import Nav from "react-bootstrap/Nav";
import { withRouter } from "react-router-dom";
function TopBar({ location }) {
return (
Word App
);
}
export default withRouter(TopBar);
Это содержит Reac Bootstrap Navbar чтобы показать верхнюю панель со ссылкой на главную страницу и имя приложения. Мы показываем ее только если существует token. Также мы проверяем pathname чтобы выделить правильные ссылки, установив параметр active.
Далее в index.html мы заменим существующий код на:
После написания всего этого кода мы можем запустить наше приложение. Прежде чем что-либо запускать, установите nodemon, запустив, npm i -g nodemon чтобы нам не приходилось перезагружать сервер при изменении файлов.
Затем запустите back end, запустив команду npm start в папке backend и npm start в папке frontend, затем выберите «yes», если вас попросят запустить его с другого порта.
Тогда вы получите:
How to use html-docx-js in node.js .
I have refered the npm site (https://www.npmjs.com/package/html-docx-js) for this. Below is the code
var converted = htmlDocx.asBlob(content);
saveAs(converted, 'test.docx');
But here is the problem, the saveAs function is missing in the tutorial.
I have downloaded filesaver.js on the client side i Iave implemented this and it works fine. But I want complete code in node.js running which it will convert my html content and will download a word file in client machine.
Looking forward for some help.
Regards,
Bikram Nayak.
![]()
edi9999
19.3k13 gold badges88 silver badges127 bronze badges
asked Jul 12, 2017 at 14:11
![]()
1
    var HtmlDocx = require('html-docx-js');
    var fs = require('fs');
    var html = 'fasfasfasdfsfsdfsf';

    var docx = HtmlDocx.asBlob(html);
    fs.writeFile('helloworld3.docx',docx, function (err){
       if (err) return console.log(err);
       console.log('done');
    });
answered Jan 4, 2018 at 7:58
![]()
0
html-to-docx

html-to-docx is a js library for converting HTML documents to DOCX format supported by Microsoft Word 2007+, LibreOffice Writer, Google Docs, WPS Writer etc.
It was inspired by html-docx-js project but mitigates the problem of documents generated being non-compatiable with word processors like Google Docs and libreOffice Writer that doesn’t support altchunks feature.
html-to-docx earlier used to use libtidy to clean up the html before parsing, but had to remove it since it was causing so many dependency issues due to node-gyp.
Disclaimer
Even though there is an instance of html-to-docx running in production, please ensure that it covers all the cases that you might be encountering usually, since this is not a complete solution.
Currently it doesn’t work with browser directly, but it was tested against React.
Installation
Use the npm to install foobar.
Usage
await HTMLtoDOCX(htmlString, headerHTMLString, documentOptions, footerHTMLString)
full fledged examples can be found under example/
Parameters
htmlString<String> clean html string equivalent of document content.headerHTMLString<String> clean html string equivalent of header. Defaults to<p></p>if header flag istrue.documentOptions<?Object>orientation<«portrait»|»landscape»> defines the general orientation of the document. Defaults to portrait.pageSize<?Object> Defaults to U.S. letter portrait orientation.width<Number> width of the page for all pages in this section in TWIP. Defaults to 12240. Maximum 31680. Supports equivalent measurement in pixel, cm or inch.height<Number> height of the page for all pages in this section in TWIP. Defaults to 15840. Maximum 31680. Supports equivalent measurement in pixel, cm or inch.
margins<?Object>top<Number> distance between the top of the text margins for the main document and the top of the page for all pages in this section in TWIP. Defaults to 1440. Supports equivalent measurement in pixel, cm or inch.right<Number> distance between the right edge of the page and the right edge of the text extents for this document in TWIP. Defaults to 1800. Supports equivalent measurement in pixel, cm or inch.bottom<Number> distance between the bottom of text margins for the document and the bottom of the page in TWIP. Defaults to 1440. Supports equivalent measurement in pixel, cm or inch.left<Number> distance between the left edge of the page and the left edge of the text extents for this document in TWIP. Defaults to 1800. Supports equivalent measurement in pixel, cm or inch.header<Number> distance from the top edge of the page to the top edge of the header in TWIP. Defaults to 720. Supports equivalent measurement in pixel, cm or inch.footer<Number> distance from the bottom edge of the page to the bottom edge of the footer in TWIP. Defaults to 720. Supports equivalent measurement in pixel, cm or inch.gutter<Number> amount of extra space added to the specified margin, above any existing margin values. This setting is typically used when a document is being created for binding in TWIP. Defaults to 0. Supports equivalent measurement in pixel, cm or inch.
title<?String> title of the document.subject<?String> subject of the document.creator<?String> creator of the document. Defaults tohtml-to-docxkeywords<?Array<String>> keywords associated with the document. Defaults to [‘html-to-docx’].description<?String> description of the document.lastModifiedBy<?String> last modifier of the document. Defaults tohtml-to-docx.revision<?Number> revision of the document. Defaults to1.createdAt<?Date> time of creation of the document. Defaults to current time.modifiedAt<?Date> time of last modification of the document. Defaults to current time.headerType<«default»|»first»|»even»> type of header. Defaults todefault.header<?Boolean> flag to enable header. Defaults tofalse.footerType<«default»|»first»|»even»> type of footer. Defaults todefault.footer<?Boolean> flag to enable footer. Defaults tofalse.font<?String> font name to be used. Defaults toTimes New Roman.fontSize<?Number> size of font in HIP(Half of point). Defaults to22. Supports equivalent measure in pt.complexScriptFontSize<?Number> size of complex script font in HIP(Half of point). Defaults to22. Supports equivalent measure in pt.table<?Object>row<?Object>cantSplit<?Boolean> flag to allow table row to split across pages. Defaults tofalse.
pageNumber<?Boolean> flag to enable page number in footer. Defaults tofalse. Page number works only if footer flag is set astrue.skipFirstHeaderFooter<?Boolean> flag to skip first page header and footer. Defaults tofalse.lineNumber<?Boolean> flag to enable line numbering. Defaults tofalse.lineNumberOptions<?Object>start<Number> start of the numbering — 1. Defaults to0.countBy<Number> skip numbering in how many lines in between + 1. Defaults to1.restart<«continuous»|»newPage»|»newSection»> numbering restart strategy. Defaults tocontinuous.
numbering<?Object>defaultOrderedListStyleType<?String> default ordered list style type. Defaults todecimal.
decodeUnicode<?Boolean> flag to enable unicode decoding of header, body and footer. Defaults tofalse.lang<?String> language localization code for spell checker to work properly. Defaults toen-US.
footerHTMLString<String> clean html string equivalent of footer. Defaults to<p></p>if footer flag istrue.
Returns
<Promise<Buffer|Blob>>
Notes
Currently page break can be implemented by having div with classname «page-break» or style «page-break-after» despite the values of the «page-break-after», and contents inside the div element will be ignored. <div class="page-break" style="page-break-after: always;"></div>
CSS list-style-type for <ol> element are now supported. Just do something like this in the HTML:
  <ol style="list-style-type:lower-alpha;">
    <li>List item</li>
    ...
  </ol>
List of supported list-style-types:
- upper-alpha, will result in
A. List item - lower-alpha, will result in
a. List item - upper-roman, will result in
I. List item - lower-roman, will result in
i. List item - lower-alpha-bracket-end, will result in
a) List item - decimal-bracket-end, will result in
1) List item - decimal-bracket, will result in
(1) List item - decimal, (the default) will result in
1. List item
Also you could add attribute data-start="n" to start the numbering from the n-th.
<ol data-start="2"> will start the numbering from ( B. b. II. ii. 2. )
Font family doesnt work consistently for all word processor softwares
- Word Desktop work as intended
- LibreOffice ignores the fontTable.xml file, and finds a font by itself
- Word Online ignores the fontTable.xml file, and finds closest font in their font library
Contributing
Pull requests are welcome. For major changes, please open an issue first to discuss what you would like to change.
Please make sure to branch new branches off of develop for contribution.
Support
License
MIT
Contributors
Made with contrib.rocks.
July 14th, 2021 /
by api2pdf /
Intro
If you are writing nodejs / javascript code, you might be tasked with generating a Microsoft Word (Docx) file. After some research, you discover that this is not as trivial as you hoped it would be. You might have ended up on stackoverflow seeing old, outdated libraries or confusing answers that ask you to use interop or LibreOffice. Let’s make your pain go away right now.
Our API will take your .html file and convert it to a docx. Just make sure your HTML is saved as a .html file and accessible at a URL that our service can ingest. For example, see this: http://www.api2pdf.com/wp-content/uploads/2021/01/sampleHtml.html — Ideally a file storage provider like S3 or Azure Blob Storage. See the code sample below.
Convert HTML to Docx with Node / Javascript
Step 1) Open up your package manager and run the command
npm install –save api2pdf
Step 2) Grab an API key from https://portal.api2pdf.com. Only takes 60 seconds.
Step 3) Use the sample code below and replace “YOUR-API-KEY” with the api key you acquired in step 2.
var Api2Pdf = require('api2pdf');
var a2pClient = new Api2Pdf('YOUR-API-KEY');

a2pClient.libreOfficeHtmlToDocx('http://www.api2pdf.com/wp-content/uploads/2021/01/sampleHtml.html').then(function(result) { console.log(result); });
And that’s it! Modify the code as you see fit. Hopefully this saves you time and makes converting HTML to Docx files easy and painless for those writing node / javascript code.
See full github library
We have a whole nodejs based client library for our API that does a lot more than just this. Check out the full library capabilities here: https://github.com/Api2Pdf/api2pdf.node
Tags: html to docx api, html to docx javascript, html to docx nodejs, html to word javascript, html to word nodejs, libreoffice nodejs html to word, nodejs libreoffice api
Comments are closed.