
Excel or CSV are used to store large set of data to analyses and for reporting. In this article we will learn to export excel or CSV in laravel. This tutorial is best fit to you if you want to understand the basic of export of database table content with custom logic.
Laravel maatwebsite/excel uses phpspreadsheet to simplify the task of import and export. maatwebsite/excel package is wrapper around PhpSpreadsheet package. It gives much more flexibility and easy to use PhpSpreadsheet package through its Export object and encapsulates all logic.
In this example we will create a simple example to export database table in excel format. For this we will create a database, table, model, controller and simple view for html.
Let’s understand Import and export Excel or CSV in laravel 8 / 9 with simple example
Step 1 : Install the package
I assume the you have already installed the laravel and basic connection of it like database connection and composer.
Now install the package using composer in laravel root directory, open the terminal in laravel root directory and run below command to install maatwebsite/excel the package. This package has good stars on github and has lot of fan base of artisans
composer require maatwebsite/excelRegister Providers & Aliases
Add the following code the config/app.php file
'providers' => [
  .......
  .......
  .......
  MaatwebsiteExcelExcelServiceProvider::class,

 ],
'aliases' => [
  .......
  .......
  .......
  'Excel' => MaatwebsiteExcelFacadesExcel::class,
],
Step 2 : Create a table, model and fill data
Now, for an example i am creating here a table using migration and then i am going to fill the data in it, so create model and migration
php artisan make:model Article -mthis will generate the model and migration file
<?php

namespace AppModels;

use IlluminateDatabaseEloquentFactoriesHasFactory;
use IlluminateDatabaseEloquentModel;

class Article extends Model
{
    use HasFactory;

}
and migration file database/migrations/timestamp_create_articles_table.php
<?php

use IlluminateDatabaseMigrationsMigration;
use IlluminateDatabaseSchemaBlueprint;
use IlluminateSupportFacadesSchema;

class CreateArticlesTable extends Migration
{
    /**
     * Run the migrations.
     *
     * @return void
     */
     public function up()
    {
        Schema::create('articles', function (Blueprint $table) {
            $table->id();
            $table->string('email')->unique();;
            $table->string('title');
            $table->string('body');
            $table->timestamps();
        });
    }

    /**
     * Reverse the migrations.
     *
     * @return void
     */
    public function down()
    {
        Schema::dropIfExists('products');
    }
}
and then migrate the migration
Now create seeder in database/seeders/DatabaseSeeder.php
<?php

namespace DatabaseSeeders;

use IlluminateDatabaseSeeder;

// Import DB and Faker services
use IlluminateSupportFacadesDB;
use FakerFactory as Faker;

class DatabaseSeeder extends Seeder
{
    /**
     * Seed the application's database.
     *
     * @return void
     */
    public function run()
    {
        $faker = Faker::create();

    	for ($i=0;$i<=100;$i++) {
            DB::table('articles')->insert([
                'title' => $faker->name,
                'body' => $faker->text,
                'email' => $faker->email,
                'updated_at' =>$faker->datetime,
                'created_at' => $faker->datetime
            ]);
        }

    }
}
Run Seeder in command line
Step 3 : Create Export Class
In new version of maatwebsite module it’s required to create a class for each export and we need to implement Export interface in class, then we can use this class in our controller to export or download
So create a class by following artisan command
php artisan make:export ArticlesExport --model=ArticleThis command will create the following file in path app/Exports/ArticlesExport.php.
<?php
namespace AppExports;
use AppModelsArticle;
use MaatwebsiteExcelConcernsFromCollection;
class ArticlesExport implements FromCollection
{
    /**
    * @return IlluminateSupportCollection
    */
    public function collection()
    {
        return Article::all();
    }
}
Step 3 : Create controller
Let’s create a controller and add a methods showArticle and exportArticles
php artisan make:controller ArticleControllerand add the below code
<?php

namespace AppHttpControllers;
use IlluminateHttpRequest;
use AppModelsArticle;
use MaatwebsiteExcelFacadesExcel;
use AppExportsArticlesExport;

class ArticleController extends Controller {
    // Show products
    public function showArticle(Request $request){

     // added searching as well
      $articles = Article::when($request->has("title"),function($q)use($request){
            return $q->where("title","like","%".$request->get("title")."%");
        })->get();
     // or
     //  $articles = Article::all();


       return view('articles.article',['articles'=>$articles]);
    }

    function exportArticles(){

        $excel = Excel::download(new ArticlesExport, 'article-collection.xlsx');
        return $excel;

    }

}
here we added showArticle method to show the list of articles and exportArticle to export the article on the condition of request params.
Step 5 : Create the views
Create a view resource/articles/article.blade.php
<!DOCTYPE html>
<html lang="{{ str_replace('_', '-', app()->getLocale()) }}">

<head>
  <meta charset="utf-8">
  <meta name="viewport" content="width=device-width, initial-scale=1">

  <title>Readerstacks Export or Convert Html to Excel or CSV in laravel 8 / 9</title>

  <script src="https://code.jquery.com/jquery-3.6.0.min.js" crossorigin="anonymous"></script>
  <script type="text/javascript" src="https://cdnjs.cloudflare.com/ajax/libs/jquery-validate/1.19.1/jquery.validate.min.js"></script>
  <link href="//netdna.bootstrapcdn.com/bootstrap/4.1.1/css/bootstrap.min.css" rel="stylesheet" />

</head>

<body class="antialiased">
  <div class="container">
    <!-- main app container -->
    <div class="readersack">
      <div class="container">
        <div class="row">
          <div class="col-md-12 ">
            <h3>Export or Convert Html to Excel or CSV in laravel 8 / 9 - Readerstacks</h3>

            <a class='btn btn-info' href='{{url("article-export")}}'>Export Excel</a>

            <div id="search">

              <form id="searchform" name="searchform">
                <div class="form-group">
                  <label>Search by Title</label>
                  <input type="text" name="title" value="{{request()->get('title','')}}" class="form-control" />


                </div>
                <div class="form-group">
                  <label>Search by body</label>
                  <input type="text" name="body" value="{{request()->get('body','')}}" class="form-control" />


                </div>
                <button class='btn btn-success' >Search</button>
              </form>


            </div>

            <div id="pagination_data">
              <table class="table table-striped table-dark table-bordered">
                <tr>
                  <th>Sr No.</th>
                  <th>Title</th>

                  <th>Body</th>

                  <th>Date</th>
                </tr>
                @foreach($articles as $article)
                <tr>
                  <td>{{$article->id}}</td>
                  <td>{{$article->title}}</td>

                  <td>{{substr($article->body,0,50)}}</td>
                  <td>{{$article->created_at}}</td>
                </tr>
                @endforeach
              </table>

            </div>
          </div>
        </div>
      </div>
    </div>
    <!-- credits -->
    <div class="text-center">
      <p>
        <a href="#" target="_top">Export or Convert Html to Excel or CSV in laravel 8 / 9</a>
      </p>
      <p>
        <a href="https://readerstacks.com" target="_top">readerstacks.com</a>
      </p>
    </div>
  </div>

</body>

</html>
Step 6 : Create Routes
Last step is to create the routes to show the form and submit the form
<?php

use IlluminateSupportFacadesRoute;
use AppHttpControllersArticleController;


Route::get('/article-view',[ArticleController::class, 'showArticle']);
Route::get('/article-export',[ArticleController::class, 'exportArticles']);
ScreenShot


Introduction:
Exporting Data is extremely essential need of every Software you develop and when it comes to excel spreadsheet exporting it becomes a bit complex to implement, in this article I am going to provide perfect solution on this problem and will make it very easy for you.
After reading this article you will find simple way to implement this feature into your Laravel project.
Before going to start working on the solution you need to have a Laravel project ready, you can also use your existing Laravel project.
1. Project Setup
You can skip this step if you already have your Laravel project up and running.
Create New Project:
$ laravel new project-nameOR using composer:
$ composer create-project --prefer-dist laravel/laravel project-name "5.6.*"Database Settings
Open MySql and create new database for this tutorial.
Now go ahead and open your project into your favourite code editor and update .env file for database connectivity settings as showing below.
DB_CONNECTION=mysql
DB_HOST=127.0.0.1
DB_PORT=3306
DB_DATABASE=ADD-DATABASE-NAME-HERE
DB_USERNAME=root
DB_PASSWORD=
2. Database Migration and Load Test Records
Create Migration and Model:
Next we are going to generate Laravel Eloquent model and database migration file to create new database table, using php artisan commands.
Open your terminal/command prompt and navigate to project directory and execute following command
$ php artisan make:model Post -mYou should see message as showing below:
Model created successfully.
Created Migration: 2018_08_07_143410_create_posts_table
Next open create_posts_table migration file to add table columns
public function up()
    {
        Schema::create('posts', function (Blueprint $table) {
            $table->increments('id');
            $table->string('title');
            $table->text('body');
            $table->timestamps();
        });
    }
Let’s migrate the database to create posts table, execute following command from terminal
$ php artisan migrateIf your database settings are correct then your should see following success message along with the list of migrated files:
Migration table created successfully.
Migrating: 2014_10_12_000000_create_users_table
Migrated:  2014_10_12_000000_create_users_table
Migrating: 2014_10_12_100000_create_password_resets_table
Migrated:  2014_10_12_100000_create_password_resets_table
Migrating: 2018_08_07_143410_create_posts_table
Migrated:  2018_08_07_143410_create_posts_table
Now will have to update our Post eloquent model.
Open Post.php model to add fillable attribute, as we know Laravel framework by default provides protection against mass-assignment, so will have to specify our fillable attributes so that we can insert records into the table.
Post.php:
<?php

namespace App;

use IlluminateDatabaseEloquentModel;

class Post extends Model
{
    protected $fillable = [
        'title', 'body'
    ];
}
Load Test Records:
To Export data will need some records into the database, so in this step will load up few records using Factories, I am intentionally using model factory here just get you understanding of using it.
Go ahead and use following command to generate new factory for our Post model
$ php artisan make:factory PostFactory --model=PostNext open up PostFactory.php file from database/factories directory and make changes to add Post fields along with using values from faker libraries:
<?php

use FakerGenerator as Faker;

$factory->define(AppPost::class, function (Faker $faker) {
    return [
        'title' => $faker->text(45),
        'body' => $faker->paragraph
    ];
});
Now use tinker tool to execute model factory to store number of records into the database table, use following command to do that
$ php artisan tinker
>>> factory(AppPost::class, 50)->create();
>>> exit
The above command should have 50 records inserted into the database, you can open mysql database to verify.
Now we are ready to use those records for our export operation.
3. Design Export View
Create Controller:
Let’s design front end view, which will have all records listed along with export to excel buttons, to do that first let’s create new controller called PostController use this command to generate controller
$ php artisan make:controller PostsControllerNext open PostController.php file into editor and add new index method as showing below, which will fetch all records with pagination and it will return view.
<?php

namespace AppHttpControllers;

use IlluminateHttpRequest;
use AppPost;

class PostsController extends Controller
{
    public function index()
    {
        $posts = Post::paginate(5);

        return view('welcome', ['posts' => $posts]);
    }
}
Designing – Listing records, Pagination and export Links:
Open welcome.blade.php file from resources/views folder and replace it’s script with below one:
<!doctype html>
<html lang="{{ app()->getLocale() }}">
<head>
<meta charset="utf-8">
<meta http-equiv="X-UA-Compatible" content="IE=edge">
<meta name="viewport" content="width=device-width, initial-scale=1">
<title>Laravel</title>
<!-- Fonts -->
<link href="https://fonts.googleapis.com/css?family=Raleway:100,600" rel="stylesheet" type="text/css">
<link href="css/app.css" rel="stylesheet" type="text/css">
<style>
body{
padding-top: 40px;
}
</style>
</head>
<body>
<div class="container">
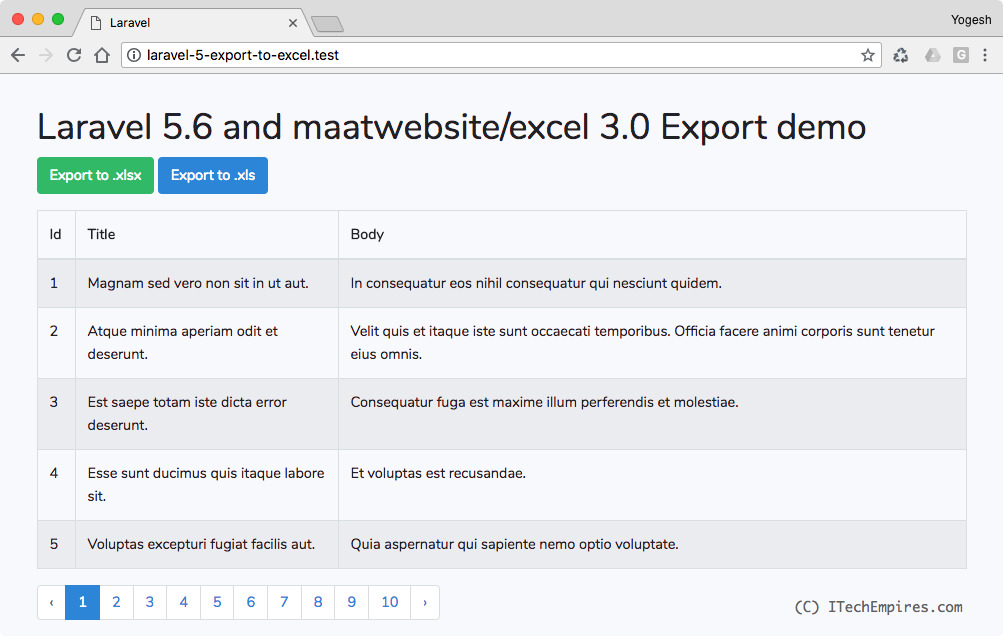
<h1>
Laravel 5.6 and maatwebsite/excel 3.0 Export demo
</h1>
<div class="form-group">
<a href="#" class="btn btn-success">Export to .xlsx</a>
<a href="#" class="btn btn-primary">Export to .xls</a>
</div>
<table class="table table-striped table-bordered ">
<thead>
<tr>
<th>Id</th>
<th>Title</th>
<th>Body</th>
</tr>
</thead>
<tbody>
@foreach($posts as $post)
<tr>
<td>{{ $post->id }}</td>
<td>{{ $post->title }}</td>
<td>{{ $post->body }}</td>
</tr>
@endforeach
</tbody>
</table>
{{ $posts->links() }}
</div>
</body>
</html>Update default Route:
Basically we need to connect our PostController and it’s index method the default route so that whenever we load up the project it will show up all records.
Open web.php file and make changes into the default route as showing below:
<?php

Route::get('/', 'PostsController@index');
Next let’s test project to have a look on view and see if everything is working or not, you should see output as showing below:
4. Export Records
This is the step were we are going to export the data into excel spreadsheet and to do that the first thing we required to install maatwebsite/excel package.
This is the most popular package in Laravel community. it performs really well when it comes handle excel export and import operations.
maatwebsite/excel Installation:
Before going to install this package make sure you have following requirements are ready and installed/enabled on your development environment
- PHP: ^7.1
- PhpSpreadsheet: ^1.2
- PHP extension php_zip enabled
- PHP extension php_xml enabled
- PHP extension php_gd2 enabled
Use following command to start the installation with composer:
$ composer require maatwebsite/excelAfter completing the installation process use following command to publish the config file, this command will create new file called excel.php into config directory
$ php artisan vendor:publishImplement Exporting:
There are several way to export records using maatwebsite excel, amongst them here I am going to demonstrate most important and usable ways to implement export feature.
Export from collection:
This is very simple and quick way to start exporting, do this first will have to create export class, use following command to generate new PostsExport class, also make sure to focus on command.
This command will generate new file under app/Exports directory called PostsExport.php
$ php artisan make:export PostsExport --model=PostNext open PostsController.php file from app/Http/Controllers directory and add new method under PostsController class, as showing below:
<?php

namespace AppHttpControllers;

use IlluminateHttpRequest;
use AppPost;
use MaatwebsiteExcelFacadesExcel;
use AppExportsPostsExport;

class PostsController extends Controller
{
    public function index()
    {
        $posts = Post::paginate(5);

        return view('welcome', ['posts' => $posts]);
    }

    public function export($type)
    {
        return Excel::download(new PostsExport, 'posts.' . $type);
    }
}
If you focus on above class, we basically added new method called export and we are providing instance of PostsExport class to the Excel Facade.
Next add new route in web.php file to access export method from the view
Route::get('/export/{type}', 'PostsController@export');Now open welcome.blade.php file and update export links to reference above route:
<a href="/export/xlsx" class="btn btn-success">Export to .xlsx</a>
<a href="/export/xls" class="btn btn-primary">Export to .xls</a>
Now you can go ahead and reload project and click on Export link, you should get excel spreadsheet downloaded into your system called posts.xlsx or xls depending on your chosen link.
Export with heading:
In the above example if you see we are getting records exported successfully but without column headings, if you want to add headings then you need to update PostsExport class little bit more, to implement WithHeading interface as showing below:
<?php

namespace AppExports;

use AppPost;
use MaatwebsiteExcelConcernsFromCollection;
use MaatwebsiteExcelConcernsWithHeadings;

class PostsExport implements FromCollection, WithHeadings
{
    /**
    * @return IlluminateSupportCollection
    */
    public function collection()
    {
        return Post::all();
    }

    public function headings() : array{
        return [
            'Id',
            'Title',
            'Body',
            'Created At',
            'Updated At',
        ];
    }
}
Now if you try to click export link again you should get heading added to the excel spreadsheet columns.
Export From Query
While exporting we also needs to fetch records depending on a specific query, it might required to add certain conditional queries depending on the project.
In this example we are going see how we can export records along with query, here I have create another export class called PostsQueryExport and here is the example:
$ php artisan make:export PostsQueryExport --model=Post<?php
namespace AppExports;
use AppPost;
use MaatwebsiteExcelConcernsFromQuery;
use MaatwebsiteExcelConcernsExportable;
use MaatwebsiteExcelConcernsWithHeadings;
class PostsQueryExport implements FromQuery, WithHeadings
{
use Exportable;
public function __construct(int $year)
{
$this->year = $year;
}
public function query()
{
return Post::query()->select('id', 'title', 'body')->whereYear('created_at', $this->year);
}
public function headings() : array
{
return [
'Id',
'Title',
'Body',
];
}
}Now in our post controller we can simple change export method allow using new Export Class called PostsQueryExport and pass the required argument value.
 public function export($type)
    {
        return Excel::download(new PostsQueryExport(2018), 'posts.' . $type);
    }
Export From View
We can also export data from our blade view, this is always good option for us to directly export data from the view. Specially when it comes to have excel description along with column headings, this feature is come very handy it is really flexible and easy to use.
Let see how we can use our blade template view to to export into excel spreadsheet.
First as always we need to export class, one more thing we can also modify our existing export class, but just to make thing simple to understand will create brand new class for demonstration.
Create new class:
$ php artisan make:export PostsViewExport --model=PostOpen PostsViewExport.php file from app/Exports directory and update according to the script showing below:
<?php

namespace AppExports;

use AppPost;
use IlluminateContractsViewView;
use MaatwebsiteExcelConcernsFromView;

class PostsViewExport implements FromView
{
    public function view() : View
    {
        return view('exports.posts', [
            'posts' => Post::all()
        ]);
    }
}
As you can see in the above exporter we are calling a view called posts from exports folder which is not exists yet so will have to create one, go ahead and create new view under resources/views/exports/ called posts.blade.php
Open posts.blade.php file and add following html script:
 <table>
    <thead>
    <tr>
        <th>Title</th>
        <th>Body</th>
    </tr>
    </thead>
    <tbody>
    @foreach($posts as $post)
        <tr>
            <td>{{ $post->title }}</td>
            <td>{{ $post->body }}</td>
        </tr>
    @endforeach
    </tbody>
</table>
Now you just needs to call this new export class into the PostsController’s export method:
 public function export($type)
    {
        return Excel::download(new PostsViewExport, 'posts.' . $type);
    }
We are done, if you try to run the demo again and click export you will see the excel spreadsheet being downloaded, the export class will convert HTML table into excel spreadsheet.
Introduction
We have seen a few Laravel tutorials for beginners and through one of our blog posts, we received a query- Laravel 8 export data excel file with example. So here we are with another Laravel tutorial!
In this step-by-step guideline of Laravel 8 export data as excel file, we will build a demo application in which we will use the maatwebsite/excel package for exporting data. You might be familiar with the package; it provides the best way for exporting the data as a CSV file or Excel file.
We will build a demo application where we will see how to implement Excel export functionality in Laravel using the maatwebsite/excel package.
Before starting the development part, let’s see the below video so that you can have an idea of what are we going to build in this blog.
Create a Model with Migration
Run this command to create a modal

php artisan make:model Student -m
// Student.php
Here we have to store the student data to create a table and define the table’s fields.
Create a Data Table
Go to the database/migration folder, then open the migration file and write the following code.
// 2021_07_16_041455_create_students_table
id();
            $table->string('name');
            $table->string('email');
            $table->string('city');
            $table->timestamps();
        });
    }
    /**
     * Reverse the migrations.
     *
     * @return void
     */
    public function down()
    {
        Schema::dropIfExists('students');
    }
}
We will create a table using the above fields.
Now run this command. This command is useful for creating actual tables in the GUI and migrating tables in the database.
php artisan migrate
Install maatwebsite/excel package
To install maatwebsite/excel, run the below-mentioned command
composer require maatwebsite/excel.
With the help of this package, we can export data into an excel file.
Now open config/app.php and add service provider and alias.
'providers' => [
      ....
     MaatwebsiteExcelExcelServiceProvider::class,
],
'aliases' => [
      ....
     'Excel' => MaatwebsiteExcelFacadesExcel::class,
],
Define the routes
Routes are required for navigating the web pages for defining routes in our demo app, open routes/web.php, and use the following code.
// web.php
Route::resource('student', StudentController::class);
Route::get('student_export',[StudentController::class, 'get_student_data'])->name('student.export');
Create an Export Class
In this section, we will create an export class and define the model to which it is connected. The maatwebsite package offers a way for building an export class so that we can further use it in the controller.
Run the below command for the same.
php artisan make:export StudentExport --model=Student
Here StudentExport class will define the data that we want to export in our excel file.
Go to app/Exports/ StudentExport.php and make the following changes in your code
// StudentExport.php
The heading() function will define the heading, which would be displayed in an excel file.
The collection() method will return the data which we have to export. Here in our demo app, we will export all student data using the Student Model.
Create Controller
Before creating the controller we have to make a request.
The command for creating a request.
php artisan make::request StoreStudentRequest
Here are the validation rules applied for entering student data.
public function rules()
    {
        return [
            'name' => 'bail|required|string|max:255',
            'email' => 'bail|required|string|email|max:255',
            'city' => 'bail|required|string|max:255'
        ];
    }
}
Run this command to create a resource controller for writing the logic.
php artisan make:controller StudentController –resource
Go to app/Http/Controllers/StudentController.php and write a code.
// StudentController.php
name = $request->name;
        $student->email = $request->email;
        $student->city = $request->city;
        $student->save();
        return redirect(route('student.index'))->with('success','Data submited successfully!');
    }
    /**
     * Display the specified resource.
     *
     * @param  int  $id
     * @return IlluminateHttpResponse
     */
    public function show($id)
    {
        //
    }
    /**
     * Show the form for editing the specified resource.
     *
     * @param  int  $id
     * @return IlluminateHttpResponse
     */
    public function edit($id)
    {
        //
    }
    /**
     * Update the specified resource in storage.
     *
     * @param  IlluminateHttpRequest  $request
     * @param  int  $id
     * @return IlluminateHttpResponse
     */
    public function update(Request $request, $id)
    {
        //
    }

    /**
     * Remove the specified resource from storage.
     *
     * @param  int  $id
     * @return IlluminateHttpResponse
     */
    public function destroy($id)
    {
        //
    }
    public function get_student_data()
    {
        return Excel::download(new StudentExport, 'students.xlsx');
    }
}
Now we will use the download method of the Laravel excel package within the get_student_data() function. It will accept two parameters: export class and name of the file (you can name it anything you want)
The second parameter is the name of the file in which we want to export the data.
- The create() function is used to create the form.
- The store() method is used to store the data in the database
- The index() method is used to display the data.
Create a View to Add Records and Display Details
Go to the resources/views folder. Create a new folder layout with a file named a main.blade.php
// main.blade.php
    href="https://cdn.jsdelivr.net/npm/bootstrap@5.0.2/dist/css/bootstrap.min.css" rel="stylesheet" integrity="sha384-EVSTQN3/azprG1Anm3QDgpJLIm9Nao0Yz1ztcQTwFspd3yD65VohhpuuCOmLASjC" crossorigin="anonymous">
    @yield('title')


     @yield('content')
Now create another folder within the views folder named student. We have to add the records of the student, and for that, we will need forms. Forms are defined in the view file.
Here main.blade.php is the parent layout file containing all the common header and footer.
In the Student folder, create two files, namely: create.blade.php and index.blade.php.
The create.blade.php file is required to create the form so that students can enter the data. Open create.blade.php and write the following code.
//create.blade.php
@extends('layout.main')

@section('title')
    Registration form
@endsection

@section('content')

    Student Registration Form

        @csrf

            Name

            @error('name')
            {{ $message }}
            @enderror


            Email

            @error('email')
            {{ $message }}
          @enderror


            City

            @error('city')
            {{ $message }}
            @enderror

        Submit


@endsection
In the index.blade.php file, we have displayed the Student data in the table format, and we can easily download the data and export it as an excel file by clicking the Export button.
// index.blade.php
@extends('layout.main')

@section('title')
    Student Data
@endsection

@section('content')

    @if ($message = session('success'))

        {{ $message }}

     @endif
    Student Data


             Export Data


            Add Data


                ID
                Name
                Email
                City


            @foreach ($students as $student)

                      {{ $student->id }}
                      {{ $student->name }}
                      {{ $student->email }}
                      {{ $student->city }}

            @endforeach


        {{ $students->links() }}


@endsection
Develop. Maintain. Optimize. Deploy – with Bacancy!
Are you looking for proficient developers to build highly-optimized applications? Get in touch with us to hire Laravel developer. Contact the best, to get the best! Period!
Run the Demo Application
The last section of the tutorial- laravel 8 export data as excel file is to run the app. Now it’s time to run our demo. Run the below command.
php artisan serve
After running the server successfully you can see the app working on
http://localhost:8000/student/create
GitHub Repository
The entire source code is available here: laravel-excel-export-example. Feel free to clone the repo and play around with the code.
Conclusion
So, I hope the tutorial of laravel 8 export data as excel file was helpful to you. Are you a laravel enthusiast and find it difficult for basic tutorials? If yes, then the Laravel tutorials page is for you! Feel free to visit and explore more such laravel tutorials.
Bacancy has dedicated, skilled, and experienced laravel developers with problem-solving skills. If you are looking for laravel developers who can help you with your requirements and project then without wasting your time contact Bacancy and hire laravel developer.
Data Export to Excel (xlsx or xls) format is feature of web project to allow users to export MySQL data for further use. In our previous tutorial you have learned how to export data to excel with PHP, in this tutorial you will learn how to export data to excel in Laravel framework. As PHPExcel is deprecated with latest Laravel version, so we will use PhpSpreadsheet to create excel file with collection data.
Also, read:
- Import Excel File in Laravel
- CRUD Operations in Laravel
We will cover this tutorial in easy steps with live example to allow data export to xlsx and xls file and link to download complete source code of running demo.
As we will cover this tutorial with live example to export data to excel in Laravel, so the major files that we will create for this example is following.
- Emp.php: Employee model
- EmpController.php: Employee controller
- employee.blade.php: Employee view
Step1: Create Database Table
First we will create MySQL database table emp to store employee details to display and export into Excel file.
CREATE TABLE `emp` (

  `id` int(11) NOT NULL,

  `name` varchar(255) NOT NULL,

  `skills` varchar(255) NOT NULL,

  `address` varchar(255) NOT NULL,

  `designation` varchar(255) NOT NULL,

  `age` int(11) NOT NULL

) ENGINE=InnoDB DEFAULT CHARSET=latin
We will also insert few records to create example.
INSERT INTO `emp` (`id`, `name`, `skills`, `address`, `designation`, `age`) VALUES

(1, 'Jhone', 'Java', 'Sydney', 'Software Engineer', 34),

(2, 'David', 'PHP', 'London', 'Web Developer', 28),

(3, 'Rhodes', 'jQuery', 'New Jersy', 'Web Developer', 30),

(4, 'Sara', 'JavaScript', 'Delhi', 'Web Developer', 25),

(5, 'Shyrlin', 'NodeJS', 'Tokiyo', 'Programmer', 35),

(6, 'Steve', 'Angular', 'London', 'Web Developer', 28),

(7, 'Cook', 'MySQL', 'Paris', 'Web Developer', 26),

(8, 'Root', 'HTML', 'Paris', 'Web Developer', 28),

(9, 'William', 'jQuery', 'Sydney', 'Web Developer', 23),

(10, 'Nathan', 'PHP', 'London', 'Web Developer', 28),

(11, 'Raman', 'PHP', 'Delhi', 'Web Developer', 38),

(12, 'Mohan', 'PHP', 'Delhi, India', 'Web Developer', 30);
Step2: Create and Configure Laravel Project
If you have already running Laravel project then you can skip this step otherwise first create your Laravel project using below composer:
$ composer create-project --prefer-dist laravel/laravel project-name
Now we will .env file from project root directory and update MySQL database connection details like shown below.
DB_CONNECTION=mysql

DB_HOST=127.0.0.1

DB_PORT=3306

DB_DATABASE=database_name

DB_USERNAME=root

DB_PASSWORD=
Step3: Create Emp Model
Now we will create Model Emp using below command.
$ php artisan make:model Emp -m
The Emp model will be created in app/Emp.php. We will use MySQL database table emp to get employee data.
<?php

namespace App;

use IlluminateDatabaseEloquentModel;

class Emp extends Model {

	 protected $table = 'emp';

}
Step4: Create Emp Controller
We will create EmpController using below command. The EmpController.php file will be created in at app/Http/Controllers.
$ php artisan make:controller EmpController
Now we will make changes into EmpController.php to add new index() function as showing below, which will fetch all records from emp model with pagination and it will return view employee. We will also add new function export() to all records and then create Excel spreadsheet using PhpSpreadsheet. Below is complete code of EmpController.php.
<?php

namespace AppHttpControllers;

use IlluminateHttpRequest;

use PhpOfficePhpSpreadsheetSpreadsheet;

use PhpOfficePhpSpreadsheetWriterXlsx;

use PhpOfficePhpSpreadsheetWriterXls;

use AppEmp;

class EmpController extends Controller {

    public function index(){

        $emp = Emp::paginate(5);

        return view('employee', ['emp' => $emp]);

    }

	public function export($type) {

		$employees = Emp::all();

		$spreadsheet = new Spreadsheet();

        $sheet = $spreadsheet->getActiveSheet();

        $sheet->setCellValue('A1', 'Id');

        $sheet->setCellValue('B1', 'Name');

		$sheet->setCellValue('C1', 'Age');

        $sheet->setCellValue('D1', 'Skills');

        $sheet->setCellValue('E1', 'Address');

		$sheet->setCellValue('F1', 'Designation');

		$rows = 2;

		foreach($employees as $empDetails){

			$sheet->setCellValue('A' . $rows, $empDetails['id']);

            $sheet->setCellValue('B' . $rows, $empDetails['name']);

            $sheet->setCellValue('C' . $rows, $empDetails['age']);

            $sheet->setCellValue('D' . $rows, $empDetails['skills']);

			$sheet->setCellValue('E' . $rows, $empDetails['address']);

            $sheet->setCellValue('F' . $rows, $empDetails['designation']);

            $rows++;

		}

	    $fileName = "emp.".$type;

		if($type == 'xlsx') {

			$writer = new Xlsx($spreadsheet);

		} else if($type == 'xls') {

			$writer = new Xls($spreadsheet);

		}

		$writer->save("export/".$fileName);

		header("Content-Type: application/vnd.ms-excel");

        return redirect(url('/')."/export/".$fileName);

    }

}
Step5: Display Employee Records with Export Button
Now we will create employee view file at resources/views/employee.blade.php to display employee records and button to export data into Excel file.
<div class="container">

	<h1>Example: Export Data to Excel File in Laravel</h1>

	 <br>

	 <div class="form-group">

		 <a href="{{ url('/') }}/export/xlsx" class="btn btn-success">Export to .xlsx</a>

		<a href="{{ url('/') }}/export/xls" class="btn btn-primary">Export to .xls</a>

	 </div>

	 <table class="table table-striped table-bordered ">

		<thead>

		<tr>

			<th>Id</th>

			<th>Name</th>

			<th>Age</th>

			<th>Skills</th>

			<th>Address</th>

			<th>Designation</th>

		</tr>

		</thead>

		<tbody>

			@foreach($emp as $empDetails)

			<tr>

			<td>{{ $empDetails->id }}</td>

			<td>{{ $empDetails->name }}</td>

			<td>{{ $empDetails->age }}</td>

			<td>{{ $empDetails->skills }}</td>

			<td>{{ $empDetails->address }}</td>

			<td>{{ $empDetails->designation }}</td>

			</tr>

			@endforeach

		</tbody>

	</table>

	{{ $emp->links() }}

</div>
Step6: Change Default Route
We will make changes into routes/web.php to add route to PostController and it’s index function. We will also add a new route in to access export method from the view with excl file type to export data into xlsx or xls file.
Route::get('/', 'EmpController@index');

Route::get('/export/{type}', 'EmpController@export');
You may also like:
- Build Live Chat System with Ajax, PHP & MySQL
- Create Event Calendar with jQuery, PHP and MySQL
- Build Invoice System with PHP & MySQL
- Push Notification System with PHP & MySQL
- Create Bootstrap Cards with PHP and MySQL
- Build Content Management System with PHP & MySQL
- Convert Unix Timestamp To Readable Date Time in PHP
- Ajax Drop Down Selection Data Load with PHP & MySQL
- Inventory Management System with Ajax, PHP & MySQL
- Drag and Drop File Upload using jQuery and PHP
- Load Dynamic Content in Bootstrap Popover with Ajax, PHP & MySQL
You can download the full script from the Download link below.
Download
Today, We want to share with you laravel excel export example.In this post we will show you import csv or excel file and export csv or excel file using maatwebsite/excel version 3 composer package, hear for how to export import Excel spreadsheet or csv file to database in php laravel framework. we will give you demo and example for implement.In this post, we will learn about using maatwebsite/excel laravel with an example.
Laravel Import Export Excel to database Example
The simple way to start an export is to make a custom export class. We’ll use members an invoices export as example. how to comfortably import export excel or CSV file to Database file from the database with the maatwebsite/excel composer package in Laravel Application.
Follow Bellow Few Step:
- 1) Install Required Packages
- 2) Configuration app.php file
- 3) Create route
- 4) Create controller
- 5) Create view file
simple way put composer.json this code
and then run this commands “composer update”.
"require": {
    "php": ">=5.6.4",
    "laravel/framework": "5.4.*",
    "laravel/tinker": "~1.0",
    "maatwebsite/excel": "~2.1.0"
},
Step 1 : Install Laravel Application
composer create-project --prefer-dist laravel/laravel member_shop
Step 2: Install Maatwebsite Package
In second methos for install any package it very easy. open terminal and run bellow command then you can install your any required package.
composer require maatwebsite/excel
config/app.php
'providers' => [
	....
	MaatwebsiteExcelExcelServiceProvider::class,
],

'aliases' => [
	....
	'Excel' => MaatwebsiteExcelFacadesExcel::class,
],
and then simple you can make publish configuration file by using following command:
php artisan vendor:publish
and then here create a new config file named “config/excel.php”.
Step 3: Create Dummy Records
php artisan migrate
php artisan tinker

factory(AppMember::class, 50)->create();
Step 4: Add Routes
routes/web.php
Route::get('export', '[email protected]')->name('export');
Route::get('membersImpExpList', '[email protected]');
Route::post('import', '[email protected]')->name('import');
Step 5: Create Import Class
php artisan make:import MembersImport --model=Member
app/Imports/MembersImport.php
<?php

namespace AppImports;

use AppMember;
use MaatwebsiteExcelConcernsToModel;

class MembersImport implements ToModel
{
    /**
    * @param array $row
    *
    * @return IlluminateDatabaseEloquentModel|null
    */
    public function model(array $row)
    {
        return new Member([
            'name'     => $row[0],
            'email'    => $row[1],
            'password' => Hash::make('98256'),
        ]);
    }
}
Step 6: Make Export Class
php artisan make:export MembersExport --model=Member
app/Exports/MembersExport.php
<?php

namespace AppExports;

use AppMember;
use MaatwebsiteExcelConcernsFromCollection;

class MembersExport implements FromCollection
{
    /**
    * @return IlluminateSupportCollection
    */
    public function collection()
    {
        return Member::all();
    }
}
Step 7: Create a Laravel Controller
app/Http/Controllers/MemberController.php
<?php

namespace AppHttpControllers;

use IlluminateHttpRequest;
use AppExportsMembersExport;
use AppImportsMembersImport;
use MaatwebsiteExcelFacadesExcel;

class MemberController extends Controller
{
    /**
    * @return IlluminateSupportCollection
    */
    public function membersImpExpList()
    {
       return view('import');
    }

    /**
    * @return IlluminateSupportCollection
    */
    public function export()
    {
        return Excel::download(new MembersExport, 'members.xlsx');
    }

    /**
    * @return IlluminateSupportCollection
    */
    public function import()
    {
        Excel::import(new MembersImport,request()->file('file'));

        return back();
    }
}
Step 8: Create Blade File
resources/views/import.blade.php
<!DOCTYPE html>
<html>
<head>
    <title>Laravel PHP Import Export Excel to database Example - www.pakainfo.com</title>
    <link rel="stylesheet" href="https://cdnjs.cloudflare.com/ajax/libs/twitter-bootstrap/4.1.3/css/bootstrap.min.css" />
</head>
<body>

<div class="container">
    <div class="card bg-light mt-3">
        <div class="card-header">
            Laravel PHP Import Export Excel to database Example - www.pakainfo.com
        </div>
        <div class="card-body">
            <form action="{{ route('import') }}" method="POST" enctype="multipart/form-data">
                @csrf
                <input type="file" name="file" class="form-control">
                <br>
                <button class="btn btn-success">Import Member Data</button>
                <a class="btn btn-warning" href="{{ route('export') }}">Export Member Data</a>
            </form>
        </div>
    </div>
</div>

</body>
</html>
I hope you get an idea about Laravel Import Export Excel & CSV File Tutorial with Example.
I would like to have feedback on my infinityknow.com blog.
Your valuable feedback, question, or comments about this article are always welcome.
If you enjoyed and liked this post, don’t forget to share.