
Nice! Very slick.
I was disappointed that Excel doesn’t let us paste to a merged cell and also pastes results containing a break into successive rows below the «target» cell though, as that meant it simply doesn’t work for me. I tried a few tweaks (unmerge/remerge, etc.) but then Excel dropped anything below a break, so that was a dead end.
Ultimately, I came up with a routine that’ll handle simple tags and not use the «native» Unicode converter that is causing the issue with merged fields. Hope others find this useful:
Public Sub AddHTMLFormattedText(rngA As Range, strHTML As String, Optional blnShowBadHTMLWarning As Boolean = False)
    ' Adds converts text formatted with basic HTML tags to formatted text in an Excel cell
    ' NOTE: Font Sizes not handled perfectly per HTML standard, but I find this method more useful!

    Dim strActualText As String, intSrcPos As Integer, intDestPos As Integer, intDestSrcEquiv() As Integer
    Dim varyTags As Variant, varTag As Variant, varEndTag As Variant, blnTagMatch As Boolean
    Dim intCtr As Integer
    Dim intStartPos As Integer, intEndPos As Integer, intActualStartPos As Integer, intActualEndPos As Integer
    Dim intFontSizeStartPos As Integer, intFontSizeEndPos As Integer, intFontSize As Integer

    varyTags = Array("<b>", "</b>", "<i>", "</i>", "<u>", "</u>", "<sub>", "</sub>", "<sup>", "</sup>")

    ' Remove unhandled/unneeded tags, convert <br> and <p> tags to line feeds
    strHTML = Trim(strHTML)
    strHTML = Replace(strHTML, "<html>", "")
    strHTML = Replace(strHTML, "</html>", "")
    strHTML = Replace(strHTML, "<p>", "")
    While LCase(Right$(strHTML, 4)) = "</p>" Or LCase(Right$(strHTML, 4)) = "<br>"
        strHTML = Left$(strHTML, Len(strHTML) - 4)
        strHTML = Trim(strHTML)
    Wend
    strHTML = Replace(strHTML, "<br>", vbLf)
    strHTML = Replace(strHTML, "</p>", vbLf)

    strHTML = Trim(strHTML)

    ReDim intDestSrcEquiv(1 To Len(strHTML))
    strActualText = ""
    intSrcPos = 1
    intDestPos = 1
    Do While intSrcPos <= Len(strHTML)
        blnTagMatch = False
        For Each varTag In varyTags
            If LCase(Mid$(strHTML, intSrcPos, Len(varTag))) = varTag Then
                blnTagMatch = True
                intSrcPos = intSrcPos + Len(varTag)
                If intSrcPos > Len(strHTML) Then Exit Do
                Exit For
            End If
        Next
        If blnTagMatch = False Then
            varTag = "<font size"
            If LCase(Mid$(strHTML, intSrcPos, Len(varTag))) = varTag Then
                blnTagMatch = True
                intEndPos = InStr(intSrcPos, strHTML, ">")
                intSrcPos = intEndPos + 1
                If intSrcPos > Len(strHTML) Then Exit Do
            Else
                varTag = "</font>"
                If LCase(Mid$(strHTML, intSrcPos, Len(varTag))) = varTag Then
                    blnTagMatch = True
                    intSrcPos = intSrcPos + Len(varTag)
                    If intSrcPos > Len(strHTML) Then Exit Do
                End If
            End If
        End If
        If blnTagMatch = False Then
            strActualText = strActualText & Mid$(strHTML, intSrcPos, 1)
            intDestSrcEquiv(intSrcPos) = intDestPos
            intDestPos = intDestPos + 1
            intSrcPos = intSrcPos + 1
        End If
    Loop

    ' Clear any bold/underline/italic/superscript/subscript formatting from cell
    rngA.Font.Bold = False
    rngA.Font.Underline = False
    rngA.Font.Italic = False
    rngA.Font.Subscript = False
    rngA.Font.Superscript = False

    rngA.Value = strActualText

    ' Now start applying Formats!"
    ' Start with Font Size first
    intSrcPos = 1
    intDestPos = 1
    Do While intSrcPos <= Len(strHTML)
        varTag = "<font size"
        If LCase(Mid$(strHTML, intSrcPos, Len(varTag))) = varTag Then
            intFontSizeStartPos = InStr(intSrcPos, strHTML, """") + 1
            intFontSizeEndPos = InStr(intFontSizeStartPos, strHTML, """") - 1
            If intFontSizeEndPos - intFontSizeStartPos <= 3 And intFontSizeEndPos - intFontSizeStartPos > 0 Then
                Debug.Print Mid$(strHTML, intFontSizeStartPos, intFontSizeEndPos - intFontSizeStartPos + 1)
                If Mid$(strHTML, intFontSizeStartPos, 1) = "+" Then
                    intFontSizeStartPos = intFontSizeStartPos + 1
                    intFontSize = 11 + 2 * Mid$(strHTML, intFontSizeStartPos, intFontSizeEndPos - intFontSizeStartPos + 1)
                ElseIf Mid$(strHTML, intFontSizeStartPos, 1) = "-" Then
                    intFontSizeStartPos = intFontSizeStartPos + 1
                    intFontSize = 11 - 2 * Mid$(strHTML, intFontSizeStartPos, intFontSizeEndPos - intFontSizeStartPos + 1)
                Else
                    intFontSize = Mid$(strHTML, intFontSizeStartPos, intFontSizeEndPos - intFontSizeStartPos + 1)
                End If
            Else
                ' Error!
                GoTo HTML_Err
            End If
            intEndPos = InStr(intSrcPos, strHTML, ">")
            intSrcPos = intEndPos + 1
            intStartPos = intSrcPos
            If intSrcPos > Len(strHTML) Then Exit Do
            While intDestSrcEquiv(intStartPos) = 0 And intStartPos < Len(strHTML)
                intStartPos = intStartPos + 1
            Wend
            If intStartPos >= Len(strHTML) Then GoTo HTML_Err ' HTML is bad!
            varEndTag = "</font>"
            intEndPos = InStr(intSrcPos, LCase(strHTML), varEndTag)
            If intEndPos = 0 Then GoTo HTML_Err ' HTML is bad!
            While intDestSrcEquiv(intEndPos) = 0 And intEndPos > intSrcPos
                intEndPos = intEndPos - 1
            Wend
            If intEndPos > intSrcPos Then
                intActualStartPos = intDestSrcEquiv(intStartPos)
                intActualEndPos = intDestSrcEquiv(intEndPos)
                rngA.Characters(intActualStartPos, intActualEndPos - intActualStartPos + 1) _
                    .Font.Size = intFontSize
            End If
        End If
        intSrcPos = intSrcPos + 1
    Loop

    'Now do remaining tags
    intSrcPos = 1
    intDestPos = 1
    Do While intSrcPos <= Len(strHTML)
        If intDestSrcEquiv(intSrcPos) = 0 Then
            ' This must be a Tag!
            For intCtr = 0 To UBound(varyTags) Step 2
                varTag = varyTags(intCtr)
                intStartPos = intSrcPos + Len(varTag)
                While intDestSrcEquiv(intStartPos) = 0 And intStartPos < Len(strHTML)
                    intStartPos = intStartPos + 1
                Wend
                If intStartPos >= Len(strHTML) Then GoTo HTML_Err ' HTML is bad!
                If LCase(Mid$(strHTML, intSrcPos, Len(varTag))) = varTag Then
                    varEndTag = varyTags(intCtr + 1)
                    intEndPos = InStr(intSrcPos, LCase(strHTML), varEndTag)
                    If intEndPos = 0 Then GoTo HTML_Err ' HTML is bad!
                    While intDestSrcEquiv(intEndPos) = 0 And intEndPos > intSrcPos
                        intEndPos = intEndPos - 1
                    Wend
                    If intEndPos > intSrcPos Then
                        intActualStartPos = intDestSrcEquiv(intStartPos)
                        intActualEndPos = intDestSrcEquiv(intEndPos)
                        With rngA.Characters(intActualStartPos, intActualEndPos - intActualStartPos + 1).Font
                            If varTag = "<b>" Then
                                .Bold = True
                            ElseIf varTag = "<i>" Then
                                .Italic = True
                            ElseIf varTag = "<u>" Then
                                .Underline = True
                            ElseIf varTag = "<sup>" Then
                                .Superscript = True
                            ElseIf varTag = "<sub>" Then
                                .Subscript = True
                            End If
                        End With
                    End If
                    intSrcPos = intSrcPos + Len(varTag) - 1
                    Exit For
                End If
            Next
        End If
        intSrcPos = intSrcPos + 1
        intDestPos = intDestPos + 1
    Loop
Exit_Sub:
    Exit Sub
HTML_Err:
    ' There was an error with the Tags. Show warning if requested.
    If blnShowBadHTMLWarning Then
        MsgBox "There was an error with the Tags in the HTML file. Could not apply formatting."
    End If
End Sub
Note this doesn’t care about tag nesting, instead only requiring a close tag for every open tag, and assuming the close tag nearest the opening tag applies to the opening tag. Properly nested tags will work fine, while improperly nested tags will not be rejected and may or may not work.
Содержание
- Convert HTML Table to Excel
- How to Convert HTML Table to Excel Online ?
- 1. Upload or paste your HTML Table
- 2. Edit your HTML Table online, if needed
- 3. Copy the converted Excel
- What is HTML?
- What is Excel?
- Converting html to xlsx
- table of contents
- Examples
- Options
- Sheets
- Cells with data types
- Format
- Formula
- Font family
- Insert output into xlsx template
- Conversion triggers
- Issues with row height being larger than actual the content
- Performance
- Cheerio HTML engine
- How to Convert HTML to Text in Cells in Excel
- A Real Example of Converting HTML to Text in Cells in Excel
- How to Convert HTML to Text in Cells in Excel Using Find and Replace
- How to Convert HTML to Text in Excel Using VBA
- Get emails from us about Google Sheets.
Convert HTML Table to Excel
Rotate columns and rows
Clear all contents
Delete blank rows or columns
Delete duplicate rows
How to Convert HTML Table to Excel Online ?
1. Upload or paste your HTML Table
Just paste (copy html source code from a browser) or drag-and-drop your HTML file into the textarea of Data Source, and it will immediately perform the magic of the conversion. The HTML table converter will automatically search for tables from the html source code you provide.
2. Edit your HTML Table online, if needed
You can edit your data online like Excel through Table Editor, and the changes will be converted into Excel in real-time.
3. Copy the converted Excel
The generated Excel is separated by tabs, it’s here: Table Generator. You can copy and paste into Microsoft Excel, Google Sheets or Numbers, or download as an xlsx file.
Note: Your data is secure, the converts is done completely in your web browser and we will not store any of your data.
What is HTML?
HTML stands for Hypertext Markup Language. HTML is the code that is used to structure a web page and its content, paragraphs, list, images and tables etc.
What is Excel?
Microsoft Excel is an electronic spreadsheet application that enables users to store, organize, calculate and manipulate the data with formulas using a spreadsheet system broken up by rows and columns.
Источник
Converting html to xlsx
table of contents
html-to-xlsx recipe generates Excel xslx files from HTML tables. This isn’t a full HTML -> Excel conversion but a rather pragmatic and fast way to create Excel files from jsreport. The recipe reads input table and extract a couple of CSS style properties using a specific HTML engine (which defaults to chrome), and finally uses the styles to create the Excel cells.
Examples
The following CSS properties are supported:
- background-color — cell background color
- color — cell foreground color
- border — all the border-[left|right|top|bottom]-width , border-[left|right|top|bottom]-style , border-[left|right|top|bottom]-color will be transformed into Excel cells borders.
- text-align — text horizontal align in the Excel cell
- vertical-align — vertical align in the Excel cell
- width — the Excel column will get the highest width; it can be little bit inaccurate because of pixel to Excel points conversion
- height — the Excel row will get the highest height
- font-family — font family, defaults to Calibri
- font-size — font size, defaults to 16px
- font-style — normal , and italic styles are supported
- font-weight — control whether the cell’s text should be bold or not
- text-decoration — underline and line-through are supported
- overflow — the Excel cell will have text wrap enabled if this is set to scroll.
The following HTML attributes are supported:
- colspan — numeric value that merges current column with columns to the right
- rowspan — numeric value that merges current row with rows below.
Options
- htmlEngine — String (supported values here depends on the HTML engines that you have available in your jsreport installation, by default just chrome is available but you can additionally install better performing cheerio as HTML engine too)
- waitForJS — Boolean whether to wait for the JavaScript trigger to be enabled before trying to read the HTML tables on the page or not. defaults to false .
- insertToXlsxTemplate — Boolean controls if the result of the HTML to Excel tables conversion should be added as new sheets of existing xlsx template, it needs you to set an xlsx template to work. Default is false .
Sheets
Each table detected on the HTML source is converted to a new sheet in the final xlsx file. The sheets names are by default Sheet1 , Sheet2 etc. However, you can specify a custom sheet name using the name or data-sheet-name attribute on the table element where the data-sheet-name has precedence.
Cells with data types
To produce a cell with specific data type you need to use the data-cell-type on the td element. The supported data types are number , boolean , date , datetime and formula :
Format
Excel supports setting cell string format. Add the following attributes to the td element:
- data-cell-format-str -> Specify the raw string format
- data-cell-format-enum -> Select an existing format
Possible values of the data-cell-format-enum are:
- 0 -> format equal to general
- 1 -> format equal to 0
- 2 -> format equal to 0.00
- 3 -> format equal to #,##0
- 4 -> format equal to #,##0.00
- 9 -> format equal to 0%
- 10 -> format equal to 0.00%
- 11 -> format equal to 0.00e+00
- 12 -> format equal to # ?/?
- 13 -> format equal to # ??/??
- 14 -> format equal to mm-dd-yy
- 15 -> format equal to d-mmm-yy
- 16 -> format equal to d-mmm
- 17 -> format equal to mmm-yy
- 18 -> format equal to h:mm am/pm
- 19 -> format equal to h:mm:ss am/pm
- 20 -> format equal to h:mm
- 21 -> format equal to h:mm:ss
- 22 -> format equal to m/d/yy h:mm
- 37 -> format equal to #,##0 ;(#,##0)
- 38 -> format equal to #,##0 ;[red](#,##0)
- 39 -> format equal to #,##0.00;(#,##0.00)
- 40 -> format equal to #,##0.00;[red](#,##0.00)
- 41 -> format equal to _(* #,##0_);_(* (#,##0);_(* «-«_);_(@_)
- 42 -> format equal to _(«$»* #,##0_);_(«$* (#,##0);_(«$»* «-«_);_(@_)
- 43 -> format equal to _(* #,##0.00_);_(* (#,##0.00);_(* «-«??_);_(@_)
- 44 -> format equal to _(«$»* #,##0.00_);_(«$»* (#,##0.00);_(«$»* «-«??_);_(@_)
- 45 -> format equal to mm:ss
- 46 -> format equal to [h]:mm:ss
- 47 -> format equal to mmss.0
- 48 -> format equal to ##0.0e+0
- 49 -> format equal to @
Setting the format is also required when the cell needs to have a specific format category which depends on the computer locale. The cell is otherwise categorized by Excel as General .
For example, using data-cell-type=»date» makes the cell a date and you can use it in the date-based calculations. However, the cell format category in Excel is displayed as General and not Date . To rectify this, you need to use data-cell-format-str to match your locale.
Formula
A formula cell can be specified using data-cell-type=»formula» on the td element.
Font family
You can use the following CSS styles to change the default font-family for all cells in table.
Insert output into xlsx template
The table to xlsx conversion can be enough for some cases. However, for more complex cases (like producing pivot tables or complex charts using Excel) there is an option to insert the produced tables into an existing xlsx template (as new sheets) instead of producing a new xlsx file.
The flow is the following:
- Open your desktop Excel application and prepare file with pivot tables and charts on the one sheet and with static data on the second.
- Upload the xlsx to jsreport studio and link it with your html-to-xlsx template generating dynamic table.
- Make sure the table name matches with the data sheet name in your Excel.
Running the template now produces dynamic Excel with charts or pivots based on the data assembled by jsreport.
Conversion triggers
You may need to postpone conversion of tables until some JavaScript async tasks are processed. If this is the case; set htmlToXlsx.waitForJS = true in the API options or Wait for conversion trigger in the studio menu. When set, the conversion won’t start until you set window.JSREPORT_READY_TO_START = true inside your template’s JavaScript.
Issues with row height being larger than actual the content
When using phantomjs as the engine there are cases when a row height ends with a larger height than the actual content. This is caused by a phantomjs bug that retrieves a larger height when the content of cells contains white space characters.
There are two possible workarounds:
- use letter-spacing CSS property with some negative value (demo)
- use line-height: 0 with a specific height (demo)
Performance
The chrome engine can have performance problems when evaluating huge tables with many cells. For these cases the recipe provides an additional helper which splits large tables into chunks and runs evaluation in batches. Usage is like each or jsrender for handlebar helpers.
Cheerio HTML engine
Although the htmlToXlsxEachRows helper prevents Chrome from hanging, the rendering can still be slow. This is because Chrome needs to create DOM elements for the whole table and evaluate every single cell. Fortunately, there is a better option for large tables – using the custom HTML engine cheerio-page-eval.
This custom engine is experimental and requires manual installation through NPM.
Afterward, you can select it in the studio HTML to xlsx menu and start using it. This engine doesn’t create DOM representation like Chrome, so it has much better performance. However, the lack of DOM also introduces some limitations.
- The cheerio engine doesn’t support global CSS styles in the tag. You need to use in-line styles on cells.
- It also doesn’t evaluate JavaScript in the —>
Источник
How to Convert HTML to Text in Cells in Excel

This guide will discuss how to convert HTML to Text in Cells in Excel using two methods.
In other words, there are two ways we can use to convert html to text in cells in Excel, which are using the Find and Replace feature and VBA.
Table of Contents
Hypertext markup language, or html, is a standardized formatting system that is used to create web pages. So it is a computer language that is often used for web development, internet navigation, and web documentation.
An html code always contains tags, , which can make it difficult to read, especially when placed in a cell in Excel. So there are two ways to convert html to text in Excel.
One is using the Find and Replace feature. The Find and Replace feature in Excel finds the character you specify and replaces it with any text, character, or number you input.
Another way is using VBA in Excel. VBA stands for Visual Basic for Applications. It is a programming language in Excel and other Office apps. And VBA automates repetitive tasks, data processing, and generating graphs and reports.
VBA is useful for converting html to text in the entire worksheet, all while using a VBA code. If we have certain repetitive tasks in Excel, we can utilize VBA and record a macro to automate those repetitive tasks.
But VBA is not available for the web-based version of Excel. We recommend using the VBA method when working with the Microsoft Excel application or the Office 360 version. So only the free version of Excel does not support working with VBA.
Let’s take an example.
Suppose you are a web designer and you want to share how you created a certain web page with your colleagues. But some of them find it difficult to read html. So you need to convert the html to text in the spreadsheet to make it easier to read and share with others.
Awesome! Let’s move on and check out how to convert html to text in Excel using the two methods.
A Real Example of Converting HTML to Text in Cells in Excel
First, let’s focus on an example of how to convert html to text in cells using the Find and Replace feature. For instance, you have an html code in a cell. 
Since html codes always have tags, , we simply need to find those tags in the cells. Then, we can replace it with nothing or an empty string. So this method will simply remove the tags in the html, and we will be left with just the text.
And this is what it will look like after removing the tags. So we have converted html to text. 
Then, let’s see an example of converting html to text using VBA. Essentially, it does the same thing as the Find and Replace feature. But it utilizes a programming code instead.
VBA allows us to convert html to text in the entire worksheet. This is what the VBA window in Excel looks like. 
We will convert html to text by copying a macro code in the module window. After all the tags, , are removed from the entire worksheet, we will only be left with the text.
You can make your own copy of the spreadsheet above using the link attached below.
How to Convert HTML to Text in Cells in Excel Using Find and Replace
This section will explain the step-by-step process of how to convert HTML to Text in cells in Excel using the Find and Replace feature.
1. First, select the cell containing the html you want to convert to text. In this case, we will select A2 . Then, press Ctrl + H to open the Find and Replace window. 
2. Next, input ‘ ’ in the Find what . Also, the * is a wildcard character that basically tells Excel to look for anything that starts and ends with tags. 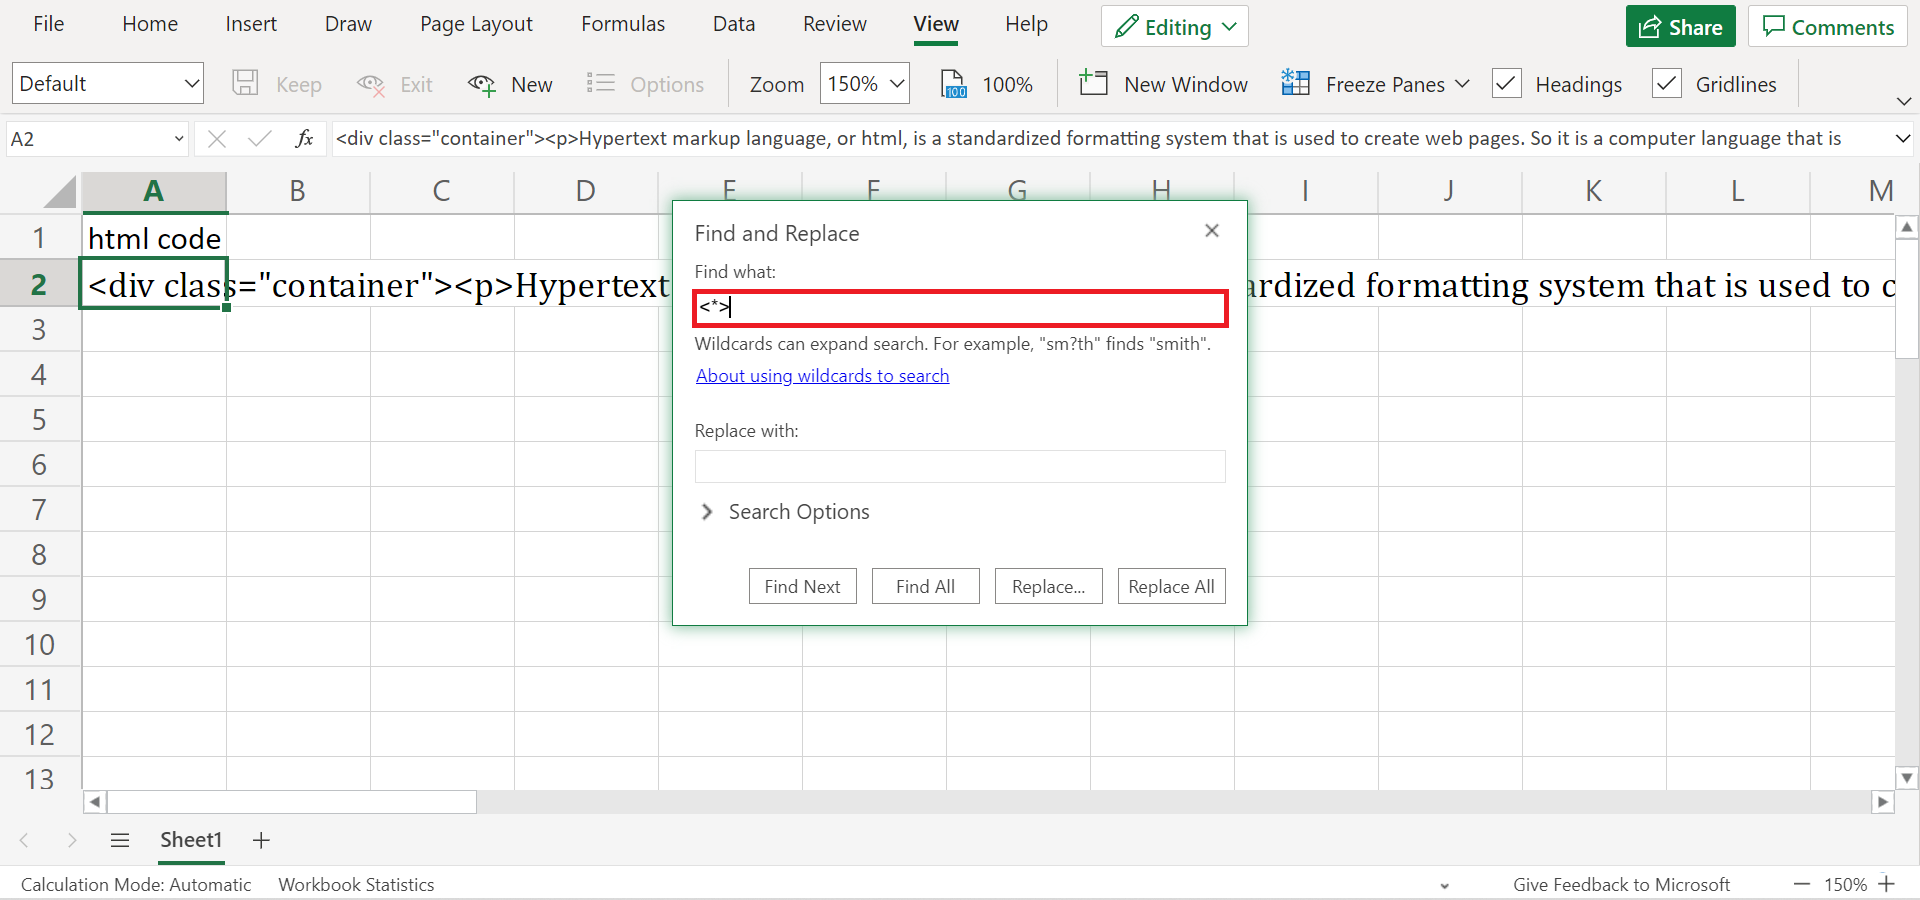
3. Lastly, we will leave the Replace with empty or blank. 
4. Since we only selected one cell, simply click Replace. Otherwise, it will apply the function to the whole worksheet. 
Furthermore, you can click the Replace All option if you have more than one cell selected.
5. And that’s it! You have successfully converted html to text using Find and Replace.
6. Additionally, we may end up with a weird format after doing this. For example, the cell may go all the way down in the worksheet. To fix it, simply select the cell. Then, go to Home and select Wrap Text . 
How to Convert HTML to Text in Excel Using VBA
This section will focus on the steps in converting html to text in Excel using VBA.
1. First, we need to open the VBA window in Excel. To do this, press Alt + F11 .
2. In the VBA window, select Insert . 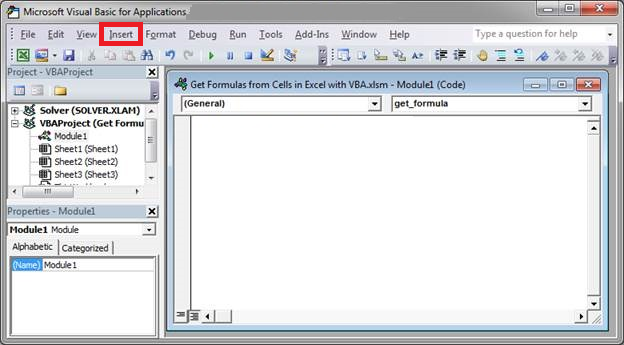
3. Third, click Module . Then, input this code:
Dim Cell As Range
For Each Cell In Selection
4. Next, select the cells containing the html code you want to convert to text. 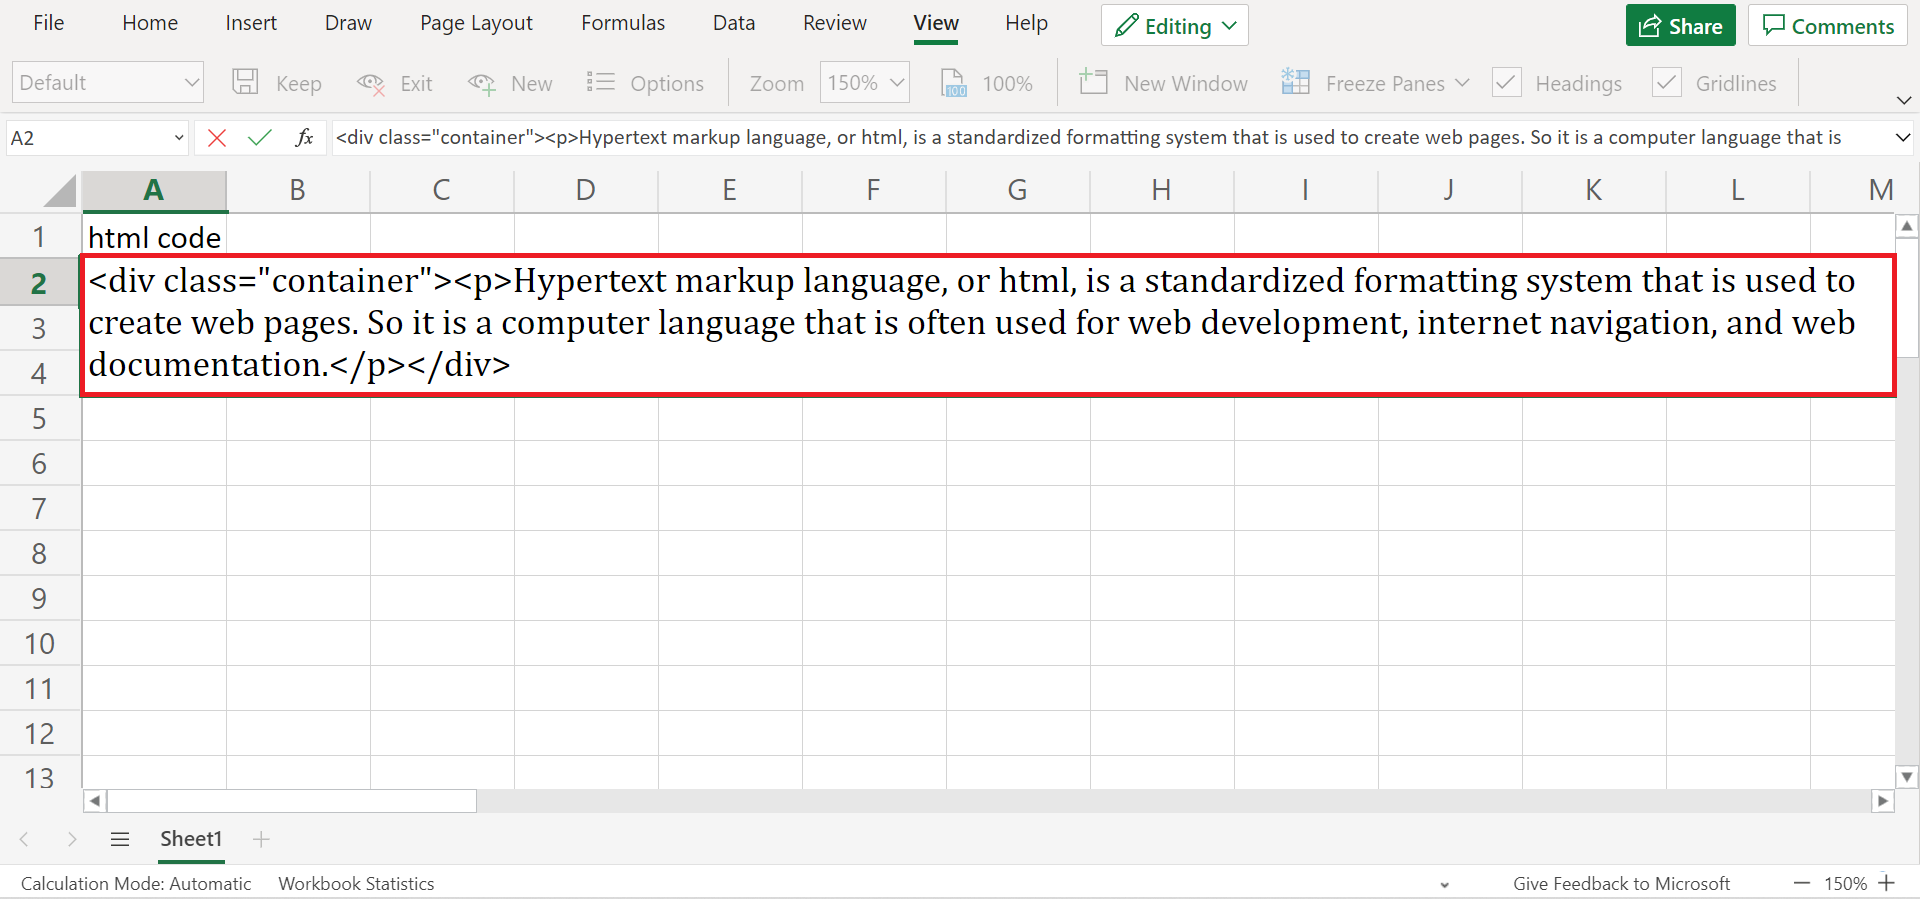
5. Finally, click Run or press the F5 key to run the macro code. 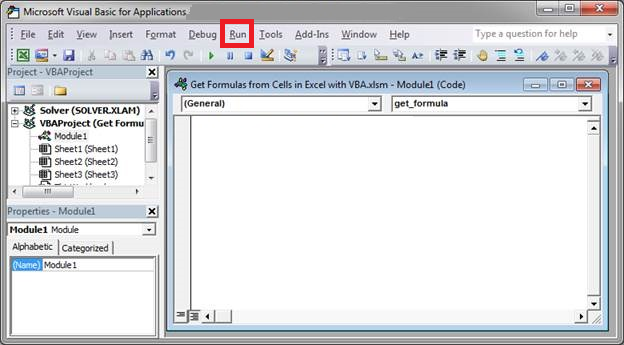
6. And tada! You have converted the html to text in Cells in Excel using a macro code in VBA.
That’s it! You have successfully learned how to convert html to text in cells in Excel using two methods: the Find and Replace feature and VBA. Now you can convert html to text whether you are using a free version of Excel or the application.
Are you interested in learning more about what Excel can do? You can now use the various other Microsoft Excel formulas available to create great worksheets that work for you. Make sure to subscribe to our newsletter to be the first to know about the latest guides and tutorials from us.

Get emails from us about Google Sheets.
Our goal this year is to create lots of rich, bite-sized tutorials for Google Sheets users like you. If you liked this one, you’ll love what we are working on! Readers receive ✨ early access ✨ to new content.
Источник
This guide will discuss how to convert HTML to Text in Cells in Excel using two methods.
In other words, there are two ways we can use to convert html to text in cells in Excel, which are using the Find and Replace feature and VBA.
Table of Contents
- A Real Example of Converting HTML to Text in Cells in Excel
- How to Convert HTML to Text in Cells in Excel Using Find and Replace
- How to Convert HTML to Text in Excel Using VBA
Hypertext markup language, or html, is a standardized formatting system that is used to create web pages. So it is a computer language that is often used for web development, internet navigation, and web documentation.
An html code always contains tags, < and >, which can make it difficult to read, especially when placed in a cell in Excel. So there are two ways to convert html to text in Excel.
One is using the Find and Replace feature. The Find and Replace feature in Excel finds the character you specify and replaces it with any text, character, or number you input.
Another way is using VBA in Excel. VBA stands for Visual Basic for Applications. It is a programming language in Excel and other Office apps. And VBA automates repetitive tasks, data processing, and generating graphs and reports.
VBA is useful for converting html to text in the entire worksheet, all while using a VBA code. If we have certain repetitive tasks in Excel, we can utilize VBA and record a macro to automate those repetitive tasks.
But VBA is not available for the web-based version of Excel. We recommend using the VBA method when working with the Microsoft Excel application or the Office 360 version. So only the free version of Excel does not support working with VBA.
Let’s take an example.
Suppose you are a web designer and you want to share how you created a certain web page with your colleagues. But some of them find it difficult to read html. So you need to convert the html to text in the spreadsheet to make it easier to read and share with others.
Awesome! Let’s move on and check out how to convert html to text in Excel using the two methods.
A Real Example of Converting HTML to Text in Cells in Excel
First, let’s focus on an example of how to convert html to text in cells using the Find and Replace feature. For instance, you have an html code in a cell.
Since html codes always have tags, < and >, we simply need to find those tags in the cells. Then, we can replace it with nothing or an empty string. So this method will simply remove the tags in the html, and we will be left with just the text.
And this is what it will look like after removing the tags. So we have converted html to text.
Then, let’s see an example of converting html to text using VBA. Essentially, it does the same thing as the Find and Replace feature. But it utilizes a programming code instead.
VBA allows us to convert html to text in the entire worksheet. This is what the VBA window in Excel looks like.
We will convert html to text by copying a macro code in the module window. After all the tags, < and >, are removed from the entire worksheet, we will only be left with the text.
You can make your own copy of the spreadsheet above using the link attached below.
How to Convert HTML to Text in Cells in Excel Using Find and Replace
This section will explain the step-by-step process of how to convert HTML to Text in cells in Excel using the Find and Replace feature.
1. First, select the cell containing the html you want to convert to text. In this case, we will select A2. Then, press Ctrl + H to open the Find and Replace window.
2. Next, input ‘<*>’ in the Find what. Also, the * is a wildcard character that basically tells Excel to look for anything that starts and ends with tags.
3. Lastly, we will leave the Replace with empty or blank.
4. Since we only selected one cell, simply click Replace. Otherwise, it will apply the function to the whole worksheet.
Furthermore, you can click the Replace All option if you have more than one cell selected.
5. And that’s it! You have successfully converted html to text using Find and Replace.
6. Additionally, we may end up with a weird format after doing this. For example, the cell may go all the way down in the worksheet. To fix it, simply select the cell. Then, go to Home and select Wrap Text.
This section will focus on the steps in converting html to text in Excel using VBA.
1. First, we need to open the VBA window in Excel. To do this, press Alt + F11.
2. In the VBA window, select Insert.
3. Third, click Module. Then, input this code:
Sub HTML_Removal()
Dim Cell As Range
With CreateObject("vbscript.regexp")
.Pattern = "<.*?>"
.Global = True
For Each Cell In Selection
Cell.Value = .Replace(Cell.Value, "")
Next
End With
End Sub
4. Next, select the cells containing the html code you want to convert to text.
5. Finally, click Run or press the F5 key to run the macro code.
6. And tada! You have converted the html to text in Cells in Excel using a macro code in VBA.
That’s it! You have successfully learned how to convert html to text in cells in Excel using two methods: the Find and Replace feature and VBA. Now you can convert html to text whether you are using a free version of Excel or the application.
Are you interested in learning more about what Excel can do? You can now use the various other Microsoft Excel formulas available to create great worksheets that work for you. Make sure to subscribe to our newsletter to be the first to know about the latest guides and tutorials from us.
Get emails from us about Google Sheets.
Our goal this year is to create lots of rich, bite-sized tutorials for Google Sheets users like you. If you liked this one, you’ll love what we are working on! Readers receive ✨ early access ✨ to new content.
table of contents
html-to-xlsx recipe generates Excel xslx files from HTML tables. This isn’t a full HTML -> Excel conversion but a rather pragmatic and fast way to create Excel files from jsreport. The recipe reads input table and extract a couple of CSS style properties using a specific HTML engine (which defaults to chrome), and finally uses the styles to create the Excel cells.
Examples
- Basic table
- Cells with data types
- Cell with line break
- Cell with format
- Cell with formula
- Merged cells
- Multiple sheets
- Conversion JS trigger
- Insert output into xlsx template
- Postprocess using xlsx
The following CSS properties are supported:
background-color— cell background colorcolor— cell foreground colorborder— all theborder-[left|right|top|bottom]-width,border-[left|right|top|bottom]-style,border-[left|right|top|bottom]-colorwill be transformed into Excel cells borders.text-align— text horizontal align in the Excel cellvertical-align— vertical align in the Excel cellwidth— the Excel column will get the highest width; it can be little bit inaccurate because of pixel to Excel points conversionheight— the Excel row will get the highest heightfont-family— font family, defaults toCalibrifont-size— font size, defaults to16pxfont-style—normal, anditalicstyles are supportedfont-weight— control whether the cell’s text should be bold or nottext-decoration—underlineandline-throughare supportedoverflow— the Excel cell will have text wrap enabled if this is set to scroll.
The following HTML attributes are supported:
colspan— numeric value that merges current column with columns to the rightrowspan— numeric value that merges current row with rows below.
Options
htmlEngine—String(supported values here depends on the HTML engines that you have available in your jsreport installation, by default justchromeis available but you can additionally install better performing cheerio as HTML engine too)waitForJS—Booleanwhether to wait for the JavaScript trigger to be enabled before trying to read the HTML tables on the page or not. defaults tofalse.insertToXlsxTemplate—Booleancontrols if the result of the HTML to Excel tables conversion should be added as new sheets of existing xlsx template, it needs you to set an xlsx template to work. Default isfalse.
Sheets
Each table detected on the HTML source is converted to a new sheet in the final xlsx file. The sheets names are by default Sheet1, Sheet2 etc. However, you can specify a custom sheet name using the name or data-sheet-name attribute on the table element where the data-sheet-name has precedence.
<table name="Data1">
    <tr>
        <td>1</td>
    </tr>
</table>
<table data-sheet-name="Data2">
    <tr>
        <td>2</td>
    </tr>
</table>
Cells with data types
To produce a cell with specific data type you need to use the data-cell-type on the td element. The supported data types are number, boolean, date, datetime and formula:
<table>
    <tr>
        <td data-cell-type="number">10</td>
        <td data-cell-type="boolean" style="width: 85px">1</td>
        <td data-cell-type="date">2019-01-22</td>
        <td data-cell-type="datetime">2019-01-22T17:31:36.000-05:00</td>
    </tr>
</table>
Format
Excel supports setting cell string format. Add the following attributes to the td element:
data-cell-format-str-> Specify the raw string formatdata-cell-format-enum-> Select an existing format
Possible values of the data-cell-format-enum are:
0-> format equal togeneral1-> format equal to02-> format equal to0.003-> format equal to#,##04-> format equal to#,##0.009-> format equal to0%10-> format equal to0.00%11-> format equal to0.00e+0012-> format equal to# ?/?13-> format equal to# ??/??14-> format equal tomm-dd-yy15-> format equal tod-mmm-yy16-> format equal tod-mmm17-> format equal tommm-yy18-> format equal toh:mm am/pm19-> format equal toh:mm:ss am/pm20-> format equal toh:mm21-> format equal toh:mm:ss22-> format equal tom/d/yy h:mm37-> format equal to#,##0 ;(#,##0)38-> format equal to#,##0 ;[red](#,##0)39-> format equal to#,##0.00;(#,##0.00)40-> format equal to#,##0.00;[red](#,##0.00)41-> format equal to_(* #,##0_);_(* (#,##0);_(* "-"_);_(@_)42-> format equal to_("$"* #,##0_);_("$* (#,##0);_("$"* "-"_);_(@_)43-> format equal to_(* #,##0.00_);_(* (#,##0.00);_(* "-"??_);_(@_)44-> format equal to_("$"* #,##0.00_);_("$"* (#,##0.00);_("$"* "-"??_);_(@_)45-> format equal tomm:ss46-> format equal to[h]:mm:ss47-> format equal tommss.048-> format equal to##0.0e+049-> format equal to@
<style>
    td {
        width: 60px;
        padding: 5px;
    }
</style>
<table>
    <tr>
        <td data-cell-type="number" data-cell-format-str="0.00">10</td>
        <td data-cell-type="number" data-cell-format-enum="3">100000</td>
        <td data-cell-type="date" data-cell-format-str="m/d/yyy">2019-01-22</td>
    </tr>
</table>
Setting the format is also required when the cell needs to have a specific format category which depends on the computer locale. The cell is otherwise categorized by Excel as General.
For example, using data-cell-type="date" makes the cell a date and you can use it in the date-based calculations. However, the cell format category in Excel is displayed as General and not Date. To rectify this, you need to use data-cell-format-str to match your locale.
Formula
A formula cell can be specified using data-cell-type="formula" on the td element.
<table>
    <tr>
        <td data-cell-type="number">10</td>
        <td data-cell-type="number">10</td>
        <td data-cell-type="formula">=SUM(A1, B1)</td>
    </tr>
</table>
Font family
You can use the following CSS styles to change the default font-family for all cells in table.
td  {
  font-family: 'Verdana';
  font-size: 18px;
}
Insert output into xlsx template
The table to xlsx conversion can be enough for some cases. However, for more complex cases (like producing pivot tables or complex charts using Excel) there is an option to insert the produced tables into an existing xlsx template (as new sheets) instead of producing a new xlsx file.
The flow is the following:
- Open your desktop Excel application and prepare file with pivot tables and charts on the one sheet and with static data on the second.
- Upload the xlsx to jsreport studio and link it with your
html-to-xlsxtemplate generating dynamic table. - Make sure the table name matches with the data sheet name in your Excel.
Running the template now produces dynamic Excel with charts or pivots based on the data assembled by jsreport.
See this example to get an idea of what can be possible with this feature.
Conversion triggers
You may need to postpone conversion of tables until some JavaScript async tasks are processed. If this is the case; set htmlToXlsx.waitForJS = true in the API options or Wait for conversion trigger in the studio menu. When set, the conversion won’t start until you set window.JSREPORT_READY_TO_START = true inside your template’s JavaScript.
...
<script>
    // do some calculations or something async
    setTimeout(function() {
        window.JSREPORT_READY_TO_START = true; //this will start the conversion and read the existing tables on the page
    }, 500);
    ...
</script>
Issues with row height being larger than actual the content
When using phantomjs as the engine there are cases when a row height ends with a larger height than the actual content. This is caused by a phantomjs bug that retrieves a larger height when the content of cells contains white space characters.
There are two possible workarounds:
- use
letter-spacingCSS property with some negative value (demo)
<!-- without "letter-spacing" the row would be more larger -->
<table style="letter-spacing: -4px">
    <tr>
        <td> From Date: N/A</td>
        <td> To Date: N/A </td>
        <td> Search Text: N/A </td>
        <td> Sort Order: N/A </td>
        <td> Sort Key: N/A </td>
        <td> Filter: N/A </td>
    </tr>
</table>
- use
line-height: 0with a specificheight(demo)
<!-- without "line-height" and "height" the row would be more larger -->
<table style="line-height: 0">
    <tr style="height: 20px">
        <td> From Date: N/A</td>
        <td> To Date: N/A </td>
        <td> Search Text: N/A </td>
        <td> Sort Order: N/A </td>
        <td> Sort Key: N/A </td>
        <td> Filter: N/A </td>
    </tr>
</table>
Performance
The chrome engine can have performance problems when evaluating huge tables with many cells. For these cases the recipe provides an additional helper which splits large tables into chunks and runs evaluation in batches. Usage is like each or jsrender for handlebar helpers.
<table>
    {{#htmlToXlsxEachRows people}}
      <tr>
        <td>{{name}}</td>
        <td>{{address}}</td>
      </tr>
    {{/htmlToXlsxEachRows}}
</table>
Cheerio HTML engine
Although the htmlToXlsxEachRows helper prevents Chrome from hanging, the rendering can still be slow. This is because Chrome needs to create DOM elements for the whole table and evaluate every single cell. Fortunately, there is a better option for large tables – using the custom HTML engine cheerio-page-eval.
This custom engine is experimental and requires manual installation through NPM.
npm i cheerio-page-eval
restart jsreport
Afterward, you can select it in the studio HTML to xlsx menu and start using it. This engine doesn’t create DOM representation like Chrome, so it has much better performance. However, the lack of DOM also introduces some limitations.
- The cheerio engine doesn’t support global CSS styles in the
<style>tag. You need to use in-line styles on cells. - It also doesn’t evaluate JavaScript in the
<script>tags. The helpers and templating engines aren’t limited.
htmlToXlsxEachRows helper also works with the cheerio engine and can significantly improve rendering memory footprint on long tables.
Preview in studio
See general documentation for office preview in studio here.
Postprocess using xlsx recipe
The html-to-xlsx will be always limited and you may miss some features that aren’t yet implemented in it. In this case you can use xlsx recipe and postprocess the html-to-xlsx and modify what you need using low level xlsx helpers.
Demo in playground
API
You can specify the template the standard way by using name or shortid, or alternatively you can also send it in the API request. If you have the Excel template stored as an asset you can also reference it in the request.
{
  "template":  {
    "recipe":  "html-to-xlsx",
    "engine":  "handlebars",
    "content": "<table></table>",
    "htmlToXlsx":  {
      "templateAssetShortid":  "xxxx"
    }
  },
  "data":  {}
}
If you don’t have the xlsx template stored as an asset you can send it directly in the API request.
{
  "template":  {
    "recipe":  "html-to-xlsx",
    "engine":  "handlebars",
    "content": "<table></table>",
    "htmlToXlsx":  {
      "templateAsset":  {
        "content": "base64 encoded word file",
        "encoding":"base64"
       }
    }
  },
  "data":  {}
}
HTML to Excel
Powered by
aspose.com
and
aspose.cloud
Choose HTML files
or drop HTML files
Minimize the number of worksheets in the output workbook
Use password
This password will be applied to all documents
If you need to convert several HTML to one Excel use Merger
Convert HTML to Excel Online
Use HTML to Excel converter to export HTML files to Excel format online. Our free conversion service will parse the content of the original HTML file to the smallest detail and recreate the content in the target Excel format.
You can use the HTML to Excel Converter completely free, at any time, and from any device.
HTML to Excel Converter Online
Converting from HTML to Excel format is one of the most common operations. We often need both of the features that HTML and Excel formats provide. HTML and Excel formats complement each other in some cases.
Convert HTML file to Excel Online
To convert HTML to Excel format, simply drag and drop a HTML file into the data upload area, specify the conversion options, click the ‘Convert’ button, and get your output Excel file in seconds.
Free HTML to Excel Converter is based on Aspose software products, which are widely used around the world for programmatic processing of HTML and Excel files with high speed and professional quality of the result.