
I have an html table (Not Gridview) and that has no proper Header and rows. Instead it has customized structure and data. I want to export this table to Excel. How can I do using ASP.NET?
The labels are fixed text and the integer values are coming from database. So the table structure is fixed only the integer/decimal values change.
![]()
asked Feb 20, 2012 at 15:56
![]()
3
You want Export HTML table (Not Gridview) customized structure and data to Excel using ASP.NET.
Try the following Approach
-
Provide the
IDand addrunat="server"attribute<table id="tbl" runat="server" > -
Add the following code
Response.ContentType = "application/x-msexcel";
Response.AddHeader("Content-Disposition", "attachment;
filename=ExcelFile.xls");
Response.ContentEncoding = Encoding.UTF8;
StringWriter tw = new StringWriter();
HtmlTextWriter hw = new HtmlTextWriter(tw);
tbl.RenderControl(hw);
Response.Write(tw.ToString());
Response.End();
![]()
answered Mar 21, 2012 at 18:42
![]()
Arun SinghArun Singh
1,5284 gold badges19 silver badges43 bronze badges
3
You can use below code:
Response.ContentType = "application/force-download";
Response.AddHeader("content-disposition", "attachment; filename=Print.xls");
Response.Write("<html xmlns:x="urn:schemas-microsoft-com:office:excel">");
Response.Write("<head>");
Response.Write("<META http-equiv="Content-Type" content="text/html; charset=utf-     8">");
Response.Write("<!--[if gte mso 9]><xml>");
Response.Write("<x:ExcelWorkbook>");
Response.Write("<x:ExcelWorksheets>");
Response.Write("<x:ExcelWorksheet>");
Response.Write("<x:Name>Report Data</x:Name>");
Response.Write("<x:WorksheetOptions>");
Response.Write("<x:Print>");
Response.Write("<x:ValidPrinterInfo/>");
Response.Write("</x:Print>");
Response.Write("</x:WorksheetOptions>");
Response.Write("</x:ExcelWorksheet>");
Response.Write("</x:ExcelWorksheets>");
Response.Write("</x:ExcelWorkbook>");
Response.Write("</xml>");
Response.Write("<![endif]--> ");
StringWriter tw = new StringWriter();
HtmlTextWriter hw = new HtmlTextWriter(tw);
tbl.RenderControl(hw);
Response.Write(tw.ToString());
Response.Write("</head>");
Response.flush();
Also it is advicable to give inline css if you want the exported output look exactly same as your UI. If you apply css classes to the table then it would not be displayed in exported excel.
answered Feb 18, 2014 at 8:07
![]()
1
If dtReport contains the table(i.e data to be exported) then we can export the table to excel by using the following LOC and also we can format the header
    if (dtReports != null && dtReports.Rows.Count > 0 && !string.IsNullOrEmpty(formName))
            {
                string filename = formName.ToUpper() + ParsConstant.XLS_EXTENSION;
                StringWriter tw = new StringWriter();

                using (HtmlTextWriter hw = new HtmlTextWriter(tw))
                {

                    //Binding Datatable to DataGrid.
                    DataGrid dgGrid = new DataGrid();
                    dgGrid.DataSource = dtReports;
                    dgGrid.DataBind();

                    //Some Properties for the Header
                    dgGrid.HeaderStyle.Font.Bold = true;
                    dgGrid.HeaderStyle.Font.Size = 13;

                    //Get the HTML for the control.
                    dgGrid.RenderControl(hw);


                    Response.ContentType = "application/vnd.ms-excel";
                    Response.AppendHeader("Content-Disposition", "attachment; filename=" + filename + "");
                    //Response.Write("<style> TD { mso-number-format:\@; } </style>");


                    Response.Write(tw.ToString());
                    Response.End();
                }
            }
using MSO Format will not be avoiding leading zero’s,but it will convert the text to string which is not advisable for doing operations.
answered Mar 21, 2014 at 17:59
![]()
There’s no automated way. But you could use the same code to create the table and write it to the output instead. If you write it as a simple CSV file, then the user can load it into Excel by simply clicking the downloaded file.
By setting the correct headers, you can direct the browser to treat the content as a download instead of a web page. I posted the code to do this in this article.
answered Feb 20, 2012 at 16:22
![]()
Jonathan WoodJonathan Wood
64.8k70 gold badges261 silver badges450 bronze badges
3
In this article I will explain with an example, how to export HTML string to Excel file in ASP.Net MVC Razor.
First the Grid (Html Table) will be populated from database using Entity Framework and then the HTML Table will be sent as HTML string to the Controller which ultimately will be exported to Excel file in ASP.Net MVC Razor.
Database
Here I am making use of Microsoft’s Northwind Database. You can download it from here.
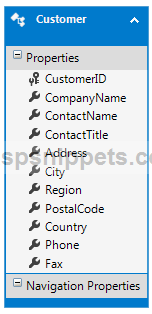
Entity Framework Model
Once the Entity Framework is configured and connected to the database table, the Model will look as shown below.
Namespaces
You will need to import the following namespace.
Controller
The Controller consists of two Action methods.
Action method for handling GET operation
Inside this Action method, the Top 10 Customer records are fetched and returned to the View.
Action method for handling the Excel File Export and Download operation
This Action method is executed when the Export Submit button is clicked.
Note: The following Action method performs File Download and hence the return type is set to FileResult.
The HTML of the Grid sent from the View is extracted from the GridHtml parameter.
The HTML string is converted into Byte Array using the GetBytes functions of the ASCII class.
Finally it is exported and downloaded as Excel file using the File function.
public class HomeController : Controller
{
// GET: Home
public ActionResult Index()
{
NorthwindEntities entities = new NorthwindEntities();
return View(from customer in entities.Customers.Take(10)
select customer);
}
[HttpPost]
[ValidateInput(false)]
public FileResult Export(string GridHtml)
{
return File(Encoding.ASCII.GetBytes(GridHtml), «application/vnd.ms-excel», «Grid.xls»);
}
}
View
Inside the View, in the very first line the Customer Entity is declared as IEnumerable which specifies that it will be available as a Collection.
For displaying the records, an HTML Table is used. A loop will be executed over the Model which will generate the HTML Table rows with the Customer records.
There is an HTML Hidden Field element which is used to send the Grid HTML content to the Controller’s Action method.
Finally there’s an HTML Submit button enclosed inside a Form with the Action method specified as Export.
When this Button will be clicked, first the HTML of the Grid (Html Table) is extracted and set into the Hidden Field element and finally the Form is submitted.
@model IEnumerable<Export_HTML_String_Excel.Customer>
@{
Layout = null;
}
<!DOCTYPE html>
<html>
<head>
<meta name=»viewport» content=»width=device-width»/>
<title>Index</title>
<style type=»text/css»>
body {
font-family: Arial;
font-size: 9pt;
}
</style>
</head>
<body>
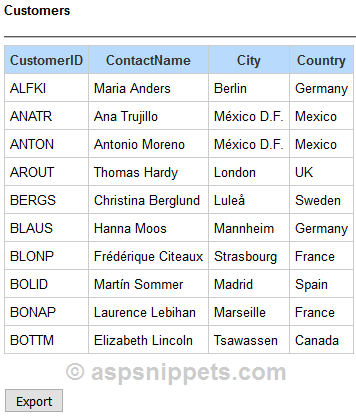
<h4>Customers</h4>
<hr/>
<div id=»Grid»>
<table cellpadding=»5″ cellspacing=»0″ style=»border: 1px solid #ccc;font-size: 9pt;«>
<tr>
<th style=»background-color: #B8DBFD;border: 1px solid #ccc»>CustomerID</th>
<th style=»background-color: #B8DBFD;border: 1px solid #ccc»>ContactName</th>
<th style=»background-color: #B8DBFD;border: 1px solid #ccc»>City</th>
<th style=»background-color: #B8DBFD;border: 1px solid #ccc»>Country</th>
</tr>
@foreach (Customer customer in Model)
{
<tr>
<td style=»width:120px;border: 1px solid #ccc»>@customer.CustomerID</td>
<td style=»width:120px;border: 1px solid #ccc»>@customer.ContactName</td>
<td style=»width:120px;border: 1px solid #ccc»>@customer.City</td>
<td style=»width:120px;border: 1px solid #ccc»>@customer.Country</td>
</tr>
}
</table>
</div>
<br/>
<br/>
@using (Html.BeginForm(«Export», «Home», FormMethod.Post))
{
<input type=»hidden» name=»GridHtml»/>
<input type=»submit» id=»btnSubmit» value=»Export»/>
}
<script type=»text/javascript» src=»http://ajax.googleapis.com/ajax/libs/jquery/1.8.3/jquery.min.js»></script>
<script type=»text/javascript»>
$(function () {
$(«#btnSubmit»).click(function () {
$(«input[name=’GridHtml’]»).val($(«#Grid»).html());
});
});
</script>
</body>
</html>
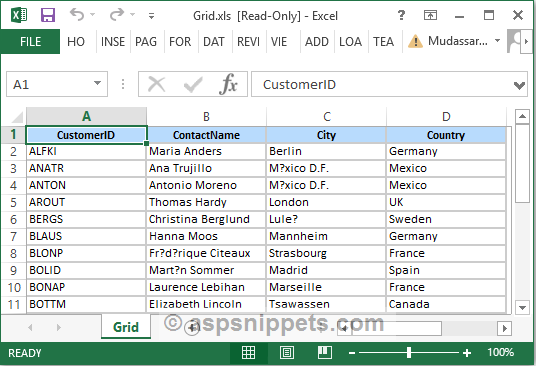
Screenshots
Grid (Html Table)
Exported Excel File
Downloads
Export HTML to Excel in ASP.NET : Here we will see how to export a HTML table;div content to excel using asp.net web form and C#.
In previous articles we explained Expand Collapse Nested Gridview, Search Location in Google Map API, WPF Multithreading Backgroundworker, Auto Refresh Page Every 5 Seconds, Color Picker using JavaScript, Hindi TextBox using Google Transliterate API, Image Gallery, Responsive Slider, and many more. Now we will move on export HTML to Excel in ASP.NET.
Following are the steps to create Export HTML to Excel in ASP.NET
Over here we use simple HTML structure to export in excel format. First add the .aspx page in your project and take some table format structure and also take one asp button to export excel sheet. See below code for more instruction and also you can download the demo project with full source code.
ADD .ASPX PAGE
<%@ Page Language="C#" AutoEventWireup="true" CodeFile="ExportHTMLExcel.aspx.cs"  Inherits="ExportHTMLExcel" %>
<title>Export HTML to Excel</title>
<form id="form1" runat="server">
   <div>
      <div id="dvInfo" runat="server">
         <center>
            <b>Student Informations Generated By CODE SCRATCHER</b>
         </center>
         <table align="center" border="1" bordercolor="#00aeef" width="50%" class="reporttable1" cellspacing="0" cellpadding="0" style="font-size: 10;">
            <tbody>
               <tr align="center">
                  <td style="width: 10%">
                     <b>RollNo</b>
                  </td>
                  <td>
                     <b>Name</b>
                  </td>
                  <td>
                     <b>College Name</b>
                  </td>
               </tr>
               <tr>
                  <td>
                     A1
                  </td>
                  <td>
                     Rahul
                  </td>
                  <td>
                     College of Eng
                  </td>
               </tr>
               <tr>
                  <td>
                     A2
                  </td>
                  <td>
                     Ramesh
                  </td>
                  <td>
                     College of IT
                  </td>
               </tr>
            </tbody>
         </table>
      </div>
      <center>
         <asp:button id="Button2" runat="server" style="height: 30px;" onclick="Button2_Click" text="Export HTML to Excel">
         </asp:button>
      </center>
   </div>
</form>
ADD CODE-BEHIND SOURCE
using System;
using System.Data;
using System.Configuration;
using System.Collections;
using System.Web;
using System.Web.Security;
using System.Web.UI;
using System.Web.UI.WebControls;
using System.Web.UI.WebControls.WebParts;
using System.Web.UI.HtmlControls;
using System.Text;

public partial class ExportHTMLExcel : System.Web.UI.Page
{
    StringBuilder StrHtmlGenerate = new StringBuilder();
    StringBuilder StrExport = new StringBuilder();

    protected void Page_Load(object sender, EventArgs e)
    {

    }

    protected void Button2_Click(object sender, EventArgs e)
    {
        StrExport.Append(@"");
        StrExport.Append(@"
“); StrExport.Append(”
“); StrExport.Append(dvInfo.InnerHtml); StrExport.Append(“
“); string strFile = “StudentInformations_CODESCRATCHER.xls”; string strcontentType = “application/excel”; Response.ClearContent(); Response.ClearHeaders(); Response.BufferOutput = true; Response.ContentType = strcontentType; Response.AddHeader(“Content-Disposition”, “attachment; filename=” + strFile); Response.Write(StrExport.ToString()); Response.Flush(); Response.Close(); Response.End(); } }
RUN PROJECT AND CHECK FINAL OUTPUT

Source Code

What do you think of this article? Export HTML to Excel in ASP.NET
If you have ideas about this article, or an opinion on how we can make it better, then let us know by emailing…
help@codescratcher.com
Incoming search terms
How to export html table to excel using asp.net/c#, c# – export html file to excel using asp.net, Export HTML Table to Excel using ASP.NET, Export ASP.NET to Excel, Export Asp.net Table to Excel, Export div structure to excel using ASP.NET.
Post Views:
6,446
Syncfusion Excel (XlsIO) Library is a .NET Excel library that allows users to export data from various data sources to Excel worksheets in C# and VB.NET. This library allows you to export even HTML tables to Excel worksheets. This feature will be useful when there is a need to extract data from an HTML document and manage it.
If you are looking for easy steps to do this, then you are in the right place.
Consider a scenario where you have webpages with HTML tables. To retrieve data from each webpage, you might need to copy the tables in the page manually. To automate this process, XlsIO provides the support to export any number of HTML tables in a webpage to an Excel worksheet. This makes the work simple and saves time, too. The export includes the table formatting, as well.
Let’s see how to export HTML tables from a webpage to Excel worksheets in C# using XlsIO.
Export HTML table
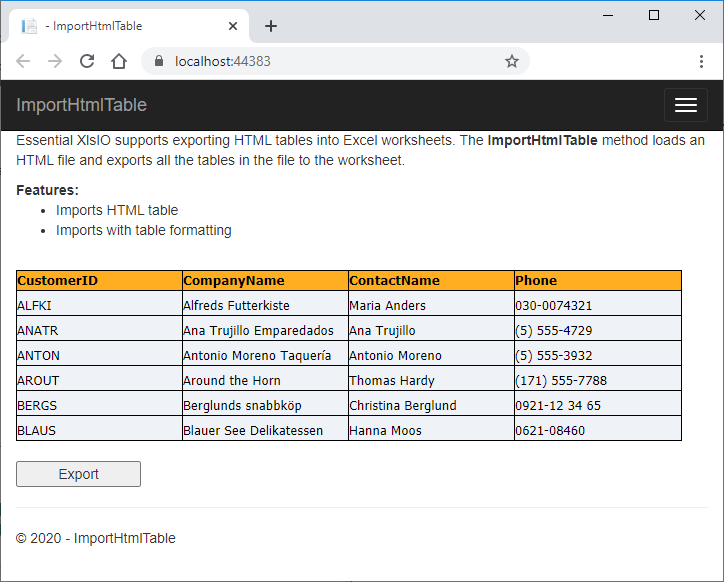
The ImportHtmlTable method loads an HTML file and imports all the tables in the file to the worksheet. This import operation includes the table formatting that is defined within the HTML file.
For demonstration, I am going to create an ASP.NET Core application to export HTML tables to an Excel worksheet using the Syncfusion XlsIO library.
Step 1: Create an ASP.NET Core project.
Step 2: Add a view; I am naming it ExportHtmlTables.cshtml. Add the following sample code. This code contains an HTML table in the HTML DIV, a hidden field, and an Export button. This button has been assigned a jQuery click event handler to copy the contents of the HTML DIV to the hidden field, so that the HTML string can be sent to the server.
@{Html.BeginForm("ImportHtmlTable", "ImportHtmlTable", FormMethod.Post);
{
<div class="Common">
<div class="tablediv">
<div class="rowdiv">
<p>
Essential XlsIO supports exporting HTML tables into Excel worksheets. The <b>ImportHtmlTable</b> method loads an HTML file and exports all the tables in the file to the worksheet.
</p>
<b>Features:</b>
<br />
<ul>
<li>Imports HTML table</li>
<li>Imports with table formatting </li>
</ul>
<br />
<div id="cssStyle">
<style type="text/css">
th {
color:rgb(0,0,0);
font-family:Tahoma, sans-serif;
font-size:10pt;
white-space:nowrap;
background-color:rgb(255,174,33);
border-top:solid;
border-top-width: thin;
border-bottom:solid;
border-bottom-width:thin;
border-left:solid;
border-left-width:thin;
border-right:solid;
border-right-width:thin;
border-top-color:rgb(0,0,0);
border-bottom-color:rgb(0,0,0);
border-left-color:rgb(0,0,0);
border-right-color:rgb(0,0,0);
font-weight:bold;
vertical-align:bottom;
}
td {
color:rgb(0,0,0);
font-family:Tahoma, sans-serif;
font-size:10pt;
white-space:nowrap;
background-color:rgb(239,243,247);
border-left:solid;
border-left-width:thin;
border-right:solid;
border-right-width:thin;
border-top-color:rgb(0,0,0);
border-bottom-color:rgb(0,0,0);
border-bottom:solid;
border-bottom-width:thin;
border-left-color:rgb(0,0,0);
border-right-color:rgb(0,0,0);
vertical-align:bottom;
}
</style>
</div>
<div id="Grid">
<table cellspacing="0" width="500" style="table-layout:fixed;border-collapse:collapse;width:500pt">
<tr>
<th class="X64" style="text-align:left;">
<span>CustomerID</span>
</th>
<th class="X64" style="text-align:left;">
<span>CompanyName</span>
</th>
<th class="X64" style="text-align:left;">
<span>ContactName</span>
</th>
<th class="X64" style="text-align:left;">
<span>Phone</span>
</th>
</tr>
<tr height="25">
<td class="X65" style="text-align:left;">
<span>ALFKI</span>
</td>
<td class="X65" style="text-align:left;">
<span>Alfreds Futterkiste</span>
</td>
<td class="X65" style="text-align:left;">
<span>Maria Anders</span>
</td>
<td class="X65" style="text-align:left;">
<span>030-0074321</span>
</td>
</tr>
<tr height="25">
<td class="X65" style="text-align:left;">
<span>ANATR</span>
</td>
<td class="X65" style="text-align:left;">
<span>Ana Trujillo Emparedados</span>
</td>
<td class="X65" style="text-align:left;">
<span>Ana Trujillo</span>
</td>
<td class="X65" style="text-align:left;">
<span>(5) 555-4729</span>
</td>
</tr>
<tr height="25">
<td class="X65" style="text-align:left;">
<span>ANTON</span>
</td>
<td class="X65" style="text-align:left;">
<span>Antonio Moreno Taquería</span>
</td>
<td class="X65" style="text-align:left;">
<span>Antonio Moreno</span>
</td>
<td class="X65" style="text-align:left;">
<span>(5) 555-3932</span>
</td>
</tr>
<tr height="25">
<td class="X65" style="text-align:left;">
<span>AROUT</span>
</td>
<td class="X65" style="text-align:left;">
<span>Around the Horn</span>
</td>
<td class="X65" style="text-align:left;">
<span>Thomas Hardy</span>
</td>
<td class="X65" style="text-align:left;">
<span>(171) 555-7788</span>
</td>
</tr>
<tr height="25">
<td class="X65" style="text-align:left;">
<span>BERGS</span>
</td>
<td class="X65" style="text-align:left;">
<span>Berglunds snabbköp</span>
</td>
<td class="X65" style="text-align:left;">
<span>Christina Berglund</span>
</td>
<td class="X65" style="text-align:left;">
<span>0921-12 34 65</span>
</td>
</tr>
<tr height="25">
<td class="X65" style="text-align:left;">
<span>BLAUS</span>
</td>
<td class="X65" style="text-align:left;">
<span>Blauer See Delikatessen</span>
</td>
<td class="X65" style="text-align:left;">
<span>Hanna Moos</span>
</td>
<td class="X65" style="text-align:left;">
<span>0621-08460</span>
</td>
</tr>
</table>
</div>
</div>
<br />
<input name="tableHTML" id="tbl" hidden="hidden"/>
<div class="rowdiv">
<div class="celldiv">
<input id="ExportTbl" class="buttonStyle" type="submit" name="button" value="Export" onclick="exportHTML()" style="width:125px;" />
</div>
</div>
</div>
</div>
Html.EndForm();
} }
<script type="text/javascript">
function exportHTML() {
let value = "<html>" + document.getElementById("cssStyle").innerHTML + "<body>" + document.getElementById("Grid").innerHTML + "</body></html>";
value = value.replace("<tbody>", "");
value = value.replace("</tbody>", "");
document.getElementById("tbl").setAttribute("value", value);
}
</script>
This code will create the webpage shown in the following screenshot.
Step 3: Create an Excel document in the controller class ExportHtmlTableController.cs.
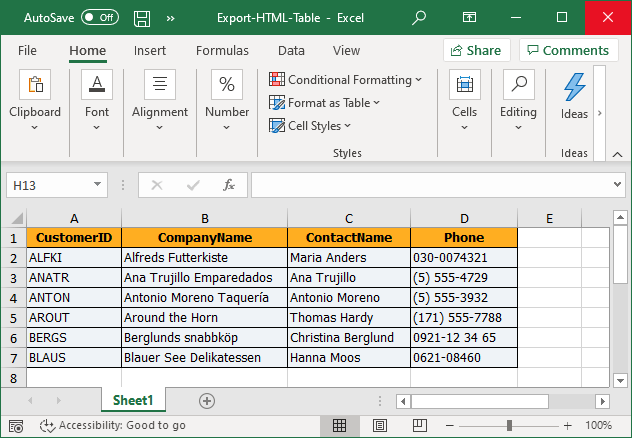
Step 4: The HTML string parsed into the hidden field is now passed to the click event. Then, convert the HTML string into a stream and load it using the ImportHtmlTable method, then export it to an Excel worksheet. The start row and column must be specified while exporting them. After exporting to a worksheet, auto fit the rows and columns and save the output Excel file.
The following code example shows how to export a webpage with an HTML table to an Excel worksheet in C# using XlsIO.
        public ActionResult ImportHtmlTable(string button, string tableHTML)
        {
            if (button == null)
                return View();

            MemoryStream ms = new MemoryStream();

            // The instantiation process consists of two steps.
            // Step 1: Instantiate the spreadsheet creation engine.
            using (ExcelEngine excelEngine = new ExcelEngine())
            {

                // Step 2 : Instantiate the Excel application object.
                IApplication application = excelEngine.Excel;
                application.DefaultVersion = ExcelVersion.Excel2016;

                // A workbook is created.
                IWorkbook workbook = application.Workbooks.Create(1);

                // The first worksheet object in the worksheets collection is accessed.
                IWorksheet worksheet = workbook.Worksheets[0];

                byte[] byteArray = Encoding.UTF8.GetBytes(tableHTML);

                MemoryStream file = new MemoryStream(byteArray);

                // Imports HTML table into the worksheet from first row and first column.
                worksheet.ImportHtmlTable(file, 1, 1);

                worksheet.UsedRange.AutofitColumns();
                worksheet.UsedRange.AutofitRows();

                workbook.SaveAs(ms);
                ms.Position = 0;
            }

            return File(ms, "Application/vnd.openxmlformats-officedocument.spreadsheetml.sheet", "Export-HTML-Table.xlsx");
        }
Note: You can also use this ImportHtmlTable method to load an HTML file from a disk to export the HTML tables to an Excel worksheet. For that, you need to specify the starting row and column values while importing the HTML file. Refer to the following code example.
    //Exports HTML tables to the worksheet from first row and first column.
    worksheet.ImportHtmlTable("Import-HTML-Table.html", 1, 1);
The following screenshot is the output of the Excel file exported from the webpage with the HTML table.
GitHub samples
You can download the example of exporting HTML tables to Excel worksheets in C# on this GitHub page.
Wrapping up
As you can see, Syncfusion Excel (XlsIO) Library provides support to easily export HTML tables to Excel in C#. Take a moment to peruse the documentation, where you’ll find other importing options and features like data tables, collection objects, a grid view, data column, and CSV, all with accompanying code samples.
Using the XlsIO library, you can also export Excel data to PDF, image, data table, CSV, TSV, HTML, collections of objects, ODS , JSON, and more file formats.
If you are new to our Excel Library, it is highly recommended to follow our Getting Started guide.
Are you already a Syncfusion user? You can download the product setup here. If you’re not yet a Syncfusion user, you can download a free, 30-day trial here.
If you have any questions about these features, please let us know in the comments section below. You can also contact us through our support forum, Direct-Trac, or feedback portal. We are always happy to assist you!
Related Blogs
- 6 Easy Ways to Export Data to Excel in C#
- How to Export Data from SQL Server to Excel Table in C#
- Export Data from Collection to Excel and Group It in C#
- Export Data to a Predefined Excel Template in C#
A very common need of any reporting solution is to give user ability to export the report content as Excel or PDF once he/she has viewed the report in the browser as HTML. It is a not a new thing to deal with the HTML tables in ASP.NET. However, usage of MVC makes the things a bit complex and hence, it is required by the ASP.NET Developer to consider it seriously.
You may have an idea earlier about reading Microsoft Excel data files using Excel Data Reader library and the ways to display that data in ASP.NET MVC based web application. In this post, I am going to suggest how that data can be exported to Excel file using same application with the help of ASP.NET Framework. So, check out the coding examples displayed below.
Create excel or Export Excel from Html Table using MVC (asp.net MVC)
1) First Create HTML or CSHTML extension File:-
- There Is No Required html body etc.
- If You Are Using Asp.net MVC Partial Page Your Page Extension Is “.CSHTML”
Example:-
<div style="margin-top:10px;"></div>
    <table style="border:1px solid black;padding:5px;font-weight:100">
        <tbody style="border:1px solid black;padding:5px;font-weight:100"><tr style="border:1px solid black;padding:5px;font-weight:100">
        <td colspan = "5" style ="text-align:center;border:1px solid black">
            <h1 style="color:red;text-decoration:underline">Your Invoice</h1></td>
        </tr>

        <tr>
            <td colspan="5" style="border:1px solid black;padding:5px;font-weight:100">Searching criteria</td>
        </tr>

        <tr>
            <td colspan="2" style="border:1px solid black;padding:5px;font-weight:100">Search Param 1</td>
            <td colspan="3" style="border:1px solid black;padding:5px;font-weight:100">8821650318629</td>
        </tr>
        <tr>
            <td colspan="2" style="border:1px solid black;padding:5px;font-weight:100">Period</td>
            <td colspan="3" style="border:1px solid black;padding:5px;font-weight:100">04/04/2017 - 03/05/2017</td>
        </tr>
        <tr>
            <td colspan="2" style="border:1px solid black;padding:5px;font-weight:100">Search Param 2</td>
            <td colspan="3" data-xls-col-index="2">Call Details</td>
        </tr>
        <tr>
            <td colspan="3" style="border:1px solid black;padding:5px;font-weight:100"> GPS Location Information</td>
            <td colspan="2" style="border:1px solid black;padding:5px;font-weight:100"> -</td>
        </tr>
        <tr>
            <td colspan="2" style="border:1px solid black;padding:5px;font-weight:100">Search Param 3</td>
            <td colspan="3" style="border:1px solid black;padding:5px;font-weight:100">MS - ORIGINATING</td>
        </tr>
        <tr>
            <td colspan="3" style="border:1px solid black;padding:5px;font-weight:100">MS - TERMINATING</td>
            <td colspan="2" style="border:1px solid black;padding:5px;font-weight:100"> -</td>
        </tr>
        <tr>
            <td colspan="5" style="border:1px solid black;padding:5px;font-weight:100">Summary Report</td>
        </tr>
        <tr>
            <td colspan="5" style="border:1px solid black;padding:5px;font-weight:100">Originating Call Details</td>
        </tr>
        <tr>
            <td style="border:1px solid black;padding:5px;font-weight:100">Number calling</td>
            <td style="border:1px solid black;padding:5px;font-weight:100">Number called</td>
            <td style="border:1px solid black;padding:5px;font-weight:100">Date(YYYY/MM/DD HH:MM:SS) </td>
            <td style="border:1px solid black;padding:5px;font-weight:100">Call Duration(sec) </td>
            <td style="border:1px solid black;padding:5px;font-weight:100">Country</td>
        </tr>
        <tr>
            <td style="border:1px solid black;padding:5px;font-weight:100">8821650318629 </td>
            <td style="border:1px solid black;padding:5px;font-weight:100">393662555630 </td>
            <td style="border:1px solid black;padding:5px;font-weight:100">2017/05/02 16:31:17 </td>
            <td style="border:1px solid black;padding:5px;font-weight:100">0 </td>
            <td style="border:1px solid black;padding:5px;font-weight:100">Mediterranean Sea</td>
        </tr>
        <tr>
            <td style="border:1px solid black;padding:5px;font-weight:100">
                8821650318629 </td >
                <td style="border:1px solid black;padding:5px;font-weight:100"> 393662555630 </td >
                <td style="border:1px solid black;padding:5px;font-weight:100" > 2017 / 05 / 02 03:40:30
            </td>
            <td style="border:1px solid black;padding:5px;font-weight:100">
                0 </td >
                <td style="border:1px solid black;padding:5px;font-weight:100"> Italy </td >
                </tr >
                <tr >
                <td colspan= "5" style="border:1px solid black;padding:5px;font-weight:100">Terminating Call Details
            </td>
        </tr>
        <tr>
            <td style="border:1px solid black;padding:5px;font-weight:100">Number calling</td>
            <td style="border:1px solid black;padding:5px;font-weight:100">Number called</td>
            <td style="border:1px solid black;padding:5px;font-weight:100">Date(YYYY/MM/DD HH:MM:SS) </td>
            <td style="border:1px solid black;padding:5px;font-weight:100">Call Duration(sec) </td>
            <td style="border:1px solid black;padding:5px;font-weight:100">Country</td>
        </tr>
        <tr>
            <td  colspan="5" style="border:1px solid black;padding:5px;font-weight:100">No Record found.</td>
        </tr>
        <tr>
            <td colspan="5" style="border:1px solid black;padding:5px;font-weight:100">GPS Location Information</td>
        </tr>
        <tr>
            <td style="border:1px solid black;padding:5px;font-weight:100">IMEI</td>
            <td style="border:1px solid black;padding:5px;font-weight:100">Date(YYYY/MM/DD HH:MM:SS) </td>
            <td style="border:1px solid black;padding:5px;font-weight:100">Country</td>
            <td style="border:1px solid black;padding:5px;font-weight:100">Latitude</td>
            <td style="border:1px solid black;padding:5px;font-weight:100">Longitude</td>
        </tr>
        <tr>
            <td style="border:1px solid black;padding:5px;font-weight:100">3560130010789500 </td>
            <td style="border:1px solid black;padding:5px;font-weight:100">2017/05/03 16:02:51 </td>
            <td style="border:1px solid black;padding:5px;font-weight:100">ITALY</td>
            <td style="border:1px solid black;padding:5px;font-weight:100">45.220586 </td>
            <td style="border:1px solid black;padding:5px;font-weight:100">12.282395 </td>
        </tr>

        </tbody>
    </table>
2) Second We Need To Create Action Method From Which We Use:-
It is a Get Action Request Action Method Write This Code in Your Controller
using System;
Using System.Collections.Generic;
Using System.Data.Entity;
using System.Data.Entity.Validation;
Using System.IO;
Using System.Linq;
Using System.Text;
Using System.Web;
Using System.Web.Mvc;
Using AngularFirstWithMVC.DataEntity;
Using AngularFirstWithMVC.Filter;
using AngularFirstWithMVC.Models;

namespace AngularFirstWithMVC.Controllers
{
    [Authorize]
    public class EmployeeController : Controller
    {

 public ActionResult Export()
        {
            return View();

        }
    }
}
3) Third We Need To Create View of Export Action Method:-
For User View We need Create View of Export Action Method View by Following Steps
1).Right Click on Export Action Method
2).Choose Create View Option
3). finally create Empty View like This
A). View name: Export (already Inserted When You Create View from Action Method)
b). Template: Select Empty (Without model) Option because we do note any model in this action method
c). Model class: set To Be Empty
d). Data Context Class: set To Be Empty
e). Select Option
1). Create as a Partial View (leave unchecked the Check box)
2). Render Script Library (leave unchecked the Check box)
3). Use a Layout Page (Checked the Check box), and select path of layout Page
e). finally click on add Button
4) Fourth We Need To Design View of Export Action Method:-
You need to write Your Code of View Manfully because you select template type is Empty
This Is View design Code
`
@{
    ViewBag.Title = "Employee List";
    Layout = "~/Views/Shared/_Layout.cshtml";
}
@using (Html.BeginForm())
{

    @Html.Partial("invoice")

    <input type="submit" value="Convert To Excel" />
}
In Above Code we use Layout Page and Also Used HTml.BeginForm for Submitting on Post Method of Export
5) Fifth We Need To Post Verb Type of Export Action Method:-
Here the Code of Post Method Of Export Action Method With Get Action Method
using System;
using System.Collections.Generic;
using System.Data.Entity;
using System.Data.Entity.Validation;
using System.IO;
using System.Linq;
using System.Text;
using System.Web;
using System.Web.Mvc;
using AngularFirstWithMVC.DataEntity;
using AngularFirstWithMVC.Filter;
using AngularFirstWithMVC.Models;

namespace AngularFirstWithMVC.Controllers
{
    [Authorize]
    public class EmployeeController : Controller
    {
//Get httpVerb Method
 public ActionResult Export()
        {
            return View();

        }
//Post httpVerb Method
        [HttpPost]
        [ValidateInput(false)]
        public FileResult Export(FormCollection frm)
        {
            string body = string.Empty;

            using (StreamReader reader = new StreamReader(Server.MapPath("~/Views/Shared/invoice.cshtml")))
            {
                body = reader.ReadToEnd();
            }

            return File(Encoding.ASCII.GetBytes(body), "application/vnd.ms-excel", "Grid.xls");
        }
    }
}
Important Notes:
1). Here We Used [validate Input (false)] Attribute to allow a String input that contain Tags if we Do not use this attribute Server Not allow to input html string into the post request
2). FormCollection Class Indicate The Entire Form Element from Where the post request Come
3). We Are Using StreamReader Class to read string from Html or partial Cshtml file (which content Table Data
4). We Use Action Result type file because we return file type content which extension is .xls
Hope You like it. If you guys have any query regarding this than let me know at my mail I’d: [email protected], I will definitely try to solve it.