
Improve Article
Save Article
Like Article
Improve Article
Save Article
Like Article
MS Excel is a powerful tool for handling huge amounts of tabular data. It can be particularly useful for sorting, analyzing, performing complex calculations and visualizing data. In this article, we will discuss how to extract a table from a webpage and store it in Excel format.
Step #1: Converting to Pandas dataframe
Pandas is a Python library used for managing tables. Our first step would be to store the table from the webpage into a Pandas dataframe. The function read_html() returns a list of dataframes, each element representing a table in the webpage. Here we are assuming that the webpage contains a single table.
Output
         0       1        2           3    4
0  ROLL_NO    NAME  ADDRESS       PHONE  AGE
1        1     RAM    DELHI  9455123451   18
2        2  RAMESH  GURGAON  9652431543   18
3        3   SUJIT   ROHTAK  9156253131   20
4        4  SURESH    DELHI  9156768971   18
Step #2: Storing the Pandas dataframe in an excel file
For this, we use the to_excel() function of Pandas, passing the filename as a parameter.
Output: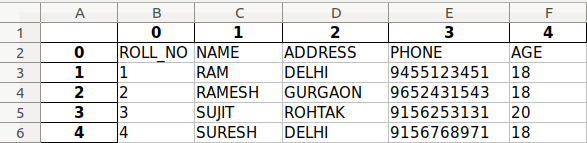
In case of multiple tables on the webpage, we can change the index number from 0 to that of the required table.
Like Article
Save Article
Project description
HTML2Excel Documentation
Library to convert HTML Tables to Excel file.
While libraries like pandas do read html files, they often don’t work with merged cells and line breaks.
This library was created with the sole intention of converting HTML tables to Excel files
as they’re seen while opening them with softwares such as MS Excel and LibreOffice.
A sample flask host code is provided in this link
Installation
pip install html2excel
Usage
Running from command line
python -m html2excel input_file output_file
Using as package
from html2excel import ExcelParser

input_file = '/tmp/text_file.html'
output_file = '/tmp/converted_file.xlsx'

parser = ExcelParser(input_file)
parser.to_excel(output_file)
Download files
Download the file for your platform. If you’re not sure which to choose, learn more about installing packages.
Source Distribution
Built Distribution

tablepyxl — A python library to convert html tables to Excel
Introduction
Tablepyxl is a bridge between html tables and openpyxl.
If you can make an html table, you can make an Excel workbook.
Usage
If your html table is in a string, you can write an Excel file with the document_to_xl function:
from tablepyxl import tablepyxl

table = "<table>"
        " <thead>"
        "  <tr>"
        "   <th>Header 1</th>"
        "   <th>Header 2</th>"
        "  </tr>"
        " </thead>"
        " <tbody>"
        "  <tr>"
        "   <td>Cell contents 1</td>"
        "   <td>Cell contents 2</td>"
        "  </tr>"
        " </tbody>"

tablepyxl.document_to_xl(table, "/path/to/file")
If your html table is in a file, read it into a string first:
from tablepyxl import tablepyxl

doc = open("/file/with/html/table", "r")
table = doc.read()

tablepyxl.document_to_xl(table, "/path/to/output")
Convert your html to an openpyxl workbook object instead of a file so that you can do further work:
from tablepyxl import tablepyxl

doc = open("/file/with/html/table", "r")
table = doc.read()

wb = tablepyxl.document_to_wb(table)

# For example, you can add another document to the same workbook
# in a new sheet:
doc2 = open("/file/with/html/table2", "r")
table2 = doc2.read()

wb = tablepyxl.document_to_wb(table, wb=wb)
Notes:
- A document with more than one table will write each table to a separate sheet
- Sheet names match the name attribute of the table element
- Multiple tables can be added to the same sheet using the
insert_tablemethod.
Styling and Formatting
Tablepyxl intends to support all of the style and formatting options supported by Openpyxl. Here are the
currently supported styles:
Font
- bold via the font-weight style, e.g.
<td style="font-weight:bold;"> - color via the color style, e.g.
<td style="color:ff0000">
Alignment
- horizontal via the text-align style
- vertical via the vertical-align style
- wrap_text via the white-space style
Fill
- Solid background color via the background-color style
Border
- style and color for the top border via border-top-style and border-top-color styles
Cell types
Cell types can be set by adding any of the following classes to the td element:
- TYPE_STRING
- TYPE_FORMULA
- TYPE_NUMERIC
- TYPE_BOOL
- TYPE_CURRENCY
- TYPE_NULL
- TYPE_INLINE
- TYPE_ERROR
- TYPE_FORMULA_CACHE_STRING
- TYPE_INTEGER
Number formatting
- Currency is formatted using FORMAT_CURRENCY_USD_SIMPLE
- Dates are formatted using ‘mm/dd/yyyy’
- Numeric values are formatted with commas every 3 digits if the commas are present in the html
Merging
- Cells can be merged using the colspan and rowspan attributes of td elements
License
MIT (http://opensource.org/licenses/MIT)
Contributors
- amehjabeen
- bmdavi3
- scottsexton
I have been given a task to create a Python file that will take the data from an HTML table and export the data into an Excel sheet.
I have the Python file created and want to test it now. I have created the HTML with a sample table with data in it.
I have to create javascript to take the table data and send it to the Python file for processing. I am using a button to set the action.
Javascript
$("button").click(
    function(){
        //What should go here?
    }
);
You probably don’t need it but if you want to see the HTML I can post it as well, but it is really just a table and a button. Pretty straight forward. The Python file is pretty complex so I’d rather not post it. I just need to know how to get the table data and export it to the Python file for processing.
Thanks!
To clarify. I am hard-coding a table in HTML for testing purposes. A sample user should be able to go to the web page and view the table. Then have the option to export the table into an excel sheet to save on their computer. So I have created a button «Export» to start this process, but don’t know how to get the hard-coded data to the python script
asked Feb 17, 2012 at 16:51
![]()
amlane86amlane86
6684 gold badges15 silver badges24 bronze badges
1
I see two parts to this problem:
- Extracting the data from the HTML table.
- Exporting the data in a format understandable by Excel.
Extracting data from HTML table
I’ve not actually done this before, but there are answers already on StackOverflow that explain several ways of doing with the aid of Python libraries like lxml or BeautifulSoup.
The easiest way of doing this is actually to avoid doing it at all. Will you have access to the data that was used to create the HTML table, and can you use that directly instead?
Exporting data to a spreadsheet
The Excel file formats (.xls, .xlsx) are programatically hard to deal with. However Excel will also read files in the .csv (Comma Separated Value) format, which is just a plain text file and therefore much easier to deal with.
The Python csv library is dead easy to use — see the documentation for the csv module.
![]()
answered Feb 17, 2012 at 18:40
![]()
Li-aung YipLi-aung Yip
12.2k5 gold badges33 silver badges49 bronze badges
2
In general:
Link to a page that sends out an EXCEL Mime header. Then just spit out an HTML page with a table in it. I’m not sure how this works on Python.
This may help:
Do all browsers support excel respond?
![]()
answered Feb 17, 2012 at 16:57
![]()
I am not certain I agree with the approach 100%, unless you are screen scrapping from a server you have no control over.
If you do have control over the server providing the data, I would pass the variables that generated the table to begin with back to python and conduct another database query specific to this request.
From there, generating an excel file is easy, by using python-excel.
I’m also not sure what you mean by «export»? Is this something to be downloaded by the client, or something emailed when the user presses go, or something else?
Which webframework are you working in (if any)?
answered Feb 17, 2012 at 17:16
![]()
James RJames R
4,5513 gold badges30 silver badges45 bronze badges
1
Today we are going to see how we can scrape Wikipedia table information using Python and BeautifulSoup into an Excel sheet simply and elegantly.
This article aims to get you started on a real-world problem solving while keeping it super simple, so you get familiar and get practical results as fast as possible.
So the first thing we need is to make sure we have Python 3 installed. If not, you can just get Python 3 and get it installed before you proceed.
Then you can install beautiful soup with.
pip3 install beautifulsoup4We will also need the libraries requests, lxml and soupsieve to fetch data, break it down to XML and to use CSS selectors. Install them using.
pip3 install requests soupsieve lxmlOnce installed, open an editor and type in.
# -*- coding: utf-8 -*-
from bs4 import BeautifulSoup
import requests
Now let’s go to the Wikipedia List of Football Champions page and inspect the data we can get.
This is how it looks.

Back to our code now. Let’s try and get this data by pretending we are a browser like this.
# -*- coding: utf-8 -*-
from bs4 import BeautifulSoup
import requests
import csv


headers = {'User-Agent':'Mozilla/5.0 (Macintosh; Intel Mac OS X 10_11_2) AppleWebKit/601.3.11 (KHTML, like Gecko) Version/9.0.2 Safari/601.3.9',
'Accept-Encoding': 'identity'
}
#'Accept-Encoding': 'identity'


url = 'https://en.wikipedia.org/wiki/List_of_English_football_champions'

response=requests.get(url,headers=headers)

#print(response.content)

soup=BeautifulSoup(response.content,'lxml')
Save this as scrapeTable.py.
If you run it
python3 scrapeTable.pyYou will see the whole HTML page.
Now, let’s use CSS selectors to get to the data we want… To do that, let’s go back to Chrome and open the inspect tool. We now need to get to all the table details. We notice that with the class ‘wikitable’ holds all the individual table details together.

Let’s write code that traverses the Table rows and then the columns like this.
# -*- coding: utf-8 -*-
from bs4 import BeautifulSoup
import requests
import csv


headers = {'User-Agent':'Mozilla/5.0 (Macintosh; Intel Mac OS X 10_11_2) AppleWebKit/601.3.11 (KHTML, like Gecko) Version/9.0.2 Safari/601.3.9',
'Accept-Encoding': 'identity'
}
#'Accept-Encoding': 'identity'


url = 'https://en.wikipedia.org/wiki/List_of_English_football_champions'

response=requests.get(url,headers=headers)

#print(response.content)

soup=BeautifulSoup(response.content,'lxml')


for item in soup.select('.wikitable')[2]:
	try:

		for trow in item.select('tr'):
			cnt=0
			row_data = []
			for tcell in trow.select('td'):
				if (len(tcell.get_text().strip())>0):
					print(tcell.get_text().strip())
				cnt=cnt 1
			if (cnt>3):
				print('---------------------------')


	except Exception as e:
		#raise e
		print('')
So when you run it, you get.

Bingo!! We got the table data.
Now, let’s push the code into Excel by using CSV exports. For this, we will use the CSV module in Python
with open('winner.csv', 'a', newline='') as file:
    writer = csv.writer(file)
    writer.writerow(["Year", "Champions", "Runners-up", "Third-place", "Top Goal Scorer", "Goals"])
That code creates the header row of the CSV.
And the following code adds the column details stored in a list after every row is finished.
for tcell in trow.select('td'):
				if (len(tcell.get_text().strip())>0):
					print(tcell.get_text().strip())
					row_data.append(tcell.get_text().strip())
				cnt=cnt 1
			if (cnt>3):
				print('---------------------------')
				with open('winner.csv', 'a', newline='') as file:
					writer = csv.writer(file)
					writer.writerow(row_data)
Here is how it looks all together.
# -*- coding: utf-8 -*-
from bs4 import BeautifulSoup
import requests
import csv


headers = {'User-Agent':'Mozilla/5.0 (Macintosh; Intel Mac OS X 10_11_2) AppleWebKit/601.3.11 (KHTML, like Gecko) Version/9.0.2 Safari/601.3.9',
'Accept-Encoding': 'identity'
}
#'Accept-Encoding': 'identity'


url = 'https://en.wikipedia.org/wiki/List_of_English_football_champions'

response=requests.get(url,headers=headers)

#print(response.content)

soup=BeautifulSoup(response.content,'lxml')

with open('winner.csv', 'a', newline='') as file:
    writer = csv.writer(file)
    writer.writerow(["Year", "Champions", "Runners-up", "Third-place", "Top Goal Scorer", "Goals"])

for item in soup.select('.wikitable')[2]:
	try:

		for trow in item.select('tr'):
			cnt=0
			row_data = []
			for tcell in trow.select('td'):
				if (len(tcell.get_text().strip())>0):
					print(tcell.get_text().strip())
					row_data.append(tcell.get_text().strip())
				cnt=cnt 1
			if (cnt>3):
				print('---------------------------')
				with open('winner.csv', 'a', newline='') as file:
					writer = csv.writer(file)
					writer.writerow(row_data)


	except Exception as e:
		#raise e
		print('')
That when run, it will print the results like earlier but will also create a CSV file in addition.
You can open the file in Excel to see the following data.

That was fun
If you want to use this in production and want to scale to thousands of links, then you will find that you will get IP blocked easily by many websites. In this scenario, using a rotating proxy service to rotate IPs is almost a must. You can use a service like Proxies API to route your calls through a pool of millions of residential proxies.
If you want to scale the crawling speed and dont want to set up you own infrastructure, you can use our Cloud base crawler crawltohell.com to easily crawl thousands of URLs at high speed from our network of crawlers.
What will we cover in this tutorial?
Yes, you can do it manually. Copy from an HTML table and paste into an Excel spread sheet. Or you can dive into how to pull data directly from the internet into Excel. Sometimes it is not convenient, as some data needs to be transformed and you need to do it often.
In this tutorial we will show how this can be easily automated with Python using Pandas.
That is we go from data that needs to be transformed, like, $102,000 into 102000. Also, how to join (or merge) different datasources before we create a Excel spread sheet.
Step 1: The first data source: Revenue of Microsoft
There are many sources where you can get this data, but Macrotrends has it nicely in a table and for more than 10 years old data.
First thing first, let’s try to take a look at the data. You can use Pandas read_html to get the data from the tables given a URL.
import pandas as pd

url = "https://www.macrotrends.net/stocks/charts/MSFT/microsoft/revenue"
tables = pd.read_html(url)
revenue = tables[0]
print(revenue)
Where we know it is in the first table on the page. A first few lines of the output is given here.
    Microsoft Annual Revenue(Millions of US $) Microsoft Annual Revenue(Millions of US $).1
0                                         2020                                     $143,015
1                                         2019                                     $125,843
2                                         2018                                     $110,360
3                                         2017                                      $96,571
4                                         2016                                      $91,154
First thing to manage are the column names and setting the year to the index.
import pandas as pd

url = "https://www.macrotrends.net/stocks/charts/MSFT/microsoft/revenue"
tables = pd.read_html(url)
revenue = tables[0]
revenue.columns = ['Year', 'Revenue']
revenue = revenue.set_index('Year')
print(revenue)
A first few lines.
      Revenue
Year
2020  $143,015
2019  $125,843
2018  $110,360
2017   $96,571
2016   $91,154
That helped. But then we need to convert the Revenue column to integers. This is a bit tricky and can be done in various ways. We first need to remove the $-sign, then the comma-sign, before we convert it.
revenue['Revenue'] = pd.to_numeric(revenue['Revenue'].str[1:].str.replace(',',''), errors='coerce')
And that covers it.
Step 2: Getting another data source: Free Cash Flow for Microsoft
We want to combine this data with the Free Cash Flow (FCF) of Microsoft.
The data can be gathered the same way and column and index can be set similar.
import pandas as pd

url = "https://www.macrotrends.net/stocks/charts/MSFT/microsoft/free-cash-flow"
tables = pd.read_html(url)
fcf = tables[0]
fcf.columns = ['Year', 'FCF']
fcf = fcf.set_index('Year')
print(fcf)
The first few lines are.
     FCF
Year
2020 45234.0
2019 38260.0
2018 32252.0
2017 31378.0
2016 24982.0
All ready to be joined with the other data.
import pandas as pd

url = "https://www.macrotrends.net/stocks/charts/MSFT/microsoft/revenue"
tables = pd.read_html(url)
revenue = tables[0]
revenue.columns = ['Year', 'Revenue']
revenue = revenue.set_index('Year')
revenue['Revenue'] = pd.to_numeric(revenue['Revenue'].str[1:].str.replace(',',''), errors='coerce')
# print(revenue)
url = "https://www.macrotrends.net/stocks/charts/MSFT/microsoft/free-cash-flow"
tables = pd.read_html(url)
fcf = tables[0]
fcf.columns = ['Year', 'FCF']
fcf = fcf.set_index('Year')
data = revenue.join(fcf)
# Let's reorder it
data = data.iloc[::-1].copy()
Where we also reorder it, to have it from the early ears in the top. Notice the copy(), which is not strictly necessary, but makes a hard-copy of the data and not just a view.
      Revenue      FCF
Year
2005    39788  15793.0
2006    44282  12826.0
2007    51122  15532.0
2008    60420  18430.0
2009    58437  15918.0
Wow. Ready to export.
Step 3: Exporting it to Excel
This is too easy to have an entire section for it.
data.to_excel('Output.xlsx')
Isn’t it beautiful. Of course you need to execute this after all the lines above.
In total.
import pandas as pd

url = "https://www.macrotrends.net/stocks/charts/MSFT/microsoft/revenue"
tables = pd.read_html(url)
revenue = tables[0]
revenue.columns = ['Year', 'Revenue']
revenue = revenue.set_index('Year')
revenue['Revenue'] = pd.to_numeric(revenue['Revenue'].str[1:].str.replace(',',''), errors='coerce')
# print(revenue)
url = "https://www.macrotrends.net/stocks/charts/MSFT/microsoft/free-cash-flow"
tables = pd.read_html(url)
fcf = tables[0]
fcf.columns = ['Year', 'FCF']
fcf = fcf.set_index('Year')
data = revenue.join(fcf)
# Let's reorder it
data = data.iloc[::-1].copy()
# Export to Excel
data.to_excel('Output.xlsx')
Which will result in an Excel spread sheet called Output.xlsx.

There are many things you might find easier in Excel, like playing around with different types of visualization. On the other hand, there might be many aspects you find easier in Python. I know, I do. Almost all of them. Not kidding. Still, Excel is a powerful tool which is utilized by many specialists. Still it seems like the skills of Python are in request in connection with Excel.
Python Circle
Do you know what the 5 key success factors every programmer must have?
How is it possible that some people become programmer so fast?
While others struggle for years and still fail.
Not only do they learn python 10 times faster they solve complex problems with ease.
What separates them from the rest?
I identified these 5 success factors that every programmer must have to succeed:
- Collaboration: sharing your work with others and receiving help with any questions or challenges you may have.
- Networking: the ability to connect with the right people and leverage their knowledge, experience, and resources.
- Support: receive feedback on your work and ask questions without feeling intimidated or judged.
- Accountability: stay motivated and accountable to your learning goals by surrounding yourself with others who are also committed to learning Python.
- Feedback from the instructor: receiving feedback and support from an instructor with years of experience in the field.
I know how important these success factors are for growth and progress in mastering Python.
That is why I want to make them available to anyone struggling to learn or who just wants to improve faster.
With the Python Circle community, you can take advantage of 5 key success factors every programmer must have.

Be part of something bigger and join the Python Circle community.
Парсинг данных. Эта штука может быть настолько увлекательной, что порой затягивает очень сильно. Ведь всегда интересно найти способ, с помощью которого можно получить те или иные данные, да еще и структурировать их в нужном виде. В статье «Простой пример работы с Excel в Python» уже был рассмотрен один из способов получить данные из таблиц и сохранить их в формате Excel на разных листах. Для этого мы искали на странице все теги, которые так или иначе входят в содержимое таблицы и вытаскивали из них данные. Но, есть способ немного проще. И, давайте, о нем поговорим.

А состоит этот способ в использовании библиотеки pandas. Конечно же, ее простой не назовешь. Это очень мощный инструмент для аналитики самых разнообразных данных. И в рассмотренном ниже случае мы лишь коснемся небольшого фрагмента из того, что вообще умеет делать эта библиотека.
Что понадобиться?
Для того, чтобы написать данный скрипт нам понадобиться конечно же сам pandas. Библиотеки requests, BeautifulSoup и lxml. А также модуль для записи файлов в формате xlsx – xlsxwriter. Установить их все можно одной командой:
pip install requests bs4 lxml pandas xlsxwriter
А после установки импортировать в скрипт для дальнейшей работы с функциями, которые они предоставляют:
Python:
import requests
from bs4 import BeautifulSoup

import pandas as pd
Так же с сайта, на котором расположены целевые таблицы нужно взять заголовки для запроса. Данные заголовки не нужны для pandas, но нужны для requests. Зачем вообще использовать в данном случае запросы? Тут все просто. Можно и не использовать вовсе. А полученные таблицы при сохранении называть какими-нибудь составными именами, вроде «Таблица 1» и так далее, но гораздо лучше и понятнее, все же собрать данные о том, как называется данная таблица в оригинале. Поэтому, с помощью запросов и библиотеки BeautifulSoup мы просто будем искать название таблицы.
Но, вернемся к заголовкам. Взял я их в инструментах разработчика на вкладке сеть у первого попавшегося запроса.
Python:
headers = {
    'user-agent': 'Mozilla/5.0 (X11; Linux x86_64) AppleWebKit/537.36 (KHTML, like Gecko) Chrome/96.0.4664.174 '
                  'YaBrowser/22.1.3.942 Yowser/2.5 Safari/537.36',
    'accept': 'text/html,application/xhtml+xml,application/xml;q=0.9,image/avif,image/webp,image/apng,*/*;q=0.8,'
              'application/signed-exchange;v=b3;q=0.9 '
}
Теперь нужен список, в котором будут перечисляться года, которые представлены в виде таблиц на сайте. Эти года получаются из псевдовыпадающего списка. Я не стал использовать selenium для того, чтобы получить их со страницы. Так как обычный запрос не может забрать эти данные. Они подгружаются с помощью JS скриптов. В данном случае не так уж много данных, которые надо обработать руками. Поэтому я создал список, в которые эти данные и внес вручную:
Python:
num_year_dict = ['443', '442', '441', '440', '439', '438', '437', '436', '435', '434', '433', '432', '431', '426',
                 '425', '1', '2', '165', '884', '1851', '3226', '4385', '4959', '5582', '6297', '6886', '7371',
                 '8071', '8671']
Теперь нам нужно будет создать пустой словарь вне всяких циклов. Именно, чтобы он был глобальной переменной. Этот словарь мы и будем наполнять полученными данными, а также сохранять их него данные в таблицу Excel. Поэтому, я подумал, что проще сделать его глобальной переменной, чем тасовать из функции в функцию.
df = {}
Назвал я его df, потому как все так называют. И увидев данное название в нужном контексте становиться понятно, что используется pandas. df – это сокращение от DataFrame, то есть, определенный набор данных.
Ну вот, предварительная подготовка закончена. Самое время получать данные. Давайте для начала сходим на одну страницу с таблицей и попробуем получить оттуда данные с помощью pandas.
tables = pd.read_html('https://www.sports.ru/rfpl/table/?s=443&table=0&sub=table')
Здесь была использована функция read_html. Pandas использует библиотеку для парсинга lxml. То есть, примерно это все работает так. Получаются данные со страницы, а затем в коде выполняется поиск с целью найти все таблицы, у которых есть тэг <table>, а далее, внутри таблиц ищутся заголовки и данные под тэгами <tr> и <td>, которые и возвращаются в виде списка формата DataFrame.
Давайте выполним запрос. Но вот печатать данные пока не будем. Нужно для начала понять, сколько таблиц нашлось в запросе. Так как на странице их может быть несколько. Помимо той, что на виду, в виде таблиц может быть оформлен подзаголовок или еще какая информация. Поэтому, давайте узнаем, сколько элементов списка содержится в запросе, а соответственно, столько и таблиц. Выполняем:
print(len(tables))
И видим, что найденных таблиц две. Если вывести по очереди элементы списка, то мы увидим, что нужная нам таблица, в данном случае, находиться под индексом 1. Вот ее и распечатаем для просмотра:
print(tables[1])
И вот она полученная таблица:

Как видим, в данной таблице помимо нужных нам данных, содержится так же лишний столбец, от которого желательно избавиться. Это, скажем так, можно назвать сопутствующим мусором. Поэтому, полученные данные иногда надо «причесать». Давайте вызовем метод drop и удалим ненужный нам столбец.
tables[1].drop('Unnamed: 0', axis=1, inplace=True)
На то, что нужно удалить столбец указывает параметр axis, который равен 1. Если бы нужно было удалить строку, он был бы равен 0. Ну и указываем название столбца, который нужно удалить. Параметр inplace в значении True указывает на то, что удалить столбец нужно будет в исходных данных, а не возвращать нам их копию с удаленным столбцом.
А теперь нужно получить заголовок таблицы. Поэтому, делаем запрос к странице, получаем ее содержимое и отправляем для распарсивания в BeautifulSoup. После чего выполняем поиск названия и обрезаем из него все лишние данные.
Python:
url = f'https://www.sports.ru/rfpl/table/?s={num}&table=0&sub=table'
req = requests.get(url=url, headers=headers)
soup = BeautifulSoup(req.text, 'lxml')
title_table = soup.find('h2', class_='titleH3').text.split("-")[2].strip().replace("/", "_")
Теперь, когда у нас есть таблица и ее название, отправим полученные значения в ранее созданный глобально словарь.
df[title_table] = tables[1]
Вот и все. Мы получили данные по одной таблице. Но, не будем забывать, что их больше тридцати. А потому, нужен цикл, чтобы формировать ссылки из созданного ранее списка и делать запросы уже к страницам по ссылке. Давайте полностью оформим код функции. Назовем мы ее, к примеру, get_pd_table(). Ее полный код состоит из всех тех элементов кода, которые мы рассмотрели выше, плюс они запущены в цикле.
Python:
def get_pd_table():
    for num in num_year_dict:
        url = f'https://www.sports.ru/rfpl/table/?s={num}&table=0&sub=table'
        req = requests.get(url=url, headers=headers)
        soup = BeautifulSoup(req.text, 'lxml')
        title_table = soup.find('h2', class_='titleH3').text.split("-")[2].strip().replace("/", "_")
        print(f'Получаю данные из таблицы: "{title_table}"...')
        tables = pd.read_html(url)
        tables[1].drop('Unnamed: 0', axis=1, inplace=True)
        df[title_table] = tables[1]
Итак, когда цикл пробежится по всем ссылкам у нас будет готовый словарь с данными турниров, которые желательно бы записать на отдельные листы. На каждом листе по таблице. Давайте сразу создадим для этого функцию pd_save().
writer = pd.ExcelWriter('./Турнирная таблица ПЛ РФ.xlsx', engine='xlsxwriter')
Создаем объект писателя, в котором указываем имя записываемой книги, и инструмент, с помощью которого будем производить запись в параметре engine=’xlsxwriter’.
После запускаем цикл, в котором создаем объекты, то есть листы для записи из ключей списка с таблицами df, указываем, с помощью какого инструмента будет производиться запись, на какой лист. Имя листа берется из ключа словаря. А также указывается параметр index=False, чтобы не сохранялись индексы автоматически присваиваемые pandas.
df[df_name].to_excel(writer, sheet_name=df_name, index=False)
Ну и после всего сохраняем книгу:
writer.save()
Полный код функции сохранения значений:
Python:
def pd_save():
    writer = pd.ExcelWriter('./Турнирная таблица ПЛ РФ.xlsx', engine='xlsxwriter')
    for df_name in df.keys():
        print(f'Записываем данные в лист: {df_name}')
        df[df_name].to_excel(writer, sheet_name=df_name, index=False)
    writer.save()
Вот и все. Для того, чтобы было не скучно ждать, пока будет произведен парсинг таблиц, добавим принты с информацией о получаемой таблице в первую функцию.
print(f'Получаю данные из таблицы: "{title_table}"...')
И во вторую функцию, с сообщением о том, данные на какой лист записываются в данный момент.
print(f'Записываем данные в лист: {df_name}')
Ну, а дальше идет функция main, в которой и вызываются вышеприведенные функции. Все остальное, в виде принтов, это просто декорации, для того чтобы пользователь видел, что происходят какие-то процессы.
Python:
import requests
from bs4 import BeautifulSoup

import pandas as pd

headers = {
    'user-agent': 'Mozilla/5.0 (X11; Linux x86_64) AppleWebKit/537.36 (KHTML, like Gecko) Chrome/96.0.4664.174 '
                  'YaBrowser/22.1.3.942 Yowser/2.5 Safari/537.36',
    'accept': 'text/html,application/xhtml+xml,application/xml;q=0.9,image/avif,image/webp,image/apng,*/*;q=0.8,'
              'application/signed-exchange;v=b3;q=0.9 '
}

num_year_dict = ['443', '442', '441', '440', '439', '438', '437', '436', '435', '434', '433', '432', '431', '426',
                 '425', '1', '2', '165', '884', '1851', '3226', '4385', '4959', '5582', '6297', '6886', '7371',
                 '8071', '8671']

df = {}


def get_pd_table():
    for num in num_year_dict:
        url = f'https://www.sports.ru/rfpl/table/?s={num}&table=0&sub=table'
        req = requests.get(url=url, headers=headers)
        soup = BeautifulSoup(req.text, 'lxml')
        title_table = soup.find('h2', class_='titleH3').text.split("-")[2].strip().replace("/", "_")
        print(f'Получаю данные из таблицы: "{title_table}"...')
        tables = pd.read_html(url)
        tables[1].drop('Unnamed: 0', axis=1, inplace=True)
        df[title_table] = tables[1]


def pd_save():
    writer = pd.ExcelWriter('./Турнирная таблица ПЛ РФ.xlsx', engine='xlsxwriter')
    for df_name in df.keys():
        print(f'Записываем данные в лист: {df_name}')
        df[df_name].to_excel(writer, sheet_name=df_name, index=False)
    writer.save()


def main():
    get_pd_table()
    print(' ')
    pd_save()
    print('n[+] Данные записаны!')


if __name__ == '__main__':
    main()
И ниже результат работы скрипта с уже полученными и записанными таблицами:

Как видите, использовать библиотеку pandas, по крайней мере в данном контексте, не очень сложно. Конечно же, это только самая малая часть того, что она умеет. А умеет она собирать и анализировать данные из самых разных форматов, включая такие распространенные, как: cvs, txt, HTML, XML, xlsx.
Ну и думаю, что не всегда данные будут прилетать «чистыми». Скорее всего, периодически будут попадаться мусорные столбцы или строки. Но их не особо то трудно удалить. Нужно только понимать, что и откуда.
В общем, для себя я сделал однозначный вывод – если мне понадобиться парсить табличные значения, то лучше, чем использование pandas, пожалуй и не придумаешь. Можно просто на лету формировать данные из одного формата и переводить тут же в другой без утомительного перебора. К примеру, из формата csv в json.
Спасибо за внимание. Надеюсь, что данная информация будет вам полезна
Ранее мы рассмотрели основы парсинга данных с сайтов. Но знаете ли вы, что парсинг применим также для данных в табличном виде? Если вы часто сидите в Интернете, то, вероятно, заметили, что многие веб-сайты содержат таблицы. Например, расписание рейсов, характеристики продукта, дифференцирование услуг, расписание телепередач, рейтинг и многое другое.
В некоторых случаях можно легко скопировать таблицу и вставить в Excel без единой строчки кода. Но учтите, что специалисты по обработке и анализу данных работают с намного большими объемами данных, где метод копирования-вставки не очень эффективен. Итак, теперь мы покажем вам, как парсить таблицу с сайта на Python.
ШАГ 1. УСТАНОВКА БИБЛИОТЕК
Прежде всего, нужно установить в нашу среду разработки библиотеки:
- BeautifulSoup4
- Requests
- pandas
- lxml
Если у вас возникли проблемы на этом этапе, рекомендуем прочитать статью о парсинге сайтов на Python.
ШАГ 2. ИМПОРТИРОВАНИЕ БИБЛИОТЕК
Как только необходимые библиотеки установлены, мы можем открыть Spyder. Мы выбираем именно Spyder, потому что его удобнее использовать для проектов. Но вы можете иметь свои предпочтения.
Следующий этап парсинга таблицы на Python — это импортирование библиотеки:
# Import libraries
import requests
from bs4 import BeautifulSoup
import pandas as pd
ШАГ 3. ВЫБОР СТРАНИЦЫ
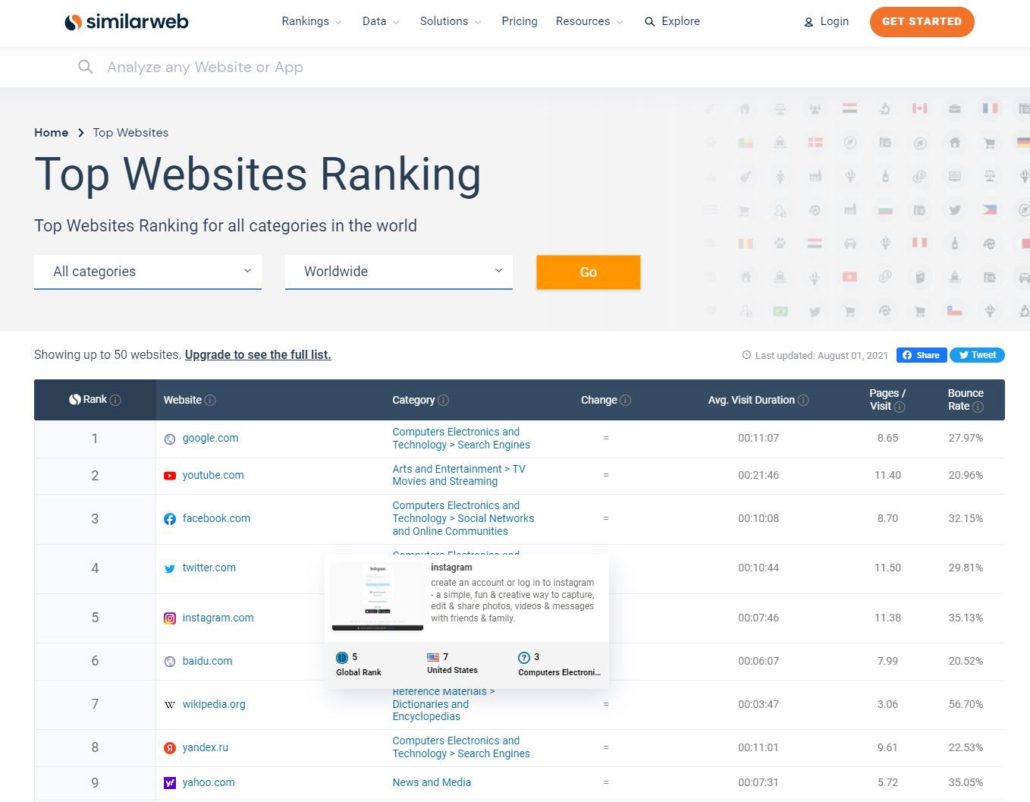
В этом проекте мы будем парсить таблицу данных covid с Worldometers. Как и в предыдущем руководстве, данный веб-сайт также создан с помощью HTML и считается более легким для понимания новичками.

ШАГ 4. ЗАПРОС РАЗРЕШЕНИЯ
После выбора страницы для парсинга мы можем скопировать ее URL-адрес и использовать requests, чтобы запросить разрешение у сервера на получение данных с их сайта.
# Create an URL object
url = 'https://www.worldometers.info/coronavirus/'
# Create object page
page = requests.get(url)
Результат <Response [200]> означает, что сервер позволяет нам собирать информацию. Дальше необходимо обработать HTML-код с помощью lxml, чтобы сделать его более доступным для чтения.
# parser-lxml = Change html to Python friendly format# Obtain page's information soup = BeautifulSoup(page.text, 'lxml') soup
ШАГ 5. ПРОСМОТР КОДА ЭЛЕМЕНТОВ ТАБЛИЦЫ
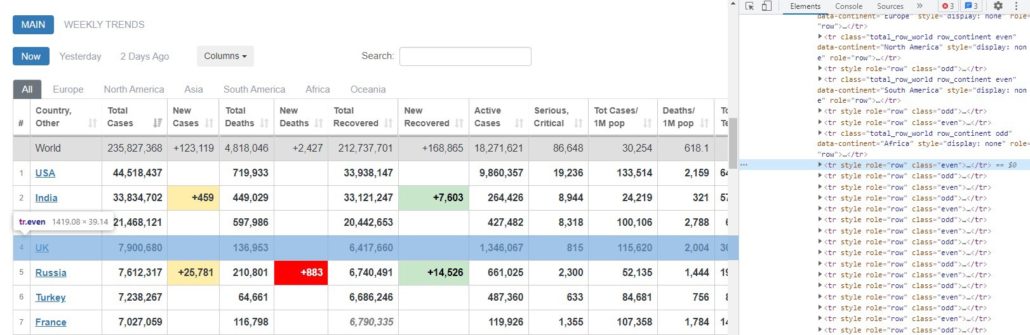
В предыдущей статье мы узнали, как просмотреть код каждого элемента на странице веб-сайта. Чтобы получить информацию о коде элементов таблицы, нам нужно сначала проверить ее расположение.
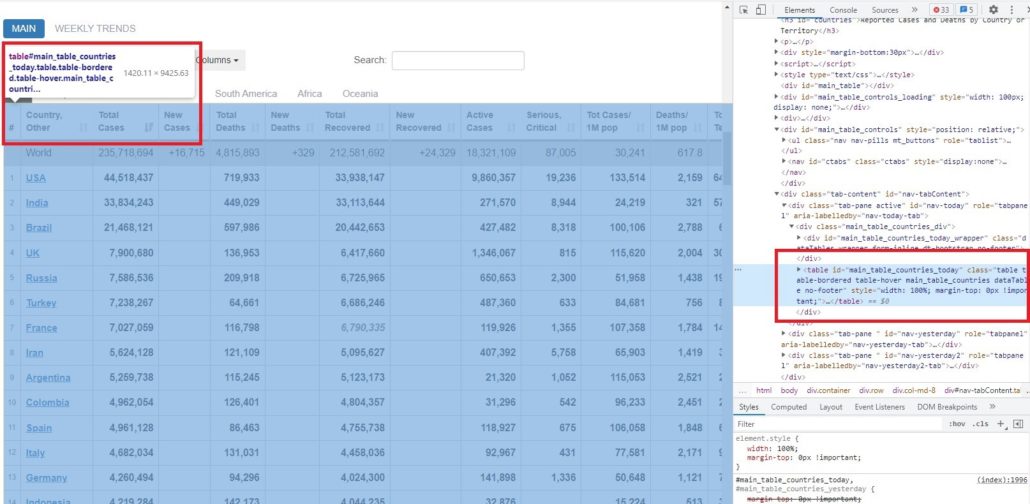
Как видно из рисунка выше, эта таблица находится внутри тега <table> и id = ‘main_table_countries_today’. Теперь мы можем определить переменную. В нашем случае мы определим таблицу как ‘table1’.
# Obtain information from tag <table>table1 = soup.find(‘table’, id=’main_table_countries_today’)
table1
ШАГ 6. СОЗДАНИЕ КОЛОНОК
После создания table1 мы можем посмотреть расположение каждой колонки. Если мы просмотрим все колонки, то заметим, что они имеют одну и ту же характеристику.
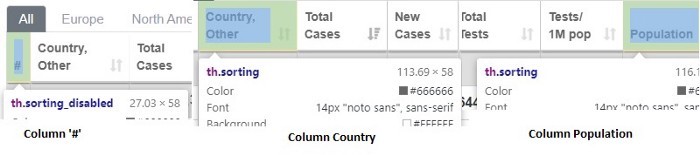
На рисунке видна общая характеристика каждой колонки — они расположены внутри тега <th>.
После нахождения тегов мы создаем цикл for, чтобы заполнить пустой список нашими колонками. Давайте определим пустой список как headers.
# Obtain every title of columns with tag <th>headers = []
for i in table1.find_all(‘th’):
title = i.text
headers.append(title)
Результат:
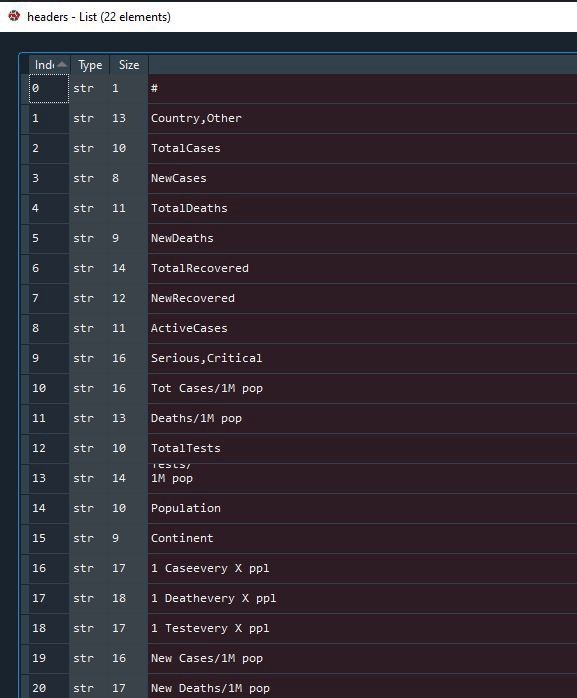
Список успешно заполнен и мы можем проверить его еще раз. Давайте посмотрим на индекс 13, здесь многострочный текст. Подобный перенос может быть проблемой, когда мы захотим сделать из него фрейм данных, поэтому необходимо преобразовать его в однострочный текст.
# Convert wrapped text in column 13 into one line text
headers[13] = ‘Tests/1M pop’
Результат:

ШАГ 7. СОЗДАНИЕ ФРЕЙМА ДАННЫХ
Следующий этап парсинга таблицы с помощью Python — это создание фрейма данных. Предлагаю определить фрейм данных как mydata.
# Create a dataframe
mydata = pd.DataFrame(columns = headers)
ШАГ 8. СОЗДАНИЕ ЦИКЛА FOR ДЛЯ ЗАПОЛНЕНИЯ ФРЕЙМА ДАННЫХ
Как только фрейм данных готов, мы можем заполнить его элементами в каждой колонке. До момента создания цикла for нам нужно еще определить место расположения строки и колонки элемента.

На рисунках выше видно, что строка находится внутри тега <tr>, а элементы — внутри тега <td>. Это применимо ко всем строкам и элементам в таблице.
Теги найдены и теперь можно создавать цикл for.
# Create a for loop to fill mydata
for j in table1.find_all(‘tr’)[1:]:
 row_data = j.find_all(‘td’)
 row = [i.text for i in row_data]
 length = len(mydata)
 mydata.loc[length] = row
Результат:

ШАГ 9. ОЧИСТКА ФРЕЙМА ДАННЫХ
Далее, как только фрейм данных будет успешно создан, мы можем удалить и очистить ненужные строки. В нашем случае мы удалим индекс 0–6, 222–228, затем вернем индекс в исходное состояние и удалим столбец «#».
# Drop and clearing unnecessary rowsmydata.drop(mydata.index[0:7], inplace=True) mydata.drop(mydata.index[222:229], inplace=True) mydata.reset_index(inplace=True, drop=True)# Drop “#” column mydata.drop(‘#’, inplace=True, axis=1)
Результат:

ШАГ 10. ЭКСПОРТ ДАННЫХ В CSV-ФАЙЛ
Когда фрейм данных будет готов, мы можем экспортировать данные в CSV-файл.
# Export to csv mydata.to_csv(‘covid_data.csv’, index=False)# Try to read csv mydata2 = pd.read_csv(‘covid_data.csv’)
Это был завершающий этап парсинга таблицы на Python и теперь данные можно использовать для работы в проектах по анализу и обработке данных, в машинном обучении и для получения другой необходимой информации. Надеемся, что это руководство будет полезно для вас, и особенно для тех, кто изучает веб-парсинг. До новых встреч в следующих проектах.