
Introduction
In this article, we will learn how to read an Excel file from the client-side and display its contents in an HTML table by making use of the FileReader() API in HTML5 & jQuery.
The two important jQuery plugins we used here are «xlsx.core.min.js» and «xls.core.min.js» which are used to convert the data from Excel to a JSON array.
First, we will create a File Upload button, then an HTML table which is hidden first, and lastly ab Input button which upon clicking, calls the function to export Excel data to the HTML table.
- <input type=«file» id=«excelfile» />
- <input type=«button» id=«viewfile» value=«Export To Table» onclick=«ExportToTable()» />
- <br />
- <br />
- <table id=«exceltable»>
- </table>
Running the page will look like below.
Now, we reference the jQuery plugin files «xlsx.core.min.js» and «xls.core.min.js» in the head section.
- <script src=«jquery-1.10.2.min.js» type=«text/javascript»></script>
- <script src=«https://cdnjs.cloudflare.com/ajax/libs/xlsx/0.7.7/xlsx.core.min.js»></script>
- <script src=«https://cdnjs.cloudflare.com/ajax/libs/xls/0.7.4-a/xls.core.min.js»></script>
The JavaScript function ExportToTable() is given below.
- function ExportToTable() {
- var regex = /^([a-zA-Z0-9s_\.-:])+(.xlsx|.xls)$/;
- if (regex.test($(«#excelfile»).val().toLowerCase())) {
- var xlsxflag = false;
- if ($(«#excelfile»).val().toLowerCase().indexOf(«.xlsx») > 0) {
- xlsxflag = true;
- }
- if (typeof (FileReader) != «undefined») {
- var reader = new FileReader();
- reader.onload = function (e) {
- var data = e.target.result;
- if (xlsxflag) {
- var workbook = XLSX.read(data, { type: ‘binary’ });
- }
- else {
- var workbook = XLS.read(data, { type: ‘binary’ });
- }
- var sheet_name_list = workbook.SheetNames;
- var cnt = 0;
- sheet_name_list.forEach(function (y) {
- if (xlsxflag) {
- var exceljson = XLSX.utils.sheet_to_json(workbook.Sheets[y]);
- }
- else {
- var exceljson = XLS.utils.sheet_to_row_object_array(workbook.Sheets[y]);
- }
- if (exceljson.length > 0 && cnt == 0) {
- BindTable(exceljson, ‘#exceltable’);
- cnt++;
- }
- });
- $(‘#exceltable’).show();
- }
- if (xlsxflag) {
- reader.readAsArrayBuffer($(«#excelfile»)[0].files[0]);
- }
- else {
- reader.readAsBinaryString($(«#excelfile»)[0].files[0]);
- }
- }
- else {
- alert(«Sorry! Your browser does not support HTML5!»);
- }
- }
- else {
- alert(«Please upload a valid Excel file!»);
- }
- }
Other two functions which are called in the above function are BindTable() and BindTableHeader().
- function BindTable(jsondata, tableid) {
- var columns = BindTableHeader(jsondata, tableid);
- for (var i = 0; i < jsondata.length; i++) {
- var row$ = $(‘<tr/>’);
- for (var colIndex = 0; colIndex < columns.length; colIndex++) {
- var cellValue = jsondata[i][columns[colIndex]];
- if (cellValue == null)
- cellValue = «»;
- row$.append($(‘<td/>’).html(cellValue));
- }
- $(tableid).append(row$);
- }
- }
- function BindTableHeader(jsondata, tableid) {
- var columnSet = [];
- var headerTr$ = $(‘<tr/>’);
- for (var i = 0; i < jsondata.length; i++) {
- var rowHash = jsondata[i];
- for (var key in rowHash) {
- if (rowHash.hasOwnProperty(key)) {
- if ($.inArray(key, columnSet) == -1) {
- columnSet.push(key);
- headerTr$.append($(‘<th/>’).html(key));
- }
- }
- }
- }
- $(tableid).append(headerTr$);
- return columnSet;
- }
The basic idea of the above scripts is that first we read the data from Excel file as an ArrayBuffer or raw binary data depending on the extension of the Excel file, using the FileReader() API of HTML5.
Then, we use jQuery plugins to convert that data into a JSON object. Next, we iterate through the JSON object and bind it to an HTML table. Our sample Excel file contains the data of certain employees, as given below.
Now, on selecting this Excel file and clicking on the «Export To Table» button, we will export the excel data to the table, as shown below.
That’s it. Our Excel to the table is ready!
This is just a simple example of reading an Excel sheet and displaying the data from the first sheet into a table. You can always explore the script and change it to read multiple sheets and so on.
Please note that this method will be supported only on browsers that support HTML5. You can check the browsers which support HTML5 here.
Also, the above script is tested with an Excel file having a maximum of 15 columns and 10,000 rows. Since this script uses iteration for binding, there may be performance issues while using huge Excel files.
Reference
https://github.com/SheetJS/js-xlsx
https://github.com/SheetJS/js-xls
Summary
In this article, we have learned how to make use of FileReader() API of HTML5 and jQuery to export data from an Excel file to an HTML table.
Hope this will be helpful!
Like you, I cannot get MS Office Web Components to work. I would not consider Google Docs since Google seems to think they own anything that passes through their hands. I have tried MS Publish Objects but the quality of the generated html/css is truely awful.
The secret of converting an Excel worksheet to html that will display correctly on a smartphone is to create clean, lean html/css.
The structure of the HTML is:
<!DOCTYPE html PUBLIC "-//W3C//DTD XHTML 1.0 Frameset//EN"
          "http://www.w3.org/TR/xhtml1/DTD/xhtml1-frameset.dtd">
<html xmlns="http://www.w3.org/1999/xhtml" xml:lang="en" lang="en">
  <head><meta http-equiv="Content-Type" content="text/html; charset=utf-8"/>
    HEAD
  </head>
  <body>
    BODY
  </body>
</html>
There are useful html elements that can replace «HEAD» but it is not clear to me how you would generate them from an Excel worksheet. They would need to be added separately.
The obvious output for a worksheet or a range is an html table so the following assumes BODY will be replaced by an html table.
The structure of an html table is:
<table TABLE-ATTRIBUTES>
  <tr TABLE-ROW-ATTRIBUTES>
    <td TABLE-CELL-ATTRIBUTES>CELL-VALUE</td>
    More <td>...</td> elements as necessary
  </tr>
  More <tr>...</tr> as necessary
</table>
Include as few TABLE-ATTRIBUTES, TABLE-ROW-ATTRIBUTES and TABLE-CELL-ATTRIBUTES as possible. Do not set column widths in pixels. Use css attributes rather than html attributes.
A table attribute worth considering is style = "border-collapse: collapse;". The default is separate with a gap around each cell. With collapse the cells touch as they do with Excel.
Three table attribute worth considering are style="background-color:aliceblue;", style="color:#0000FF;" and style="text-align:right;". With the first, you can specify the background colour to be any of the fifty or so named html colours. With the second, you can specify the font colour to be any of 256*256*256 colours. With the third you can right-align numeric values.
The above covers only a fraction of the formatting information that could be converted from Excel to html/css. I am developing an add-in that will convert as much Excel formatting as possible but I hope the above helps anyone with simple requirements.
Introduction
In some use cases, we have a complicated Excel sheet to share on our personal website and we would like to make it interactive. Fortunately, Microsoft allows the user to do so via OneDrive and it supports both HTML iframe and JavaScript.
In this blog post, I would like the discuss how to embed Excel sheet in HTML, the issues that I encountered, and how to fix the issues.
Embed Excel Sheet in HTML
Generate Code
Once the Excel sheet has been created or uploaded to Microsoft OneDrive, generating the Excel embed code could be as easy as clicking File → Share → Embed → Generate HTML.

Insert Code
Then we could copy the HTML iframe code or the JavaScript code and insert it into our website.
Using the default HTML iframe code will result in an embedded Excel sheet as follows. If you see lots of white spaces before the table, it is a bug from Microsoft and the bug will show in most of the browsers except the Brave browser.
1 |
<iframe width="402" height="346" frameborder="0" scrolling="no" src="https://onedrive.live.com/embed?resid=6C685993F809A9F8%212757&authkey=%21AABR6KgqMF_ImYs&em=2&wdAllowInteractivity=False&AllowTyping=True&wdDownloadButton=True&wdInConfigurator=True&wdInConfigurator=True&edesNext=true&ejss=false"></iframe> |
Using the default JavaScript code will result in an embedded Excel sheet as follows.
1 |
<div id="myExcelDiv" style="width: 402px; height: 346px"></div> |
Fix JavaScript Issues
The width of the embedded Excel sheet seems to be a problem, but we could modify the width values in the style. A bigger problem is, unlike the iframe embedding, the JavaScript embedding does not allow the user to input values and one HTML can only have one Excel sheet embedded (without problems) because the div id is a pre-defined value myExcelDiv.
Personally, I favor the JavaScript embedding over the HTML iframe embedding. So we would like to try solving those problems on our own.
We noticed that there is an argument wdAllowInteractivity=0 in the src for both JavaScript and iframe, although it does not prevent the user from typing in iframe, changing it to 1 allows the user to type successfully.
In addition, wdDivId=%22myExcelDiv%22 is the place for specifying custom div id for embedding Excel sheets. We could use new div id here.
Finally, we can also make the webpage opening a little bit faster by making the loading of JavaScript async.
Fix Preview
The fixed JavaScript code is as follows. We could see that now the embedded Excel sheet looks pretty nice.
1 |
<div id="myExcelDiv1" style="width: 100%; height: 400px"></div> |
In this tutorial you can find how to read excel file using JavaScript and display excel sheet data on web page in HTML table format using JavaScript. In previous, one of our tutorial, in which we have already seen how to convert HTML table data into Excel file by using SheetJS library. Now in this tutorial also we will use SheetJS JavaScript library and by using JavaScript library, we will convert Excel file data to HTML table and display on web page. Here under this tutorial, we will not use jQuery and Ajax server side script for fetch data from excel and display on web page. Now lets start seeing it!

First we have to include Bootstrap Stylesheet and SheetJS library link at header of our HTML page.
<link rel="stylesheet" href="https://maxcdn.bootstrapcdn.com/bootstrap/4.0.0/css/bootstrap.min.css" integrity="sha384-Gn5384xqQ1aoWXA+058RXPxPg6fy4IWvTNh0E263XmFcJlSAwiGgFAW/dAiS6JXm" crossorigin="anonymous">

<script type="text/javascript" src="https://unpkg.com/xlsx@0.15.1/dist/xlsx.full.min.js"></script>
After this under this HTML page, we have to create one file tag for select file excel from local computer.
<input type="file" id="excel_file" />
And below this file, we have to create one division tag for display excel sheet data on web page in HTML table format.
<div id="excel_data" class="mt-5"></div>
Next we have to move on write JavaScript code, so first store file tag property under one variable.
const excel_file = document.getElementById('excel_file');
Next we have to write javascript code on change event, so when user have select file from local computer using file tag, then javascript code must be execute.
excel_file.addEventListener('change', (event) => {

});
Under this change event code first we want to check selected file format is .xls or .xlsx. If selected file is not excel file then it will display error on web page, and if select file is excel then it will proceed for display excel file data on web page.
if(!['application/vnd.openxmlformats-officedocument.spreadsheetml.sheet', 'application/vnd.ms-excel'].includes(event.target.files[0].type))
    {
        document.getElementById('excel_data').innerHTML = '<div class="alert alert-danger">Only .xlsx or .xls file format are allowed</div>';

        excel_file.value = '';

        return false;
    }
After check validation error, now read the file using FileReader object. Here file must be read ads ArrayBuffer by pass the file object using event.target.files[0].
var reader = new FileReader();

reader.readAsArrayBuffer(event.target.files[0]);
IF the selected file is proper excel file then we need to convert what we have got from FileReader object to Unit8Array object by passing Filereader result into Unit8Array constructor.
var data = new Uint8Array(reader.result);
Next we have pass this Unit8Array data in SheetJS read() function, and it will return selected excel workbook object.
var work_book = XLSX.read(data, {type:'array'});
After getting workbook object, next we have to get sheet name of selected excel file. So here SheetNames variable will return sheet name in array format.
var sheet_name = work_book.SheetNames;
Once we have get sheet name, now we want to get first sheet data in JSON format, so this we can get by SheetJS sheet_to_json() function by passing workbook first sheet name.
var sheet_data = XLSX.utils.sheet_to_json(work_book.Sheets[sheet_name[0]], {header:1});
Once we have get first sheet data in JSON format, next we have to simply write JavaScript code and convert that JSON data into HTML format and display under division tag wih id excel_data. So it will display excel file data on web page in HTML table format.
        if(sheet_data.length > 0)
        {
            var table_output = '<table class="table table-striped table-bordered">';

            for(var row = 0; row < sheet_data.length; row++)
            {

                table_output += '<tr>';

                for(var cell = 0; cell < sheet_data[row].length; cell++)
                {

                    if(row == 0)
                    {

                        table_output += '<th>'+sheet_data[row][cell]+'</th>';

                    }
                    else
                    {

                        table_output += '<td>'+sheet_data[row][cell]+'</td>';

                    }

                }

                table_output += '</tr>';

            }

            table_output += '</table>';

            document.getElementById('excel_data').innerHTML = table_output;
        }
So once you have follow all above steps then you can check ouput in browser. So when we have select excel file then it will display excel sheet data on web page in HTML table format without refresh of web page. So in this tutorial, we have seen how to convert Excel file to HTML table at client-side by using SheetJS JavaScript library at client-side. Below you can find complete source code.
Full Source Code
<!DOCTYPE HTML>
<html>
<head>
	<meta charset="utf-8" />
	<title>Convert Excel to HTML Table using JavaScript</title>
	<meta name="viewport" content="width=device-width, initial-scale=1" />
    <link rel="stylesheet" href="https://maxcdn.bootstrapcdn.com/bootstrap/4.0.0/css/bootstrap.min.css" integrity="sha384-Gn5384xqQ1aoWXA+058RXPxPg6fy4IWvTNh0E263XmFcJlSAwiGgFAW/dAiS6JXm" crossorigin="anonymous">

    <script type="text/javascript" src="https://unpkg.com/xlsx@0.15.1/dist/xlsx.full.min.js"></script>
</head>
<body>
    <div class="container">
    	<h2 class="text-center mt-4 mb-4">Convert Excel to HTML Table using JavaScript</h2>
    	<div class="card">
    		<div class="card-header"><b>Select Excel File</b></div>
    		<div class="card-body">

                <input type="file" id="excel_file" />

    		</div>
    	</div>
        <div id="excel_data" class="mt-5"></div>
    </div>
</body>
</html>

<script>

const excel_file = document.getElementById('excel_file');

excel_file.addEventListener('change', (event) => {

    if(!['application/vnd.openxmlformats-officedocument.spreadsheetml.sheet', 'application/vnd.ms-excel'].includes(event.target.files[0].type))
    {
        document.getElementById('excel_data').innerHTML = '<div class="alert alert-danger">Only .xlsx or .xls file format are allowed</div>';

        excel_file.value = '';

        return false;
    }

    var reader = new FileReader();

    reader.readAsArrayBuffer(event.target.files[0]);

    reader.onload = function(event){

        var data = new Uint8Array(reader.result);

        var work_book = XLSX.read(data, {type:'array'});

        var sheet_name = work_book.SheetNames;

        var sheet_data = XLSX.utils.sheet_to_json(work_book.Sheets[sheet_name[0]], {header:1});

        if(sheet_data.length > 0)
        {
            var table_output = '<table class="table table-striped table-bordered">';

            for(var row = 0; row < sheet_data.length; row++)
            {

                table_output += '<tr>';

                for(var cell = 0; cell < sheet_data[row].length; cell++)
                {

                    if(row == 0)
                    {

                        table_output += '<th>'+sheet_data[row][cell]+'</th>';

                    }
                    else
                    {

                        table_output += '<td>'+sheet_data[row][cell]+'</td>';

                    }

                }

                table_output += '</tr>';

            }

            table_output += '</table>';

            document.getElementById('excel_data').innerHTML = table_output;
        }

        excel_file.value = '';

    }

});

</script>
See all How-To Articles
This tutorial will demonstrate how to embed Excel or Google Sheets tables into HTML.
Save Excel File as HTML
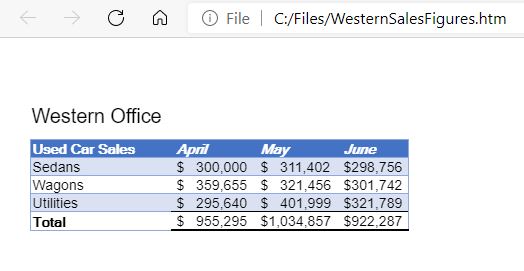
- With the workbook that you wish to save as an HTML file open in Excel, in the Ribbon, select File > Save As.
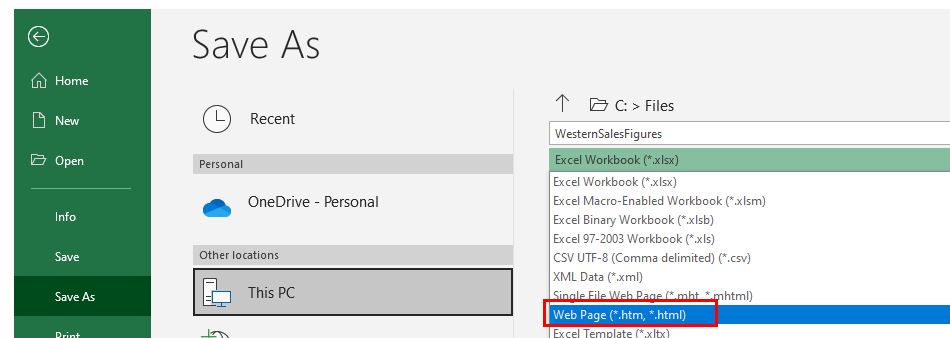
- From the drop-down list below the file name, select Web Page (*.htm, *.html) and then click Save.
- The file will then be saved as an HTML file. Switch to the Windows Explorer to view the HTML file.

- Double-click on the HTML file to open it in the default browser.
Embed Excel Sheet With Office Live
Excel on Office Live can be more flexible, as it creates a link.
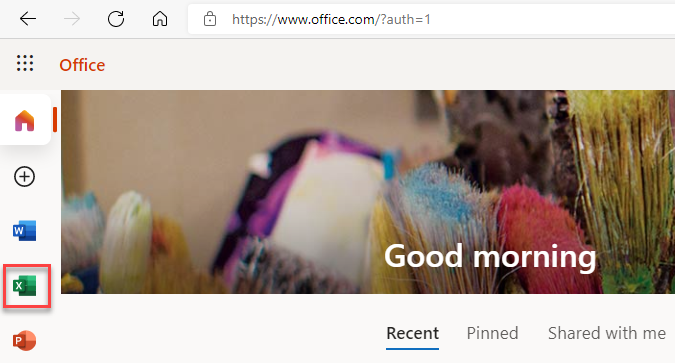
- Log onto Office 365 in the browser with Office Live and select the Excel Icon.
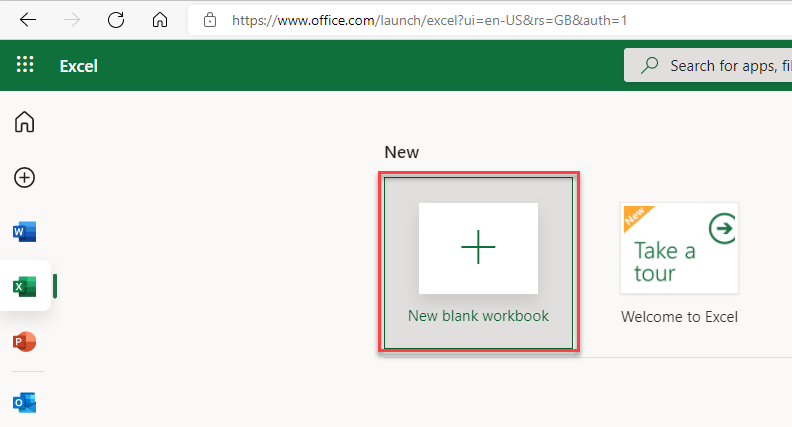
- Select New blank workbook to create a new workbook.
- Fill in the worksheet as needed, and then, in the Ribbon, select File > Share > Embed.
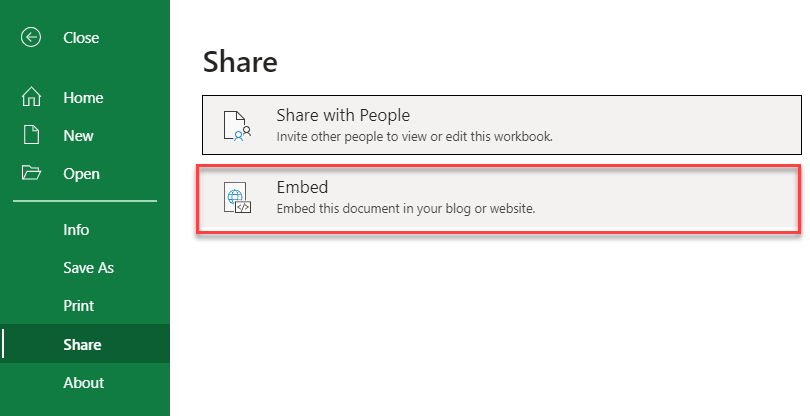
- Click Generate to generate the HTML code.

- In the Ribbon, click once again File > Share > Embed.
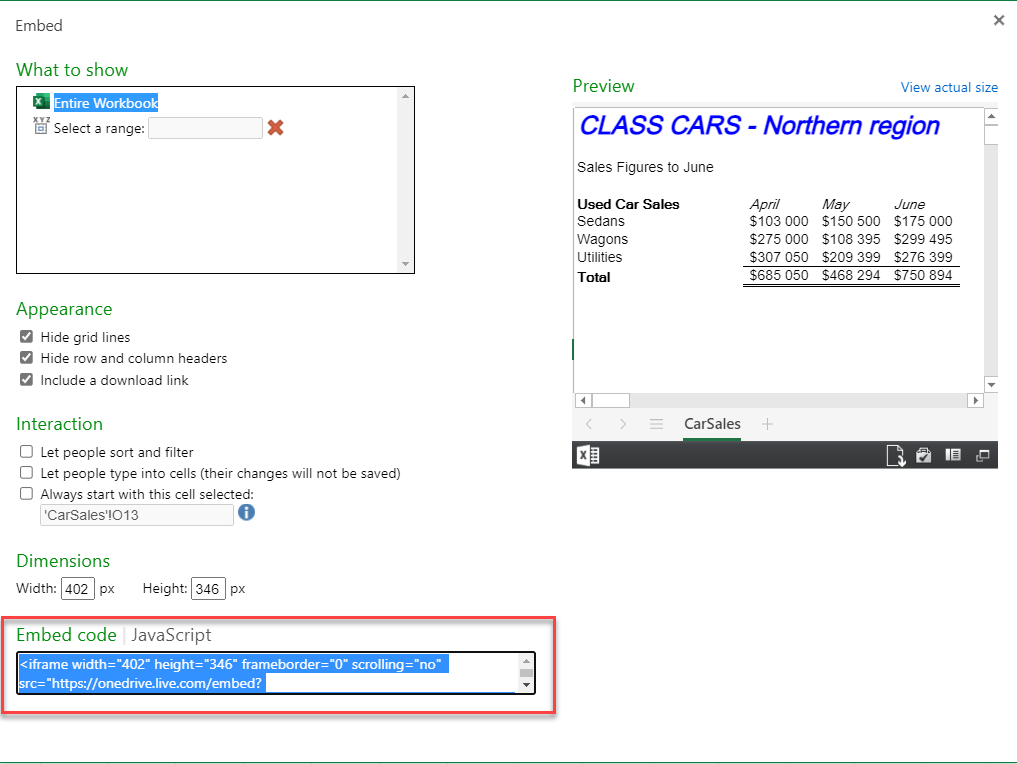
A form will open showing the layout of the embedded Excel worksheet. Amend accordingly, and the copy the Embed Code (which is in JavaScript) into the required web page to embed the Excel file into that web page.
Embed Google Sheets Tables Into HTML
Once you’ve created a Google Sheets file, you can publish it to the web and share the sheet with multiple users by sending the users a link to the sheet itself.
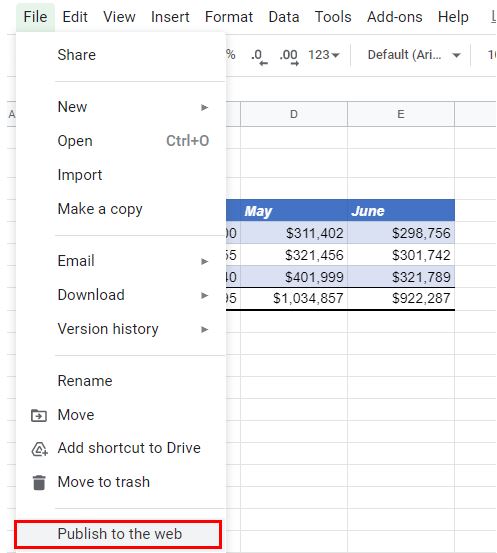
- In the File menu, select Publish to the web.
- Select from either Link or Embed.
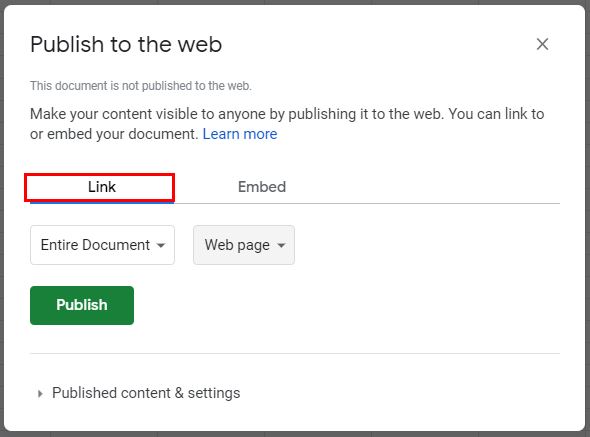
- Select either the Entire Document, or the sheet required.
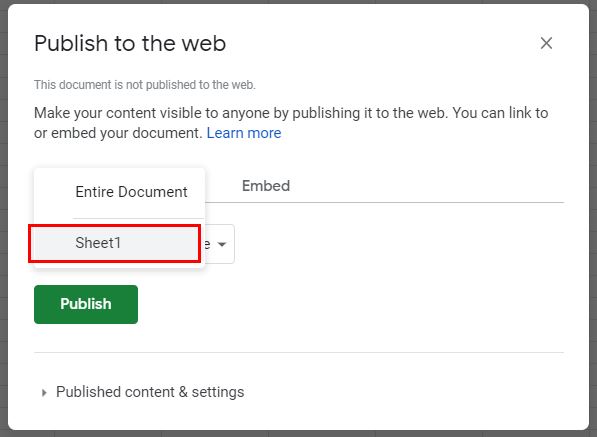
- Click Publish.
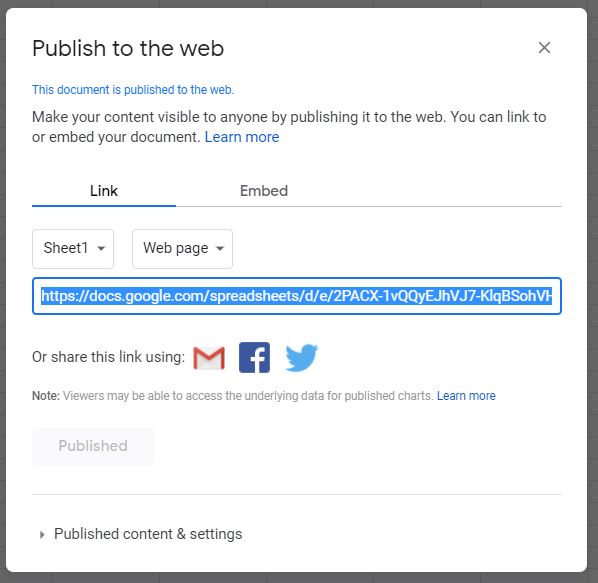
You can now send the generated link to any users you want to open the file on the web.
- To remove the file from the web, select Published content and settings > Stop publishing.
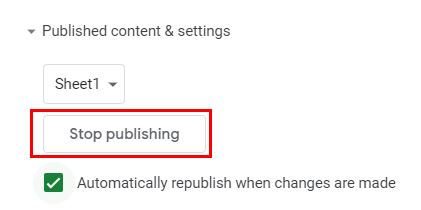
- Click OK on the Google message that pops up to remove the document from the web.
Note: If you had selected Embed, it would have generated HTML code to included in your own web site or blog. This HTML code would then embed the Google Sheets data into your website.