
HtmlMeta
=HtmlMeta(sting url, string metaName) : string
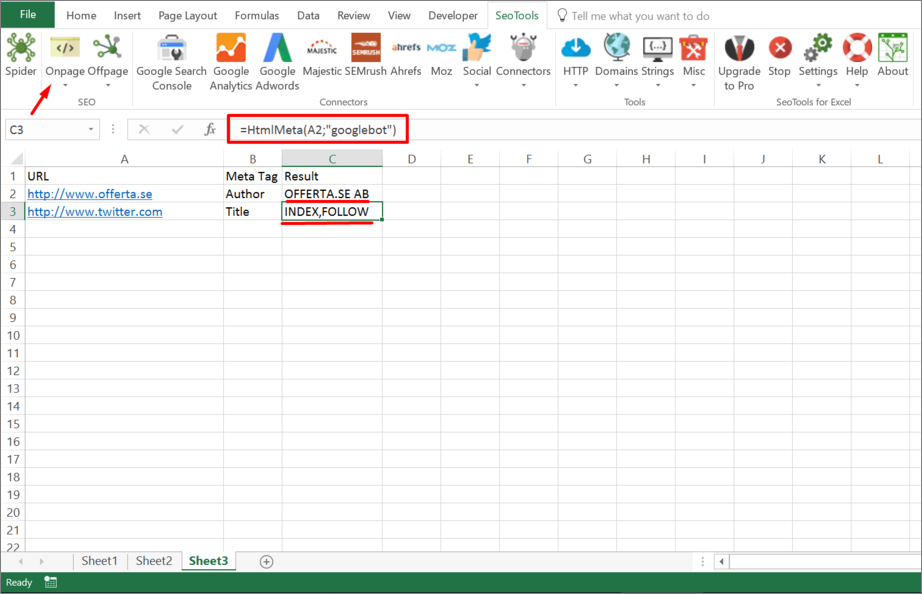
Purpose
Returns arbitrary HTML meta content of a page.
This function is cached.
- author
- googlebot
- robots
- keywords
- description
- refresh
- copyright
- contact
- last-modified
- cache-control
- content-language
- content-type
- expires
- pragma
- generator
See
Related Functions
- HtmlTitle
- HtmlMetaDescription
- HtmlMetaKeywords
- HtmlMetaRobots
- HtmlCanonical
Long story short, I’m trying to refresh a web page created by MS Excel that contains data that changes every 5 minutes.
The details … I have a large Excel workbook that is dynamically updated from an external source (a programmable logic controller). Via a macro, I am exporting as an .htm file one of the worksheets every 5 minutes. When I do this, there are
3 default meta statements when Excel is exported as an .htm file; i.e.,
<meta http-equiv=Content-Type content=»text/html; charset=windows-1252″>
<meta name=ProgId content=Excel.Sheet>
<meta name=Generator content=»Microsoft Excel 14″>
I would like to add a 4th meta statement to automatically refresh the exported file; i.e.,
<meta http-equiv=»refresh» content=»300″>
The above meta statement will cause most browsers to refresh every 300 seconds. Hence, my question … is there a way to change the Excel default HTML meta statements to include the above? If not something that could be added automatically, is
it possible to combine two .htm files via Excel VBS? One file could be everything about the HTML <body> command (which could be static) and the other file the dynamic <body>. I’ve tried searching within RegEdit, the Microsoft
Office folder, the forums, the internet, and the Excel reference books in my library … no success to date.
Thanks all.
Introduction
The focus of the article is to show the developers how to generate a dynamic Excel sheet from HTML. This article includes some sample programs to show how to implement various Excel functionalities with the help of HTML.
The prerequisite of these programs is, you should have Microsoft Office Excel installed in your PC. This article expects you to have the basic concepts HTML and Excel programming for better understanding. Before starting you need to know about Namespaces/Uniform Resource Name and Meta Tag used for Microsoft Office Excel Application.
Meta Tag
HTML includes the meta element that goes inside the head element. The purpose of the meta element is to provide meta-information about the document. To generate an Excel sheet in HTML, the following meta information should be included under the Header Section:
<meta http-equiv=Content-Type content="text/html; charset=windows-1252">

<meta name=ProgId content=Excel.Sheet>

<meta name=Generator content="Microsoft Excel 11">
Here is an example to generate a simple Excel sheet:
<html >
    <head>
        <meta http-equiv=Content-Type content="text/html; charset=windows-1252">
        <meta name=ProgId content=Excel.Sheet>
        <meta name=Generator content="Microsoft Excel 11">
    </head>
</html>
Namespace/Uniform Resource Name
In the above section we see how to generate an Excel sheet. Here we will see how to define Office objects. There is no specific HTML tag for Microsoft Office Objects, we need to use custom tags to define Office and Microsoft Excel Objects. Custom tags should have a unique Namespace or Uniform Resource Name. The following code snippet shows the required xmlns [XML Namespace] for Office and Excel:
<html xmlns:v="urn:schemas-microsoft-com:vml"xmlns:o="urn:schemas-microsoft-com:office:office" xmlns:x="urn:schemas-microsoft-com:office:excel" xmlns="http://www.w3.org/TR/REC-html40">
</html>
We will see more detailed usage of the namespace in the subsequent sections.
Custom Document Property
The Custom document property allows you to define your own property. In the following example we will see how to define Office custom properties in HTML:
<html xmlns:v="urn:schemas-microsoft-com:vml"xmlns:o="urn:schemas-microsoft-com:office:office" xmlns:x="urn:schemas-microsoft-com:office:excel" xmlns="http://www.w3.org/TR/REC-html40">
<head>
    <meta http-equiv=Content-Type content="text/html; charset=windows-1252">
    <meta name=ProgId content=Excel.Sheet>
    <meta name=Generator content="Microsoft Excel 11">
    <title>Document and Custom Property </title>
    <!--[if gte mso 9]><xml>
    <o:CustomDocumentProperties>
    <o:BUSINESSGROUP dt:dt="string">CHANNELA</o:BUSINESSGROUP>
    <o:BUSINESSGROUPID dt:dt="string">2</o:BUSINESSGROUPID>
    </o:CustomDocumentProperties>
    </xml><![endif]-->
</head>
</html>
If you look closely at the preceding code you will notice an IF block like the following:
<!--[if gte mso 9]>
   <xml></xml>
<![endif]-->
This piece of code is checking the availability of Microsoft Office. It is good practice to add this piece of code before defining a property. If you save the preceding code as HTML and open as Excel then it will have the following custom property:

Figure 1
Data Validation
Special custom tags are also available for data validation.
For example: The following tags are used to represent various properties of data validation.
<x:DataValidation>
    <x:Range></x:Range>
    <x:Type> </x:Type>
    <x:Qualifier> </x:Qualifier>
    <x:Value></x:Value>
    <x:ErrorMessage> </x:ErrorMessage>
    <x:ErrorTitle> </x:ErrorTitle>
</x:DataValidation>
The following table explains the preceding tags:
| Tags | Descriptions |
| <x:Range></x:Range> | Defines the range where validation is applied. |
| <x:Type> </x:Type> | Tells about Validation Type like Whole, Decimal, TextLength,Custom ect |
| <x:Qualifier> </x:Qualifier> | Defines comparison parameters like Greater, Equal, NotEqual, Less, GreaterOrEqual, LessOrEqual ect |
| <x:Value></x:Value> | Defines an expression or value for validation |
| <x:ErrorMessage> </x:ErrorMessage> | Defines customized Error Message. |
| <x:ErrorTitle></x:ErrorTitle> | Title of the error message. |
The following example will help you to understand the above syntax better:
<html xmlns:v="urn:schemas-microsoft-com:vml"xmlns:o="urn:schemas-microsoft-com:office:office" xmlns:x="urn:schemas-microsoft-com:office:excel"
xmlns="http://www.w3.org/TR/REC-html40">
<head>
<meta http-equiv=Content-Type content="text/html; charset=windows-1252">
<meta name=ProgId content=Excel.Sheet>
<meta name=Generator content="Microsoft Excel 11">
<!--[if gte mso 9]><xml>
<x:ExcelWorkbook>
<x:ExcelWorksheets>
<x:ExcelWorksheet>
<x:Name>CustomValidation</x:Name>
<x:WorksheetOptions>
<x:Selected/>
<x:DoNotDisplayGridlines/>
<x:ProtectContents>False</x:ProtectContents>
<x:ProtectObjects>False</x:ProtectObjects>
<x:ProtectScenarios>False</x:ProtectScenarios>
</x:WorksheetOptions>
<x:DataValidation>
<x:Range>$A$2</x:Range>
<x:Type>Whole</x:Type>
<x:Min>1</x:Min>
<x:Max>10</x:Max>
<x:ErrorMessage>Please enter between ! and 10</x:ErrorMessage>
<x:ErrorTitle>Test Application</x:ErrorTitle>
</x:DataValidation>
<x:DataValidation>
<x:Range>$A$3</x:Range>
<x:Type>Whole</x:Type>
<x:Qualifier>GreaterOrEqual</x:Qualifier>
<x:Value>12</x:Value>
<x:ErrorMessage>Please enter greater than equal to 12</x:ErrorMessage>
<x:ErrorTitle>Test Application</x:ErrorTitle>
</x:DataValidation>
<x:DataValidation>
<x:Range>$A$4</x:Range>
<x:Type>Whole</x:Type>
<x:Qualifier>LessOrEqual</x:Qualifier>
<x:Value>13</x:Value>
<x:ErrorMessage>Please enter less than equal to 13</x:ErrorMessage>
<x:ErrorTitle>Test Application</x:ErrorTitle>
</x:DataValidation>
<x:DataValidation>
<x:Range>$A$5</x:Range>
<x:Type>Custom</x:Type>
<x:Qualifier>Equal</x:Qualifier>
<x:Value>AND(MOD(A5,5)=0,A5>=0)</x:Value>
<x:ErrorMessage>Please enter in multiples of Five</x:ErrorMessage>
<x:ErrorTitle>Test Application</x:ErrorTitle>
</x:DataValidation>
</x:ExcelWorksheet>
</x:ExcelWorksheets>
<x:WindowHeight>9210</x:WindowHeight>
<x:WindowWidth>19035</x:WindowWidth>
<x:WindowTopX>0</x:WindowTopX>
<x:WindowTopY>75</x:WindowTopY>
<x:ProtectStructure>False</x:ProtectStructure>
<x:ProtectWindows>False</x:ProtectWindows>
</x:ExcelWorkbook>
</xml><![endif]-->
</head>Split Pane
A split pane can also be done using custom tags. The following custom tags are used to do that:
<x:SplitHorizontal></x:SplitHorizontal>
<x:SplitVertical></x:SplitVertical>
SplitHorizontal is used for horizontal split and tag specifies the number of rows of the top pane and SplitVertical is used for the vertical split and tag specifies the number of columns on the left pane. There are another two tags for configuring the split pane; they are:
<x:TopRowBottomPane></x:TopRowBottomPane>
<x:LeftColumnRightPane></x:LeftColumnRightPane>
These two proerties specify the start row of the bottom pane and the start column of the right pane. The following is a simple example that implements the preceding tags:
<html xmlns:v="urn:schemas-microsoft-com:vml" xmlns:o="urn:schemas-microsoft-com:office:office" xmlns:x="urn:schemas-microsoft-com:office:excel"
xmlns="http://www.w3.org/TR/REC-html40">
 <head>
    <meta http-equiv=Content-Type content="text/html; charset=windows-1252">
    <meta name=ProgId content=Excel.Sheet>
    <meta name=Generator content="Microsoft Excel 11">
    <!--[if gte mso 9]><xml>
     <x:ExcelWorkbook>
    <x:ExcelWorksheets>
     <x:ExcelWorksheet>
      <x:Name>Split</x:Name>
     <x:WorksheetOptions>
    <x:Selected/>
     <x:DoNotDisplayGridlines/>
      <x:FreezePanes/>
    <x:FrozenNoSplit/>
     <x:SplitHorizontal>2</x:SplitHorizontal>
    <x:TopRowBottomPane>2</x:TopRowBottomPane>
    <x:SplitVertical>2</x:SplitVertical>
    <x:LeftColumnRightPane>2</x:LeftColumnRightPane>
     <x:ActivePane>0</x:ActivePane>
    <x:Panes>
    <x:Pane>
    <x:Number>3</x:Number>
     </x:Pane>
     <x:Pane>
     <x:Number>1</x:Number>
    </x:Pane>
      <x:Pane>
       <x:Number>2</x:Number>
      </x:Pane>
      <x:Pane>
       <x:Number>0</x:Number>
       <x:ActiveRow>0</x:ActiveRow>
       <x:ActiveCol>1</x:ActiveCol>
      </x:Pane>
     </x:Panes>
     <x:ProtectContents>False</x:ProtectContents>
     <x:ProtectObjects>False</x:ProtectObjects>
     <x:ProtectScenarios>False</x:ProtectScenarios>
    </x:WorksheetOptions>
   </x:ExcelWorksheet>
  </x:ExcelWorksheets>
  <x:WindowHeight>9210</x:WindowHeight>
  <x:WindowWidth>19035</x:WindowWidth>
  <x:WindowTopX>0</x:WindowTopX>
  <x:WindowTopY>75</x:WindowTopY>
  <x:ProtectStructure>False</x:ProtectStructure>
  <x:ProtectWindows>False</x:ProtectWindows>
 </x:ExcelWorkbook>
</xml><![endif]-->
</head>
<body></body>
</html>
The output of the above code will be:

Figure 2
Excel Formula and NameRange
In this section we will see how to implement an Excel formula and namerange. An Excel formula is placed inside the HTML table.
For example:
<table>
    <tr>
        <td x:num x:fmla="=SUM(C1,D1)">0</td>
        <td x:num x:fmla="=SUM(D1,E1)">0</td>
    </tr>
</table>
Similarly namerange is placed inside the anchor tag <a></a>. For example:
<table>
    <tr>
        <td> <a name="NameRange1">0</a></td>
        <td ><a name="NameRange2">0</a></td>
    </tr>
</table>
The following is an example for an Excel formula and namerange implementation:
<html  xmlns:v="urn:schemas-microsoft-com:vml"xmlns:o="urn:schemas-microsoft-com:office:office" xmlns:x="urn:schemas-microsoft-com:office:excel"
xmlns="http://www.w3.org/TR/REC-html40">
<head>
    <meta http-equiv=Content-Type content="text/html; charset=windows-1252">
    <meta name=ProgId content=Excel.Sheet>
    <meta name=Generator content="Microsoft Excel 11">
<!--[if gte mso 9]><xml>
 <x:ExcelWorkbook>
  <x:ExcelWorksheets>
   <x:ExcelWorksheet>
    <x:Name>Formula</x:Name>
    <x:WorksheetOptions>
     <x:Selected/>
     <x:DoNotDisplayGridlines/>
     <x:Panes>
      <x:Pane>
       <x:Number>3</x:Number>
       <x:RangeSelection>$A$1:$B$1</x:RangeSelection>
      </x:Pane>
     </x:Panes>
     <x:ProtectContents>False</x:ProtectContents>
     <x:ProtectObjects>False</x:ProtectObjects>
     <x:ProtectScenarios>False</x:ProtectScenarios>
    </x:WorksheetOptions>
   </x:ExcelWorksheet>
  </x:ExcelWorksheets>
  <x:WindowHeight>9210</x:WindowHeight>
  <x:WindowWidth>19035</x:WindowWidth>
  <x:WindowTopX>0</x:WindowTopX>
  <x:WindowTopY>75</x:WindowTopY>
  <x:ProtectStructure>False</x:ProtectStructure>
  <x:ProtectWindows>False</x:ProtectWindows>
 </x:ExcelWorkbook>
</xml><![endif]-->
</head>
<body >
<table>
    <tr>
        <td  x:num x:fmla="=SUM(C1,D1)"><a name="NameRange1">0</a></td>
        <td  x:num x:fmla="=SUM(D1,E1)"><a name="NameRange2">0</a></td>
    </tr
</table>
</body>
</html>
Grouping
The various outline levels of grouping can be defined inside the <tr> element of HTML table. The following table row belongs to the level 1:
<tr style='mso-outline-level:1;'></tr>The following code snippet demonstrate the grouping implementation:
<html  xmlns:v="urn:schemas-microsoft-com:vml"xmlns:o="urn:schemas-microsoft-com:office:office" xmlns:x="urn:schemas-microsoft-com:office:excel" xmlns="http://www.w3.org/TR/REC-html40">
<head>
    <meta http-equiv=Content-Type content="text/html; charset=windows-1252">
    <meta name=ProgId content=Excel.Sheet>
    <meta name=Generator content="Microsoft Excel 11">
<!--[if gte mso 9]><xml>
 <x:ExcelWorkbook>
  <x:ExcelWorksheets>
   <x:ExcelWorksheet>
    <x:Name>Grouping</x:Name>
    <x:WorksheetOptions>
     <x:Selected/>
     <x:DoNotDisplayGridlines/>
     <x:ProtectContents>False</x:ProtectContents>
     <x:ProtectObjects>False</x:ProtectObjects>
     <x:ProtectScenarios>False</x:ProtectScenarios>
    </x:WorksheetOptions>
   </x:ExcelWorksheet>
  </x:ExcelWorksheets>
  <x:WindowHeight>9210</x:WindowHeight>
  <x:WindowWidth>19035</x:WindowWidth>
  <x:WindowTopX>0</x:WindowTopX>
  <x:WindowTopY>75</x:WindowTopY>
  <x:ProtectStructure>False</x:ProtectStructure>
  <x:ProtectWindows>False</x:ProtectWindows>
 </x:ExcelWorkbook>
</xml><![endif]-->
</head>
<body >
    <table
        <tr><td></td></tr>
        <tr><td></td></tr>
        <tr><td></td></tr>
        <tr style='mso-outline-level:1;'>
            <td></td>
        </tr>
        <tr style='mso-outline-level:1;'>
            <td></td>
        </tr>
        <tr style='mso-outline-level:2;'>
            <td></td>
        </tr>
        <tr style='mso-outline-level:2;'>
            <td></td>
        </tr>
        <tr style='mso-outline-level:2;'>
            <td></td>
        </tr>
        <tr style='mso-outline-level:2;'>
            <td></td>
        </tr>
        <tr style='mso-outline-level:1;'>
            <td></td>
        </tr>
        <tr>
            <td></td>
        </tr>
        <tr>
            <td></td>
        </tr>
        <tr>
            <td></td>
        </tr>
        <tr style='mso-outline-level:1;'>
            <td></td>
        </tr>
        <tr style='mso-outline-level:1;'>
            <td></td>
        </tr>
        <tr style='mso-outline-level:2;'>
            <td></td>
        </tr>
        <tr style='mso-outline-level:2;'>
            <td></td>
        </tr>
        <tr style='mso-outline-level:2;'>
            <td></td>
        </tr>
        <tr style='mso-outline-level:2;'>
            <td></td>
        </tr>
        <tr style='mso-outline-level:1;'>
            <td></td>
        </tr>
        <tr>
            <td></td>
        </tr>
        <tr>
            <td></td>
        </tr>
        <tr>
            <td></td>
        </tr>
    </table>
</body>
</html>
The output of the above code will be like this:

Figure 3
Conclusion
Excel has a wide range of usage, this topic would be helpful for those who want to invoke an Excel component from a web application to support Excel’s inherent functionalities like formulas, grouping and such.
I have an excel file named new.xls which I have saved in .html format as new.html . I have removed the extension so the filename is just new
Now if I rename the file to new.xls .
For the following code,
<input type="button" onclick='window.open("new.xls")' value="Open File">
The resultant file opens in Excel.
Then if I rename the file to new.html
For the following code
<input type="button" onclick='window.open("new.html")' value="Open File">
The resultant file will open in the browser as a table.
I want to keep the file name as new and use two different buttons, one to open the file in Excel and the other to open the file in browser as html.
Trick the browser into thinking that the file is a .xls or .html file
I tried with the following code
<!DOCTYPE html>
<html>
<body>
    <input type="button" onclick="openxls()" value="Open File as xls ">
    <input type="button" onclick="openhtml()" value="Open File as html">
</body>
<script>
    function openxls()
        {
         var x = ".xls"
         var y = "new" + x ;
         window.open(y);
        }

            function openhtml()
        {
         var x = ".html"
         var y = "new" + x ;
         window.open(y);
        }
</script>
</html>
But I got results like
Firefox can’t find the file at /C:/Users/daniel/Desktop/new.xls.
File not found
Firefox can’t find the file at /C:/Users/daniel/Desktop/new.html.
Please help
When i do var blob = new Blob([this.response], {type:"text/plain;charset=utf-8"});
The result is
<html xmlns:v="urn:schemas-microsoft-com:vml"
xmlns:o="urn:schemas-microsoft-com:office:office"
xmlns:x="urn:schemas-microsoft-com:office:excel"
xmlns="http://www.w3.org/TR/REC-html40">
<head>
<meta name="Excel Workbook Frameset">
<meta http-equiv=Content-Type content="text/html; charset=windows-1252">
<meta name=ProgId content=Excel.Sheet>
<meta name=Generator content="Microsoft Excel 12">
<link rel=File-List href="new_files/filelist.xml">
<![if !supportTabStrip]>
<link id="shLink" href="new_files/sheet001.htm">
<link id="shLink">
<script language="JavaScript">
<!--
var c_lTabs=1;
var c_rgszSh=new Array(c_lTabs);
c_rgszSh[0] = "Sample-spreadsheet-file";
var c_rgszClr=new Array(8);
c_rgszClr[0]="window";
c_rgszClr[1]="buttonface";
c_rgszClr[2]="windowframe";
c_rgszClr[3]="windowtext";
c_rgszClr[4]="threedlightshadow";
c_rgszClr[5]="threedhighlight";
c_rgszClr[6]="threeddarkshadow";
c_rgszClr[7]="threedshadow";
var g_iShCur;
var g_rglTabX=new Array(c_lTabs);
function fnGetIEVer()
{
var ua=window.navigator.userAgent
var msie=ua.indexOf("MSIE")
if (msie>0 && window.navigator.platform=="Win32")
return parseInt(ua.substring(msie+5,ua.indexOf(".", msie)));
else
return 0;
}
function fnBuildFrameset()
{
var szHTML="<frameset rows="*,18" border=0 width=0 frameborder=no framespacing=0>"+
"<frame src=""+document.all.item("shLink")[0].href+"" name="frSheet" noresize>"+
"<frameset cols="54,*" border=0 width=0 frameborder=no framespacing=0>"+
"<frame src="" name="frScroll" marginwidth=0 marginheight=0 scrolling=no>"+
"<frame src="" name="frTabs" marginwidth=0 marginheight=0 scrolling=no>"+
"</frameset></frameset><plaintext>";
with (document) {
open("text/html","replace");
write(szHTML);
close();
}
fnBuildTabStrip();
}
function fnBuildTabStrip()
{
var szHTML=
"<html><head><style>.clScroll {font:8pt Courier New;color:"+c_rgszClr[6]+";cursor:default;line-height:10pt;}"+
".clScroll2 {font:10pt Arial;color:"+c_rgszClr[6]+";cursor:default;line-height:11pt;}</style></head>"+
"<body onclick="event.returnValue=false;" ondragstart="event.returnValue=false;" onselectstart="event.returnValue=false;" bgcolor="+c_rgszClr[4]+" topmargin=0 leftmargin=0><table cellpadding=0 cellspacing=0 width=100%>"+
"<tr><td colspan=6 height=1 bgcolor="+c_rgszClr[2]+"></td></tr>"+
"<tr><td style="font:1pt"> <td>"+
"<td valign=top id=tdScroll class="clScroll" onclick="parent.fnFastScrollTabs(0);" onmouseover="parent.fnMouseOverScroll(0);" onmouseout="parent.fnMouseOutScroll(0);"><a>«</a></td>"+
"<td valign=top id=tdScroll class="clScroll2" onclick="parent.fnScrollTabs(0);" ondblclick="parent.fnScrollTabs(0);" onmouseover="parent.fnMouseOverScroll(1);" onmouseout="parent.fnMouseOutScroll(1);"><a><</a></td>"+
"<td valign=top id=tdScroll class="clScroll2" onclick="parent.fnScrollTabs(1);" ondblclick="parent.fnScrollTabs(1);" onmouseover="parent.fnMouseOverScroll(2);" onmouseout="parent.fnMouseOutScroll(2);"><a>></a></td>"+
"<td valign=top id=tdScroll class="clScroll" onclick="parent.fnFastScrollTabs(1);" onmouseover="parent.fnMouseOverScroll(3);" onmouseout="parent.fnMouseOutScroll(3);"><a>»</a></td>"+
"<td style="font:1pt"> <td></tr></table></body></html>";
with (frames['frScroll'].document) {
open("text/html","replace");
write(szHTML);
close();
}
szHTML =
"<html><head>"+
"<style>A:link,A:visited,A:active {text-decoration:none;"+"color:"+c_rgszClr[3]+";}"+
".clTab {cursor:hand;background:"+c_rgszClr[1]+";font:9pt Arial;padding-left:3px;padding-right:3px;text-align:center;}"+
".clBorder {background:"+c_rgszClr[2]+";font:1pt;}"+
"</style></head><body onload="parent.fnInit();" onselectstart="event.returnValue=false;" ondragstart="event.returnValue=false;" bgcolor="+c_rgszClr[4]+
" topmargin=0 leftmargin=0><table id=tbTabs cellpadding=0 cellspacing=0>";
var iCellCount=(c_lTabs+1)*2;
var i;
for (i=0;i<iCellCount;i+=2)
szHTML+="<col width=1><col>";
var iRow;
for (iRow=0;iRow<6;iRow++) {
szHTML+="<tr>";
if (iRow==5)
szHTML+="<td colspan="+iCellCount+"></td>";
else {
if (iRow==0) {
for(i=0;i<iCellCount;i++)
szHTML+="<td height=1 class="clBorder"></td>";
} else if (iRow==1) {
for(i=0;i<c_lTabs;i++) {
szHTML+="<td height=1 nowrap class="clBorder"> </td>";
szHTML+=
"<td id=tdTab height=1 nowrap class="clTab" onmouseover="parent.fnMouseOverTab("+i+");" onmouseout="parent.fnMouseOutTab("+i+");">"+
"<a href=""+document.all.item("shLink")[i].href+"" target="frSheet" id=aTab> "+c_rgszSh[i]+" </a></td>";
}
szHTML+="<td id=tdTab height=1 nowrap class="clBorder"><a id=aTab> </a></td><td width=100%></td>";
} else if (iRow==2) {
for (i=0;i<c_lTabs;i++)
szHTML+="<td height=1></td><td height=1 class="clBorder"></td>";
szHTML+="<td height=1></td><td height=1></td>";
} else if (iRow==3) {
for (i=0;i<iCellCount;i++)
szHTML+="<td height=1></td>";
} else if (iRow==4) {
for (i=0;i<c_lTabs;i++)
szHTML+="<td height=1 width=1></td><td height=1></td>";
szHTML+="<td height=1 width=1></td><td></td>";
}
}
szHTML+="</tr>";
}
szHTML+="</table></body></html>";
with (frames['frTabs'].document) {
open("text/html","replace");
charset=document.charset;
write(szHTML);
close();
}
}
function fnInit()
{
g_rglTabX[0]=0;
var i;
for (i=1;i<=c_lTabs;i++)
with (frames['frTabs'].document.all.tbTabs.rows[1].cells[fnTabToCol(i-1)])
g_rglTabX[i]=offsetLeft+offsetWidth-6;
}
function fnTabToCol(iTab)
{
return 2*iTab+1;
}
function fnNextTab(fDir)
{
var iNextTab=-1;
var i;
with (frames['frTabs'].document.body) {
if (fDir==0) {
if (scrollLeft>0) {
for (i=0;i<c_lTabs&&g_rglTabX[i]<scrollLeft;i++);
if (i<c_lTabs)
iNextTab=i-1;
}
} else {
if (g_rglTabX[c_lTabs]+6>offsetWidth+scrollLeft) {
for (i=0;i<c_lTabs&&g_rglTabX[i]<=scrollLeft;i++);
if (i<c_lTabs)
iNextTab=i;
}
}
}
return iNextTab;
}
function fnScrollTabs(fDir)
{
var iNextTab=fnNextTab(fDir);
if (iNextTab>=0) {
frames['frTabs'].scroll(g_rglTabX[iNextTab],0);
return true;
} else
return false;
}
function fnFastScrollTabs(fDir)
{
if (c_lTabs>16)
frames['frTabs'].scroll(g_rglTabX[fDir?c_lTabs-1:0],0);
else
if (fnScrollTabs(fDir)>0) window.setTimeout("fnFastScrollTabs("+fDir+");",5);
}
function fnSetTabProps(iTab,fActive)
{
var iCol=fnTabToCol(iTab);
var i;
if (iTab>=0) {
with (frames['frTabs'].document.all) {
with (tbTabs) {
for (i=0;i<=4;i++) {
with (rows[i]) {
if (i==0)
cells[iCol].style.background=c_rgszClr[fActive?0:2];
else if (i>0 && i<4) {
if (fActive) {
cells[iCol-1].style.background=c_rgszClr[2];
cells[iCol].style.background=c_rgszClr[0];
cells[iCol+1].style.background=c_rgszClr[2];
} else {
if (i==1) {
cells[iCol-1].style.background=c_rgszClr[2];
cells[iCol].style.background=c_rgszClr[1];
cells[iCol+1].style.background=c_rgszClr[2];
} else {
cells[iCol-1].style.background=c_rgszClr[4];
cells[iCol].style.background=c_rgszClr[(i==2)?2:4];
cells[iCol+1].style.background=c_rgszClr[4];
}
}
} else
cells[iCol].style.background=c_rgszClr[fActive?2:4];
}
}
}
with (aTab[iTab].style) {
cursor=(fActive?"default":"hand");
color=c_rgszClr[3];
}
}
}
}
function fnMouseOverScroll(iCtl)
{
frames['frScroll'].document.all.tdScroll[iCtl].style.color=c_rgszClr[7];
}
function fnMouseOutScroll(iCtl)
{
frames['frScroll'].document.all.tdScroll[iCtl].style.color=c_rgszClr[6];
}
function fnMouseOverTab(iTab)
{
if (iTab!=g_iShCur) {
var iCol=fnTabToCol(iTab);
with (frames['frTabs'].document.all) {
tdTab[iTab].style.background=c_rgszClr[5];
}
}
}
function fnMouseOutTab(iTab)
{
if (iTab>=0) {
var elFrom=frames['frTabs'].event.srcElement;
var elTo=frames['frTabs'].event.toElement;
if ((!elTo) ||
(elFrom.tagName==elTo.tagName) ||
(elTo.tagName=="A" && elTo.parentElement!=elFrom) ||
(elFrom.tagName=="A" && elFrom.parentElement!=elTo)) {
if (iTab!=g_iShCur) {
with (frames['frTabs'].document.all) {
tdTab[iTab].style.background=c_rgszClr[1];
}
}
}
}
}
function fnSetActiveSheet(iSh)
{
if (iSh!=g_iShCur) {
fnSetTabProps(g_iShCur,false);
fnSetTabProps(iSh,true);
g_iShCur=iSh;
}
}
window.g_iIEVer=fnGetIEVer();
if (window.g_iIEVer>=4)
fnBuildFrameset();
//-->
</script>
<![endif]><!--[if gte mso 9]><xml>
<x:ExcelWorkbook>
<x:ExcelWorksheets>
<x:ExcelWorksheet>
<x:Name>Sample-spreadsheet-file</x:Name>
<x:WorksheetSource HRef="new_files/sheet001.htm"/>
</x:ExcelWorksheet>
</x:ExcelWorksheets>
<x:Stylesheet HRef="new_files/stylesheet.css"/>
<x:WindowHeight>11745</x:WindowHeight>
<x:WindowWidth>20730</x:WindowWidth>
<x:WindowTopX>-15</x:WindowTopX>
<x:WindowTopY>0</x:WindowTopY>
<x:Calculation>ManualCalculation</x:Calculation>
<x:MaxChange>0.0001</x:MaxChange>
<x:ProtectStructure>False</x:ProtectStructure>
<x:ProtectWindows>False</x:ProtectWindows>
</x:ExcelWorkbook>
</xml><![endif]-->
</head>
<frameset rows="*,39" border=0 width=0 frameborder=no framespacing=0>
<frame src="new_files/sheet001.htm" name="frSheet">
<frame src="new_files/tabstrip.htm" name="frTabs" marginwidth=0 marginheight=0>
<noframes>
<body>
<p>This page uses frames, but your browser doesn't support them.</p>
</body>
</noframes>
</frameset>
</html>
-
-

- 18 Posts
Send PM
Подскажите, пожалуйста, как вывести ресурс в формате xls?
В настройках ресурса есть опция Content-type: vnd.ms-excel, но этого явно недостаточно. Как правильно сформировать содержимое ресурса, чтобы получить корректный файл Excel 2003?Я пробовал размечать ресурс в виде xml (формат подсмотрел у файлов, экспортирвоанных Экселем в xml), но в результате получаем либо файл *.xls, который требует дополнительного импорта в Эксель, либо файл *.xlsm, который открывается только в 2007-ом Офисе.
-
-
-
- 630 Posts
Send PM
Quote from: tambourine at Sep 16, 2010, 11:21 AM
Подскажите, пожалуйста, как вывести ресурс в формате xls?
…
Я пробовал размечать ресурс в виде xml (формат подсмотрел у файлов, экспортирвоанных Экселем в xml), но в результате получаем либо файл *.xls, который требует дополнительного импорта в Эксель, либо файл *.xlsm, который открывается только в 2007-ом Офисе.В своё время из PHP формировал Excel-файл накладной по шаблону следующим образом (в MODx тот же код помещаем в сниппет):
header('Content-type: application/octet-stream');
header('Content-Disposition: attachment; filename=filename.xls');
(предоставим определение типа браузеру по расширению)
А файл отдавал в html-формате (в Excel меню файл — сохранить как — HTML документ) — внутри должно быть похоже на:
<html xmlns:o=”urn:schemas-microsoft-com:office:office”
xmlns:x=”urn:schemas-microsoft-com:office:excel”
xmlns=”http://www.w3.org/TR/REC-html40″>
...
Открывается на всех (проверял на XP,2003,2007.. думаю, и с более ранними проблем не возникнет) версиях Excel как из браузера напрямую так и после сохранения.
Как вариант (если по какой-либо причине не подойдет), можно попробовать готовые PHP-классы для работы с Excel
-
-
-
- 18 Posts
Send PM
Большое спасибо! Действительно, работает. Я и не думал, что это так просто.
-
-
-
- 18 Posts
Send PM
Обнаружилось, что в OpenOffice подобным образом сгенерированные файлы открываются в неверной кодировке. Подскажите, как правильно задать кодировку?
-
-
-
- 630 Posts
Send PM
Quote from: tambourine at Sep 20, 2010, 09:55 AM
Обнаружилось, что в OpenOffice подобным образом сгенерированные файлы открываются в неверной кодировке. Подскажите, как правильно задать кодировку?
В HTML по идее как-то так задается
<meta http-equiv=»Content-Type» content=»text/html; charset=windows-1251″ />
вместо text/html по идее должно быть application/vnd.ms-excel..
Как альтернативный вариант — текстовый (.xls) файл полученный после экспорта (пере)сохранить в кодировке UTF-8(или 1251 — какая нужна?) (я обычно использую notepad++) и работать уже с ним..
-
-
-
- 18 Posts
Send PM
Спасибо. Правильный мета-тег будет таким (сайт у меня в utf-8):
<meta http-equiv=»Content-Type» content=»application/vnd.ms-excel; charset=utf-8″ /> -

