
How to type Text over a Line in Word
- Highlight the text and click the Underline button on the Home tab in the Font group, and you will notice that the text will be on the line.
- The second technique is to click the Insert tab and click the Text box button in the Text group.
Contents
- 1 How do you make lines to write on in Word?
- 2 How do you write on top of a line?
- 3 How do you put a line above text in Word?
- 4 How do you type Overbar?
- 5 How do you put a line under a letter in Word?
- 6 How do you type a horizontal line on a keyboard?
- 7 How do you write on lined paper?
- 8 How do I edit lines in Word?
- 9 How do you put a line above and below text in Word?
- 10 How do you get a line above a letter on a keyboard?
- 11 How do you make an O with a line through it?
- 12 How do you pronounce a with a line over it?
- 13 How do you add lines to a resume in Word?
How do you make lines to write on in Word?
Use the Shapes Menu to Insert a Line in Word
- Place the cursor in the spot where you want to insert a line.
- Go to the Insert tab.
- In the Illustrations group, select the Shapes drop-down arrow.
- In the Lines group, choose a line shape.
- In the Word document, drag across the location where you want the line to appear.
How do you write on top of a line?
In the drop-down menu, click on the button labeled “Special Characters” and then “More Symbols.” You will find a list of special characters under this section. Scroll through them until you find the specific overlined letter you want to add, such as an a with a line over it, and then click on it.
How do you put a line above text in Word?
Type the text you want to overline into your Word document and make sure the “Home” tab is active on the ribbon bar. Click the down arrow on the “Borders” button in the “Paragraph” section of the “Home” tab. Select “Top Border” from the drop-down menu.
How do you type Overbar?
Method 1: Use Word’s Equation Editor
- Go to the Insert tab > Symbols group (far right), then click Equation.
- Select Insert New Equation from the bottom of the list.
- Click Accent on the Design tab > Structures group.
- Scroll down past the Boxed Formulas section to the Overbars and Underbars section.
- Click the Overbar icon.
How do you put a line under a letter in Word?
Hold the “Ctrl” key and press “U” to put a line under the letter. Press the combination again to remove the line.
How do you type a horizontal line on a keyboard?
Press and hold the “Shift” key, then press and hold the hyphen “-” key, located two keys to the left of “Backspace” on a PC or “Delete” on a Mac. This creates a solid, horizontal straight line.
How do you write on lined paper?
Always on your left.
Also, don’t write in the white space above the first line. You can write your name and date there, but that’s all. And don’t write outside the red lines – you should leave at least an inch of white space all around the outside edge of the paper.
How do I edit lines in Word?
In Excel, Outlook, PowerPoint, and Word
- Select the line that you want to change.
- Under Drawing Tools, on the Format tab, in the Shape Styles group, click the arrow next to Shape Outline.
- Point to Dashes, and then click the line style that you want.
How do you put a line above and below text in Word?
To insert a line in Word above and / or below a paragraph using the Borders button:
- Select the paragraph(s) to which you want to add a line.
- Click the Home tab in the Ribbon.
- Click Borders in the Paragraph group. A drop-down menu appears.
- Select the line you want to use.
How do you get a line above a letter on a keyboard?
These keyboard shortcuts will help you display text more accurately in your business documents.
- Open a document in Microsoft Word.
- Press “Ctrl-Shift” and the caret (” ^ “) key and then the letter to insert a circumflex accent.
- Press “Ctrl-Shift” and the tilde (” ~ “) key and then the letter to insert a tilde accent.
How do you make an O with a line through it?
ø = Hold down the Control and Shift keys and type a / (slash), release the keys, and type an o. Ø = Hold down the Control and Shift keys and type a / (slash), release the keys, hold down the Shift key and type an O.
How do you pronounce a with a line over it?
For instance, a line over the letter “i” would be pronounced like “eye” like in the word “pie,” and a line over the letter “o” would be pronounced “oh” like in the word “toe.” A line over the vowel “a” would be pronounced “ay” like in “stray,” and a line over the letter “e” would be pronounced like “ee” in “tree.”
How do you add lines to a resume in Word?
To add a line under a header or line of text, highlight the text and select the bottom border option under Paragraph/Borders. Another way is to Insert>Shapes>choose the Line shape and drag the line under the text from left to right.
Download PC Repair Tool to quickly find & fix Windows errors automatically
Have you tried to type over a line in Microsoft Word, but the text is not staying on the line but keeps on moving and creating space, and you are wondering how can I get the text on the line without the line moving and creating space? In this tutorial, we will discuss some techniques to write over the line.
Open Microsoft Word.
Draw a line in your document.
The first technique we will use is to write on the line; notice, when you are typing on the line the text, is not staying on the line, and the line keeps on moving.
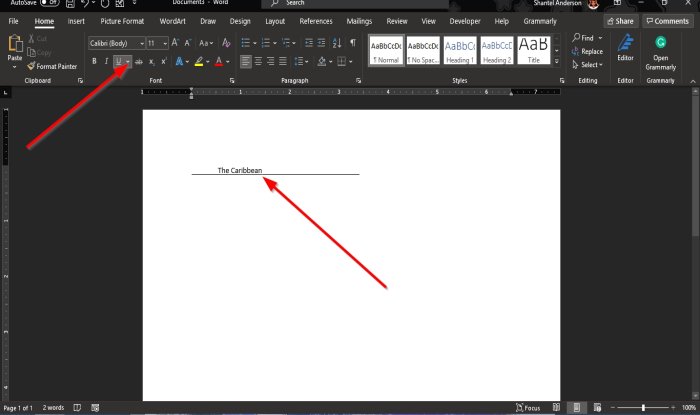
Highlight the text and click the Underline button on the Home tab in the Font group, and you will notice that the text will be on the line.
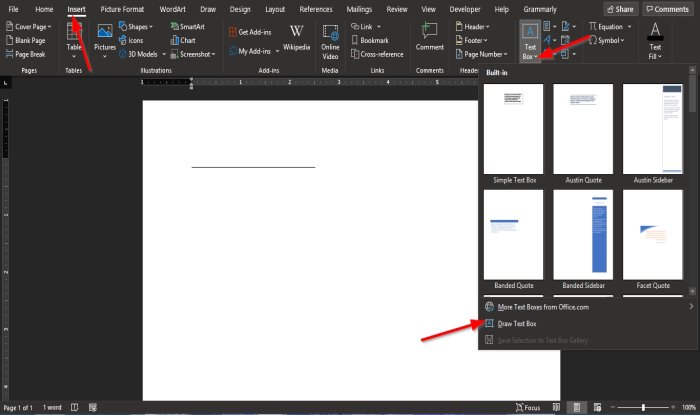
The second technique is to click the Insert tab and click the Text box button in the Text group.
In the drop-down list, select Draw Text Box.
A text box will appear in the document.
Move the text box over the line; ensure that the bottom of the text box matches the line.
We do not want the text box to have an outline; we will click the Shape Format tab.
The Shape Format tab appears whenever the shape is selected, including the text box.

On the Shape Format tab in the Shape Styles group, click the Shape Outline button, and in the drop-down list, select No Outline.
Notice that the text box lines become invisible.
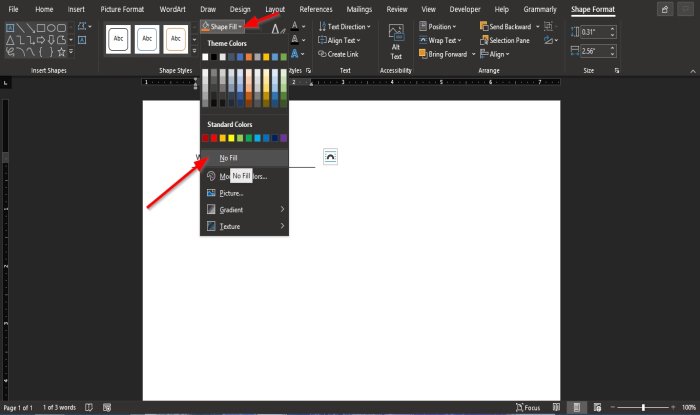
Then click the Shape Fill button, and in the drop-down list, click No Fill.
Drag the text box closer to the line.
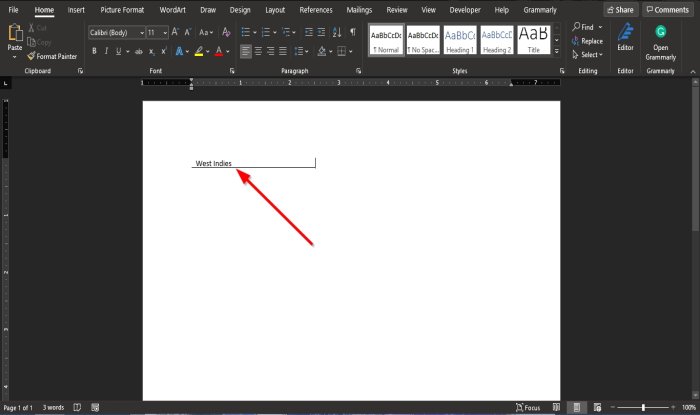
Now, we have the text on the line.
We hope this tutorial helps you understand how to type over lines in Microsoft Word.
Read next: How to add Citations & References in Word.

Shantel has studied Data Operations, Records Management, and Computer Information Systems. She is quite proficient in using Office software. Her goal is to become a Database Administrator or a System Administrator.
Contents
- 1 How do you create a line in Word that you can type on?
- 2 How do you type on a line?
- 3 Can you overline text in Word?
- 4 How do you uppercase in Word?
- 5 How do you put a line above and below text in Word?
- 6 How do you write ō?
- 7 How do you insert a line in Microsoft Word 2010?
- 8 Why does my Word document have a black line?
- 9 What is the vertical line symbol called?
- 10 Why is there a vertical line on my Word document?
- 11 How do I get rid of vertical lines in Word?
- 12 How do I remove vertical lines from a table in Word?
- 13 How do you show table lines in Word?
- 14 How do I get rid of lines in a table in Word without deleting the text?
- 15 How do you hide the lines in a table in Microsoft Word 2010?
- 16 Where is clear all formatting in Word?
- 17 How do I pin table tools in Word?
- 18 How do you customize a table in Word?
How do you create a line in Word that you can type on?
Place the insertion point where you want the ruling line (underlining). On the Format menu, click Font. In the Underline style box, select the line style you want, and then click OK. For every blank space you want to underline, press CTRL+SHIFT+SPACEBAR.
How do you type on a line?
Can you overline text in Word?
Type the text you want to overline into your Word document and make sure the “Home” tab is active on the ribbon bar. Click the down arrow on the “Borders” button in the “Paragraph” section of the “Home” tab. Select “Top Border” from the drop-down menu.
How do you uppercase in Word?
To use a keyboard shortcut to change between lowercase, UPPERCASE, and Capitalize Each Word, select the text and press SHIFT + F3 until the case you want is applied.
How do you put a line above and below text in Word?
To insert a line in Word above and / or below a paragraph using the Borders button:
- Select the paragraph(s) to which you want to add a line.
- Click the Home tab in the Ribbon.
- Click Borders in the Paragraph group. A drop-down menu appears.
- Select the line you want to use.
How do you write ō?
Press Alt with the appropriate letter. For example, to type ā (a with macron), press Alt + A ; to type ō (o with macron), press Alt + O .
How do you insert a line in Microsoft Word 2010?
Why does my Word document have a black line?
If you type three or more hyphens in Word, you often get a black line going all the way across the page. Here’s how to get rid of them: 1. Click to place your cursor above the line.
What is the vertical line symbol called?
The vertical line, also called the vertical slash or upright slash ( | ), is used in mathematical notation in place of the expression “such that” or “it is true that.” This symbol is commonly encountered in statements involving logic and sets. Also see Mathematical Symbols.
Why is there a vertical line on my Word document?
Related. When Word inserts a vertical red line into your margins when you create a new paragraph, it means someone has enabled change tracking in the document. Change tracking is often used with shared documents so that each user’s changes can be tracked and even undone if necessary.
How do I get rid of vertical lines in Word?
First, you can press Ctrl+Z right after you pressed Enter and Word added the line. In this case, the line is removed and your characters remain.
How do I remove vertical lines from a table in Word?
How do you show table lines in Word?
Click the “Layout” table under “Table Tools”. In the “Table” section of the “Layout” tab, click “View Gridlines”. The gridlines now display on the table. To turn off the gridlines for the table, simply select the table and click “View Gridlines” again.
How do I get rid of lines in a table in Word without deleting the text?
Here’s how to do that.
- Click on the table you want to remove. This action also will trigger an exclusive menu for managing the table.
- Go to the Table Tools > Layout menu.
- Click Convert to Text. Advertisement.
- Select the separator type between text, then click OK.
- The table is now removed and the text still there.
How do you hide the lines in a table in Microsoft Word 2010?
Click anywhere in the table. Activate the Layout tab of the ribbon (under Table Tools). Click View Gridlines in the Table group on the left hand side to toggle gridlines on/off.
Where is clear all formatting in Word?
On the Home tab, in the Font group, click Clear All Formatting. On the Home tab, in the Font group, click Clear All Formatting. On the Message tab, in the Basic Text group, click Clear All Formatting.
How do I pin table tools in Word?
Locking the Position of Tools
- Right-click on one of the toolbars. You should see a Context menu.
- From the Context menu, choose Customize.
- Make sure the Options tab is displayed.
- Click the Reset Menu and Toolbar Usage Data button.
- Select the Show Standard and Formatting Toolbars on Two Rows check box.
- Click OK.
How do you customize a table in Word?
To apply a table style:
- Click anywhere on the table, then click the Design tab on the right side of the Ribbon. Clicking the Design tab.
- Locate the Table Styles group, then click the More drop-down arrow to see all available table styles.
- Select the desired style.
- The selected table style will appear.
Years ago, Word added an added band back you amid shapes and graphics. It was awkward to assignment with and created abashing for users who weren’t acquainted it was there. Eventually, Word accustomed us to admit cartoon and shapes in the absolute certificate and set wrapping options to actuate how the cartoon and argument mingle. Now we accept addition option: The cartoon canvas is a new alignment apparatus for inserting circuitous assets with lots of parts. In this article, I’ll appearance you how to access assets in the cartoon layer.

SEE: 83 Excel tips every user should master (TechRepublic)
I’m application Word Online because not anybody has upgraded to 365, and this affection is accessible alone to Word Online and 365 subscribers. There’s no affirmation file; you won’t charge one.
For the best part, the cartoon band is an authoritative tool. For instance, you ability admit a account and again comment it with ink. You could do so at the certificate level, but you ability acquisition it easier in the cartoon layer, at atomic while you’re alive on it. It’s affectionate of a access for shapes, pictures, text, and so on. You can admit added pieces and move them about after impacting the agreeable breeze in the certificate layer. You’re not appropriate to use the cartoon band though; if your “drawing” has alone a brace of pieces, the cartoon band ability be overkill.
SEE: Office 365: A adviser for tech and business leaders (free PDF) (TechRepublic)
To admit a cartoon application the cartoon layer, position the cursor area you appetite the drawing. Then, bang the Admit tab and again bang Drawing. Doing so displays a new canvas, as apparent in Figure A. If you don’t accept the Draw tab in 365 desktop, bang the Admit tab. In the illustrations group, bang the Shapes dropdown. At the basal of the consistent list, bang New Cartoon Layer. Word will affectation a new cartoon layer.

Figure A
Once you accept a canvas, you can admit text, shapes, or address application one of the abounding pen options. Microsoft 365 desktop additionally lets you admit clear files into the cartoon layer. To admit the cartoon into the document, bang Save and Close.
The pieces in Figure B are bald silliness, but don’t let the abridgement of my architecture abilities abstract you from this feature. As you can see in Figure C, the cartoon is now allotment of the document. (If the cartoon is too large, use the alternative handles to abate its size.) While you assignment on the drawing, annihilation happens at the argument level. Once the cartoon is inserted, use formats as you commonly would. To adapt the drawing, double-click it. Back you annoyance it through the content, Word treats aggregate in the cartoon band as a distinct object.
Figure B
Figure C

Each cartoon uses its own canvas, which agency you can actualize assorted assets in the aforementioned document. Also, I mentioned you could use the Admit tab (in 365 desktop) if you don’t accept the Draw tab. Best likely, if you do a lot of cartoon in Word you’ll appetite to add the Draw tab as follows:
Now that you apperceive how to use the cartoon canvas, let’s attending at connectors.
True connectors aren’t accessible in the certificate layer. Application Word Online, you can use curve and accumulation them, but alike again they can be a bit difficult to assignment with. In the cartoon layer, connectors break connected. Not alone do they “stick,” they amplitude and angle as you move the affiliated shapes. Let’s analyze this affection now:
Figure D
At this point, the shapes aren’t connected. Annoyance one end of the band to the appearance on the left. Back the affiliation credibility (little dots) appear, annoyance the band to one of the points. You’ll apperceive they’re affiliated back the point changes color. In Figure E, you can see that the affiliation arrow is blooming instead of bare like the point to the right. Figure F shows both shapes affiliated to the aforementioned connector. Move one or both of the shapes and watch the adapter accommodate to the new positions. Back you’re done, bang Save and Close to admit the new cartoon into the document. Figure G shows the new cartoon amid into the certificate layer.
:max_bytes(150000):strip_icc()/Word_linedesign-56270eba450549208dc1a55a4203b1f7.jpg "How to Insert a Line in Word")
Figure E
Figure F
Figure G
We’ve affected agilely on this adolescent affection and had a bit of fun. If you charge to actualize assets in Word, you’ll acquisition the new cartoon canvas accessible in befitting the pieces together.
How To Write On A Line In Word – How To Write On A Line In Word
| Welcome to help my weblog, in this time period I’m going to explain to you about How To Factory Reset Dell Laptop. And from now on, here is the 1st picture:

Think about impression above? will be in which remarkable???. if you feel thus, I’l l explain to you a number of graphic yet again underneath:
So, if you would like get these outstanding pictures regarding (How To Write On A Line In Word), click on save link to download the shots to your laptop. They’re prepared for download, if you’d prefer and wish to get it, simply click save symbol in the post, and it’ll be instantly downloaded in your laptop.} As a final point if you would like find unique and the latest image related with (How To Write On A Line In Word), please follow us on google plus or save this website, we try our best to give you daily up-date with fresh and new graphics. Hope you love staying right here. For some up-dates and latest news about (How To Write On A Line In Word) pictures, please kindly follow us on tweets, path, Instagram and google plus, or you mark this page on bookmark area, We attempt to give you up grade periodically with all new and fresh pictures, like your exploring, and find the right for you.
Here you are at our site, contentabove (How To Write On A Line In Word) published . Nowadays we are pleased to declare that we have found an awfullyinteresting topicto be pointed out, that is (How To Write On A Line In Word) Many people attempting to find details about(How To Write On A Line In Word) and of course one of these is you, is not it?

:max_bytes(150000):strip_icc()/003_insert-horizontal-lines-in-word-4169481-5c797a97c9e77c0001f57bf9.jpg "How to Insert a Line in Word")


 the")


:max_bytes(150000):strip_icc()/Word_linetypes-3121d46c463b4445837ff9fcb06c8471.jpg "Mainai rimas paskambinti word how to make lines to write on")
:max_bytes(150000):strip_icc()/001_insert-horizontal-lines-in-word-4169481-5c79795cc9e77c000136a71d.jpg "linijinis keleivis daugiausia how to write on the line in word")


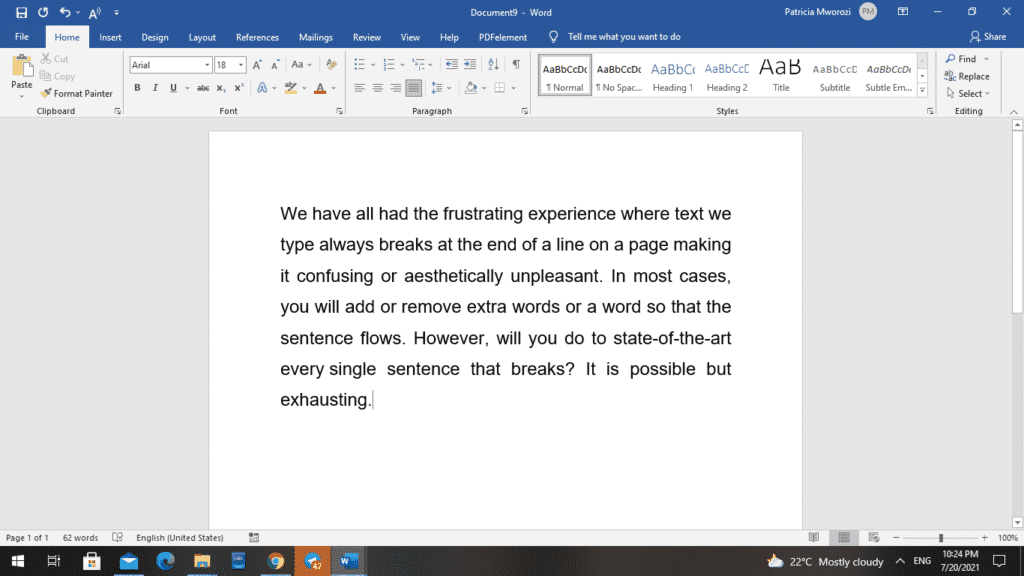
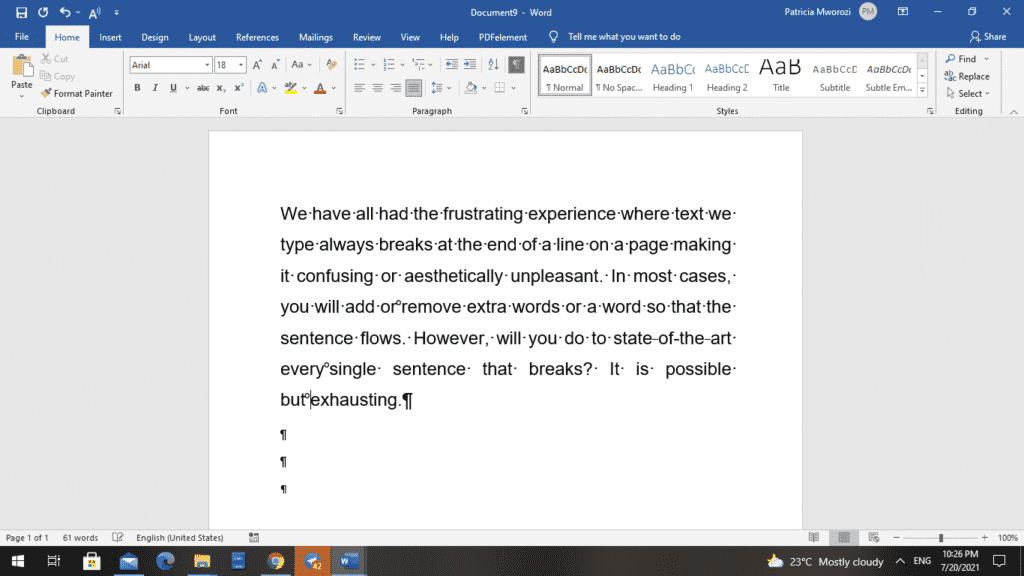
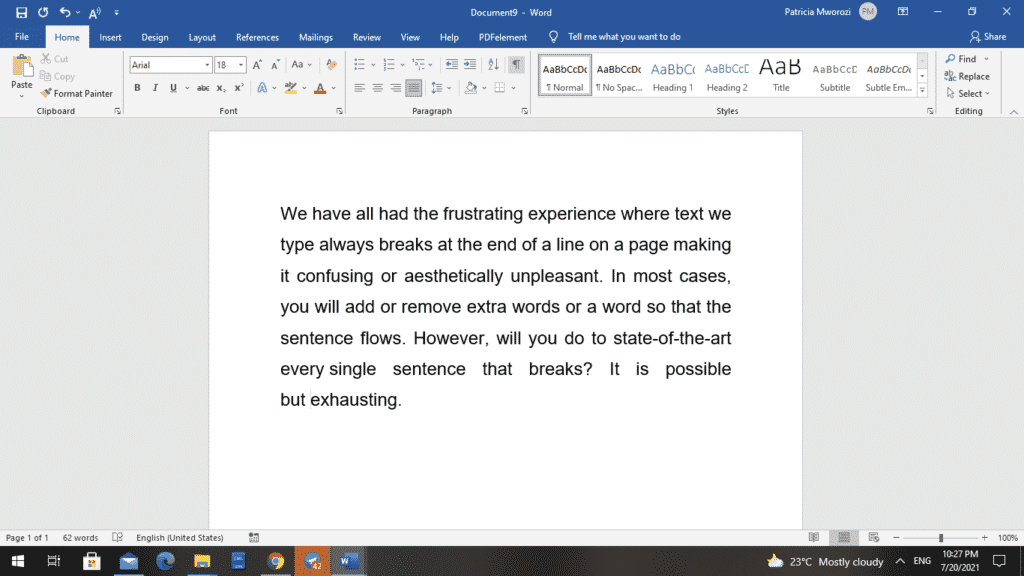
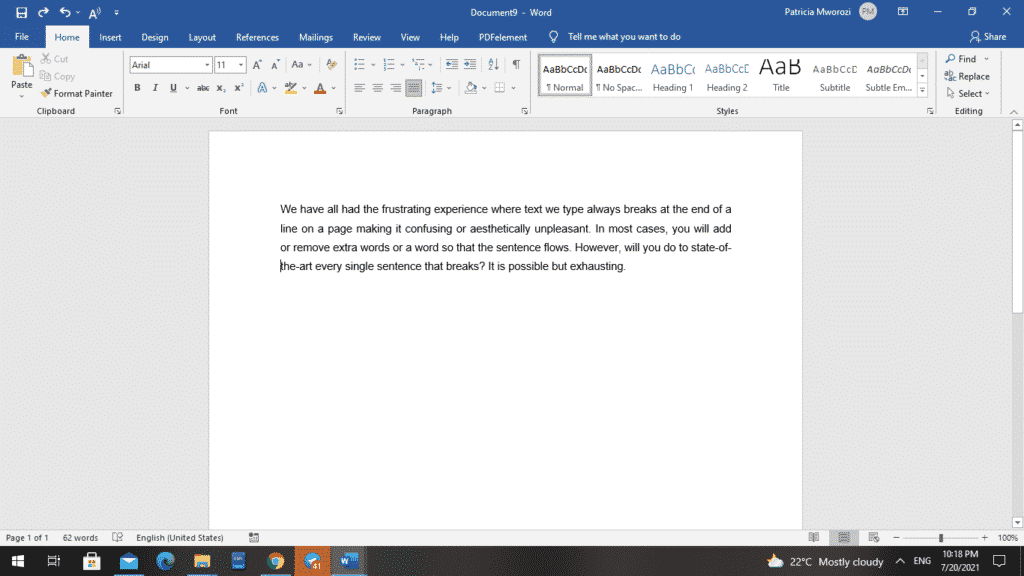
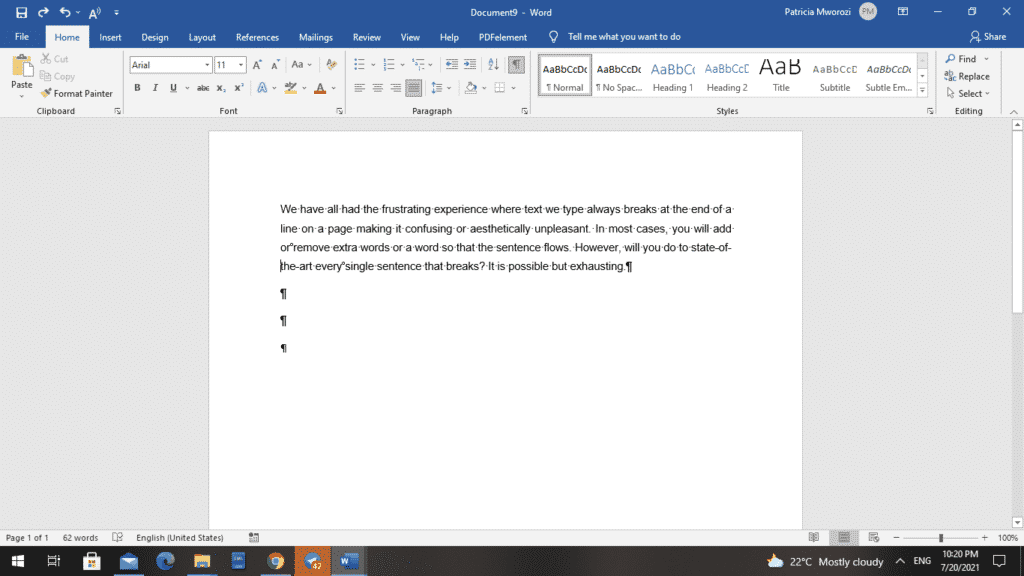
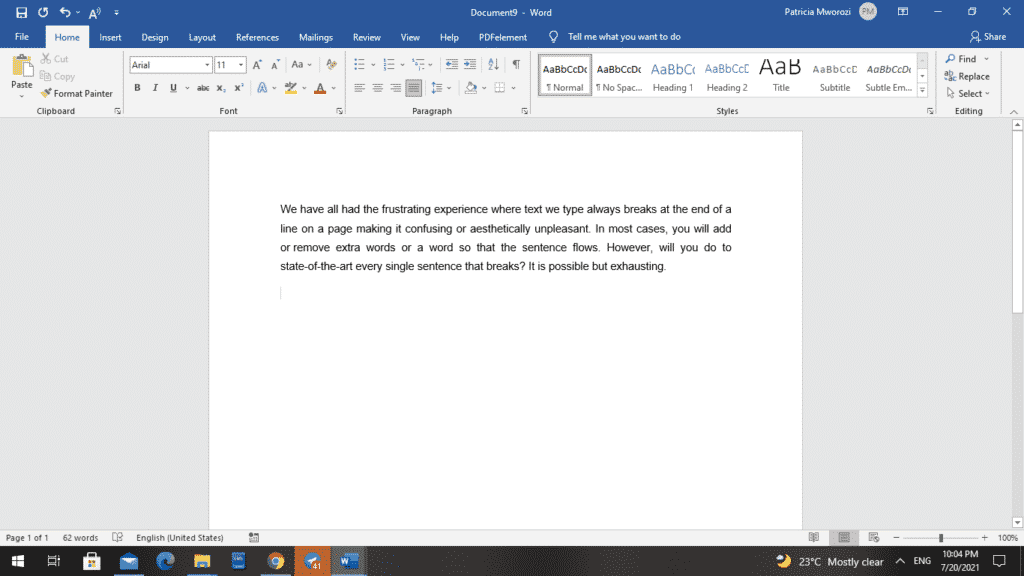
We have all had the frustrating experience where the text breaks at the end of a line on a page, making it confusing or aesthetically unpleasant. In most cases, you will add or remove extra words or a word so that the sentence flows. However, will you do this for every single sentence that breaks? It is possible but exhausting.
Below are three ways to keep words together on a line.
1. Non-breaking space
The first step is to turn on a feature called ‘Show Hide in the Home tab in the group for paragraph features. This will display non-printing characters. However, they won’t be displayed when the document is printed. By enabling this, we can see that we have what is called soft spaces: that is, where dots appear between those words. We are going to delete them where we want to put a non-breaking space.
- Go to the end of the sentence where you want to keep words together.
- Remove the space between the two words you want to keep together.

- Turn on ‘Show Hide.’
- Place the cursor between the words.
- Press CTRL +Shift + Space
The two words will remain together, regardless of the changes you make to the paragraph.
Doing this adds a character that looks like the degree symbol. This is your non-breaking space. It is only visible when you turn on Show Hide.
2. Non-breaking hyphens
This is the same with non-breaking spaces but for words that are separated by hyphens. Such words breaking at the end of a sentence are aesthetically displeasing. To make sure the words stay together, we will follow these simple steps using state-of-the-art.
- Remove the hyphens between ‘state-of-the-art.’
- Turn on ‘Show Hide.’
Before
After
- After removing the first hyphen, press CTRL + Shift + Hyphen.
- Repeat this for the remaining hyphens as this does not work for all the hyphens at once.
The block will then remain unaffected regardless of the changes made to the paragraph.
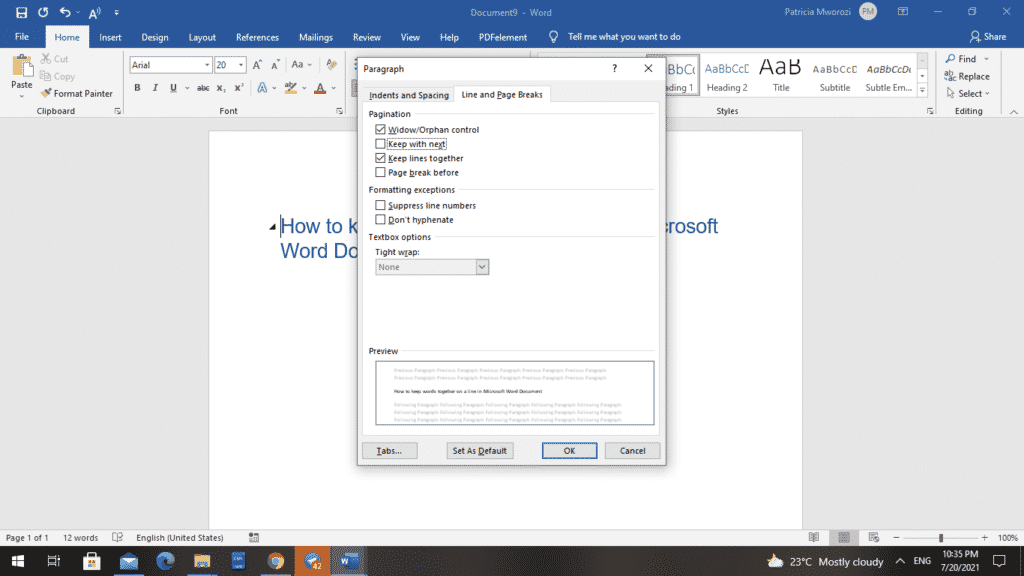
3. Non-breaking lines and paragraphs
Another challenge we might have with line breaks and page breaks is when we might have headings on one page, and the rest of the content is on another or where paragraphs might split between two different pages.
The goal is to keep that heading attached to or glued to the paragraph below it.
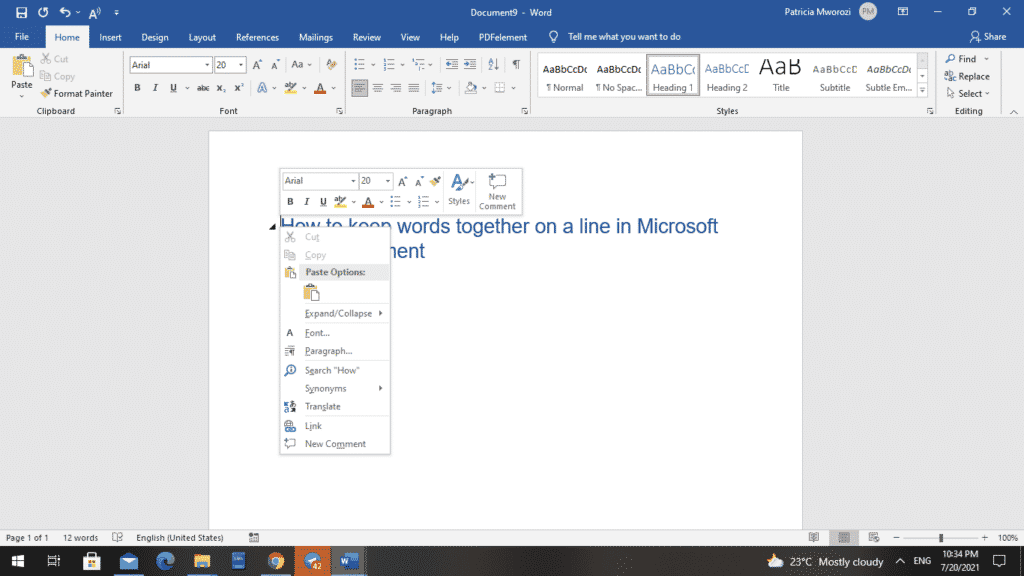
In the Home tab, we can click on the downward-facing arrow in the corner to take us to the dialog paragraph box.

Another option would be to right-click anywhere on that paragraph, and on your shortcut menu, left-click on the paragraph.
In this dialog box, you can adjust indents, line spacing. However, our interest is in the line, and the page breaks on the other tab.
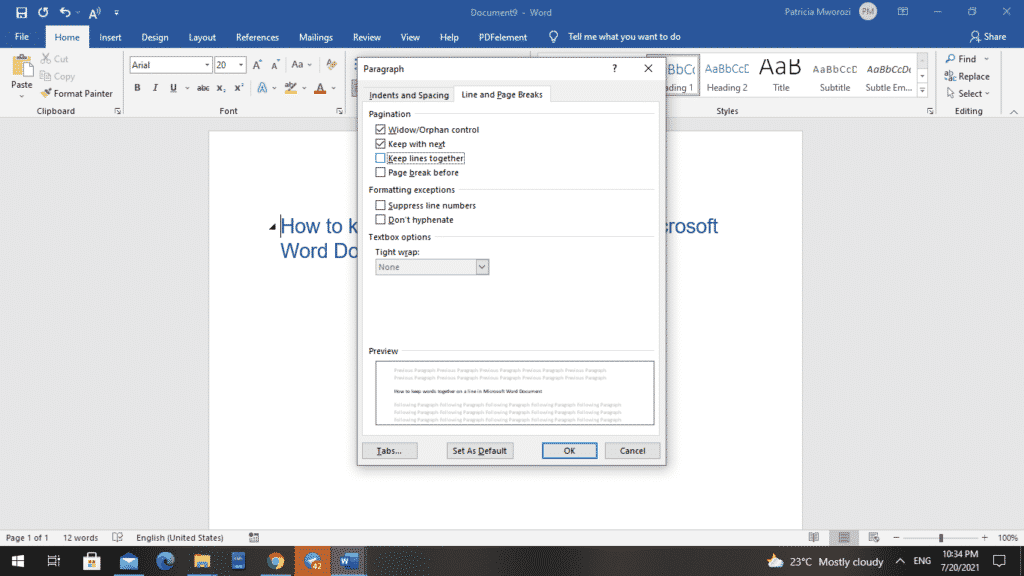
What we are interested in is ‘Keep with next.’ By selecting ‘Keep with next,’ this heading will automatically move to the following line.
Another thing to try is ‘Keep lines together.’ This means if you have one or more paragraphs highlighted, the lines within that paragraph will stay on one page together.
Are you physically unable to do group work during the pandemic because of the lockdowns?
Simul Docs is here to help you smoothly work with your classmates. With Simul Docs, it will feel like you are in the library compiling ideas and notes.
With Simul Docs, even your initial thoughts can be documented and retained. After writing your first draft in Microsoft Word, upload it to Simul Docs. This will automatically make it the first version. Now, another colleague can open it and make their edits. This will create another version different from the first. Every time another person opens a version and makes edits, a new version is created, with the latest changes. The best part is, even if you forget to turn on tracked changes, they are automatically documented!
If another co-worker is supposed to include their input, but they do not have Simul Docs. All you have to do is download the document or forward it by email. Alternatively, you can upload it to any storage software like one drive, and once their changes have been made, they can forward it to you once again, and you can open it in Simul Docs.
Once all the necessary edits have been made, you can save the final version containing all the modifications with one click.
Visit simuldocs.com and simplify your group edits today.
![]()
Download Article
A user-friendly guide to making different types of lines in Microsoft Word
![]()
Download Article
- Using Shapes to Draw a Line
- Using Borders to Add a Line
- Using Keyboard Shortcuts
- Using the Mobile App
- Q&A
- Tips
|
|
|
|
|
Do you want to create a horizontal line in your resumé or other Microsoft Word document? If you want to customize the color and format of the line, you can use the Shapes tool. If you need to make a quick, basic line, you can use the keyboard shortcut. While you can use the keyboard shortcut on Windows and Mac, you cannot use it on the mobile app. This wikiHow will show you how to insert different lines in Microsoft Word on your Windows, Mac, iPhone, or Android device.
Things You Should Know
- On desktop, go to the Insert tab. Click Shapes, then select a line. Click and drag across the document to create a line.
- To customize the line, double-click it. Click Shape Outline to change the color.
- On mobile, click the three dots. Tap Home and select Insert. Tap Shapes to select a line. Tap and drag across the document to create a line.
-

1
Open Microsoft Word on your Windows or Mac computer. Click or double-click the Word app icon, which resembles a white «W» on a dark-blue background.
- If you want to draw a line in an existing Word document, double-click the Word document to open it and skip the next step.
- You’ll need a subscription to use Office 365.
-
2
Click Blank document. It’s in the upper-left side of the page.
Advertisement
-
3
Click the Insert tab. This tab is in the blue ribbon at the top of the Word window, between Home and Draw.
-
4
Click Shapes. It’s in the Insert toolbar, next to the icon of an overlapping circle and square.
- A drop-down menu will appear.
-
5
Select a line shape. In the «Lines» heading, click one of the line templates. You can choose a line, line arrow, double line arrow, and more.
-
6
Draw your line. Click and drag across the document to create your line.
- If you need to adjust the line’s length and orientation, click the left or right circle. Drag it left or right to adjust the length, or drag it up and down to adjust the orientation.
- To move the line, double-click and drag it to the desired position.


Advertisement
-
1
Open Microsoft Word on your Windows or Mac computer. Click or double-click the Word app icon, which resembles a white «W» on a dark-blue background.
- If you want to draw a line in an existing Word document, double-click the Word document to open it and skip the next step.
-
2
Click Blank document. It’s in the upper-left side of the page.
-
3
Click the Home tab. This tab is in the blue ribbon at the top of the Word window, between File and Insert.
- You may already be on this tab by default.
-
4
Click the «Borders» arrow. This is next to the icon of the dotted square with a solid bottom line.
- A drop-down menu will open.
-
5
Click Horizontal Line. This will be towards the bottom, above Draw Table.
- A horizontal line will be added.
-
6
Format your line. Double-click the line; a dialogue box will appear.
- To change the line thickness, use the up and down arrow below Height. The higher the number, the thicker the line will be.
- To change the color, click the color box underneath Color. Select your desired color.
- Click OK to save and apply your changes.
- To move the line, double-click and drag it to the desired position.


Advertisement
-
1
Open Microsoft Word on your Windows or Mac computer. Click or double-click the Word app icon, which resembles a white «W» on a dark-blue background.[1]
- If you want to draw a line in an existing Word document, double-click the Word document to open it and skip the next step.
-
2
Click Blank document. It’s in the upper-left side of the page.
-
3
Place your cursor where you want your line to appear. You’ll need to be on a blank line, as this won’t work if there is text before or after your cursor on the same line.
- You’ll be creating a horizontal line that spans from one edge of your page to the other. The line will stop at your set margins.
- If you want to make the line span the whole page, you’ll need to change your document margins.
-
4
Type three dashes in a row. Use your dash key on the number row at the top of your keyboard, or on the numeric pad.
-
5
Press ↵ Enter to convert the dashes into a line. AutoCorrect will automatically create a solid line that will situate itself directly beneath the previous line of text.
- Note that the line does not occupy the space of a line of text, but instead exists between lines of text.
- If you do not have AutoCorrect enabled, do so by clicking File → Options → Proofing → AutoCorrect Options…. This will open a new window.
- Make sure the Border Lines box is checked. This can be found underneath Apply as you type.
- If you want to turn off AutoCorrect, uncheck the boxes.
-
6
Use different characters for different line styles. There are a variety of different lines that you can create by using characters other than the dash:[2]
- Thin line: Three hyphens (-).
- Thick line: Three underscores (_).
- Double line: Three equal signs (=).
- Dotted line: Three asterisk (*).
- Triple line: Three pound signs (#).
- Squiggly line: Three tildes (~).
-
7
Move the line by entering text above it. You can prompt the line to move down by typing text above it and then pressing Enter.
- Deleting text above the line will prompt it to move upward.


Advertisement
-
1
Open a document in the Microsoft Word app. This looks like a blue notebook next to a W.
- Microsoft Word is available for iOS in the App Store and for Android in the Google Play Store.
- Tap Blank document to open a new document or tap a file to open an existing document.
-
2
Tap ••• . This can be found above the keyboard, to the right.
- If you don’t see your keyboard, tap the document to bring it up.
- A new menu will open.
-
3
Tap Home. This will be to the left of the formatting window.
- A drop-down menu will open.
-
4
Tap Insert. You’ll see a list of all objects you can insert.
-
5
Tap Shapes. This is next to the icon of an overlapping circle and square.
-
6
Select a line shape. In the «Lines» heading, tap one of the line templates. You can choose a line, line arrow, double line arrow, and more.
-
7
Draw your line. Tap and drag across the document to create your line.
- Use two fingers to pinch and zoom out to view the entire document.
- If you need to adjust the line’s length and orientation, tap the left or right circle. Drag it left or right to adjust the length, or drag it up and down to adjust the orientation.
- To move the line, tap and drag it to the desired position.


Advertisement
Add New Question
-
Question
How do I view all available symbols in Microsoft Word?

Click «Insert» and then click «Symbols» and you should be shown a box with all of the symbols in it.
-
Question
How do I add a line on the first page, and no lines on the second?
Click «Insert» and then click «Symbols» and you should be shown a box with all of the symbols in it.
-
Question
How do I change the color of the line?
In the paragraph section, open the drop-down menu on the «Borders» button. At the very bottom is a «Borders and Shading» option. In that option, change the color of the bottom border to your specified color. Click the «Borders» button.
See more answers
Ask a Question
200 characters left
Include your email address to get a message when this question is answered.
Submit
Advertisement
-
Looking for money-saving deals on Microsoft Office products? Check out our coupon site for tons of coupons and promo codes on your next subscription.
Thanks for submitting a tip for review!
Advertisement
About This Article
Article SummaryX
1. Click Insert.
2. Click Shapes.
3. Select a line template.
4. Click and drag across your Microsoft Word document to draw the line.
Did this summary help you?
Thanks to all authors for creating a page that has been read 2,043,531 times.
Is this article up to date?
465
465 people found this article helpful
Use these three methods to quickly insert a line in your document
Updated on December 4, 2020
What to Know
- AutoFormat: Type the three characters for the desired line style > Enter.
- Horizontal Line tool: In Home tab, select Borders drop-down menu > Horizontal Line.
- Shapes menu: Go to Insert > Shapes. In Lines group, select and drag a line shape across the page.
This article covers three ways to insert horizontal lines in Word for Microsoft 365, Word 2019, Word 2016, Word 2013, and Word 2010.
Use AutoFormat to Insert a Line in Word
You can quickly insert a line into a Word document with the AutoFormat feature. To create a line, place the cursor in the location that you’d like to insert it, type the three characters for the desired line style, then press Enter.
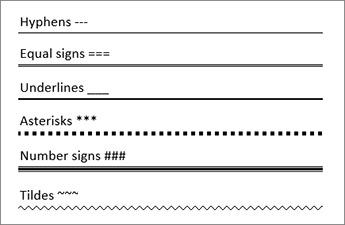
To create the different types of lines, press the associated keys on the keyboard:
- Plain single line: Three hyphens (—)
- Plain double line: Three equal signs (===)
- Broken or dotted line: Three asterisks (***)
- Bold single line: Three underline symbols (___)
- Wavy line: Three tildes (~~~)
- Triple line with a thick center: Three number signs (###)
Here’s what each of these line types looks like in Word:
Use the Horizontal Line Tool to Insert a Line in Word
To insert a line into a Word document using the built-in Horizontal Line tool:
-
Place the cursor where you want to insert a line.
-
Go to the Home tab.
By default, the Home tab is selected when you open a new or existing Word document.
-
In the Paragraph group, select the Borders drop-down arrow and choose Horizontal Line.
-
To change the look of the line, double-click the line in the document.
-
In the Format Horizontal Line dialog box, modify the width, height, color, and alignment of the line.
Use the Shapes Menu to Insert a Line in Word
A third way to add a line to a Word document is to draw it on the page. The Shapes menu contains several line options, including lines with arrow points on one or both ends. After you draw the line, customize the color and appearance.
-
Place the cursor in the spot where you want to insert a line.
-
Go to the Insert tab.
-
In the Illustrations group, select the Shapes drop-down arrow.
-
In the Lines group, choose a line shape.
-
In the Word document, drag across the location where you want the line to appear.
-
To change the look of the line, select the line to enable the Shape Format tab. (Some versions of Word call this Format.)
-
Go to the Shape Format tab and change the color, use a different line style, or apply effects.
FAQ
-
How do I change line spacing in Word?
To fix spacing in Word, highlight the text whose spacing you want to change and select the Home tab. Next to Paragraph, select the down arrow to expand the options. In the Spacing section, set the amount of space before and after line breaks or choose a preset line-spacing option.
-
How do I add a signature line in Word?
To insert a signature line in Word, go to the Insert tab and select Signature Line. Selecting few or no options leaves a blank line, and a signature line will appear in the document.
-
How do I add line numbers in Word?
To add line numbers in Word, go to Layout > Page Setup > Line Numbers and choose Continuous, Restart Each Page or Restart Each Section > Line Numbering Options.
Thanks for letting us know!
Get the Latest Tech News Delivered Every Day
Subscribe
Word for Microsoft 365 Outlook for Microsoft 365 Word 2021 Outlook 2021 Word 2019 Outlook 2019 Word 2016 Outlook 2016 Word 2013 Outlook 2013 Word 2010 Outlook 2010 Word 2007 Outlook 2007 More…Less
You can add horizontal lines, sometimes called horizontal rules, to a document or email message to help separate sections of text and add visual appeal.
By default, Word and Outlook have a three-character shortcuts that inserts a full-width horizontal rule in your document or message. The appearance of that rule—thinner, thicker, double-line, dotted, wavy—depends on which shortcut you use, as illustrated in the image below.
If this automatic line feature doesn’t suit you, you can turn off this feature in Word or turn it off in Outlook.
If you want to draw a line for illustration purposes, see Draw a line in Word or Outlook instead.
Insert a horizontal line by typing a few characters
The fastest way to add a horizontal line or rule is to use the AutoFormat feature. When you type certain characters three times in their own paragraph and then press Enter, those characters instantly become a full-width horizontal line.
-
Place the cursor where you want to insert the horizontal line.
-
Type three of the characters illustrated below, and then press Enter.
The line is inserted for the full width of the page. When inserted into a column, the line is inserted to match the width of the column. To add text above the line, put your cursor where you want the text and begin typing.
Format the horizontal line after you create it
The shortcut described above creates an empty paragraph with a bottom border. You can change the look of that border line by using the Borders options:
-
In Word, on the Home tab of the ribbon, select the down arrow next to
Borders.In Outlook, on the Format Text tab of the ribbon, select the down arrow next to
Borders. -
At the bottom of the menu, select Borders and Shading.
-
In the dialog, you can change the line’s style (solid, dotted, wavy, double, and so on), color, or width as you see fit.
-
When you’re done formatting the line, select OK. Then, on the ribbon, select the
Borders button to apply your changes.
 Borders.
 Borders button to apply your changes.
 Word: Turn off the automatic line feature
To prevent Word or Outlook from automatically inserting a horizontal line when you type the three shortcut characters, do the following:
-
On the ribbon, select File > Options.
-
In the dialog box, select Proofing > AutoCorrect Options > AutoFormat As You Type.
-
Clear the Border Lines option.
-
Select OK.
Outlook: Turn off the automatic line feature
-
On the ribbon, select File > Options.
-
In the dialog box, select the Mail tab, then select Editor Options.
-
On the Proofing tab, select AutoCorrect Options > AutoFormat As You Type.
-
Under Apply as you type, clear the Border Lines option.
-
Select OK.
Want to draw a line?
See Draw a line in Word or Outlook.
See Also
Add a border to some text
Draw shapes