
![]()
Download Article
![]()
Download Article
This wikiHow will show you how to use Microsoft Word to add text to an image on your computer, phone, or tablet. The Microsoft Word app is freely available for Androids, iPhones, and iPads, but you’ll need to purchase the app from Microsoft if you’re using a Windows or macOS.
Things You Should Know
- If you’re using a computer, use a text box with no fill and no outline to overlay text on an image.
- If you’re using the mobile Word app, insert a text box with no fill and no outline. Move the text box onto the image and edit the text.
- Make sure to tap the checkmark on mobile app Word documents to save your work!
-

1
Open your project in Word. You can do this by clicking Open from the File tab, or by right-clicking the file icon in your file browser and choosing Word from the «Open with…» dialog.
-
2
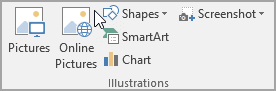
Click the Insert tab. You’ll find this above the document in the menu toolbar or along the top of your screen.
Advertisement
-
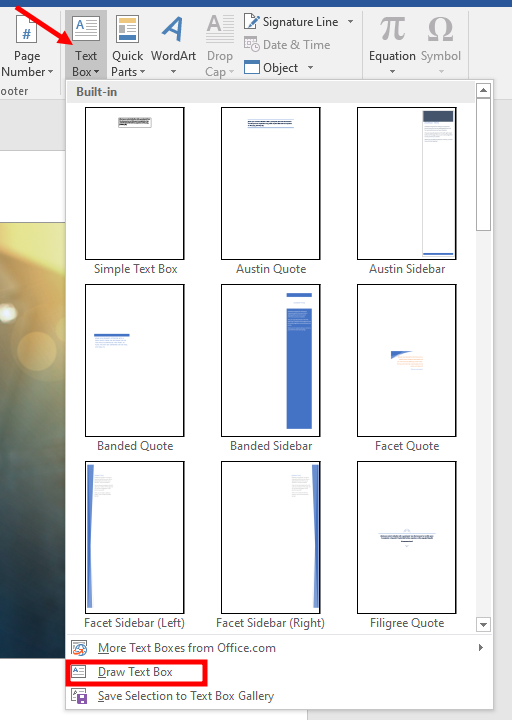
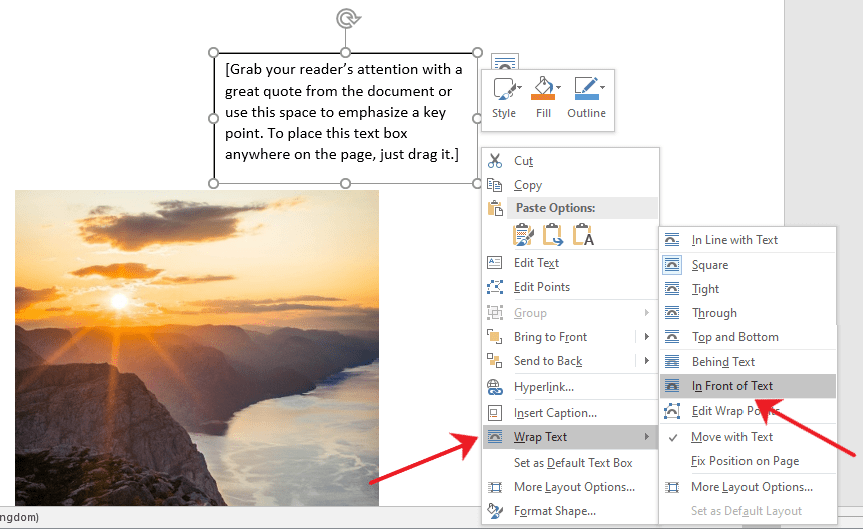
3
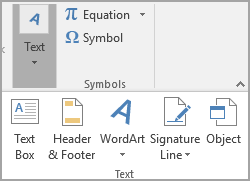
Click Text Box. You’ll find this in the Text group. A menu will dropdown.
-
4
Click Draw Text Box. You’ll see this at the bottom of the menu that drops down.
-
5
Enter your text. You’ll see your text entered into a moveable object.
- You can highlight your text and change the font size, color, and style before continuing.
-
6
Drag and drop your text box over the picture. Don’t deselect the text box yet.
-
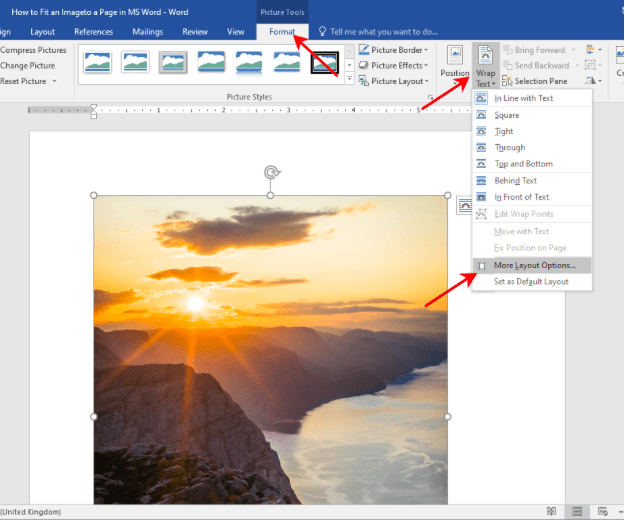
7
Click the Format tab. You’ll find this above the document in the menu toolbar or along the top of your screen.
-
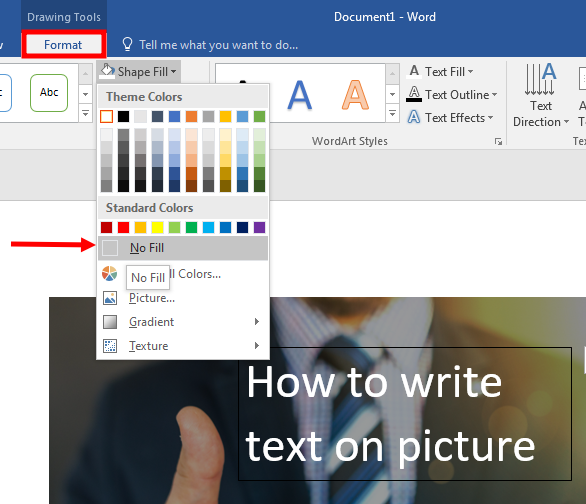
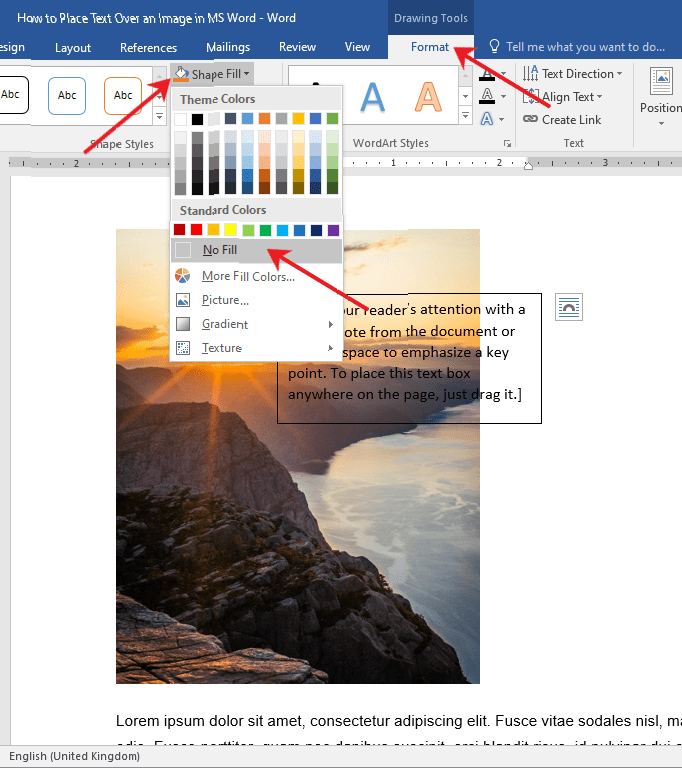
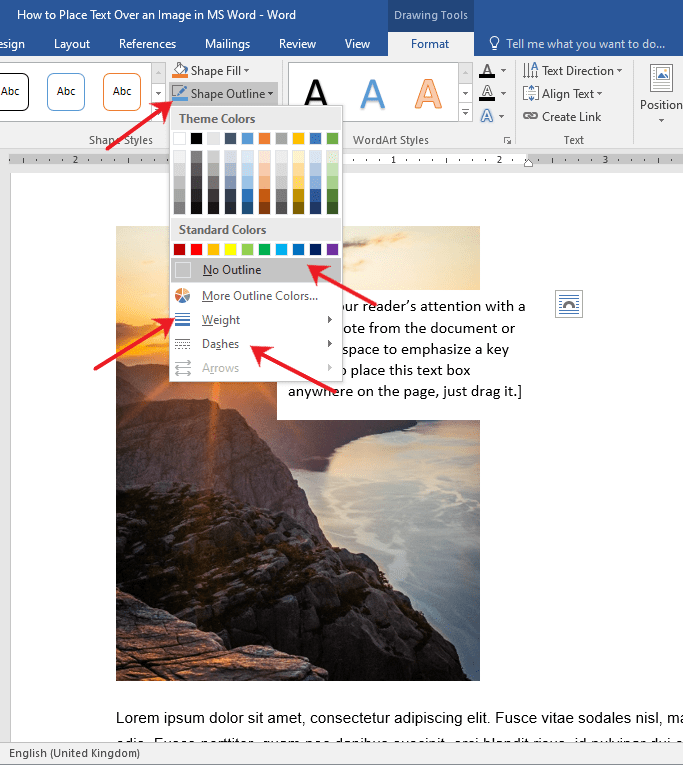
8
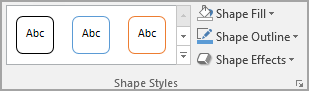
Format your text box in «Shape Styles.» You’ll want to make sure your text is not hidden by other elements.
- Click Shape Fill and select No fill.
- Click Shape Outline and select No outline.
-
9
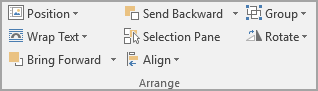
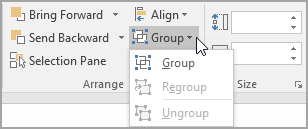
Group the picture and text box. You can do this by clicking the picture to select it, then pressing and holding Ctrl (PC) or ⌘ Cmd (Mac) and clicking the text box to select it as well. Under the Format tab, click Group.[1]


Advertisement
-
1
Open your project in Word. This app icon looks like a blue page with white writing on it, and you can find this app on your home screen, in the app drawer, or by searching. To open your project in Word, you’ll need to tap Open from the File tab.[2]
-
2
Tap the pencil icon (optional). If you don’t see the pencil icon above the document, you may already be in editing mode.
-
3
Tap the upwards-pointing arrow
. You’ll see this on the right of the options menu.
-
4
Tap Home. You’ll open up a list of toolbar options.
-
5
Tap Insert. You’ll see the Insert menu options.
-
6
Tap Text Box. You might have to scroll down to see this option.
- After you tap this, you’ll see a text box with dummy text inserted on your page.
-
7
Format your text box. After you’ve inserted your text box, you’ll notice the main menu shifts to Shape. You’ll want to edit this text box from this menu.
- From Fill, choose ‘No fill.
- From Outline, choose No outline.
-
8
Tap inside the text box. A menu will pop up.
-
9
Tap Edit Text. Your cursor will appear in the text box. You’ll first need to delete what’s already in the text box.[3]
-
10
Tap the checkmark when you’re done to save your work. You’ll see this in the upper left corner of the app.


Advertisement
Ask a Question
200 characters left
Include your email address to get a message when this question is answered.
Submit
Advertisement
Thanks for submitting a tip for review!
References
About This Article
Article SummaryX
1. Open the picture in Word.
2. Insert a new text box from the Insert tab.
3. Type in your text.
4. Drag and drop the new text box over the picture.
5. Group the picture and text box.
Did this summary help you?
Thanks to all authors for creating a page that has been read 54,628 times.
Is this article up to date?
You can use either a text box or WordArt to add text on top of a photo in Word, Outlook, PowerPoint, or Excel.
Text box over a photo

If your text is longer or doesn’t need fancy styling, a text box may be suitable. You can format the text any way you like.
WordArt over a photo

If the text is brief and you want a stylized look—similar to what you might see on a postcard—then WordArt might be your best option.
Which app are you using?
Word or Outlook | PowerPoint or Excel
Word or Outlook
Use a text box to add text on top of a photo
-
In your document, click to select an insertion point.
-
On the Insert tab, in the Illustrations group, click Shapes, and then click New Drawing Canvas.
-
Click the drawing canvas, and then, on the Insert tab, in the Illustrations group, click Pictures.
-
Browse to and double-click the photo that you want to use, and then click outside the drawing canvas.
-
On the Insert tab, in the Text group, click Text Box, and then at the bottom of the menu, click Draw Text Box.
-
Type the text that you want to appear in the text box, and then drag the text box to the location that you want on top of the picture.
-
To change the font or style of the text, highlight the text and then select the text formatting you want on the shortcut menu.
-
Click the outside edge of the text box, and then drag the text box to position it over your photo.
-
Make sure that the text box is still selected, and then, on the Shape Format tab, in the Shape Styles group, do the following:
-
Click Shape Fill, and then click No Fill.
-
Click Shape Outline, and then click No Outline.
-
-
Click the outside edge of the photo, press and hold Ctrl, and then click the edge of the WordArt so that both items are selected.
-
On the Shape Format tab, in the Arrange group, select Group > Group.


Use WordArt to add text on top of a photo
-
In your document, click to select an insertion point.
-
On the Insert tab, in the Illustrations group, click Shapes, and then click New Drawing Canvas.
-
Click the drawing canvas, and then, on the Insert tab, in the Illustrations group, click Pictures.
-
Browse to and double-click the photo that you want to use.
-
On the Insert tab, in the Text group, click WordArt, click the style of text you want, and then type your text.
-
Click the outside edge of the WordArt to select it, drag the text over your photo and then, if you want, rotate the text to the angle that works best for your photo.
-
Click the outside edge of the photo, press and hold Ctrl, and then click the edge of the WordArt so that both items are selected.
-
On the Picture Format tab, in the Arrange group, select Group > Group.
PowerPoint or Excel
Use a text box to add text on top of a photo
-
In your file, make sure that you’ve inserted a photo.
-
On the Insert tab, in the Text group, click Text Box, drag to draw a text box anywhere near the picture, and then type your text.
-
To change the font or style of the text, highlight the text, right-click it, and then select the text formatting you want on the shortcut menu.
-
Click the outside edge of the text box, drag the text over your photo and then, if you want, rotate the text to the angle that works best for your photo.
-
Make sure that the text box is still selected, and then, on the Shape Format tab, in the Shape Styles group, do the following:
-
Click Shape Fill, and then click No Fill.
-
Click Shape Outline, and then click No Outline.
-
-
Click the outside edge of the photo, press Ctrl, and then click the edge of the text box so that both items are selected.
-
On the Shape Format tab, in the Arrange group, select Group > Group.
Use WordArt to add text on top of a photo
-
In your file, make sure that you’ve inserted a photo.
-
On the Insert tab, in the Text group, click WordArt, click the style of text you want, and then type your text.
-
Click the outside edge of the WordArt to select it, drag the text over your photo and then, if you want to, rotate the text to the angle that works best for your photo.
-
Click the outside edge of the photo, press and hold Ctrl, and then click the edge of the WordArt so that both items are selected.
-
On the Shape Format tab, in the Arrange group, select Group > Group.
Which app are you using?
Word or Outlook | PowerPoint or Excel
Word or Outlook
Use a text box to add text on top of a photo
-
In your document, click to select an insertion point.
-
On the Insert tab, in the Illustrations group, click Shapes, and then click New Drawing Canvas.
-
Click the drawing canvas, and then, on the Insert tab, in the Illustrations group, click Pictures.
-
Browse to and double-click the photo that you want to use, and then click outside the drawing canvas.
-
On the Insert tab, in the Text group, click Text Box, and then at the bottom of the menu, click Draw Text Box.
-
Type the text that you want to appear in the text box, and then drag the text box to the location that you want on top of the picture.
-
To change the font or style of the text, highlight the text and then select the text formatting you want on the shortcut menu.
-
Click the outside edge of the text box, and then drag the text box to position it over your photo.
-
Make sure that the text box is still selected, and then, under Drawing Tools, on the Format tab, in the Shape Styles group, do the following:
-
Click Shape Fill, and then click No Fill.
-
Click Shape Outline, and then click No Outline.
-
-
Click the outside edge of the photo, press and hold Ctrl, and then click the edge of the WordArt so that both items are selected.
-
Under Drawing Tools, on the Format tab, in the Arrange group, select Group > Group.
Use WordArt to add text on top of a photo
-
In your document, click to select an insertion point.
-
On the Insert tab, in the Illustrations group, click Shapes, and then click New Drawing Canvas.
-
Click the drawing canvas, and then, on the Insert tab, in the Illustrations group, click Pictures.
-
Browse to and double-click the photo that you want to use.
-
On the Insert tab, in the Text group, click WordArt, click the style of text you want, and then type your text.
-
Click the outside edge of the WordArt to select it, drag the text over your photo and then, if you want, rotate the text to the angle that works best for your photo.
-
Click the outside edge of the photo, press and hold Ctrl, and then click the edge of the WordArt so that both items are selected.
-
Under Picture Tools, on the Format tab, in the Arrange group, select Group > Group.
PowerPoint or Excel
Use a text box to add text on top of a photo
-
In your file, make sure that you’ve inserted a photo.
-
On the Insert tab, in the Text group, click Text Box, drag to draw a text box anywhere near the picture, and then type your text.
-
To change the font or style of the text, highlight the text, right-click it, and then select the text formatting you want on the shortcut menu.
-
Click the outside edge of the text box, drag the text over your photo and then, if you want, rotate the text to the angle that works best for your photo.
-
Make sure that the text box is still selected, and then, under Drawing Tools, on the Format tab, in the Shape Styles group, do the following:
-
Click Shape Fill, and then click No Fill.
-
Click Shape Outline, and then click No Outline.
-
-
Click the outside edge of the photo, press Ctrl, and then click the edge of the text box so that both items are selected.
-
Under Drawing Tools, on the Format tab, in the Arrange group, select Group > Group.
Use WordArt to add text on top of a photo
-
In your file, make sure that you’ve inserted a photo.
-
On the Insert tab, in the Text group, click WordArt, click the style of text you want, and then type your text.
-
Click the outside edge of the WordArt to select it, drag the text over your photo and then, if you want to, rotate the text to the angle that works best for your photo.
-
Click the outside edge of the photo, press and hold Ctrl, and then click the edge of the WordArt so that both items are selected.
-
Under Drawing Tools, on the Format tab, in the Arrange group, select Group > Group.
On the Insert tab, in the Text group, click Text Box, drag to draw a text box anywhere near the picture, and then type your text. To change the font or style of the text, highlight the text, right-click it, and then select the text formatting you want on the shortcut menu.
Contents
- 1 How can I write on top of a picture?
- 2 How do I put text over an image in CSS?
- 3 How can I edit writing on a picture?
- 4 How can I edit a picture in Word?
- 5 How do I insert a picture in Word without moving text?
- 6 How do you type over a picture in Google Docs?
- 7 How do you put an image on another image in CSS?
- 8 How do I put text over a picture in HTML?
- 9 How do I put text over an image in HTML?
- 10 How do you edit text in a JPEG?
- 11 How can I extract text from an image?
- 12 How can I edit a JPEG image?
- 13 How do you change the text of a screenshot?
- 14 How do I edit text in a picture without changing the background?
- 15 What app adds text to photos?
- 16 How do I add text to a picture in Windows 10?
- 17 How do I insert a photo into a Word document without it being embedded?
- 18 How do I insert a moving picture into Word?
- 19 How do I insert a picture in Word without resizing?
- 20 How can I draw on a picture?
How can I write on top of a picture?
Add Text to Photos on Android Using Google Photos
- Open a photo in Google Photos.
- At the bottom of the photo, tap Edit (three horizontal lines).
- Tap the Markup icon (squiggly line). You can also select the color of text from this screen.
- Tap the Text tool and enter your desired text.
- Select Done when you’ve finished.
How do I put text over an image in CSS?
CSS position property is used to set the position of text over an image. This can be done by enclosing the image and text in an HTML “div”. Then make the position of div “relative” and that of text “absolute”. The absolute elements are positioned relative to their parent (div).
How can I edit writing on a picture?
How to Add Text to Photo?
- Open your collage, design, or photo in Fotor.
- Using the “Text” button, select and drag a text box to the desired location.
- Modify the text, change the font, color, size, background or transparency.
- Preview and save your work, choosing the size and format you wish.
How can I edit a picture in Word?
Edit text in an image
Edit the style and content of any Type layer. To edit text on a type layer, select the type layer in the Layers panel and select the Horizontal or Vertical Type tool in the Tools panel. Make a change to any of the settings in the options bar, such as font or text color.
How do I insert a picture in Word without moving text?
To insert an image into Word without moving any text is to set the image’s default wrapping to no wrapping before entering it into the document.
- Click the location in your document where you want to insert a picture.
- On the Insert tab, click Pictures.
- Select the option you want to use for inserting pictures.
How do you type over a picture in Google Docs?
Go to Insert > Drawing. Paste the image (Ctrl/Cmd V) in the Drawing application. Select the Text tool and drag the text box to wherever you want it over the image, resizing it as needed. Type in the text you want to add, using the font of your choice.
How do you put an image on another image in CSS?
As the simplest solution. That is: Create a relative div that is placed in the flow of the page; place the base image first as relative so that the div knows how big it should be; place the overlays as absolutes relative to the upper left of the first image. The trick is to get the relatives and absolutes correct.
How do I put text over a picture in HTML?
in order to have text on the left or right of the image you can style your img as style=”float:left”; or style=”float:right“; If the text is too close to the image you can play with padding: 10px; or less.
How do I put text over an image in HTML?
Chapter Summary
- Use the HTML element to define an image.
- Use the HTML src attribute to define the URL of the image.
- Use the HTML alt attribute to define an alternate text for an image, if it cannot be displayed.
How do you edit text in a JPEG?
You can not “edit” a text in a JPG file. A Jpg file has no editable text. It is just a bunch of pixels of some colors diferent that the other pixels that you percive as a background. What you do is smudge, paint or copy some other pixels above thoose to “errase them”.
Extract text from a single picture
- Right-click the picture, and click Copy Text from Picture.
- Click where you’d like to paste the copied text, and then press Ctrl+V.
How can I edit a JPEG image?
Editing a JPEG file is as easy as editing any other raster-based image file. A designer needs to open the file in their chosen image editing program and make whatever changes they need to make. Once they are done, they can use the program’s “Save” function to save the changed file back in the JPEG format.
How do you change the text of a screenshot?
Ways to Edit Screenshots on Android
- Take a screenshot on your stock Android phone using the shortcut: pressing the power button and volume down button simultaneously.
- When it is captured, you will see three options- Edit, Delete and Share.
- Tap on Edit and it will take you to Google Photos editor.
How do I edit text in a picture without changing the background?
How to Remove Text in Photoshop
- Check if the Text Has a Separate Layer. The first thing you should is to check the Layers panel to see if the text has a separate layer.
- Create a Selection.
- Expand the Selection.
- Restore the Background.
- Adjust the Selection Fill.
- Deselect.
- Done!
What app adds text to photos?
- Instasize. If you don’t want an app that is solely focused on typography, Instasize is exactly what you need.
- Phonto. It is brilliantly designed, user-friendly app for adding text to your photos, which is available for both Android and iOS.
- PicLab – Photo Editor.
- Word Swag.
How do I add text to a picture in Windows 10?
If you have Windows 10, use Microsoft Paint to add text to an image. Right-click a photo in Windows Explorer and select “Microsoft Paint.” Then click the “A” text box icon in the Tools section of the ribbon. Enter the text you want and adjust its size, color and font style.
How do I insert a photo into a Word document without it being embedded?
Luckily, there’s a simple workaround. In the Insert Picture dialog box, click the down arrow next to the Insert button, and then click either “Link to File” or “Insert and Link”.
How do I insert a moving picture into Word?
Double-click the picture to add it to your Word document. Back on Word’s editing screen, right-click the image that you just added and select Wrap Text > In Front of Text from the menu. Your picture is now freely movable. Drag and drop it anywhere you want in your document.
How do I insert a picture in Word without resizing?
CTRL+Arrow key(s). and have the ability to move it around. text-area from the drawing options and then insert a picture into it. EXACTLY its original size.
How can I draw on a picture?
How to draw on a photo or graphic
- Choose the tip. With your image open, click Draw in the side tabs.
- Choose a color. Use one of the preselected swatches or use our millions-of-options color picker tool.
- Draw lines. Drag your mouse across your image to create lines.
- Adjust, adorn, adore.
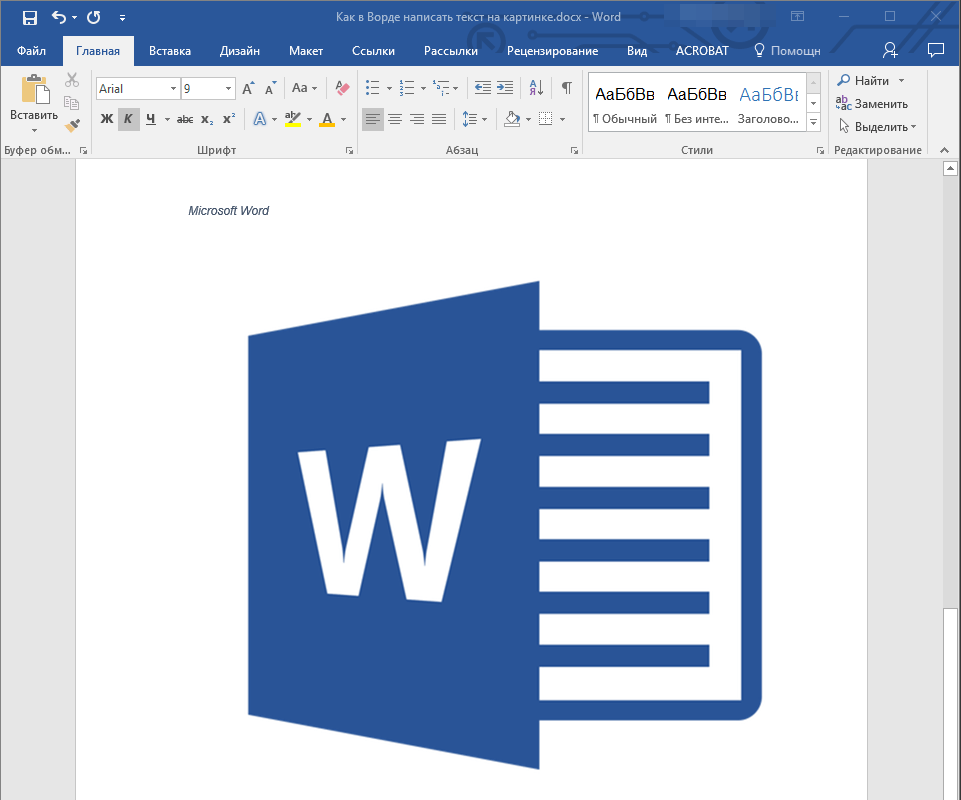
Во время работы с текстом в Word нередко приходится вставлять изображения в документ. При этом может возникнуть потребность в том, чтобы их подписать или сделать пометки, вставить замечания и так далее. Присутствующие в Word функции помогут не только поместить картинку в документ, но и дадут возможность нанести непосредственно на само изображение или подле него необходимый текст.
Написание текста на изображении в Word
Microsoft Word располагает несколькими инструментами для одновременной работы с картинками и текстом. Можно просто вписать слова в изображение, находящееся на заднем фоне, использовать буквицу или Word Art, а также создать специальное текстовое поле в документе, не говоря о добавлении подписи к рисункам или отдельной картинке. Обо всех этих методах и их особенностях пойдёт речь в данной статье.
Способ 1: Написание текста в картинке на заднем фоне
Самый простой и грубый способ написать текст на изображении в Word — это поместить картинку на задний фон документа, задав соответствующее обтекание текстом, а на переднем плане написать текст. Предположим что картинка уже содержится в документе.
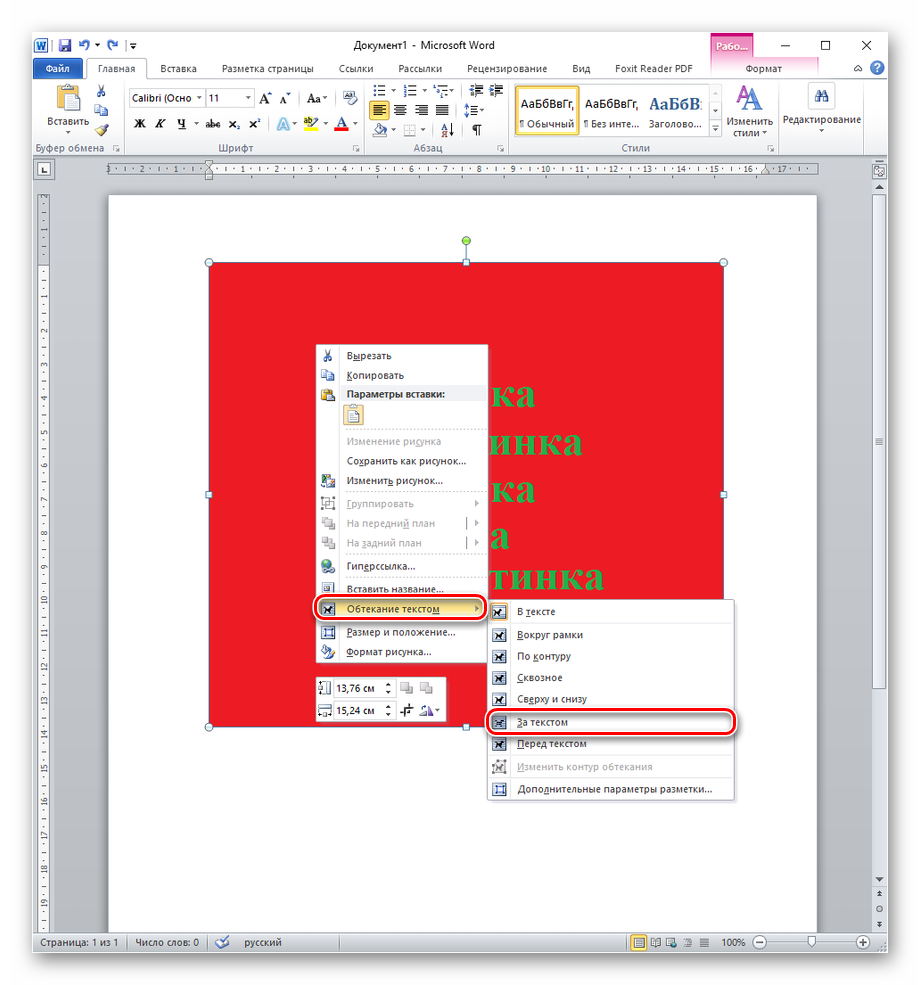
- Кликните правой кнопкой мыши по изображению, на котором следует написать текст. В выпавшем контекстном меню последовательно нажмите на «Обтекание текста», а после «За текстом».
- Наведите курсор мыши на левую область и нажмите левой кнопкой мыши, для того, чтобы курсор появился на тексте, при надобности измените его положение с помощью клавиши «Enter».
- Рекомендуется не задевать большую часть области с левой стороны, для того чтобы избежать выделения всего рисунка и его удаления (замещения текстом) при начале набора.
- Начинайте вводить текст, будто печатаете его на чистом листе в Word.
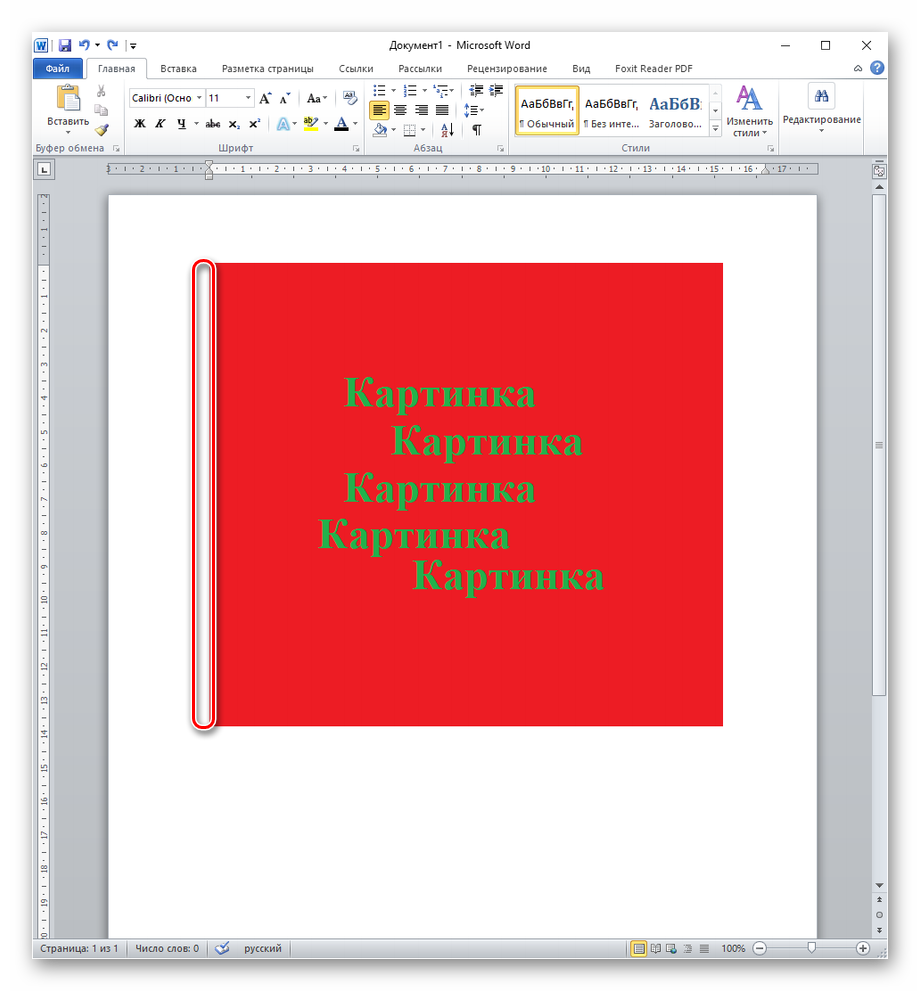

Теперь можете как угодно нанести слова на изображение, при этом будут доступны все инструменты Word. Работа с помощью этого способа особо ничем не отличается от обычной деятельности в текстовом редакторе за исключением как бы подложенной под текст картинки, что является плюсом и подходит, например, для создания открыток. Минус такого подхода в том, что выделить рисунок или текст станет несколько неудобно: совершенно случайно можно захватить не то, что хотел пользователь, или же выделить текст или картинку полностью, чего по задумке не требовалось.
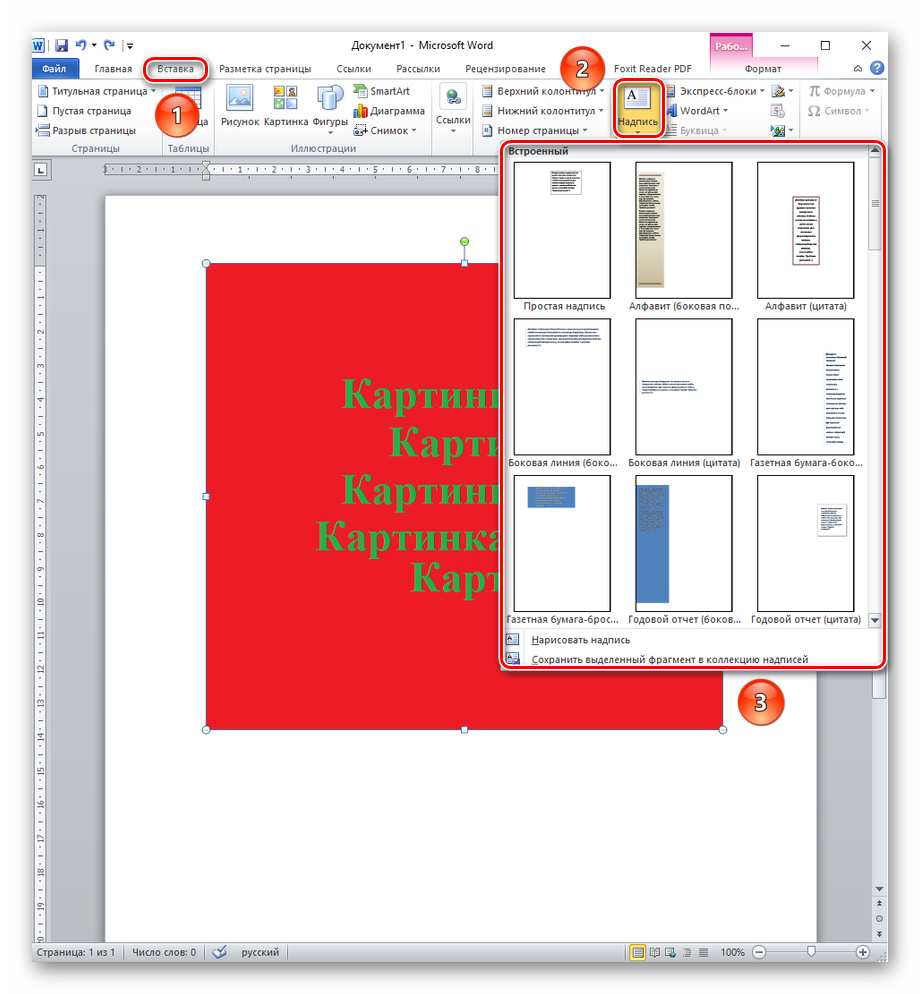
Способ 2: Вставка надписи
Первый профильный способ, если можно так сказать, для написания текста поверх изображения или же другого графического объекта. Отличается от обтекания тем, что для изменения текста становится доступно больше инструментов.
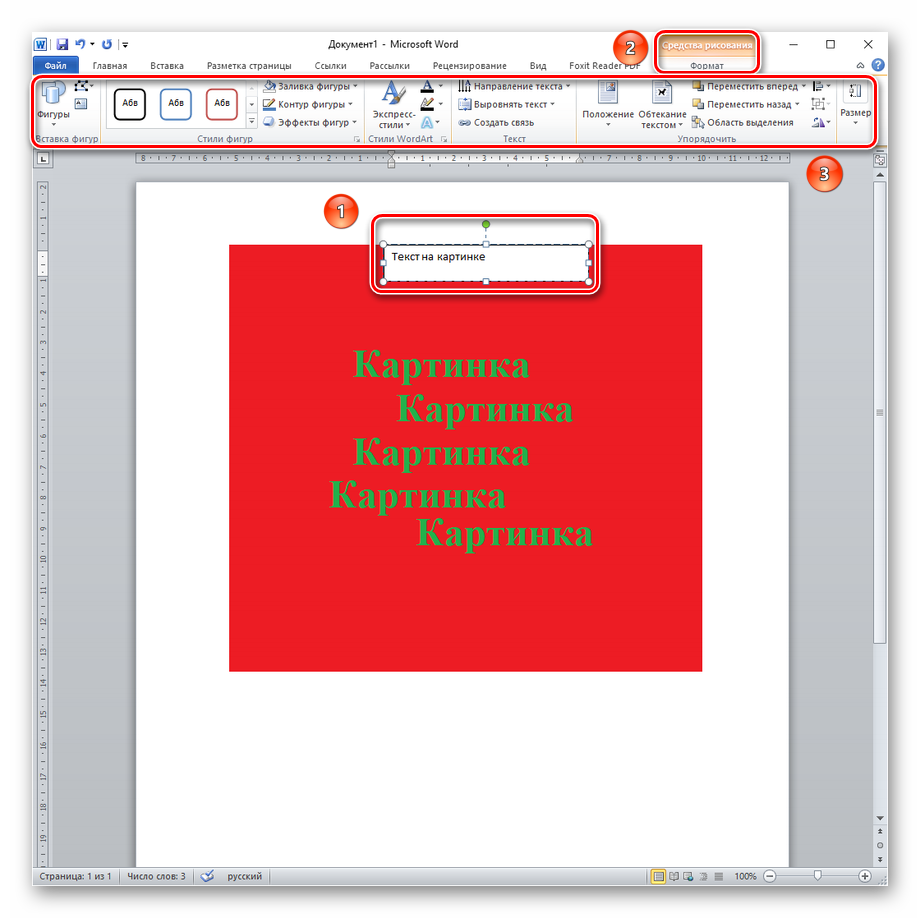
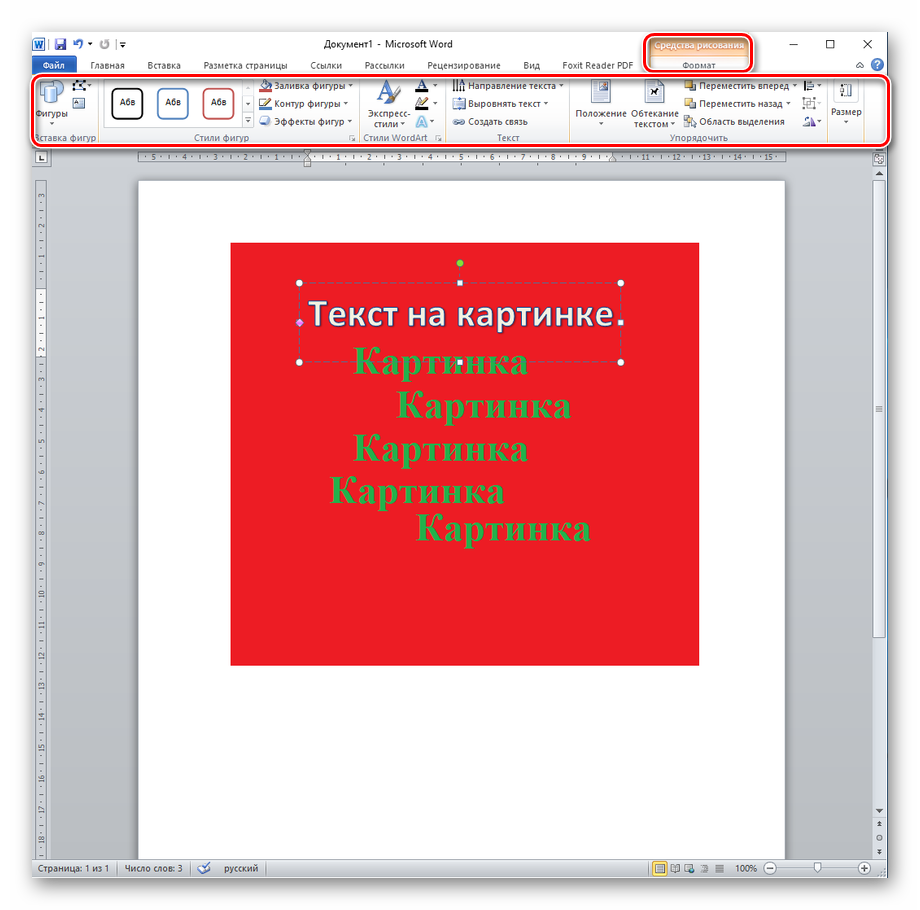
- Чтобы вставить надпись, нажмите на панель «Вставка», далее выберите раздел «Надписи» и из выпавшего меню укажите один из заданных вариантов, какой проходит вам больше. Кроме этого, можно нажать на кнопку «Нарисовать надпись» для создания своей надписи, отличной от стандартных.
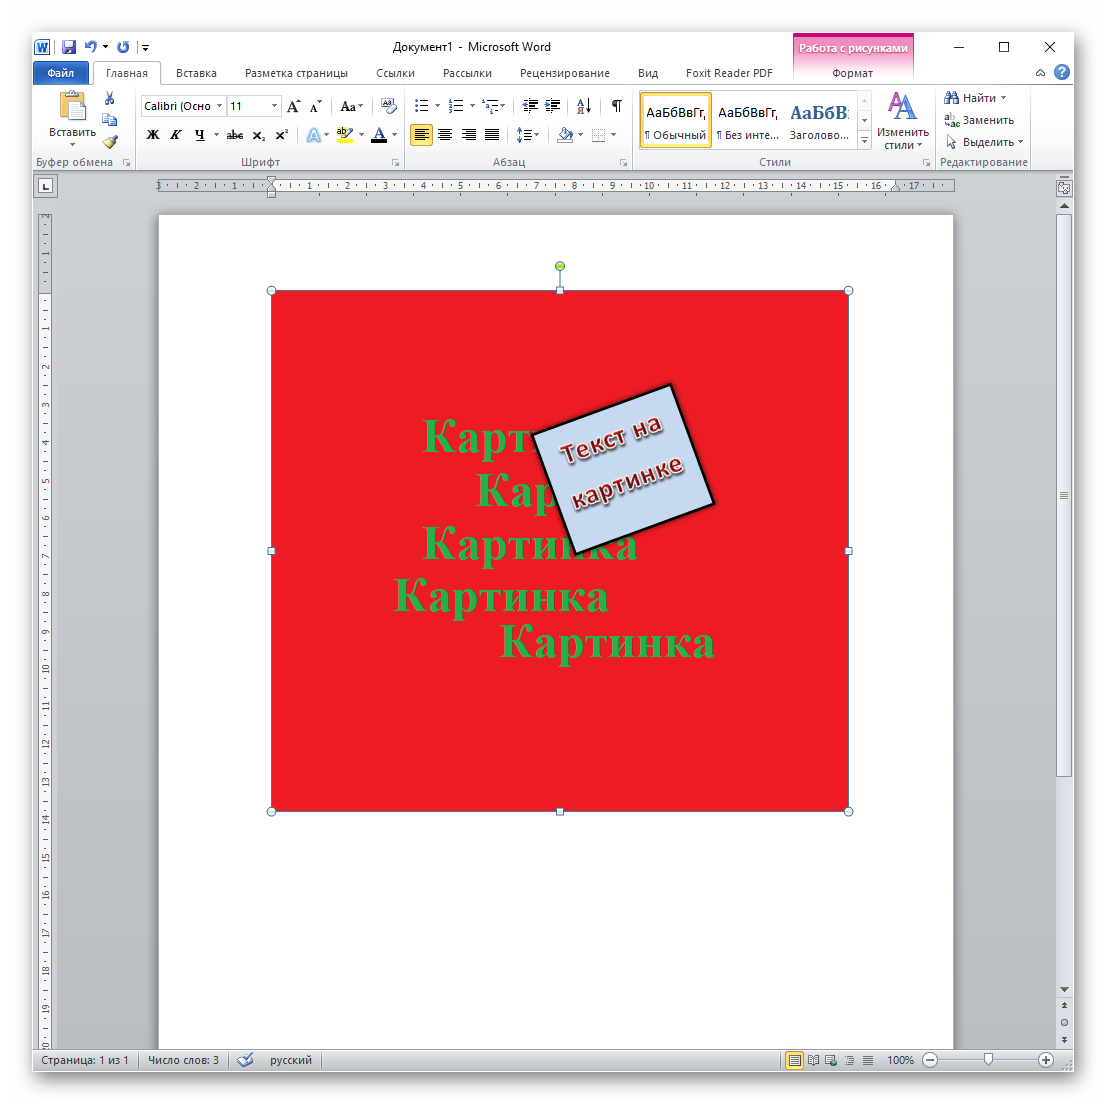
- После выбора будет предоставлена возможность изменить размер или уклон области вводимого текста. Дополнительно станут доступны «Средства рисования» на вкладке «Формат», с помощью которых можно изменить цвет рамки надписи, поменять или удалить заливку фона текста, поиграть с контуром и эффектом, добавить для написанного особый стиль или изменить его направление.
- Если вы примените все, или хотя бы несколько инструментов из предыдущего шага, ваша надпись может слегка или кардинально, но всё же заметно измениться.
Таким образом, этот вариант подходит для вставки разных примечаний, особых кусочков текста, выделения цитат и прочего, для чего может понадобиться минимальное художественное оформление. Недостаток метода состоит в том, что в таком случае работать с длинными текстами становится неудобно, так как появляется необходимость разбивать их на несколько надписей.
Способ 3: Вставка WordArt
Будучи инструментом, сходным с надписями, WordArt предназначен больше для нескольких слов, которые надо как-то вычурно оформить.
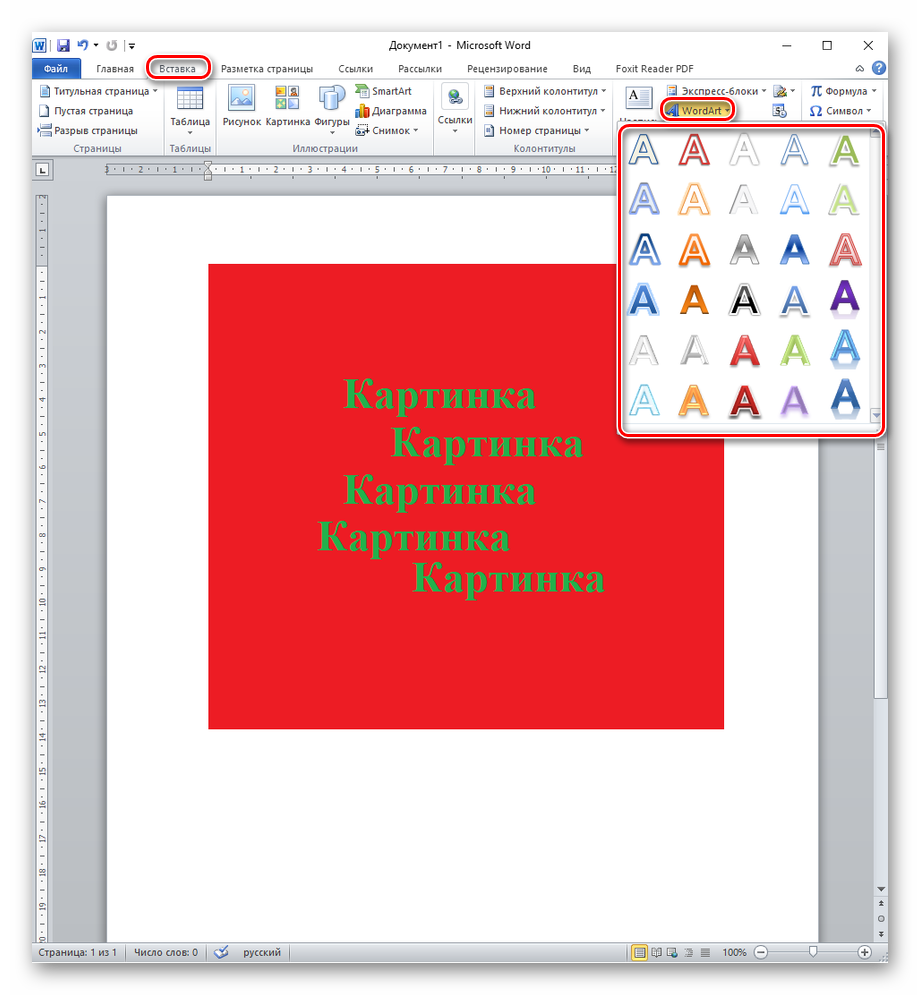
- Для вставки объекта WordArt перейдите на вкладку «Вставка», потом кликните по значку «WordArt» и выберите стиль, в котором вы хотите видеть его на картинке.
- Как можно видеть, этот способ является использованием объекта такого же типа как надписи, но с изначально заданным художественным стилем и без рамки, обладая теми же инструментами и параметрами для редактирования.
- При этом, имея направленность на пару коротких слов, WordArt больше поддаётся для манипуляций с текстом, и то, что для объёмных надписей было бы недоступно или неудобно, можно применить здесь, как, например, выгибание текста дугой.
Фундаментально не отличаясь от надписей, WordArt представляет собой инструмент быстрого создания какой-то красивой и оформленной надписи. Плюсом является то, что после клика по стилю пользователю сразу доступен какой-либо вид художественного оформления. Недостаток в том, что все инструменты редактирования такие же, как у надписей, и при должном желании WordArt можно превратить в надпись и наоборот.
Способ 4: Вставка названия
В том случае, когда пользователю необходимо не столько написать что-то в картинке, сколько дать ей описание, лучше всего использовать вставку названия.
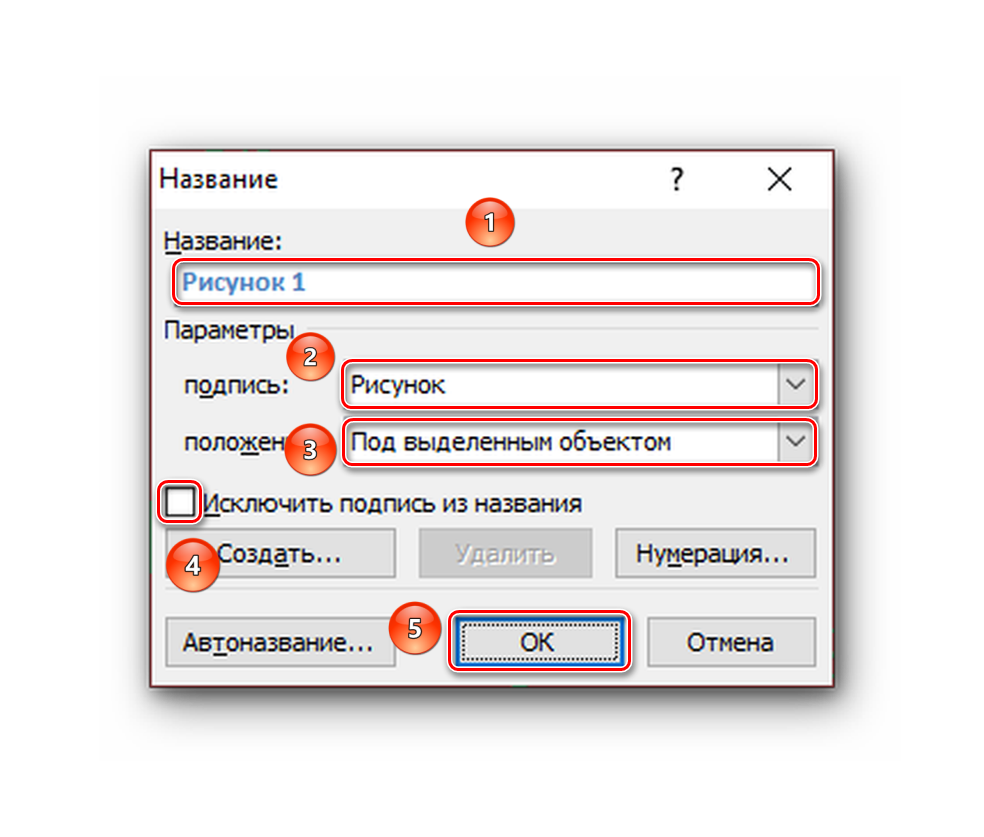
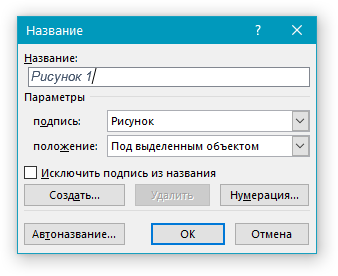
- Кликните правой кнопкой мыши по изображению, которое нужно подписать. В контекстном меню нажмите на «Вставить название…».
- В открывшемся окошке назовите ваше изображение, выбрав, какая подпись будет идти перед самим названием — это может быть «Рисунок», «Таблица» или «Формула». Выбор объекта подписи важен, если хотите соблюсти автоматическую нумерацию картинок в тексте. Далее определитесь с положением подписи: она может под текстом или над ним. При этом подпись можно вообще не использовать, поставив соответствующую галочку, если вы хотите видеть исключительно названия графических объектов в документе. После всего нажмите кнопку «ОК».
- Теперь перед вами картинка с подписью, которую в случае необходимости можно редактировать как угодно.
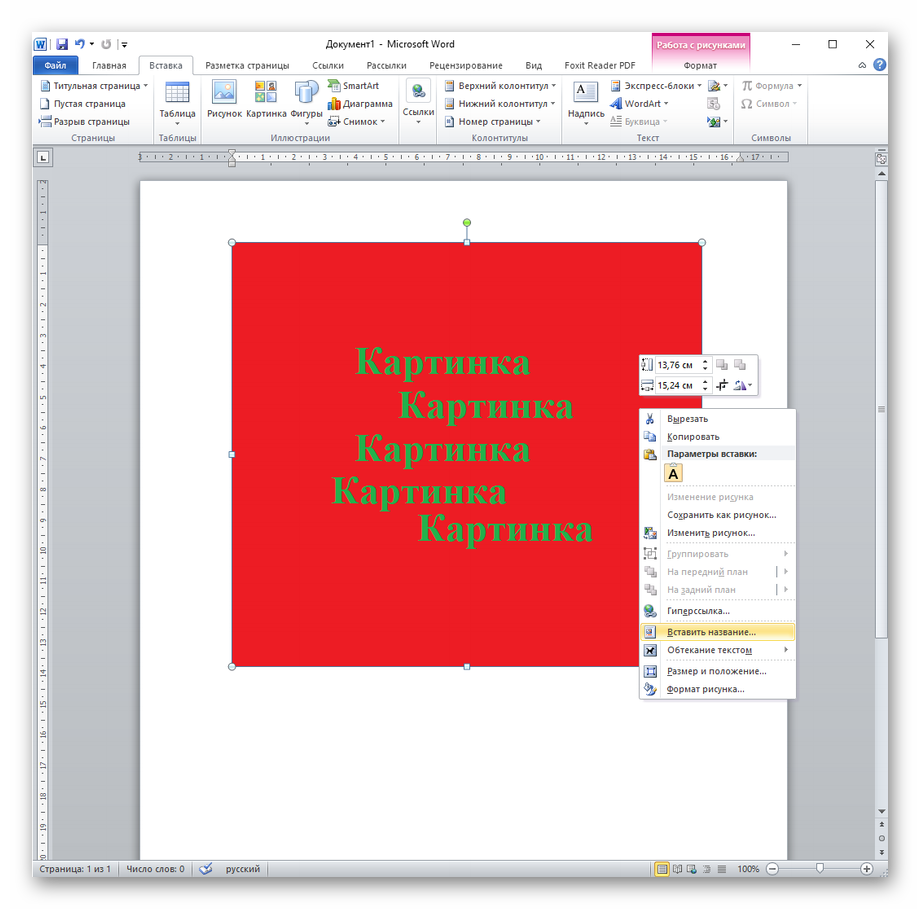
При желании можно создать новую подпись, кликнув на «Создать…», тогда ваше наименование будет появляться в списке предлагаемых вариантов во всех документах. В отличие от стандартных, его можно удалить позже.
Вставка названия — хороший инструмент для подписи картинок, если от текстового выделения больше ничего не требуется и сам текст не обязательно помещать на изображение.
Подходя к итогу, следует сказать, что написать текст поверх картинки в Microsoft Word не очень сложно, даже довольно удобно и порой интересно, если требуется его как-то красиво оформить. Текстовый редактор даёт для этого все инструменты, такие как обычное добавление текста поверх картинки, пользуясь ей как некой подложкой, блоковое написание для заметок или выделения одних частей документа над остальными, создание красиво оформленных художественных и технических подписей.
Содержание
- Добавление поверх рисунка надписи в стиле WordArt
- Добавление поверх рисунка обычного текста
- Добавление подписи к рисунку
- Вопросы и ответы

Помимо работы с текстом, программа MS Word также позволяет работать и с графическими файлами, которые в ней можно изменять (хоть и по минимуму). Так, нередко добавленную в документ картинку требуется как-нибудь подписать или дополнить, причем, сделать это необходимо так, чтобы сам текст находился поверх изображения. Именно о том, как наложить текст на картинку в Ворде, мы и расскажем ниже.
Существует два метода, с помощью которых можно наложить текст поверх картинки — это использование стилей WordArt и добавление текстового поля. В первом случае надпись будет красивая, но шаблонная, во втором — вы имеете свободу выбора шрифтов, типа написания и форматирования.
Microsoft Word заслужено считается одним из лучших текстовых редакторов, но для работы с графическими элементами, даже элементарной, он подходит с большой натяжкой. Поэтому для наложения надписи на картинку целесообразнее будет воспользоваться не этой программой, а более специализированным средством – онлайн-сервисом Canva, где данная задача решается буквально в несколько кликов, а доступные во встроенном редакторе шаблоны помогут качественно улучшить подобный проект.
Урок: Как в Word изменить шрифт
Добавление поверх рисунка надписи в стиле WordArt
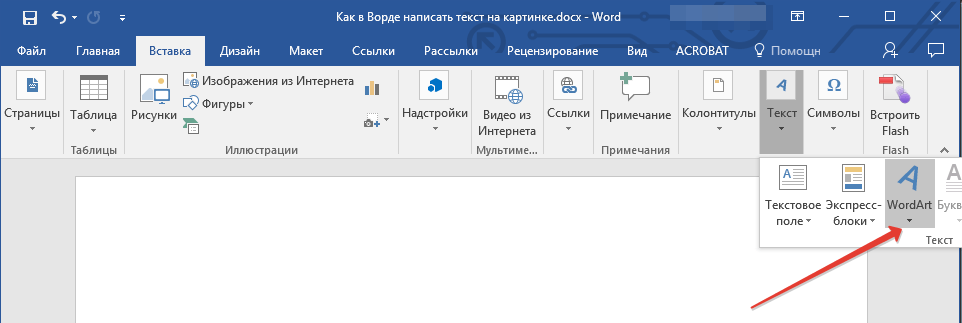
1. Откройте вкладку “Вставка” и в группе “Текст” нажмите на пункт “WordArt”.
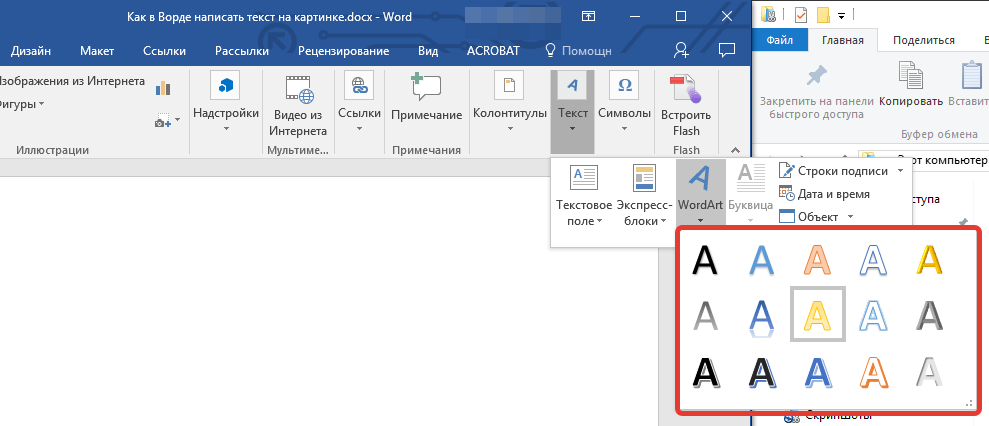
2. Из развернувшегося меню выберите подходящий стиль для надписи.
3. После того, как вы кликните по выбранному стилю, он будет добавлен на страницу документа. Введите необходимую надпись.
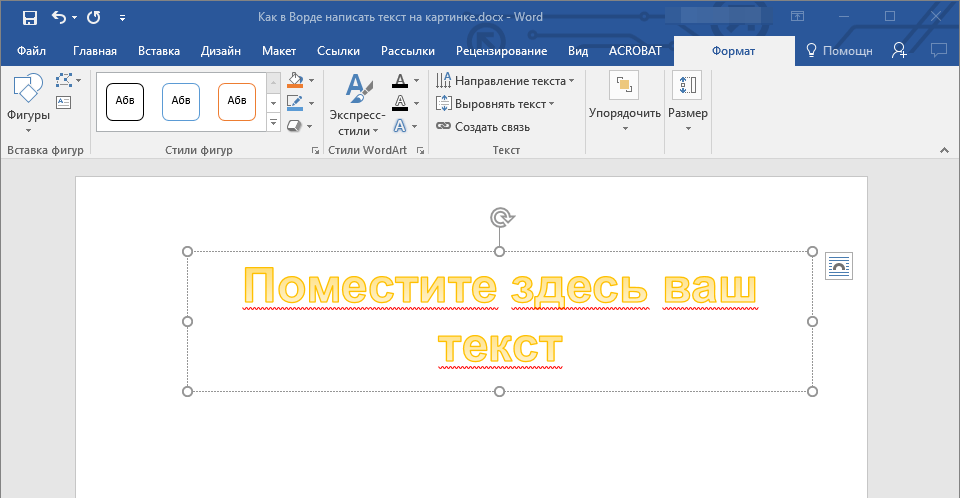
Примечание: После добавления надписи WordArt появится вкладка “Формат”, в которой можно выполнить дополнительные настройки. Кроме того, вы можете изменить размер надписи, потянув за границы поля, в котором она находится.

4. Добавьте в документ изображение, воспользовавшись инструкцией по ссылке ниже.


Урок: Как в Word вставить картинку
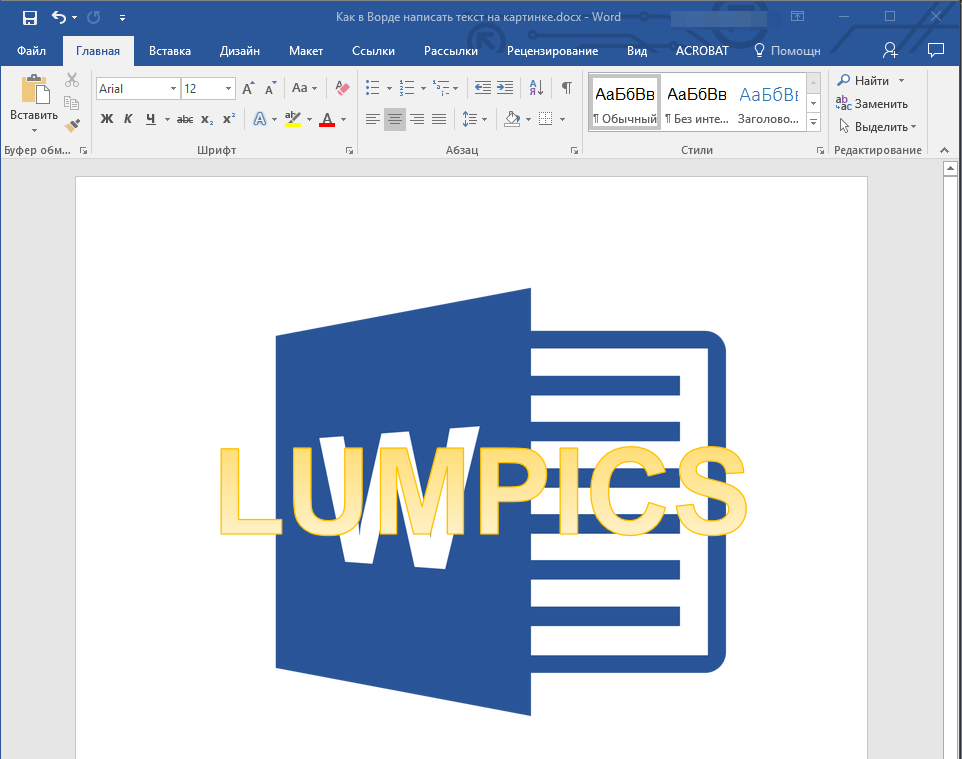
5. Переместите надпись WordArt, расположив ее поверх изображения так, как вам это необходимо. Кроме того, вы можете выровнять положение текста, воспользовавшись нашей инструкцией.
Урок: Как в Ворде выровнять текст
6. Готово, вы наложили надпись в стиле WordArt поверх изображения.
Добавление поверх рисунка обычного текста
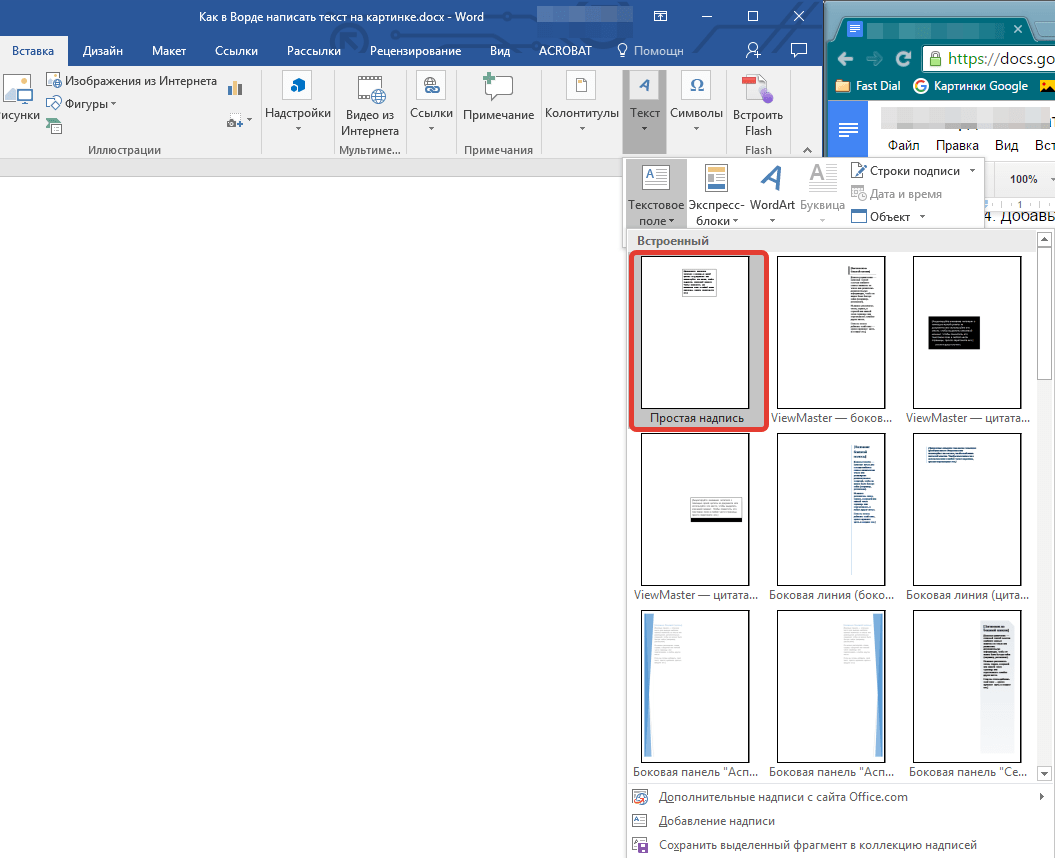
1. Откройте вкладку “Вставка” и в разделе “Текстовое поле” выберите пункт “Простая надпись”.

2. Введите необходимый текст в появившееся текстовое поле. Выровняйте размеры поля, если это необходимо.

3. Во вкладке “Формат”, которая появляется после добавления текстового поля, выполните необходимые настройки. Также, вы можете изменить внешний вид текста в поле стандартным способом (вкладка “Главная”, группа “Шрифт”).

Урок: Как в Word повернуть текст
4. Добавьте изображение в документ.

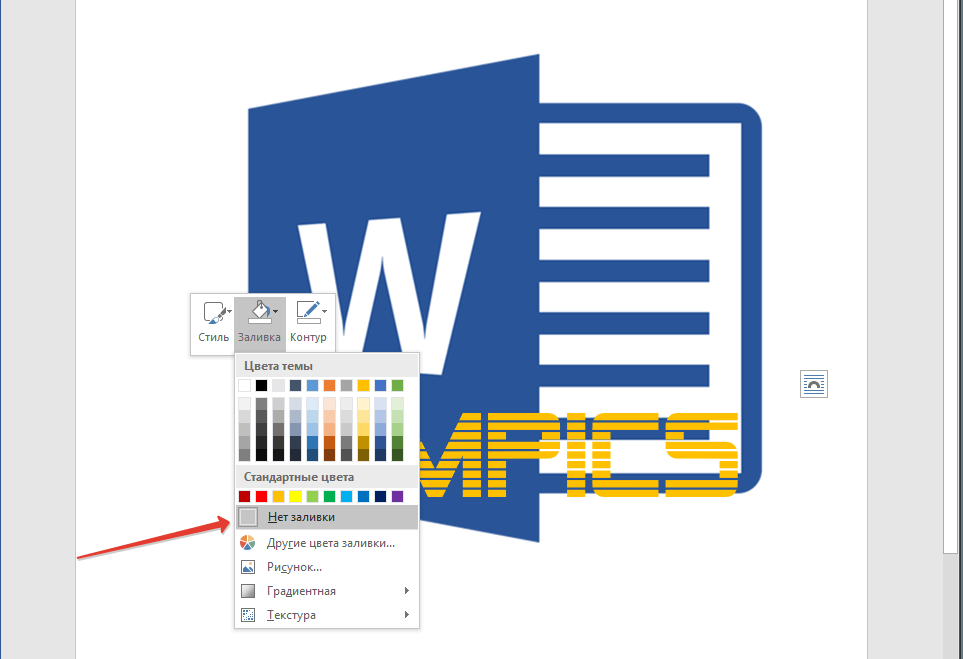
5. Переместите текстовое поле на картинку, если это необходимо, выровняйте положение объектов, воспользовавшись инструментами в группе “Абзац” (вкладка “Главная”).

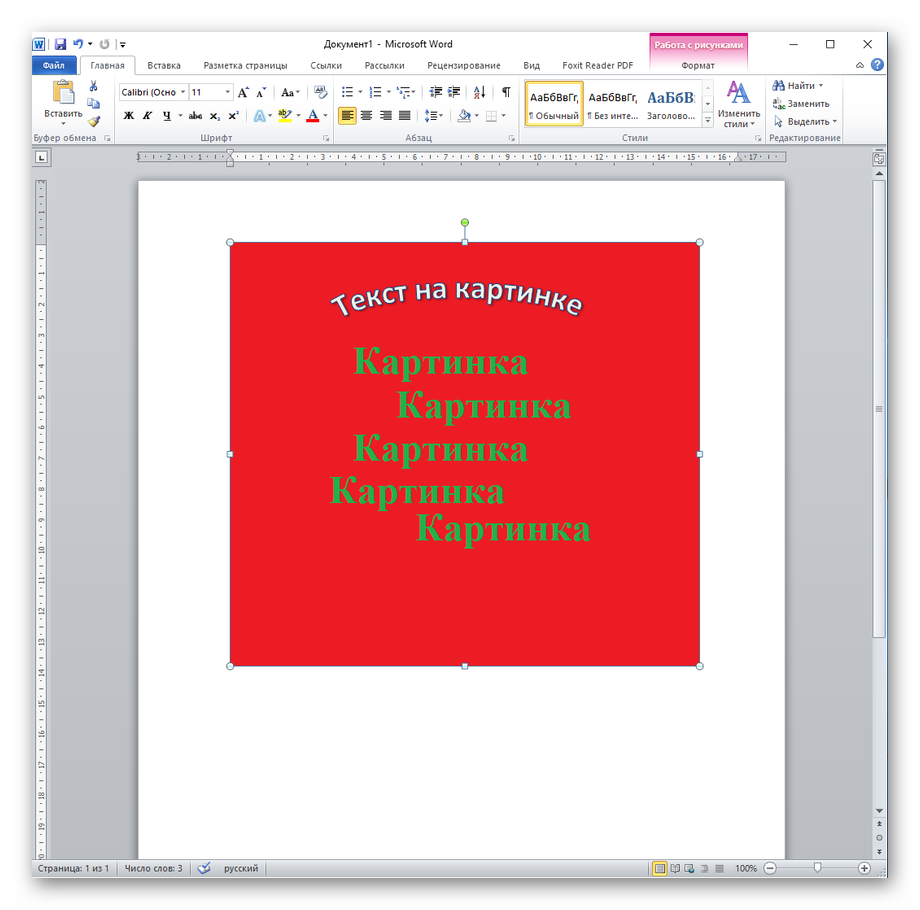
- Совет: Если текстовое поле отображается в виде надписи на белом фоне, перекрывая таким образом изображение, кликните по его краю правой кнопкой мышки и в разделе “Заливка” выберите пункт “Нет заливки”.
Добавление подписи к рисунку
Кроме наложения надписи поверх изображения, вы также можете добавить к нему подпись (название).
1. Добавьте изображение в документ Word и кликните по нему правой кнопкой мышки.

2. Выберите пункт “Вставить название”.
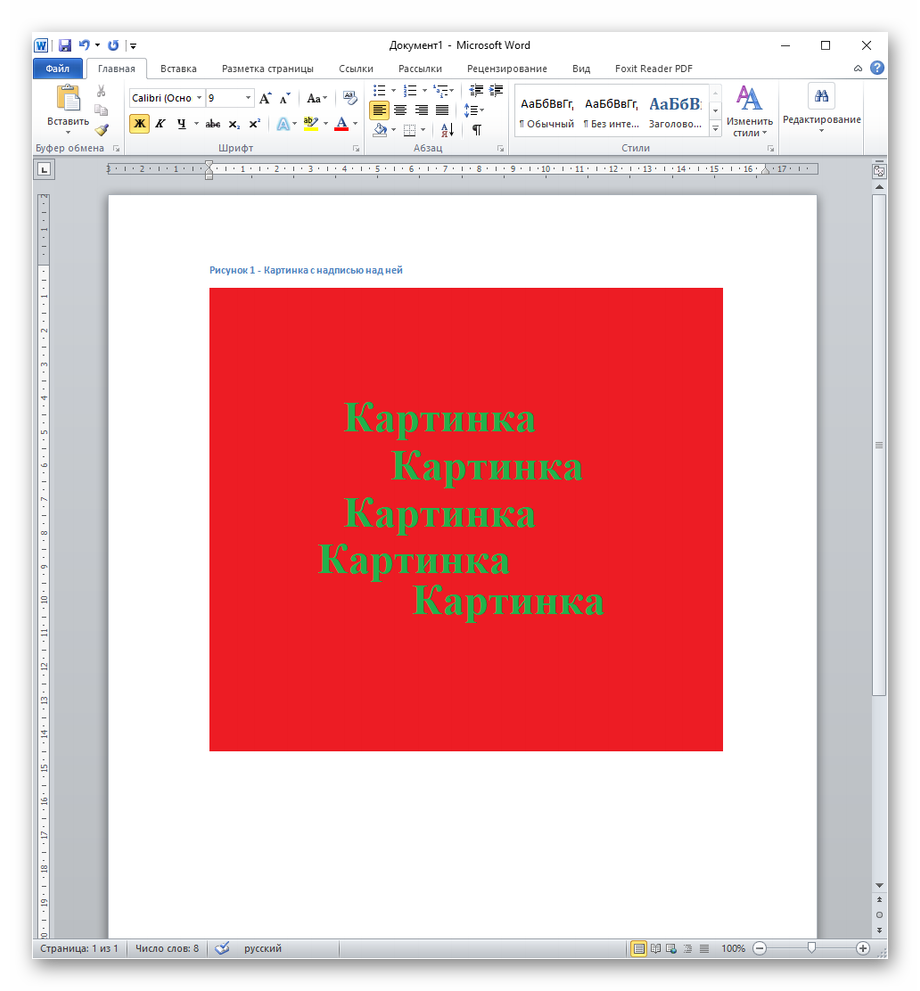
3. В открывшемся окне введите необходимый текст после слова “Рисунок 1” (остается неизменным в этом окне). Если это необходимо, выберите положение подписи (над или под изображением), развернув меню соответствующего раздела. Нажмите кнопку “ОК”.
4. Подпись будет добавлена к графическому файлу, надпись “Рисунок 1” можно будет удалить, оставив только введенный вами текст.

На этом все, теперь вы знаете, как сделать надпись на картинке в Ворде, а также о том, как подписывать рисунки в этой программе. Желаем вам успехов в дальнейшем освоении этого офисного продукта.
Do you want to give a stylized look to your photo by adding text to it? If this is the case, then you are at the right place.
In this article, we are going to look at how to write text on a picture using MS Word. So let’s dive into it.
How to Write on Pictures in Word
First, we need to insert the image into MS Word before we start writing text on it.
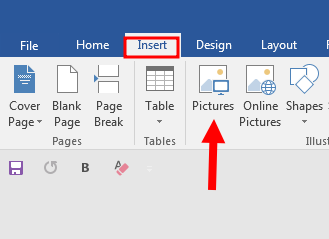
Go to the insert Tab and Click on Pictures to insert an image from your computer.
After adding the picture, within the insert Tab, Click on the Text Box and choose the Draw Text Box option.
By holding the right-click from your mouse, then draw a text box on the picture.
You can also format your text like increase font size, giving it colour and so on.

Now we have to make the background and outline of the text box transparent.
By using the same method, you can make no outline to remove the black border around the text box.
Summary
You have just learned the best way to add text to on image by using the Draw Text Box option. We hope this article will help you, with what you’re trying to achieve and which Microsoft Office program you are using.
Some Useful Articles

I’ve been in the business of writing, marketing, and web development for a while now. I have experience in SEO and content generation. If you need someone who can bring life to your words and web pages, I’m your guy.

- Using a Text Wrapping Style
- Inserting a Text Box
- Inserting a WordArt
Method 1: Place Text Over Image Using Text Wrapping Style
If you have a long chunk of text and you just want to put a background image or a watermark on a document, then this method is best for you.
Step 1: Open up a Word document.

Step 2: Set the image as background.
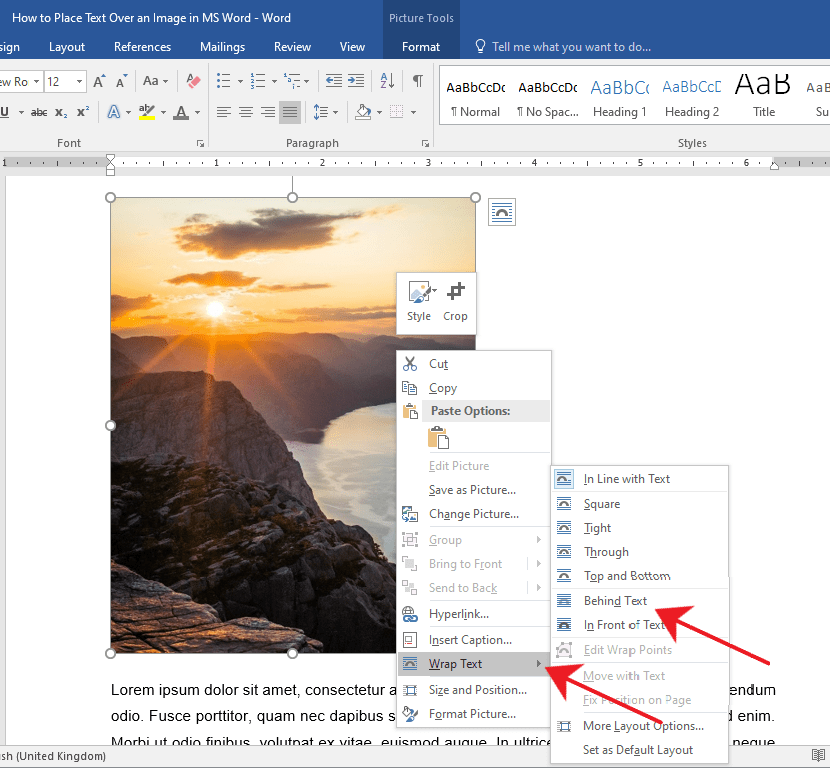
Right-click on the image and select the Wrap Text option.
This will display a horizontal drop-down menu on the right. Once you see the drop-down menu, select Behind Text.
You’ll notice the images and text will rearrange automatically as you hover over the text wrapping options.
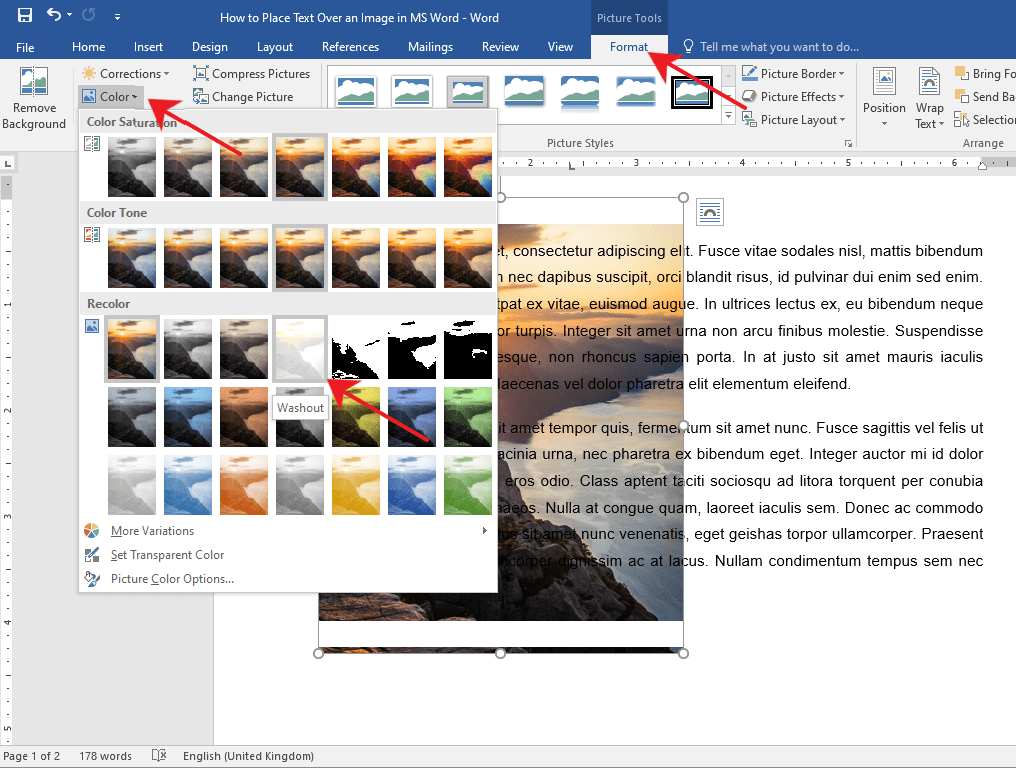
If after you’ve inserted a background image and the text becomes unreadable, you can change the image’s opacity or color.
Simply double-click on the image to activate the Format tab in the Ribbon.
After that, click on the Color drop-down menu and select Washout under the Recolor group.
You can also get creative and explore other options to suit your needs.
Method 2: Place Text Over Image Using a Text Box
Step 1: Open up a Word document.
Step 2: Insert a text box.
Go to the Insert tab on the Ribbon.
Now, navigate to the right side of the Ribbon and click on the Text Box drop-down menu.
Then, select a text box style of your preference. For this example, we’ll use the Simple Text Box.
Step 3: Type in the text.
Type in the text that you want to put on top of your image.

Step 4: Set the text wrapping style of the text box.
Select the text box and click the Layout button found at the upper right-hand corner of the text box.
Then, select the In Front of Text option.
Step 5: Place the text box over the image.
Click and drag the text box to place it over your image. You’ll notice that your text box has a background color by default and is covering a part of the image.

You can change your text box’s background and border color by accessing the Format tab.
This way, only the text will be visible on top of your image. Now, Double-click the text box and go to the Format tab.
From there, click on the Shape Fill drop-down menu and choose No Fill.
To change the border color, select the Shape Outline drop-down menu and choose No Outline.
You can also change the border’s weight and design by exploring the Dashes and Weight options.
Method 3: Place Text Over Image Using Word Art
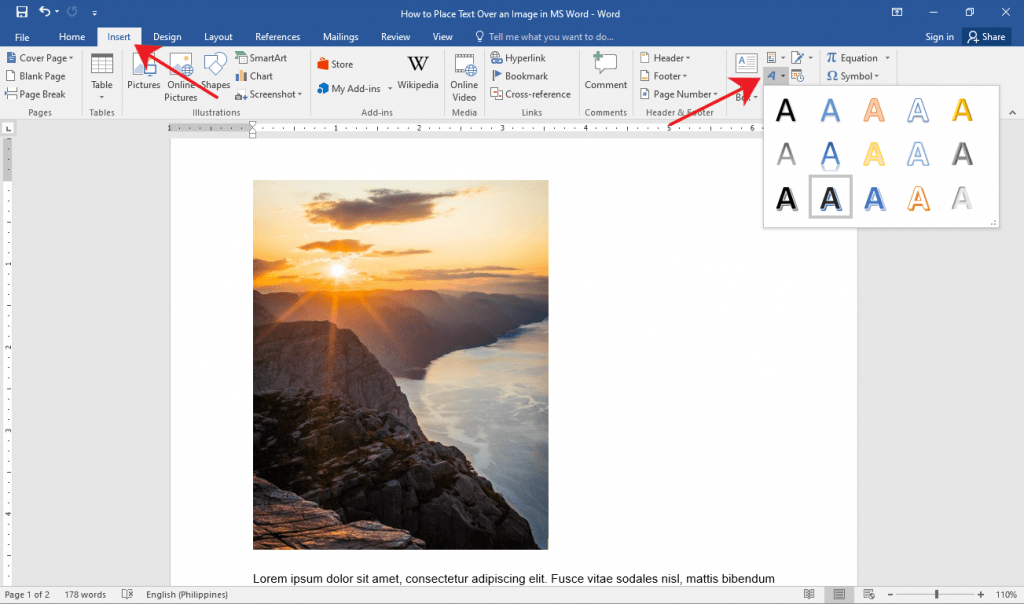
If you find yourself needing to put a title, a name, or a couple of words over an image, then this method has got you covered.
Step 1: Open up a Word file.

Step 2: Insert the WordArt
Click the Insert tab on the Ribbon.
Now, click the WordArt button found at the right side of your screen.
It’s the slanted letter A icon under the Text group. After that, choose a WordArt that suits the style of your document.
Step 3: Place the WordArt over the image.
Click on the WordArt and type in the text you want.
From there, select and drag the WordArt to easily move it around to the perfect location on your document.
You can also resize the WordArt like any other text box by grabbing either one of its corners.

Tip: If you’re using a pen or touch-enabled computer, you can directly write text over an image using the Draw option.
Editing and Deleting Text Over an Image
If you used Method 1, simply select the erroneous text and edit or delete it just as you would with any other text.
For Methods 2 and 3, click on the inside of the text box or the WordArt and start editing.
If you want to delete the entire text box or WordArt, click on any of the borders of the text box or WordArt and hit the Delete button on your keyboard.
Conclusion
That’s the rest of it. We hope you’ve found this article helpful!
How to write on a picture in Word

If you want to add text to an image via Word, then let me show you the steps to follow based on the version of the program you are using.
The procedure for inserting text on an image in Word does not differ much between the classic Word for Windows and macOS, the free online version of the application and the mobile version for smartphones and tablets. Here’s everything in detail.
Word
I start by telling you about the procedure for write text over pictures in Word for computer. If you are interested but you have not yet installed Word on your computer, first I suggest you read this guide of mine.
If, on the other hand, you already have Word and are ready to proceed, start by opening the program: you can find it in the Start menu di Windows or in Launchpad di MacOS. Once this is done, open the document you intend to work on.
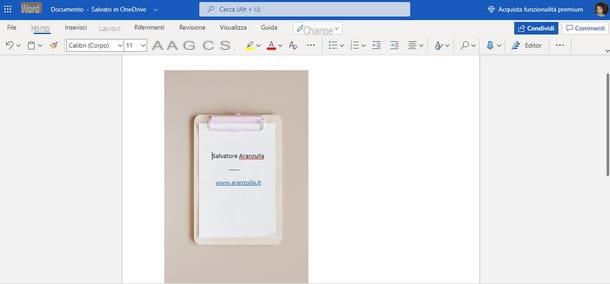
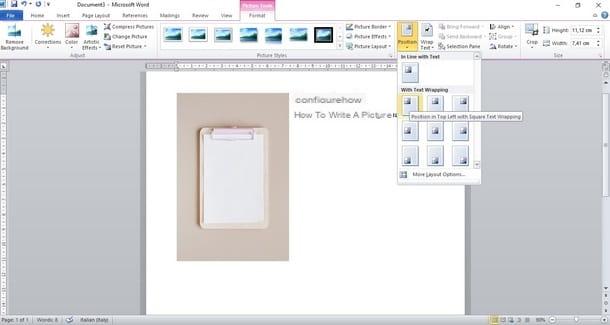
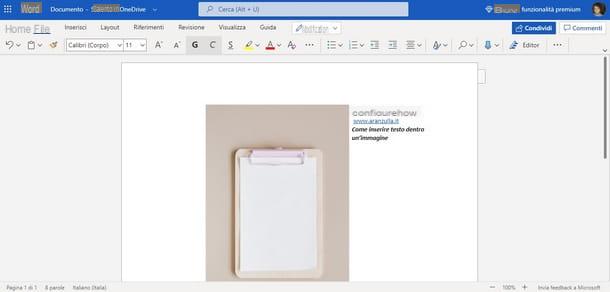
From the main screen of the software, the first step you must take is to insert the image on which you will subsequently write: to do this, click on the tab Inserisci, at the top, and then press the icon Image. Proceed by navigating through the folders on your computer to the one that contains the image or photo to be imported and once located, click on it twice.
Now open the menu Size image, to access the respective options and preferences, then click the button Text arrangement and press on the item Behind the text, in order to «tell» Word to place the image behind the text you are going to write.
What to do now? Virtually nothing more than entering the text. If everything went well, at this point you can write the text as you would on a blank page to see that the writing automatically positions itself over the image, without wrapping or next to it.
A second way to write text over an image in Word is to insert a text box. This function is always accessible from the board Inserisci, after clicking on Text box and preference Draw text box.
The mouse cursor thus turns into a cross: to draw the box, click on the point where it is to be inserted, hold down the click and move the cursor in any direction. To actually insert the text, click inside the box and type the text as you normally would. Finally, move the box after making a long click and place it over the image.
Another way to add text to an image in Word is to use a WordArt. After importing the image, click on the tab Inserisci, then click on the logo WordArt and select the style and color you prefer.
Finally, write the text to be placed over the image in the new box WordArt and move it to the place you want. Very simple, right?
Word Online
Do you prefer to use Word Online for its versatility and practicality? Great idea, this version of Microsoft’s text creation program offers many of the possibilities of the computer version, including adding text to an image, with the advantage of being free and usable by all popular browsers.
To proceed, connect to the Word Online login page and log in with your Microsoft account. From the Word Online main page, choose whether to create a New blank document, by clicking on the appropriate button, or if you load an existing one from your device, by pressing on the item Load and open.
From the new document screen, insert the image or photo to write on. The procedure is the same as that already seen for Word for Windows and macOS.
To be able to write over the imported image in Word you have to double click on it, in order to access the menu Image. Next, select the item from the bar at the top Text arrangement e premi sull’opzione Behind the text.
By doing this you have set the preference to be able to write in the document by bringing the image behind the text, so that the latter is always on top of the image. In other words, to write over the image you just have to write normally and format the text so as to arrange it according to your preferences.
If instead you would like to write some text inside an image using the text box tool or WordArt, then I must tell you that this is unfortunately not possible on Word Online. These features are only available in Word for computers and the Word app for smartphones and tablets.
If you want to know more about how you can use Word Online, I leave you to my guide dedicated to the service.
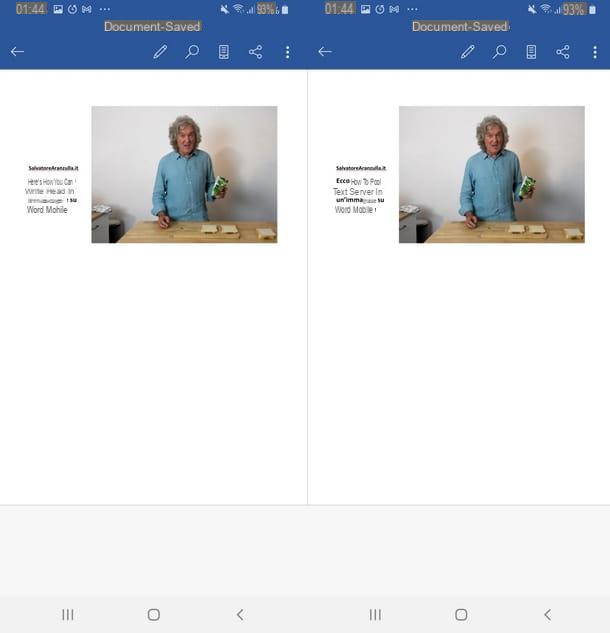
App Word mobile
In this chapter I want to focus on how to proceed to place text over an image using the Microsoft Word for Android (also available on alternative stores for devices without Play Store) and iOS / iPadOS. If you have not yet installed the application, you should know that it is very simple and nothing different from what is the usual download and installation procedure. So visit the links I just provided you from the device of your interest and press the button Installa / Ottieni (on iPhones and iPads, you may be asked to verify your identity).
I would like to clarify that the Word app is free only for devices with dimensions equal to or less than 10.1 «, otherwise it requires the subscription of a Microsoft 365 subscription, starting from 7 euros / month. I also point out that between smartphones and tablet the app interface has a difference in the placement of the menu bar.
In practice, on smartphones it is located at the bottom of the screen, divided into special drop-down menus, while on tablets it is positioned at the top, more similar to the desktop version of Word.
Proceed, therefore, by opening the Word app from the application menu of your smartphone or tablet. Then choose whether to create a new document by tapping the button with the symbol [+], or whether to select an existing one from your device or from a supported cloud service. Then press the a symbol key pen, to enable changes to the document.
Proceed now by inserting the image you want to write text on. To do this, scroll down the section Home area of toolbar and select the icon that represents aimage, to open the folder navigation menu and search for the photo or image stored on your device.
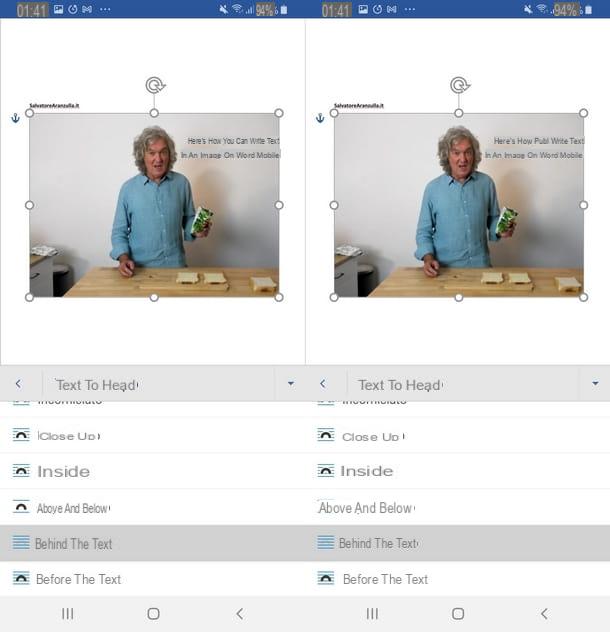
Now, import the image into Word by tapping on it, and always via the toolbar, press the button Text arrangement (recognizable by the icon with a lined sheet and a black arc in the center). To write the text inside the image, choose the option Behind the text.
At this point, if everything went the right way, when you get to write near the image, the text will not go to the head or to the side of the image but will be placed exactly on top of it.
In addition to this method, you can insert text over images in Word using the tool Text box present in the menu Inserisci. As soon as you tap on this tool, a box with temporary text is created in your Word document.
With a long tap on the box, you can move it wherever you like, while by making a quick press on its center you can select the item Edit text. Write here the text to be inserted inside the image and adjust the size of the box with a long tap on its edges.
How to write next to a picture in Word

After explaining how to write inside an image in Word, let me now show you the procedure on how to write next to a picture in Word.
If you have already learned how to write inside the image, you will see that placing the text next to it will be a breeze, both from a computer, from the Web and smartphone / tablet. Here’s how to do it.
Word
You intend to proceed using the Microsoft Word for Windows and macOS? Then after opening the program, import the image or photo from the menu as well Insert> Image.
Once you have found the image, double-click on it to import it into the document, then write the text to be placed next to it and proceed to align it as you like. How? Simple: basically, Word positions the text following the image, but if you intend to align it differently you can act from the menu Size of the image, reachable after double clicking on it.
The next step is to click the icon Location and select the alignment style from the preview menu. For example, with the first choice the text is aligned on the right side of the image, with the second on the sides (leaving the image in the center) and with the third option the text is positioned next to the left side.
That’s all. Easy, right? If you are looking for other ways to insert text next to an image in Word, you can use the tools Text box e WordArt which I already told you about in a previous chapter.

The tool is also added to these methods caption. You ask me how to insert a caption in Word? Simple, click on the tab References up, then up Insert caption, then type the content of the caption into the box Caption.
Of course, you can also change the caption label by clicking on the button New label and typing the name of the label. Once the changes are complete, click the button OK to confirm. The caption will be placed where you left the text cursor.
Word Online
You would like to do the same operation of aligning text next to an image but on Word Online? So here are the most important steps to follow.
Always start by importing the image to Word Online, exactly as I explained before, then double click on it to access the menu Image.
Now, from the menu at the top, click on the button Text arrangement and choose from the items Right framed o Framed on the left to set the position of the text to the right or left side of the image. What to do now? Simple, write all the text you want to see it positioned next to the image.
App Word mobile
If you are interested in finding out how to write next to a picture in Word in mobile version, open the Word app on your smartphone or tablet and insert the image, exactly as seen in the case of writing text on the image, then from the toolbar tap the button Text arrangement e seleziona l’opzione Framed.
Proceed now by writing the text you want to place next to the image and once done, adjust its position by making a long tap on it and moving it to the part of the document you prefer. The text will automatically be placed on the sides, or above and below the image.
Clearly, an alternative method of inserting text next to an image in Word is to use the tool Text box, exactly as I have already explained to you at the end of this chapter. The difference is in placing the box next to the image and no longer inside.
What did I tell you? After all, nothing too complicated! Mastering programs like Word can make a difference in creating digital content. If you also agree on this point, I think you might be interested in learning more about how to use Word on your mobile and become more productive with this important tool!
How to write on a picture in Word