
HTTA is reader supported. When you buy through links on our site, we may earn an affiliate commission at no extra cost to you. Learn more.
Typing letters or characters in other languages, such as Russian, is now a breeze thanks to technological advances in keyboard controls.
There are a few clean tips and tricks in this article that will help you type Russian letters quickly and efficiently on any computer platform, including desktops, laptops, and even mobile devices.
Some keyboards are made in Russian and allow you to type these Russian characters more quickly and comfortably.
However, if you don’t have access to such a special Russian keyboard, the techniques in this article can be very helpful.
Without further ado, let’s get started.
There are several methods for typing or inserting Russian characters into Microsoft Word.
Because these characters are not readily available on the keyboard, the simplest way to type them on Word is to use their alt codes.
In this section, I’ll show you how to use alt codes to type Russian letters on an English keyboard.
Using the Russian Letters Alt Code
Each Russian character has an alt code that you can use to type it in Microsoft Word.
You’ll quickly learn the alt code for all the Russian characters. For the time being, let’s focus on the steps.
To type Russian letters in MS Word, follow these steps:
- First and foremost, get the alt code for the Russian letters you intend to type. These alt codes are listed just below these instructions.
- Open your Microsoft Word document and move the insertion pointer to the location where you want to type the Russian characters.
- Turn on your Num Lock. Press Fn+NmLk to turn on Num Lock on laptops without the numeric keypad.
- Hold down the Alt key on your keyboard.
- Whilst still holding on to the Alt key, press the Russian alt code.
- For example, to type ア, press and hold the Alt key, then type the alt code 12450 on the numeric keypad.
- Now release the Alt key.
You should see the Russian letter inserted as soon as you release the Alt key.
Related: How to type Japanese Characters
Below are the alt codes for the various Russian Characters.
Uppercase Russian Letters/Characters
| Character Name | Character | Alt Code |
|---|---|---|
| CYRILLIC CAPITAL LETTER A | А | Alt + 1040 |
| CYRILLIC CAPITAL LETTER BE | Б | Alt + 1041 |
| CYRILLIC CAPITAL LETTER VE | В | Alt + 1042 |
| CYRILLIC CAPITAL LETTER GHE | Г | Alt + 1043 |
| CYRILLIC CAPITAL LETTER DE | Д | Alt + 1044 |
| CYRILLIC CAPITAL LETTER IE | Е | Alt + 1045 |
| CYRILLIC CAPITAL LETTER ZHE | Ж | Alt + 1046 |
| CYRILLIC CAPITAL LETTER ZE | З | Alt + 1047 |
| CYRILLIC CAPITAL LETTER I | И | Alt + 1048 |
| CYRILLIC CAPITAL LETTER SHORT I | Й | Alt + 1049 |
| CYRILLIC CAPITAL LETTER KA | К | Alt + 1050 |
| CYRILLIC CAPITAL LETTER EL | Л | Alt + 1051 |
| CYRILLIC CAPITAL LETTER EM | М | Alt + 1052 |
| CYRILLIC CAPITAL LETTER EN | Н | Alt + 1053 |
| CYRILLIC CAPITAL LETTER O | О | Alt + 1054 |
| CYRILLIC CAPITAL LETTER PE | П | Alt + 1055 |
| CYRILLIC CAPITAL LETTER ER | Р | Alt + 1056 |
| CYRILLIC CAPITAL LETTER ES | С | Alt + 1057 |
| CYRILLIC CAPITAL LETTER TE | Т | Alt + 1058 |
| CYRILLIC CAPITAL LETTER U | У | Alt + 1059 |
| CYRILLIC CAPITAL LETTER EF | Ф | Alt + 1060 |
| CYRILLIC CAPITAL LETTER HA | Х | Alt + 1061 |
| CYRILLIC CAPITAL LETTER TSE | Ц | Alt + 1062 |
| CYRILLIC CAPITAL LETTER CHE | Ч | Alt + 1063 |
| CYRILLIC CAPITAL LETTER SHA | Ш | Alt + 1064 |
| CYRILLIC CAPITAL LETTER SHCHA | Щ | Alt + 1065 |
| CYRILLIC CAPITAL LETTER HARD SIGN | Ъ | Alt + 1066 |
| CYRILLIC CAPITAL LETTER YERU | Ы | Alt + 1067 |
| CYRILLIC CAPITAL LETTER SOFT SIGN | Ь | Alt + 1068 |
| CYRILLIC CAPITAL LETTER E | Э | Alt + 1069 |
| CYRILLIC CAPITAL LETTER YU | Ю | Alt + 1070 |
| CYRILLIC CAPITAL LETTER YA | Я | Alt + 1071 |
Lowercase Russian Letters/Characters
| Character Name | Character | Alt Code |
|---|---|---|
| CYRILLIC SMALL LETTER A | а | Alt + 1072 |
| CYRILLIC SMALL LETTER BE | б | Alt + 1073 |
| CYRILLIC SMALL LETTER VE | в | Alt + 1074 |
| CYRILLIC SMALL LETTER GHE | г | Alt + 1075 |
| CYRILLIC SMALL LETTER DE | д | Alt + 1076 |
| CYRILLIC SMALL LETTER IE | е | Alt + 1077 |
| CYRILLIC SMALL LETTER ZHE | ж | Alt + 1078 |
| CYRILLIC SMALL LETTER ZE | з | Alt + 1079 |
| CYRILLIC SMALL LETTER I | и | Alt + 1080 |
| CYRILLIC SMALL LETTER SHORT I | й | Alt + 1081 |
| CYRILLIC SMALL LETTER KA | к | Alt + 1082 |
| CYRILLIC SMALL LETTER EL | л | Alt + 1083 |
| CYRILLIC SMALL LETTER EM | м | Alt + 1084 |
| CYRILLIC SMALL LETTER EN | н | Alt + 1085 |
| CYRILLIC SMALL LETTER O | о | Alt + 1086 |
| CYRILLIC SMALL LETTER PE | п | Alt + 1087 |
| CYRILLIC SMALL LETTER ER | р | Alt + 1088 |
| CYRILLIC SMALL LETTER ES | с | Alt + 1089 |
| CYRILLIC SMALL LETTER TE | т | Alt + 1090 |
| CYRILLIC SMALL LETTER U | у | Alt + 1091 |
| CYRILLIC SMALL LETTER EF | ф | Alt + 1092 |
| CYRILLIC SMALL LETTER HA | х | Alt + 1093 |
| CYRILLIC SMALL LETTER TSE | ц | Alt + 1094 |
| CYRILLIC SMALL LETTER CHE | ч | Alt + 1095 |
| CYRILLIC SMALL LETTER SHA | ш | Alt + 1096 |
| CYRILLIC SMALL LETTER SHCHA | щ | Alt + 1097 |
| CYRILLIC SMALL LETTER HARD SIGN | ъ | Alt + 1098 |
| CYRILLIC SMALL LETTER YERU | ы | Alt + 1099 |
| CYRILLIC SMALL LETTER SOFT SIGN | ь | Alt + 1100 |
| CYRILLIC SMALL LETTER E | э | Alt + 1101 |
| CYRILLIC SMALL LETTER YU | ю | Alt + 1102 |
| CYRILLIC SMALL LETTER YA | я | Alt + 1103 |
Additional Russian Letters and Symbols
| Character Name | Character | Alt Code |
|---|---|---|
| CYRILLIC CAPITAL LETTER OMEGA | Ѡ | Alt + 1120 |
| CYRILLIC SMALL LETTER OMEGA | ѡ | Alt + 1121 |
| CYRILLIC CAPITAL LETTER YAT | Ѣ | Alt + 1122 |
| CYRILLIC SMALL LETTER YAT | ѣ | Alt + 1123 |
| CYRILLIC CAPITAL LETTER IOTIFIED E | Ѥ | Alt + 1124 |
| CYRILLIC SMALL LETTER IOTIFIED E | ѥ | Alt + 1125 |
| CYRILLIC CAPITAL LETTER LITTLE YUS | Ѧ | Alt + 1126 |
| CYRILLIC SMALL LETTER LITTLE YUS | ѧ | Alt + 1127 |
| CYRILLIC CAPITAL LETTER IOTIFIED LITTLE YUS | Ѩ | Alt + 1128 |
| CYRILLIC SMALL LETTER IOTIFIED LITTLE YUS | ѩ | Alt + 1129 |
| CYRILLIC CAPITAL LETTER BIG YUS | Ѫ | Alt + 1130 |
| CYRILLIC SMALL LETTER BIG YUS | ѫ | Alt + 1131 |
| CYRILLIC CAPITAL LETTER IOTIFIED BIG YUS | Ѭ | Alt + 1132 |
| CYRILLIC SMALL LETTER IOTIFIED BIG YUS | ѭ | Alt + 1133 |
| CYRILLIC CAPITAL LETTER KSI | Ѯ | Alt + 1134 |
| CYRILLIC SMALL LETTER KSI | ѯ | Alt + 1135 |
| CYRILLIC CAPITAL LETTER PSI | Ѱ | Alt + 1136 |
| CYRILLIC SMALL LETTER PSI | ѱ | Alt + 1137 |
| CYRILLIC CAPITAL LETTER FITA | Ѳ | Alt + 1138 |
| CYRILLIC SMALL LETTER FITA | ѳ | Alt + 1139 |
| CYRILLIC CAPITAL LETTER IZHITSA | Ѵ | Alt + 1140 |
| CYRILLIC SMALL LETTER IZHITSA | ѵ | Alt + 1141 |
| CYRILLIC CAPITAL LETTER IZHITSA WITH DOUBLE GRAVE ACCENT | Ѷ | Alt + 1142 |
| CYRILLIC SMALL LETTER IZHITSA WITH DOUBLE GRAVE ACCENT | ѷ | Alt + 1143 |
| CYRILLIC CAPITAL LETTER UK | Ѹ | Alt + 1144 |
| CYRILLIC SMALL LETTER UK | ѹ | Alt + 1145 |
| CYRILLIC CAPITAL LETTER ROUND OMEGA | Ѻ | Alt + 1146 |
| CYRILLIC SMALL LETTER ROUND OMEGA | ѻ | Alt + 1147 |
| CYRILLIC CAPITAL LETTER OMEGA WITH TITLO | Ѽ | Alt + 1148 |
| CYRILLIC SMALL LETTER OMEGA WITH TITLO | ѽ | Alt + 1149 |
| CYRILLIC CAPITAL LETTER OT | Ѿ | Alt + 1150 |
| CYRILLIC SMALL LETTER OT | ѿ | Alt + 1151 |
| CYRILLIC CAPITAL LETTER KOPPA | Ҁ | Alt + 1152 |
| CYRILLIC SMALL LETTER KOPPA | ҁ | Alt + 1153 |
| CYRILLIC THOUSANDS SIGN | ҂ | Alt + 1154 |
| COMBINING CYRILLIC TITLO | а҃ | Alt + 1155 |
| COMBINING CYRILLIC PALATALIZATION | а҄ | Alt + 1156 |
| COMBINING CYRILLIC DASIA PNEUMATA | а҅ | Alt + 1157 |
| COMBINING CYRILLIC PSILI PNEUMATA | а҆ | Alt + 1158 |
| COMBINING CYRILLIC HUNDRED THOUSANDS SIGN | ҈а | Alt + 1160 |
| COMBINING CYRILLIC MILLIONS SIGN | ҉а | Alt + 1161 |
| CYRILLIC CAPITAL LETTER SEMISOFT SIGN | Ҍ | Alt + 1164 |
| CYRILLIC SMALL LETTER SEMISOFT SIGN | ҍ | Alt + 1165 |
| CYRILLIC CAPITAL LETTER ER WITH TICK | Ҏ | Alt + 1166 |
| CYRILLIC SMALL LETTER ER WITH TICK | ҏ | Alt + 1167 |
| CYRILLIC CAPITAL LETTER GHE WITH UPTURN | Ґ | Alt + 1168 |
| CYRILLIC SMALL LETTER GHE WITH UPTURN | ґ | Alt + 1169 |
| CYRILLIC CAPITAL LETTER GHE WITH STROKE | Ғ | Alt + 1170 |
| CYRILLIC SMALL LETTER GHE WITH STROKE | ғ | Alt + 1171 |
| CYRILLIC CAPITAL LETTER GHE WITH MIDDLE HOOK | Ҕ | Alt + 1172 |
| CYRILLIC SMALL LETTER GHE WITH MIDDLE HOOK | ҕ | Alt + 1173 |
| CYRILLIC CAPITAL LETTER ZHE WITH DESCENDER | Җ | Alt + 1174 |
| CYRILLIC SMALL LETTER ZHE WITH DESCENDER | җ | Alt + 1175 |
| CYRILLIC CAPITAL LETTER ZE WITH DESCENDER | Ҙ | Alt + 1176 |
| CYRILLIC SMALL LETTER ZE WITH DESCENDER | ҙ | Alt + 1177 |
| CYRILLIC CAPITAL LETTER KA WITH DESCENDER | Қ | Alt + 1178 |
| CYRILLIC SMALL LETTER KA WITH DESCENDER | қ | Alt + 1179 |
| CYRILLIC CAPITAL LETTER KA WITH VERTICAL STROKE | Ҝ | Alt + 1180 |
| CYRILLIC SMALL LETTER KA WITH VERTICAL STROKE | ҝ | Alt + 1181 |
| CYRILLIC CAPITAL LETTER KA WITH STROKE | Ҟ | Alt + 1182 |
| CYRILLIC SMALL LETTER KA WITH STROKE | ҟ | Alt + 1183 |
| CYRILLIC CAPITAL LETTER BASHKIR KA | Ҡ | Alt + 1184 |
| CYRILLIC SMALL LETTER BASHKIR KA | ҡ | Alt + 1185 |
| CYRILLIC CAPITAL LETTER EN WITH DESCENDER | Ң | Alt + 1186 |
| CYRILLIC SMALL LETTER EN WITH DESCENDER | ң | Alt + 1187 |
| CYRILLIC CAPITAL LIGATURE EN GHE | Ҥ | Alt + 1188 |
| CYRILLIC SMALL LIGATURE EN GHE | ҥ | Alt + 1189 |
| CYRILLIC CAPITAL LETTER PE WITH MIDDLE HOOK (Abkhasian) | Ҧ | Alt + 1190 |
| CYRILLIC SMALL LETTER PE WITH MIDDLE HOOK (Abkhasian) | ҧ | Alt + 1191 |
| CYRILLIC CAPITAL LETTER ABKHASIAN HA | Ҩ | Alt + 1192 |
| CYRILLIC SMALL LETTER ABKHASIAN HA | ҩ | Alt + 1193 |
| CYRILLIC CAPITAL LETTER ES WITH DESCENDER | Ҫ | Alt + 1194 |
| CYRILLIC SMALL LETTER ES WITH DESCENDER | ҫ | Alt + 1195 |
| CYRILLIC CAPITAL LETTER TE WITH DESCENDER | Ҭ | Alt + 1196 |
| CYRILLIC SMALL LETTER TE WITH DESCENDER | ҭ | Alt + 1197 |
| CYRILLIC CAPITAL LETTER STRAIGHT U | Ү | Alt + 1198 |
| CYRILLIC SMALL LETTER STRAIGHT U | ү | Alt + 1199 |
| CYRILLIC CAPITAL LETTER STRAIGHT U WITH STROKE | Ұ | Alt + 1200 |
| CYRILLIC SMALL LETTER STRAIGHT U WITH STROKE | ұ | Alt + 1201 |
| CYRILLIC CAPITAL LETTER HA WITH DESCENDER | Ҳ | Alt + 1202 |
| CYRILLIC SMALL LETTER HA WITH DESCENDER | ҳ | Alt + 1203 |
| CYRILLIC CAPITAL LIGATURE TE TSE (Abkhasian) | Ҵ | Alt + 1204 |
| CYRILLIC SMALL LIGATURE TE TSE (Abkhasian) | ҵ | Alt + 1205 |
| CYRILLIC CAPITAL LETTER CHE WITH DESCENDER | Ҷ | Alt + 1206 |
| CYRILLIC SMALL LETTER CHE WITH DESCENDER | ҷ | Alt + 1207 |
| CYRILLIC CAPITAL LETTER CHE WITH VERTICAL STROKE | Ҹ | Alt + 1208 |
| CYRILLIC SMALL LETTER CHE WITH VERTICAL STROKE | ҹ | Alt + 1209 |
| CYRILLIC CAPITAL LETTER SHHA | Һ | Alt + 1210 |
| CYRILLIC SMALL LETTER SHHA | һ | Alt + 1211 |
| CYRILLIC CAPITAL LETTER ABKHASIAN CHE | Ҽ | Alt + 1212 |
| CYRILLIC SMALL LETTER ABKHASIAN CHE | ҽ | Alt + 1213 |
| CYRILLIC CAPITAL LETTER ABKHASIAN CHE WITH DESCENDER | Ҿ | Alt + 1214 |
| CYRILLIC SMALL LETTER ABKHASIAN CHE WITH DESCENDER | ҿ | Alt + 1215 |
| CYRILLIC LETTER PALOCHKA | Ӏ | Alt + 1216 |
| CYRILLIC CAPITAL LETTER ZHE WITH BREVE | Ӂ | Alt + 1217 |
| CYRILLIC SMALL LETTER ZHE WITH BREVE | ӂ | Alt + 1218 |
| CYRILLIC CAPITAL LETTER KA WITH HOOK | Ӄ | Alt + 1219 |
| CYRILLIC SMALL LETTER KA WITH HOOK | ӄ | Alt + 1220 |
| CYRILLIC CAPITAL LETTER EN WITH HOOK | Ӈ | Alt + 1223 |
| CYRILLIC SMALL LETTER EN WITH HOOK | ӈ | Alt + 1224 |
| CYRILLIC CAPITAL LETTER KHAKASSIAN CHE | Ӌ | Alt + 1227 |
| CYRILLIC SMALL LETTER KHAKASSIAN CHE | ӌ | Alt + 1228 |
| CYRILLIC CAPITAL LETTER A WITH BREVE | Ӑ | Alt + 1232 |
| CYRILLIC SMALL LETTER A WITH BREVE | ӑ | Alt + 1233 |
| CYRILLIC CAPITAL LETTER A WITH DIAERESIS | Ӓ | Alt + 1234 |
| CYRILLIC SMALL LETTER A WITH DIAERESIS | ӓ | Alt + 1235 |
| CYRILLIC CAPITAL LIGATURE A IE | Ӕ | Alt + 1236 |
| CYRILLIC SMALL LIGATURE A IE | ӕ | Alt + 1237 |
| CYRILLIC CAPITAL LETTER IE WITH BREVE | Ӗ | Alt + 1238 |
| CYRILLIC SMALL LETTER IE WITH BREVE | ӗ | Alt + 1239 |
| CYRILLIC CAPITAL LETTER SCHWA | Ә | Alt + 1240 |
| CYRILLIC SMALL LETTER SCHWA | ә | Alt + 1241 |
| CYRILLIC CAPITAL LETTER SCHWA WITH DIAERESIS | Ӛ | Alt + 1242 |
| CYRILLIC SMALL LETTER SCHWA WITH DIAERESIS | ӛ | Alt + 1243 |
| CYRILLIC CAPITAL LETTER ZHE WITH DIAERESIS | Ӝ | Alt + 1244 |
| CYRILLIC SMALL LETTER ZHE WITH DIAERESIS | ӝ | Alt + 1245 |
| CYRILLIC CAPITAL LETTER ZE WITH DIAERESIS | Ӟ | Alt + 1246 |
| CYRILLIC SMALL LETTER ZE WITH DIAERESIS | ӟ | Alt + 1247 |
| CYRILLIC CAPITAL LETTER ABKHASIAN DZE | Ӡ | Alt + 1248 |
| CYRILLIC SMALL LETTER ABKHASIAN DZE | ӡ | Alt + 1249 |
| CYRILLIC CAPITAL LETTER I WITH MACRON | Ӣ | Alt + 1250 |
| CYRILLIC SMALL LETTER I WITH MACRON | ӣ | Alt + 1251 |
| CYRILLIC CAPITAL LETTER I WITH DIAERESIS | Ӥ | Alt + 1252 |
| CYRILLIC SMALL LETTER I WITH DIAERESIS | ӥ | Alt + 1253 |
| CYRILLIC CAPITAL LETTER O WITH DIAERESIS | Ӧ | Alt + 1254 |
| CYRILLIC SMALL LETTER O WITH DIAERESIS | ӧ | Alt + 1255 |
| CYRILLIC CAPITAL LETTER BARRED O | Ө | Alt + 1256 |
| CYRILLIC SMALL LETTER BARRED O | ө | Alt + 1257 |
| CYRILLIC CAPITAL LETTER BARRED O WITH DIAERESIS | Ӫ | Alt + 1258 |
| CYRILLIC SMALL LETTER BARRED O WITH DIAERESIS | ӫ | Alt + 1259 |
| CYRILLIC CAPITAL LETTER E WITH DIAERESIS | Ӭ | Alt + 1260 |
| CYRILLIC SMALL LETTER E WITH DIAERESIS | ӭ | Alt + 1261 |
| CYRILLIC CAPITAL LETTER U WITH MACRON | Ӯ | Alt + 1262 |
| CYRILLIC SMALL LETTER U WITH MACRON | ӯ | Alt + 1263 |
| CYRILLIC CAPITAL LETTER U WITH DIAERESIS | Ӱ | Alt + 1264 |
| CYRILLIC SMALL LETTER U WITH DIAERESIS | ӱ | Alt + 1265 |
| CYRILLIC CAPITAL LETTER U WITH DOUBLE ACUTE | Ӳ | Alt + 1266 |
| CYRILLIC SMALL LETTER U WITH DOUBLE ACUTE | ӳ | Alt + 1267 |
| CYRILLIC CAPITAL LETTER CHE WITH DIAERESIS | Ӵ | Alt + 1268 |
| CYRILLIC SMALL LETTER CHE WITH DIAERESIS | ӵ | Alt + 1269 |
| CYRILLIC CAPITAL LETTER YERU WITH DIAERESIS | Ӹ | Alt + 1272 |
| CYRILLIC SMALL LETTER YERU WITH DIAERESIS | ӹ | Alt + 1273 |
Note: Using the alt code approach means that you have a lot to learn. And as we all know, learning these alt codes will take a lot of practice as there are many alt codes to remember. However, you can create a cheat sheet for quick reference if you happen to type Russian letters frequently.
Using Online Russian Keyboard
There are numerous free online Russian keyboards available that allow anyone to type Russian characters by simply clicking on them.
Instead of trying to type these characters with your own keyboard, you are presented with a virtual Russian keyboard that includes all of the language’s characters.
You will also be given a simple text editor in which to type the characters. After that, you can copy and paste the typed characters into Microsoft Word or wherever you want.
Listed below are some of the best free virtual Russian keyboards.
- HowToTypeAnything.Com
- VKboard.com
- Branah.com
This is another online tool that gives you a very simple and beautiful virtual keyboard with which you can type in Russian by clicking on the virtual keyboard.
These are some of the amazing tools you can use to type in Russian.
Conclusion
These are the easiest ways you can use to type Russian letters in Microsoft Word.
If you often need to type a particular Russian letter or character in Word, using the Alt code method will be a good idea.
However, if you want to type a lot of characters, then using one of the virtual keyboards will save you lots of time.
Thank you so much for reading this blog.
Содержание
- Изменение языка интерфейса в настройках программы
- Изменение языка интерфейса для одноязычных версий MS Office
- Вопросы и ответы
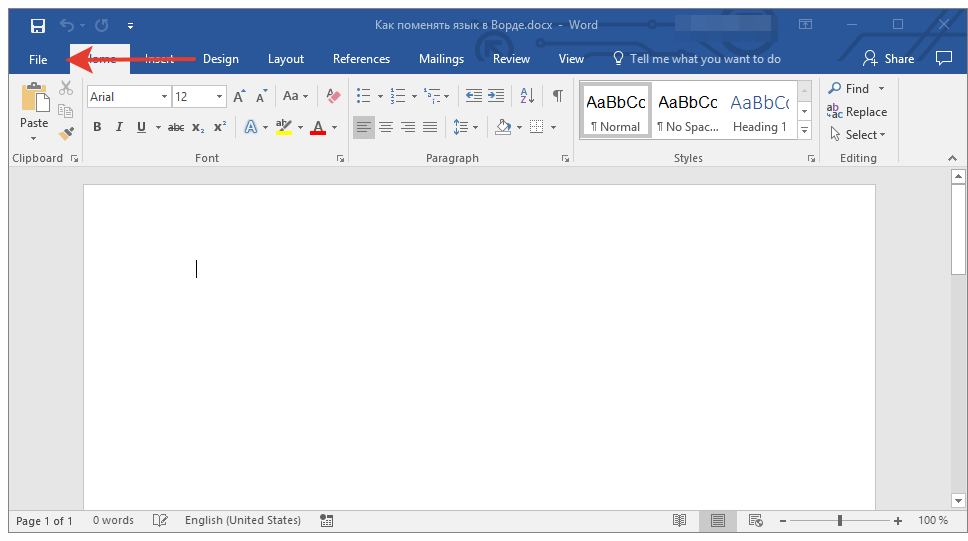
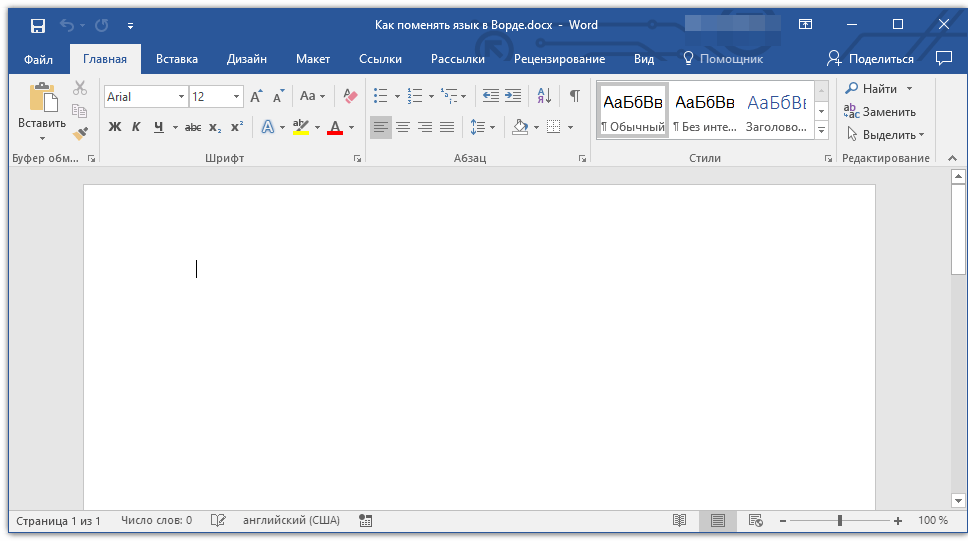
Когда пользователи задаются вопросом, как поменять язык в Word, в 99,9% случаев речь идет не об изменении раскладки клавиатуры. Последняя, как известно, во всей системе осуществляется одной комбинацией — нажатием клавиш ALT+SHIFT либо CTRL+SHIFT, в зависимости от того, что у вас выбрано в языковых настройках. И, если с переключением раскладки все просто и понятно, то со сменой языка интерфейса все чуточку сложнее. Особенно, если в Ворде у вас интерфейс на языке, который вы не совсем понимаете.
В данной статье мы рассмотрим то, как изменить язык интерфейса с английского на русский. В том же случае, если вам необходимо выполнить обратное действие, это будет еще проще. В любом случае, главное запомнить положение пунктов, которые необходимо выбирать (это если вы совсем не знаете языка). Итак, приступим.
Изменение языка интерфейса в настройках программы
1. Откройте Word и перейдите в меню «File» («Файл»).
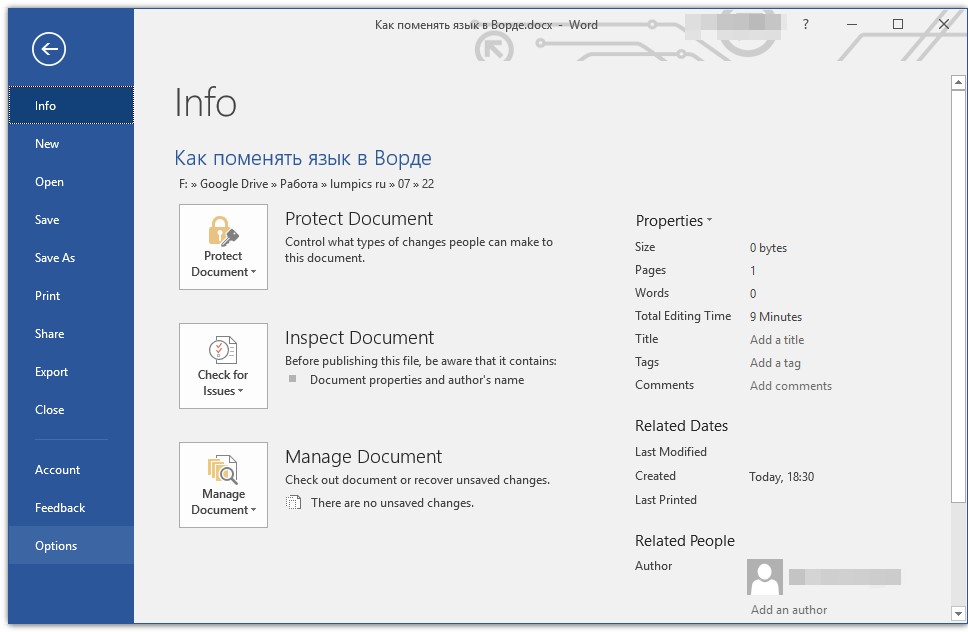
2. Перейдите в раздел «Options» («Параметры»).
3. В окне настроек выберите пункт «Language» («Язык»).
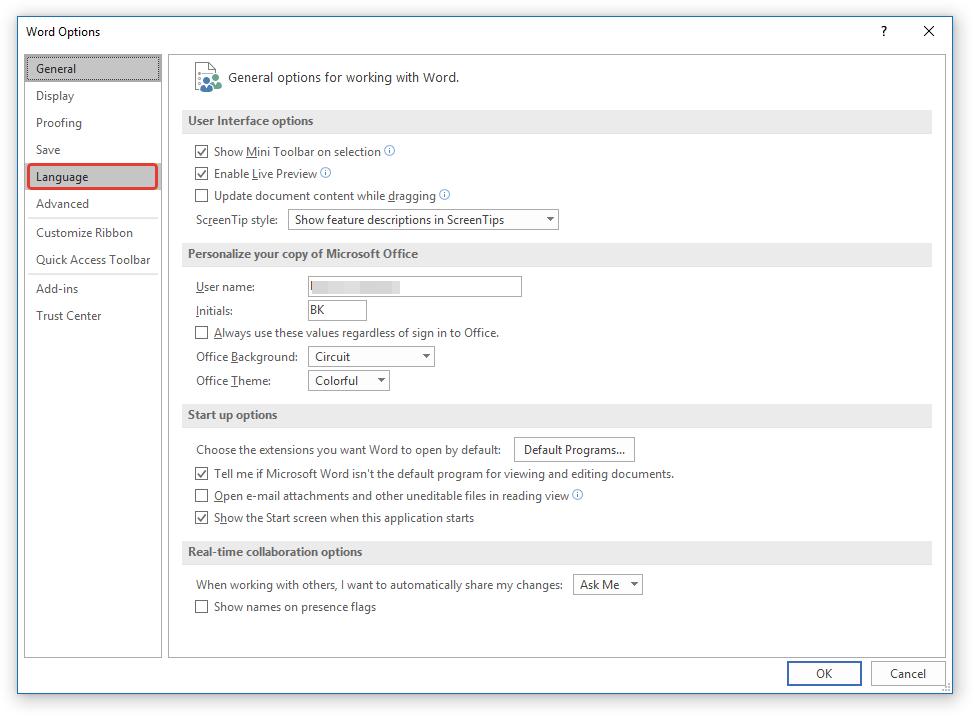
4. Пролистайте окно параметров до пункта «Display Language» («Язык интерфейса»).
5. Выберите «Russian» («Русский») или любой другой, который вы хотите использовать в программе в качестве языка интерфейса. Нажмите кнопку «Set As Default» («По умолчанию»), расположенную под окном выбора.
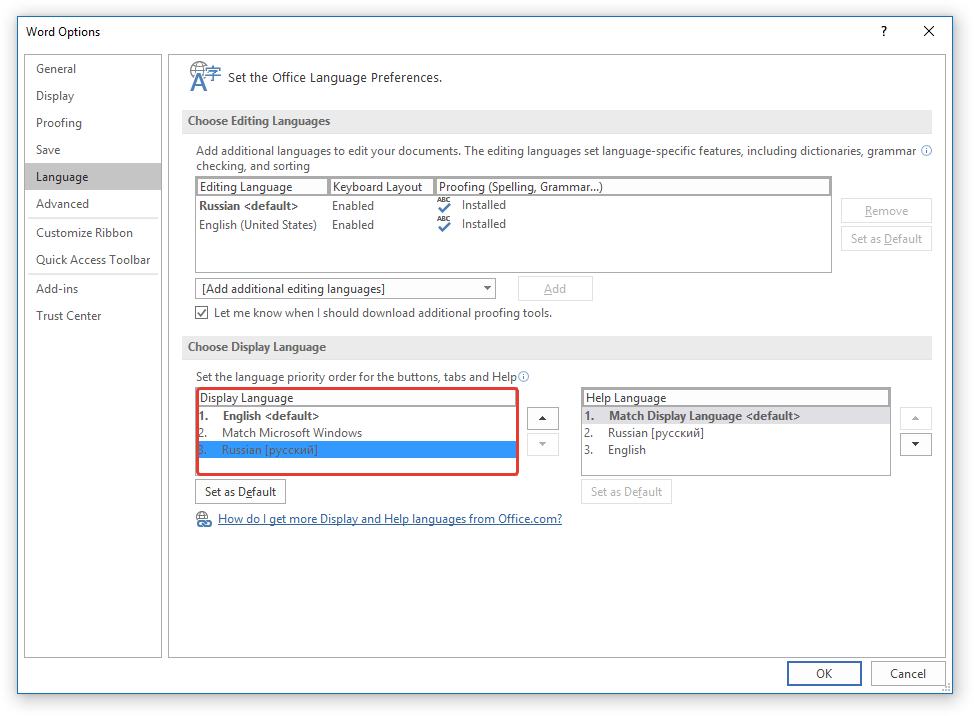
6. Нажмите «ОК» для закрытия окна «Параметры», перезапустите приложения из пакета «Microsoft Office».
Примечание: Язык интерфейса будет изменен на выбранный вами для всех программ, входящих в состав пакета Майкрософт Офис.

Изменение языка интерфейса для одноязычных версий MS Office
Некоторые версии Майкрософт Офис являются одноязычных, то есть, поддерживают только один язык интерфейса и в настройках его изменить нельзя. В таком случае следует скачать необходимый языковой пакет с сайта Microsoft и установить его на компьютер.
Скачать языковой пакет
1. Перейдите по ссылке выше и в пункте «Step 1» выберите язык, который вы хотите использовать в Word в качестве языка интерфейса по умолчанию.
2. В таблице, которая расположена под окном выбора языка, выберите версию для скачивания (32 бит или 64 бит):
- Download (x86);
- Download (x64).

3. Дождитесь скачивания языкового пакета на компьютер, установите его (для этого достаточно просто запустить установочный файл).
Примечание: Инсталляция языкового пакета происходит в автоматическом режиме и занимает некоторое время, так что придется немного подождать.
После того, как языковой пакет будет установлен на компьютер, запустите Ворд и измените язык интерфейса, следуя инструкции, описанной в предыдущем разделе этой статьи.
Урок: Проверка орфографии в Word
На этом все, теперь вы знаете, как в Ворд изменить язык интерфейса.
Еще статьи по данной теме:
Помогла ли Вам статья?
Need to write or read in a different language? Follow these tips
Updated on October 15, 2022
What to Know
- In Windows: Choose the desired Display and Help Languages in File > Options > Word Options > Language.
- Then, select Choose Editing Options in the same section to change the editing language.
- All but the proofing language in Office for Mac are the same as those for the operating system. To change it in Word: Tools > Language.
This article explains how to change display and/or editing languages in Word for Office 365, Word 2019, Word 2016, Word 2013, Word 2010, Word Online, and Word for Mac. In Windows—but not in macOS—you can choose them independently of the language installed for your operating system.
How to Change the Display Language
The display language in Word governs the ribbon, buttons, tabs, and other controls. To force a display language in Word that’s different from that of your operating system:
-
Select File > Options.
-
In the Word Options dialog box, select Language.
-
In the Choose Display Language section, choose the Display Language and Help Language you want to use. Languages installed in Windows 10 are listed.
-
If a specific language is not listed, select Get more display and help languages from Office.com. If necessary, install a Language Accessory Pack, then close and re-launch Word. You may need to reboot your computer, as well. After a language pack loads, go to the Word Options menu and choose that pack in the Display Language and Help Language lists.
-
Select Set as Default for both the Display Language and the Help Language lists.
-
Select OK to save your changes.
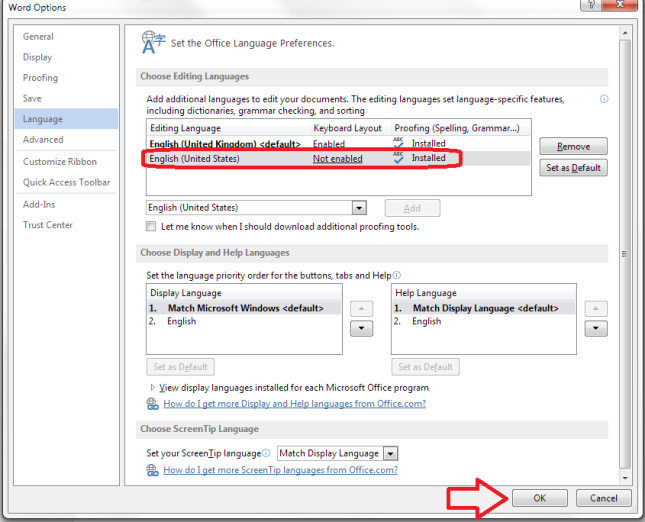
How to Change the Editing Language in Word
The editing language—which governs spelling, grammar, and word sorting—can be changed in the Word Options screen. Go to the Choose Editing Languages section, and select a language from the list. If the language isn’t listed, select the Add additional editing languages drop-down arrow and choose a language.
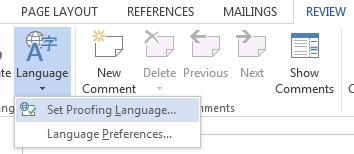
To proofread in the selected language, highlight the text, then go to the Review tab and select Language > Set proofing language. Choose a language from the list. Word will consider the highlighted selection to be the non-default, selected language and will check the spelling and grammar accordingly.
How to Change Language in Word Online
Language options for Office Online are similar to those in desktop versions of Office. In Office Online, highlight the text for proofing in the non-default language. Select Review > Spelling and Grammar > Set Proofing Language, then choose your alternative language. All proofing in that selected block will be governed by the rules of the alternative language.
How to Change Language in Word for Mac
The display and keyboard layout languages used in Office for Mac are the same as the ones for the operating system. You cannot use separate languages for the OS and Office applications. However, you can specify a different proofing language for Office for Mac.
To change the proofing language in Office for Mac, select Tools > Language in Word or another Office application. To change the proofing language for new documents, select Default.
If you select OK instead of Default, the proofing language you chose will only apply to the current file.
Normally, Word defaults to the language of the operating system. As a rule, you should use Windows to install language files rather than rely on an application like Word to do it for you.
FAQ
-
How do you delete a page in Word?
To delete a page in Word, select View, then go to the Show section and select Navigation Pane. In the left pane, select Pages, choose the page you want to delete and tap the delete or backspace key.
-
How do I check the word count in Word?
To check the word count in Microsoft Word, look at the status bar. If you don’t see the number of words, right-click the status bar and choose Word Count.
-
How do I insert a signature in Word?
To insert a signature in Microsoft Word, scan and insert a signature image into a new Word document and type your information beneath the signature. Then, select the signature block and go to Insert > Quick Parts > Save Selection to Quick Part Gallery. Name the signature > AutoText > OK.
Thanks for letting us know!
Get the Latest Tech News Delivered Every Day
Subscribe
![]()
Download Article
![]()
Download Article
PCs and Macs enable you to type your documents in different languages. A few steps are necessary to set up your Windows or Mac programs to the preferred language; however, they are fairly simple and easy to follow. You can also set up your keyboard with a template that shows you which keys to select for the letters you want.
-
1
Go to System Preferences. Click View, then «Language & Text» and the «Input Sources» tab.
-
2
Find «Russian» and choose one (only one) of the available Russian keyboard layouts. For example, «Russian» which is a standard Russian layout for Mac.
Advertisement
-
3
Switch to Russian typing using ⌘ Cmd+Space.
Advertisement
-

1
Click on the Start button and go to the Control Panel. Click on the «Clock, Language, Region» option.
-
2
Double-click «Regional and Language Options.»
-
3
Find a tab called «Keyboard and Languages»
-
4
Click «Change Keyboard». Then select «Add».
-
5
Find «Russian» (language) in the list and then click on its ‘+’ sign to see available layouts. Click on «Russian» in that list of layouts to add it.
-
6
Click on «Apply» below right. Then Windows activates Russian keyboard layout file.
-
7
Click «OK» again. You can now use the buttons Alt+⇧ Shift to switch between Russian («RU») and English («EN»).
- Now you have standard Russian keyboard layout active and can use it for typing in Russian. Or you can install Phonetic (homophonic) layout when F-Russian F,A-A, O-O,….


Advertisement
-
1
Download the ER Bukinist KOI8 font.[1]
-
2
Download the ER Kurier KOI8-R for keyboard layout.
-
3
Click on «Start.»
-
4
Quit all programs.
-
5
Place the files in «System Folder.»
-
6
Select «Help Center» from the Help menu.
-
7
Click on «Settings.»[2]
-
8
Type «keyboards» to search.
-
9
Click on «Using different languages.»
-
10
Click on «Open...Control Panel….»
-
11
Click on «Control Panel.»
-
12
Check the box at «Russian KOI8-R.»[3]
-
13
Select the keyboard layout by clicking on «Russian-KOI8 keyboard.»
Advertisement
-
1
Click on «Start.»[4]
-
2
Click on «Settings.»
-
3
Click on «Control Panel.»
-
4
Click twice on «Regional Options.»
-
5
Click on «Cyrillic» to activate it.[5]
-
6
Click on «Apply.»


Advertisement
-
1
Click on «Start.»[6]
-
2
Click on «Settings.»
-
3
Click on «Control Panel.»
-
4
Click twice on icon for «Keyboard» to get to the properties for the keyboard.
-
5
Select the «Input Locales» tab across the top of the box.
-
6
Select the «Add» button to get to the «Add Input Language» screen.
-
7
Select «Input Language» and find and select «Russian» from the list.
-
8
Leave the «EN English» keyboard as the default.[7]
-
9
Put a check in the «Enable indicator on task bar,» bottom of screen.
-
10
Click between English and Russian by selecting either on the task bar at the bottom of your screen to the right.
-
11
Select «Apply» to ensure that all changes have been accepted and saved.


Advertisement
-
1
Click on «Start.«Activate Cyrillic Support in Windows XP[8]
-
2
Click on «Control Panel.»
-
3
Click twice on «Regional and Language Options.»
-
4
Select «Details» in the «Text services» box.
-
5
Select «Add» in «Installed services.»
-
6
Select «Russian» from the drop-down list of languages.
-
7
Click «OK.»
-
8
Click «Apply»; you will see «RU Russian» in the window.
-
9
Select «Preferences» and click the «Language Bar.»[9]
-
10
Select both «Show language…» and «Show additional language…» icons.
-
11
Click «OK.»
-
12
Select «Key Settings» for the option of switching between languages.
-
13
Click on «Switch to English.»
-
14
Select «Change Key Sequence.»
-
15
Choose either CTRL or ALT and a numbered key.
-
16
Click «OK.»
-
17
Select «Switch to Russian.»
-
18
Choose «Change Key Sequence.»[10]
-
19
Choose either CTRL or ALT and a numbered key to be used to switch to Russian.
-
20
Click «OK» twice.


Advertisement
-
1
Click on KBDRUPH.Zip to download the layout.
-
2
Unzip the file and designate a folder where the files will be placed.
-
3
Open the folder where the files were placed.[11]
-
4
Copy KBDRUPH.DLL for Windows 2000 into the WINNT folder in System32.
-
5
Copy the file into the Windows folder in System32 for Windows XP.
-
6
Open System32 and click on KBDRUPH.REG.[12]
-
7
Restart your computer.
-
8
Click on «Start.»
-
9
Click on «Programs.»
-
10
Click on «Accessories.»
-
11
Click on «Accessibility.»
-
12
Click on «On-Screen Keyboard.»
-
13
Click on «Settings» and select a font.
-
14
Select «Cyrillic» under «Script.»
-
15
Click «OK.»
-
16
Select «RU Russian» at the bottom on your screen.


Advertisement
Ask a Question
200 characters left
Include your email address to get a message when this question is answered.
Submit
Advertisement
-
You can test your settings by opening a blank file, typing some words in English, and then switching to Russian using the hot keys or the language task bar, and typing the same characters. You should see the Russian characters.
Thanks for submitting a tip for review!
Advertisement
Things You’ll Need
- Computer
- Windows or Mac operating system
- Internet access
References
About This Article
Thanks to all authors for creating a page that has been read 80,748 times.
Did this article help you?
This post is linked to my one on changing the language of your document in Word, however I’ve split them up to avoid screenprint overload.
Incidentally, this process also solves the problem of the language not appearing in the lower status bar of your Word document. This language note will only appear if you have more than one language set as the editing language in Word options.
Why would I want to change my editing language?
The main thing I’ve used this for is to force the language to appear, thus be changeable, in the lower status bar of my Word document. However, it’s also used if you are intending on loading alternative alphabets into your version of Word, if you want to use it for Chinese or Russian, for example.
How do I change my editing language in Word 2013?
This is done in Word Options. Find your Word Options by clicking the File tab:

Now choose Options:

Within the Word Options window, choose Language:

Look at the Choose Editing Languages section. You can see that only English (United Kingdom) is on the list at the moment. Click on the dropdown arrow by Add additional editing languages:

Select your editing language from the list …

Once it’s selected, click the Add button:

Now English (United States) has been added to the list – press the OK button at the bottom of the window:
What else can I change in the language section?
You will notice that you can also change the display and screentip languages on this screen, as well as asking Word to prompt you if you need to download any special proofing tools. This is useful if someone who only speaks a different language to the default is going to be using this copy of Word (of course, this is all changing this individual copy of Word and does not affect the document if it’s opened on different computers).
Making the changes take effect
You will now be prompted to Restart Word in order for the change to take effect. Press the OK button and close and re-open Word.

This process has the incidental effect of displaying the language of your document in the lower status bar in your copy of Word – and this is the way to make it display if it doesn’t do so initially.

How do I change the editing language in Word 2010?
Good news – the method of changing the editing language in Word 2010 is almost the same as in Word 2013 (above). The Word Options menu just appears slightly differently, in different colours and a slightly different layout.
Click on the File tab and then choose Options.

From now on, the process is exactly the same as for Word 2013 (above).
How do I change the editing language in Word 2007?
The process for changing the editing language is a bit different for Word 2007.
Access Word Options by clicking on the Office Button in the top left, then clicking on Word Options at the bottom of the window:

Stay on the Popular screen that comes up first, and click on Language Settings at the bottom of this screen:

Now you have the option to enable and disable editing languages. Click on the language you want to add in the list on the left and press the Add button. Then click OK.

In this article, we have learned how to change the editing language in Word 2013, Word 2010 and Word 2007. Do comment or use the buttons below to share if you’ve found this useful. Many thanks to Krys Williams for her help.
Related posts in this blog
How to change the language of your document in Word
How to change the language of comments
Please note, these hints work with versions of Microsoft Word currently in use – Word 2007, Word 2010 and Word 2013, all for PC. Mac compatible versions of Word should have similar options. Always save a copy of your document before manipulating it. I bear no responsibility for any pickles you might get yourself into!
Find all the short cuts here …
Microsoft Word is one of the most popular and widely used programs for documentation purposes around the world. If you hail from a non-English speaking country, then you may want to use MS Word in your own language or any other language of your choice.
Sometimes, you may want to access accent marks or include special characters from a different language in your writing – this would require you to change the MS Word language itself. Fortunately, Microsoft Word allows you to change the editing language, proofing tools, and the user interface language (display language) and set a different display language while applying another language in editing and proofing documents.
In this article, we’ll show you how to change the display language as well as the editing and proofing language in Microsoft Word. Throughout the post, we’ll be using Microsoft 365 but most of the options are similar to the offline versions (2019, 2016, 2013, or 2010) and Office 365. So irrespective of the version you’re using, this article can surely help change or switch up the language(s) on your Microsoft Word.
Changing the Display and Help Languages
When you install Microsoft Office, it usually has English as its default language or the local/regional language of the location that powered the MS Word purchase. If you want to change this language(s) to any other, you would have to manually install it/them first.
A display language is the one that’s visible on all tabs, menus, buttons, preferences, dialog boxes and other controls on your Word application. If you want to use a different language instead of the default, follow these steps:
Open Microsoft Word and click the ‘File’ tab.
In the backstage view, click ‘Options’.
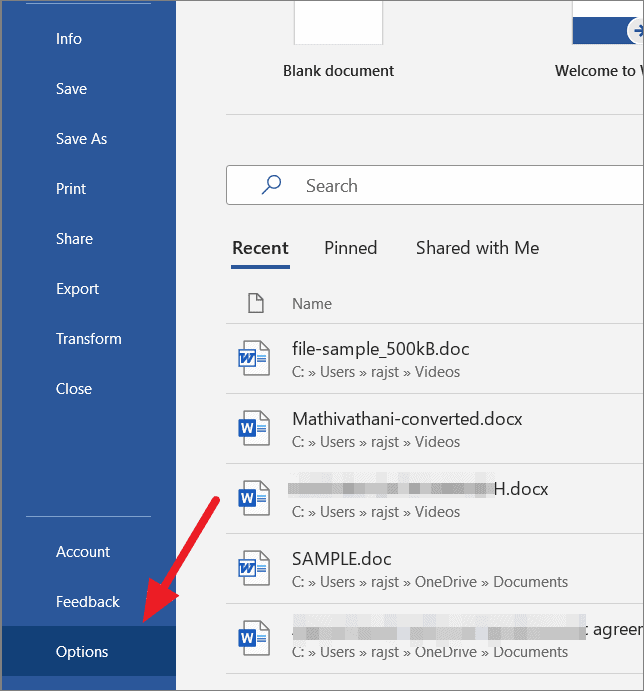
A Word Options dialog window will appear. Here, select the ‘Language’ tab. In the Language tab, you will see two sections – ‘Office display language’ and ‘Office authoring languages and proofing’.
If you are using Office 2019, 2016, 2013, or 2010, you will see ‘Choose Editing Languages’ and ‘Choose Display Languages’

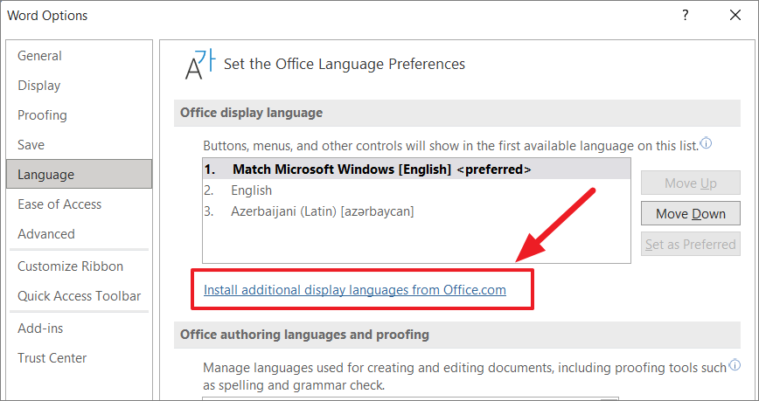
‘Office display language’ or ‘Choose Display Languages’ section is where you can set the MS Word display (UI) language. You’ll see a list of installed languages under this section. If the language you’re looking for is not in the box, you would have to manually download and install that particular language pack.
Adding Language Packs on Office
If a specific language is not listed here, click the ‘Install additional display languages from Office.com’ link below the box (as shown below).
This will show you a ‘Install a display language’ dialog. Here, choose your language and click ‘Install’.
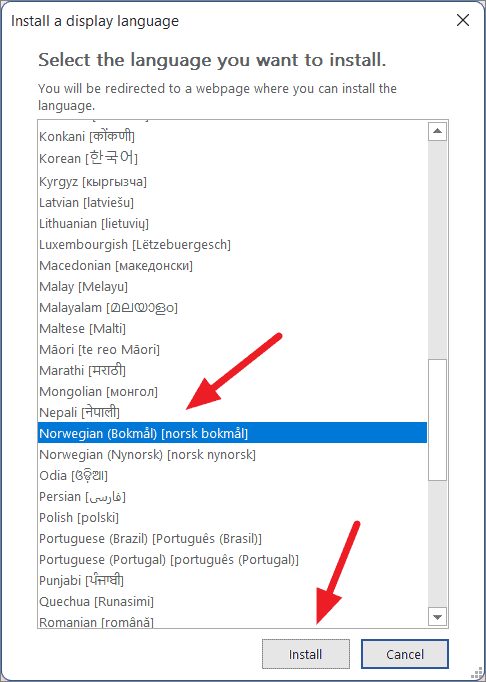
This will take you to the Microsoft website where you can download the language pack for the selected language as shown below. Here, click the ‘Download’ button.
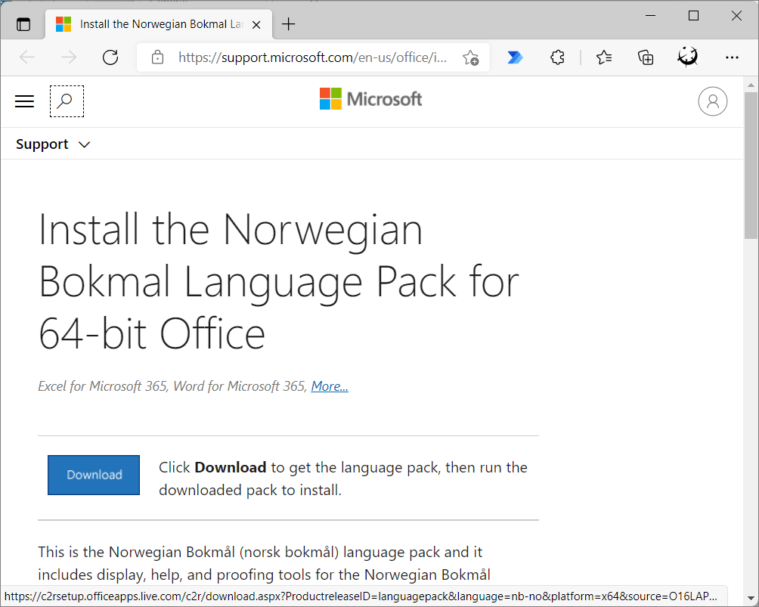
Run the downloaded setup file to install it.
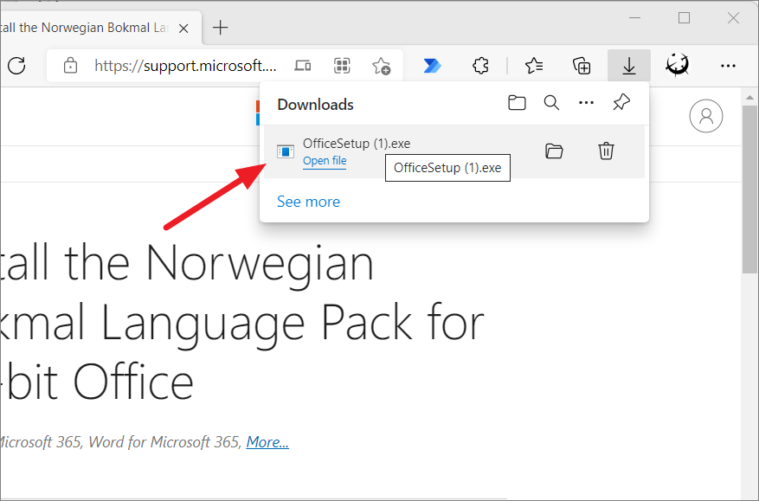
Wait for the installation to complete, then close and re-launch Word. Sometimes, you may need to reboot your computer for smoother functioning.

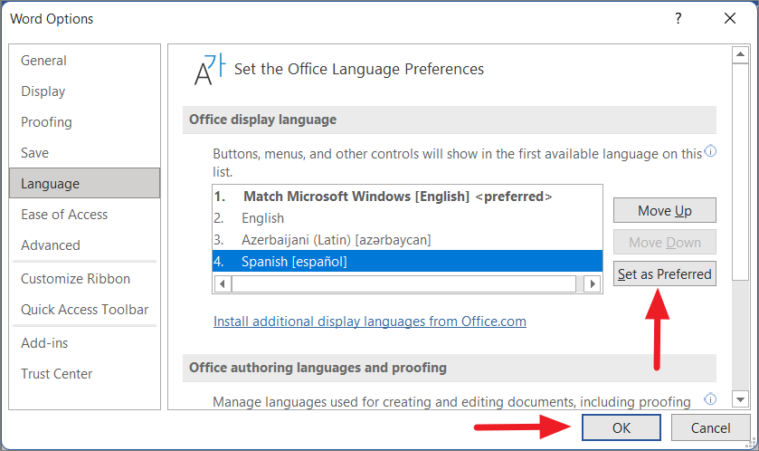
Then, open the MS Word app again and go to File > Options > Language. As you can see, the ‘Office display language’ box lists the installed language. Now, select your desired language and click the ‘Set as Preferred’ or ‘Set as Default’ option (for Office 2019 and older versions).
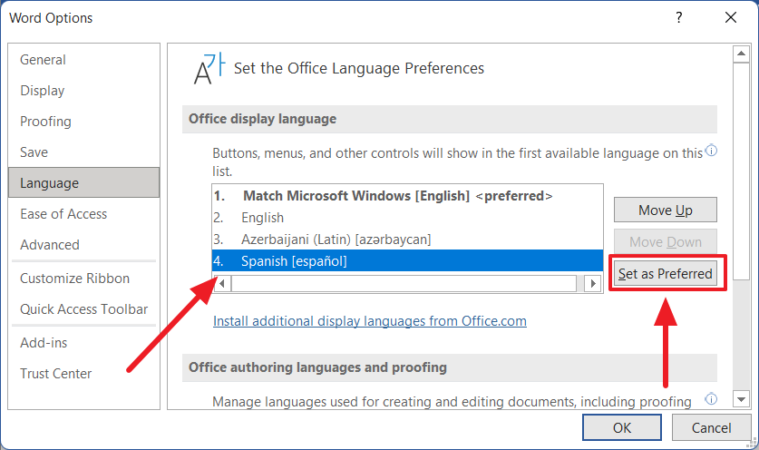
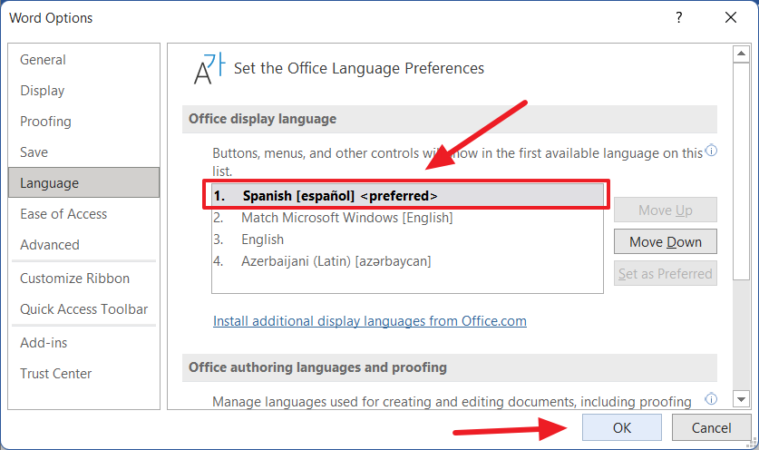
After you select the ‘Set as preferred’ or ‘Set as Default’ button, your selected language should show ‘<preferred>’ at the end as shown below. Then, click ‘OK’.
Adding Language Packs from Office Webpage
Alternatively, you can directly visit the MS Office’s Language pack for Office page, where you can download the language you wish to use. Microsoft Office offers over 100 additional language accessory packs which you can download and install for free.
Once you’re on Office’s language accessory pack webpage, scroll to see a section called ‘Step 1: Install the language accessory pack’. Under this section, select your Office version tab.
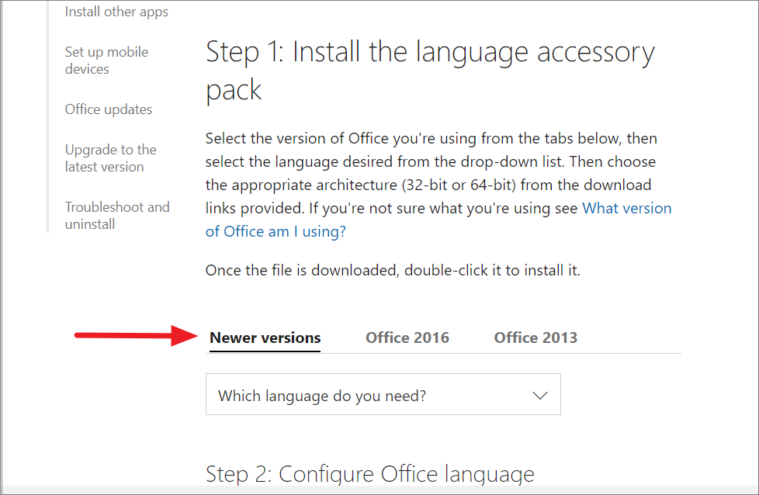
Then, choose your language from the ‘Which language do you need?’ drop-down.
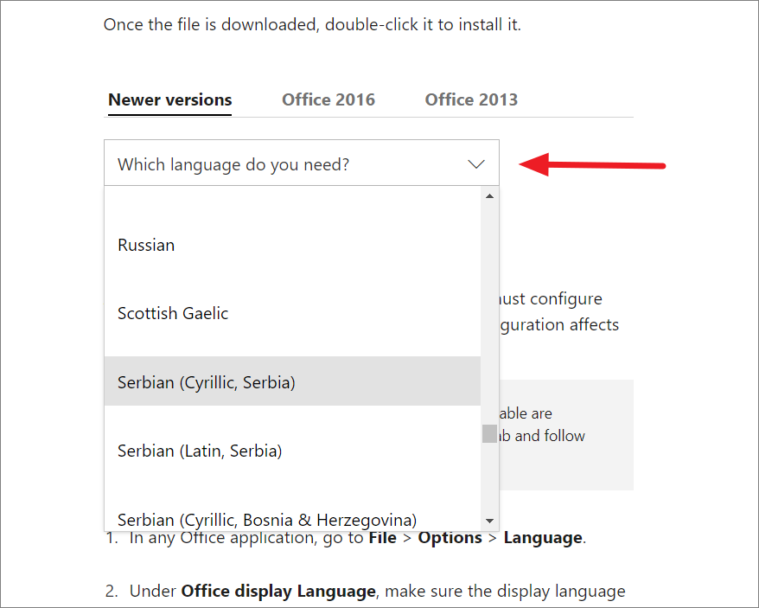
Once you select the language, you’ll notice the ’32-bit’ and ’64-bit’ download links. If your operating system is of 32-bit architecture, click ‘Download (32-bit)’. Or if your system uses 64-bit OS, then, select the ‘Download (64)’ bit.
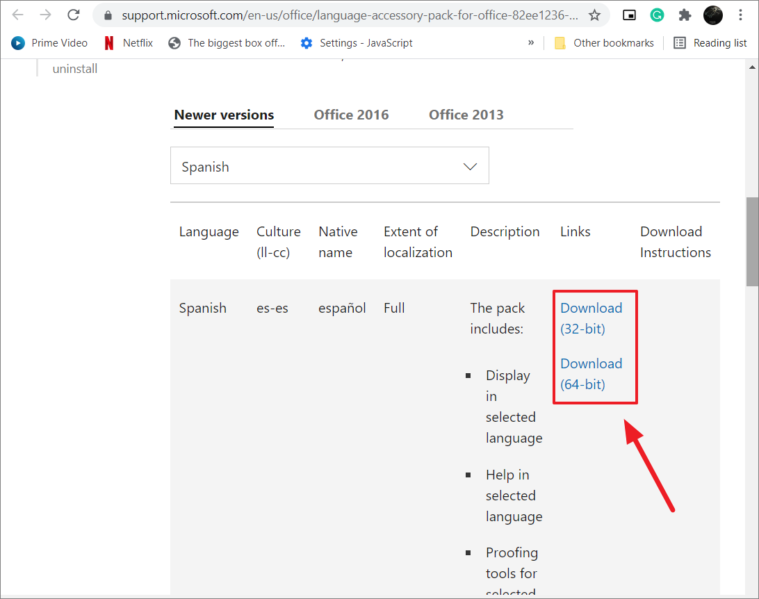
After the file is downloaded, install the setup file, close, and re-open the Word app. Then, go to the Word Options menu, choose the language pack you installed under the ‘Office display language’ box and select ‘Set as Preferred or ‘Set as default’. Then, click ‘OK’.
Restart Word and you’ll see that the UI language is changed for MS Word.
Changing the Editing and Proofing Language
The editing/authoring language is the language in which you write and edit documents. This language also controls the text direction and arrangement for vertical, right-to-left, and mixed text. The Proofing tool checks for spelling and grammatical errors. If the editing/input and proofing language is already installed on your computer, you can easily change it. If not, you need to first manually install the language and then change it.
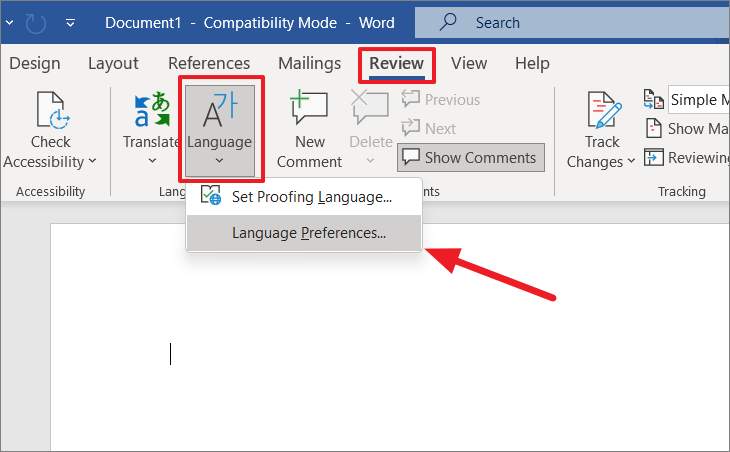
Open the Word application, click the ‘File’ tab and select ‘Options’ to open Word Options. You can also open the Word Options window by switching to the ‘Review’ tab in the Ribbon and clicking the ‘Language’ button and then selecting the ‘Language Preference’ option.
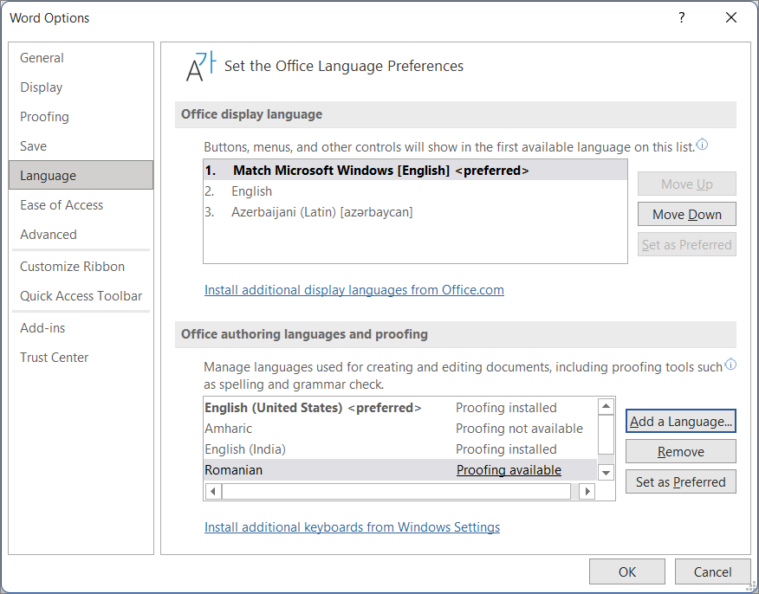
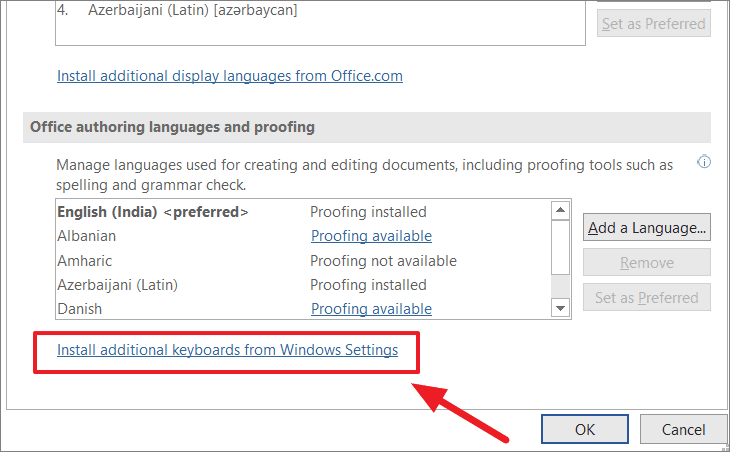
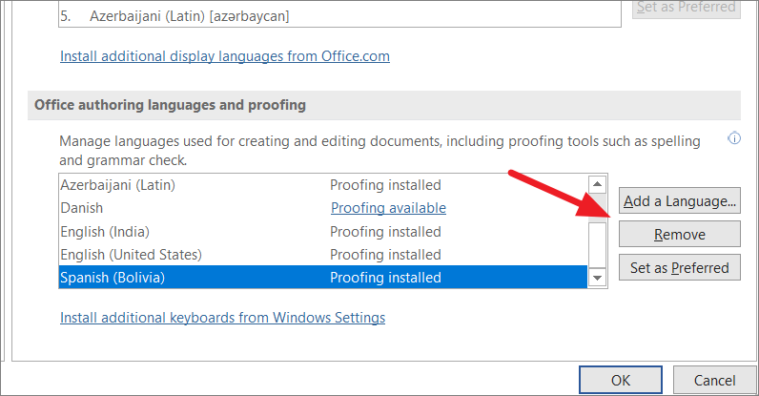
In the Word Options, select the ‘Language’ tab. You’ll see the ‘Office authoring languages and proofing’ or ‘Choose Editing language’ section where you can add and set the language for editing. When you install MS Word, the app will automatically be configured to use the default system language.
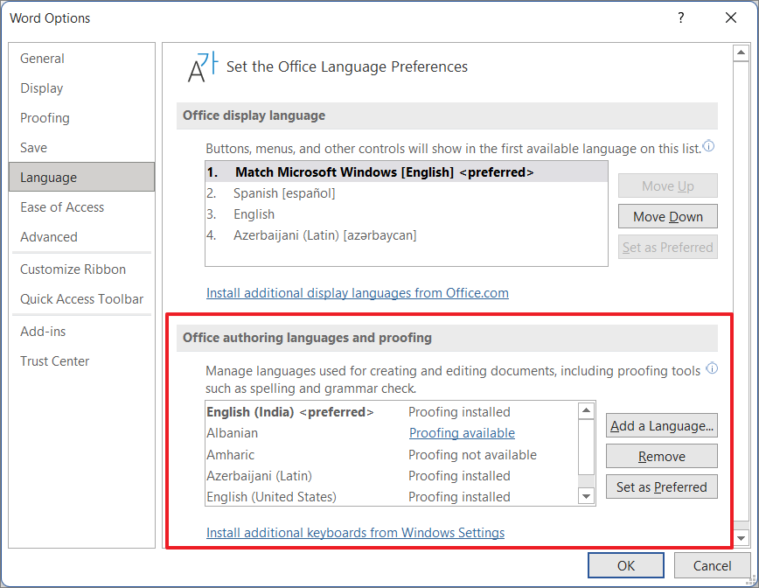
The ‘Office authoring languages and proofing’ box lists all installed system and Office languages. If the language you want to change is on the list, select the language and click ‘Set as Preferred’ or ‘Set as Default’.

Installing Additional Input Languages for Word
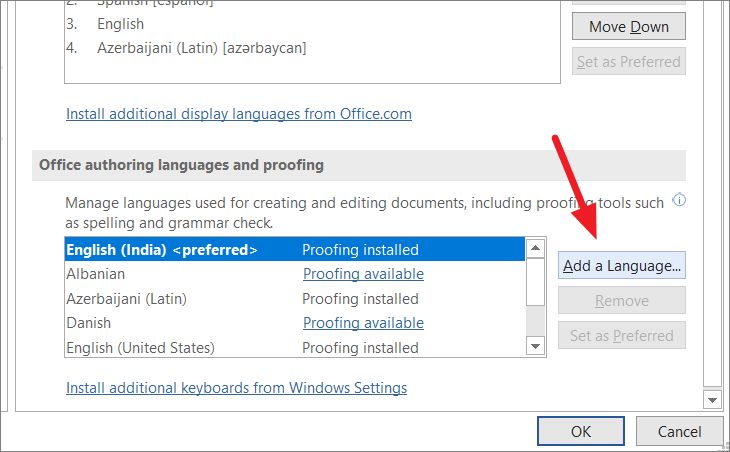
Follow these installation steps if a specific language is on the ‘Office authoring languages and proofing’ box.
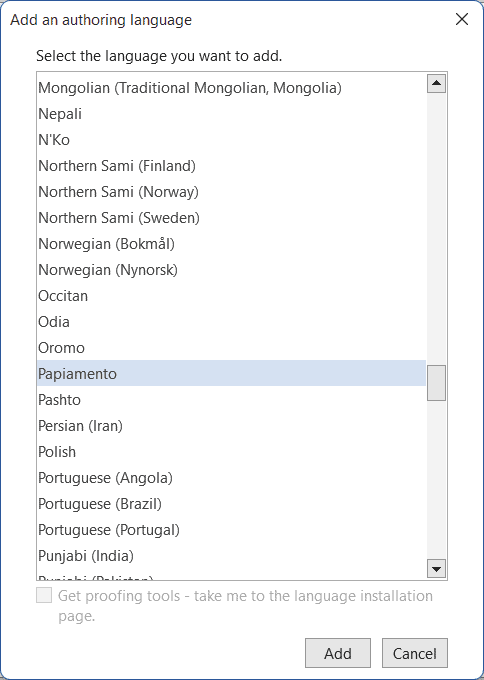
To add an authoring language, click the ‘Add a Language..’ button.
Select the language you want to add and click ‘Add’.
Most of the time, even if you add the language, you still have to manually install the language or additional proofing tools on your Windows OS.
To install additional input/editing language on your computer, click the ‘Install additional keyboards from Windows Settings’ link below the Office authoring languages and proofing box.
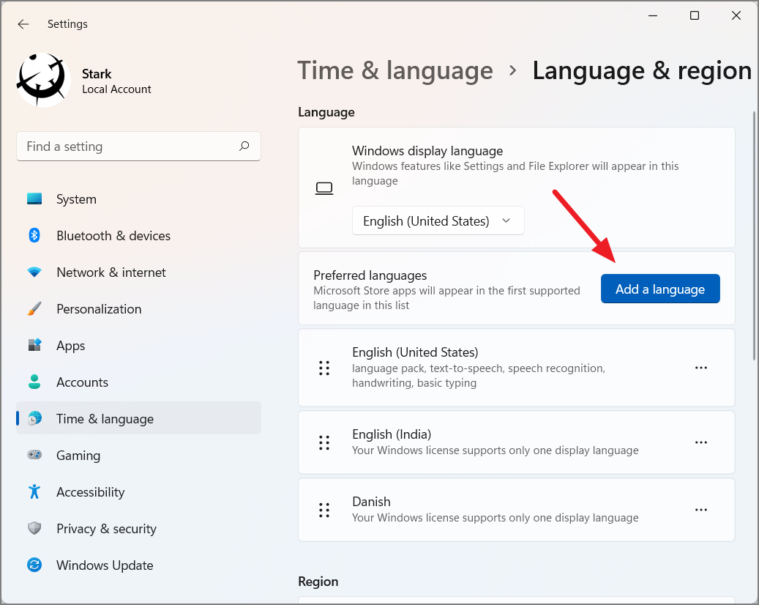
This will open the Windows Settings page where you can install languages on your system. Click the ‘Add a language’ button (if you have Windows 10 or 11).
In the ‘Choose a language to install’ dialog box, choose a language and select ‘Next’.
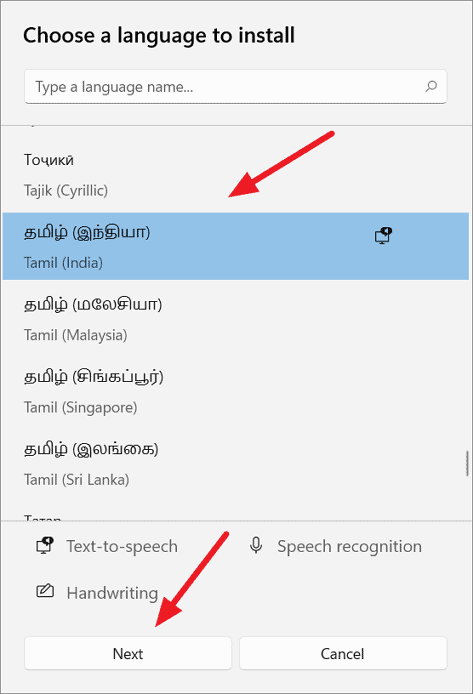
On the next page, select ‘Install’.

Once done, you’ll see the installed language in the list of languages.

Usually, when you type on your computer, the system will use the default input language (first in this list) to input characters. So, you should change the input language to the recently installed language to actively use the latter. You can do this via the settings application or from the taskbar.
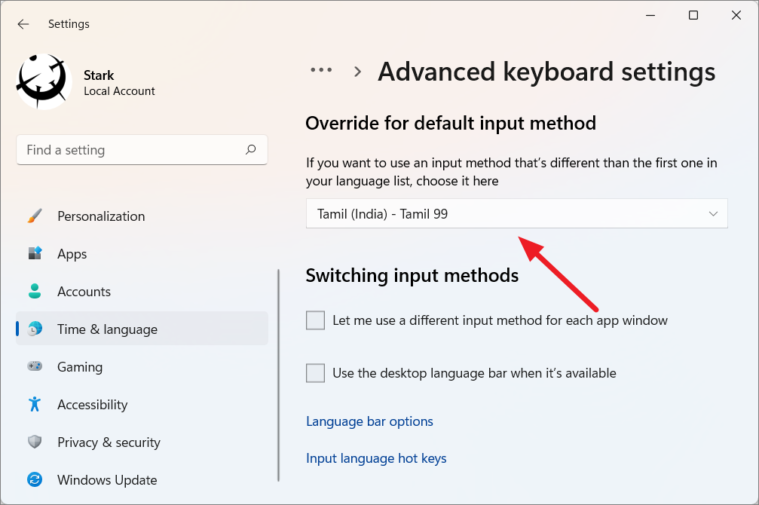
Via Settings App
To change the input keyboard layout, select the ‘Time & language’ settings, and click the ‘Typing’ option.
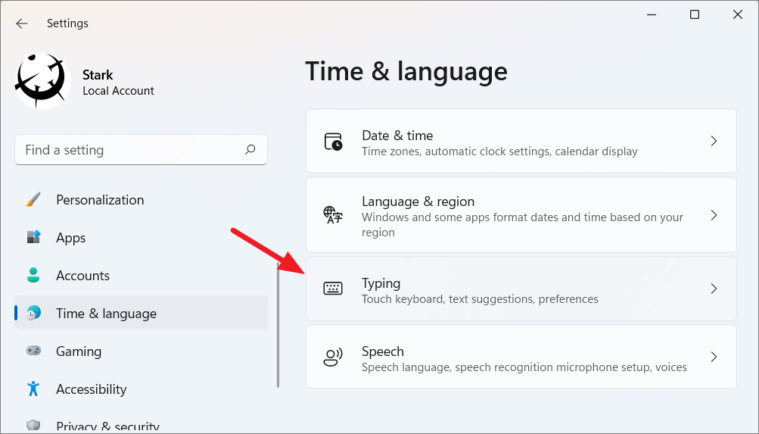
Then, select ‘Advanced keyboard settings’.

Now, choose your input method to use as a default.
Via Taskbar
OR, you can easily switch between the input method from the taskbar.
After you installed the language, go back to File > Options > Language. In the Word Options, you’ll notice the installed language in the ‘Office authoring and proofing language’ box.
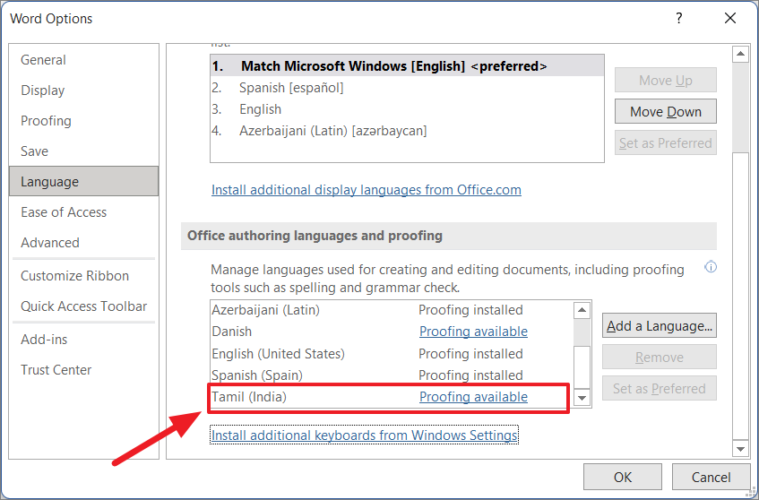
To remove an editing language, first, select the language and then hit ‘Remove’.
Installing Proofing Tools
Sometimes, proofing tools may not be installed on Office even after installing the input language. If you’re using Microsoft 365, you would see three proofing tool statuses next to each language, namely – ‘Proofing available, Proofing not available, Proofing installed’. For other Office suites (like Office 2019, 2016, etc.), the status will be shown as ‘Enabled’ or ‘Not enabled’ under the Keyboard layout column.
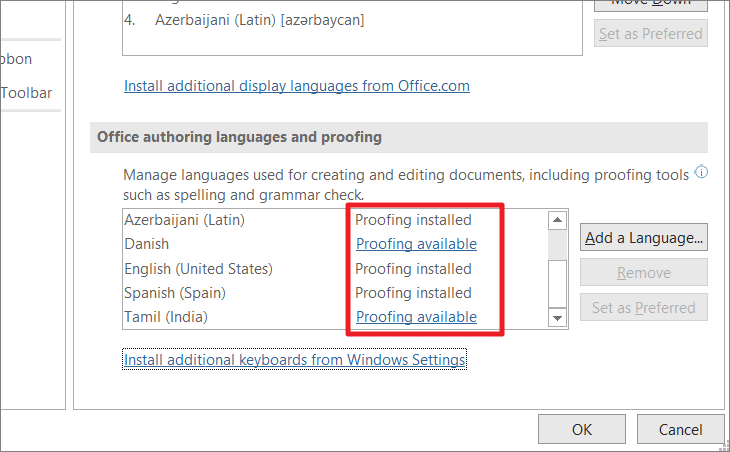
‘Proofing not available’ means the proofing tools are not available for that particular language. ‘Proofing available’ suggests you download and install the language pack with proofing tools for that language. And ‘Proofing installed’ means the proofing tools are installed for that specific language and you are free to use them.
If Proofing tools are available but not installed, click the ‘Proofing available’ link next to the language you want to use to download the language pack.
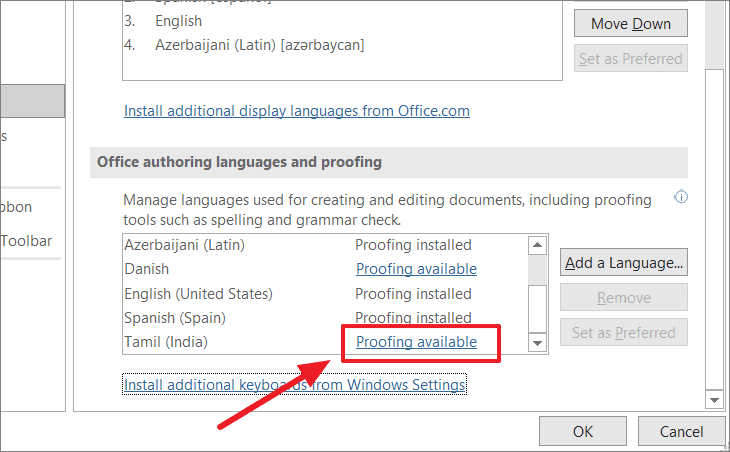
This will direct you to the Language pack download page on the Microsoft Office website. Here, click the ‘Download’ button.
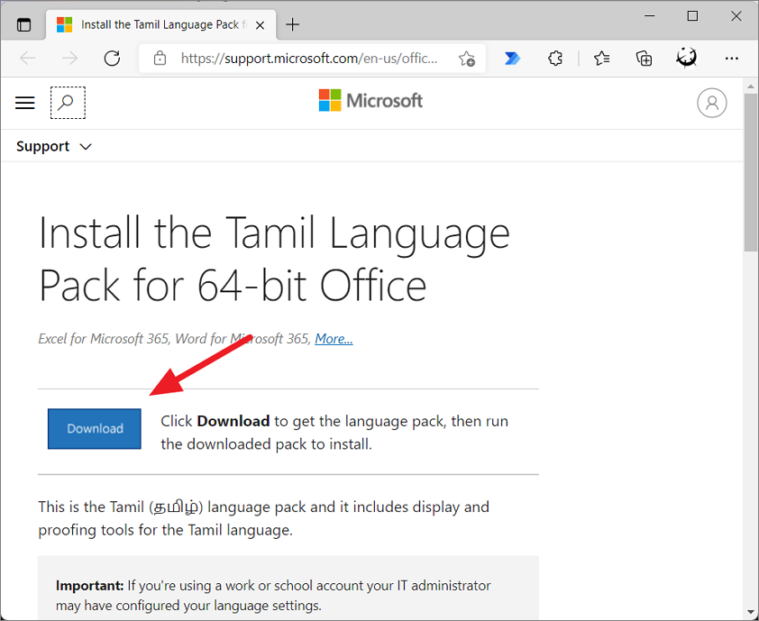
After the download is complete, install the ‘OfficeSetup.exe’ file, wait for the installation to complete, then close and re-launch the Word app.
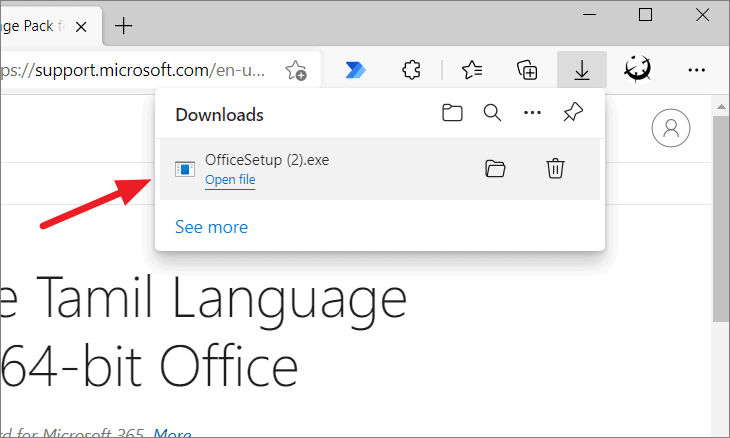
After re-launching the app, go to Word Options. You’ll now see ‘Proofing installed’ next to the chosen language. Now, select the language and click ‘Set as Preferred’.
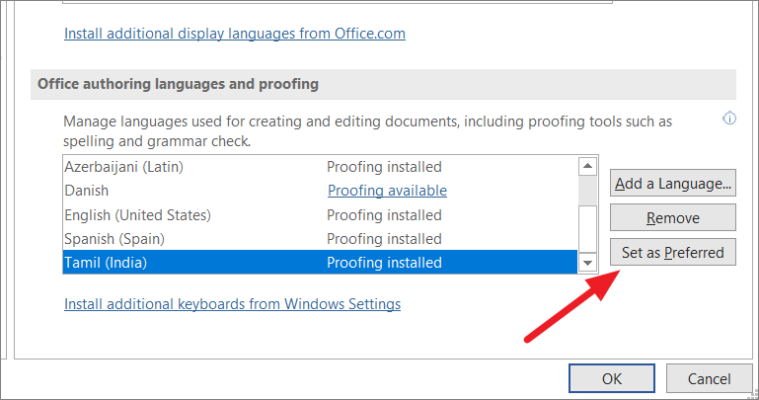
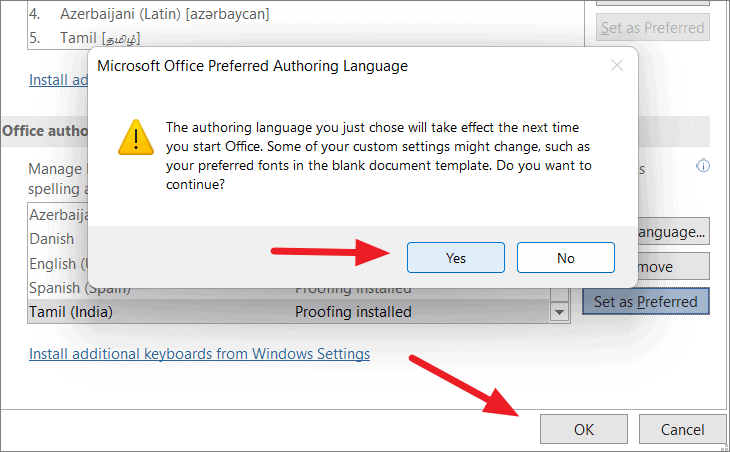
Word will show you a warning message to let you know that the authoring language you just chose will take effect the next time you launch Office. It also warns you of changes that may occur to custom settings (like your preferred default font). If you want to continue, click ‘Yes’. Then, click ‘OK’ to close the Word Options.
Now, restart your Microsoft Word, again, to change the editing and proofing language.
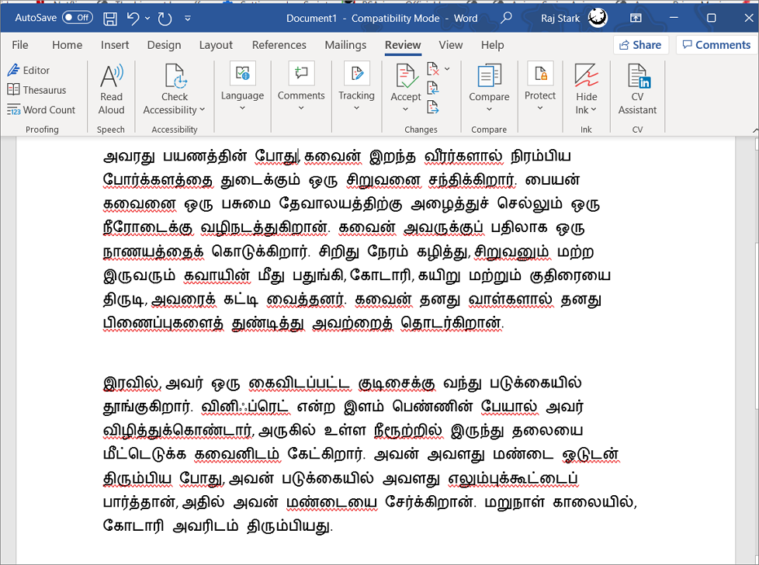
Once the Word editing language is changed, you would have to change your keyboard layout to type text in the changed language. Usually, the keyboard layout language matches the characters of a different language as the keys on your keyboard would automatically translate to the chosen different language on your screen. Essentially, the keyboard layout language controls and changes display characters when manually typed.
Switching Between Keyboard Layouts
When you install a new language on your OS, it comes with a keyboard for language-specific key layouts and input options. After you install more than one keyboard layout for different languages, you can easily switch between those keyboard languages using the language bar.
When you change/switch the keyboard language, the keyboard layout shifts to the keyboard for that particular language. For instance, if you are writing something in English and if you want to include content in a different language, you can quickly switch between keyboard layouts to write in different languages.
Here’s what you need to do to change the keyboard layout to a different language.
When you have more than one layout installed, the Language bar (language abbreviation) automatically appears in the ‘System Tray’ or ‘Notification Area’. To change the keyboard layout, click the language icon (ENG stands for English keyboard) and select the language you want to use from the list of available keyboards.
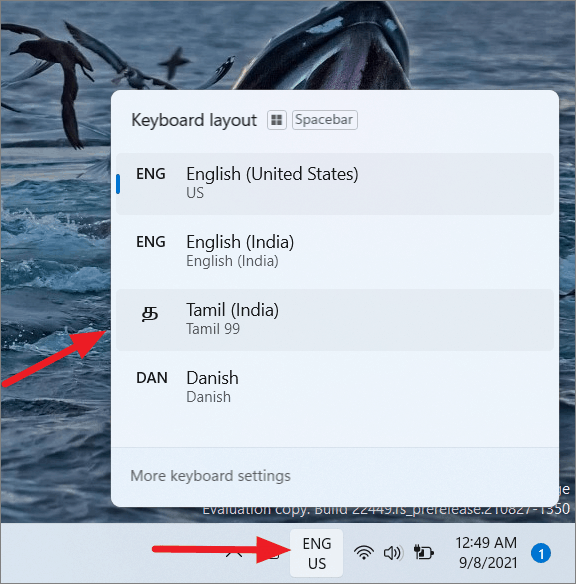
If you have Windows 10 or 11, you can press Windows+Spacebar to switch layouts. The language abbreviation represents the active keyboard layout of the system.
Now, you can easily write and edit Word documents using a different language.
Proofreading in Different Languages
MS Word also allows you to write or edit in one language and proofread text in another. To proofread in a different language, go to the ‘Review’ tab, select ‘Language’, and click the ‘Set Proofing Languages..’ option.
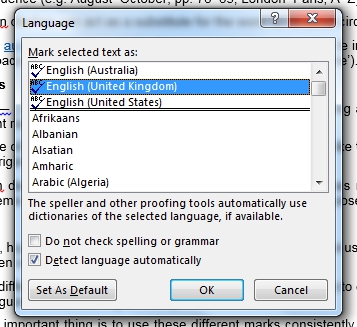
Then, select the language from the Language dialog box and click ‘OK’. Here, you also have options to ignore spelling/grammar errors, detect language automatically or set the default language.
For instance, if you want to include a word or phrase in a different language without showing grammatical errors, you should only change the proofing language for the particular word or phrase.
To do this, first, select the word or phrase, then go to the ‘Review’ tab, select ‘Language’ and click the ‘Set Proofing Languages..’ option. Then, choose a language from the list and click ‘OK’. Word will ignore spelling and grammar on the highlighted selection.
That’s it, folks! You can now easily change both the display and editing and proofreading languages on your MS Word to any language(s) of your choice.
If you are writing an essay at a UK university, chances are you will have to write in British English. Likewise, if you’re in the UK and writing for an international audience, you should make sure to adapt your language use accordingly.
Most word processors, including Microsoft Word, are automatically set to US spelling. This is fine if you’re writing for an American (or even international) audience. But otherwise you might need to make a change. In this post, we explain how to change the language of a document in Microsoft Word.
Step One
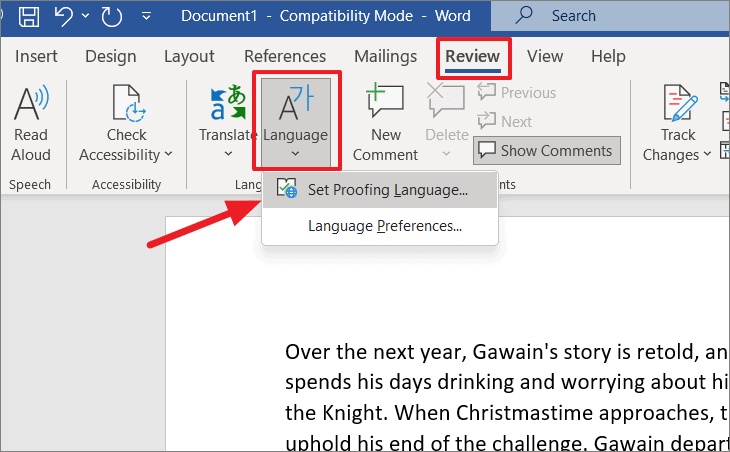
Select all of the text in your document. To do this quickly, use ‘Ctrl + A’ (or ‘command + A’ on Mac). If you want to use different language settings in different parts of the document, simply selected the text you want to modify.
Step Two
On a Windows PC, go to the ‘Review’ tab, click ‘Language’ and select ‘Set Proofing Language’.
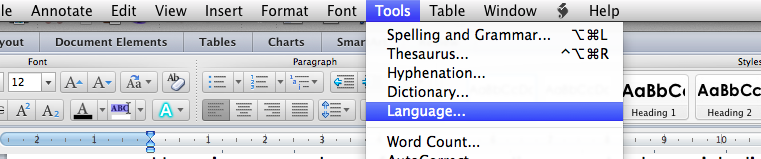
 On a Mac, go to ‘Tools-Language’.
Alternatively, you can click on the ‘Language’ setting at the bottom of the screen.
Find this useful?
Subscribe to our newsletter and get writing tips from our editors straight to your inbox.
![]() This will open a new dialogue box.
This will open a new dialogue box.
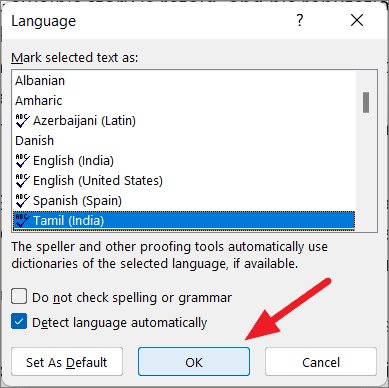
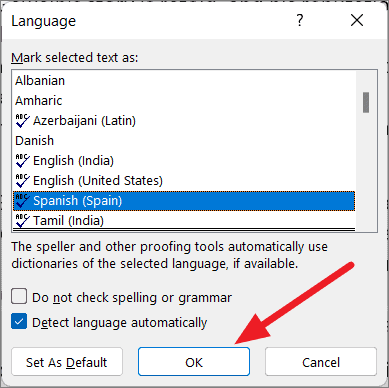
Step Three
In the window that opens, choose your preferred language from the list. Click ‘OK’ to change the proofing language of the selected text.
 Step Four
If you usually use this language for your documents, click ‘Set As Default’. And that’s it! Good luck!
For users in the US, Word automatically displays the ribbon and commands in English and makes English the default language for spell-checking text and suggesting corrections. However, if you often work with documents in other languages, you can change the language in Word. This will make your work much easier. There are actually two different language settings in Word:
The display language is the language in which user controls and menus are displayed. The editing language is the language of the document. This language is important for checking spelling and suggesting corrections. For example, if spell check is not working, Word could be set to the wrong editing language. However, you can easily change the spell check language in Word.
Contents
- Changing the display language in Word
- Changing the editing language
- Changing the display language in Word Online
- Changing the editing language in Word Online
- How to change Word language on a Mac
Changing the display language in Word
To change the display language in Word, click “File” on the ribbon and then “Options”. In the next dialog box, select “Language” in the sidebar on the left. The display language and help language are now displayed at the bottom of the dialog box. By default, Word uses the language of the Windows operating system as the display language. However, you can select a different language at any time and click “Set as Default” to make it your default for future documents. This setting isn’t applied until you restart Word. The user interface is then displayed in the new language.

Select a help language in the list box on the right. By default, the help language is the same as the display language. This is the language in which help is displayed in Word. You can also change this language: For example, if you normally use Word in English but have a different native language, you can display help in your native language without changing the language of the user interface in Word. After making your changes, click “OK” at the bottom of the window and restart Word.
Changing the editing language
You can also change the editing language in the same dialog box under “File” -> “Options”. In the “Language” section, all installed editing languages are displayed at the top of this dialog box. To enable a language, click one of the languages marked “Not enabled”. You can add additional editing languages in the list box below the list of editing languages. Word allows you to choose from over 100 languages and dialects. Select the desired language and enable it. In some cases, you may have to download additional proofing tools, e.g. if a language is written from right to left.

Once you’ve enabled the language you want, click “Set as Default” to use this editing language for all new documents. Save your changes by choosing “OK”.
Changing the display language in Word Online
Word Online edits documents in OneDrive and uses the same display language as OneDrive.
1. Go to onedrive.live.com, click the settings icon in the upper right corner of your browser and then click the language currently displayed.

2. Now you can select a different display language for OneDrive from the list.

3. Save your changes by choosing “OK”. The OneDrive interface is then displayed in your browser in the new language.

4. You have to confirm a second time to verify that you can read the new language.

5. The user interface of Word Online will appear in the new language once you have confirmed a second time.


Tip
Microsoft 365 is a server-based office solution that includes the popular Office applications Word, Excel and PowerPoint and is ideal for home users and small businesses. Automatic updates ensure that you always have the latest version.
Changing the editing language in Word Online
In Word Online, the editing language is set individually for each document. Open a document, select all text using the keyboard shortcut Ctrl + A or select several paragraphs. Right-click within the selected area. A toolbar and a context menu will appear. In the context menu, select “Set Proofing Language”. A list of available languages will appear. Select the language you want to use and click “OK”.

The procedure for setting the language is slightly different in the macOS version of Microsoft Word. To change the editing language on a Mac, go to “Tools” -> “Language” and select the desired language. If you want to use this editing language as the default language for all new documents, click the “Default” button.
The display language for Word cannot be changed independently of the operating system language in macOS. Word always uses the system setting on a Mac. If you want to change the display language for the user interface, you have to change the language for the operating system. You can find this setting in the Apple menu under “System Preferences” -> “Language & Region”.

Word table: Creating a table in Microsoft Word
In Word, tables prove useful in the most diverse situations, and you have several options for creating them. You can either use the table templates provided by the Microsoft tool, or you can design your own. This enables you to improve your reports, invoices or the performance of household tasks. Even data from Excel can be integrated as a table into a Word file.
Word table: Creating a table in Microsoft Word

Word Shortcuts: an overview of the best ones
Word shortcuts make working with the popular word processing program quicker and easier. Whether you are copying text, printing a document or changing the formatting – many commands do not need a mouse click to be activated. Thanks to shortcuts, you can work faster and more effectively. Here is a list of the most common Word shortcuts.
Word Shortcuts: an overview of the best ones

Inserting footnotes and endnotes in Word
When you insert footnotes and endnotes in Microsoft Word, you’re able to provide supplemental context by explaining technical terms, commenting on paragraphs or adding citations to sources. These comments don’t disrupt the flow of the text because they are separate sections within a document. At the same time, they allow the reader to look up a respective passage where necessary. We’ll show you…
Inserting footnotes and endnotes in Word

Microsoft Word: Find and Replace made simple
Microsoft Word’s Find and Replace function is an extremely useful tool if you have to adapt particular terms in a text. From changing a name to correcting a common spelling mistake, the function helps you in a wide range of situations. But it also has its peculiarities. This guide will help you use the Find and Replace function in Word correctly and avoid pitfalls.
Microsoft Word: Find and Replace made simple

Password-protect a Word document
By password-protecting a Word document, you are encrypting important data from unauthorized access or unlawful modification. Your Microsoft Word or Office program file can only be opened if a valid password is entered. Password-protecting a Word document is also possible in older versions of Word.
Password-protect a Word document