
Headings make text stand out and help people scan your document.
The simplest way to add headings is with heading styles. Using heading styles means you can also quickly build a table of contents, reorganize your document, and reformat its design without having to manually change each heading’s text.
-
Select the text you want to use as a heading.
-
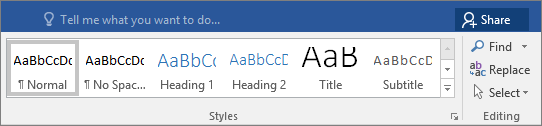
On the Home tab, move the pointer over different headings in the Styles gallery. Notice as you pause over each style, your text will change so you can see how it will look in your document. Click the heading style you want to use.

If you don’t see the style that you want, click the More button
to expand the gallery.
 to expand the gallery.
Tip: You can change the font and formatting of a heading style. Just select the heading text you want to customize, modify its styles the way you want, and then on the Home tab, in the Styles group, right-click the heading style that you customized and click Update Heading to Match Selection. Every time you apply that heading style in your document, the heading style will include your customizations.
Styles can do a lot more, including a table of contents. Here’s a short video on why to write first and format later using Styles.

Headings can make text stand out and help people scan your document. The simplest way to add headings is to use heading styles.
-
Select the text you want to use as a heading.
-
On the Home tab, click the heading style you want to use.
If you don’t see the style you want, click a left, right, or down arrow to see more available styles.
This tutorial shows how to create headings in Microsoft Word. First, we’ll look at how to create headings using Word’s built-in styles. Then, we’ll look at how to customize Word’s built-in heading styles to your preferred font, font size, alignment, and color.
Table of Contents
- How to Create Headings Using Word’s Built-In Heading Styles
- How to Customize Word’s Built-In Heading Styles
Before jumping to the tutorial, let’s discuss the importance of using Word’s heading styles.
Why Are Heading Styles Important?
You can make any text in Word look like a heading by using a large font size. However, you won’t have access to several important features if you use a large font size rather than Word’s official heading styles. For example, Word’s heading styles help you perform the following tasks:
- Create an automatic or custom table of contents
- Create bookmarks in a PDF using Adobe Acrobat
- Use Word’s outline feature
- Use Word’s Navigation pane
Most importantly, screen reading software can identify your heading hierarchy based on Word’s styles. If you only use a large font size for headings, people who use screen readers will have less information about how your document is organized.*
This tutorial’s companion video shows all the steps in real time.
Watch more than 200 other writing-related software tutorials on my YouTube channel.
The images below are from Word for Microsoft 365. The steps are the same in Word for Microsoft 365 for Mac (a.k.a., Word for Mac), Word 2021, Word 2019, and Word 2016, and similar in Word 2013 (PC only).
How to Create Headings Using Word’s Built-In Heading Styles
The following steps show how to create headings using Word’s built-in styles.
- Select the text you want to turn into a heading. (Or, move your cursor to a blank line where you want to type your new heading during the next step.)

- Select the Home tab in the ribbon.

- Select the appropriate heading level in the Styles group. (If you didn’t select existing text during step 2, type your new heading text after making your selection.)

Pro Tip: Word includes nine heading levels, although only a few will appear in your Styles group when you open a new document. Additional heading levels will appear after you use higher-level headings. For example, Heading 3 will appear after you use Heading 2.
The selected text will be formatted with the new heading style immediately.

- Deselect the heading and then press Enter (PC) or Return (Mac) on your keyboard to move your cursor to the next line. The heading formatting will automatically turn off.
5. Save your file to save your new heading.
How to Customize Word’s Built-In Heading Styles
The following steps show how to customize the built-in heading styles in an individual Word document.
There are many ways to change styles in Word. For this tutorial, we’ll stick with the basics: font, font size, emphasis (i.e., bold, italic, or underlined), color, alignment, spacing, and indentation.
- Select the Home tab in the ribbon (see figure 1).
- Right-click (PC) or Control-click (Mac) the heading level in the Styles group, and then select Modify from the shortcut menu.

- Make all necessary formatting changes in the Modify Style dialog box. Here are the eight basic modifications:
A. Font
B. Font size
C. Emphasis
D. Font color
E. Alignment
F. Line spacing
G. Spacing before and after
H. Indentation

- (PC Users) Select Only in this document to ensure that your customized style is limited to your current document.

- (Mac Users) Ensure that Add to template is not selected to limit your customized style to your current document.

- Ensure that Automatically Update is not selected. (If Automatically Update is selected, you won’t be able to edit the styles of individual same-level headings.)

- Select the OK button.

Your changes will be applied to all existing text using the heading style you just customized.
- Save your file to save your changes.
Related Resources
How to Create Run-In Headings in Microsoft Word (Indented & Left-Aligned)
What Is Headline-Style Capitalization?
How to Capitalize Hyphenated Words in Titles and Headings
*Visit “Make Your Word Documents Accessible to People with Disabilities” from the Microsoft Office Support website for an in-depth list of ways to make your document accessible to the widest audience.
Updated March 18, 2023
Apply and Customize Headings in Word Documents
by Avantix Learning Team | Updated April 19, 2022
Applies to: Microsoft® Word® 2010, 2013, 2016, 2019, 2021 or 365 (Windows)
You can create headings in Microsoft Word documents by applying Word’s built-in heading styles (such as Heading 1 or Heading 2). After you have applied styles, you can modify them and change the font, size, color, and other formatting attributes so the entire document will update. Once you have applied heading styles, you’ll be able to navigate to the headings using the Navigation Pane and create a table of contents.
Recommended article: How to Hide Comments in Word (or Display Them)
Do you want to learn more about Microsoft Word? Check out our virtual classroom or in-person classroom Word courses >
Heading styles are very important because they create structure in your documents and are readable by screen readers or assistive technology programs used by people with vision impairments. They can also save you a lot of time formatting and reformatting documents.
In addition to creating structure, heading styles are also used to:
- Generate a table of contents
- Reformat a document using Style Sets
- Navigate using the Navigation Pane (select Navigation Pane on the View tab in the Ribbon)
- Rearrange a document using the Outline View
- Create a structured PDF (portable document format) file with heading tags
Note: Screenshots in this article are from Word 365 but are very similar in previous versions of Word.
Creating headings by applying Word heading styles
To create or designate headings, you will need to apply the built-in heading styles in order (Heading 1, Heading 2, Heading 3, and so) to paragraphs. There are 9 levels of headings available in Word.
Heading styles are technically available as paragraph and character styles, but it’s important to apply them as paragraph styles to entire paragraphs. A paragraph in Word is anything with a hard return after it (you have pressed Return or Enter).
Heading styles are affected by your theme choices (overall theme, color theme, and font theme). You can change theme options using the Design tab in the Ribbon.
To create headings by applying heading styles:
- Click in the paragraph (title or subheading) you want to designate or format as a heading.
- Click the Home tab in the Ribbon.
- Click the heading style you want in the Styles Gallery (such as Heading 1) in the Style group. You may need to click the More arrow on the bottom right of the Styles Gallery to view more styles and then click the style you want to use.
All available heading styles do not appear initially in the Styles Gallery. When you apply a heading level (such as Heading 3), an additional heading level should appear in the Gallery (such as Heading 4).
The Styles Gallery appears on the Home tab in the Ribbon and typically displays top level headings:

If you click the More arrow on the bottom right of the Styles Gallery, an expanded gallery appears:

Modifying or customizing heading styles using the Styles task pane
If you modify heading styles, every instance of the modified style will change in your document. Not only will this save time, but it will also ensure consistency. There are many ways to customize heading styles in Word. In this article, we will modify heading styles using the Styles task pane.
The Styles task pane appears with styles in the document (you can change this display by clicking Options at the bottom of the task pane):

To modify or customize a heading style:
- Click the Home tab in the Ribbon.
- Click the dialog box launcher (diagonal arrow) on the bottom right in the Styles group. You can also press Ctrl + Alt + Shift + S. The Styles task pane will appear. If the task pane is floating, double-click the title bar.
- Click in a paragraph using the style you want to modify.
- Click the arrow to the right of the heading you want to modify in the Styles task pane and then select Modify from the drop-down menu. You can also right-click the heading style in the task pane and select Modify. A dialog box appears.
- In the Modify Style dialog box, select the desired options such as font, font size, font color, alignment, and line spacing. Buttons in this dialog box are comparable to those in the Ribbon.
- If you want to change some other formatting options (such as paragraph formats), select Format at the bottom of the dialog box and select other options from the drop-down menu.
- Select Only in this document so that the style is modified in the current document only.
- Do not select Automatically Update unless you want the document styles to update when a user changes heading formatting in the document. It’s typically best to leave this option unchecked.
- Click OK or press Enter. The entire document will change unless a heading has been manually formatted (which overrides the style). You can simply reapply the style if this occurs.
The Modify Styles dialog box displays the style name, the type of style and options for modifying the style:

When you save the document, the modified styles are also saved.
Styles are the most important formatting feature in Word to automate formatting in longer documents. Heading styles also have the added benefit of creating structured documents and are integrated with several other Word features such as generated tables of contents.
This article was first published on May 15, 2021 and has been updated for clarity and content.
Subscribe to get more articles like this one
Did you find this article helpful? If you would like to receive new articles, join our email list.
More resources
How to Create a Table of Contents in Word
14+ Word Selection Shortcuts to Quickly Select Text
How to Copy Styles Between Microsoft Word Documents Using the Organizer
How to Insert Reusable Text Snippets in Word with Quick Parts (Great Timesaver)
How to Convert a PDF to Word in Microsoft Word (for Free – No Third Party Programs Needed)
Related courses
Microsoft Word: Intermediate / Advanced
Microsoft Excel: Intermediate / Advanced
Microsoft PowerPoint: Intermediate / Advanced
Microsoft Word: Long Documents Master Class
Microsoft Word: Styles, Templates and Tables of Contents
Microsoft Word: Designing Dynamic Word Documents Using Fields
VIEW MORE COURSES >
To request this page in an alternate format, contact us.
Our instructor-led courses are delivered in virtual classroom format or at our downtown Toronto location at 18 King Street East, Suite 1400, Toronto, Ontario, Canada (some in-person classroom courses may also be delivered at an alternate downtown Toronto location). Contact us at info@avantixlearning.ca if you’d like to arrange custom instructor-led virtual classroom or onsite training on a date that’s convenient for you.
Copyright 2023 Avantix® Learning
Microsoft, the Microsoft logo, Microsoft Office and related Microsoft applications and logos are registered trademarks of Microsoft Corporation in Canada, US and other countries. All other trademarks are the property of the registered owners.
Avantix Learning |18 King Street East, Suite 1400, Toronto, Ontario, Canada M5C 1C4 | Contact us at info@avantixlearning.ca
To add a heading style
- Type the text you want into a Word document.
- Select a sentence that you want to add a header to.
- Select Home > Styles (or press Alt+H, then L), and then select the heading you want, such as the Heading 1 button.
Contents
- 1 How do you organize headings in Word?
- 2 How do you write headings and subheadings?
- 3 How do you put a heading 3 in Word?
- 4 How do you apply title style?
- 5 How can create the headings in MS text document?
- 6 How do I add a heading 4 style in Word?
- 7 Should headings be indented?
- 8 What are APA headings?
- 9 What are types of headings?
- 10 How do I add more headings?
- 11 How do I put text under a header in Word?
- 12 How do I make a heading 5 in Word?
- 13 How do I add more headings to a Table of Contents?
- 14 How do I create a heading and Table of Contents in Word?
- 15 Do you need subheadings in apa?
- 16 Do you bold APA headings?
- 17 What does APA stand for?
- 18 Are headings centered in APA?
- 19 What is APA Format example?
- 20 What are the 4 major sections of an APA paper?
How do you organize headings in Word?
Sort a list alphabetically in Word
- Select the list you want to sort.
- Go to Home > Sort.
- Set Sort by to Paragraphs and Text.
- Choose Ascending (A to Z) or Descending (Z to A).
- Select OK.
How do you write headings and subheadings?
A heading or subheading appears at the beginning of a page or section and briefly describes the content that follows.
Accessibility #
- Make sure headings and subheadings always follow a consecutive hierarchy.
- Do not skip a header level for styling reasons.
- Do not use all caps.
- Do not bold or italicize a heading.
How do you put a heading 3 in Word?
When you have the selection where you want to insert a Heading 3 style paragraph, press CTRL+SHIFT+s to display the Apply Styles dialog and in the Style Name control type Heading 3 and then click on Apply.
How do you apply title style?
To apply a style:
- Select the text you want to format, or place your cursor at the beginning of the line.
- In the Styles group on the Home tab, click the More drop-down arrow.
- Select the desired style from the drop-down menu.
- The text will appear in the selected style.
How can create the headings in MS text document?
Add a heading
- Select the text you want to use as a heading.
- On the Home tab, move the pointer over different headings in the Styles gallery. Notice as you pause over each style, your text will change so you can see how it will look in your document. Click the heading style you want to use.
How do I add a heading 4 style in Word?
Word 2010 — How can you make heading 4, 5, etc.. visible in the table of contents?
- select the text.
- right-click the selected text.
- select Styles… from the dropdown list.
- select Apply Styles… from the dropdown list.
- type Heading 4 into the textbox, and hit enter.
Should headings be indented?
headings: Level 1 headings should be centered (and in bold), and Level 2 and 3 headings should be left-aligned (and in bold or bold italic, respectively). Level 4 and 5 headings are indented like regular paragraphs.
What are APA headings?
APA Style uses a unique headings system to separate and classify paper sections. Headings are used to help guide the reader through a document. The levels are organized by levels of subordination, and each section of the paper should start with the highest level of heading. There are 5 heading levels in APA.
What are types of headings?
3 Types of Headings
- Question Headings. A question heading, as you might have guessed, is a heading in the interrogative case.
- Statement Headings. Statement headings are those that include a noun and a verb, forming a complete thought.
- Topic Heading.
How do I add more headings?
To add a heading style
- Type the text you want into a Word document.
- Select a sentence that you want to add a header to.
- Select Home > Styles (or press Alt+H, then L), and then select the heading you want, such as the Heading 1 button.
In This Article
- In Page Layout view, double-click the top or bottom margin area of the page.
- On the Insert tab, click the Header button or the Footer button and then choose Edit Header or Edit Footer from the menu that appears.
- Position the insertion point where you want the header or footer text to appear.
How do I make a heading 5 in Word?
Change the heading levels reported in the TOC
- Click anywhere inside the TOC.
- Go to the References tab > Table of Contents > Insert Table of Contents.
- On the Table of Contents window, change the Show levels setting from 3 to 4 or 5, depending on how deep you want to go.
- Click OK.
- Say Yes to replace the existing TOC.
How do I add more headings to a Table of Contents?
Go to References > Table of Contents. Select Custom table of contents. Use the settings to show, hide, and align page numbers, add or change the tab leader, set formats, and specify how many levels of headings to show.
How do I create a heading and Table of Contents in Word?
Click where you want to insert the table of contents – usually near the beginning of a document. Click References > Table of Contents and then choose an Automatic Table of Contents style from the list.
Do you need subheadings in apa?
If you are including a subheading to a section, APA formatted papers require you to have two subheadings on the same level. Some other general tips for you to consider are, donΓÇÖt overdo the use of headings and subheadings. Not every paragraph needs them.
Do you bold APA headings?
Note: Headings for Title, Abstract, and References are not in bold but otherwise follow Level 1 format. Your paragraph text begins a double-spaced line below the heading, with a ½-inch indentation at the start of each paragraph. Indented, bold, lowercase, and ending with a period.
What does APA stand for?
American Psychological Association
Summary: APA (American Psychological Association) style is most commonly used to cite sources within the social sciences.
Are headings centered in APA?
The first level of heading is bolded and centered, and the first letter of each word in the heading is capitalized. The paragraph text should be typed on the following line and indented five spaces from the left.
What is APA Format example?
APA in-text citation style uses the author’s last name and the year of publication, for example: (Field, 2005). For direct quotations, include the page number as well, for example: (Field, 2005, p. 14).
What are the 4 major sections of an APA paper?
In most cases, your paper should include four main sections: the title page, abstract, main section, and references list.
Style is essential to making a strong first impression. Admittedly, this usually applies to fashion rather than formatting. But in the academic realm, you’ll win more points for applying clear and consistent heading styles in a document than for wearing a fancy outfit.

And since a well-formatted document is vital for clarity as well as grabbing the reader’s attention, today we’re taking a look at how to apply heading styles in Microsoft Word.
Using Headings
The ‘Headings’ styles in Microsoft Word are formatting options for making headings and subheadings stand out from the other text in your essay. This will help your reader, particularly in longer essays, by clearly indicating where different sections begin and end.
Microsoft Word actually comes with a number of default heading styles (named ‘Heading 1’ through to ‘Heading 9’). You can use these as you find them, but you may also need to change them to fit with any specific requirements for headings set out in your style guide.
But how should you use these headings? Like so:
Find this useful?
Subscribe to our newsletter and get writing tips from our editors straight to your inbox.
- Go to the ‘Styles’ section of the ‘Home’ tab on the main ribbon
- Select the text you’re using as a heading and click on the appropriate ‘Heading’ style (e.g. ‘Heading 1’, ‘Heading 2’, etc.)

- If the required style is not visible in the ‘Styles’ tab, click the little arrow in the bottom right to open a side menu with further options
- If the required ‘Style’ still isn’t visible, click ‘Options…’ in the side menu and make sure ‘All styles’ is selected under ‘Select Styles to Show’, then click OK

- Once the correct heading styles show in the menu, select the text you want to format and apply each heading and subheading accordinglyBe sure to use different styles to distinguish between different ‘levels’ of heading, since the formatting style of chapter titles should be distinct from those used for section or subsection headings: e.g. use ‘Heading 1’ for the main headings, then ‘Heading 2’ for the next level down, and ‘Heading 3’ for subsections, etc., being careful to apply each style consistently.


Numbered Headings
If you want to use numbered headings, Microsoft Word’s multilevel list options are very useful. This will apply numbering to titles and subtitles whenever a ‘Heading’ style is used, thereby ensuring clear and consistent numbering for all headings in your document.
 To do this, you’ll need to:
- Apply different heading styles to your document for each level of heading
- Click on the ‘Multilevel List’ button in the ‘Paragraph’ section of the ‘Home’ tab
- Select one of the list styles that refers to headings

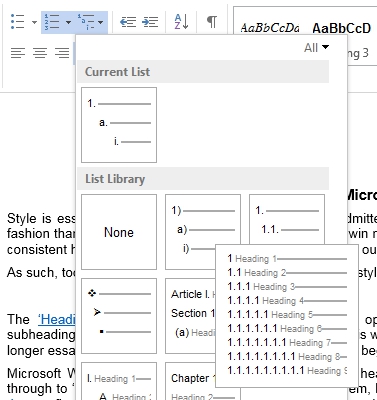
This will apply a different numbering level to each heading style, while you can also modify and create multilevel list styles via the ‘Multilevel List’ menu.
This numbering will also update automatically if you add or remove headings, saving you the effort of re-numbering headings manually.
Breaking up a longer document, such as a dissertation or manuscript, into chapters will make it much easier to read. And if you do this, adding chapter headers will help your reader navigate the document quickly and easily. But how does this work in Microsoft Word? Let us explain.
Chapter Headers in Microsoft Word
Adding chapter headers to a Microsoft Word document requires three things:
- Using a Heading style for your chapter headings
- Adding section breaks between chapters
- Generating the chapter headers
This might seem complex, but each step is simple. Read on to find out more.
Step One: Applying Heading Styles
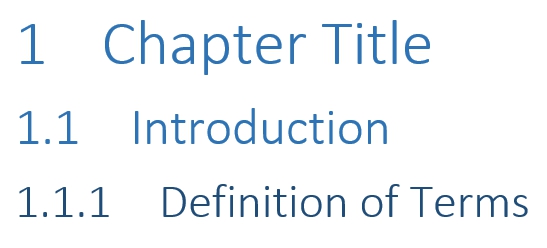
The Heading styles in Word are used for headings and subheadings. Chapter titles are the main headings in a document, so they would usually be formatted with Heading 1. Whichever style you use, though, to prepare for applying chapter headers you should:
- Select a style and customize it as required
- Go through your work applying the chosen style to all chapter headings

Make sure to only use this style for chapter titles (you can use the other Heading styles for subheadings within chapters). This will let Microsoft Word tell the chapter titles apart from other text.
Step Two: Adding Section Breaks
Next, we need to add section breaks between chapters. Usually, you will want each chapter to start on a new page. You can do this throughout your document as follows:
Find this useful?
Subscribe to our newsletter and get writing tips from our editors straight to your inbox.
- Find the first chapter title
- Place the cursor before the heading
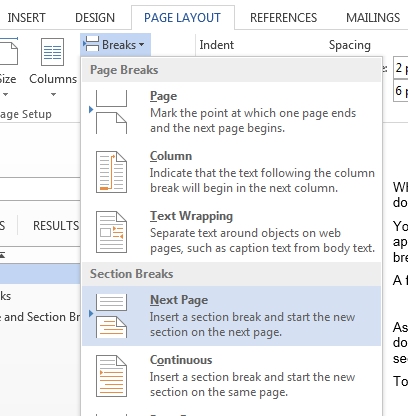
- Go to Layout > Page Setup on the main ribbon
- Click Breaks and select Next Page from the dropdown menu
- Repeat for each chapter in the document
Doing this will tell Microsoft Word where each chapter starts and ends.
Step Three: Creating Chapter Headers
All we need to do now is tell Microsoft Word what goes in each header. To do this, we first need to make sure that the headers in each section are separated from one another. To do this:
- Go to the first chapter in your document
- Open the header by going to Insert > Header & Footer > Header > Edit Header on the ribbon
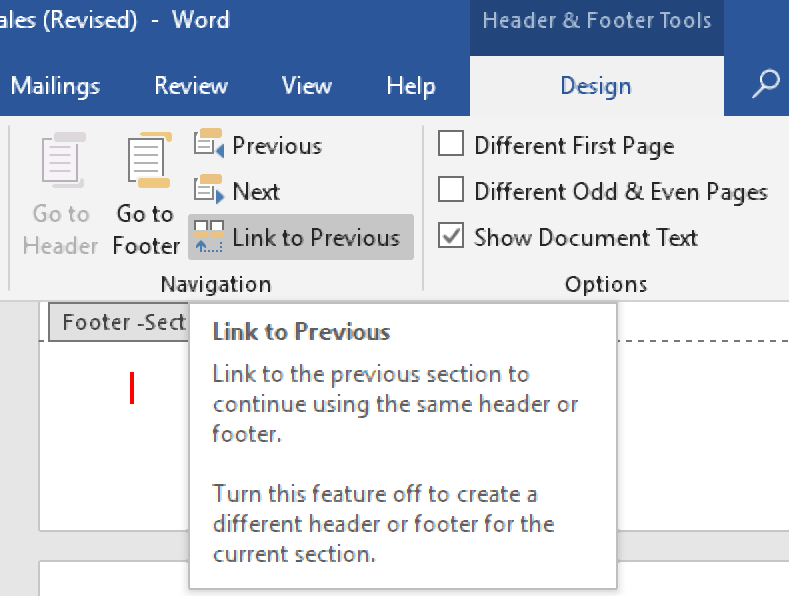
- With the header selected, go to Design > Navigation
- Deselect Link to Previous
- Repeat for each section of the document
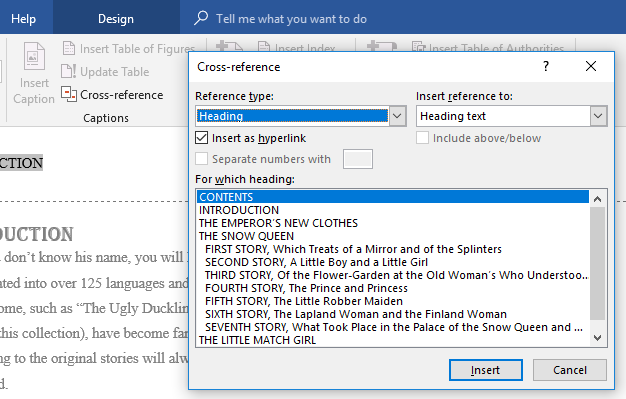
And finally, to create the chapter headers themselves, all you need to do is:
- Open the header in the first chapter
- Go to References > Captions > Cross-reference
- Select Heading from the menu as your reference type
- Pick the relevant chapter title and click Insert
- Repeat for each chapter of your document
This will insert the text formatted with the selected Heading style at the top of each page in each section. You can also apply the same header throughout multiple sections by leaving the Link to Previous option selected for each section after the first.
If you later update your chapter titles, don’t forget to update your chapter headers! Getting your work proofread is a great way of making sure you don’t miss issues like this, so get in touch today.
Asked by: Prof. Charity Kutch MD
Score: 4.5/5
(60 votes)
How to Create Headings Using Word’s Built-In Heading Styles
- Select the Home tab in the ribbon. Figure 1. …
- Select the text you want to turn into a heading. …
- Select the appropriate heading level in the Styles group. …
- Press Enter on your keyboard to move your cursor to the next line. …
- Save your file to save your new heading.
How do I navigate headings in Word?
To go to a page or a heading in a Word document without scrolling, use the Navigation pane. To open the Navigation pane, press Ctrl+F, or click View > Navigation Pane. If you’ve applied heading styles to the headings in the body of your document, those headings appear in the Navigation pane.
What are heading styles and how do I use them in Word?
Styles are sets of formatting options (like font, line spacing and alignment) that you can apply to text in one click. This is more efficient than applying each effect individually, and also increases consistency throughout your document. Word contains nine built-in Heading styles named Heading 1 through to Heading 9.
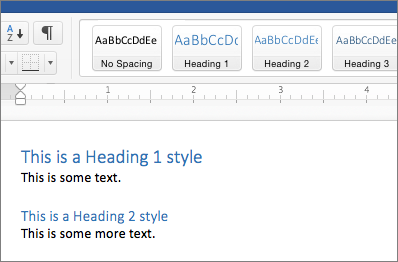
What is the difference between Heading 1 and Heading 2 in Word?
Usually, the topic heading at the top of your page will be Heading 1. The headings of sections within the document will have Heading 2 styles. … Next, give each section of the document a meaningful heading. Assign each of these a Heading 2 style.
How many headings does word have?
Word has nine built-in Heading styles. They are called Heading 1, Heading 2 etc. You can use other styles (including your own custom styles) for most heading and numbering purposes.
27 related questions found
How do I make heading 3 in Word?
When you have the selection where you want to insert a Heading 3 style paragraph, press CTRL+SHIFT+s to display the Apply Styles dialog and in the Style Name control type Heading 3 and then click on Apply. Likewise for Heading 4. Headings 1 and 2 are displayed in the Quick Styles gallery and Styles pane by default.
How do I fix headings in Word?
Windows Key commands: Alt+H,F,Y,F6. Then right click on the desired Heading style you wish that text to resemble and select “Update Heading to Match Selection.” This will modify all the headings for this document.
What is a Level 2 heading?
There are five levels of heading in APA Style. Level 1 is the highest or main level of heading, Level 2 is a subheading of Level 1, Level 3 is a subheading of Level 2, and so on through Levels 4 and 5. Headings are covered in Sections 2.26 and 2.27 of the APA Publication Manual, Seventh Edition.
How do I use styles in Word?
Right-click the text on which you want to base a new style. In the mini toolbar that appears, click Styles, and then click Create a Style. In the Create New Style from Formatting dialog box, give your style a name and click OK. Your new style will now appear in the Styles gallery.
How do I use headings and subheadings in Word?
Follow these steps to create a new subhead within a chapter:
- Type in the text for the subheading.
- Click the style that appears in the Style Area left of the subheading.
- In the Styles Toolbox, click the style you want to apply. Use “Heading 2” for a first-level subheading, “Heading 3” for a second-level subheading, etc.
How do I rearrange pages in Word without headings?
Using the navigation pane to move sections by their headings only works if you’re using headings in your document. Word doesn’t offer an easy, built-in option to easily rearrange pages if you don’t use headings. The only way to do it is to cut and paste the text and manually rearrange it instead.
How do you get rid of navigation headings in Word?
How do you reset headings in Word? Select all the heading styles and press “delete” a dialog box will appeared asked if you want to delete the styles and click on ‘yes. ‘ Word will take you through a series of “Cannot delete Heading 1-9.” Each time click the ‘ok’ button.
How do you jump to a section in Word?
You can jump to a section by following these steps:
- Press F5. …
- On the left side of the dialog box, make sure Section is selected. …
- If you just want to jump to the next section, you can simply click on Next.
- In the Enter Section Number box, enter the section number.
- Click on the Go To button.
What is a heading example?
Heading is defined as the direction a person or thing is moving. An example of a heading is a car driving south. (masonry) The end of a stone or brick which is presented outward. The title, subtitle, or topic that stands at the top or beginning, as of a paragraph, letter, or chapter.
What are first level headings?
The first level of heading is bolded and centered, and the first letter of each word in the heading is capitalized. The paragraph text should be typed on the following line and indented five spaces from the left.
What are the headings?
A heading is a word, phrase, or sentence at the beginning of a written passage that explains what it’s about. A heading is very similar to a title. A heading is similar to a caption, a line below a photograph that briefly explains it.
How do I align in Word?
Change text alignment
- To align the text left, press Ctrl+L.
- To align the text right, press Ctrl+R.
- To center the text, press Ctrl+E.
How do you align tabs in Word?
On the Home tab, in the Paragraph group, choose Paragraph Settings. Click the Tabs button. Set the Tab stop position, choose the Alignment and Leader options, and then click Set and OK.
How do you reset styles in Word?
Character Styles like Emphasis, Reference, Strong, and Book Title can be reset by deleting them from the Styles window. Select the Home tab and open the Styles pane with the launcher button in the bottom-right of the Styles group. Alternatively, use the shortcut Ctrl + Alt + Shift + S .
How do I fix weird formatting in Word?
Use Ctrl + A to select all text in a document and then click the Clear All Formatting button to remove the formatting from the text (aka character level formatting.) You can also select just a few paragraphs and use the same method to remove formatting from part of a document.
How do you fix headings?
The Styles pane appears on the right.
- Locate the heading level 1 in the Styles pane. Place mouse cursor over it. …
- Click the down arrow button on the extreme right. A drop-down list appears. …
- From the drop-down list, click option Update Heading 1 to Match Selection.
What is a Level 3 heading in Word?
*Level 3 headings are lowercase, bold face, and indented with a period at the end. Your heading should begin with an uppercase character and your paragraph text will continue after the heading’s period (inline).
Why are my headings not showing in navigation pane?
In the «Outline level» selection list, make sure that «Level 1» is selected. (Or whichever level you want this header to be. If the selection box says «Body Text,» then nothing will appear in the Navigation Pane.)
Topics Map > Services > Teaching, Learning and Classrooms > Services for Students & Staff
One of the key ways to make Microsoft Word documents accessible is to use Word’s built-in heading styles to format the document.
Why Use Headings
Accessible documents benefit everyone — not just those with disabilities! For example, accessible documents benefit cell phone and tablet users, as well as students with low bandwidth access. Accessible documents also make it easier for browsers to display them and are much easier to convert to various platforms or other formats.
Headings aren’t just a good idea — they’re required for accessibility. Microsoft Word provides pre-built heading styles to assist you.
Add Heading Styles in Word
Documents with a proper heading structure allow screen reader and other assistive technology users to:
- view a list of all of the headings on the page to navigate
- choose top-level headings or other heading levels and
- read or navigate a document by using headings.
Most of us scan a document or page quickly and look for big, bold text (headings) to get an idea of its structure and content. Screen readers and other assistive technologies also need to scan a document. They read and navigate through a document by using the heading structure.
To do this, documents should be structured in a hierarchical manner:
- Heading 1 is usually a page title or the main content heading. Generally, there is only one such header, and it is usually the most important.
- Heading 2 is usually a major section heading.
- Heading 3 is usually a sub-section of the Heading 2.
- Heading 4 is usually a sub-section of the Heading 3, and so on, ending with Heading 6.
Note:
- Lower-level headings should be contained within headings of the next highest heading.
- You should not skip heading levels, such as using Heading 4 directly below Heading 2.
- Headings should have descriptive text that give users a good idea of the content they will find within that section of the document.
Applying Heading Styles
- Select the text to be styled with a heading.
- Click the Home tab — see the heading styles listed in the Styles pane.
- Click on the heading style you want to apply to the selected text.
- To remove or change the heading style applied, highlight the text and select the Normal style, or a different heading style.

Verifying Your Headings
It is good practice to check that your headings create a logical outline for your content and verify that all of the headings are displayed in the headings list in the Navigation Pane.
Note: Instructions may vary when using Office versions older than Office 2019 or the Office 365 web versions, and/or Macintosh Office applications.
- Click the View tab
- Check the Navigation Pane option in the Show group (OR press Ctrl+F).
- The Navigation pane opens on the left. Click Headings to display the headings hierarchically. The headings should be nested in a logical manner.
- Click on a heading in the Navigation pane to move to specific parts of the document.

Modifying Pre-Defined Heading Styles
You can modify a pre-defined style to change the visual display:
- On the Home tab, right-click the style you wish to change in the Style pane and select Modify…
- In the Modify Style pop-up window, you can change the font type, font size, formatting, spacing, color, etc.
- Click the Format drop-down list in the bottom left corner to navigate through other style options.
- Check Automatically Update in the bottom left corner so that any text with that style applied in your document is automatically updated.
- Click OK — all text formatted with that heading style will change.

Note: Remember — there must be sufficient color contrast between the text and the background color to meet accessibility requirements.
Understand and Fix Color Contrast Issues
See Also:
- Blackboard Ally

Jill Williamson is a chocolate loving, daydreaming, creator of kingdoms. She writes weird books in lots of weird genres like fantasy (Blood of Kings and Kinsman Chronicles), science fiction (Replication), and dystopian (The Safe Lands trilogy). She has a podcast/vlog at www.StoryworldFirst.com. You can also find Jill on Instagram, Facebook, Twitter, Pinterest, or on her author website. Tagboth (Tag for short) is a goldhorn dragon from Belfaylinn, a hidden fantasy realm on the western end of the Sargasso Sea. Jill is working on the first book of this tale for this year’s Grow an Author series.
When I gear up to write a first draft, whether I’m starting from scratch or doing a rewrite, I like to organize my Word file. I do this because being organized sets me up for success. In the case of Onyx Eyes, I’m doing a bit of a rewrite, but since I only ever wrote out the first few chapters, I don’t have to rearrange an entire first draft, I just need to create new chapters for the whole book. As always, doing this doesn’t mean the story will stay like this. Later on, I very likely might end up deleting a chapter or adding several. Who knows? But doing this really helps me get ready to write a full novel. Here is now I tackle such a project.

First, I open my story file. Then I need to open the navigation sidebar. To find it, click on the “View” tab, then click the little box that says “Navigation Pane,” which is in the left center of the toolbar under the “Ruler” and “Gridlines” boxes. Here is an image to help you find it:

Once you select that box, the navigation sidebar will open to the left of your document. If you have already created headings in your document, those will show up in a list. If they don’t, make sure you click on the word “Headings” under the search box. Mine looks like this:

And since that is very small, here is a much closer look at my navigation sidebar. See how the word “Headings” is dark blue? That’s because I clicked on it. You can also click on “Pages” or “Results” if you want to look at your pages or the results of a word search.

As you can see, I divided my story into chapters, then I divided the chapters of my story into parts, with part two starting between chapters six and seven. I did this by starting each new chapter or part page on a new page break. Then I wrote the chapter number, or “Part Two: Idaho” or whatever the case, selected the text, then chose a heading style. For the part pages, that title is all I’ll ever write on those pages. But with the chapter pages, I will write the book after the chapter titles. The words of the book don’t show up in the navigation sidebar because I did not choose a special heading for them. The text for your book should be “normal,” which it likely is already by default. (FYI, in the image above, Part Three: Idaho has already changed to Part Three: Kenmare. And who knows? It all might change again.)
Heading styles are what enable the text to show up in the headings list on the navigation sidebar. I put my part three between chapters twelve and thirteen since that will be my midpoint, then I put my part four between chapters eighteen and nineteen. You don’t have to have parts in your book, but I wanted them for this story.
If you don’t have any headings showing up and don’t know how to make them, it’s pretty simple. You type out one or more words, select them, then click on the “Home” tab and choose a heading from the selections on the right side of the toolbar, like this:

If you use headings and subheadings, your list will stack, like an outline. It’s pretty handy. Play around with it until you get a good feel for how it works.
Once I’ve reorganized my book file, I can copy and paste sections of my first draft so that everything is in the right place. Then I use my outline to write my plans into each chapter. If I’ve done a major rewrite, I will use my storyboard cards to go through each chapter and write any notes into that chapter so that when I come to it in my rewrite, all my notes are right there waiting to remind me what to write or change. I might type these notes into the document itself at the start of the chapter, or I might put them in a comment so they don’t affect my word count. Once I’ve added in all my notes or instructions, I’m ready to write. Or rewrite. Being organized like this makes writing a lot easier.