
![]()
Download Article
An easy-to-follow guide on changing the direction of text in Microsoft Word
![]()
Download Article
- Rotating Text
- Making Text Vertical
- Mirroring Text
- Changing Paper Orientation
|
|
|
Do you want to type vertically in word? You can create vertical text by creating a textbox and adjusting its settings to set the position. You can change the text’s direction, rotate it, and mirror it. You could also change the document’s orientation from portrait to landscape mode. This wikiHow will show you how to write vertically in word on your Windows or Mac computer.
Things You Should Know
- Create a textbox with your text. Click «Shape Format» → «Text Direction» → «Rotate all text 90°».
- To make text vertical, drag the right-center circle of your textbox towards the left.
- To mirror text, right-click the textbox, then «Format Shape». Click «Effects», then input «180» into the X or Y Rotation field.
-

1
-
2
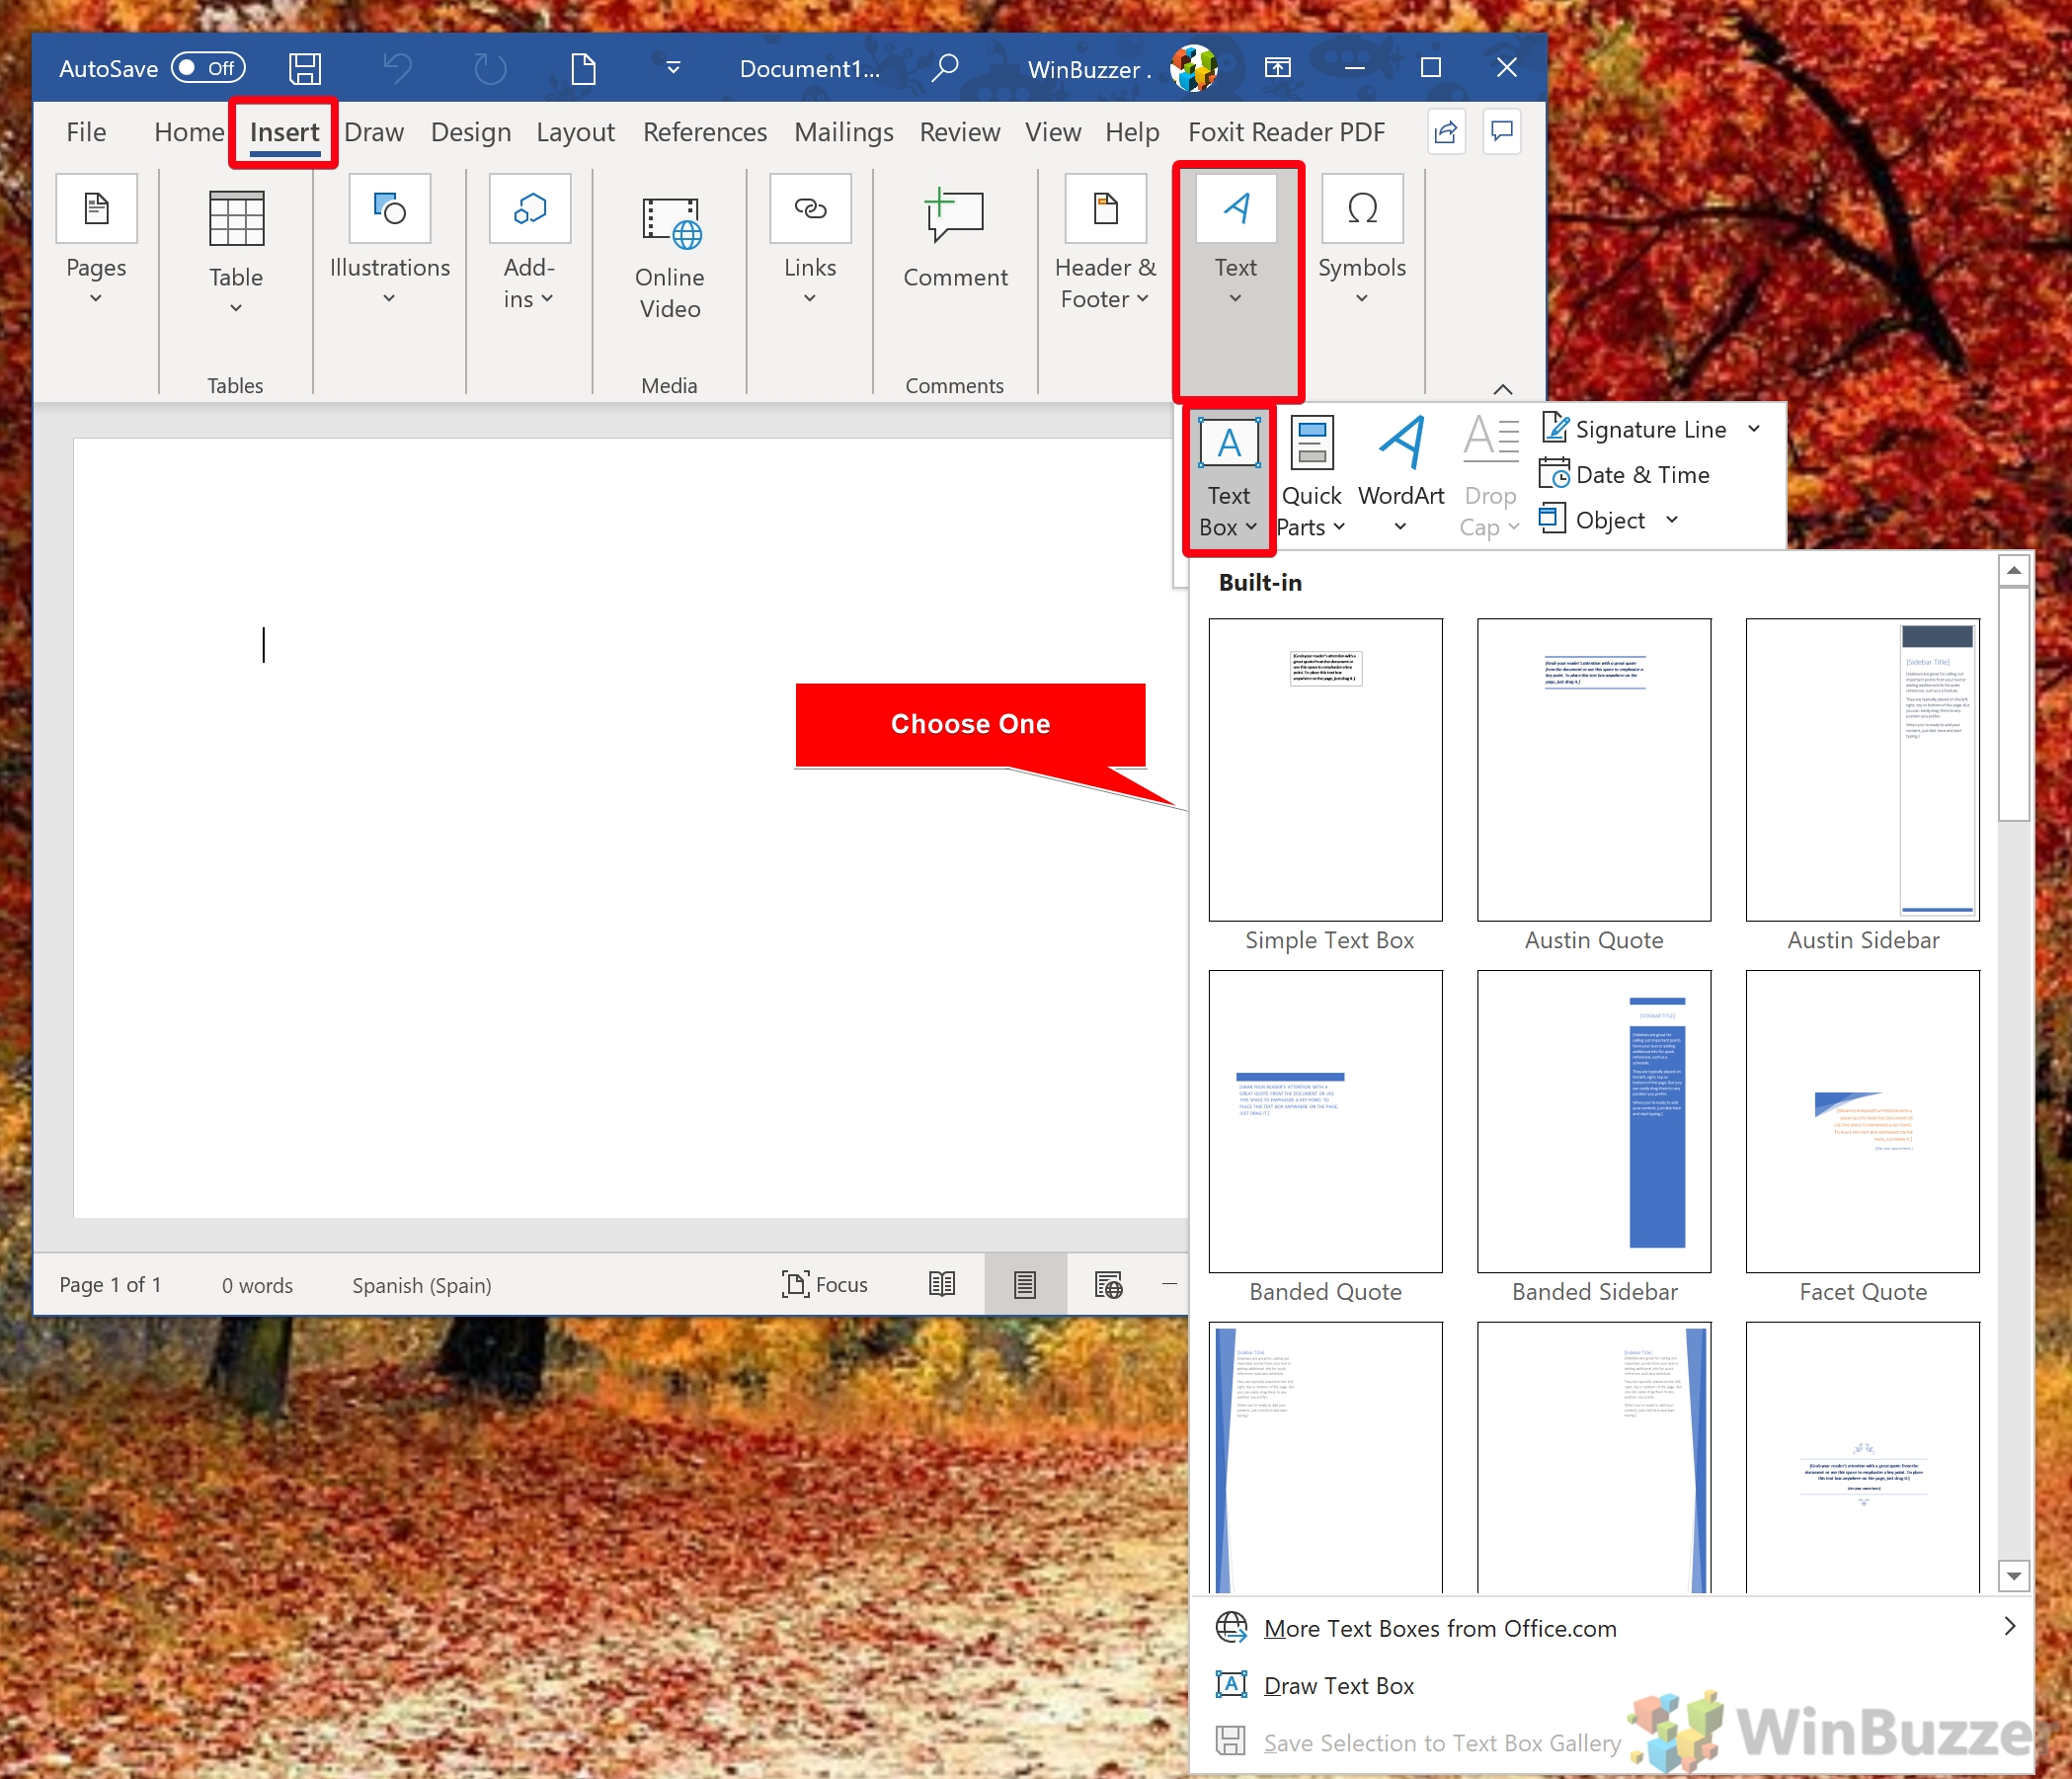
Create a textbox. To do this, click the Insert tab in the top toolbar, then click the Text Box icon in the Text section. You can select Simple Text Box from the presets.
Advertisement
-
3
Insert your text. Input the text you want to edit. You can copy and paste from another program into Microsoft Word.
- Make sure the textbox is still selected.
-
4
Click Shape Format. You can find this at the top toolbar, next to Help. Alternatively, double-click the edge of the textbox to be quickly redirected.
-
5
Click Text Direction. This will be in the Text section.
- A drop-down menu will open.
-
6
Select Rotate all text 90°. You can also select Rotate all text 270° if you want the top of the words to face the left side.
- Your text will be rotated.
- You can continue to edit your text in the textbox. The words will type in the direction set.


Advertisement
-
1
Open a project in Microsoft Word. This looks like a W on top of a blue square. Microsoft Word is available to install for Windows and Mac.
- You must have a subscription to use Office 365.
-
2
Create a textbox. To do this, click the Insert tab in the top toolbar, then click the Text Box icon in the Text section. You can select Simple Text Box from the presets.
-
3
Insert your text. Input the text you want to edit. You can copy and paste from another program into Microsoft Word.
- Make sure the textbox is still selected.
-
4
Click and drag the center circle on the right towards the left. With the textbox selected, you’ll see four circles at each point of the text box and one circle between each corner. Use the middle circle on the left side.
- As you drag the text box towards the left, it will become smaller. The text inside will adjust to fit the size of the box in vertical format.
- Make sure not to drag past the point of the left line. This could result in the words returning to their normal positions.
-
5
Remove the textbox lines (optional). If you want to remove the lines around the text, double-click the textbox to return to the Shape Format tab.
- Click Shape Outline, then select No Outline from the drop-down menu.
- The textbox lines will be hidden. Be sure to save your document if you need to return to it later.


Advertisement
-
1
Open a project in Microsoft Word. This looks like a W on top of a blue square. Microsoft Word is available to install for Windows and Mac.
- You must have a subscription to use Office 365.
-
2
Create a text box. To do this, click the Insert tab in the top toolbar, then click the Text Box icon in the Text section. You can select Simple Text Box from the presets.
-
3
Insert your text. Input the text you want to edit. You can copy and paste from another program into Microsoft Word.
- Make sure the textbox is still selected.
-
4
Right-click the textbox. A drop-down menu will open.
-
5
Click Format Shape…. This will be at the very bottom of the menu.
- A panel will open on the right side.
- If you don’t see this option, make sure the textbox is selected, not the text.
-
6
Click the «Effects» icon. This looks like a pentagon, next to the paint bucket icon.
-
7
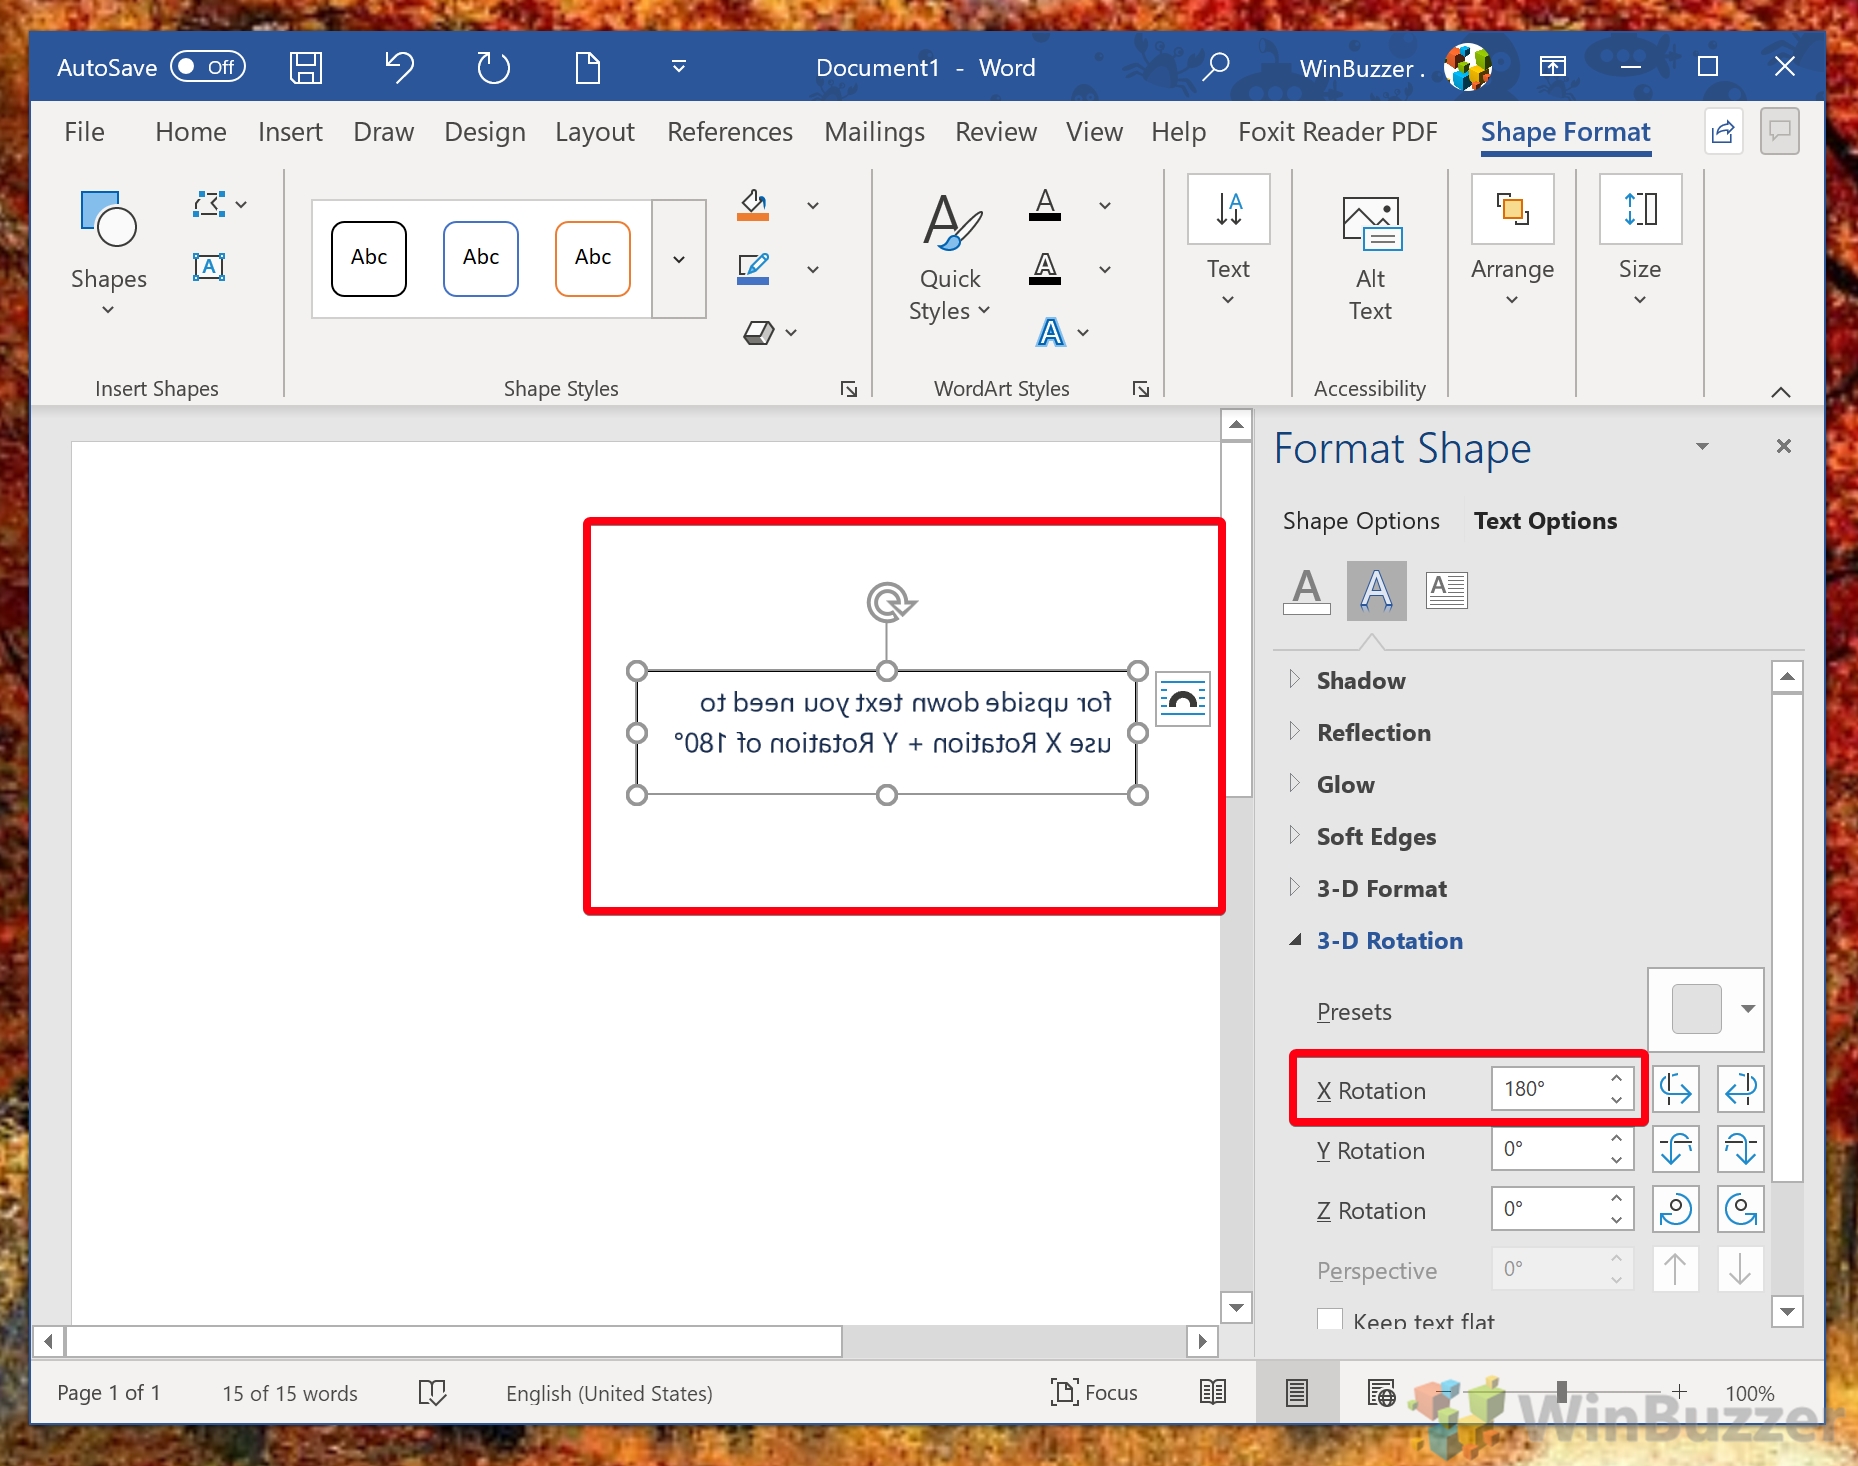
Enter 180 in the X or Y field. If you want your text to be mirrored left-right, enter 180 into the X Rotation field. If you want your text to be mirrored up-down, enter 180 into the Y Rotation field.
- The changes will take effect immediately.
-
8
Remove the textbox lines (optional). If you want to remove the lines around the text, double-click the textbox to return to the Shape Format tab.
- Click Shape Outline, then select No Outline from the drop-down menu.
- The textbox lines will be hidden. You can print your document if needed.


Advertisement
-
1
Open a project in Microsoft Word. This looks like a W on top of a blue square. Microsoft Word is available to install for Windows and Mac.
- You must have a subscription to use Office 365.
- Use this method if you want to change your paper orientation from portrait to landscape.
-
2
Click Layout. This will be in the top toolbar, between Design and References.
-
3
Click Orientation. You can find this at the top, next to Margins.
- A drop-down menu will open.
-
4
Click Landscape. Your Microsoft Word document will change to landscape orientation.
- If you change back to portrait mode after inputting text, the text will follow the portrait mode orientation. It will not save in its landscape position.


Advertisement
Ask a Question
200 characters left
Include your email address to get a message when this question is answered.
Submit
Advertisement
Thanks for submitting a tip for review!
About This Article
Article SummaryX
1. Click Insert.
2. Click Text.
3. Click Text Box.
4. Click Draw Text Box.
5. Click and drag a text box.
6. Type text into the box.
7. Hover the mouse over the box outline.
8. Click the rotation icon and drag in any direction.
Did this summary help you?
Thanks to all authors for creating a page that has been read 1,279,262 times.
Is this article up to date?
If you regularly use Microsoft Word with a language that reads from right-to-left, you may find that the right-to-left format remains when you try to write in English. This is because the text direction defaults to right-to-left in versions of Microsoft Word sold in some regions.
Luckily, if you’re using a Windows computer, changing the direction of text is easy via the “left-to-right” command. Only the most recent versions of Word for Mac support this feature, so if you encounter this problem, the best option is to copy and paste the text into a new document.
Customizing the Quick Access Toolbar
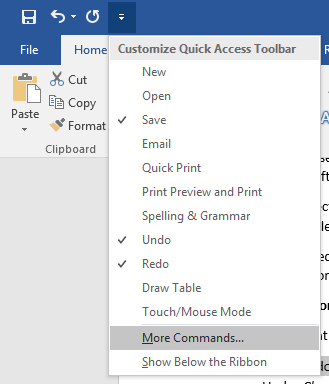
The first thing you need to do is add the “left-to-right” command to the Quick Access Toolbar. To do this, click the arrow next to the “Redo” button and choose “More Commands” from the dropdown list.
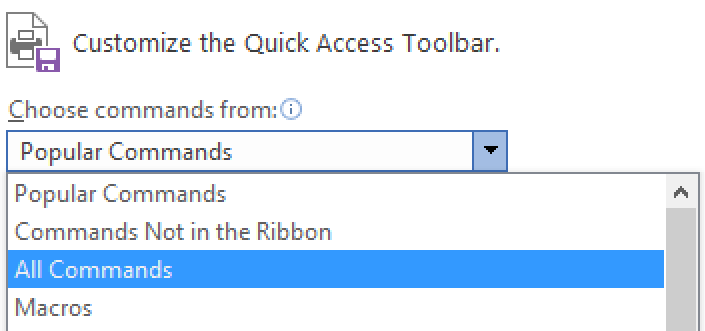
On the next screen, you have the option to choose commands to add to the toolbar. If you can’t see the “left-to-right” command, chose “All Commands” from the top menu.
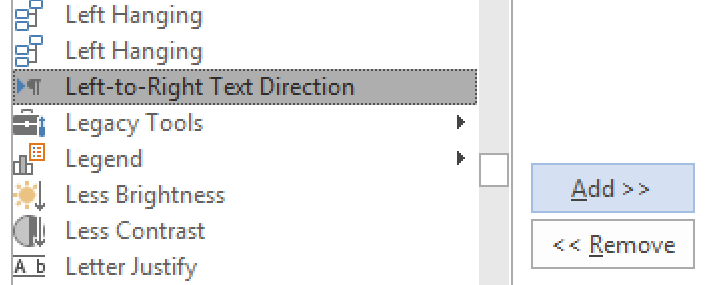
Next, scroll down and choose “Left-to-Right Text Direction.” The name of the command here may depend on the version of Word you’re using. In Word 2010, this command is called “Ltr run,” while Word 2003 lists it as “Ltr para.”
Find this useful?
Subscribe to our newsletter and get writing tips from our editors straight to your inbox.
Now the button will be displayed on the toolbar (you can use a similar process to add it to the main ribbon if you right click on the ribbon and select “Customize the Ribbon”).
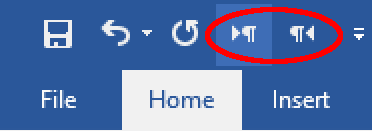
Now select the text that is showing right-to-left, click the button, and it should switch to left-to-right. Repeat this last step anywhere in your document, including footnotes and comment boxes, where the text direction displays from right-to-left.
It’s also worth noting that you can select the “Right-to-Left Text Direction” command using the same method. This is useful if you need to switch back to the original format at any point.
Formatting from Proofed
If you would like to get your paper formatted perfectly, send it to the professionals at Proofed!

There may be times when you want to change the direction of text in Word. This is easily done using text boxes or shapes or using cells in a table. We will show you both methods for changing the direction of text.
Change the Direction of Text in a Text Box or Shape
To change the direction of text using a text box or shape, insert a text box using the Text Box tool in the Text section of the Insert tab or a shape using the Shapes tool in the Illustrations section of the Insert tab. Enter text into the text box or shape. Make sure the text box or shape is selected and click the Format tab under Drawing Tools.

In the Text section of the Format tab, click Text Direction and select an option to rotate the text. Symbols next to the options show you how the text will display after applying each option.
The text is rotated and the text box is reshaped accordingly.
You can also select Text Direction Options from the Text Direction drop-down menu to rotate text.
Select an Orientation on the Text Direction dialog box. A Preview displays on the right side of the dialog box. Click OK to accept your selection.
Change the Direction of Text in Table Cells
You can also change the direction of text in one or more table cells. To do so, select the cells for which you want to change the text direction and click the Layout tab under Table Tools.
Click Text Direction in the Alignment section of the Layout tab.
Each time you click Text Direction, a different direction is applied. Keep clicking the button until the desired direction is applied.
You can also right click on the selected text in the table cells and select Text Direction from the popup menu to change text direction in a table.
READ NEXT
- › How to Adjust and Change Discord Fonts
- › This New Google TV Streaming Device Costs Just $20
- › Google Chrome Is Getting Faster
- › The New NVIDIA GeForce RTX 4070 Is Like an RTX 3080 for $599
- › BLUETTI Slashed Hundreds off Its Best Power Stations for Easter Sale
- › HoloLens Now Has Windows 11 and Incredible 3D Ink Features
How-To Geek is where you turn when you want experts to explain technology. Since we launched in 2006, our articles have been read billions of times. Want to know more?
Содержание
- Вариант 1: Текст
- Вариант 2: Отдельные буквы
- Вариант 3: Подстрочный и надстрочный знак
- Вариант 4: Надпись
- Вариант 5: Разрывы
- Вариант 6: Боковая линейка
- Вопросы и ответы

Вариант 1: Текст
Если в MS Word необходимо сместить текст с заданной периодичностью, используйте отступы в окне «Абзац». Для смещения вверх/вниз применяют категорию «Интервал перед/после», устанавливая стандартные значения 6 или 12 пт. Для лучшего отображения текста поэкспериментируйте с величинами.
Подробнее: Настройка абзацных отступов в Microsoft Word

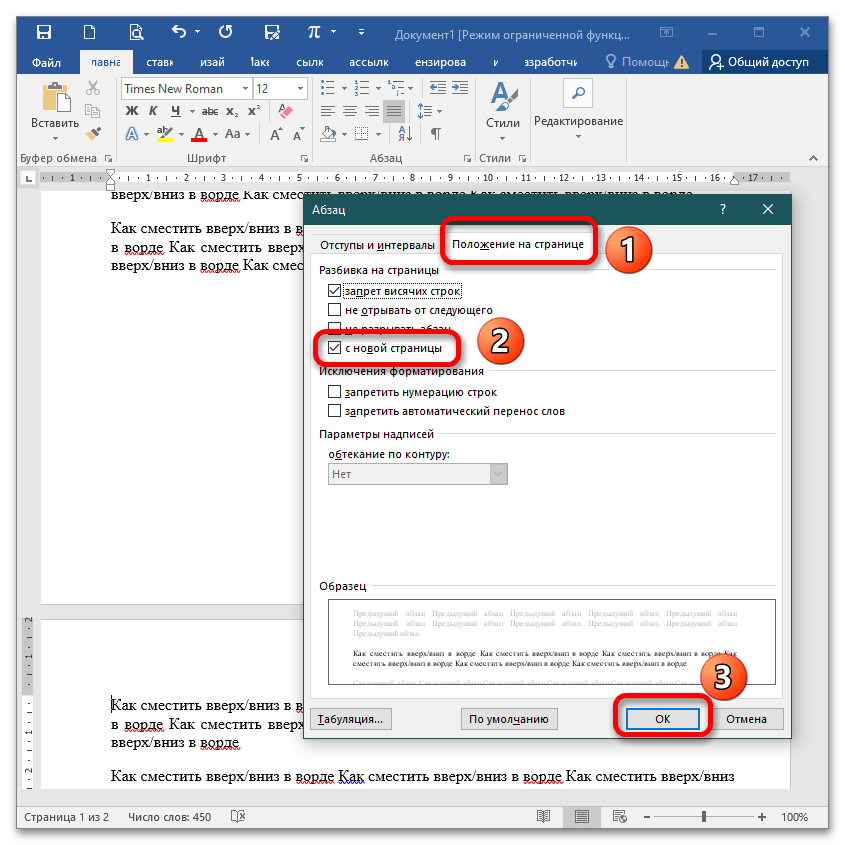
Если нужно сместить фрагмент на новую страницу, установите курсор перед его началом и вызовите окно «Абзац». На вкладке «Положение на странице» установите переключатель «С новой страницы», щелкните «ОК». После закрытия окна фрагмент съедет вниз и начнется на новом листе.
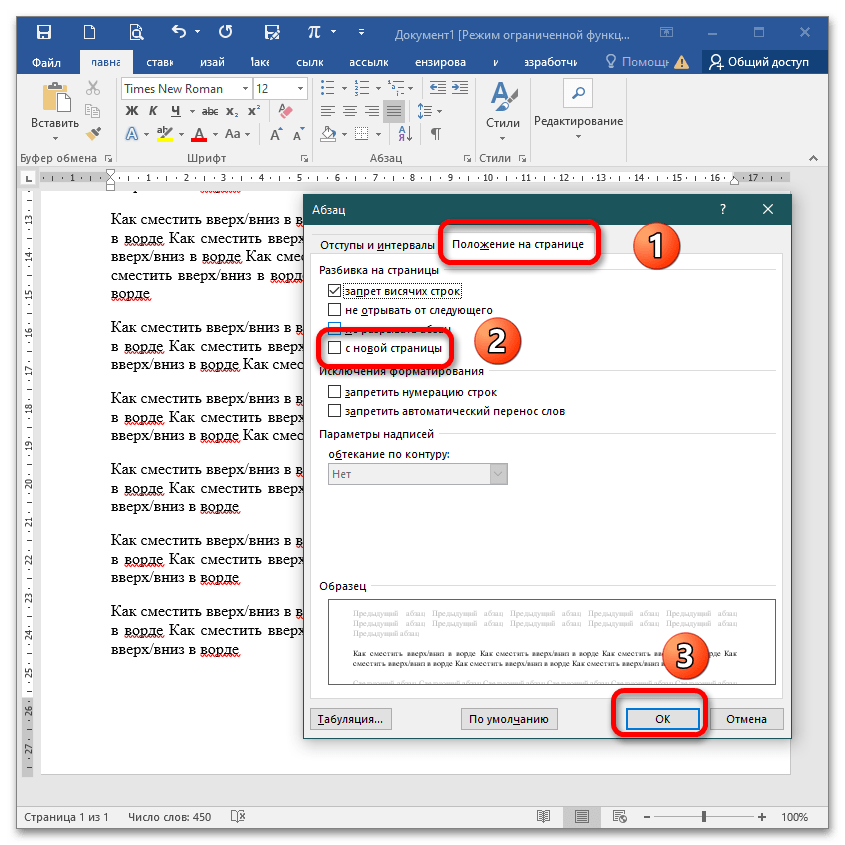
Если открыть это же окно, убрать галочку с опции «С новой страницы» и подтвердить действие, текст автоматически поднимется и встанет на свое место.
Вариант 2: Отдельные буквы
Чтобы сместить несколько букв относительно заданной плоскости:
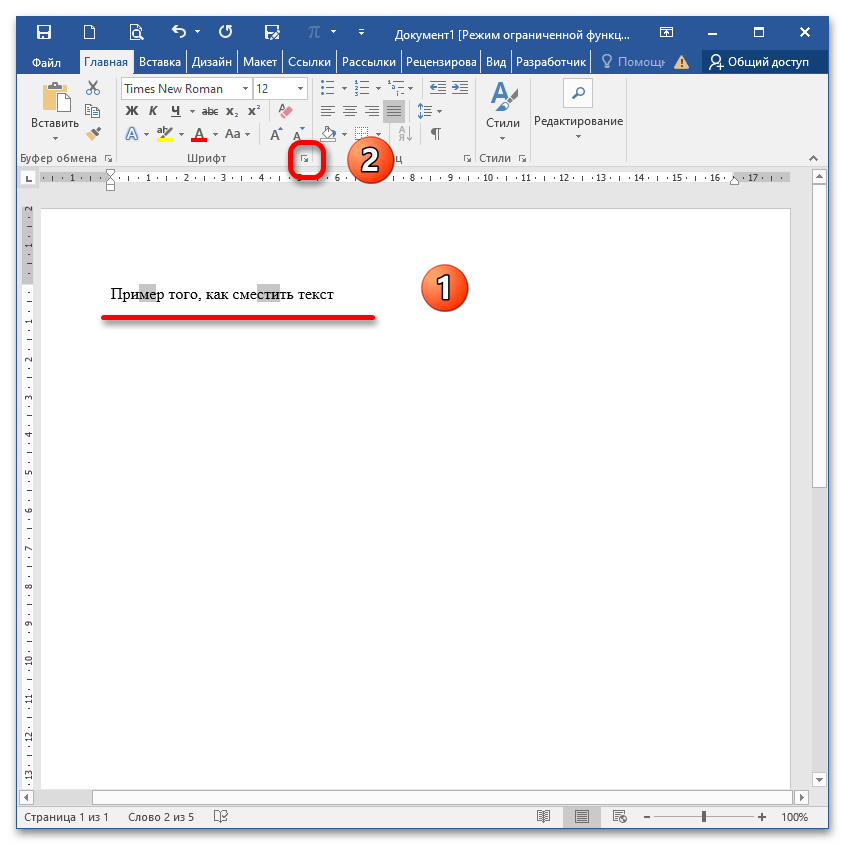
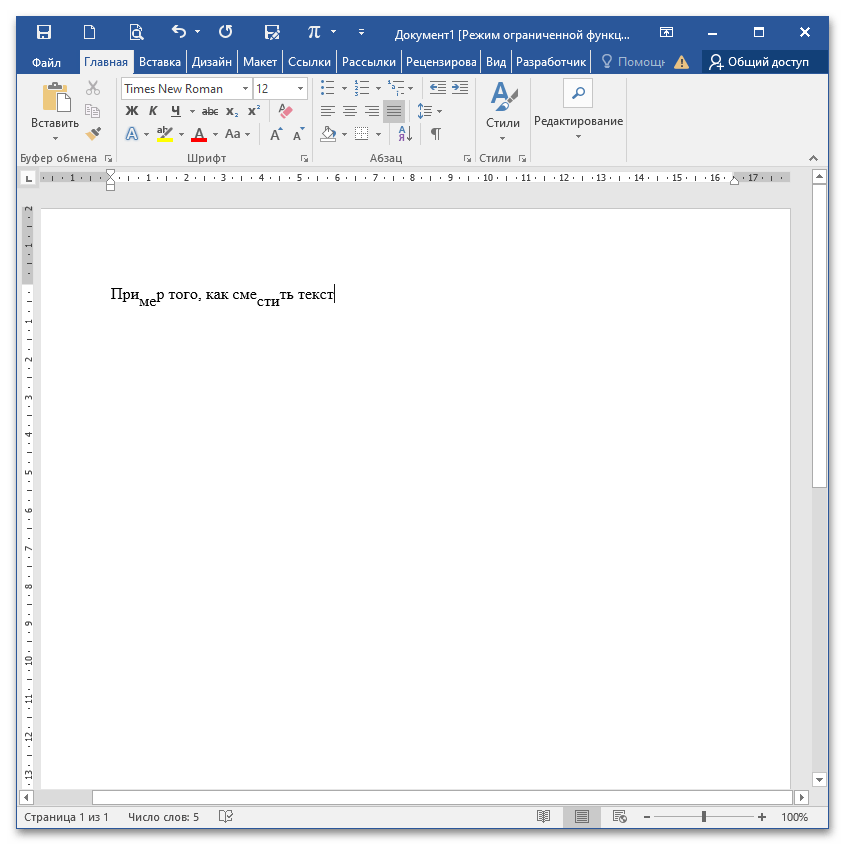
- Напишите текст или откройте документ и выберите те элементы, которые будут редактироваться. Перейдите в меню «Шрифт», кликнув на стрелку на панели инструментов.
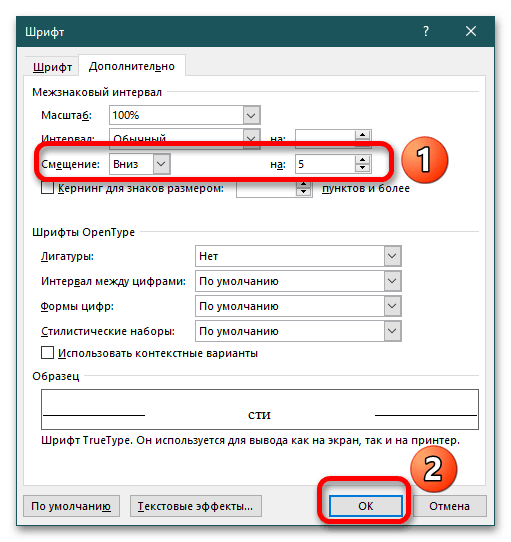
- При открытии диалогового окна раскройте вкладку «Дополнительно» и в поле «Смещение» в выпадающем списке выберите «Вверх» или «Вниз». В рядом стоящем поле «на» укажите количество пунктов, на которые выделенный фрагмент сдвинется.
- После нажатия на «ОК» буквы «сползут» вниз или поднимутся в верх.
Вариант 3: Подстрочный и надстрочный знак
Выделите фрагмент, подлежащий редактированию. На панели инструментов есть две рядом стоящие кнопки, которые располагают символы в верхнем/нижнем индексе. Нажав на них, вы преобразуете текст.
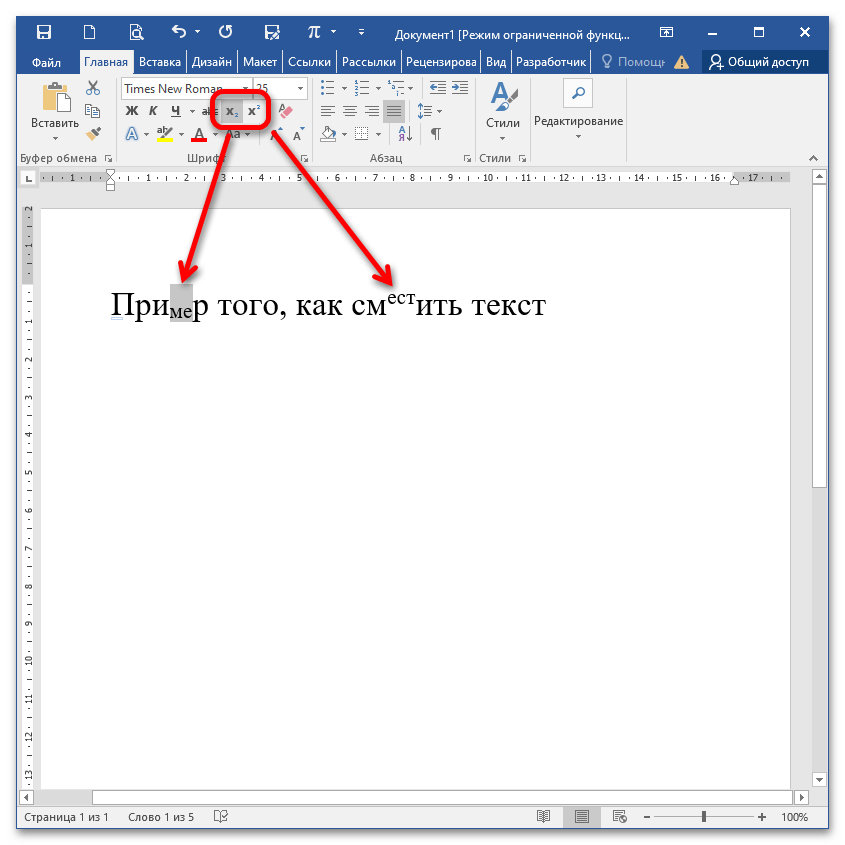
Для увеличения скорости форматирования фрагмента используйте горячие клавиши: CTRL+= (выше основной клавиатуры) для подстрочного индекса и CTRL+SHIFT+= – для надстрочного.
Подробнее: Ввод надстрочного и подстрочного индекса в Microsoft Word

Вариант 4: Надпись
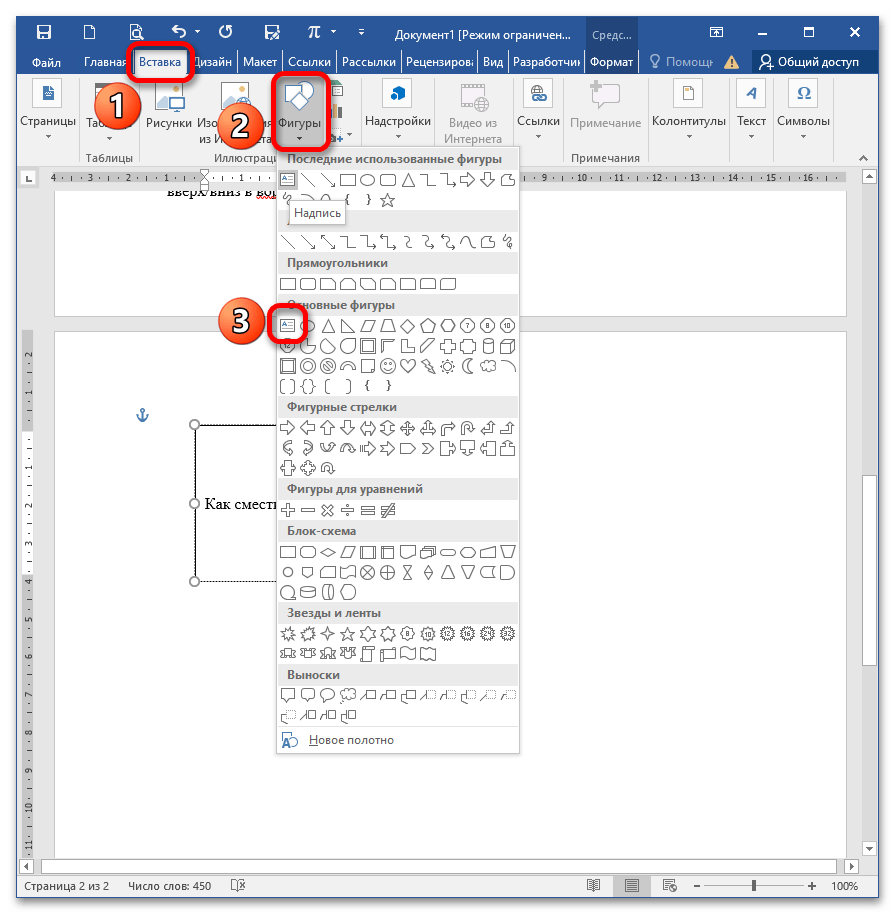
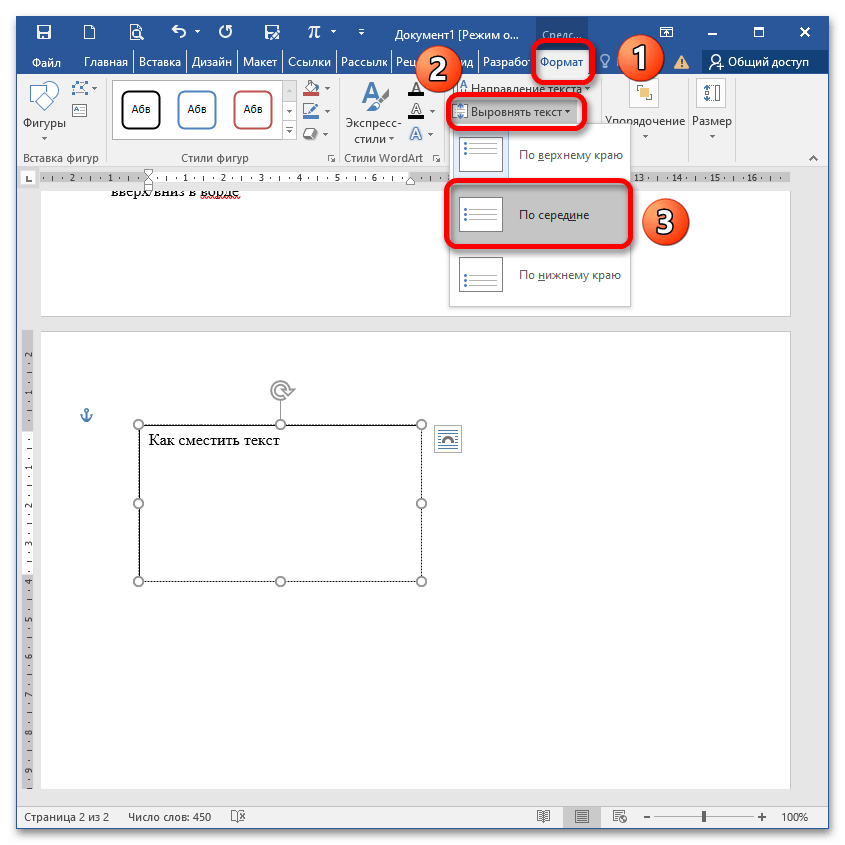
При необходимости сдвига текста в надписи перейдите в меню «Вставка» – «Фигуры» – «Надпись», начертите фигуру в положенном месте и пропишите необходимый текст.
Перейдите в меню «Формат», раскройте опцию «Выровнять текст» и выберите понравившееся положение. При этом текст не нужно выделять, написанное сдвигается «в полном составе» и выравнивается «По верхнему краю», «По середине» или «По нижнему краю».
Вариант 5: Разрывы
Чтобы сместить текст вниз до начала новой страницы, можно сделать разрыв. Перейдите во вкладку «Макет» («Разметка страницы») и выберите «Разрывы» – «Со следующей страницы».
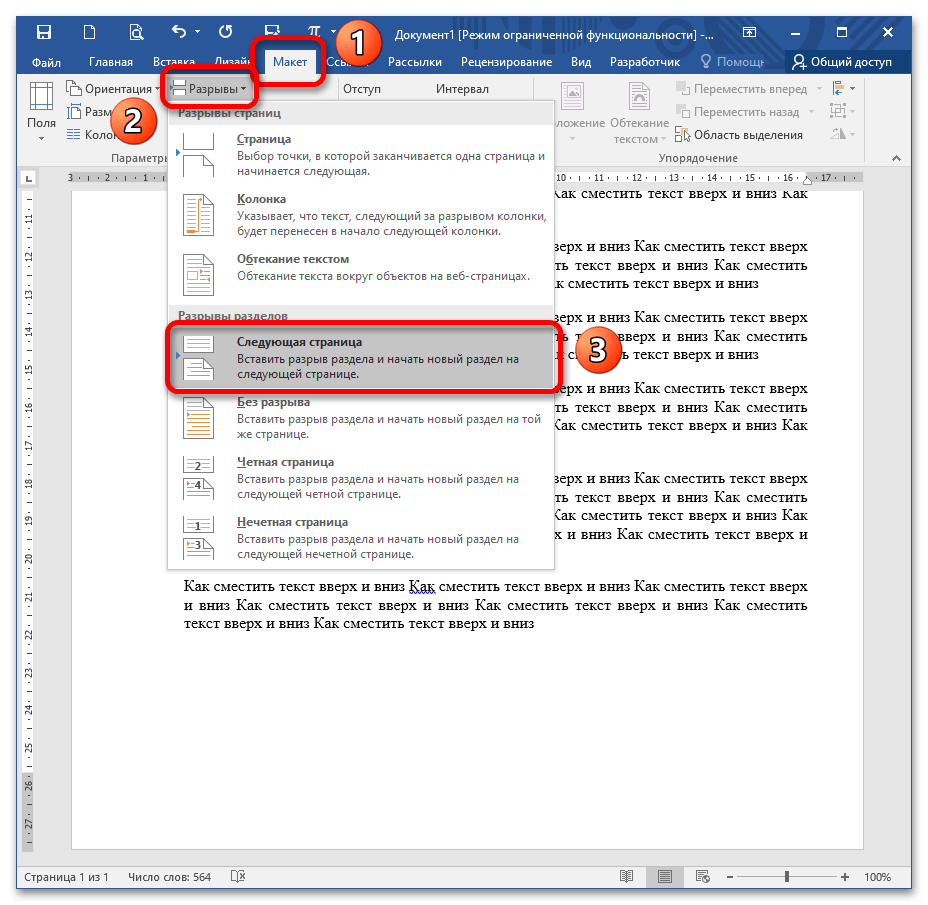
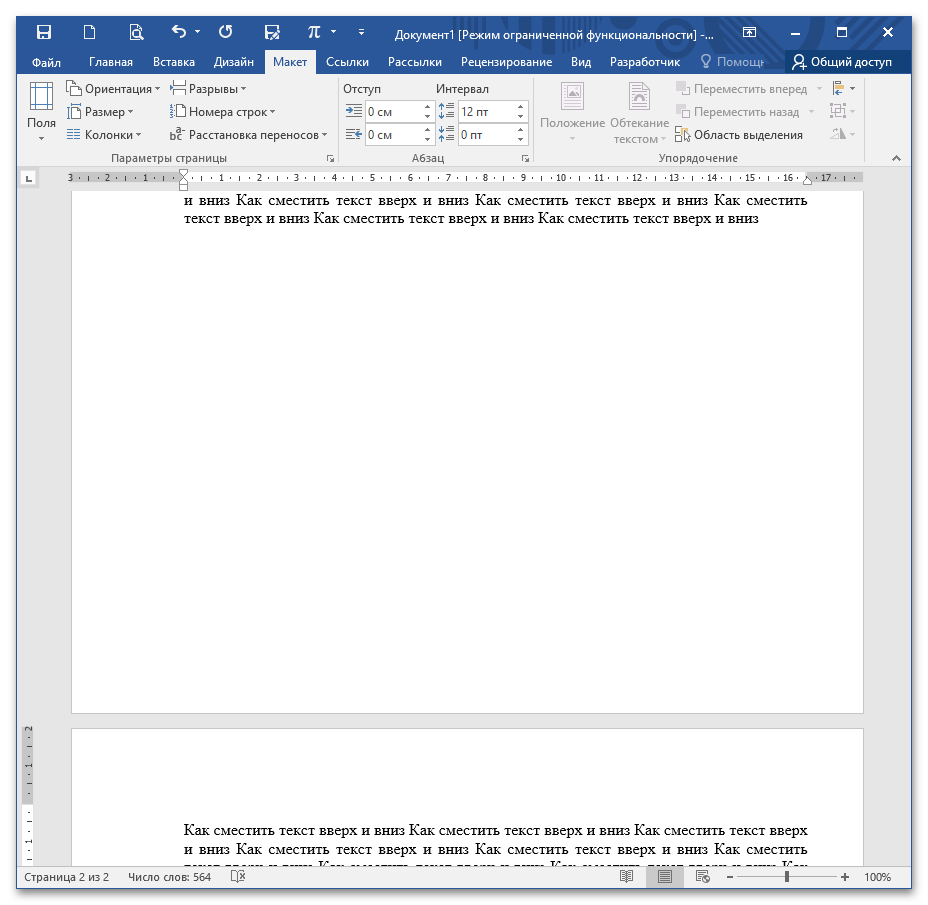
После этого вы увидите, что весь текст, расположенный за курсором «съехал» на новый лист. Если просмотреть в режиме отображения непечатных знаков (CTRL+SHIFT+8), можно увидеть, что после предыдущего абзаца отсутствуют какие-либо знаки, например, Enter.
Подробнее: Невидимые знаки форматирования в Microsoft Word
Вариант 6: Боковая линейка
Если у вас не отображается линейка, включите ее на вкладке «Вид» (установите галочку «Линейка»).
Подробнее: Включаем отображение линейки в Microsoft Word
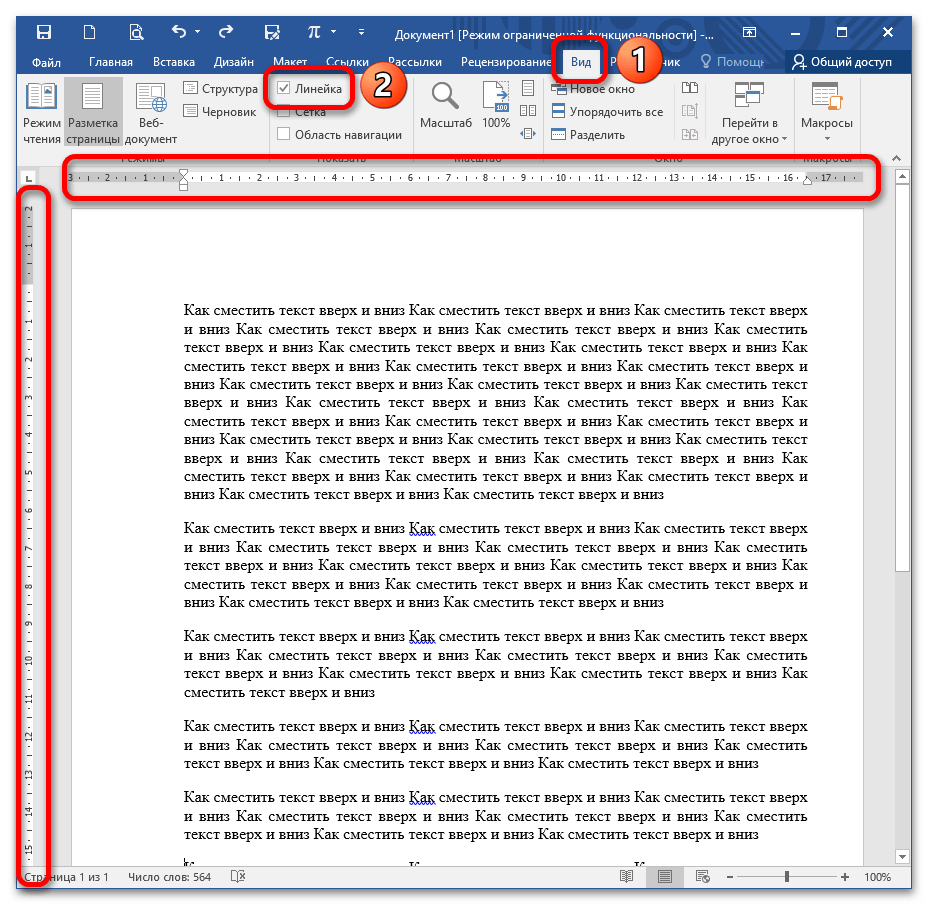
Установите курсор в тексте, наведите мышку на границу серого и белого полей слева от текста, удерживайте кнопку мыши и потяните вниз.
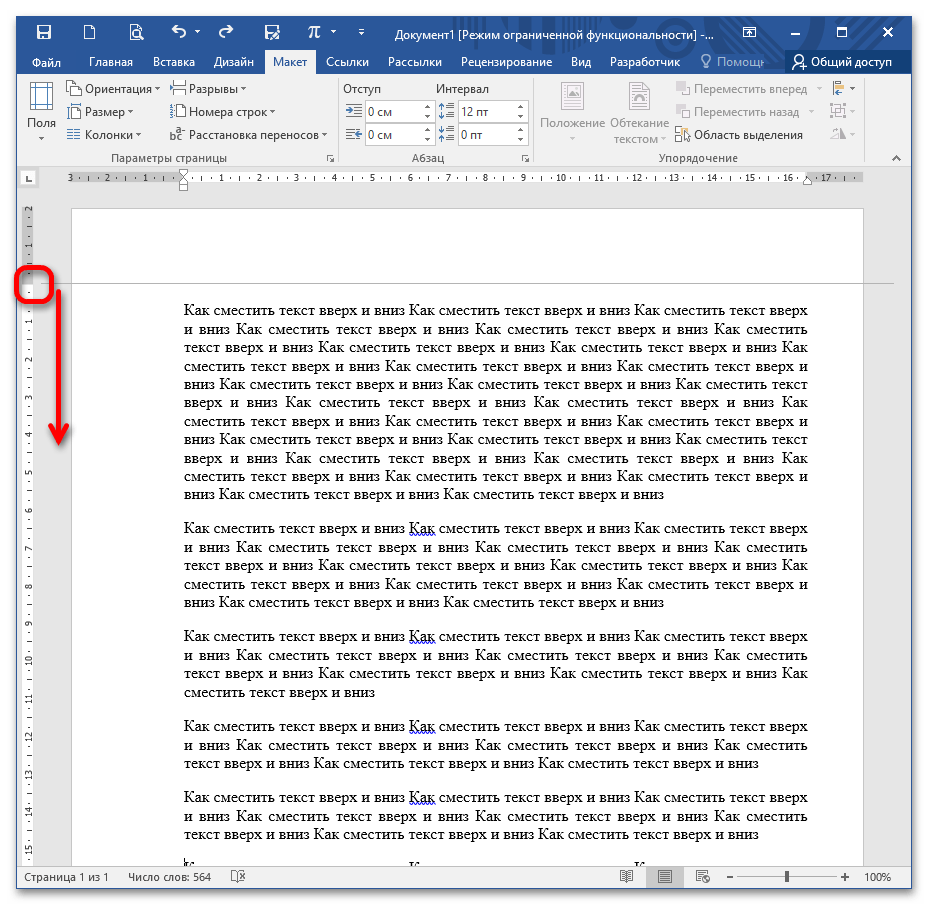
Чтобы поднять текст вверх и таким образом создать особую рабочую зону, перелистните к концу страницы и, аналогично удерживая мышку, подтяните границу вверх.

При уменьшении масштаба вы заметите, что на всех листах рабочая зона находится в указанном с помощью линейки интервале.
Подробнее: Расширяем страницу в документе Microsoft Word

Самый простой способ (однако он приводит к проблемам с форматированием) – это опускать текст с помощью клавиши Enter и поднимать вверх с помощью BackSpace.
Еще статьи по данной теме:
Помогла ли Вам статья?

Contents
- 1 How to Rotate Text in Word
- 2 How to Mirror text in Word
- 3 How to Change Text Box Border and Shadow
Whether you want to joke around with a friend or have a genuine reason, knowing how to rotate text is a useful skill. We’re going to show you how to do just that today in Microsoft Word.
We’ll also be showing you how to flip text, mirror text, and add effects to it to make it stand out more. Before we start, though, it’s worth noting that if you just want to flip text upside down, an online upside down text generator may be the fastest choice. You can simply type your message and have the changes carry over to any application.
That said, creating rotated text in Word provides some additional options and is usually the best choice if you don’t plan to take the text elsewhere.
Reasons to Flip Text, Rotate Text or Mirror Text in Word:
- Design aesthetics: Flipping text can be used to create an interesting visual effect in a design.
- Translation: Text can be flipped to change its orientation in order to support languages that are written from right-to-left.
- Technical limitations: In some cases, text might need to be flipped in order to accommodate technical limitations, such as limitations in printing or display capabilities.
- Accessibility: Flipping text can be used to make documents more accessible to individuals with visual impairments by reversing the orientation of the text.
You may have noticed that there’s no option to rotate text that you’ve typed directly into a Word document. This is because you need to create a textbox first, which will provide you with additional formatting and style options. We’ll run through the basics below.
- Create a text box
Open the “Insert” tab in your Microsoft Word ribbon and then click “Text > Text Box”. Choose one of the built-in style options from the list. We’re going to use the Simple Text Box as it’s the closest to regular text. If you don’t have any text to add to it, you can one of Word’s random text generation tools.
- How to quickly rotate text in Word
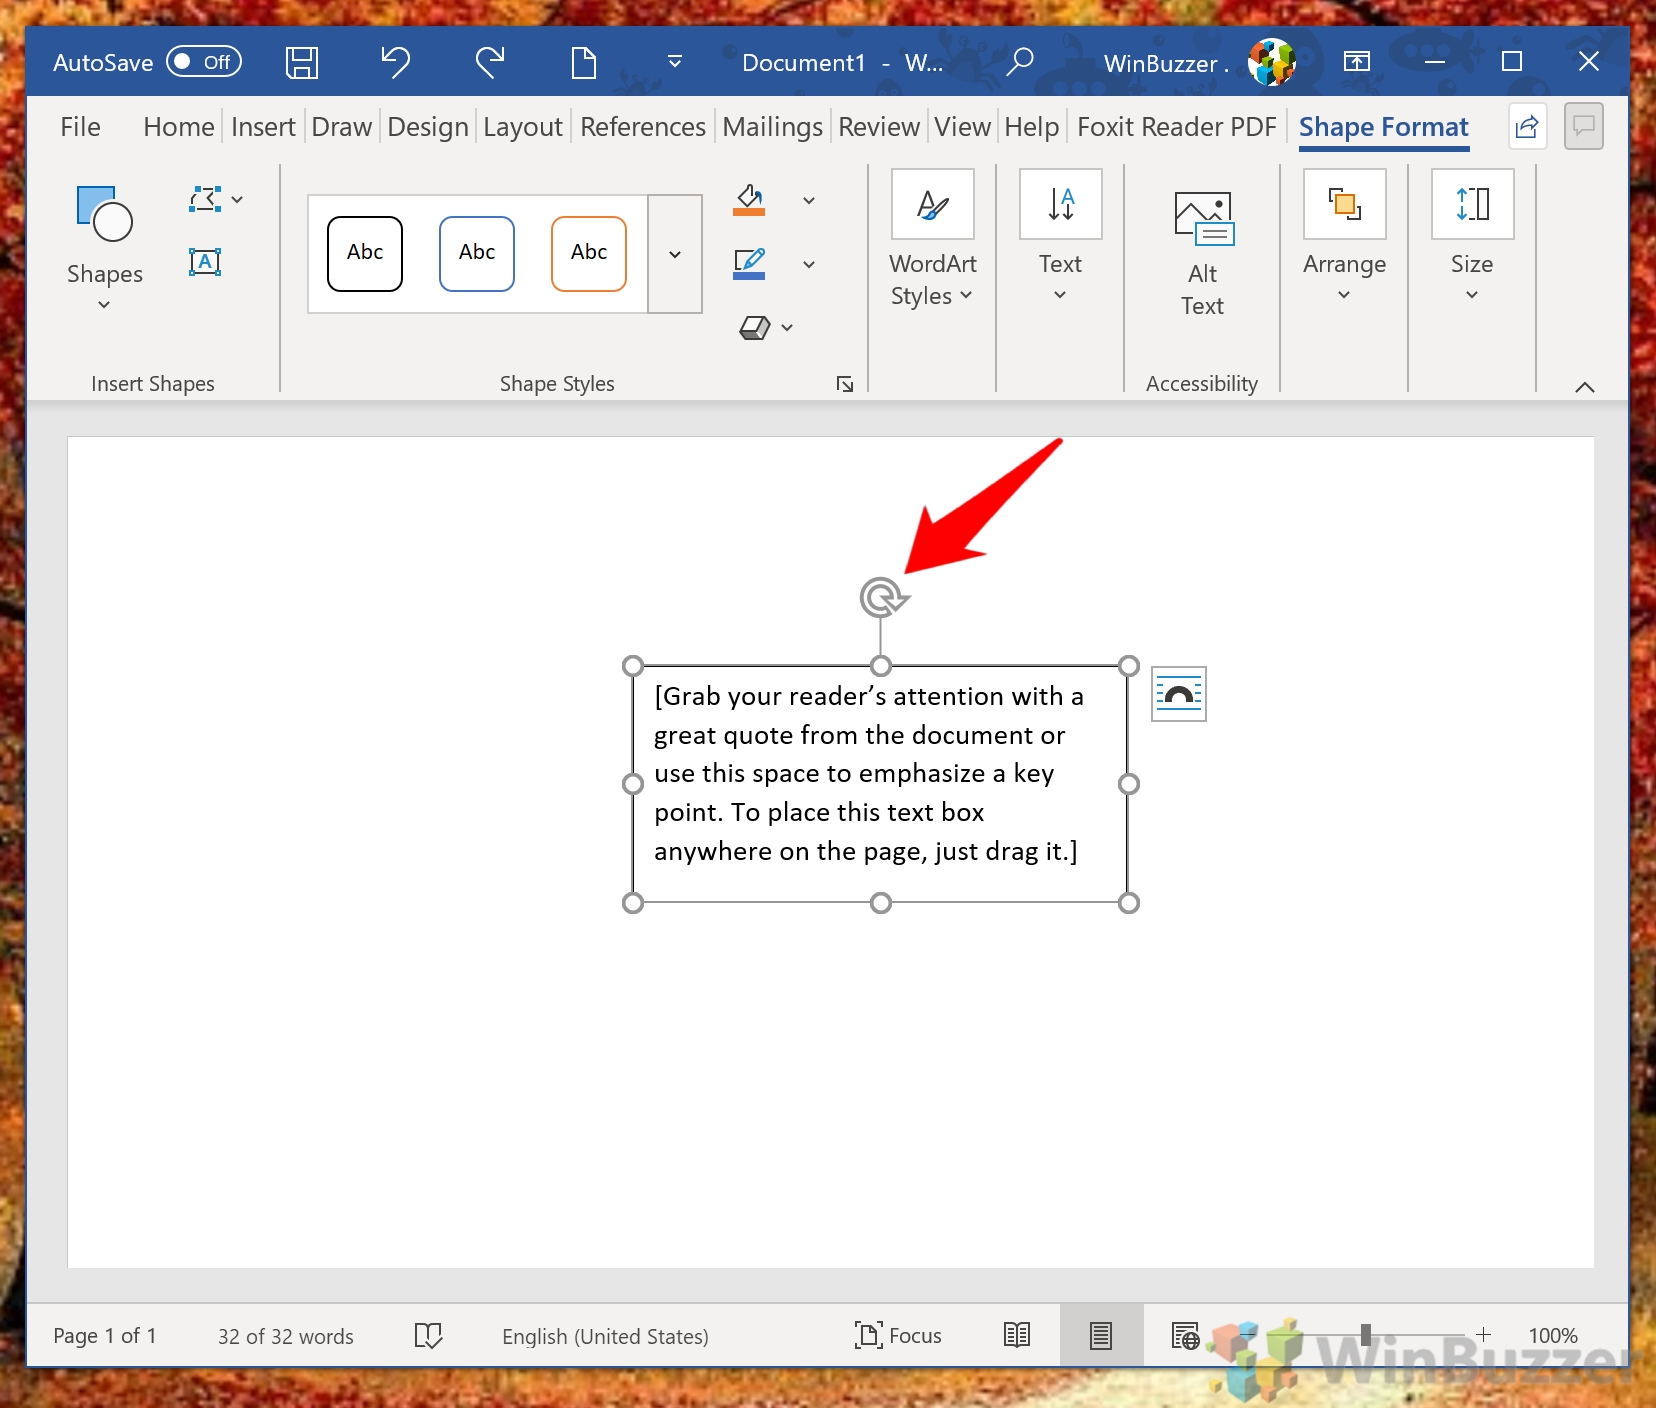
You can quickly rotate text in 90-degree increments by pressing selecting the text box and making sure “Shape Format” is the active ribbon tab. Press the right-angle triangle button at the right of the ribbon and select from one of the options to rotate words.
You can rotate right left or right, as well as use the text flipper to flip text horizontally or vertically.
- How to manually rotate a text box in Word
If you want to rotate your text box in Word to an angle that doesn’t divide by 90, you can instead use the rotation (?) icon above the box.
- Enjoy your rotated text
You may notice that your textbox has a border around it. We’ll show you how to fix that, as well as how to mirror text and apply a shadow, below.


How to Mirror text in Word
The process to mirror text in Word is a little less intuitive, but still quite simple. In a few clicks, you can mirror text in the X, Y, or Z axis. Here’s how:
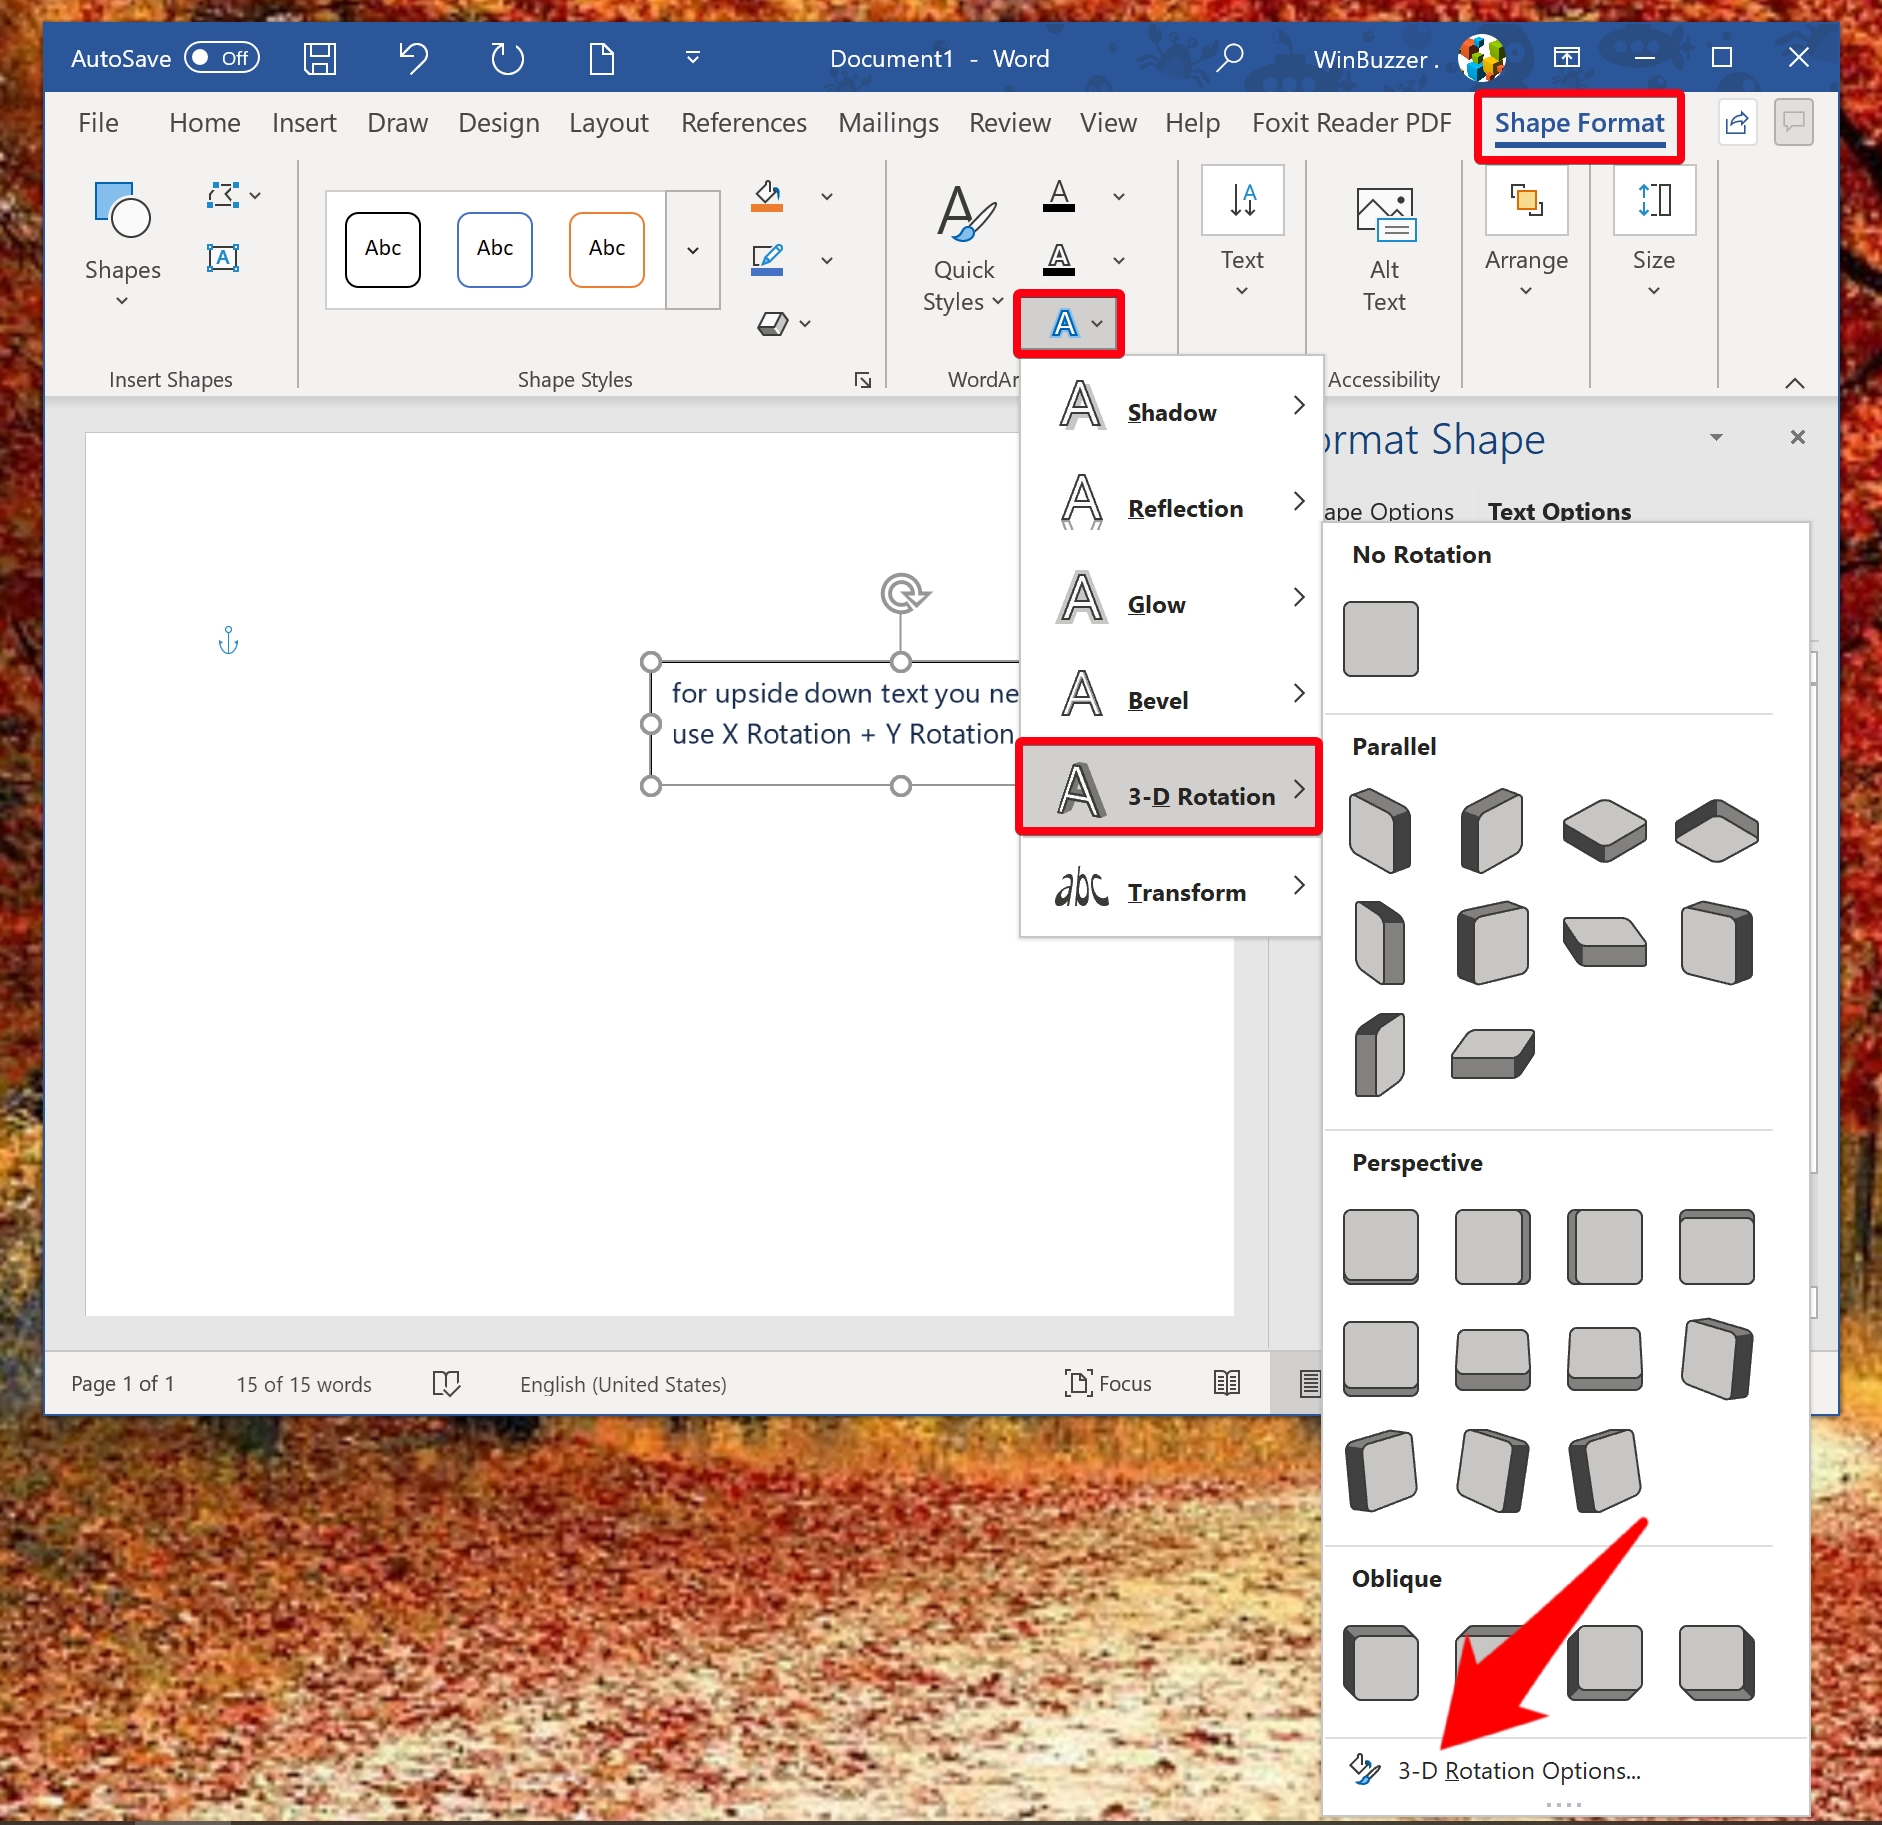
- Open 3-D rotation options
With your text box selected, open the “Shape Format” tab. Press the text effects icon, which is an A with a blue border, and then hover over “3-D Rotation”. At the bottom of the 3-D rotation window, you’ll see text that reads “3-D rotation Options…”. Click it.
- Mirror text by X, Y, or Z rotation
In the “3-D Rotation” drop-down, you can then type your mirror rotation in degrees in the X Rotation, Y Rotation, or Z Rotation boxes.
You can type 180 in the X rotation field mirror your text horizontally, in the Y rotation to mirror the text upside down, or in the Z rotation box to flip the text.
How to Change Text Box Border and Shadow
You may have noticed that your text box has a black border by default which distracts the eyes from the text itself. Word lets you remove this or even add shadow to make the text stand out more. Here’s how you can achieve the effect:
- How to remove a text box border in Microsoft Word
To remove a border in Word, click the text box and open the “Shape Format” tab. Then, click the pen icon, which should be somewhere in the middle, below the paint bucket.
This will bring up the Theme Colors menu, where you can change it to your background color or select “No Outline” to get rid of it. Of course, you can also change the color and styling options if you so wish.
- How to add shadow and other effects to a text box in Word
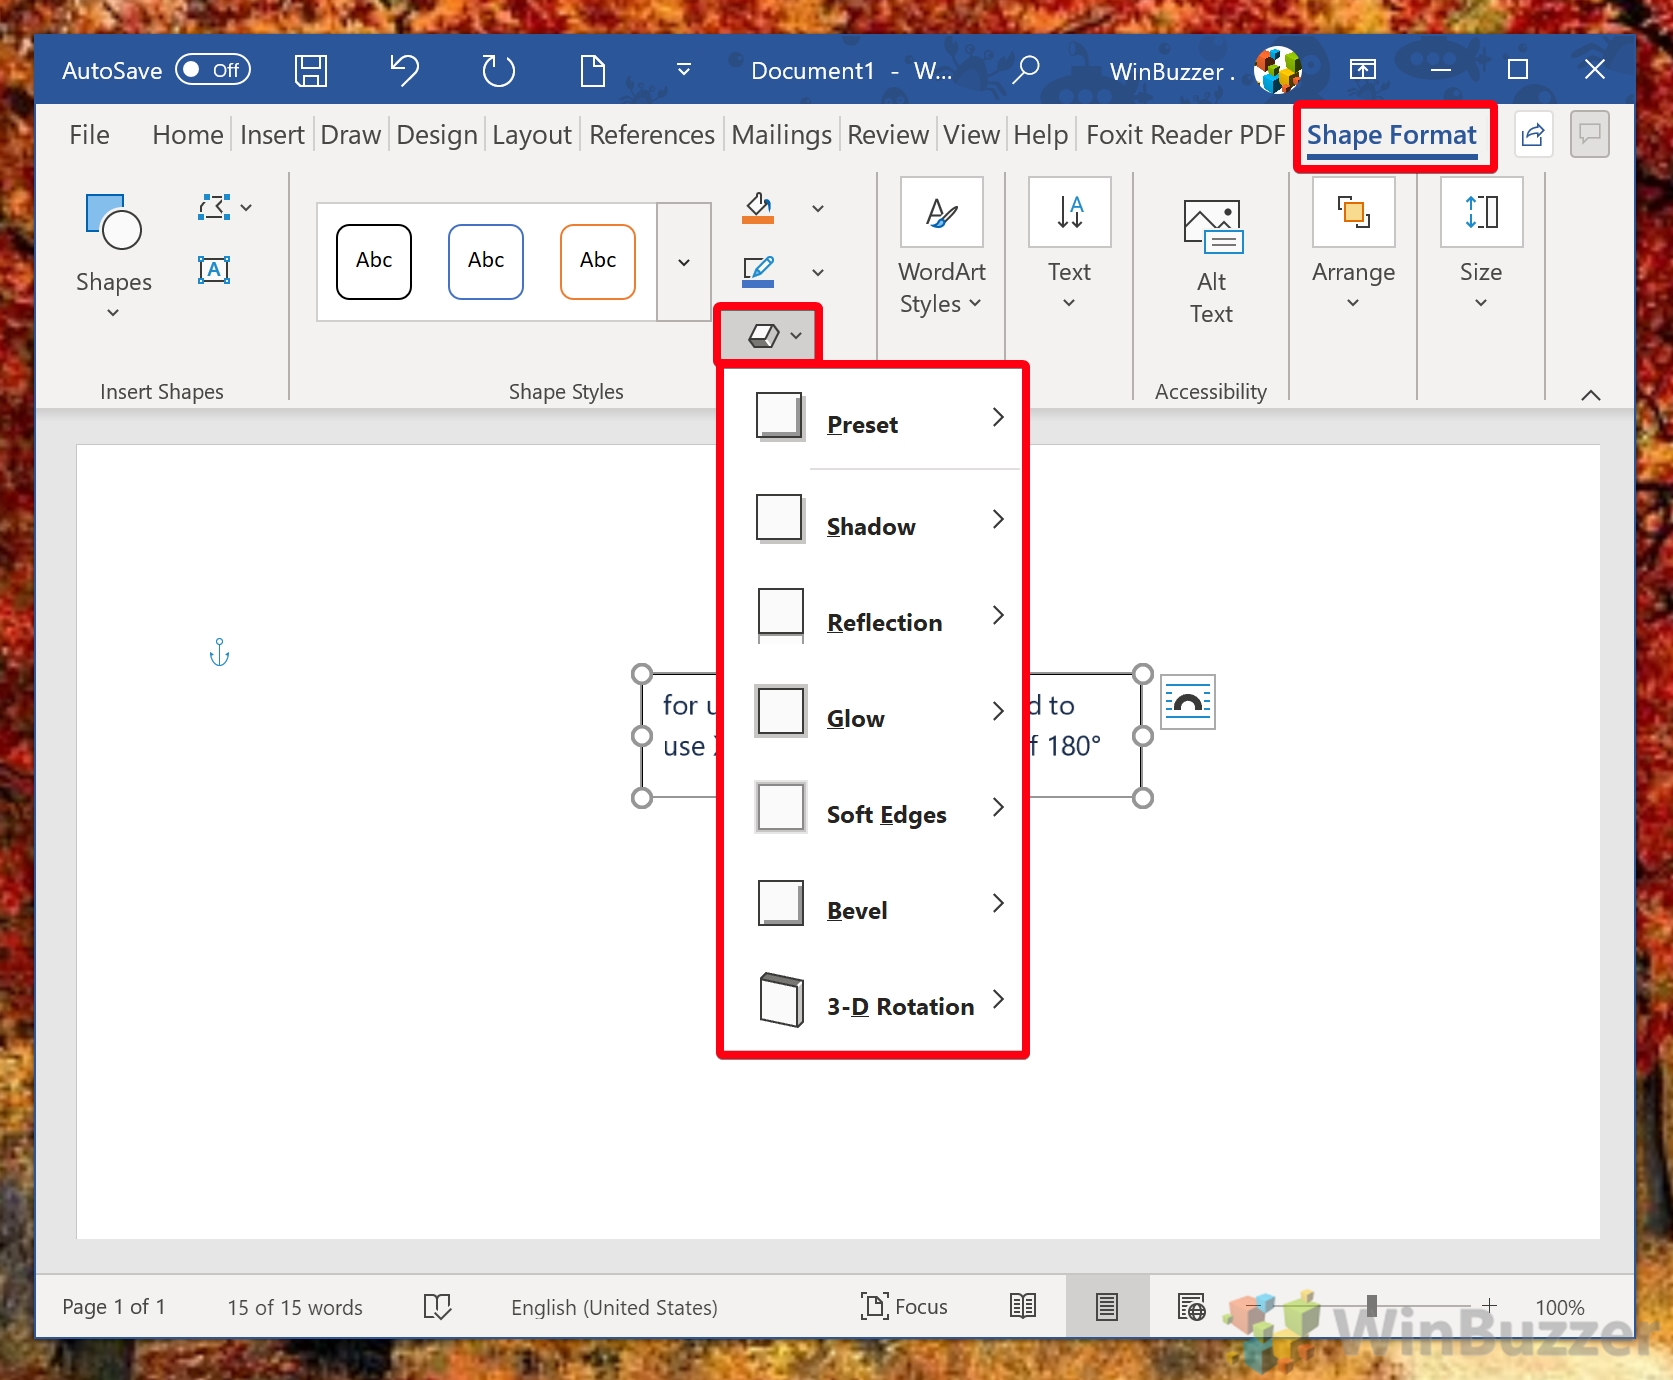
There are a few other effects you can apply to make your text box look more interesting. If you click the text box and then press the cuboid icon in the Shape Format tab, you can apply the following effects:
- Shadow
- Reflection
- Glow
- Soft Edges
- Bevel
- 3D rotation
- Select your effects and enjoy
In just a couple of seconds, you can create something that looks a lot more unique.


That wraps up this tutorial on how to rotate text in Word, but we have plenty of other Microsoft Word guides for you to try. Why not learn how to clear formatting from text or create a flowchart from scratch?
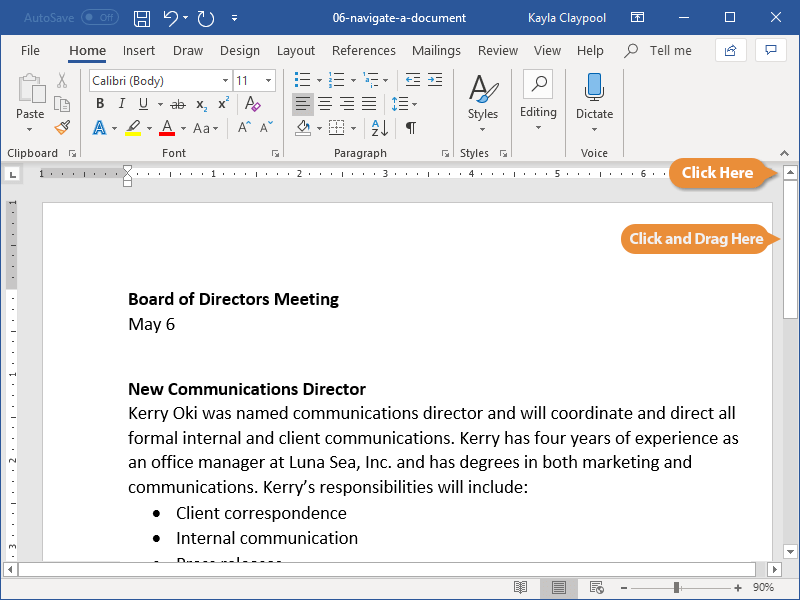
While working on a document, you’ll often need to move the text cursor around to change where you’re typing.
Move the Insertion Point
The insertion point is the blinking vertical bar that represents where text will be inserted as you type.
- Click anywhere inside the document.

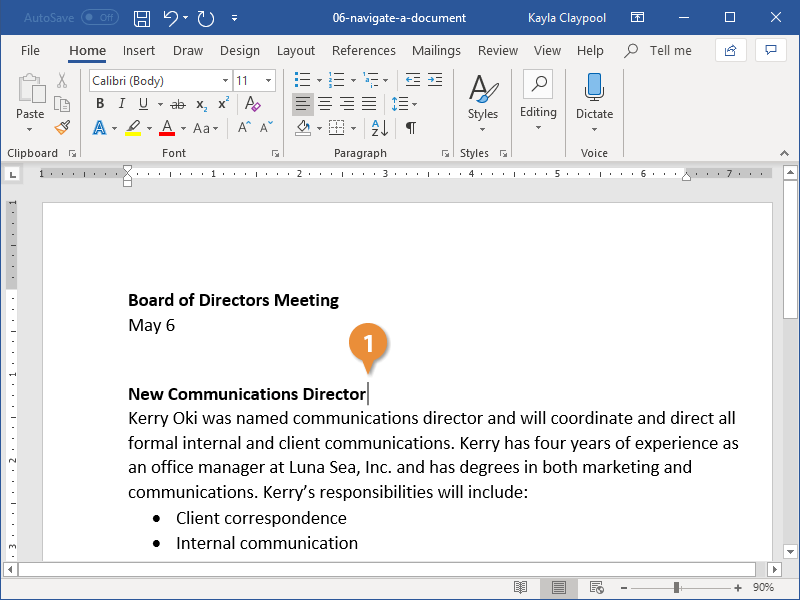
The insertion point moves to where you clicked—or, at least, as close as possible. If you click in a margin, or after the end of the text toward the bottom of the page, the insertion point moves to the closest point it can.
You can also move the insertion point around using the keyboard. This method is described in the table below.
| Press | To Move the Insertion Point |
|---|---|
| Arrows (↑ ↓ ← →) | Up or down one line; or left or right one character. |
| Home | To the beginning of the current line. |
| End | To the end of the current line. |
| Page Up | Up one screen, while also scrolling the page the same distance. |
| Page Down | Down one screen, while also scrolling the page the same distance. |
| Ctrl + Arrows (↑ ↓ ← →) | Up or down one paragraph; or left or right one word. |
| Ctrl + Home | To the beginning of the document. |
| Ctrl + End | To the end of the document. |
Scroll in a Document
When a document gets long enough, it can be tough to navigate through the whole thing with just the keyboard. You can use the scroll bars on the right and bottom sides of the window to move through the document quickly.
- Click the arrow buttons at the top, bottom, and sides of the scroll bar to scroll one line at a time.
- Click and drag a scroll bar to move quickly though a document, releasing it when you’ve reached the page you want.
Use the Navigation Pane
If you have a longer document with multiple pages, or you’ve set up your document into sections with headings, you can use the Navigation Pane to move quickly through sections and pages.
- Click the View tab on the ribbon.
- Select the Navigation Pane checkbox in the Show group.
The Navigation Pane appears on the left side of the screen, showing headings used in the document. Clicking one will jump to that heading.
- Click Pages.
The Navigation Pane now shows every page in the document, represented by a thumbnail.
- Click a page in the Navigation Pane.
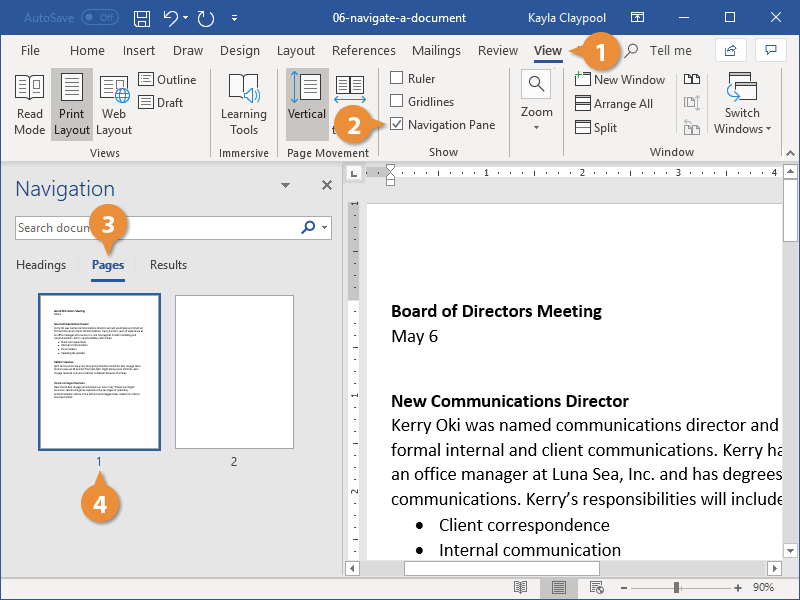
Word navigates right to the selected page.

FREE Quick Reference
Click to Download
Free to distribute with our compliments; we hope you will consider our paid training.
Let’s say I have the word cake and I want to move the «a» higher and the «e» lower (about 1pt each).
Is there any way to shift them up and down without messing with the paragraph settings (which changes the rules whole line)? I remember I had a macro on my Word 2003 which did just that, but I can’t seem to find it.
asked Oct 14, 2016 at 19:26
![]()
Yes. Select «a», then press Ctrl+D (Font dialog box) and go to Advanced tab. Then change Position to Raised (or Lowered) and set appropriate point size.
answered Oct 14, 2016 at 21:36
![]()
endrjuendrju
1,1429 silver badges9 bronze badges