
On the Format menu, click Font. In the Underline style box, select the line style you want, and then click OK. For every blank space you want to underline, press CTRL+SHIFT+SPACEBAR.
Contents
- 1 How do I put text under a line in Word?
- 2 How do you type below a line?
- 3 How do you write under a word in Word?
- 4 How do I insert a fill in the blank line in Word?
- 5 How do you put a line above text in Word?
- 6 How do you write 1st 2nd 3rd in Word?
- 7 How do I type above and below arrow in Word?
- 8 How do you put a line through text?
- 9 How do you type a sub letter?
- 10 What is correct 4rth or 4th?
- 11 How do you write 45 in words?
- 12 How do you write 100th in words?
- 13 How do you type a small 2?
- 14 How do you write ND?
- 15 How do you type a third in Word?
- 16 How do you make an under Arrow in Word?
How do I put text under a line in Word?
Select the text that you want to underline. Go to Home > Underline. Or press Ctrl+U.
How do you type below a line?
Hold the “Ctrl” key and press “U” to put a line under the letter.
Use keyboard shortcuts to apply superscript or subscript
- Select the text or number that you want.
- For superscript, press Ctrl, Shift, and the Plus sign (+) at the same time. For subscript, press Ctrl and the Equal sign (=) at the same time. (Do not press Shift.)
How do I insert a fill in the blank line in Word?
Click the “Insert” tab, then click the “Shapes” button. Click the basic Line shape. When the cursor changes to a plus sign, hold down the “Ctrl” key to give you a straight drawing line, and drag the cursor to the right of the text you just typed, giving your form recipients a place to write.
How do you put a line above text in Word?
Type the text you want to overline into your Word document and make sure the “Home” tab is active on the ribbon bar. Click the down arrow on the “Borders” button in the “Paragraph” section of the “Home” tab. Select “Top Border” from the drop-down menu.
How do you write 1st 2nd 3rd in Word?
When expressed as figures, the last two letters of the written word are added to the ordinal number:
- first = 1st.
- second = 2nd.
- third = 3rd.
- fourth = 4th.
- twenty-sixth = 26th.
- hundred and first = 101st.
How do I type above and below arrow in Word?
Choose the “Scribble” tool, which looks like a squiggly line. When the cursor changes to a plus sign, click inside the text box above the line, press and hold down the left mouse button and draw what you want to write. Release the left mouse button when the word is complete.
How do you put a line through text?
When you have your text selected, look on the “Home” tab of Word’s Ribbon. In the “Font” group, click the Strikethrough button (it’s the three letters with a line drawn through them). Now, any text you had selected should be struck through. You can also apply strikethrough formatting using the Font window.
How do you type a sub letter?
Click the “Subscript” button in the Font group on the Home tab to make the letters subscript. Press the “Superscript” button to make them superscript. Alternatively, use the “Ctrl-=” or “Ctrl-Shift-=” keyboard shortcuts for subscript or superscript respectively.
What is correct 4rth or 4th?
second – last two letters are ‘nd’ put after 2 = 2nd. third – last two letters are ‘rd’ so put after 3 = 3rd. 4th – last two letters are ‘th’ so put after 4 = 4th.
How do you write 45 in words?
45 in words is written as Forty Five.
How do you write 100th in words?
The ordinal number 100 is written as “one hundredth”, but sometimes people say “the hundredth”. To write a number from 100 to 999: First write how many hundreds. If nothing is left over, write the word “hundredth”.
How do you type a small 2?
Hold down Alt and key in 0178 and let go of Alt. A superscript 2 will appear. Incidentally, if you needed ‘cubed’ instead of ‘squared’ then type 0179 and you’ll get a superscript 3. In fact, this will work anywhere in Windows or online – even in Word.
How do you write ND?
Here are a few guidelines for determining which suffix to add to a number.
- When a number ends with 1, the suffix at the end is -st.
- When a number ends with 2, the suffix at the end is -nd.
- When a number ends with 3, the suffix at the end is -rd.
How do you type a third in Word?
Some fractions (1/4, 1/2, and 3/4) automatically switch to a fraction character when you type them (¼, ½, ¾). But others do not (1/3, 2/3, 1/5, etc.). To switch to a fraction character, click Insert > Symbols > More Symbols. In the Subset drop-down list, click Number Forms and select a fraction.
How do you make an under Arrow in Word?
Then type above . Then when you press the space bar, the equation editor will give you the space to write on above the arrow. Similarly, when you type below followed by a press on the space bar, you will find the slot to write under the arrow.
Содержание
- Способ 1: Инструменты форматирования
- Способ 2: Таблица
- Способ 3: Вставка текстового поля
- Способ 4: Фигуры
- Вопросы и ответы

Важно! Все представленные в статье действия будут выполняться в Microsoft Word 2021 года, но изложенный материал применим и к остальным версиям текстового процессора. Основные различная будут заключаться только в графическом оформлении и названиях некоторых элементов интерфейса.
Способ 1: Инструменты форматирования
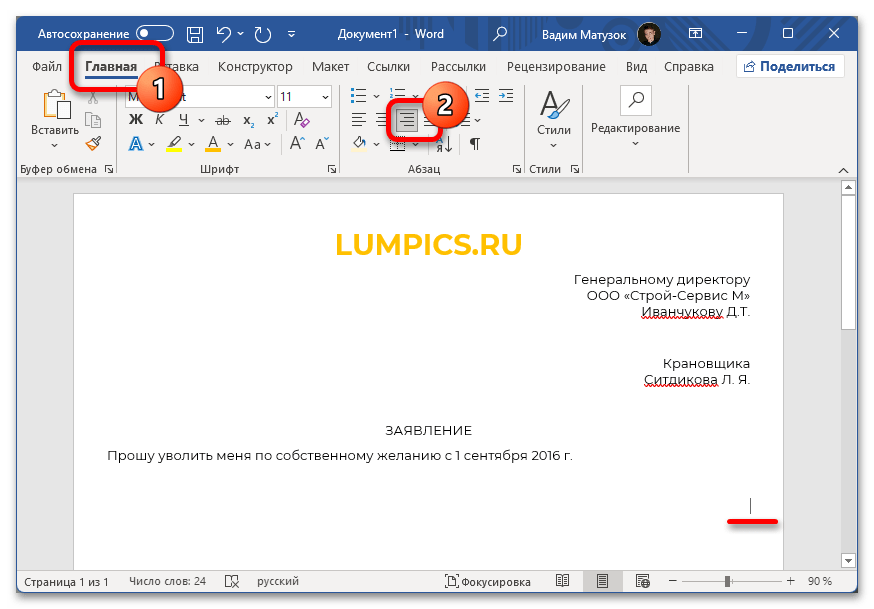
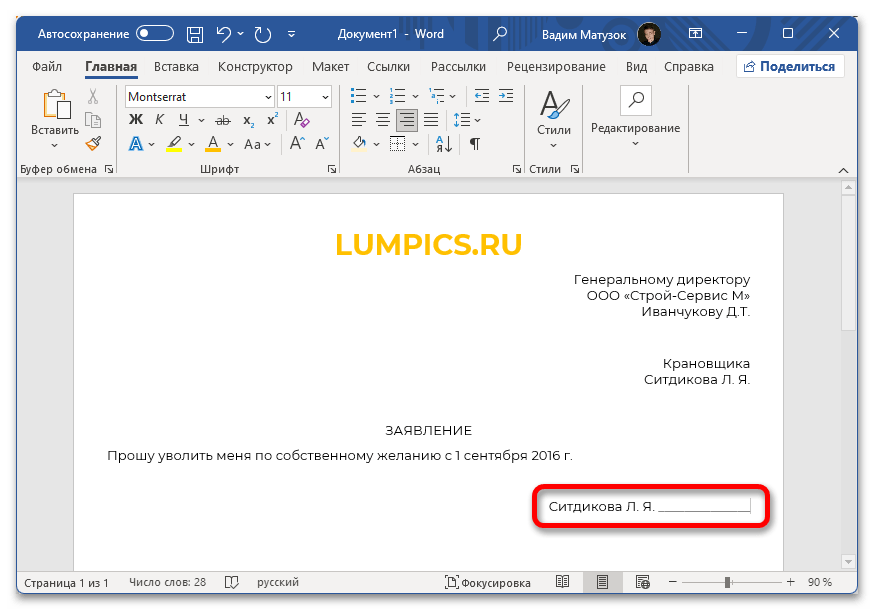
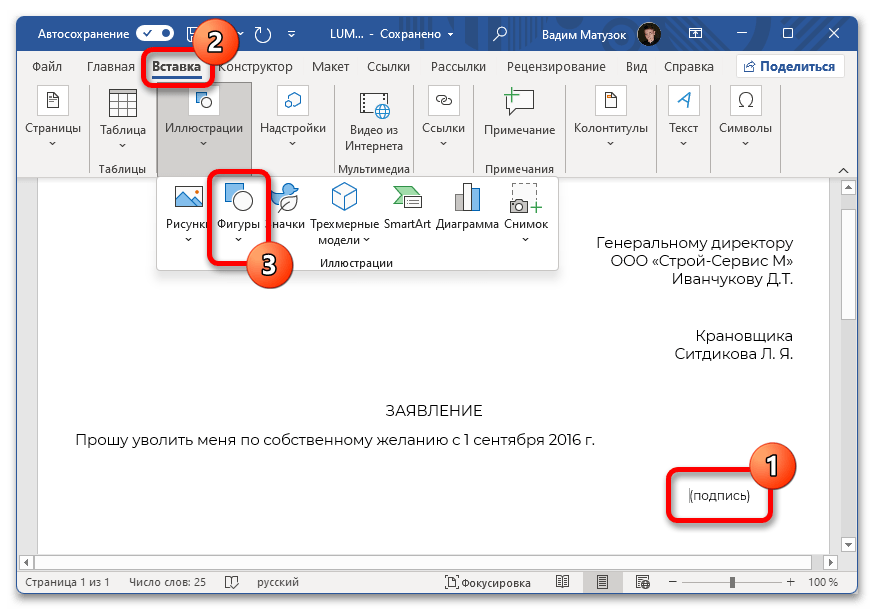
Создание надписи под чертой в Microsoft Word зачастую требуется в случае составления делового документа, в котором необходимо делать поля для подписи. Подстрочный текст в таком случае выступает в качестве пояснения, что именно необходимо указывать в пропусках. В качестве примера будет рассмотрено заявление об увольнении по собственному желанию, в котором потребуется создать графу для подписи.
Чтобы добиться поставленного результата, установите курсор в необходимое место и выполните следующую последовательность действий:
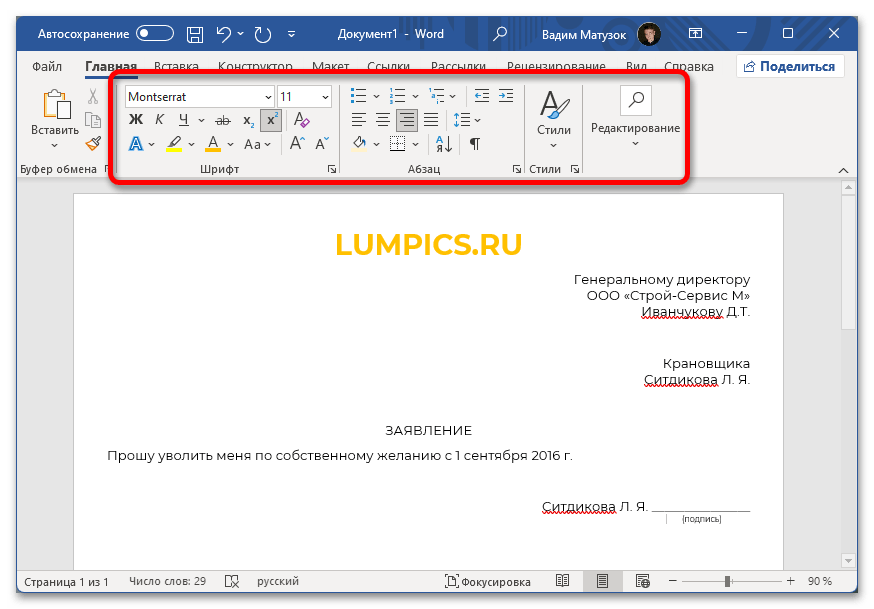
- Выровняйте текст по правой стороне, кликнув по соответствующей опции на панели инструментов. Делается это на вкладке «Главная».
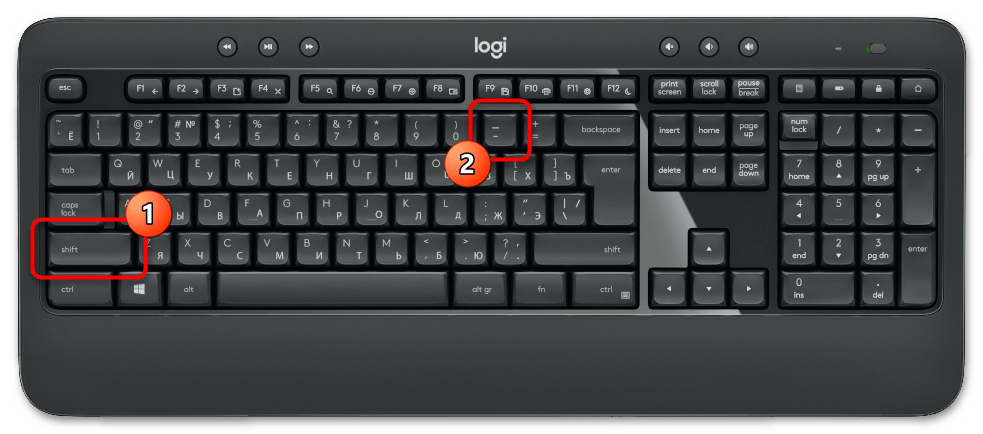
- Впишите достаточное количество символов нижнего подчеркивания, чтобы создать горизонтальную черту. Для этого зажмите на клавиатуре Shift и нажимайте по клавише, месторасположение которой отмечено цифрой 2 на изображении ниже.
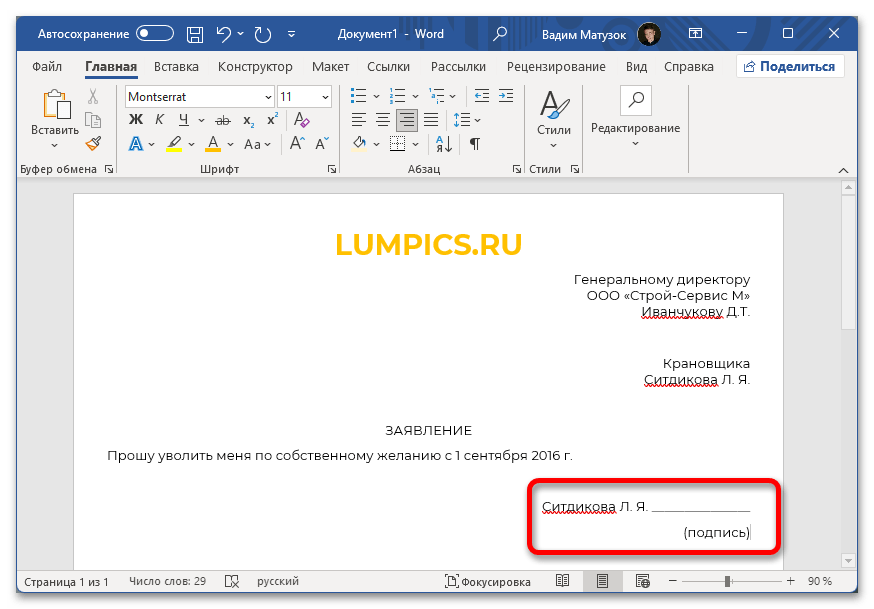
- Перейдите на следующую строку с помощью Enter и напишите желаемый текст. В этом примере будет фигурировать слово «Подпись».
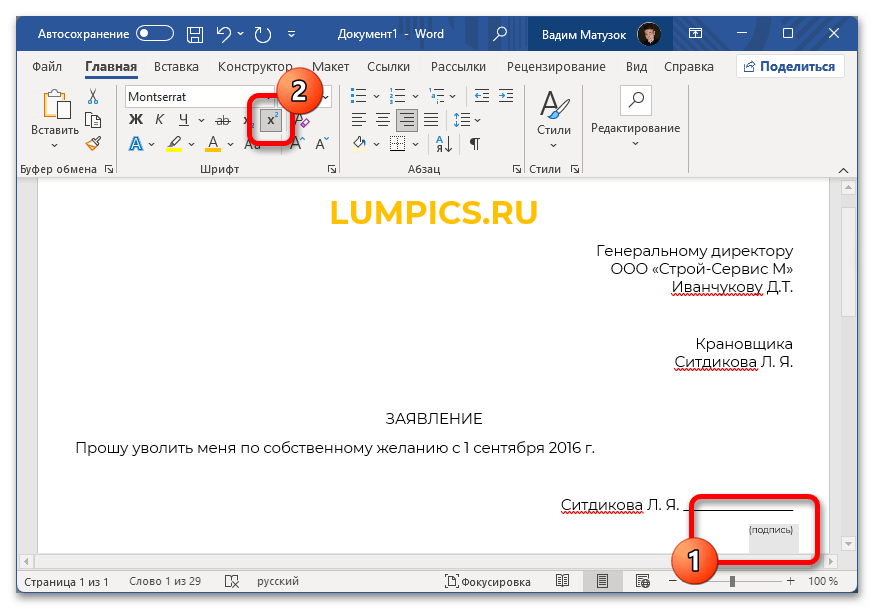
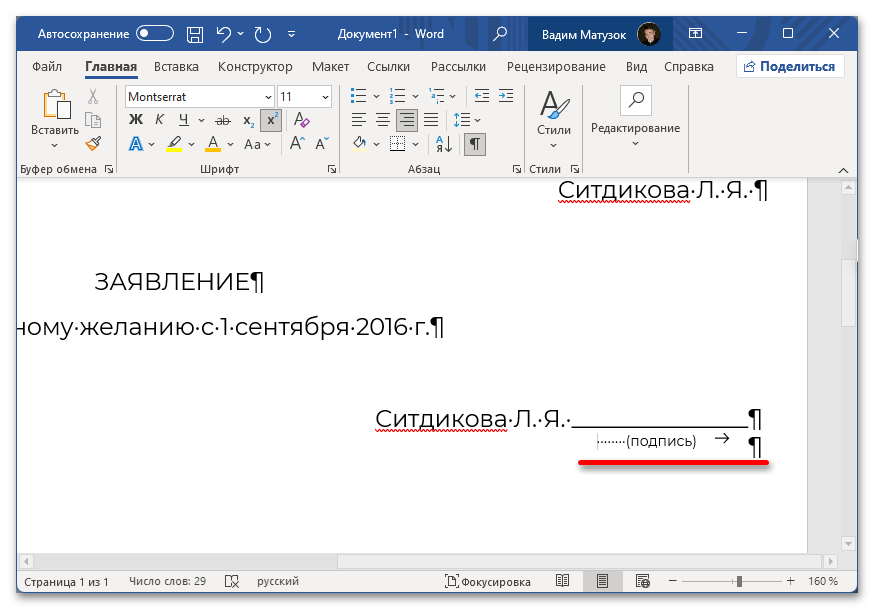
- Зажав левую кнопку мыши, выделите строку. Примените надстрочное форматирование, чтобы расположить текст ближе к ранее созданной черте.
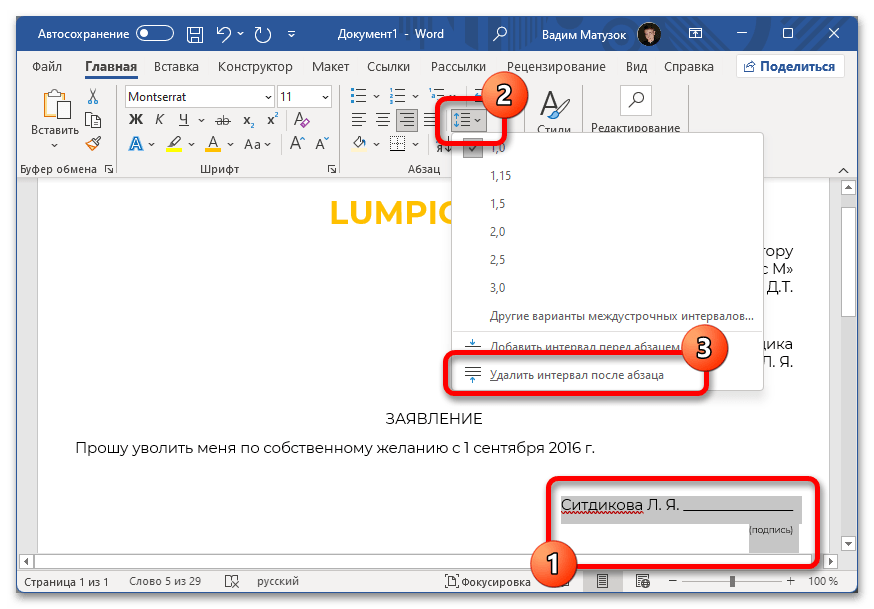
- Измените междустрочный интервал двух последних абзацев. Для этого выделите их и на панели инструментов раскройте меню соответствующей опции. Из выпадающего списка выберите пункт «Удалить интервал после абзаца».
- Установите курсор после слова «подпись» и поставьте знак табуляции, нажав по клавише Tab. После этого расположите указатель перед строкой и начните вводить символы пробела, пока надпись не будет расположена по центру линии. Для наглядности на изображении ниже в программе включен режим отображения невидимых знаков.
Представленный метод создания надписи под линией предполагает использование множества инструментов форматирования. Если в процессе выполнения инструкции появились сложности, рекомендуется ознакомиться с другим материалом на нашем сайте, в котором подробно рассмотрены все использующиеся функции.
Подробнее: Форматирование текста в документе Microsoft Word
Способ 2: Таблица
Надпись под чертой в Microsoft Word можно сделать посредством таблицы. Для этого потребуется создать соответствующий объект и выполнить его форматирование.
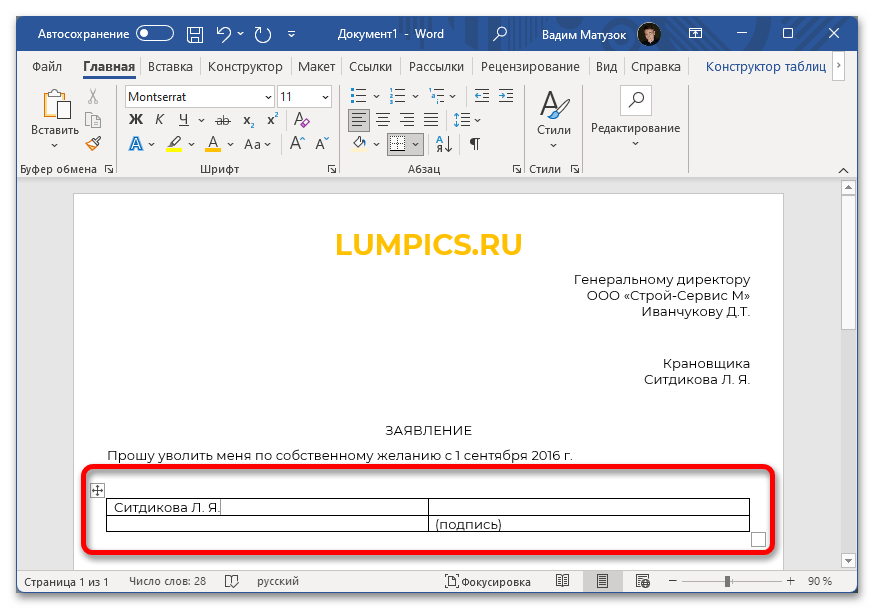
- Установите курсор в том месте, где необходимо создать поле для подписи. Перейдите на вкладку «Вставка» и на панели инструментов раскройте меню пункта «Таблица». Добавьте на страницу объект размером 2×2.
Подробнее: Как сделать таблицу в Microsoft Word
- В верхней левой ячейке при необходимости впишите дополнительную информацию. В нижней правой области введите текст, который будет расположен под линией.
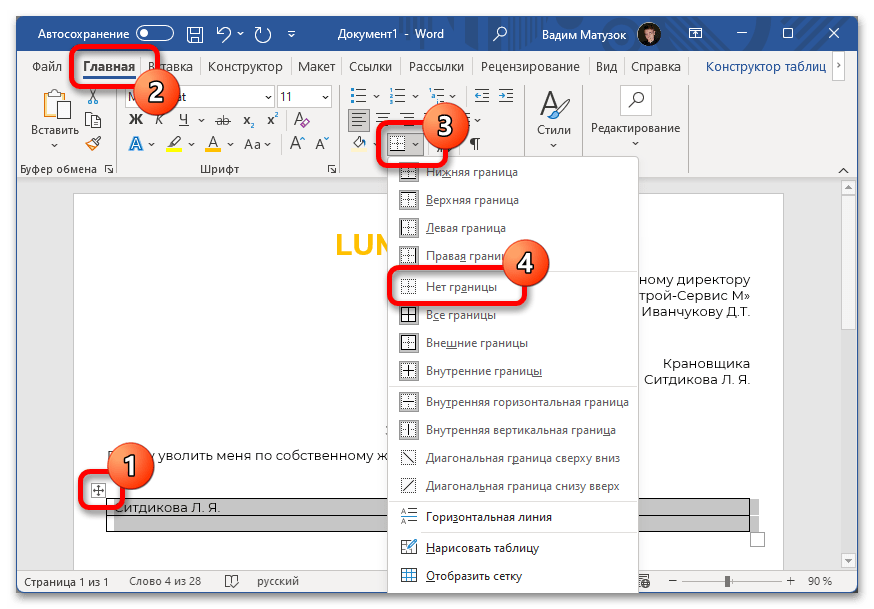
- Кликнув по крестику в верхнем левом углу, выделите всю таблицу и уберите ее границы. Для этого на вкладке «Главная» раскройте меню инструмента «Границы» и выберите пункт «Нет границ».
Подробнее: Как убрать границы таблицы в Word
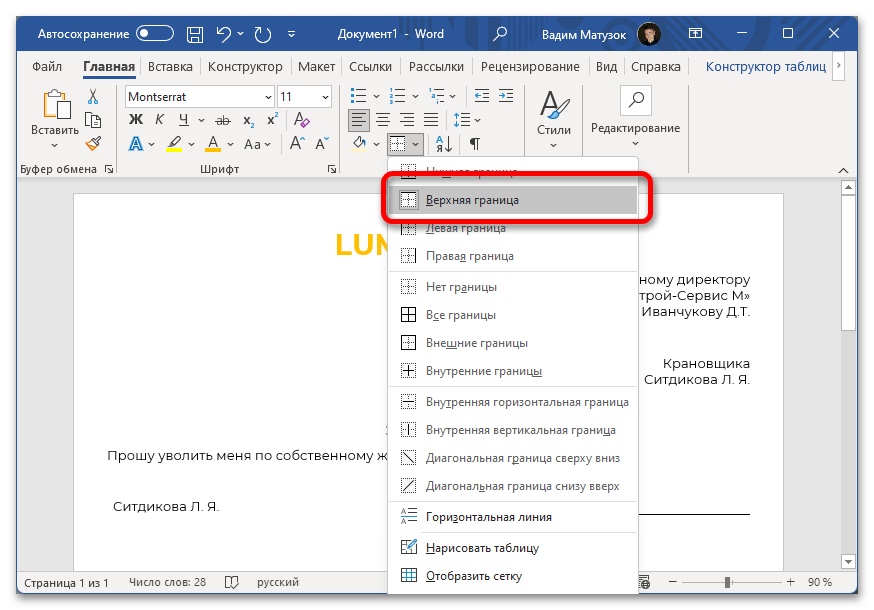
- Выделите ячейку с текстом, который будет находиться под чертой, и посредством только что рассмотренного инструмента добавьте верхнюю границу.
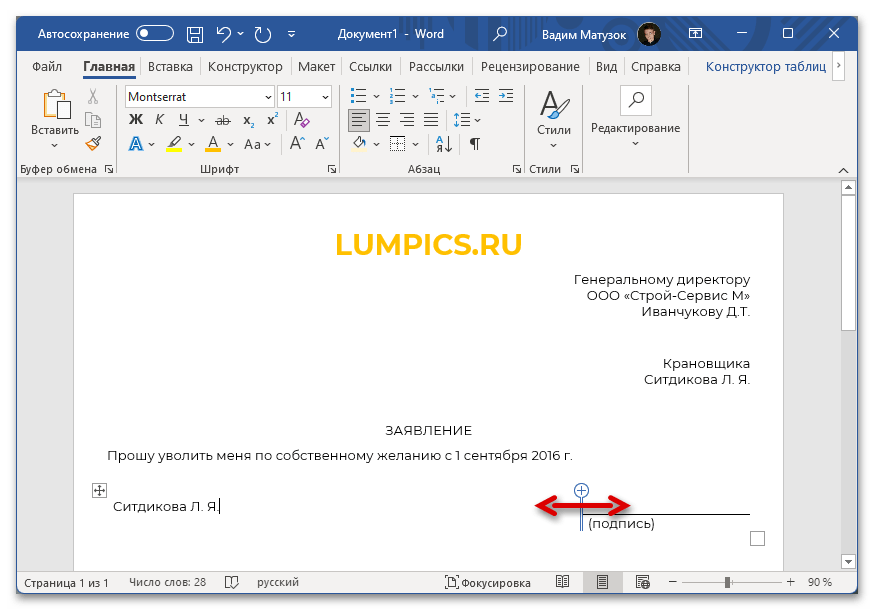
- Наведите указатель на среднюю вертикальную линию и после появления курсора в виде противоположно направленных стрелок зажмите левую кнопку мыши. Переместите эту границу в одну из сторон, чтобы задать длину горизонтальной линии.
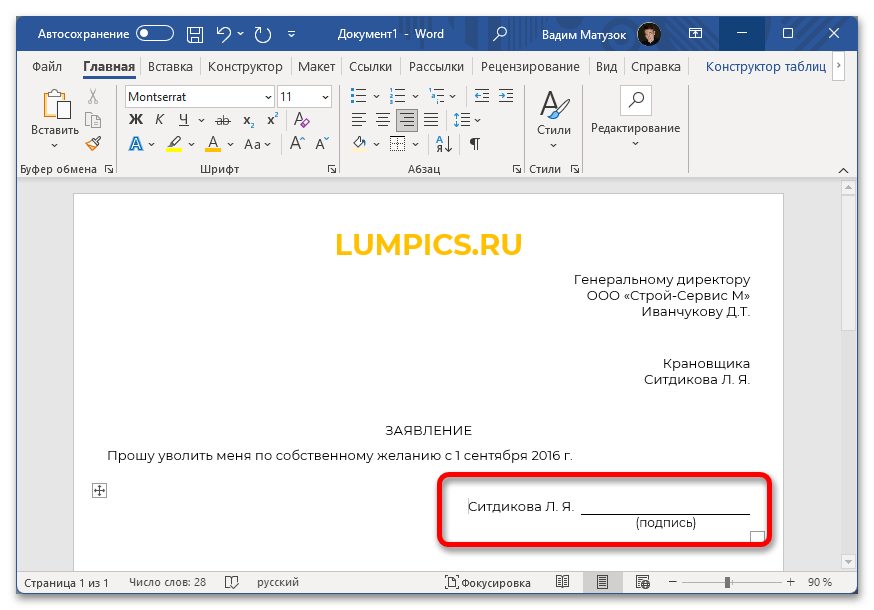
- Поочередно выделите текст в других ячейках и отформатируйте его. Например, надпись под чертой расположите по центру и измените размер шрифта, а дополнительную информацию в первой ячейке выровняйте по правому краю, чтобы она была ближе к линии.
Подробнее: Как выровнять текст таблицы в Microsoft Word


Работа с таблицами требует определенных навыков. Если их недостаточно для выполнения описанных действий, ознакомьтесь с другой статьей на нашем сайте, в которой описаны все основные возможности редактирования таких объектов.
Подробнее: Форматирование таблиц в Microsoft Word

Способ 3: Вставка текстового поля
Способ создания текста под чертой в Word посредством добавления в документ текстового поля во многом схож с первым рассмотренным в этой статье, но благодаря использованию дополнительного объекта исключается множество лишних действий.
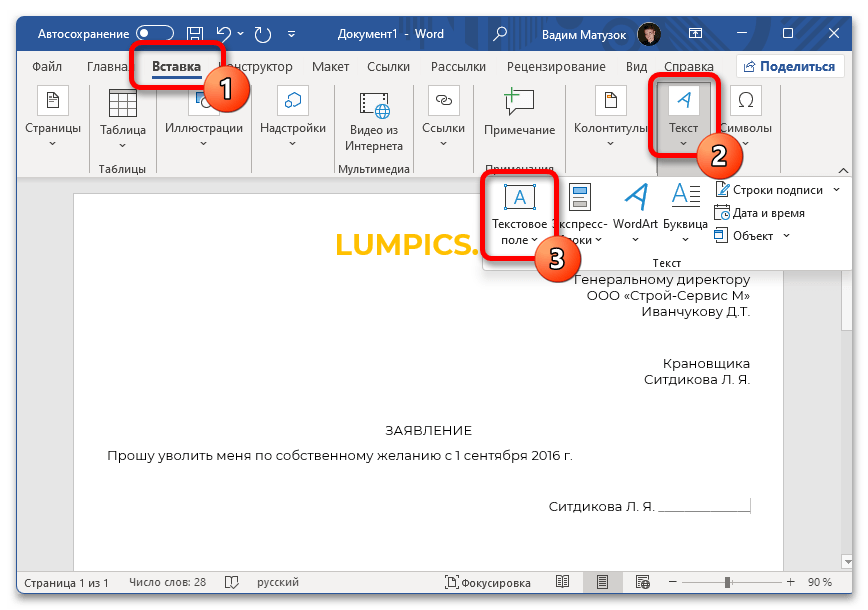
- Установите курсор на нужную строку и выровняйте текст по правому краю. Нарисуйте горизонтальную линию с помощью символов нижнего подчеркивания.
- Перейдите на вкладку «Вставка» и выберите инструмент «Текстовое поле», расположенный в блоке «Текст».
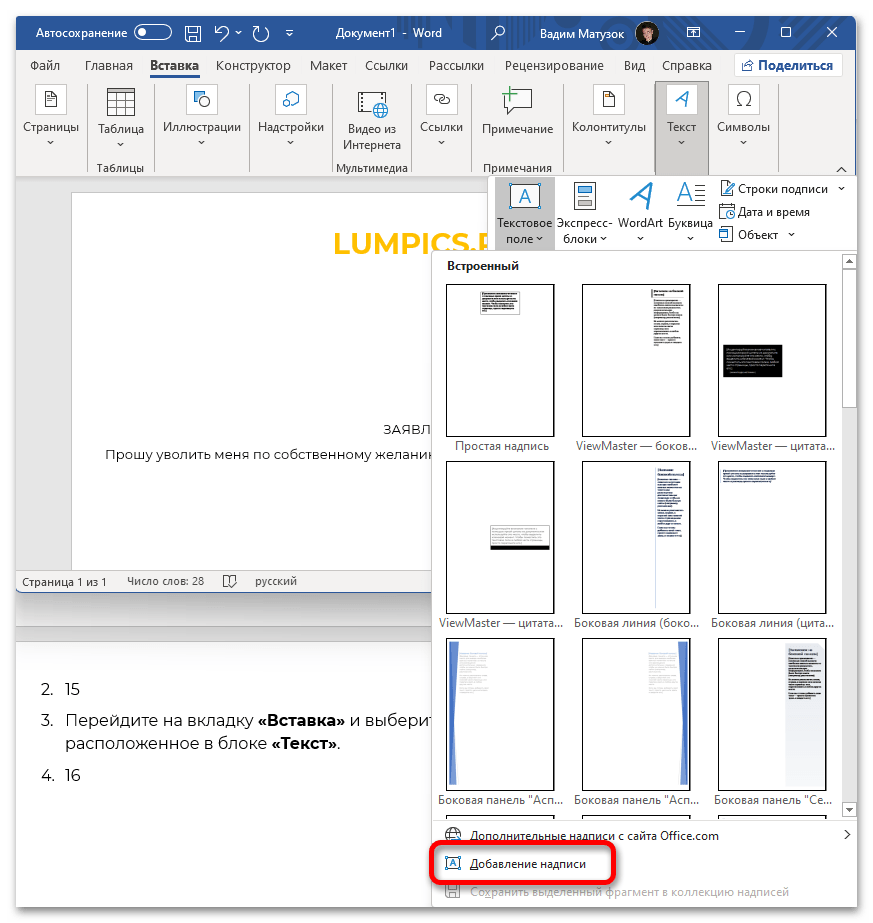
- В открывшемся диалоговом меню кликните по пункту «Добавление надписи».
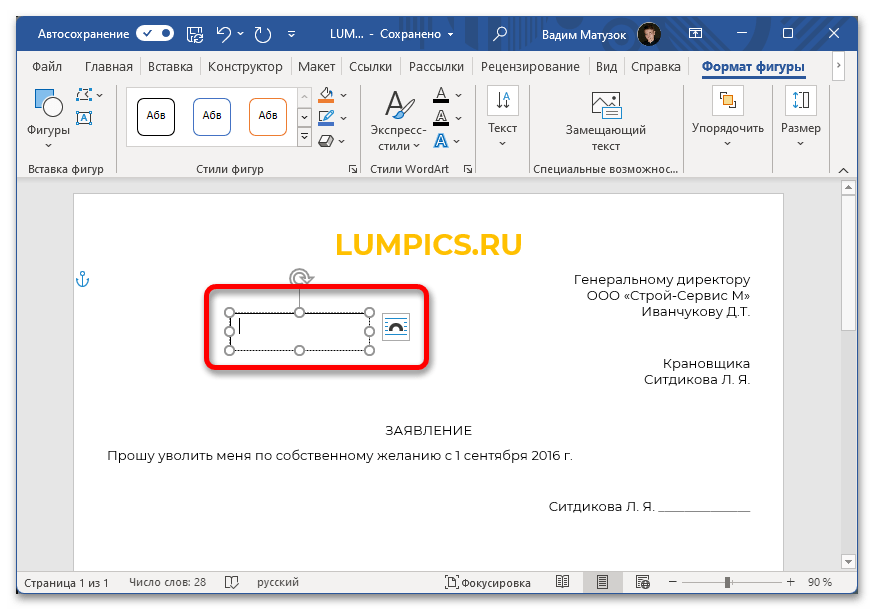
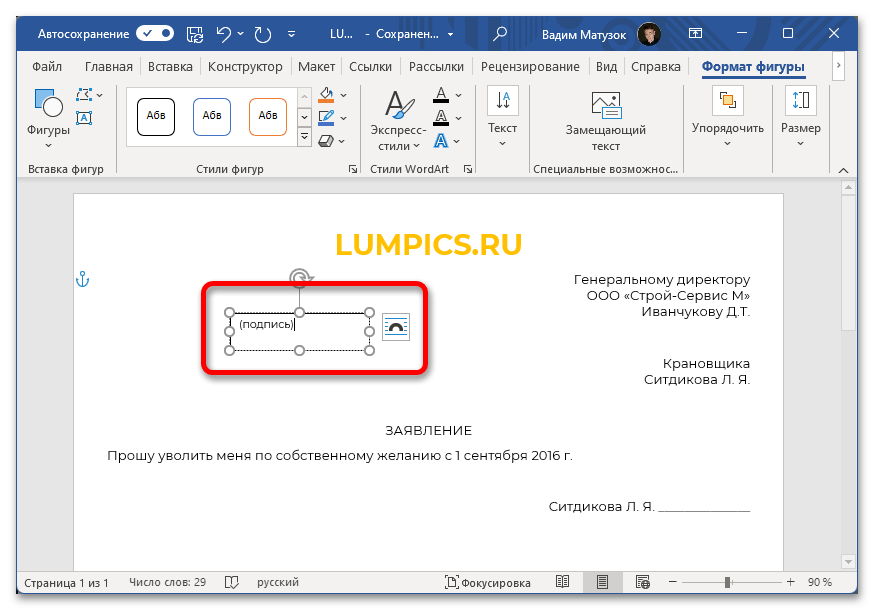
- После появления курсора в виде черного креста в произвольном месте документа зажмите левую кнопку мыши и нарисуйте прямоугольник, который и будет являться врезкой текстового поля.
- Поместите указатель внутрь объекта и напишите текст, который будет находиться под линией. При необходимости выполните форматирование одним из ранее предложенных способов.
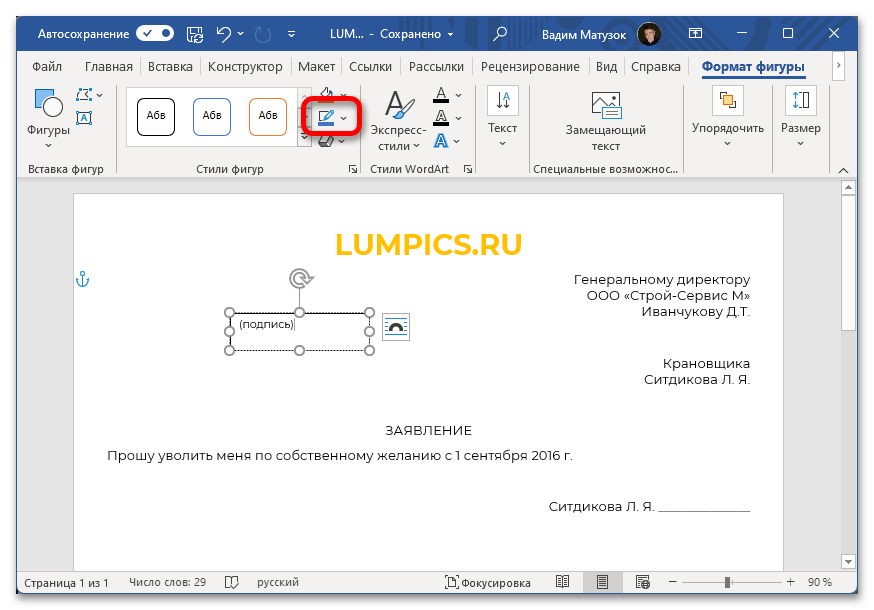
- Перейдите на вкладку «Формат фигуры» и в блоке «Стили фигуры» раскройте меню показанного на изображении ниже инструмента.
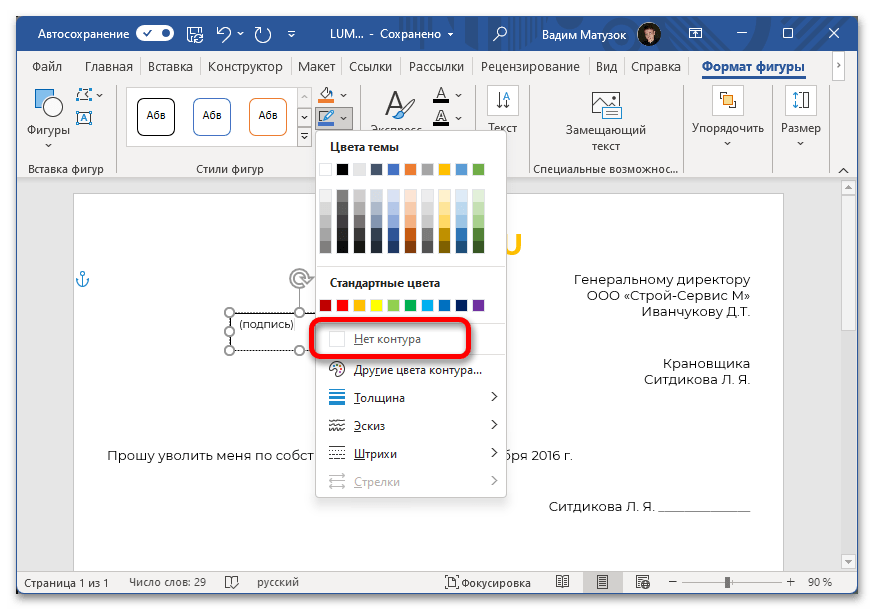
- Из выпадающего списка опций выберите пункт «Нет контура».
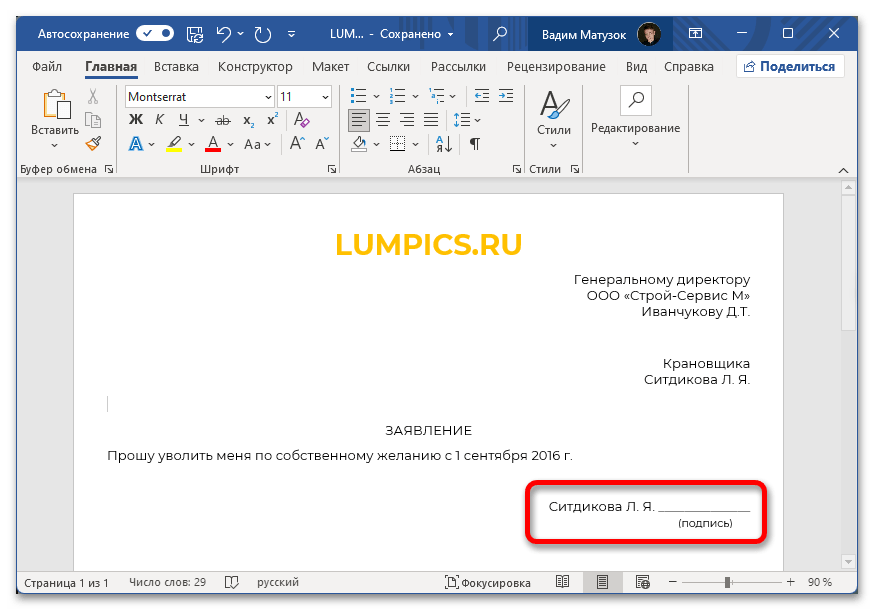
- После этого выделите текстовое поле, зажмите на одной из его границ левую кнопку мыши и переместите надпись под горизонтальную черту.
Более подробно о текстовых полях и работой с надписями рассказано в другой статье на нашем сайте. При необходимости рекомендуем с ней ознакомиться.
Подробнее: Создание надписей в Microsoft Word
Способ 4: Фигуры
Программа Microsoft Word позволяет пойти от обратного и установить черту над надписью. Делается это посредством встроенного инструмента «Фигуры». Для этого потребуется изначально ввести текст, который будет находиться под линией, после чего выполнить следующее:
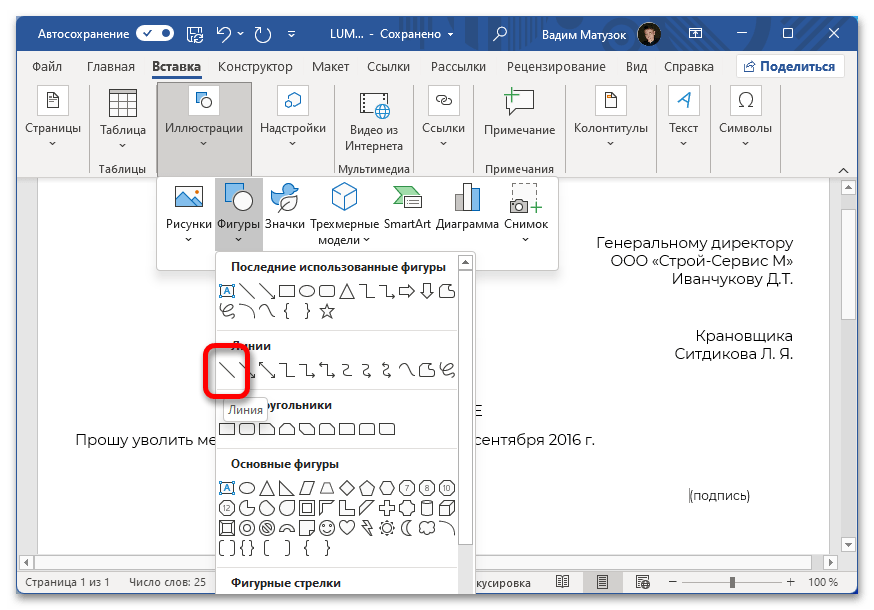
- Перейдите на вкладку «Вставка» и в блоке «Иллюстрации» нажмите по пункту «Фигуры».
- Из появившегося выпадающего меню выберите фигуру «Линия», находящуюся в категории «Линии».
Подробнее: Как вставить фигуру в Microsoft Word
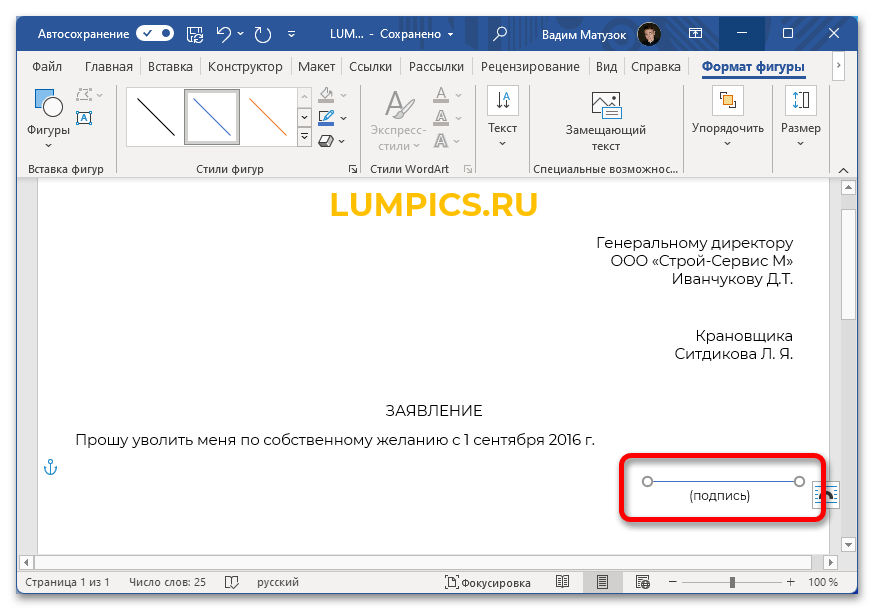
- После преобразования курсора в черный крест зажмите левую кнопку мыши и проведите ровную черту над ранее введенным текстом.
- Выделите только что добавленный объект, кликнув один раз по нему. Перейдите во вкладку «Формат фигуры» и в блоке инструментов «Стили фигур» раскройте выпадающий список «Контур фигуры».
- Измените цвет на черный, задайте толщину линии и при необходимости выберите тип отображения.

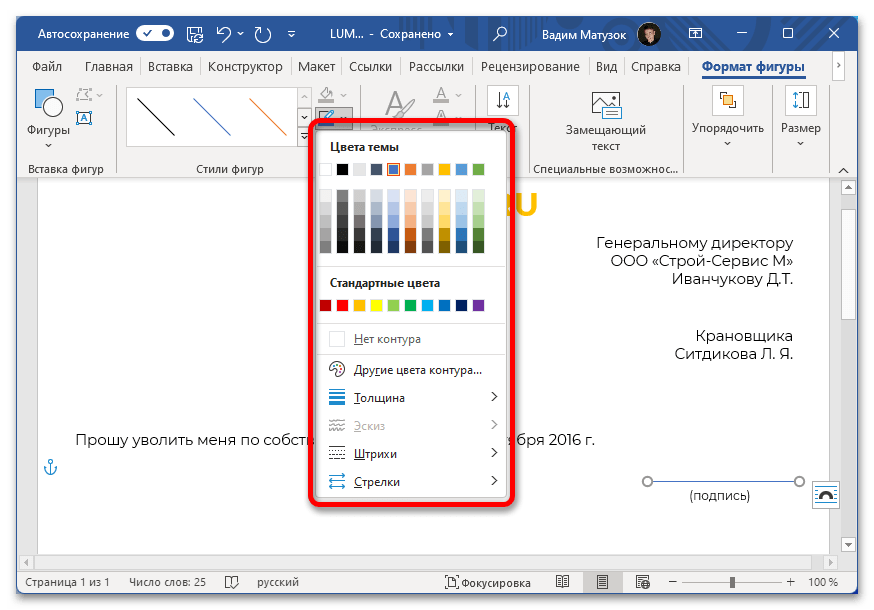
После этого линия окажется над текстом, и поставленная задача будет выполнена. Если возникли трудности во время добавления объекта на страницу документа, рекомендуем ознакомиться с отдельным материалом на нашем сайте, в котором подробно рассмотрены все инструменты для рисования в Microsoft Word.
Подробнее: Основы рисования в Microsoft Word
Еще статьи по данной теме:
Помогла ли Вам статья?
To insert a line in Word above and / or below a paragraph using the Borders button: Select the paragraph(s) to which you want to add a line. Click the Home tab in the Ribbon. Click Borders in the Paragraph group. A drop-down menu appears. Select the line you want to use.
How do you put a line above text in Word?
Type the text you want to overline into your Word document and make sure the “Home” tab is active on the ribbon bar. Click the down arrow on the “Borders” button in the “Paragraph” section of the “Home” tab. Select “Top Border” from the drop-down menu.
How do you put a line under text in Word?
Draw a line On the Insert tab, select Shapes. Under Lines, select any line style you like. Select a location in the document, hold and drag your pointer to a different location, and then release the mouse button.
How do you put a line under a subheading in Word?
Click in the paragraph of text you want a line under. Click on the HOME Tab > BORDERS button — Bottom Border is usually the default. This places a line across the page, underlining not just the text but the rest of the row, too.
How do you put a horizontal line under text in Word?
Microsoft Word Put your cursor in the document where you want to insert the horizontal line. Go to Format | Borders And Shading. On the Borders tab, click the Horizontal Line button. Scroll through the options and select the desired line. Click OK.
How do you get a line above a letter on a keyboard?
These keyboard shortcuts will help you display text more accurately in your business documents. Open a document in Microsoft Word. Press “Ctrl-Shift” and the caret (” ^ “) key and then the letter to insert a circumflex accent. Press “Ctrl-Shift” and the tilde (” ~ “) key and then the letter to insert a tilde accent.
How do you type Overbar?
Start opening the document in Word where you want to add the overline. Position the cursor at the point where you want to put the text you’re going to overbar. Press “Ctrl + F9” on your keyboard and the field code brackets will appear.
How do you put a line through text?
When you have your text selected, look on the “Home” tab of Word’s Ribbon. In the “Font” group, click the Strikethrough button (it’s the three letters with a line drawn through them). Now, any text you had selected should be struck through. You can also apply strikethrough formatting using the Font window.
How do you put a vertical line in between words?
Press and hold the Alt key, then on the numeric keypad push numbers 1, 2, and 4. Method 3: Symbols. Click the Insert tab in the Word app, then click the Symbol and select More Symbols. The vertical line is below the small letter L.
How do I put a line above the footer in Word?
Edit the Footer. Select Insert > Shape > Line > Line (yes, you select Line again from a submenu). Use your mouse to drag the cursor and draw a horizontal line.Add Horizontal Rule to footer – how? Edit the Footer. Press the Enter key to create a new line, then arrow up to the first line. Select Insert > Horizontal Line.
How do I change the footer line in Word?
Edit your existing headers and footers Double-click the header or footer you want to edit, or select Header or Footer, and then select Edit Header or Edit Footer. Add or change text for the header or footer or do any of the following: When you’re done, select Close Header and Footer or press Esc.
How do you underline headers and footers?
Type the text and click Right Align from the Home tab and Underline (select text and Ctrl+U). If you want greater separation, insert a table in the header (at least two columns).
How do you put symbols above letters?
You’ll use the Ctrl or Shift key along with the accent key on your keyboard, followed by a quick press of the letter. For example, to get the á character, you’d press Ctrl+’ (apostrophe), release those keys, and then quickly press the A key.
How do I put accents over letters in Windows 10?
When you open Microsoft Word, head over to the Insert tab on the Ribbon and select Insert. Then on the drop-down menu, choose the Symbol option and click on the accented character or symbol that you need from the list.
How do I type é on my keyboard?
é: Press Ctrl and type “‘” (apostrophe). Release both keys and type “e”. à-è-ù: Press Ctrl and type “`” key (left-hand side, top of the keyboard).These accents are: L’accent aigu (é) L’accent grave (à, è, ù) L’accent circonflexe or “chapeau” (â, ê, î, ô, û) La cédille (ç) Le tréma (ë, ï, ü).
How do you put a vertical line in text?
You can type a straight vertical line, or “|,” on most modern keyboards dating back to some of the 1980s IBM PCs. It’s generally found above the backslash, so you can type a “|” by holding down the shift key and hitting the “” key.
How do you put a line above a footer?
How do I insert a line above a footer in Word? Edit the Footer. Select Insert > Shape > Line > Line (yes, you select Line again from a submenu). Use your mouse to drag the cursor and draw a horizontal line. To keep the line level, hold the Shift key as you do.
How do I add a line to the bottom of the page?
Lining Up Bottoms Display the Page Layout or Layout (Word 2016 or later versions) tab of the ribbon. Click the small icon at the bottom-right of the Page Setup group. Word displays the Page Setup dialog box. Make sure the Layout tab is selected. Set the Vertical Alignment drop-down list to Justified. Click on OK.
How do I put a border around a footer?
Add a border to a page Go to Design > Page Borders. Make selections for how you want the border to look. To adjust the distance between the border and the edge of the page, select Options. Make your changes and select OK. Select OK.
Download PC Repair Tool to quickly find & fix Windows errors automatically
Have you tried to type over a line in Microsoft Word, but the text is not staying on the line but keeps on moving and creating space, and you are wondering how can I get the text on the line without the line moving and creating space? In this tutorial, we will discuss some techniques to write over the line.
Open Microsoft Word.
Draw a line in your document.
The first technique we will use is to write on the line; notice, when you are typing on the line the text, is not staying on the line, and the line keeps on moving.
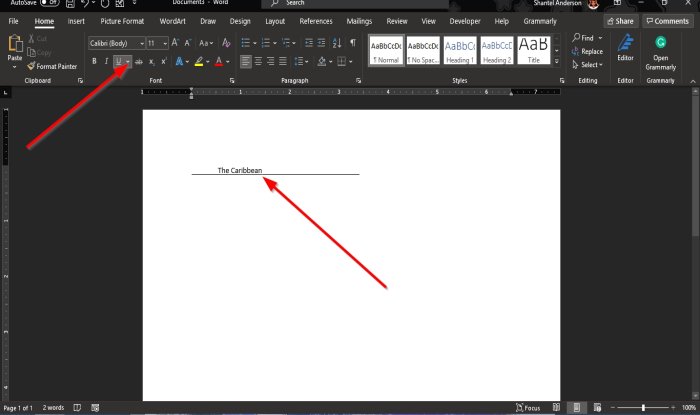
Highlight the text and click the Underline button on the Home tab in the Font group, and you will notice that the text will be on the line.
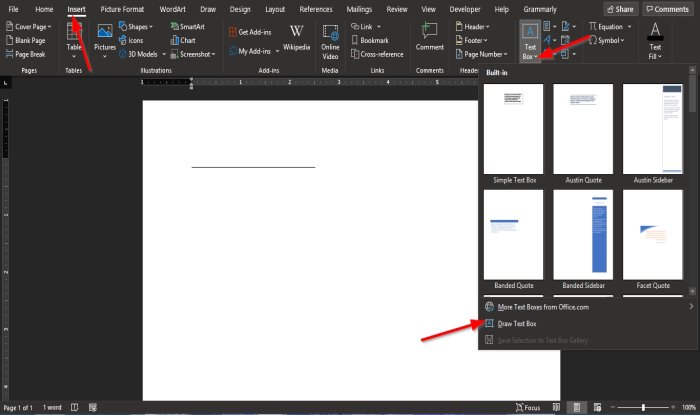
The second technique is to click the Insert tab and click the Text box button in the Text group.
In the drop-down list, select Draw Text Box.
A text box will appear in the document.
Move the text box over the line; ensure that the bottom of the text box matches the line.
We do not want the text box to have an outline; we will click the Shape Format tab.
The Shape Format tab appears whenever the shape is selected, including the text box.

On the Shape Format tab in the Shape Styles group, click the Shape Outline button, and in the drop-down list, select No Outline.
Notice that the text box lines become invisible.
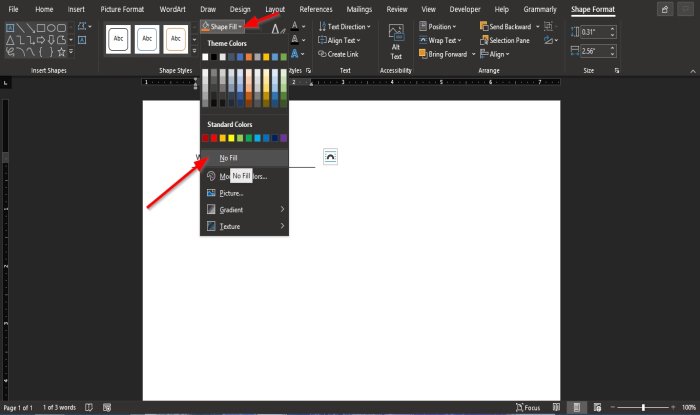
Then click the Shape Fill button, and in the drop-down list, click No Fill.
Drag the text box closer to the line.
Now, we have the text on the line.
We hope this tutorial helps you understand how to type over lines in Microsoft Word.
Read next: How to add Citations & References in Word.

Shantel has studied Data Operations, Records Management, and Computer Information Systems. She is quite proficient in using Office software. Her goal is to become a Database Administrator or a System Administrator.

- Using an underlined tab space
- Using a line tool
- Using a table cell
Method 1: Type Over a Line Using an Underlined Tab Space
Step 1: Open up a Word document.

Step 2: Use the Tab key.
Once your document is ready, move your cursor where you want to start typing over the line.
Then, press the Tab key multiple times to create ample space. Now, select the tab spaces you’ve just created.

Step 3: Use the underline tool.
Once you’ve selected the tab space, go to the Home tab and click the Underline button found in the Font group.
Alternatively, you can also simply press Ctrl + U.

Notice that the Underline button provides several styles for your underline. A straight line is the standard format for forms.

Congratulations! You can now start typing over a line in MS Word.
If you want to edit the spacing around the text over the line, you can skip to the Editing and Deleting Text Over a Line in MS Word section.
Method 2: Type Over a Line Using the Line Tool
The Line tool is one of the many shape tools you can find in the Illustration group.
Step 1: Open up an MS Word document.

Step 2: Draw a line.
Now that your document is opened, go to the Insert menu and click the Shapes drop-down menu.
From there, select the Line tool found at the very first row in the selection.

Click and drag your mouse to start drawing the line.
Press the Shift key to ensure that the line stays completely straight.

Once the line is drawn, you can still resize and edit its length. Simply click the line and drag the ends to move it around.
You’ll want to place your line just slightly below the main text line.
Method 3: Type Over a Line Using a Table Cell
Step 1: Open up an MS Word file.

Step 2: Insert a table.
Go to the Insert menu and click on the Table button.
For this example, we’ll create a 4×3 table to allow six labels with corresponding lines.

You’ll want to type in the labels at this point.
Also, we’ll have to adjust the column width a bit so that we have ample space to type over the lines.
By default, the columns and the rows are equally distributed.

Step 3: Edit the cell borders.
Select the entire table by clicking the Four-Arrow icon at the top-right corner of the table.

Go to the Design tab and click the Borders drop-down menu. Now, select No Border from the options.

Click on any cell in the second column. Then, click the Borders button again and select Bottom Border. Repeat this process for the other cells.

Note that you’ll have to do this one by one for each cell, as the borders of one cell can also be the borders of another cell.
Editing and Deleting Text Over a Line in MS Word
Editing and Deleting an Underlined Tab Spaces
To edit the underlined tab space we used for method 1, simply press the Tab key to add more tabs or the Backspace key to shorten the line.
Select the whole tab space and press the Delete key to get rid of all of them at once.
Editing and Deleting the Line Shape
Click the line and drag the circles on the edge to shorten or extend the line. Otherwise, press the Delete key on your keyboard to delete the line.
In addition, you can go to the Format tab to further customize your line.

Editing and Deleting Bottom Borders
If you used the third method, simply go to the Format tab after selecting your table. Select the cells you want to edit.
Then, click the Borders button and select No Borders to delete the bottom borders of the table cells.
Conclusion
We hope you’ve found this article helpful!
![]()
Download Article
A user-friendly guide to making different types of lines in Microsoft Word
![]()
Download Article
- Using Shapes to Draw a Line
- Using Borders to Add a Line
- Using Keyboard Shortcuts
- Using the Mobile App
- Q&A
- Tips
|
|
|
|
|
Do you want to create a horizontal line in your resumé or other Microsoft Word document? If you want to customize the color and format of the line, you can use the Shapes tool. If you need to make a quick, basic line, you can use the keyboard shortcut. While you can use the keyboard shortcut on Windows and Mac, you cannot use it on the mobile app. This wikiHow will show you how to insert different lines in Microsoft Word on your Windows, Mac, iPhone, or Android device.
Things You Should Know
- On desktop, go to the Insert tab. Click Shapes, then select a line. Click and drag across the document to create a line.
- To customize the line, double-click it. Click Shape Outline to change the color.
- On mobile, click the three dots. Tap Home and select Insert. Tap Shapes to select a line. Tap and drag across the document to create a line.
-

1
Open Microsoft Word on your Windows or Mac computer. Click or double-click the Word app icon, which resembles a white «W» on a dark-blue background.
- If you want to draw a line in an existing Word document, double-click the Word document to open it and skip the next step.
- You’ll need a subscription to use Office 365.
-
2
Click Blank document. It’s in the upper-left side of the page.
Advertisement
-
3
Click the Insert tab. This tab is in the blue ribbon at the top of the Word window, between Home and Draw.
-
4
Click Shapes. It’s in the Insert toolbar, next to the icon of an overlapping circle and square.
- A drop-down menu will appear.
-
5
Select a line shape. In the «Lines» heading, click one of the line templates. You can choose a line, line arrow, double line arrow, and more.
-
6
Draw your line. Click and drag across the document to create your line.
- If you need to adjust the line’s length and orientation, click the left or right circle. Drag it left or right to adjust the length, or drag it up and down to adjust the orientation.
- To move the line, double-click and drag it to the desired position.


Advertisement
-
1
Open Microsoft Word on your Windows or Mac computer. Click or double-click the Word app icon, which resembles a white «W» on a dark-blue background.
- If you want to draw a line in an existing Word document, double-click the Word document to open it and skip the next step.
-
2
Click Blank document. It’s in the upper-left side of the page.
-
3
Click the Home tab. This tab is in the blue ribbon at the top of the Word window, between File and Insert.
- You may already be on this tab by default.
-
4
Click the «Borders» arrow. This is next to the icon of the dotted square with a solid bottom line.
- A drop-down menu will open.
-
5
Click Horizontal Line. This will be towards the bottom, above Draw Table.
- A horizontal line will be added.
-
6
Format your line. Double-click the line; a dialogue box will appear.
- To change the line thickness, use the up and down arrow below Height. The higher the number, the thicker the line will be.
- To change the color, click the color box underneath Color. Select your desired color.
- Click OK to save and apply your changes.
- To move the line, double-click and drag it to the desired position.


Advertisement
-
1
Open Microsoft Word on your Windows or Mac computer. Click or double-click the Word app icon, which resembles a white «W» on a dark-blue background.[1]
- If you want to draw a line in an existing Word document, double-click the Word document to open it and skip the next step.
-
2
Click Blank document. It’s in the upper-left side of the page.
-
3
Place your cursor where you want your line to appear. You’ll need to be on a blank line, as this won’t work if there is text before or after your cursor on the same line.
- You’ll be creating a horizontal line that spans from one edge of your page to the other. The line will stop at your set margins.
- If you want to make the line span the whole page, you’ll need to change your document margins.
-
4
Type three dashes in a row. Use your dash key on the number row at the top of your keyboard, or on the numeric pad.
-
5
Press ↵ Enter to convert the dashes into a line. AutoCorrect will automatically create a solid line that will situate itself directly beneath the previous line of text.
- Note that the line does not occupy the space of a line of text, but instead exists between lines of text.
- If you do not have AutoCorrect enabled, do so by clicking File → Options → Proofing → AutoCorrect Options…. This will open a new window.
- Make sure the Border Lines box is checked. This can be found underneath Apply as you type.
- If you want to turn off AutoCorrect, uncheck the boxes.
-
6
Use different characters for different line styles. There are a variety of different lines that you can create by using characters other than the dash:[2]
- Thin line: Three hyphens (-).
- Thick line: Three underscores (_).
- Double line: Three equal signs (=).
- Dotted line: Three asterisk (*).
- Triple line: Three pound signs (#).
- Squiggly line: Three tildes (~).
-
7
Move the line by entering text above it. You can prompt the line to move down by typing text above it and then pressing Enter.
- Deleting text above the line will prompt it to move upward.


Advertisement
-
1
Open a document in the Microsoft Word app. This looks like a blue notebook next to a W.
- Microsoft Word is available for iOS in the App Store and for Android in the Google Play Store.
- Tap Blank document to open a new document or tap a file to open an existing document.
-
2
Tap ••• . This can be found above the keyboard, to the right.
- If you don’t see your keyboard, tap the document to bring it up.
- A new menu will open.
-
3
Tap Home. This will be to the left of the formatting window.
- A drop-down menu will open.
-
4
Tap Insert. You’ll see a list of all objects you can insert.
-
5
Tap Shapes. This is next to the icon of an overlapping circle and square.
-
6
Select a line shape. In the «Lines» heading, tap one of the line templates. You can choose a line, line arrow, double line arrow, and more.
-
7
Draw your line. Tap and drag across the document to create your line.
- Use two fingers to pinch and zoom out to view the entire document.
- If you need to adjust the line’s length and orientation, tap the left or right circle. Drag it left or right to adjust the length, or drag it up and down to adjust the orientation.
- To move the line, tap and drag it to the desired position.


Advertisement
Add New Question
-
Question
How do I view all available symbols in Microsoft Word?

Click «Insert» and then click «Symbols» and you should be shown a box with all of the symbols in it.
-
Question
How do I add a line on the first page, and no lines on the second?
Click «Insert» and then click «Symbols» and you should be shown a box with all of the symbols in it.
-
Question
How do I change the color of the line?
In the paragraph section, open the drop-down menu on the «Borders» button. At the very bottom is a «Borders and Shading» option. In that option, change the color of the bottom border to your specified color. Click the «Borders» button.
See more answers
Ask a Question
200 characters left
Include your email address to get a message when this question is answered.
Submit
Advertisement
-
Looking for money-saving deals on Microsoft Office products? Check out our coupon site for tons of coupons and promo codes on your next subscription.
Thanks for submitting a tip for review!
Advertisement
About This Article
Article SummaryX
1. Click Insert.
2. Click Shapes.
3. Select a line template.
4. Click and drag across your Microsoft Word document to draw the line.
Did this summary help you?
Thanks to all authors for creating a page that has been read 2,043,531 times.
Is this article up to date?
When we write a sentence to its end and do not use the enter key, that utilizes the intended style. The indent style is reset when you use the Enter key, which starts a new paragraph. You can continue this format by pressing Shift+ Enter and that will start a new line and the line will be within the paragraph. This adds a new line to the paragraph without terminating it. This article will explain how to indent the second line in Word.
When Should Line Indent be Used?
The Second Line Indent should be used for the additional lines when the work cited is longer than two lines. To make each entry simpler to read, the second line indent is commonly used in reference lists, works cited pages, and bibliographies.
Difference between first-line indent and second-line indent
There are basically two types of indentations in a paragraph which are first line and second line indent.
Second Line Indent
In Second line indent the 1st line of the paragraph remains same and the rest of the lines are indented.
First Line Indent
In First line indent, only the first line is indented and the rest of the lines of the paragraph remains same.
No Indent
None of the lines in a paragraph are indented.
Process of Indenting Second Line in Word
In Microsoft Word, the instructions below demonstrate how to indent a second line. Follow these instructions to easily indent the second line of a paragraph.
Step 1. Select the paragraph that you want to attach a Second Line indent. Simply place your mouse cursor at the beginning of the desired text. Next, when holding the left mouse button down, drag the cursor to the desired area’s end before releasing it.
Step 2. Go to the Paragraph component of the Word application‘s Home tab. Click on that arrow sign from the Paragraph section to open the Paragraph Settings.
Step 3. Click the down arrow next to the indent type you like in the Special settings section of the default Indents and Spacing tab of the paragraph settings box.
Step 4. To save your changes and exit the settings, click OK.
If you select First line or Hanging in Step 3 above, the By box beneath the Special options allows you to fine-tune the indent depth.
Process for Creating a Second Line Indent in Word as the Default Format
If you wish to keep the Second Line indentation always, you can alter the setting and use the intended style instead of the normal style.
Step 1. Select a location in the Word document with your cursor.
Step 2. Go to the Styles section of the Home tab. Right-click the Normal style and select Modify from the drop-down menu.
Step 3. Click the Format button in the lower-left corner of the pop-up Modify Style window, then pick Paragraph from the pop-up menu.

Step 4. The paragraph settings box will then appear. Simply define the paragraph indent style as specified in the material above.
Select the option “New document based on this template” in the lower section of the above Modify Style box, just before the Format button, when you create a new Word document.
Hanging Indents in Google Docs or Word
In bibliographies, referencing, and work citations, hanging indents are utilized. A citation’s second and subsequent lines are indented five spaces with a hanging indent.
Process of Creating Hanging Indent on Word
Open a Word file on a PC or Mac and write down or paste your citations using a citation generator to create a reversed indent for a Creating Hanging Indent citation. Next, in order to indent a citation, format each entry as follows.
Step-1: Highlight the first line of your entry with your cursor.
Step-2: Choose “Paragraph” from the drop-down menu by right-clicking.

Step-3: You will then find “Indents and Spacing” tab.
Step-4: In the “Special” section under “Indentation,” click “Hanging.”
Step-5: After that, press “OK.”

You may generate a second line indent for your works referenced by right-clicking or using the menu drop-down tab. Follow these instructions to use this technique:
Step-1: Start typing your works cited item with your cursor at the top.
Step-2: Select “Home” tab.

Step-3: Next you will find the “Paragraph” toolbar.
Step-4: In the bottom right corner, put your mouse over the small arrow next to “Paragraph.”
Step-5: Next you will find the “Indents and Spacing” tab.
Step-6: In the “Special Indent” box, select “Hanging.”.
Step-7: Finally, hit “OK.”
How to indent the second line of a citation in Word (work cited) for APA part 2 new version
Process of Creating Hanging Indent on Google Docs
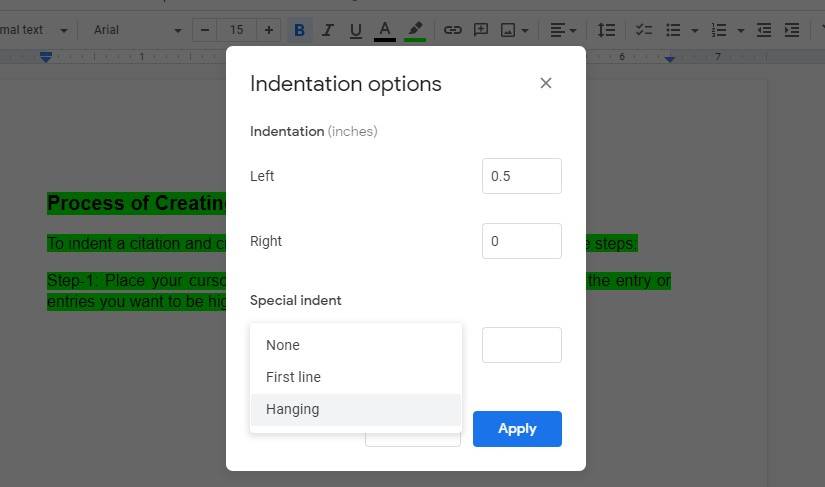
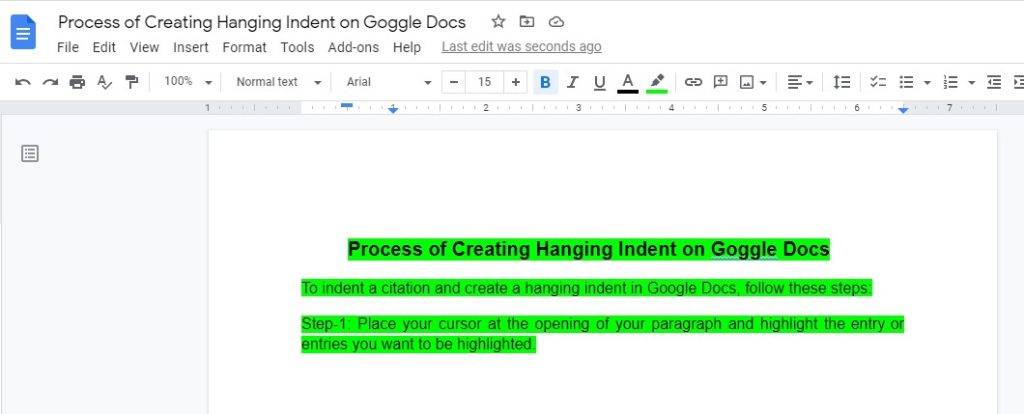
To indent a citation and create a hanging indent in Google Docs, follow these steps:
Step-1: Place your cursor at the opening of your paragraph and highlight the entry or entries you want to be highlighted.

Step-2: Select “Format” from the drop-down list.
Step-3: After that, choose “Align & indent.”
Step-4: “Indentation options, “should be selected next

Step-5: Select “Hanging” from the “Special indent” options.
Step-6: 0.5 inches is the default amount setting for indentation.
Step-7: Finally, select “Apply.”
After you’ve applied these changes to your content, here is how your Process of Creating Hanging Indent On Google Docs should look.
Process of Creating Hanging Indent in Word for Mac
The appropriate layout of your Word documents conveys professionalism. Indenting lines may make a document seem more professional and tidier. To add and change hanging indents in Microsoft Word for Mac, utilize the Paragraph dialog box.
Step 1
In the document, highlight a paragraph.
Step 2
To access the Paragraph dialog box, click “Format” from the main menu and then “Paragraph.” All paragraphs, including page breaks and spacing, are formatted in this dialog box.
Step 3
Click the “Indents and Spacing” tab if it isn’t currently chosen. The paragraph dialog box has two tabs: “Indents and Spacing” and “Line and Page Breaks.”
Step 4
Select “Hanging” from the “Special” pull-down option in the Indentation section.
Step 5
To use for the hanging indent, click the “By” option and input a value in inches. Word uses a half-inch hanging indent by default.
Step 6
Press “OK” to apply hanging indent.
Conclusion
Writing professionally is a talent that may be learned over time. It’s also crucial to present your writing. Indenting may be quite useful when creating bibliographies, references, or works reference to make them seem tidy. The above-mentioned suggestions on how to indent a second line in Word should suffice.
Insert Lines in Microsoft Word Documents
by Avantix Learning Team | Updated October 9, 2021
Applies to: Microsoft® Word® 2010, 2013, 2016, 2019 and 365 (Windows)
You can insert a line in Word using the Ribbon or by using keyboard shortcuts. It’s best to avoid drawing lines and instead insert border lines in Microsoft Word (normally paragraph borders) so the line or lines will move as you edit the document.
In this article, we’ll focus on inserting lines using borders attached to paragraphs. In Microsoft Word, anything with a hard return after it is a paragraph. If you use border lines, you can customize the type of border, line thickness and color. You can also include paragraph border lines in styles so they will appear throughout your document. If you draw lines using Insert Shapes, you’ll have to worry about the line being inline or floating.
You can insert a line in Word in 3 ways using borders:
- Use the Borders command on the Home tab in the Ribbon
- Select and apply different types of lines using the Borders and Shading dialog box
- Insert different types of lines using keyboard shortcuts (which add lines using AutoCorrect)
Recommended article: How to Keep Text Together in Microsoft Word
Do you want to learn more about Microsoft Word? Check out our virtual classroom or live classroom Word courses >
Inserting a line using the Borders button
To insert a line in Word above and / or below a paragraph using the Borders button:
- Select the paragraph(s) to which you want to add a line.
- Click the Home tab in the Ribbon.
- Click Borders in the Paragraph group. A drop-down menu appears.
- Select the line you want to use.
Below is the Borders command in the Ribbon in Word:
![]()
Removing lines using the Borders command
To remove a border line or lines from one or more paragraphs:
- Select the paragraph(s) with the border lines you want to remove.
- Click the Home tab in the Ribbon and then click Borders. A drop-down menu appears.
- Choose No Border from the drop-down menu.
Inserting a line using the Borders and Shading dialog box
You can apply a line or custom border lines to one or more paragraphs using the Borders and Shading dialog box.
To insert a line in Word above and / or below a paragraph using the Borders and Shading dialog box:
- Select the paragraph(s) to which you want to add a line.
- Click the Home tab in the Ribbon.
- Click Borders in the Paragraph group. A drop-down menu appears.
- Select Borders and Shading. A dialog box appears.
- Select a border style, color and width.
- Click between the guides in the sample area on the right (above or below the sample).
- Click Options (if required), enter any offset amounts to control the distance between the line and the paragraph and click OK.
- In Apply to, ensure Paragraph is selected.
- Click OK.
Below is the Borders and Shading dialog box where you can add a line or lines to paragraphs:

Removing lines using the Borders and Shading dialog box
To remove lines from one or more paragraphs using the Borders and Shading dialog box:
- Select the paragraph(s) with the lines you want to remove.
- Click the Home tab in the Ribbon and click Borders. A drop-down menu appears.
- Select Borders and Shading. A dialog box appears.
- Click None in the Setting area.
- In Apply to, ensure Paragraph is selected.
- Click OK.
Inserting a line using keyboard shortcuts
You can also insert a horizontal line using keyboard shortcuts (which insert border lines as AutoCorrect entries).
Type the following characters and then press Enter or Return to insert lines:
- To insert a plain single line, type three hyphens (—).
- To insert a plain double line, type three equal signs (===).
- To insert a dotted line, type three asterisks (***).
- To insert a bold single line, type three underlines (___).
- To insert a wavy line, type three tildes (~~~).
- To insert a triple line, type three number signs or hash tags (###).
To remove these lines, select the paragraph with the line, click the Borders button on the Home tab and select No Border.
Subscribe to get more articles like this one
Did you find this article helpful? If you would like to receive new articles, join our email list.
More resources
How to Double Space in Word (4 Ways)
14 Shortcuts to Quickly Select Text in Microsoft Word
4 Ways to Insert or Type the Pound Symbol in Word (£)
How to Create a Hanging Indent or First Line Indent in Microsoft Word
How to Insert an Em or En Dash in Microsoft Word (4 Ways with Shortcuts)
Related courses
Microsoft Word: Intermediate / Advanced
Microsoft Excel: Intermediate / Advanced
Microsoft PowerPoint: Intermediate / Advanced
Microsoft Word: Long Documents Master Class
Microsoft Word: Styles, Templates and Tables of Contents
Microsoft Word: Designing Dynamic Word Documents Using Fields
VIEW MORE COURSES >
Our instructor-led courses are delivered in virtual classroom format or at our downtown Toronto location at 18 King Street East, Suite 1400, Toronto, Ontario, Canada (some in-person classroom courses may also be delivered at an alternate downtown Toronto location). Contact us at info@avantixlearning.ca if you’d like to arrange custom instructor-led virtual classroom or onsite training on a date that’s convenient for you.
Copyright 2023 Avantix® Learning
Microsoft, the Microsoft logo, Microsoft Office and related Microsoft applications and logos are registered trademarks of Microsoft Corporation in Canada, US and other countries. All other trademarks are the property of the registered owners.
Avantix Learning |18 King Street East, Suite 1400, Toronto, Ontario, Canada M5C 1C4 | Contact us at info@avantixlearning.ca
How do I indent the second line in Word? In this essay offered by MiniTool team, it will teach you two easy methods that you can quickly remember. Also, it will tell you how to do the first-line indent. Those methods apply to Word 2013, Word 2016, Word 2019, and Word for Microsoft 365.
About Indent in Word
The indent styles are applied to a paragraph where sentences are typed to the end without pressing the Enter key. if you press Enter, it will start a new paragraph and the indent style over again. If you want to start another line within the same paragraph that continues the format, just press “Shift + Enter”. It will start a new line without leaving the paragraph.
Second Line Indent vs First Line Indent
In general, there are 2 indent types in a paragraph, First Line indent and Second Line indent (also called Hanging indent).
Second Line Indent
The Second Line indent sets off the first line of a paragraph by positioning it at the margin and then indenting each subsequent line of the paragraph.

First Line Indent
The First Line indent only indents the very first line of a paragraph, while putting the rest of the lines within the paragraph at the margin.

No Indent
As you can figure out from the Second Line indent and First Line indent, no indent will lie all lines of a paragraph at the margin in the Word document.
How to Indent Second Line in Word?
Then, how to indent the Second Line in Word? Just follow the below guide.
How to Indent Second Line of Citation in Word?
- Select target text.
- Navigate to Home > Paragraph > Paragraph Settings > Indents and Spacing > Special.
- Choose Hanging.
Step 1. Select the content where you would like to add a Second Line indent. Just put your mouse cursor at the start of the target text. Then, hold the left button of the mouse, drag the cursor to the end of the target area, and release your mouse.
Step 2. Under the Home tab of the Word application, go to the Paragraph section. Click the little arrow icon in the bottom right corner of the Paragraph section to open the Paragraph Settings window.
Step 3. In the default Indents and Spacing tab of the Paragraph settings window, under the Special settings, click the down arrow and select the indent type you like.

Step 4. Click OK to save changes and exit the settings.
If you choose the First line or Hanging in step 3 above, you are able to further set the indent depth with the By field behind the Special settings.
How to Make Second Line Indent in Word as Default Format?
If you always want the Second Line indentation, you can modify the Normal style of your Word paragraph.
Step 1. Put your mouse cursor anywhere in the Word.
Step 2. In the Home tab, move to the Styles section. There, right-click on the Normal style and select Modify.
Step 3. In the pop-up Modify Style window, click the Format in the bottom left corner and choose Paragraph in the pop-up menu.

Step 4. Then, it will open the Paragraph settings window. There, just specify the paragraph indent style like described in the above content.
If you always want the Second Line indent style whenever you create a new Word document, just select the “New document based on this template” option in the above Modify Style window, in the lower part, right above the Format button.
Also read: How to Quickly Remove Watermark in Word in 2021 (Windows 10/11)?
Quickly Set up First Line Indent
Both of the above two ways can also set up the First Line indent for a Word file. Yet, there is another easier way to quickly indent the First Line in a paragraph.
Put your cursor at the very beginning of the target paragraph and press the Tab key. Then, you will see the paragraph turns into the First Line indent style. If you press Enter to start the next paragraph from this paragraph, the first line of the next paragraph is indented automatically.
If you want to set several continuous paragraphs that are already done to the First Line indent style. Just set the first paragraph of them as the First Line indent using the Tab key. then, merge the next paragraph with the first paragraph by putting the cursor at the beginning of the next paragraph and pressing the Backspace key. Then, splitting the two paragraphs by pressing the Enter key, and the new second paragraph will become First Line indent. Use the same way to set the rest of the paragraphs into First Line indent.
When to Use Line Indent?
You should use the Second Line indent, also known as the Hanging indent, for the additional lines if your works cited entry is longer than 2 lines. The second line indent is widely used in reference lists, works cited pages, as well as formatting bibliographies to make each entry easier to read.
While the First Line indent is the most common way to signal the start of a new paragraph.
Related articles:
- How to Rearrange Pages in Word? | How to Move Pages in Word?
- Full Guides to Use Learning Tools in Microsoft Word
- Word Could Not Create the Work File? Get Solutions Here