
Summary
This article explains how to use the Mail Merge feature in Microsoft Word to create and to print form letters by using data from a Microsoft Excel worksheet.
When you use the Word Mail Merge feature, Word merges a main document with a recipient list to generate a set of output documents:
-
The main document contains the basic text that is the same in all of the output documents. It may contain a letterhead, text, and instructions in merge fields for inserting text (such as recipient names and addresses) that vary from one output document to another.
-
The recipient list is a database that contains the data that is to be merged into the output documents. For example, the recipient list is a Microsoft Access database file or an Excel worksheet.
This database is typically a list of names, addresses, phone numbers, and other categories of personal information.
-
The output documents are the result of the mail merge. The text in an output document can be the same in all output documents, but you can apply formatting to specific documents.
Step 1: Set Up the Excel Data File
Before you proceed with the Mail Merge Wizard, make sure that your Excel worksheet is well structured for this purpose. Note the following requirements for the data table:
-
The first row should contain field names for each column — for example, Title, Salutation, First Name, Middle Name, Last Name, Address1, and Address2.
-
Each field name should be unique.
-
Each row should provide information about a particular item. For example, in a mailing list, each row might include information about a particular recipient.
-
The table should contain no blank rows.
Create your Excel data file, and then arrange it by using the fields that you want to use for your letter, as shown in the following sample data file.
After you create your Excel data file, save it, and then close the data file.
For more information about how to create a mail-merge address list, click the following article number to view the article in the Microsoft Knowledge Base:
294688 How to design and set up a mail merge address list in Word 2002 and in later versions of Word
Step 2: Set Up the Main Document
-
In Microsoft Office Word 2003 and in earlier versions of Word, point to Letters and Mailings on the Tools menu, and then click Mail Merge Wizard.
In Microsoft Office Word 2007, click Start Mail Merge in the Start Mail Merge group on the Mailings tab, and then click Step by Step by Mail Merge Wizard.
-
Under Select document type, click Letters.
The active document becomes the main document. The main document contains the text and graphics that are the same for each version of the merged document. For example, the return address and the salutation in a form letter are the same for each version.
-
Click Next: Starting document.
-
Use one of the following methods:
-
Start with the document that is currently shown in the document window. To do this, click Use the current document.
You can then either type the letter in the document window or wait until the wizard prompts you to do so in a later step.
-
Start with a template. To do this, follow these steps:
-
Click Start from a template.
-
Click Select template.
-
On the Mail Merge tab, select the template that you want in the Select Template dialog box, and then click OK.
-
-
Start with an existing document. To do this, follow these steps:
-
Click Start from existing document.
-
In the Start from existing box, select the document that you want, and then click Open.
-
If you do not see the document, click More files, and then click Open. In the Open dialog box, locate the document that you want, and then click Open.
-
-
-
Click Next: Select recipients.
Step 3: Specify the Excel Data Source
-
Under Select recipients, click Use an existing list.
-
Click Browse.
-
In the Select Data Source dialog box, locate and then click the Excel worksheet that you want to use.
By default, Word opens the «My Data Sources» folder.
-
Click Open.
-
If your Excel worksheet contains information about multiple tabs, select the tab that contains the information that you want, and then click OK.
-
All entries in the data source appear in the Mail Merge Recipients dialog box. Here, you can refine the list of recipients to include in the merge.
Step 4: Select the Recipients
-
In the Mail Merge Recipients dialog box, select the recipients that you want to include. To do this, use one of the following methods:
-
Use the check boxes to designate recipients.
This method is most useful if the list is short. Click to select the check boxes next to the recipients that you want to include, and then click to clear the check boxes next to the recipients that you want to exclude.
Note If you know that you want to include most of the list in your merge, click Select All, and then click to clear particular records. Similarly, if you want to include only a few records in the list, click Clear All, and then select the records that you want.
-
Sort items in the list.
This method is useful if you want to see items in alphabetical or numeric order. Click the column heading of the element by which you want to sort. For example, if you want to display the list alphabetically by last name, click the Last Name column heading.
-
Filter items in the list.
This method is useful if the list contains records that you know you do not want to see or include in the merge. After you have filtered the list, you can use the check boxes to include and exclude records, as described earlier. To filter the list, follow these steps:
-
Click the arrow next to the column heading of the element that you want to filter by.
-
Click any of the following:
-
(Blanks): This option displays all the records in which the corresponding field is blank.
-
(Nonblanks): This option displays all the records in which the corresponding field contains information.
-
If the data source contains records that share the same information, and if there are 10 or fewer unique values in the column, you can filter by specific information. For example, if there are multiple addresses that list Australia as the country, you can filter by Australia.
-
-
-
The Mail Merge Recipients dialog box displays only the designated records. To display all the records again, click (All).
Notes
-
For advanced sorting and filtering, click the arrow next to any column name, and then click (Advanced). Use the Filter Records and Sort Records tabs to set up the sorting or filtering query that you want.
-
If you have installed address validation software, click Validate in the Mail Merge Recipients dialog box to validate your recipients’ addresses.
-
-
Click OK to return to the Mail Merge Wizard.
Word uses the recipients that you designated for the merge.
-
Click Next: Write your letter.
Step 5: Complete the Letter and Add Merge Fields
If you have not already done this, type the text that you want to appear in every form letter in the main document.
Insert Merge Fields
Insert merge fields where you want to merge names, addresses, and other information from the data source. To insert merge fields, follow these steps:
-
In the main document, click where you want to insert the field.
-
Insert any of the following:
-
Address block with name, address, and other information:
-
Click Address block.
-
In the Insert Address Block dialog box, select the address elements that you want to include and the formats that you want, and then click OK. For help on an option, click the question mark, and then click the option.
-
For help on an option, click the question mark, and then click the option. If the Match Fields dialog box appears, Word may be unable to find some of the information it needs for the address block. Click the arrow next to
(not available), and then select the field from your data source that corresponds to the field required for the mail merge.
-
-
Greeting line:
-
Click Greeting line.
-
Select the greeting line format that includes the salutation, name format, and following punctuation.
-
Select the text that you want to appear in the cases in which Word cannot interpret the recipient’s name. For example, Word cannot interpret the name when the data source contains no first or last name for a recipient, but only a company name.
-
Click OK.
-
If the Match Fields dialog box appears, Word may be unable to find some of the information it needs for the greeting line. Click the arrow next to (not available), and then select the field from your data source that corresponds to the field required for the mail merge.
-
-
Other fields of information:
-
Click More items.
-
Use one of the following methods:
-
Click Address Fields to select from address fields that will automatically map to corresponding fields in your data source, even if the data source’s fields do not have the same name as your fields.
-
Click Database Fields to select from fields that always take data directly from a column in a database.
-
-
In the Fields box, click the field that you want.
-
Click Insert, and then click Close.
-
If the Match Fields dialog box appears, Word may not be able to find some of the information it needs to insert the field. Click the arrow next to (not available), and then select the field from your data source that corresponds to the field required for the mail merge.
Note If you insert a field from the Database Fields list, and if you later switch to a data source that does not have a column with the same name, Word cannot insert that field information into the merged document.
-
-
Electronic postage:
To add electronic postage, you must first install an electronic postage program, such as one that you can purchase from a third-party provider on the Web. To use electronic postage, follow these steps:
-
Click Electronic postage.
If you do not have an electronic postage program installed, Word prompts you to install one, and offers to connect to the following Microsoft Office Web site:
Print Online Postage
http://office.microsoft.com/services/service.aspx?sid=2.4 -
Insert the postage according to the program’s instructions.
-
-
To add electronic postage, you must first install an electronic postage program, such as one that you can purchase from a third-party provider on the Web. To use electronic postage, follow these steps:Postal bar code: You must select a letter or envelope type that supports the POSTNET bar code. To use the Postal bar code, follow these steps:
-
Click Postal Bar Code.
-
In the Insert Postal Bar Code dialog box, select the appropriate address fields.
Note The Postal Bar Code option appears only if you are using the U.S. language version of Word.
-
Repeat steps a and b for all the fields that you want to insert. NOTES:
-
You cannot type merge field characters (» «) or insert them by using the Symbol command on the Insert menu.
-
If the merge fields appear inside braces, such as { MERGEFIELD City }, Word is displaying field codes instead of field results. This does not affect the merge, but if you want to display the results instead, right-click the field code, and then click Toggle Field Codes on the shortcut menu.
-
For example, by using the sample database shown earlier, your letter might contain the AddressBlock and GreetingLine fields, and therefore your first page appears similar to the following:
February 26, 2002
AddressBlock
GreetingLine
Type your letter here.
Sincerely,
Type your name here
-
Note You can also use the Mail Merge toolbar to insert merge fields, work with your mail-merge main document, or run a mail merge. To display the Mail Merge toolbar, point to Letters and Mailings on the Tools menu, and then click Show Mail Merge Toolbar.
The Mail Merge toolbar provides additional commands that are not included in the Mail Merge Wizard task panes. For example, you can use the Insert Word Field menu on the Mail Merge toolbar to insert Word fields for controlling the merge process. For example, you can insert an IF field that inserts text only if a particular merge field has a specified value.
Alternatively, you can click Check For Errors to make Word run the mail merge and report any errors that are contained in the main document.
-
Change the Format of the Merged Data
To format merged data, you must format the merge fields in the main document. Do not format the data in the data source, because its formatting is not retained when you merge the data into the document. To change the format of the merged data, follow these steps:
-
In the main document, select the field that contains the information that you want to format, including the enclosing merge field characters (<< >>).
-
In Word 2003 and in earlier versions of Word, click Font on the Format menu, and then select the options that you want.
In Word 2007, click the option that you want in the Theme Fonts box in the Font group on the Home tab.
Format by Using Field Codes
To control other aspects of formatting, press ALT+F9 to display field codes, and then add switches to the merge fields. When you work with fields, a switch is a special instruction that causes a specific action to occur. Generally, a switch is added to a field to modify a result.
Examples of how to use switches are as follows:
-
To display the number 34987.89 as $34,987.89, add the Numeric Picture switch (#).
-
To print client names in uppercase letters, add the Format switch (*).
-
To make sure that the merged information has the same font and point size that you apply to the merge field, add the Charformat switch (*).
Step 6: Save the Document
After you have completed the main document and inserted all the merge fields, make sure that you save the document before proceeding. To do this, follow these steps:
-
In Word 2003 and in earlier versions of Word, click Save As on the File menu.
In Word 2007, click the Microsoft Office Button, and then click Save As.
-
Name the document, and then click Save.
-
Click Next: Preview your letters.
Step 7: Preview the Letters and Fine-Tune the Recipient List
When the wizard displays the «Step 5 Mail Merge» task pane, the wizard replaces each of the merge fields in the main document that has the actual text from the first entry of the recipient list.Therefore, you can see how your first output document will look.
For example, if you were to continue to use the sample database shown earlier, the first page should resemble the following page after you click Next: Preview your letters:
February 26, 2002
Andrew Fuller
908 W. Capital Way
Tacoma 98401
Dear Andrew Fuller,
Type your letter here.
Sincerely,
Type your name here To preview additional entries, use one of the following methods:
-
To preview the items in order, click the left or right arrow buttons.
-
To locate and preview a specific item, click Find a recipient, and then enter the search criteria in the Find Entry dialog box.
Fine-tune the recipient list if you want. To do this, use one of the following methods:
-
To exclude a particular recipient from the merge operation, click Exclude this recipient.
-
To change the list of recipients, click Edit recipient list, and then make your changes in the Mail Merge Recipients dialog box.
Step 8: Complete the Merge
To complete the merge, use any of the following methods.
Personalize Individual Letters
To personalize individual items, you actually complete the merge, and then edit the information that you want in the resulting merged document. To do this, follow these steps:
-
Click Edit individual letters.
-
In the Merge to New Document dialog box, select the records that you want to merge.
-
Click OK.
Word creates and opens a new merged document. Your main document also remains open, and you can switch back to it if you want to change all the documents.
-
Scroll to the information that you want to edit, and then make your changes.
-
Print or save the document just as you would any regular document.
Print the Letters
To print the letters, use one of the following methods:
-
If you personalized the items and if the merged document is active, follow these steps:
-
In Word 2003 and in earlier versions of Word, click Print on the File menu.
In Word 2007, click the Microsoft Office Button, and then click Print.
-
Select the options that you want.
-
-
If you want to print directly from the Mail Merge Wizard, follow these steps:
-
In Step 6 of the Mail Merge Wizard (Complete the merge), click Print.
-
In the Merge to Printer dialog box, use one of the following methods, and then click OK:
-
To print all the documents, click All.
-
To print the document that you see in the document window, click Current record.
-
To print a range of documents, click From, and then type the record numbers in the From and To boxes.
-
-
In the Print dialog box, select the options that you want.
-
Save the Merged Letters for Later Use
If you want to edit merged letters or to save them for later use, you can collect them into a single document. To do this, follow these steps:
-
Click Edit individual letters.
-
In the Merge to a New Document dialog box, use one of the following methods, and then click OK:
-
To merge all the documents, click All.
-
To merge only the document that you see in the document window, click Current record.
-
To merge a range of documents, click From, and then type the record numbers in the From and To boxes.
-
-
Word opens a single new document that contains all the individual letters. You can then save the document for later use, just as you would any regular document.
References
For more information, click the following article numbers to view the articles in the Microsoft Knowledge Base:
318117 How to use addresses from an Excel worksheet to create labels in Word
318115 How to create a form letter by using information from an Access database in Word 2002
318112 How to use addresses from an Access 2002 database to create labels in Word 2002
294686 How to use mail merge to create a list sorted by category in Word 2002 and in later versions of Word
290408 Frequently asked questions about mail merge in Word 2002
294688 How to design and set up a mail merge address list in Word 2002 and in later versions of Word
294693 How to use mail merge to create a directory in Word 2002 and in later versions of Word
294683 How to use mail merge to create form letters in Word 2002 and in later versions of Word
Are you sending the same letter over and over to different individuals on different dates?
There is a way to automate that process.
You can actually create such a form letter within 15 seconds: 1 second to create the letter, and 14 more to change the name and address as appropriate.
In this method even the date updates itself automatically.
Follow these steps:
1) First create the letter just as you want it, complete with its logo, border, drop cap, or any other stylistic or design features that you’d like to have in your form letter.
Here is an example:
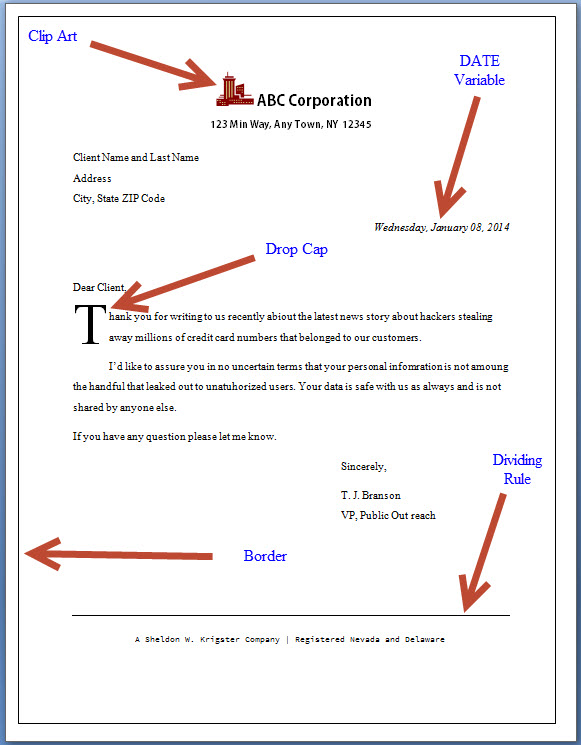
NOTE: To insert the date select MS WORD Ribbon > Insert TAB > Quick Parts > Field > Date. In the Field dialog box, select the date format you like and click OK.
2) Place your cursor anywhere in the letter and select all by pressing Ctrl + A.
3) Select MS WORD Ribbon > Insert TAB > Quick Parts > Save selection to Quick Part Gallery to display the Create New Building Block dialog box.
4) In the NAME field, give a very simple name that you can remember easily, like “L”. Click OK and close the dialog box.
5) Whenever you’d like to create this form letter, create a new blank document. Then press L (or whatever the name you have given to your letter template in step 4) and F3. (NAME + F3)
Bingo! Your letter will appear in a flash, with every feature you have saved it with.
Now all you need to do is update the client name and address and you’re good to go!
NOTE: If while shutting down your MS Word you get a warning message asking whether you’d like to save the changes made to the Building Blocks or not, click Yes so that your letter template will still be available the next time you launch your MS Word.
- Start
- Newsblog
- Android / iOS / Microsoft Windows
- Data Protection / ecommerce / finance
- Microsoft Excel – Office 365
- Microsoft Office / Office 365
- Microsoft Outlook – Office 365
- Microsoft Word – Office 365
- WordPress, Google, SEO & Affiliate
- Downloads
- Word & Excel Templates
- CV-Templates
- Contact
- Imprint
- Donate
Create professional letter templates with form fields in Word
In a society that is characterized by bureaucracy, nobody gets past more frequent correspondence with various places. Therefore, it makes sense to create a template in which the letterhead is already prepared.
If you have multiple people living in your household, you could either create a separate template for each one, or you could take advantage of the controls in Word 2016 to create a dynamic template that works for everyone.

Topic Overview
Topic Overview
We want to describe how to create dynamic letter templates in Word 2016 through controls.
Content:
- Show formatting characters
- Page setup
- Enable developer tools in Word
- Prepare letterhead in word
- Contents of drop-down list controls
- Insert recipient fields
- Insert date control in Word
- Fields for salutation, subject and letter text
- Greeting formula in letter template
- Insert page numbers in Word
- Enable edit protection in Word
Create professional letter templates with form fields in Word
In a society that is characterized by bureaucracy, nobody gets past more frequent correspondence with various places. Therefore, it makes sense to create a template in which the letterhead is already prepared.
If you have multiple people living in your household, you could either create a separate template for each one, or you could take advantage of the controls in Word 2016 to create a dynamic template that works for everyone.
Topic Overview
Topic Overview
We want to describe how to create dynamic letter templates in Word 2016 through controls.
Content:
- Show formatting characters
- Page setup
- Enable developer tools in Word
- Prepare letterhead in word
- Contents of drop-down list controls
- Insert recipient fields
- Insert date control in Word
- Fields for salutation, subject and letter text
- Greeting formula in letter template
- Insert page numbers in Word
- Enable edit protection in Word
1. Show formatting characters
1. Show formatting characters
As a first step, I recommend (as in all work under Word) to show the formatting characters, so we can see where paragraphs, blank lines, tab stops, etc. are.
Fortunately, this is quite simple, and can also be turned off and then off via one-click.
In the tab: “Start” and the symbol group “Paragraph”, click on the corresponding symbol.
See picture: (click to enlarge)
2. Page setup
2. Page setup
Next, we set up our page so that later the letterhead fits exactly into an envelope (DIN Lang) with window. To do this we go to the “Layout” – “Page margins” tab at the bottom of “Custom margins”
There we set the dimensions as follows:
- Above: 4.5 cm
- Left: 2.5 cm
- Right: 2.5 cm
- Below: 2.0 cm
- Gutter: 0.0 cm
- Gutter position: left
- Orientation: Portrait
See picture: (click to enlarge)

Next, we set up our page so that later the letterhead fits exactly into an envelope (DIN Lang) with window. To do this we go to the “Layout” – “Page margins” tab at the bottom of “Custom margins”
There we set the dimensions as follows:
- Above: 4.5 cm
- Left: 2.5 cm
- Right: 2.5 cm
- Below: 2.0 cm
- Gutter: 0.0 cm
- Gutter position: left
- Orientation: Portrait
See picture:
3. Enable developer tools in Word
3. Enable developer tools in Word
Since we want to create a dynamic letter template, we need the controls in Word at this point.
Although these are deactivated in the standard installation, it is recommended to make them permanently available via the options menu, since they can be used repeatedly for a variety of tasks.
To do this we go to the tab “File” – “Options” – “Customize Ribbon” and activate the item “Developer Tools” under the main tabs on the right side of the dialog box.
See picture: (click to enlarge)

After activation, the new “Developer Tools” tab is permanently available in every document, which you can use for all sorts of purposes.
Since we want to create a dynamic letter template, we need the controls in Word at this point.
Although these are deactivated in the standard installation, it is recommended to make them permanently available via the options menu, since they can be used repeatedly for a variety of tasks.
To do this we go to the tab “File” – “Options” – “Customize Ribbon” and activate the item “Developer Tools” under the main tabs on the right side of the dialog box.
See picture:
After activation, the new “Developer Tools” tab is permanently available in every document, which you can use for all sorts of purposes.
4. Prepare letterhead in Word
4. Prepare letterhead in Word
Now that we’ve made the basic settings and activated the tools we need, we can go to the first part of the letterhead.
Our cursor is now set to 4.5 cm from above and 2.5 cm from left to the layout setting previously set.
In this first line we insert our sender address in short form, so that the recipient can see who the sender is even before opening, and also for the postman, who, if the letter is undeliverable, can come back to us.
- On the Developer tab – Controls tab, select the Drop-down List Control tool
- Then click the design mode
- Click on “Properties” in the context menu (right mouse button) of the drop-down box
- Check the box next to “Apply text using style sheet ….”
- Click on “New Style”
- In the next dialog box, click on “Format” – “Font”
- Select the font and font size and confirm with “OK”
See picture: (click to enlarge)


Note:
In our example we set the font for the top line to “Arial” and the size to “9 points”. This is a good value according to experience, but of course you can of course set it completely free.
In addition, you can of course choose from already created styles, if you have a suitable for it, and do not have to make these settings completely new.
Now that we’ve made the basic settings and activated the tools we need, we can go to the first part of the letterhead.
Our cursor is now set to 4.5 cm from above and 2.5 cm from left to the layout setting previously set.
In this first line we insert our sender address in short form, so that the recipient can see who the sender is even before opening, and also for the postman, who, if the letter is undeliverable, can come back to us.
- On the Developer tab – Controls tab, select the Drop-down List Control tool
- Then click the design mode
- Click on “Properties” in the context menu (right mouse button) of the drop-down box
- Check the box next to “Apply text using style sheet ….”
- Click on “New Style”
- In the next dialog box, click on “Format” – “Font”
- Select the font and font size and confirm with “OK”
See picture:
Note:
In our example we set the font for the top line to “Arial” and the size to “9 points”. This is a good value according to experience, but of course you can of course set it completely free.
In addition, you can of course choose from already created styles, if you have a suitable for it, and do not have to make these settings completely new.
5. Contents of drop-down list controls
5. Contents of drop-down list controls
After the basic formatting of the drop-down list control, we can now turn to the desired interchangeable content.
For this we simply stay in the Properties dialog box and:
- Click once on the default “Select an item”
- Then change to “Change”
- In the next dialogue window, we exchange this value for our 1st sender address, and confirm with “OK”
- Then click on “Add” and insert the next sender address, which should be available later
You can repeat these steps as often as you like and insert the desired sender addresses that you want to be available for selection.
See picture: (click to enlarge)

After the basic formatting of the drop-down list control, we can now turn to the desired interchangeable content.
For this we simply stay in the Properties dialog box and:
- Click once on the default “Select an item”
- Then change to “Change”
- In the next dialogue window, we exchange this value for our 1st sender address, and confirm with “OK”
- Then click on “Add” and insert the next sender address, which should be available later
You can repeat these steps as often as you like and insert the desired sender addresses that you want to be available for selection.
See picture:

6. Insert recipient fields
6. Insert recipient fields
After we have inserted and adjusted the top sender line, we end the design mode again at short notice, and we can try out the result here.
There is now a drop-down list box available via which you can easily select your previously entered sender addresses.
Next we leave one line free (1x enter key) and start with the fields for the recipient address.
- To do this, we again create a drop-down list element in the first line of the recipient field
- Then go back to design mode
- Swap the text marked there for “salutation”
- And then insert the desired forms of address “Mr.” – “woman” – “company” and so on
- Close the draft mode
Then we go down one line (no paragraph!) By pressing “Shift” + “Enter” and insert element fields for text.
- In the Developer tools, select the Rich Text Content Control item
- Switch to design mode
- Replace the marked text with “Name”
- As described earlier, switch to the properties of the content control
- Enter the desired description title
- Use the styles to either select the default or set a custom style
In our example, we have here again to the font “Arial” and the font size set to 11 points. Repeat the points just described for all other recipient fields (street, postcode, city, etc.)
In the end, the whole thing should look like this:
See picture: (click to enlarge)

Letterhead in standard view

After we have inserted and adjusted the top sender line, we end the design mode again at short notice, and we can try out the result here.
There is now a drop-down list box available via which you can easily select your previously entered sender addresses.
Next we leave one line free (1x enter key) and start with the fields for the recipient address.
- To do this, we again create a drop-down list element in the first line of the recipient field
- Then go back to design mode
- Swap the text marked there for “salutation”
- And then insert the desired forms of address “Mr.” – “woman” – “company” and so on
- Close the draft mode
Then we go down one line (no paragraph!) By pressing “Shift” + “Enter” and insert element fields for text.
- In the Developer tools, select the Rich Text Content Control item
- Switch to design mode
- Replace the marked text with “Name”
- As described earlier, switch to the properties of the content control
- Enter the desired description title
- Use the styles to either select the default or set a custom style
In our example, we have here again to the font “Arial” and the font size set to 11 points. Repeat the points just described for all other recipient fields (street, postcode, city, etc.)
In the end, the whole thing should look like this:
See picture:
Letterhead in standard view
7. Insert date control in Word
7. Insert date control in Word
Now we have done a good deal.
Next, we’ll add a date control so we do not have to enter it, but simply pick it from a drop-down box.
To do this, we proceed as follows:
- Place the cursor in the last line after the control in the receiver field
- Put a left-aligned tab stop at 11 cm
- Press the TAB key once
- Use the Developer tools to insert the Date Picker content control
- Return to design mode
- As before, adjust the date selector for the other elements via the context menu of the element
See picture: (click to enlarge)

When all settings have been made, the whole thing should look like this, and you can easily paste the date over the selection.
See picture: (click to enlarge)

Now we have done a good deal.
Next, we’ll add a date control so we do not have to enter it, but simply pick it from a drop-down box.
To do this, we proceed as follows:
- Place the cursor in the last line after the control in the receiver field
- Put a left-aligned tab stop at 11 cm
- Press the TAB key once
- Use the Developer tools to insert the Date Picker content control
- Return to design mode
- As before, adjust the date selector for the other elements via the context menu of the element
See picture:
When all settings have been made, the whole thing should look like this, and you can easily paste the date over the selection.
See picture:
8. Fields for salutation, subject and letter text
8. Fields for salutation, subject and letter text
Next we continue with the subject line (Dear Mister or Mr.), as well as the title line, and of course the field for our actual letter text
- For this we start from the date line and release 3 paragraphs
- Insert a Rich Text control here again and adjust it as described above
- Then we release a paragraph again and reinsert a drop-down list control, which we use with e.g. “Dear Sir / Madam” and so on.
- Now again leave a paragraph free, and again insert a Rich Text control for the letter text
The whole thing should look like this:
See picture: (click to enlarge)
Letter template in draft mode

Letter template in standard view

Next we continue with the subject line (Dear Mister or Mr.), as well as the title line, and of course the field for our actual letter text
- For this we start from the date line and release 3 paragraphs
- Insert a Rich Text control here again and adjust it as described above
- Then we release a paragraph again and reinsert a drop-down list control, which we use with e.g. “Dear Sir / Madam” and so on.
- Now again leave a paragraph free, and again insert a Rich Text control for the letter text
The whole thing should look like this:
See picture:
Letter template in draft mode
Letter template in standard view
9. Greeting formula in letter template
9. Greeting formula in letter template
Now we have almost made it, and can make us to the greeting line.
For this purpose, we simply leave 2 paragraphs underneath the Text element for the letter text, and either add a dropdown box there, for example, to select between “Best regards” or “Best regards”, etc., or we will leave that alone At this point, remove the control altogether, and write a static salutation into it.
Next, I would again leave 2-3 paragraphs free to leave room for a signature between the greeting line and the name
There, we simply add a dropdown element with the sender name, which should be available to us later.
10. Insert page numbers in Word
10. Insert page numbers in Word
Since our letter can sometimes have more than one page, we should now use for the sake of completeness, an automatic numbering of the page numbers in our letter template.
To do this, we proceed as follows:
- In the footer of the document, double-click on it, which automatically activates the edit mode for headers and footers
- On the left side of the formula bar, go to “Page Number” – “Page End” and select a preferred number format, or create your own
- Close the Header and Footer area again
In the end, our letter template should look like this:
See picture: (click to enlarge)


Note:
You do not have to worry about the small distance in our template between the letter field and the greeting line. The greeting line automatically shifts down the more text you put into your letter.
Since our letter can sometimes have more than one page, we should now use for the sake of completeness, an automatic numbering of the page numbers in our letter template.
To do this, we proceed as follows:
- In the footer of the document, double-click on it, which automatically activates the edit mode for headers and footers
- On the left side of the formula bar, go to “Page Number” – “Page End” and select a preferred number format, or create your own
- Close the Header and Footer area again
In the end, our letter template should look like this:
See picture:
Note:
You do not have to worry about the small distance in our template between the letter field and the greeting line. The greeting line automatically shifts down the more text you put into your letter.
11. Enable edit protection in Word
11. Enable edit protection in Word
Before we save the letter template, I recommend to activate the processing protection so that only form fields can be filled out. This gives you the advantage that you do not accidentally change something in the template on the controls, because as you have seen, the whole thing is not even made on the fast.
For processing protection, go to the tab “Review” – “Restrict processing” in the editing restrictions and set best that only the filling of forms is allowed.
Save the document afterwards as .dotx (template).
Once you have made this selection, the “Custom Office Templates” location is automatically suggested, and you can later easily retrieve the template from any document in Word.
See picture: (click to enlarge)
Before we save the letter template, I recommend to activate the processing protection so that only form fields can be filled out. This gives you the advantage that you do not accidentally change something in the template on the controls, because as you have seen, the whole thing is not even made on the fast.
For processing protection, go to the tab “Review” – “Restrict processing” in the editing restrictions and set best that only the filling of forms is allowed.
Save the document afterwards as .dotx (template).
Once you have made this selection, the “Custom Office Templates” location is automatically suggested, and you can later easily retrieve the template from any document in Word.
See picture:
Popular Posts:

Enable developer tools in Office 365
Michael2023-04-12T09:11:59+02:00April 12th, 2023|Categories: Microsoft Excel, Microsoft Office, Microsoft Outlook, Microsoft PowerPoint, Microsoft Teams, Microsoft Word, Office 365, Short News, Uncategorized|Tags: form fields, MS-Office, Office 365, Short News|
Schalten Sie die Entwicklertools in Excel, Word und Outlook frei. Erweitern Sie die Möglichkeiten mit zusätzlichen Funktionen in Office 365.

Hide folders in Windows – Protect folders with password
Michael2023-04-04T07:05:14+02:00April 4th, 2023|Categories: Data Protection, Homeoffice, Microsoft Office, Microsoft Windows, Office 365, Short News, Uncategorized|Tags: Data Protection, Datenschutz, MS-Windows, password, Passwort, Short News|
Cyber security is also becoming increasingly important in the home. Encrypt files | Hiding folders | Password protection of folders in Windows.


Special Offers: Word & Excel Templates
Special Offers: Design CV Templates
Monatliche Technik Bestseller:
Popular Posts:
Enable developer tools in Office 365
Michael2023-04-12T09:11:59+02:00April 12th, 2023|Categories: Microsoft Excel, Microsoft Office, Microsoft Outlook, Microsoft PowerPoint, Microsoft Teams, Microsoft Word, Office 365, Short News, Uncategorized|Tags: form fields, MS-Office, Office 365, Short News|
Schalten Sie die Entwicklertools in Excel, Word und Outlook frei. Erweitern Sie die Möglichkeiten mit zusätzlichen Funktionen in Office 365.
Hide folders in Windows – Protect folders with password
Michael2023-04-04T07:05:14+02:00April 4th, 2023|Categories: Data Protection, Homeoffice, Microsoft Office, Microsoft Windows, Office 365, Short News, Uncategorized|Tags: Data Protection, Datenschutz, MS-Windows, password, Passwort, Short News|
Cyber security is also becoming increasingly important in the home. Encrypt files | Hiding folders | Password protection of folders in Windows.
Special Offers: Word & Excel Templates
Special Offers: Design CV Templates
Monatliche Technik Bestseller:
Related Posts
Title
Page load link
Go to Top
How to create a letter in Word
Do you want write a letter with Word but you don’t know how to do it? Then follow the instructions below. In the following lines, in fact, you will find explained how to proceed in the case of the version of Word for Windows e MacOS, of Word Online and the app of the famous word processing tool available for Android e iOS.
Windows/macOS
Let’s start by going to find out how to create a letter with Word per computer, be on Windows that of MacOS. Before proceeding, however, it is my duty to point out that, in this case, Word is part of the office suite from Microsoft, which is paid.
The suite is available in various versions: Office 365, which can be used upon subscription of a special subscription of 7 euros / month (valid for one computer only) or 10 euros / month (valid for six computers, with a free 30-day trial without obligation of renewal) and Home & Student/Professional, at a one-off cost of 149 euros. Alternatively, Word is available as a stand-alone application on the Windows 10 store for 135 euros. For all the details of the case, you can refer to my guide on how to download Word.
Having made the necessary clarifications above, let’s get to the real core of the topic and let’s find out, therefore, how to write a letter with Word from a PC. First, start the program by selecting the relevant one collegamento annexed to Start menu (on Windows) or by clicking on its icon that you find in Launchpad (your macOS).
Once the main Word screen appears, click the button New, located in the left sidebar, type the term «letter» in the search field located at the top and press the button Submit on the keyboard, so that all the letter templates available.
Then click on the template that you intend to use to draft your letter, in such a way as to display an enlarged preview and, if it convinces you, click on the button Crea, to load the model. And if you want to download other models, connect to this special web page on the Microsoft website. When the download is complete, open the file obtained and the template will be automatically loaded into Word.
After that, you can start editing the open template as you see fit. First of all, replace the example text in it with a customizing text, by clicking on the field to be modified (eg. Recipient name, Email address, Telephone etc.) and starting to type.
If you wish, you can also change the layout of the text and that of any decorative elements attached to the letter. To do this, select the tab Home that you find at the top of the Word window and use the buttons and menus available to change the type of font used, the font size and / or the color of the text. By going to the tab Inserisci (which is always at the top), on the other hand, you can insert and edit images, graphics, icons, etc. Further details on this can be found in my tutorial on how to use Microsoft Word.
After making all the necessary changes to your letter, save the created document by clicking on the menu Fillet located at the top left, by selecting the item Save with name from the side menu that appears, indicating the name, position and format (if you want to set a different one from the default one, which is DOCX) and clicking on the button Save.
To print your letter, click on the menu instead Fillet, select the voice Print from the side menu that opens, adjust all the appropriate settings relating to printing (orientation, sheet format, etc.) and click on the button Print.
Word Online
Word Online is, as can be easily guessed from the name itself, a version of the famous Microsoft program accessible via the Web. It has all the main features of the «classic» Word, works from any browser and operating system without having to download absolutely anything on the computer in use and is totally free. The only thing to take into consideration is the fact that to be able to use it, you need to log in with a Microsoft account.
That said, in order to write a letter with Word Online, the first step you need to take is to open the browser you usually use to surf the Net from your computer (eg. Chrome), go to the home page of the service and log in to your Microsoft account (if necessary).
Next, select one of the templates for letter among those available and click on the one you want to use. If you are not satisfied with any of the models listed, you can search and download more by visiting the appropriate web page on the Microsoft website. Once the download is complete, you need to upload the model to OneDriveby selecting the appropriate item at the bottom left, dragging the file into the browser window and then double clicking on its icon.
Once the Word editor is displayed, start modifying the chosen template, first of all replacing the example text in it with a personalized one: to do this, double-click on the field you want to modify, so as to highlight it, and just type your text.
As for the possibility of changing the layout of the text, any decorative elements present and the customization of the appearance of the letter, you can refer to the instructions I gave you in the step dedicated to Word for Windows and macOS, absolutely nothing changes.
Once you’ve made all the necessary changes to the letter, to save the created document to OneDrive, click on the menu Fillet situato in alto a sinistra, selects the voice Save with name, twice and press the button Save. To download a copy of the letter on your computer, instead, after going to the menu File> Save with nome select the item Download a copy (to download the document in DOCX format), Scarica come PDF (to download the PDF file) or Download as ODT (to download the file in ODT format).
If you want, you can also proceed with printing the letter by acting directly from the browser window: to do so, go, even in this case, to the menu Filletclick sulla voce Print twice in a row, adjust the print settings in the window that opens and press the button print.
Android / iOS
Word is also available as app for Android and iOS. In this specific case, it is a solution that can be used free of charge, provided however that the device in use has dimensions equal to or less than 10.1 «. In the case of larger devices, in fact, to use the application you need to subscribe Office 365, which I told you about in the chapter at the beginning of the guide. It should also be noted that subscribing to the plan in question allows you to unlock some additional functions that are not available in the free variant.
Having said that, in order to write a letter with Word using the app for Android or iOS, take your device, unlock it, access the home screen and select theicon application. Once the main Word screen appears, follow the short introductory tutorial that is proposed to you and log in to yours Microsoft account.
Make sure now that the section is selected New at the bottom of the screen (otherwise you can do it yourself) and select one of the available letter templates. You can also download new templates from the appropriate section of the Microsoft website and open them in the app by selecting them from the section apri (which is always found at the bottom).
Once the editor screen is displayed, proceed to modify the chosen template, replacing the example text in it with a customized one: to do this, tap on the portion of text of your interest, so as to highlight it, and type what you want.
If you want, you can also change the layout of the text and that of any decorative elements present in the letter: to do this, tap on the icon with the letter «A» and the pencil located at the top, select the item Home attached to the menu below and use the buttons and menus available to change the type of font used, the font size and / or the color of the text. By selecting the item Inserisci always attached to the bottom menu, however, you can choose to insert and edit images, icons, shapes and so on.
After completing all the changes, tap the button (…) at the top right and press the button Save, to save the document on OneDrive. If, on the other hand, you want to share the file in another app, select the item Send a copy.
If you want, still from the same menu, you can also export the document in a format other than the default Word format (DOCX), by tapping on the wording Export and selecting the output format you prefer (ODT o PDF).
As for printing, you can proceed directly from Android or iOS, always selecting the button (…) located at the top right of the letter editor, then the entry Print and, subsequently, the printer or printing app of your interest.
Tips on how to write a letter in Word
After understanding how to write a letter with Word, it seems only right to provide you with some useful advice on how to set up its content. Below, therefore, you will find explained how to write a type letter informal, formal e commercial. Enjoy the reading!
How to write an informal letter in Word
First, I want to give you some useful tips for drafting one informal letter, that is to say a letter addressed to a person you know or with whom you have a minimum of confidence. Below you will find a summary of how a letter of this type should be written (always pay attention to distracting and grammatical errors, to be absolutely avoided even in communications between friends!).
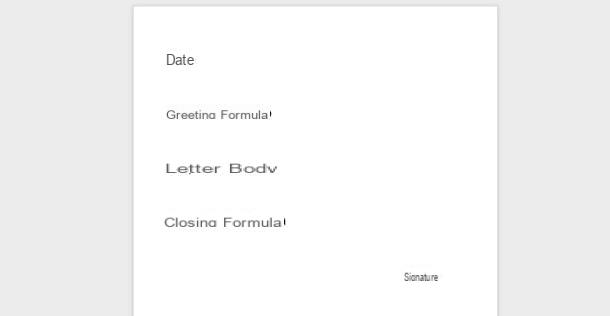
- Data — in general, the date is inserted at the top left and can be written both in letters and numbers. Yes, it is very important information, as, in this way, whoever receives the letter will be able to see when it was written.
- Salutation — in the case of letters of an informal nature, it is possible to use any form of greeting, which must always be written in the top left, depending on the relationship you have with the recipient, for example «Dear / a», «Dearest / a «,» Hello «etc., followed by the recipient’s name. After the name, a comma must be inserted and you have to go back.
- Body of the letter — is the «real» message to be sent to the recipient, in which it is possible to enter everything you want to communicate to the interlocutor.
- Closing formula — is the part of the letter dedicated to final greetings. As a rule, the formulas used are «I greet you with affection», «Affectionately», «See you soon», etc.
- Company — in general, the signature must be inserted at the bottom left. Being an informal letter, it can contain only the name or the name and surname pointed to.
- Post Scriptum — it is a short message to be inserted at the end of the letter, at the bottom or after the signature, which may contain information of secondary importance that you have chosen not to include in the body of the message or which you had forgotten in precedence.
How to write a formal letter in Word
If you have to write one formal letter, i.e. a letter addressed to subjects with whom you do not have a confidential relationship, the way in which you must address the recipient, in the introductory part, in the body of the message and also at the end, must be treated with the utmost attention. The same, of course, applies to punctuation, spelling and grammar. Taking into account what has just been stated, below you will find a summary scheme of how such a letter should be set up.
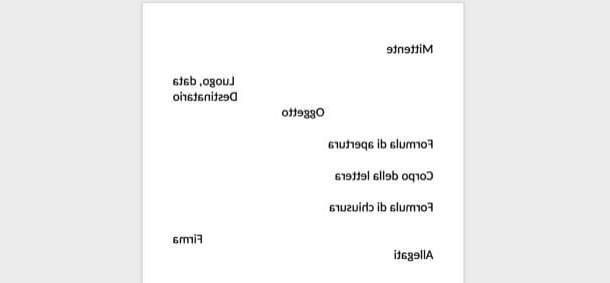
- Sender — in this section, usually located at the top left, you must indicate who is sending the letter, providing your name and surname or the name of the company you represent, address, contact details, etc.
- Place and date — in this section, generally placed at the top right or top left, the place and date on which the letter was written must be indicated, on the same line and separated by a comma. The date can be given both in letters and numbers.
- Addresses — in this section, located at the top right, immediately after indicating the place and date on which the letter was written, the name or company name of the recipient and his address must be entered. If necessary, it is also possible to precede the name of the recipient with the formula «For the attention of».
- Subject — is the part of the letter that highlights the content of the message. Generally, the object inserted in the upper left, but in some cases it can also be found centered. To make it more visible, you can write it in uppercase and / or format it in bold.
- Opening formula — is practically the initial part of the message to be sent to the recipient and must always be written on the left. Among the main formulas that can be used at the beginning are «Dear», «Dear» and «Dear» «, followed by the person’s title (eg Mr./Mrs., Dott./Dott.ssa etc.). After the name and surname of the recipient, you have to insert a comma and go back.
- Body of the message — is the content of the message. It usually consists of an introductory paragraph, a central part and a concluding paragraph.
- Closing formula — is practically the final part of the letter, which must be placed at the bottom right, in which a farewell formula must be inserted, such as «Yours sincerely.», «Sincerely.», «Cordiality.». The closing formula is always followed by a period.
- Company — in its simple form it consists of name and surname, while in its complete form it may also contain some contact information. In both cases, it should be written at the bottom right.
- Attachments — if the letter contains attachments, it is good practice to indicate them at the bottom left.
How to write a business letter with Word

If you need to write one business letter, that is to say a letter addressed to a company or an enterprise, the precautions you must take to ensure that it is composed correctly are those indicated in the following diagram. Keep in mind that it pretty much matches the style of the formal letter.
- Heading — usually, the header of the business letter is pre-printed, must be inserted at the top and must contain all the information relating to the sender, such as company name / name and surname, address (street, house number, postcode, city), telephone number and fax, postal current account, tax code and / or VAT number, etc.
- Place and date — place and date must be placed before the recipient, at the top right. They must be written in full, generally in textual form.
- Recipient and address — this section, placed at the top right, after place and date, allows you to enter the name or company name of the recipient and his address. Usually, the recipient is introduced with formulas such as «Dear», «Dear», «Dear», also abbreviated to «Dear», «Mr.», «Dear», if desired. etc.
- Content — this is the fulcrum of the business letter, to be placed, generally, 3 lines from the addressee. As a rule, double spacing must be left between paragraphs. Present an opening formula, in which the content of the message is introduced, and a closing formula, or greetings.
- Company — it must be placed at the bottom right, aligned with place and date, and it is customary to compose it with the name of the company with the qualification of the person signing under it and / or even further below, in brackets, name and surname.
How to write a letter without Word

As I told you at the beginning of the guide, it is also possible write a letter without Word: to do this, just turn to alternative word processing programs, as in the case of those I have reported below.
- LibreOffice (Windows / macOS / Linux) — is a renowned office suite, free and open source, available for the main computer operating systems. It allows you to perform all the operations that can be performed with Office and, consequently, also integrates a word processing software, called Writer, which has very little to envy to Word. For more information, refer to my guide on how to download LibreOffice.
- Google Docs (Online / Android / iOS) — this is the word processing tool that is part of the productivity suite from Google, usable as a Web service and as an app for smartphones and tablets. It is free, easy to use and offers all the main tools available in Word. For more information, see my article on writing apps.
- Polaris Office (Android / iOS) — this is an application for Android and iOS that follows in all respects the main functions of Office and, consequently, also integrates a convenient tool for word processing. Basically it is free, but eventually it is available in some paid versions (with prices starting from 3,99 euros / month) that allow you to remove advertising and unlock other extra functions. Again, for more details, you can read my post on writing apps.
- AndrOpen Office (Android) — is a port of LibreOffice for Android. Unfortunately, its interface is not particularly comfortable to use with the touch (as it is 100% similar to that of the desktop version), but it certainly represents a valid alternative on the mobile front to the use of Word and, more generally, Office. I told you about it in more detail in my post on Office for Android.
How to write a letter with Word
If you use forms at work, you’ll love the convenience of interactive or fillable forms in Microsoft Word. Forms that you can fill out make gathering information easy.


With a fillable form, all you’ve got to do is create a form in Word. Then you can use it over and over again. There’s nothing to print, so interactive forms are good for both your budget and the environment.
If you want a fillable form that also looks good, then begin with a template in Word. Form templates for Microsoft Word are available in Envato Elements and GraphicRiver.
In this tutorial, you’ll learn how to create a fillable form in Word, so you can reap all the benefits of an interactive form.
Find Great Form Templates on Elements
Fillable forms in Word have a variety of uses. Human resources use forms to capture employee and consultant information. Organizations use forms to register members, students, or clients. You also use forms to take orders for your products and services. Those are only a few examples of how useful fillable forms are.
Ideally, you want your Microsoft Word forms to be consistent with your branding. Well-designed forms reflect your credibility and professionalism. That’s why you want to avoid generic-looking forms. Want to know how to make a fillable form in Word that’s aligned with your visual brand?


The easiest way is by using templates for Word with pre-built tables or forms. One awesome source for Word templates is Envato Elements. Elements has an irresistible offer: for one low monthly fee, you get unlimited downloads of the millions of creative assets in its library. These include:
- Word templates
- fonts
- graphics
- photos
- and more
Whatever you need to make your forms look as good as possible, you can find in Elements.
If you need to create only one form, then a better source for Word templates is GraphicRiver. It’s got the same massive library of creative assets but on a pay-per-use basis. For the one-off project in Word, GraphicRiver is a terrific and budget-friendly option.
How to Create Fillable Forms in Word
You may be wondering, «How do I make a fillable form in Word?» Let me take you step-by-step through how to create a fillable form in Word.
Note: In the following tutorial, I’m using Microsoft Word for Mac version 16.48. If you’re using a different version, then the steps and interface may be different. But these steps should still be helpful for you.
1. Show the Developer Tab
As a first step, make sure that the Developer tab is showing up for you. This may be hidden by default. If you don’t see the Developer tab, follow these steps:
Go to Word > Preferences.


The Word Preferences menu opens. Click on the Ribbon & Toolbar button.


The Ribbon & Toolbar menu pops up. Under Main Tabs, scroll down and check Developer. Click Save.


The Developer tab should now be visible.


2. Determine the Layout and Structure of the Form
The next step is to determine the layout and structure of the fillable form. This will depend on what information you want to capture. You may want to sketch this on a sheet of paper first.
When you know what the form will look like, create a table in Word. By creating your form as a table in Word, it’ll be easier for you to keep things aligned and organized. The cells of the table are the form fields. Keep this in mind as you create your interactive form. This tutorial shows you the steps for how to make a table in Word:
Another option is to use a Word template with a pre-built table as a form. This way, the form has already been professionally designed. All you’ve got to do is to customize the form in Word according to your needs. Remember that the form template must have been built as a table so that you can make the form interactive in Word.
In the steps that follow, I’m going to create a form from scratch by first creating a table in Word:


Now, it’s time to make this a fillable form in Word.
3. Add Form Fields With Content Controls
You create a fillable form in Word by adding form fields. There are different types of form fields with content controls, depending on the types of responses you’re looking for.
Under the Developer tab, you’ll see buttons for creating a Text Box, Check Box, and Combo Box (or drop-down form field).


Let me show you how to create each type of form field:
How to Add a Word Fillable Form Text Box
Place the cursor where you would like to create a text field. Click on the Developer tab, then the Text Box button.


A text box is created. To change the text box settings, click on Options. The Text Form Field Options menu opens.


Here, choose various settings. For example, you’ve got several Text Types to choose from:
- Regular Text
- Number
- Date
- Current Date
- Current Time
- Calculation
Add a Default Text for the form field to guide respondents in filling out the form. You can also specify the Maximum Length and Text or Number Format.


When you’re happy with the settings, click OK. Repeat for each text box you want to create.


How to Add a Check Box to a Fillable Form in Word
Next, let’s make check boxes. First type the text for the check box items. Then, place your cursor in front of the first item. Go to Developer > Check Box.


A check box appears where your cursor was. Again, change the check box settings by clicking on the Options button.


The Check Box Form Field Options menu opens. Here you can determine whether the Default Value for the check box is Not Checked or Checked. Specify the Check Box Size and other options. When you’re done setting up the check box options, click OK.
Repeat these steps for the other check boxes.


How to Create a Drop-down Field in a Fillable Form in Word
Finally, let’s add a drop-down field in our form. Place the cursor where you want the drop-down menu to be, then go to Developer > Combo Box.


To add the drop-down menu items, click on the Options button. The Drop-Down Form Field Options menu opens.


Type a drop-down item, then click the + sign.


Repeat for each drop-down item you want to include in your fillable form. When you’re done, click OK.


Only the first drop-down item will appear. You’ll see the rest when you test the form.
4. Finalize the Form
Before using the fillable form in Word, it’s a good idea to first test it. To do this, click the Protect Form button on the Developer ribbon.


Now that the form is protected, fill the form fields like your respondents would. You’ll notice that the drop-down menu items appear when you click on the field or the arrow beside it.


When you’re happy with how the fillable form works, finalize the document by formatting the page. Click Protect Form again to un-protect it, so you can edit the document. Now’s the time to change fonts, colors, add logos, and format the form as you wish.
This is what my final fillable form looks like:


You may also decide to remove the shading for each form field. To do so, go to Developer > Shading.


I’m going to keep the Shading on, to make it clear to my respondents where they’re supposed to type in their answers. That’s because I deleted the borders of my table to give my form a cleaner appearance. If you keep the table borders, then it makes sense to switch off the form field Shading.
5. Use and Distribute Fillable Forms in Word
Once the fillable form in Word is completed, share it with your users or respondents. Do this by sharing the fillable form as an email attachment.
First, make sure that the form is protected. This ensures that other users won’t be able to edit the form when you share it with them.
Next, click on Share > Share a Copy.


In the menu that opens, click Email as Attachment.


This launches your default email application with the fillable form attached.


3 Top Form Templates for Word (Unlimited Downloads from Elements)
If you want a form with an impressive design, it’s best to start with a form template for Word. Templates with built-in forms are designed by professional graphic designers. This means the biggest—and hardest—design decisions have already been made for you. By customizing the colors and fonts and adding your logo, you can make the template truly your own.
Below are a few form templates for Word that look great:
1. Clean Business Registration Form Template


The Clean Business Registration Form template for Word allows you to gather basic personal information and contact details. It’s useful for registering employees, clients, members, vendors, and more. This form template comes in A4 size. You’ve got the option of customizing it with your branding colors. The template comes in Microsoft Word files, as well as files for InDesign, Adobe Illustrator, and Photoshop.
2. Order Form


Receive orders for your products or services with this Order Form for Word. This A4-sized template uses paragraph styles, making it easy to edit in Microsoft Word. It also comes in Adobe InDesign files, if you’re more comfortable editing in that application. A file guide is included to help you customize this template.
3. Client Questionnaire


Impress your clients with this Client Questionnaire template that looks anything but generic. Editable in both Microsoft Word and Adobe InDesign, this form template comes in A4 size. A 34-page guide walks you through how to edit and use the template files.
More of the Best Word Templates for Your Business or Organization
Now you know how to create a fillable Word document. But aside from fillable forms, your business or organization needs other types of documents. Using templates for MS Word helps you create professional-looking documents quickly. Premium Word templates are designed to be easy to customize, so you end up with materials that are coherent with your brand.
Here are more Word templates you can customize to easily create impressive documents for your business or organization:
Learn More About Using Microsoft Word for Your Business and Personal Needs
Whether for personal or business use, MS Word lets you create various kinds of documents. But with power comes complexity, so it can take time to learn how to use its robust features.
The best place to start is with our ultimate guide, Learn How to Use Microsoft Word (Beginner Tutorial Guide). It takes you from the basics of opening and creating Word files, to more advanced skills like comparing and merging two Word documents.
These Word tutorials will also help:
Enhance Your Workflow With Fillable Forms in Word
You’ve seen how convenient it is to use an interactive, fillable form. And now, you know how to create your own fillable form in Word.
Take it up a notch by starting with a Word template, such as those from Elements or GraphicRiver. These professionally-designed templates for Word are sure to impress your clients, employees, or members.
For unlimited downloads of Word templates, take your pick of the vast options in Envato Elements. For one small monthly subscription, you get unlimited downloads of anything you want in its massive library. These include photos, fonts, graphics, as well as sound effects, music, and stock video. If you create many marketing and communication materials, Elements gives you massive value.
For one-off projects, GraphicRiver is another massive library of Word templates and other creative elements. But with GraphicRiver, you pay only for each single use of each item. It’s an affordable way of getting the same professional results.
Have to write a letter to the PC using Word, but he is not a great expert in technology and you still don’t know how to get around in Microsoft’s famous word processing software. Things are like that, am I right? Then I would say that you have come to the right guide at the right time. If you give me a few moments of your precious free time, in fact, I can explain to you, in a simple but at the same time detailed way, how to do it.
In the following lines you will find, for the note, a detailed explanation on how to write a letter with Word informal, formal or business. I will therefore explain to you how to reach your goal using the «classic» computer software, its online variant and its applications available for mobile phones and tablets. In short, in the end you should have a fairly complete picture of the situation.
Finally, I will be happy to suggest some alternative tools that you could use to «throw away» your message acting both as a PC and as a mobile device, if you cannot use Word. Now, however, it is enough to chat and take action! I wish you, as always, a good reading and I wish you all the best!
Table of Contents
- 1 How to create a letter in Word
- 1.1 Windows / MacOS
- 1.2 Word online
- 1.3 Android / iOS
- 2 Tips on how to write a letter in Word
- 2.1 How to write an informal letter in Word
- 2.2 How to write a formal letter in Word
- 2.3 How to write a business letter with Word
- 3 How to write a letter without Word
How to create a letter in Word
to wish write a letter with word but you don’t know how to do it? Then follow the instructions below. In the following lines, in fact, you will find explained how to proceed in the case of the version of Word for windows y MacOS de Word online and the application of the famous word processor available for Android y iOS.
Windows / MacOS
Let’s start by discovering how to create a letter with Word for Pc both up windows that up MacOS. However, before I continue, it is my duty to point out that in this case, Word is part of Office package Microsoft, which is paid.
The suite is available in several versions: Office 365, which can be used with the subscription of a specific subscription of 7 euros / month (valid only for one PC) or 10 euros / month (valid for six PCs, with a free trial of 30 days without obligation to renew) and Home and Student / Professional, at a single cost of 149 euros. Alternatively, Word is available as a separate application from the store Windows 10 for 135 euros. For all the details of the case, you can refer to my guide on how download word.
After making the aforementioned clarifications, let’s go to the core of the topic and discover, therefore, how to write a letter with Word from the PC. First, start the program by selecting the relevant one link annexed to Start Menu (in Windows) or by clicking on your icon what do you find in the Launchpad (in macOS)
Once the main Word screen is displayed, click the button new, located in the left sidebar, type the term «Letter» in the search field located at the top and press the button presentar in the keyboard, to show all letter templates available.
Therefore, click template that you intend to use to write your letter, to show an enlarged preview and, if you are convinced, click the button can bring to life, to load the model. If you later want to download other models, link to this special web page on the Microsoft website. Once the download is complete, open the obtained file and the template will automatically load in Word.
Later, you can start edit the open model as you see fit. First, replace the sample text present in it with a custom text by clicking on the field to modify (eg. Recipient’s name, Email address, phone etc.) and starting to write.
If you wish, you can also change the text design and the design of the decorative elements attached to the letter. To do this, select the tab casa located at the top of the Word window and use the available buttons and menus to change the type of font used, the size of the font and / or the color of the text. Going to card enter (which is always at the top), instead you can insert and edit images, graphics, icons, etc. More details on this can be found in my tutorial on how use Microsoft Word.
After making all the necessary changes to your letter, save the created document by clicking on the menu office hour located in the upper left corner, selecting the item Save as from the side menu that appears, which indicates the name, position and format (if you want to set another one than the default, which is DOCX) and click on the button Save.
To print your letter, click on the menu office hour, select the article print From the side menu that opens, adjust all settings related to printing (orientation, sheet format, etc.) and click the button. Print.
Word online
Word online It is, as you can easily guess from the name itself, a version of Microsoft’s famous home program that can be used via the Web. It presents all the main characteristics of the word «classic», it works from any browser and operating system without having to download absolutely anything on your PC and it’s totally free. The only thing to keep in mind is the fact that in order to use them, you must log in with a Microsoft account.
That said, to write a letter with Word Online, the first step you must follow is to open the browser you usually use to surf the net from your PC (ex. chrome ), go to the home page of the service and log in to your Microsoft account (if necessary).
Then select one of the models by letter among those available and click on what you want to use. If none of the models on the list satisfy you, you can search for and download others by visiting the appropriate website on the Microsoft website. Once the download is complete, you should upload the template to one drive linuxby selecting the appropriate item in the lower left, dragging the file into the browser window, and then double-clicking the relative icon.
Once the Word editor is displayed, start modifying the chosen template, first replacing the sample text in it with a custom one: to do so, double click on the field you want to modify, to highlight it and type your text as well.
As for the possibility of changing the text design, the decorative elements that may be present and the customization of the letter’s appearance, you can consult the instructions I gave you in the step dedicated to Word for Windows and MacOS, it does not change nothing at all.
Once you have made all the relevant changes to the letter, to save the document created in OneDrive, click on the menu office hour located in the upper left, select the item Save astwice and press the button Save. To download a copy of the letter on the PC, instead, after going to the menu File> Save As select the article Download a copy (to download the document in DOCX format), Download as PDF (to download the PDF file) or Download as ODT (to download the file in ODT format).
If you wish, you can also proceed to print the letter by acting directly in the browser window: to do so, go, even in this case, to the menu office hourclick on the item print twice in a row, adjust the print related settings in the window that opens and press the button press.
Android / iOS
word also available as application for Android and iOS. In this specific case, it is a solution that can be used for free, as long as the device in use is 10.1″ or less in size. In the case of larger devices, in fact, to take advantage of the application, you must subscribe to a subscription Office 365, which I told you about in the chapter at the beginning of the guide. It should also be noted that the subscription of the plan in question allows you to unlock some additional features that are not available in the free variant.
Given this, to write a letter with Word using the Android or iOS app, grab your device, unlock it, go to the home screen and select the icon application. Once the main Word screen appears, follow the summary introductory tutorial that is proposed to you and access yours Microsoft account.
Now make sure the section is selected new at the bottom of the screen (otherwise provide) and select one of the available models by letter. You can also download new models from the corresponding section of the Microsoft website and open them in the application, selecting them in the section open (which is always at the bottom).
Once the editor screen is displayed, also proceed to change the chosen template, replacing the sample text with a custom one: to do so, touch the part of the text that interests you, to highlight it and write what you want
Optionally, you can also change the text layout and decorative letter design: to do so, tap the icon with the letter «A» and the pencil located at the top, select the item casa attached to the menu at the bottom and use the available buttons and menus to change the type of font used, the font size and / or the color of the text. Select item enter always attached to the menu at the bottom, instead, you can choose to insert and modify images, icons, shapes, etc.
After completing all changes, tap the button (…) located in the upper right and press the button Save, to save the document in onedrive. If you want to share the file in another app instead, select the entry Send a copy.
If you want, always from the same menu, you can also export the document in a different format from Word’s default (DOCX), by touching the wording export and selecting the output format you prefer ( ODT o PDF ).
As for printing, you can proceed directly from Android or iOS, always selecting the button (…) located at the top right of the card editor, then the entry print and, later, the printer or application for printing of your interest.
Tips on how to write a letter in Word
After understanding how to write a letter with Word, it seems right to give you useful tips on how to set up content. Below, therefore, you will find explained how to write a type letter. informal, formal y commercial. Happy reading!
How to write an informal letter in Word
First of all, I want to give you some useful tips for writing one. informal letterThat is, a letter intended for a person you know or with whom you have a minimum of trust. Below is a summary of how to write such a letter (always pay attention to distraction errors and grammatical errors, to avoid them absolutely even in communication between friends!).
- date — in general, the date is entered in the upper left corner and can be written in both letters and figures. Yes, this is very important information, because this way, those who receive the letter will be able to see when it was written.
- Greeting formula — In the case of informal letters, it is possible to use any form of greeting, which should always be written at the top left, depending on the relationship you have with the recipient, for example, «Dear», «Dear» «,» Hello ‘, Etc., followed by the recipient’s name. After the name, a comma must be inserted and you must return to it.
- Body of the letter — is the «real» message that will be sent to the recipient, where you can enter everything you want to communicate to the other party.
- Closing formula — is the part of the letter dedicated to the final greetings. As a general rule, the formulas used are «I greet you with affection», «Affectionately», «See you soon», and so on.
- company — in general, the signature should be inserted at the bottom left. Being an informal letter, it can contain only the first name or the indicated first and last name.
- Post Scriptum — It is a short message that must be inserted at the end of the letter, at the bottom of the page or after the signature, which may contain secondary information that has been chosen not to be included in the body of the message or that was previously forgotten.
How to write a formal letter in Word
If you have to write one formal letterThat is, a letter addressed to people with whom you do not have a confidential relationship, the way in which you should communicate with the recipient, in the introductory part, in the body of the message and even at the end, must be treated with the utmost care . The same, of course, for punctuation, spelling, and grammar. Given what has just been said, a summary of how such a letter should be established is shown below.
- sender — in this section, generally located in the upper left part, it is necessary to indicate who is sending the letter, providing the name and surname or the name of the represented company, address, contact information, etc.
- Place and date — In this section, generally placed in the upper right or upper left, the place and date the letter was written must be indicated, on the same line and separated by a comma. The date can be written in both letters and numbers.
- beneficiary — in this section, located in the upper right, immediately after the indication of the place and the date the letter was written, the name or the name of the recipient’s company and its address must be entered. Eventually, it is also possible to prefix the recipient’s name with «To the kind attention of».
- sujeto — is the part of the letter that highlights the content of the message. In general, the object inserted in the upper left corner, but in some cases it can also be found centered. To make it more visible, you can write it in capital letters and / or format it in bold.
- Opening formula — is practically the initial part of the message that will be sent to the recipient and should always be written on the left. Among the main formulas that can be used at the beginning are ‘Gentile’, ‘Egregio’ and ‘Spettabile’ ‘, followed by the person’s title (eg Sig./Sig.ra, Dott./Dott.ssa, etc. ). After the recipient’s first and last name, you need to enter a comma and return.
- Message body — is the content of the message. Generally it consists of an introductory paragraph, a central part and a final paragraph.
- Closing formula — is practically the final part of the letter, which should be placed in the lower right corner, in which a farewell formula should be inserted, such as «Sincerely», «Kind regards», «Kindness». The closing formula is always followed by a period.
- company — in its simple form, it consists of a first and last name, while in its full form it may also contain certain contact information. In both cases, it should be written at the bottom right.
- attached — if the letter contains attachments, it is good practice to indicate them in the lower left corner.
How to write a business letter with Word
If you need to write one business letterIn other words, a letter addressed to a company or company, the steps you must follow to correct it are the ones you will find in the following diagram. Note that it practically follows what the style of the formal letter is.
- header — Usually the heading of the business letter is pre-printed, it should be inserted at the top and it should contain all the information related to the sender, such as the first / last name of the company, address (street, house number, zip code , city), telephone and fax number, postal account, tax code number and / or VAT number, etc.
- Place and date — place and date must be placed before the recipient, top right. They must be written in their entirety, usually in text form.
- Recipient and address — this section, located in the upper right, after the place and date, allows you to enter the name or company name of the recipient and their address. In general, the addressee is introduced with formulas such as «Egregia / o», «Gentile», «Spettabile», which is also abbreviated as «Egr.», «Sig.», «Spett». and so on
- content — is the fulcrum of the business letter, which will generally be located on 3 lines from the recipient. As a general rule, double space should be left between paragraphs. Present an opening formula, in which the content of the message is entered, and a closing formula or greetings.
- company — It must be placed in the lower right part, aligned with the place and date, and is used to compose it with the name of the company with the name of the person who signs it and / or even below, between parentheses, first and last name.
As I told you at the beginning of the guide, it is also possible write a letter without Word : To do this, simply turn to alternative word processing programs, such as the ones I have provided below.
- LibreOffice (Windows / macOS / Linux): it is a renowned office suite, free and open source, available for the main OS of the Pc. It allows you to carry out all the operations that can be carried out with Office and, consequently, it also integrates a software for word processing, called Writer, which has very little to envy to Word. For more information, see my guide on how to download LibreOffice.
- Google Docs (Online / Android / iOS) — This is the word processing tool that is part of Google’s productivity suite, which can be used as a web service and as an application for mobile phones and tablets. It’s free, easy to use, and offers all the major tools available in Word. For more information, see my article on how to write apps.
- Polaris Office (Android / iOS): it is an application for Android and iOS that follows the main characteristics of Office and, consequently, also integrates a useful tool for word processing. It’s basically free, but it is eventually available in some paid versions (starting at € 3.99 / mo) that allow you to remove ads and unlock other additional features. Again, for more details, you can read my post on how to write applications.
- AndrOpen Office (Android): It is a LibreOffice port for Android. Unfortunately, its interface is not particularly comfortable to use by touch (as it is 100% similar to the desktop version), but it certainly represents a valid alternative on the mobile front for the use of Word and, in general, Office. I told you more in detail in my post on Office for Android.

- Article navigation:
- C1 Advanced (CAE) Formal Letter/Email: Structure
- C1 Advanced (CAE) Formal Letter/Email: Writing Guide
- C1 Advanced (CAE) Formal Letter/Email: Example Letters
- C1 Advanced (CAE) Formal Letter/Email: Example Questions
- C1 Advanced (CAE) Formal Letter/Email: Tips & Strategy
- C1 Advanced (CAE) Formal Letter/Email: Writing Checklist
- C1 Advanced (CAE) Formal Letter/Email: Useful phrases
- C1 Advanced (CAE) Formal Letter/Email: FAQ
![]()
FCE, CAE, CPE
Practice Tests Online
Get your writing checked, track your progress online.
Sample papers, online practice tests & tips.
Writing paper will require a response which is consistently appropriate for the specified target reader, and for example, you can expect to be asked to write different kinds of letters. Moreover, their register and style can be formal or informal.
What is the formal style of writing?
The main characteristics of a formal writing style are:
- A more complex structure. Formal writing often uses longer sentences. In formal writing, you will also see a more structured approach generally, with points clearly introduced, explained and concluded.
- An objective approach. Main points are usually stated and then supported with arguments. Formal writing is less likely to be emotional in style.
- Writing in the third person. Formal writing is not a personal writing style. The writer often aims to sound dispassionate about the topic.
 One of the most common mistakes made by inexperienced writers involves using too personal a manner in a piece of formal writing.
Me, myself, I
Everybody likes to talk about themselves, but when (for example) you’re reviewing a film, you should be talking about the film and not about yourself.
The informal you
The way the word you is used in informal speech ‘You should have seen it!’ ‘if you know what I mean’ is not appropriate in formal writing. The word you point a finger at the reader. But the readers are not friends of yours, and you have no right to make assumptions about them.
C1 Advanced (CAE) Formal Letter/Email: Structure
| 1. Salutation Dear Sir or Madam, Dear Mr Jenkins |
| 2. The first paragraph (opening) The reason why you’re writing this letter / the topic |
| 3. The next paragraphs (main content) Organise all the essential information in a clear and logical way. |
| 4. Closing and signing off Specify the action the recipient should take – sign off with: Yours faithfully |
![]()
FCE, CAE, CPE
Practice, Write & Improve
Get your writing checked, track your progress online.
Sample papers, online practice tests & tips.
C1 Advanced (CAE) Formal Letter/Email: Writing Guide
Before you start…

Read the task carefully and then… You need to underline all the content points and consider the following:
- Why are you are writing the letter/email? To correct information, to apply for a job, to complain about something…
- Who is the target reader? You may have to write to the editor of a publication, to a potential employer, to a university administrator…
- Which language/register would be appropriate to reach my goal? Is there enough specific detail in my letter/email to convince the target reader?
The CAE test does not require you to include dates or addresses in any of your letters, whether formal or informal.
1. Salutation
If you do not know the name of the person you are writing to, use this. It is always advisable to try to find out a name.
Dear Sir or Madam
If you know the name, use the title (Mr, Mrs, Miss or Ms, Dr, etc.) and the surname only. If you are writing to a woman and do not know if she uses Mrs or Miss, you can use Ms, which is for married and single women.
Dear Mr Jenkins
or simply
Dear Editor
2. The first paragraph (opening)
The first paragraph of formal letters should include an introduction to the purpose of the letter. The summary of the letter can be found and the intentions which will be displayed through the rest of the letter should be outlined.
Example 1: I am writing in response to the advert I saw in the newspaper seeking people to work as tour guides. I think I would make a very good tour guide and I wish to apply for the job.
Example 2: I am writing about a recent incident in your shop in which I had the misfortune to be involved in. The incident I refer to is when one of your staff stopped me and accused me of shoplifting.
3. The next paragraphs (main content)
The second and following paragraphs should provide the main information of the letter, and describe the main purpose mentioned in the introductory first paragraph. Most letters in English are not very long, so keep the information to the essentials and concentrate on organising it in a clear and logical manner rather than expanding too much.
- You should always be polite and respectful. A useful way to achieve it especially in formal letters is to use ‘modal verbs’, i.e., would, could or should.
- It’s important to write simply and clearly. It’s worth noting that you have to avoid using informal language, for instance, avoid contractions (i.e. I’m, it’s, etc.).
Sample paragraph structure:
Paragraph 1: To begin with, I would like to put forward …
Paragraph 2: Needless to say, this was ….
Paragraph 3: But the thing that impressed me most…
Get Your (CAE) Letter Checked!
Sample papers, online practice tests & tips. Track your progress online.
See more
4. Closing and signing off
 The final paragraph should shortly summarize the intent of the formal letter and end with some call to action – take, return the money, send information, etc.
Example call to actions:
Example:1 Thank you for your consideration of my suggestions. I look forward to an opportunity to discuss this matter further.
Example 2: If you require further information, please do not hesitate to ask
Closing and signing off:
Yours faithfully – use it if you don’t know the name of the recipient.
Yours sincerely – use it if you know the name of the recipient.
Let’s sum it up…
A good formal letter should be:
|
Keep your readers in mind when writing:
|
TIP: Remember about “linking” in the letter!
 Between paragraphs:
To begin with, I would like to put forward […]
Furthermore, …[…]
As far as …. is concerned […]
Within a paragraph:
I have taken part In many activities […] Moreover, I have been In the basket-ball team[…]
![]()
FCE, CAE, CPE
Practice Tests Online
Get your writing checked, track your progress online.
Sample papers, online practice tests & tips.
C1 Advanced (CAE) Formal Letter/Email: Example Letters
Topic:
You recently had an unpleasant experience when you were shopping in a department store. One of the assistants wrongly accused you of shoplifting. Although you were able to prove that you had paid for the item in question, you received no apology.
Write a letter to the manager of the shop, saying why you are angry and disappointed and asking for some kind of compensation for the way you were treated. Say that you will take further action if you do not receive an official apology.
Model answer
Dear Mr Menton,
I am writing about a recent incident in your shop in which I had the misfortune to be involved in. The incident I refer to is when one of your staff stopped me and accused me of shoplifting in front of about 20 other people. Needless to say, this was an extremely embarrassing situation for me. Thank goodness I had kept the receipt to prove that I had paid for everything on my person at the time, but to be accused of stealing like that in front of all those people – some of whom I knew personally – was very humiliating and degrading. The shop assistant used a very accusatory tone…
But the thing that angered and dismayed me most was not the accusation itself – after all, misunderstandings happen sometimes – but the accuser’s failure to acknowledge his mistake or apologise to me. When I showed him the receipt, he simply walked off mumbling about how ‘shady’ a character I looked. Considering how much embarrassment I was caused, I do not think it was too much to have expected a simple apology either, do you?
Which brings me back to why I am writing; if I cannot get an apology from this assistant, then I would like a formal one from you instead. If an official apology is not forthcoming and I am not compensated in some way – with a shopping voucher for example – then be warned that I will take further steps to ensure that I get justice.
I look forward to hearing from you at the very earliest convenience.
Yours sincerely,
Michael Mathers
Get Your (CAE) Letter Checked!
Sample papers, online practice tests & tips. Track your progress online.
See more
Topic
A student from a business school in an English-speaking country has arranged to spend two months on a work experience programme in your department. Your manager has asked you to write a letter to the student, welcoming him to your company, explaining what he will be expected to do and how he will benefit from this experience.
Write your letter.
Model answer
Dear Mr Miller
We are delighted that you have decided to spend two months on a work experience programme in the xxx marketing department. We warmly welcome you to our company in general and to our department in particular.
You will be given the unique opportunity to work with a young team launching a new soft drink. Your work will be as interesting as demanding. You will have to analyse several surveys which have recently been conducted. Based on the results of your analysis you will have to think about possible target customers. Furthermore, you will be asked to develop ideas on how exactly we could launch our soft drink. You will have to gather thoughts about how to run a successful campaign. As this project has not been made public yet, we expect you not to talk about this project to your friends or family. You will be expected to work hard and, sometimes, for long hours.
However, you will most certainly learn a lot. You will be given the unique chance to develop a marketing campaign. You will also get used to working with different marketing tools. Furthermore, you will have to learn how to take advantage of a wide variety of computer programs, which will not only help you to analyse the surveys conducted but will also assist you in making out possible target customers. This two months work experience programme will help you to understand the use and impact of marketing tools. We areconfident that this experience will go far beyond that what you have learnt at university.
We are looking forward to working with you.
Yours sincerely
Get Your (CAE) Letter Checked!
Sample papers, online practice tests & tips. Track your progress online.
See more
Topic:
Your company would like to offer work-experience placements to students in an international college. Write a letter for publication in the student newspaper at the college.
Your letter should explain what your company does, what kind of work-experience placements are available, and how students would benefit from the experience.
Write your letter.
Model answer
Dear Students,
Are you looking for a work placement that will give you plenty of valuable experience and will look good on your CV? If so, then our company may have something to offer you.
We are an international educational exchange organisation which organises links between schools all over the world. We currently have three work-experience placements available for students from your college. The work would involve a range of office tasks, including dealing with correspondence, arranging meetings and keeping our database up-to-date. We are particularly interested in offering these placements to students with some knowledge of two or more languages.
The placements would be of great benefit to the students who are given this opportunity. It would provide experience of working in a small and dedicated team, which would give you the chance to develop a wider range of office skills than would normally be the case in larger organisations. Our international network means that you would also gain some contacts all over the world, which might be of particular value to any of you considering a career in some aspect of education.
You will find further information about our organisation and the placements we offer on our website and we look forward to hearing from any of you who think that the work might be right for you — and that you might be the right person for one of these placements.
Best wishes to you all,
Paula Fisher
Get Your (CAE) Letter Checked!
Sample papers, online practice tests & tips. Track your progress online.
See more
C1 Advanced (CAE) Formal Letter/Email: Example Questions
Volunteers needed
We are looking for volunteers to help out at a famous, international sporting event.
We’re looking for friendly, respectful people with good language skills, good team skills and a ‘can-do’ attitude. We need people to welcome delegates, provide customer service and solve problems. If you think you have what it takes, apply now.
Write an application to become a volunteer. Mention:
– your language skills
– your personal qualities
– examples of times when you have demonstrated team skills
– any relevant work experience
Now write your letter. You do not need to include any postal addresses
A colleague of yours, Alice Watson, has applied for a job in the public relations department of a large charity. Poverty Action. You have been asked to write a letter providing a character reference for her. Indicate how long and what capacity you have worked with her, and how her personal characteristics would make her suited for her job. Here is part of the letter you received from Poverty Action:
The job of Public Relations Co-ordinator consists mainly of supervising PR work and entails travelling around the country and working with various people in our large organization. The successful applicant will need good managerial skills and be committed to the philosophy of
our charity
Write your letter in reply. You do not need to include postal addresses
On a recent holiday, you lost a valuable item. Fortunately, you have travel insurance to cover the cost of anything lost.
Write a letter to the manager of your insurance company. In your letter:
– describe the item you lost
– explain how lost it
– tell the insurance company what you would like them to do.
Write your email in an appropriate style.
![]()
FCE, CAE, CPE
More than Practice Tests
Get your writing checked, track your progress online.
Sample papers, online practice tests & tips.
C1 Advanced (CAE) Formal Letter/Email: Tips & Strategy

If you aim to write an official letter, you should:
- avoid everyday colloquial language or slang
- avoid contractions (I’m, it’s)
- avoid emotional, subjective language (terrible, rubbish, etc.)
- avoid general words such as nice, good, get, etc.
![]()
FCE, CAE, CPE
Practice, Write & Improve
Get your writing checked, track your progress online.
Sample papers, online practice tests & tips.
C1 Advanced (CAE) Formal Letter/Email: Writing Checklist

After writing your text, you can check it yourself using the writing checklist below.
How to do that? Simply check your text/email by answering the questions one by one:
Content
- Have I covered all the key information required by the task?
- Have I written only information which is relevant to the task?
- Have I developed the basic points in the task with my own ideas?
Communicative Achievement
- Have I achieved the main purpose(s) of the text (for example, explaining, persuading, suggesting, apologising, comparing, etc.)?
- Have I used a suitable mix of fact and opinion?
- Have I used a suitable style and register (formal or informal) for the task?
Organisation
- Have I used paragraphs appropriately to organise my ideas?
- Have I used other organisational features appropriately for the genre of the text (for example, titles, headings, openings, closings, etc.)?
- Is the connection between my ideas clear and easy for the reader to follow? (For example, have I used appropriate linking words, pronouns, etc. to refer to different things within the text?)
- Are the ideas balanced appropriately, with suitable attention and space given to each one?
Language
- Have I used a wide range of vocabulary?
- Have I avoided repeating the same words and phrases?
- Have I used a range of simple and more complex grammatical structures?
- Have I correctly used any common phrases which are relevant to the specific task or topic?
- Is my use of grammar accurate?
- Is my spelling accurate?
![]()
FCE, CAE, CPE
Practice Tests Online
Get your writing checked, track your progress online.
Sample papers, online practice tests & tips.
C1 Advanced (CAE) Formal Letter/Email: Useful phrases
Useful phrases for a formal letter: (use as set phrases in the exam, don´t experiment with new vocabulary or grammar)
Greetings
Dear Sir or Madam
Dear Mr Jenkins
Beginning:
With regards to the letter/email on…
With reference to your letter/email…
After having received your letter/email…
I received your address from … and would like …
Thank you very much for your letter/email on…
I have been given your contact details by… and I would like to…
In reply to your letter/email of…
Reason for writing
I am writing with regard/reference to …
I am writing to express (my concern about/ disappointment with/disapproval of/apologies for)
I would like to draw your attention to/point out …
Referring to their letter
As you stated in your leter, …
Regarding… Concerning … With regard to…
Complaining
I am wiing to compiain about …
You said …but in fact what happened …
Introducing points
(I feel) I must also (dis)agree with …
I should also like to point out that …
Your (article) states that … However,…
Request for action
I would appreciate it/be grateful if you would …
I look forward to receiving/seeing …
I trust/very much hope you will …
Ending:
I hope to hear from you soon…
If you require any further information, feel free to contact me
Should you require anything else, do not hesitate in contacting me
Regards
Yours faithfully
Yours sincerely
(signature)
C1 Advanced (CAE) Formal Letter/Email: FAQ
Who is the audience? This will be given in the prompt.
What is the purpose of the writing?
You are usually giving information or requesting action. You should be direct and get to the point quickly.
Should I use headings or bullet points? No.
How should it start?
“Dear Sir or Madam (if no name is given), I am writing to…” This is the expected opening of a letter. First, you explain why you are writing, in the next paragraph you explain why you think you should get what you want.
How should it finish?
You should clearly re-state your recommendation or desired action in your last paragraph. This is usually followed by a “I am looking forward to…” statement and “Yours faithfully/Yours sincerely, x.”
Cada vez más, los médicos han estado recomendando comprar viagra cialis levitra a sus pacientes para aliviar los síntomas de la disfunción eréctil. Estas son algunas de las razones: viagra cialis levitra es más dura que otras píldoras y, por lo tanto, permanece más tiempo en el organismo, comienza a actuar en 30 minutos y puede durar hasta 48 horas si se toma correctamente, y contiene Tadalafil (cialis), que es un “primo químico” de la Viagra.
Would you pass C1 Advanced (CAE)?
Sign up, resolve the tests and see what results you get.
Sign up