
If you want to write a book, you’ll need book writing software that’s up to the task. Yes, you can invest in dedicated book writing programs. But you don’t have to: a great writing tool is likely already at your fingertips, if you know how to write a book using Microsoft Word.
There’s a lot of book writing software out there. Many of these programs claim to offer intuitive use, help with organization, and even say they’ll keep you from distraction. The options can be overwhelming.
There’s still one tried and true option if you’re not interested in all that (or can’t afford the fancier programs): Microsoft Word.
I write most of my books in Microsoft Word, not to mention short stories. Here’s the rundown of how to write a book using Microsoft Word, and why that might be your best choice.
The Benefits of Microsoft Word for Book Writing
You most likely already have it. And so does everybody else. Word is the standard, accepted across platforms, and is easy to access for non-writers (your beta readers). It’s been around forever, so most people know how to use it.
There are book formatting templates. A ton of them. They have them for short story format and for manuscript format. Personally, I don’t use those templates, but they’re a nice baseline for beginners, or even old hats that just want to hurry up and write without setting up their document first.
It’s simple and uncluttered. There are a ton of apps and programs out there that will allow you to keep your plot structure notes close at hand, to rearrange your chapters with the click of a button, and to keep detailed character profiles right in the program. That’s all a little too much for me. I prefer handwritten notes and nothing else blocking my screen while I’m typing and Word gives me that.
It is worth noting that if all that sounds appealing to you, you can do those things in Word as well, it just won’t be as fancy as other programs.
Hey writer: the first step to writing a book is coming up with a great idea. The second step is figuring out the structure of your book. If you have an idea but you need help with the structure, check out our new book The Write Structure. In it, we’ll teach you how to apply timeless story structure principles to write a great book. Get The Write Structure »
How to Navigate Your Book in Microsoft Word
When you have a 90,000-word manuscript, navigating becomes daunting. Luckily there are ways to do it in Word that make it easier if you know where to look.
Chapter Headings
Word doesn’t divide your book into chapters for you like some other programs. There will be no easy way to click and drag to rearrange chapters.
What I recommend is using headings. On Word’s Home page, there are already standard headings listed. Definitely mess with them and change their formatting to something simple.
No one needs giant blue words as their chapter headings. (You can set your simpler formatting as your default style as well, so you don’t have to change it every time.)
Make the title or number of each chapter a heading. Then you can easily bounce around to different chapters through the navigation pane (check the Navigation Pane box under the View menu).
Bookmarks
These basically work the same way as headings, but they’re for anywhere in your document. Have a specific scene you need to do more research on? You can bookmark it and jump back to it later.
Bookmark by going to the Insert menu and clicking Bookmark. Name your bookmark and voilà. You can delete them easily from the popup menu as well.
Find and Replace
CTRL+F brings up a simple search option to find words and phrases in your document. CTRL+H brings up the full gambit. From that dialogue box, you can search, replace certain words with others (i.e. Jennifer now becomes Julia all through the manuscript), and go to any page, section, heading, bookmark, etc. that you need to go to.
Microsoft Word is Great for Editing Your Book
Word has a ton of options for editing your story, including comments, tracking changes, and comparing documents. All of these are under the Review menu.
I use the comments feature to make notes to myself where I need to recheck facts or add description later. It’s easy to navigate through the comments with the search feature or the buttons under the Review menu. Don’t forget to remove them all before saving your document as a PDF or sending it off to an editor.
Tracking changes is awesome and a lot of editors (for short stories anyway) will use this feature to collaborate with you during the editing process. You can accept or reject changes or even revert back to the original.
Finally, make sure you have grammar and spellcheck on! Grammar check even allows you to check style issues (like how to use an ellipsis correctly) and passive voice. It’s invaluable.
Pro tip: To keep you on track while you’re writing, turn off some of the more fine-tuning features of grammar check. There’s nothing that will ruin your flow more than a bunch of underlining you feel like you need to take care of immediately. I recommend running the full check when you’re done (or at least done for the day).
Formatting Your Book in Microsoft Word
Make sure you’re familiar with standard manuscript format for novels and formatting short stories. Take a look at those links and follow their instructions. You don’t want to get rejected out of hand because you tried some weird formatting that’s hard to look at.
One of the biggest gripes I see from editors is writers using spaces to indent paragraphs. Don’t do this. It makes it super hard on them when they’re putting a book together. Instead, use the ruler in Word (under the View menu) or the paragraph settings (under the Home menu) to adjust your tabs. A half inch is standard.
Despite what most of us were taught in school, the standard is now one space after periods, not two. This is another sticking point with editors, so don’t do it. If you’re used to two, there’s a grammar check feature in Word you can turn on to highlight every time you use two spaces.
Finally, use the page break option to break for a new chapter, not enter or a million spaces. You can find the page break under the Insert menu.
Pro tip: When in doubt about your formatting, you can turn on the Show/Hide option under the Home menu (looks like a paragraph symbol) to see all your formatting symbols.
Now That You’ve Mastered Microsoft Word, Go Write Your Book
Don’t let choosing writing software stagnant your writing. Don’t overthink it. You don’t need to keep up with the Joneses with the latest writing technology that’s trotted out on tech forums and in writing chats.
The important thing about writing a book is actually writing it. No fancy book writing software is going to help you with that.
So get writing!
Ever used Word to write a book? Do you have any more tips for how to write a book using Word? Let me know in the comments!
PRACTICE
Take fifteen minutes to write. Just write. Don’t worry about page setup, formatting, or which program you’re going to use. Open up Word or get out a pen and paper if you’d like!
When you’re done, share your writing in the comments. Don’t forget to comment on your fellow writers’ work!

Sarah Gribble
Sarah Gribble is the author of dozens of short stories that explore uncomfortable situations, basic fears, and the general awe and fascination of the unknown. She just released Surviving Death, her first novel, and is currently working on her next book.
Follow her on Instagram or join her email list for free scares.
Create a booklet or book
-
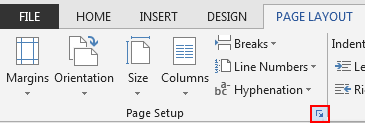
Go to Layout and select the Page Setup dialog launch icon at the bottom-right corner.

-
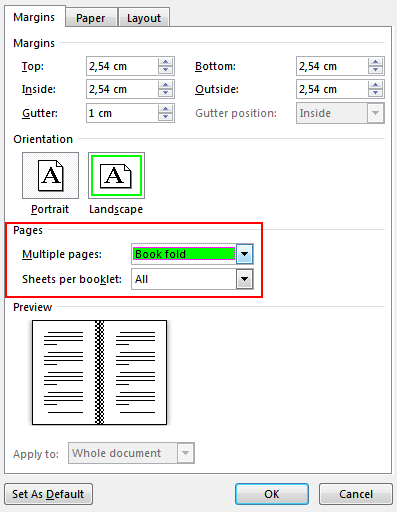
On the Margins tab, change the setting for Multiple pages to Book fold. The orientation automatically changes to Landscape.
Tip: If you have a long document, you might want to split it into multiple booklets, which you can then bind into one book. Under Sheets per booklet, choose how many pages to print per booklet.
-
Select and increase the value of Gutter to reserve space on the inside fold for binding.
-
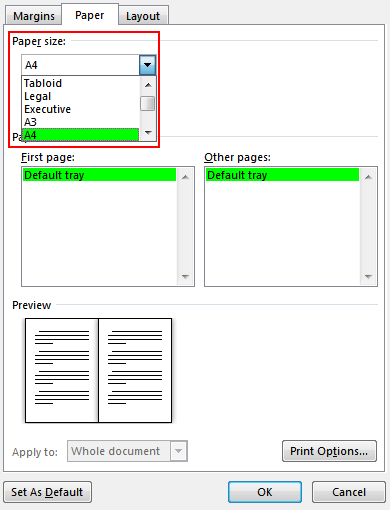
Go to the Paper tab and select the Paper size. The final size of the booklet is one half width of the paper size.
Tip: You can add many embellishments to your booklet’s appearance. For example, to add borders to every page, on the Layout tab of the Page Setup window, click Borders.
-
Click OK. If your document already has content, the text is formatted automatically, but you might need to adjust objects like images and tables manually.
Print settings for booklets
When you print the booklet, check the print settings to make sure you print on both sides of the paper and flip the papers correctly for the printing to work as intended.
-
Go to File > Print.
-
If your printer supports automatic printing on both sides, change Print One Sidedto Print on Both Sides. Choose the option Flip pages on short edge to avoid printing the second side of each sheet upside down.
-
If your printer doesn’t support automatic printing on both sides, select Manually Print on Both Sides, and feed the pages back to the printer when prompted. To avoid pages from printing upside down, flip the sheets on the short edge of the paper according to your printer’s instructions.
Tip: For a professional touch, consider adding page numbers in the header or the footer. For more info, see Add page numbers.
See Also
Create a booklet using a Word template
Booklet: Page numbering tips.
Create different headers or footers for odd and even pages
Get Microsoft publishing templates
Create a booklet or book
-
Go to Layout > Margins > Custom Margins.
-
Change the setting for Multiple pages to Book fold. The orientation automatically changes to Landscape.
Tip: If you have a long document, you might want to split it into multiple booklets, which you can then bind into one book. Under Sheets per booklet, choose how many pages to print per booklet.
-
To reserve space on the inside fold for binding, increase the width of the Gutter.
-
You can add many embellishments to your booklet’s appearance. For example, to add borders to every page, on the Layout tab of the Custom Margins window, select Borders.
-
Select OK.
If your document already has content, the text is formatted automatically, but you might need to adjust objects like images and tables manually.
-
Go to File > Page Setup and check the paper size. Keep in mind that the final size of the booklet is one half of the paper size. Make sure your printer is stocked with paper of the right size.
Print settings for booklets
When you print the booklet, check the print settings to make sure you print on both sides of the paper and flip the papers correctly for the printing to work as intended. If your printer supports automatic printing on both sides, follow these steps.
-
Click File > Print.
-
Under Two-sided, select Booklet.
Tip: For a professional touch, consider adding page numbers in the header or the footer. For more info, see Add page numbers.
Note: If your printer doesn’t support automatic printing on both sides, you’ll need to print each page manually.
See Also
Create a booklet using a Word template
Booklet: Page numbering tips.
Create different headers or footers for odd and even pages
Get Microsoft publishing templates
Contents
- 1 How do you make a book on Microsoft Word?
- 2 Can I use Word to write a book?
- 3 Does Microsoft Word have a book writing template?
- 4 How do I write a book on my laptop?
- 5 What is the best format to write a book in?
- 6 How do I write my first book?
- 7 How do you write a novel for beginners?
- 8 Do authors use Word?
- 9 What is the format for a book?
- 10 What app do you use to write a book?
- 11 How can I write a book online for free?
- 12 Can you write a book on Google Docs?
- 13 What does JK Rowling use to write?
- 14 Can anyone write a book?
- 15 What font do publishers prefer?
- 16 What are the 10 steps to writing a book?
- 17 What to Know Before writing a book?
- 18 How many chapter should a book have?
- 19 What makes a novel Bad?
- 20 Can I write a novel in simple words?
How do you make a book on Microsoft Word?
Create a booklet or book
- Go to Layout and select the Page Setup dialog launch icon at the bottom-right corner.
- On the Margins tab, change the setting for Multiple pages to Book fold.
- Select and increase the value of Gutter to reserve space on the inside fold for binding.
- Go to the Paper tab and select the Paper size.
Can I use Word to write a book?
Microsoft Word comes with pre-built page settings for creating books. Whether you’re creating a memoir or event guide, these settings let you create a beautiful book or booklet, from start to finish.
Does Microsoft Word have a book writing template?
Yes, Microsoft Word offers several templates within the application, including book templates to choose from. Different sizes and formats are offered, depending on the type of book you are writing.
How do I write a book on my laptop?
15 Book Writing Software Programs That Can Make Your Life Easier
- Scrivener. Scrivener is the ultimate book-organization tool.
- Google Docs. Google Docs is a great collaborative tool.
- Freedom.
- ProWritingAid.
- Grammarly.
- Novel Factory.
- Hemingway Editor.
- Evernote.
What is the best format to write a book in?
How To Format Your Book: Tips for Nailing Your Book Format
- Use black, 12-point, Times New Roman as the font.
- Use the U.S. standard page size of 8.5×11 inches and set your margins to 1 inch on all sides.
- Set alignment to left justified.
- Use a single space after periods.
- Use double-spaced line spacing.
How do I write my first book?
Here’s how to write a book : Life Kit Everyone has a book in them. Everyone also has a crummy inner voice telling them it’s never going to happen. This episode will help shut down those distracting voices and get you started writing a book. After all, all it takes to be a “real writer” is to do some writing.
How do you write a novel for beginners?
6 Key Tips for Starting the Novel Writing Process
- Choose a world you want to spend a lot of time in.
- Find a story idea within this world you want to immerse in.
- Assemble a cast of characters.
- Plan your ending.
- Break the story into acts.
- Start writing before you get cold feet.
Absolutely, many (most) authors use Microsoft Word, if not while writing the book, then in the editing process. Every editor I’ve ever worked with has sent me a Word file back with Track Changes and Comments for me to work on. I usually write in Word, too, but recently I started using Scrivener to write and outline in.
What is the format for a book?
Formatting is how your manuscript looks and reads. Things like font size, page color, word count, page number, line spacing, paragraph breaks–everything that goes into the visual appearance. This means manuscript format is the proper way your manuscript should look when you send it in for editing.
What app do you use to write a book?
Here are seven writing apps designed specifically for creative writing, with various organizational tools to take your work to the next level.
- Reedsy Book Editor. Price: Free.
- Scrivener. Price: Free trial for 30 days, $45 license fee.
- Ulysses.
- iA Writer.
- yWriter.
- Storyist.
- Final Draft.
- Grammarly.
How can I write a book online for free?
Best Free Online Writing Tools to Write a Book
- Google Docs.
- yWriter.
- FocusWriter.
- WerdSmith.
- Notes App.
- Evernote App.
- Grammarly.
- Hemingway.
Can you write a book on Google Docs?
Among all the book software options available, one is particularly practical for you: Google Docs. It’s free, and all you need is a computer with internet access. You can use Google Docs to write a book from start to finish, after which you’ll be ready to publish your work.
What does JK Rowling use to write?
Since finishing the Harry Potter novels, Rowling has gone on record saying she now uses a MacBook Air to write.
Can anyone write a book?
Anyone can write a book. It might be bad or be incomprehensible, but so what: it’s still a book and many published authors haven’t done any better.I like this though: it means anyone who puts in enough time can actually write well. Some of our best writing comes from ordinary people from all walks of life.
What font do publishers prefer?
Font: Your font should generally be 12 point Times New Roman. Though some agents and editors may prefer different serif or sans serif fonts like Arial or Courier New, Times New Roman with a 12 point font size is the industry standard.
What are the 10 steps to writing a book?
10 Steps To Writing A Novel
- Idea. It starts with an idea.
- General plot. What is the novel about?
- Character. I tend to move away from plot once I have the elevator pitch down.
- A synopsis. Ah, the synopsis.
- Write! I do a first draft where I essentially write up the above synopsis.
- Read.
- Re-write.
- Prose edit.
What to Know Before writing a book?
Before you start writing a novel…
- Nail down the story idea. An obvious step, but not an easy one to cross off.
- Read books in your genre.
- Choose your book’s point of view.
- Establish the setting.
- Develop your main characters.
- Establish the conflict and stakes.
- Create an outline.
- Choose your story structure.
How many chapter should a book have?
Most novels have between 10 to 12 chapters, but that’s not set in stone. You can have two chapters or 200 — it all depends on how comfortable you are with experimenting. Consider your dear reader.
What makes a novel Bad?
By flawed writing, I mean regular use of awkward, overly wordy, or confusing sentences or sentence constructions. I also mean grammar or punctuation that’s bad enough to cause the reader comprehension trouble.Flawed writing on a sentence level ruins a book because it makes the book difficult for most people to read.
Can I write a novel in simple words?
Yes, you can write a novel without a big, rich, wide, or vast vocabulary. If you ask famous writers like Stephen King or Ernest Hemmingway, they would agree wholeheartedly. In fact, having a standard or limited vocabulary might help you write a better novel. However, it’s often not as simple as it sounds.
Microsoft Word has been a go-to tool for authors for nearly forty years. Not only is it the industry standard for editors and agents, but it can also be used to format your book (although I wouldn’t advise it).
And since most people already have Word on their computers, it’s often the first stop on the book-writing journey. So read on as we explore how to write a book using Microsoft Word.
In this article, you will learn:
- Pros and cons of using Word.
- Basics for writing using Word
- Advanced features for using Word
- Whether Word is the best book writing tool
As you’ll see in this article, Word is adequate for writing books. But for indie authors, it’s certainly not the best tool. Even after you write your book in Word, you’ll need to format it before you sell any copies. And formatting requires either a separate tool or a professional (and expensive) formatter.
This is why we created Atticus as a better alternative to Word and other basic tools like it. Atticus is a word-processor, formatter, simple design tool, and a goal-tracker all at once. It’s a powerful but easy-to-use tool that can allow you to see how your finished book will look as you write it! These are just a few of the features Atticus offers. Plus, we’re working on a ton of new features like collaboration and editing that will be out soon.
There’s no subscription. Just a one-time price that includes all future updates.
If you want to see Atticus in action, check out this article. And if you want to see how to write a book using Word, keep on reading!
Pros and Cons of Writing With Word
There are a lot of word processors out there designed for book-writing. With all these options, how does Word measure up? Well, there are some definite pros and cons that will help you decide.
Pros
- Often included with your computer.
- Plenty of options for a tailored writing experience.
- Provides an auto-save function you can use.
- Has a good grammar and spelling tool included.
- Track Changes is used by most editors.
Cons
- Expensive if you have to buy it.
- Can be distracting with all the options.
- Not ideal for ebook or print book formatting.
- Long documents can get cumbersome.
Video: How to Write a Book in Word
For a nice summary of this article, along with a few of my own personal thoughts on the subject, be sure to check out this video on how to write a book in Microsoft Word.
Want more videos like this? Be sure to subscribe to my YouTube channel for weekly videos!
The Basics of Book Writing in Word
MS Word has a ton of features. This is good because it gives you options, allowing you to choose how best to build your writing experience. But there’s such a thing as too many options, and it’s easy to get bogged down in them.
Luckily, you don’t need to familiarize yourself with many Word features to get started. In fact, you can get by just fine with the basics.
For those who crave a simple, uncluttered writing process, the basics will be more than enough.
Font Size and Style
When you open a new Word document, you’ll see a default font style and size on the Home tab. Usually, this is Calibri or Times New Roman for the style, and 11 for the font size. Feel free to change these. Times New Roman and 12-point font are the widely accepted standard manuscript format.
If you are querying a literary agent or sending the document to an editor, they may have their submission guidelines, so remember to check.
If you’re going to self-publish (and you totally should), then simply choose a font size and style that you like. You’ll likely change it during formatting, anyway.
Chapter Headings
You’ll want a way to navigate easily through your document when the word count gets high. To do this, use the Styles option on the Home toolbar in Word.
You can highlight your chapter heading or number, which will bring up a toolbar with the Styles option in it. Or you can simply place your cursor in or next to your heading and then select the Styles option from the toolbar near the top of your screen.
I’d suggest using the Header 1 option for chapter headings. This way, you can use Header 2 for subheadings or scene breaks.
You can also pick “Create a Style” and make your own headings, using a color and font of your choice if you don’t like the defaults. But since you’ll likely end up changing the chapter styles later anyway, it’s not necessary.
Navigation
Once you start using Headings, you’ll want to activate the Navigation Pane so you can click around your book easily. When you’re working on a long document, this is a massive time-saver.
To do this, click on the View tab from the top toolbar. Just left of center, you’ll see an option that says “Navigation Pane Show.” Simply click the box. If you don’t have any headings yet, they’ll automatically populate there once you do.
If you don’t want to have the Navigation Pane up while you write, simply click it off and click it back on whenever you want to use it!
Find and Replace
Using the Find or Find and Replace feature in Microsoft Word can make your life easier when editing or trying to remember what color a certain character’s eyes were. (If you’re not using character profiles, that is.)
On the Home toolbar, you’ll see the Editing feature next to the Styles feature. Click on this to use the Find or Find and Replace tool, depending on what you need.
Word Count
If you’re writing to meet daily goals (which you totally should!), then it’s important to know your word count. Luckily, Word makes this easy by automatically displaying the word count at the bottom left corner of the window. (It displays the page number, as well.)
If you want to know how many words are in a certain section, you can highlight that section, and the program will automatically count them and display them in the bottom left corner. Easy!
That’s it for the basics! Using those four basic tools, you’ll be able to write your book in Word. But what if you’re a plotter or you want to get a jump on formatting? Or maybe you just want to know about some other features you can use. Well, read on for some advanced tips!
(If you’re writing a book for something like National Novel Writing Month, I’d stick with the basics above. NaNoWriMo is all about getting the words down. You can worry about prettying them up later!)
Advanced Word Book Writing
MS Word is a word processor. It’s a powerful one, but it’s still mainly a word processor. Now, that doesn’t mean you can’t do other things with it, like format for submission to a publishing house. You can.
But if you’re mainly concerned with formatting your manuscript for submission to traditional publishing channels, check out our in-depth article on manuscript formatting. In it, we cover things like title page creation, margins, and headers and footers.
If you want to know a bit more about Microsoft Word features that can help you write your book, read on!
Page Break
When ending a chapter, it’s a good idea to use the Page Break feature instead of hitting enter a bunch of times to get to the next page.
To do this, click on the Insert tab on the top toolbar. On the very left-hand side of the bar, you’ll see the Page Break option at the bottom. Just make sure your cursor is beyond the last character at the end of the chapter!
Using a Template
There are plenty of templates you can use with your Microsoft Word document. When you first open the word processor, you’ll see some Word templates offered next to the basic Blank Document option. You’ll also see a More Templates option so you can search for a specific type of Word template.
Most of these aren’t great for books, although you can likely find one or two with most (if not all) of the standard manuscript formatting in place. But if you’re making a booklet or you know there’s a book template available online, feel free to use them.
Just be aware that your Word document will probably still require you to use a book formatting software if you want a professional-looking book for self-publishing.
The Layout Tab
The default page size in Word is 8.5 by 11 inches. Most books are much smaller than this. So if you want to change your document to reflect the smaller page size, you can do so in the Layout Tab.
This is also the place to change your margins with the Margins tab located in the Page Setup section. You’ll also see options to change the paragraph indents and spacing if you want.
Editing Your Word Document
Word has a built-in spelling and grammar checker under the Review tab. It’s a good idea to do at least one pass with this. You can also access the Editor at the right side of the Home tab. It’s also worth doing another pass with a proofreading tool like ProWritingAid, Grammarly, or one of the many other options available.
The Review tab has a lot of useful stuff for editing. You can use the Read Aloud feature to help you find awkward sentences or minor mistakes you didn’t see on other editing passes. After sending your polished manuscript off to an editor (every writer should hire an editor!) you’ll likely use the Review tab to accept or decline changes made to the document.
Should You Use Word for Book Writing?
If you’re planning on self-publishing your book, Word is an adequate option. But if you want to make things (a lot) easier, we recommend using a writing tool that’s designed for writing books.
As mentioned above, we recommend Atticus. It is an all-in-one writing and formatting software made by yours truly with help from some truly awesome developers. With Atticus, you don’t have to worry about setting margins or page size — or even font type. This is all stuff that you can do with a few clicks of the mouse when you’re ready to export your finished product.
It includes a bunch of templates that will automatically format your book with the click of a button. And you can export it as a PDF file, a DOCX document for use in Word, or the industry-standard EPUB file for selling your book through online retailers.
Essentially, it’s like Word but without all the unneeded options — and a bunch of other options that you’ll actually use! It’s easy to use and makes everything from writing and editing to formatting and exporting a breeze.
But we know Atticus might not be ideal for everyone. You can check out our article on the best book writing software here for more options.
Conclusion
If you’re writing a blog post or a short story for online publication, Microsoft Word is a pretty great option. But things start to get a little unwieldy when you’re working on a long document. Plus, you’ll need to use a book formatting software for a professionally formatted book.
But if Word is what you’re comfortable with and you just want to get the words on the page, why wait!? Use the basics above and get to writing today!

Microsoft Word comes with pre-built page settings for creating books. Whether you’re creating a memoir or event guide, these settings let you create a beautiful book or booklet, from start to finish.
Create a Book or Booklet
First, go ahead and open Word. It’s recommended that you adjust these setting before writing the content of your book to prevent formatting issues late on.
Once you’re in Word, head over to the “Layout” tab. In the “Page Setup” group, click the small arrow at the bottom-right.

This opens the “Page Setup” window, where you will automatically be on the “Margin” tab. In the “Margins” group, you’re able to set the margins of the page. By default, the “Gutter” margin will be set to 0. This could cause issues further on, as the gutter margin is the amount of space between the content of your book and the fold where the pages of the book will be bound together. That said, go ahead and give the gutter a 1” margin, so the content of your book doesn’t get lost in the fold.
Next, select the arrow next to “Multiple Pages” in the “Pages” group, then select “Book Fold” from the drop-down menu. Once selected, you’ll notice your page orientation automatically changes from “Portrait” to “Landscape.”
Tip: You may notice a “Reverse Book Fold” option. This is for content that reads from right to left, such as Japanese-style books.
Once you’ve adjusted the settings, click “OK.”
The page setup for creating a book or booklet is now complete. There’s a ton of stuff you can do from here depending on what you require for your book. You may want to add a header or footer, create a table of contents, or give your book page numbers for easier navigation. We’ll leave the content and add-ons to you—we’re just here to show you how to create the setup.
It’s also worth noting that, depending on the length of your document, you may need to split it up into multiple booklets due to the sheer size of the document. That’s fine—you can bind them into one book later.
RELATED: How to Reduce the Size of a Microsoft Word Document
Print Your Book or Booklet
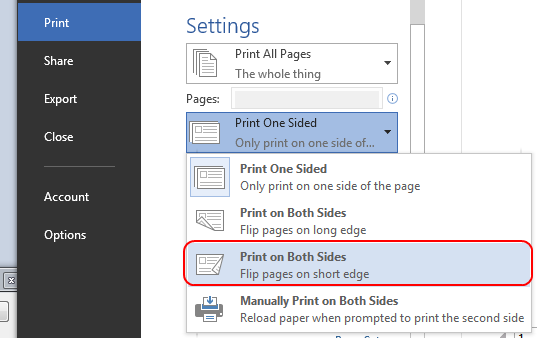
Once you’ve finished composing your book, it’s time for printing. Select the “File” tab, then select “Print” found in the left-hand pane.
Next, select the second option in the “Settings” group.
A drop-down menu will appear, presenting a few different printing-style options. If you have a duplex printer, select (1) “Print on Both Sides” (and whether or not to flip the page on the long or short edge). If your printer doesn’t have this functionality, you’ll need to select the (2) “Manually Print on Both Sides” option.
All that’s left to do now is select Print, and you’re good to go!
READ NEXT
- › How to Search for Text in Word
- › How to Use Outline View in Microsoft Word
- › How to Adjust and Change Discord Fonts
- › HoloLens Now Has Windows 11 and Incredible 3D Ink Features
- › This New Google TV Streaming Device Costs Just $20
- › Google Chrome Is Getting Faster
- › The New NVIDIA GeForce RTX 4070 Is Like an RTX 3080 for $599
- › BLUETTI Slashed Hundreds off Its Best Power Stations for Easter Sale
How-To Geek is where you turn when you want experts to explain technology. Since we launched in 2006, our articles have been read billions of times. Want to know more?
You know what can take away all the joy of finishing your book? Realizing that you have hours of tedious work to improve it from the technical side. And I don’t mean editing here, but formatting the text. Line by line, often word for word. Especially since it’s a job that could have been avoided.
Learn everything I know about how to write a book in Word here. I will tell you step by step about formatting the text that can be sent to the publishing house (this area is the focus of the entire article), will enable you to prepare an e-book, create a copy file for the client and avoid later technical corrections. Above all, I promise it will be very practical.
Ready? Ready?
Microsoft Word vs. Google Docs
At the beginning, it is worth noting that the following guide will be useful for you, regardless of whether you use standard Word or Word online (Google Docs). You can only find differences in the placement of certain functions.
Where to get Word for free and fully legal?
Microsoft Word (versions from different years) is a program with more features, but to use it legally you need to purchase a license.
If you want to have full (unlimited) access to the free program, it’s worth using Google Docs. Anyone with a Google (“Gmail”) email inbox, which is also completely free (and one of the best on the Internet) can access them for free. To take full advantage of “Word Online” you need Internet access, but it is also possible to work offline.
All the screenshots you will see below come from Google Docs. In this article, I will alternate between using the original name and the name “Word online”.
I use this terminology so that other people looking for free Word could come across this article.
A quick guide on how to get your free Word online
If you have never had contact with Online Documents, below I will describe step by step how to start them. If you are familiar with this program, go straight to the next part of this article
- To get a free Google email, go here: https://accounts.google.com/signup
- After creating an account and entering the mailbox in the upper right corner you will find an icon of 9 points that form a square. After clicking on it, you will expand the list of other available services (screen below). Select “Disk”. You can also access it directly via the link: https://drive.google.com
- “Google Drive” -> the “My Drive” tab(left menu) is the place where all your Google Docs will be saved by default.
- Click on the big plus image and then on “Google Docs”.
That’s all. Now we’ll get to how to write a book in Word online. Below you will find a description of all the settings, thanks to which you will create a text perfectly prepared for the publisher.
How to write a book in Word
Even before we start non fiction ghostwriting a book, it is worth setting the appropriate parameters for the text being created. We do not decide about them ourselves! Publishing houses adopt certain standards that are worth knowing in advance.
- Appropriate file name
Before we go into the settings, make sure you name your file appropriately. In Google Docs, you need to give a title to save the document.
Personally, I recommend you a very simple formula.
- Book title (possibly working).
- Date of edition.
Personally, I save a backup version of the file on my hard drive and in a separate folder at least once a day (but during intense writing days – even several times a day).
Including in your title the date you are working on the text is one of the best tips for writing a Word book in my opinion. This way, you can easily find other versions of the files and avoid accidentally overwriting a newer version with an older one. This type of “archive” will also be helpful if you decide to revert to a previous version of a scene or chapter.
- Text formatting
- Let’s start by setting the Times New Roman font(sometimes other fonts are also accepted, but this one is the most popular).
- Font size: 12 points.
- Then – justified text(the text fills the full available width), or “left-aligned”).
- Leading 1.5 lines(this is the space between lines of text).
- The next step is to set the indentation on the first line of each paragraph. To do this, select “Format” -> “Alignment and indents” -> “Indentation options”on the toolbar
Here you just need to click on the “First line” under the heading “Special indents” and confirm the changes with the “Apply” button.
- Save the settings as “Text style”
This way you won’t have to reset everything in the future
- To do this, select “Format” -> “Paragraph Styles” -> “Plain Text” -> “Update” Plain Text “to adjust”.
- Track title and chapter titles
- It is best to center the title of the novel / story / guide(central alignment) and set the size to 14 points.
- The same applies to chapter titles or their designations (“Chapter 1”, “Chapter 2”).
Often times, publishers do not indicate any specific specifications here (you should check it before sending your novel to a specific publisher!) – Then it’s best to keep it simple.
- Don’t forget to save the formatting as “Format” -> “Paragraph Styles” -> “Update” Title “/” Subtitle “style to adjust”.
- Record of dialogues
If you’ve never looked for information on this topic before, I recommend that you do so before writing a novel. I will write an article about it soon. It will complement your knowledge on how to write a book in Word so that it is prepared as well as possible for the needs of the publisher.
- I recommend that you set the automatic overwrite of the target “dash” here, which appears after pressing the minus on the keyboard “-“, for the so-called dash, which is the writing mark that starts the dialogues “-“. It will greatly simplify your struggle with how to write a book in Word
- To set a dash select “Tools” -> “Settings”,then manually add a “minus” sign (-) and paste “dash” (-). You can copy it from this text. Don’t forget to commit the change.
- Page numbering
If you want to insert page numbering, you can do it very easily by selecting “Insert” -> “Page Numbers” -> on the toolbar and then clicking on the tile where the numbering is in the lower right corner of each page.
The most common mistakes made by those who wrote a book in Word
- In the first place there must be too little involvement in checking the text before sending it to the publisher.
It is worth telling the painful truth here – even the best plot will not defend itself if the text contains a large number of basic spelling, punctuation, grammatical, stylistic and lexical errors. Why? Because it will be rejected in advance, without further exploring its contents. If you had to extract one piece of information from this article on how to write a book in Word, let it be – a thorough text check.
- Manual spaces, that is, double (and more) spaces.
One of the most important things about an article on how to write a Word book is to make sure that all the formatting is done automatically. All the settings I described above will make your text look exactly as it should.
- Manual word breakdown and transfer of “orphans”.
It is not possible to do this before the text is finally broken, in other words – it is not your job as a writer, unless you want to make the work of those who will do it much more difficult once you receive your final text.
- Incorrect spelling of punctuation marks (full stop, comma, exclamation point, question mark, semicolon, colon) and writing the text in parentheses.
They must adhere to the words they follow and be separated by a space from the word that follows.
To work!
You already know everything about how to write a book in Word, from the technical side.

Wondering how to write a book in Word? In this video, I’ll be sharing how to use Word to format your manuscript. This video is perfect for aspiring writers who need to know the format for writing a book.
Not only is Word online, which means you can be anywhere and have access, but you can also use this software to share your manuscript with your editor, writing coach, and beta readers. In this video, I share my screen and show my Microsoft Word format template, which walks you step-by-step through the process of formatting a book.
In this tutorial, you’ll learn how to format your manuscript, find your word count, create chapters, and more!
Video Transcript
The traditional publishing industry has set guidelines for how a manuscript should look. And the reason why everyone follows these guidelines is just because it makes it easier for the person reviewing the document. And of course, if we want somebody to review our document, we want to make it as easy as possible.
So what I’m showing you on the screen is my format template, and we’re looking at what is going to be your title page.
So on the very first line, you’re going to include your first name and your last name, you’re going to tab over to the right and type the words, ‘Word Count’ and include your word count.
Now the reason why this is important is because there is so many people that are going to make a determination on pricing based off word count. So to learn your word count, what you want to do is go to the top of your screen, and you want to go to Review, and then click word count. And in this particular document, there are 618 words. So I want to include that in this word count section.
So I’m going to highlight this. And I’m going to put 618 words. Of course, you want to include the word count for your own document. And then you’re going to drop down to the next line and you’re going to type your address.
On the very next line, you’re going to type your city, state and zip, and then you’re going to type your email address. Now, with your email address, make sure that it’s an email that you check regularly, this is going to be the email that you’re going to either be giving to your editor or your writing coach, or even to an agent or the publishing company. So you want to make sure that it’s an email address that you check often.
Then you’re going to drop down to the middle of the page, and you’re going to put your manuscript title in all capital letters.
Then you’re going to drop down two additional lines, and then you’re going to put the words by, and then your first and last name. And that basically is what your title page consists of. This is the first step in learning how to write a book in Word.
The next page we’re going to be looking at is the actual manuscript. So this is the page right after your title page. And this is going to be where your manuscript begins. You first want to do a page break so that your manuscript starts on a new page. In the menu, click Insert, then click Page Break and that will start you off on a new page. And you will also want to use this page break when you are looking to start a new chapter.
Now we’re going to make some changes to our manuscript. The first thing want to do is confirm the page layout. Click layout. Then click Margins and confirm that its set to normal. Next click these three dots, then Paragraph options, and then make sure that your line spacing says double.
And you’ll notice that there is an extra space between the line and again, this just makes it easier for the person reviewing your document.
The next thing you want to do is to make sure that you are using the right font. So the most common font for a manuscript is Times New Roman. You can also use the other Arial, and also Courier. So in order to change the font, you would click Home and if you already have text, you would want to select it first, otherwise for the sake of this video I’m going to use Times New Roman. And also confirm that your font size is 12. Now 12-point font is the standard font size, you don’t want it to be smaller, and you don’t want it to be bigger. Again, we’re trying to make it as easy as possible for the person reviewing the document.
The last thing that we want to do is make sure that we include a header. Now the reason why the header is important is if a person decides to print your document, you want to make sure that they know that your document is in the correct order.
So we’re going to add a couple of things to the header, we’re going to include your name and your manuscript title. And we’re also going to include page numbers this way, if they print it, and it happens to get out of order, they can put it back into order.
To get to your header, click here where it says header. And now you can type in this section. So include your first name and last name, you’re going to put a space and then you’re going to put a slash, and then you got to put another space and you’re going to put your manuscript title.
Then you’re going click Insert, then Page Numbers. And then I’m going to hit this option on the far right that will right align the page numbers.
Now you just click on your document and you can begin typing your manuscript. And that’s how you write a book in Word!
So I hope you enjoyed this video. If you want to write a book that helps you to connect with readers and sell more books make sure to visit my website at howtowriteabookthatsells.com!
Want to write your book in Google Docs instead?
For more videos like How To Write A Book In Word Click to Subscribe on YouTube!
Writing a book in Word seems like something simple and that everyone knows how to do. Just open a new document and start filling it out. The problem is that you may not like the result so much if you have not spent time before structuring the pages.
Because of that, and because an author I’ll call K. asked me how to configure Word to write, I decided to create this article.
Why is it important to properly configure your Word? You will feel better when it comes to writing. It is like using a folio filled with good handwriting, with everything well structured and clean. It will look like a real novel. It will help you to achieve a good finish and will motivate you to review or reread it when finished, and you will send your zero readers a quality copy.
In this article, I’ll show you the first steps, how to avoid mistakes, and how to use the review features when it’s your turn to self-correct.
Before going fully into the article, I want to tell you that the screenshots and references are to my version of Word. It may vary a bit in yours.
Configure the page
Before starting to write a single word, you must configure the page that you will use from now on. Thus, everything you write from the first line will come out to your liking.
We are going to work with a standard page in A4, which is the one that Word brings by default. In case you want to change the size to another of your preference, go to the Arrangement – Size menu and choose the measurements.
Paragraph
To carry out the configuration of the paragraph, you can click on the different buttons of the upper Start menu (surrounded by a red circle), or on the little arrow that you see in the image, of the block for the paragraph, which will open a box menu.
The first thing is to choose the option to justify the text. This way it will not stay aligned to the left and it will be well structured, with the appearance of a book.
Choose the line spacing. The usual option is 1.5 or 2, although you can use another that you prefer. I recommend not choosing a smaller one so that it does not look tight and makes reading difficult.
Remove the space after the paragraph. The usual thing is that this option comes by default. Create a gap between each paragraph or dialogue. This is a common mistake when writing a book in Word. Think that for the text to be correct, it has to be all together, each paragraph pasted to another, dialogue included
Fountain
Choose a simple font that is easy to read and a minimum of 12 points.
There are some recommended fonts for reading on the computer, which are those that do not have serif (san serif), that is, some “sticks” that adorn the letters. These serif (or serif) fonts are recommended for reading on paper: Times New Roman, Garamond, Book Antiqua, Georgia, Palatino Linotype, etc.
With these criteria in mind, choose the font you prefer. You can write on the computer with a san serif type Calibri, Verdana, or similar, and, when printing, choose one with serif. For example, I use Garamond for my novels, to write both on PC and read on paper. I’ve gotten used to it.
Configure options
From the top File menu, go to the Options submenu. In it, you will find a series of useful tabs.
- Review: uncheck the option “omit capitalized words” to mark the errors in these words as well. Check your grammar settings.
- Save: check the option to save every X minutes, just in case your computer shuts down. That way you won’t lose anything.
- Language: if you work with several languages, you can choose the specific one for your novel.
- Quick-access toolbar. It is very useful to have the most used buttons at the top. Great for symbols, comments, track changes, etc., and not having to search through the menus.
Bleeding
The first line indentation is used to make the text look better visually and to differentiate the paragraphs better. When there is no sangria and everything is followed, the feeling is overwhelmed.
To set the indentation, go back to the paragraph menu and mark the “first line” indentation. And next to the size. By default, it comes 1.25 cm. You can enter it more or less, according to taste.
At the beginning of the chapter or scene jump, after a narrative paragraph, the indentation in the first paragraph is usually removed and all the text is justified to the left. It is something optional that is seen more and more in novels.
Dialogue stripes
If you want to write a book in Word, you have to say goodbye to dialogues in bullets or moles. It is a resource that gives the fix for lack of something better, but they are not correct.
Dialogs must have the same alignment and indentation as the rest of the paragraphs, something that does not happen with bullets. And they must have a different dash than the normal dash (-).
To know more about the dialogues and how to rate them, I recommend you read this article.
I leave you a sample of a fragment of Asteria, one of my novels. The first image contains a bulleted dialogue and with the wrong line, the second is correct. You can tell the difference in structure, right?
Footnotes
If you have to add footnotes to your book, clarify something, translate a text in another language, a reference, etc. do not use parentheses in the same place where you wrote the novel. Insert a footnote. It will be perfect.
To include it, go to the References menu – insert footnote. It is very simple and it is numbered consecutively. There’s no way to get lost!
Other signs
Some other signs that we can use when writing a book in Word can be parenthetical hyphens or parentheses, or quotation marks for thoughts.
Parenthetical hyphens serve the same function as parentheses and, visually, are more beautiful in the narration. But, be careful, if you are going to use them in the dialogue you will have to use the normal parentheses so as not to confuse the reader with the narrator’s dimensions.
To use these scripts we use the same dialogue line.
With respect to the quotation marks, the usual thing is to use the Latin or angular “, although it goes by taste, and other authors use the English ones. Of course, it always unifies. If you use one, the same throughout the document.
They are found in the menu Insert – Symbols. If you are going to use them often, I recommend adding the symbols menu to the quick access toolbar that I showed you at the beginning of the article. Keep reading 9 tips to read more books and make reading a healthy habit in your day to day
Revision
The good thing about writing a book in Word is that when it comes to reviewing it, it makes our work much easier. Almost all of the items I’ll tell you about now are in the Review menu.
On the one hand, we have Exchange Control. If you leave it marked, you can correct it, but in such a way as to keep the text that was there before, although with studs. Clicking on the lines on the left toggles between the corrected version and the new one.
We can also add comments in the margin. Either from the menu or with the right button on any word. That way we can leave feedback to zero readers or to ourselves if we are reviewing.
The Spelling and grammar button makes a review of the entire document. Sometimes, it warns you of errors that have happened to you but be careful, because it is not always right. For example, Word believes that a dialog dash followed by an exclamation or question mark is an error. And anything farter from reality. The script must be attached to the sign at the beginning of the dialogue. In these cases, Word would mark these correct examples as incorrect:
-I’m glad to see you!
“Have you come back?”
Other utilities
- When a word runs out of space, Word usually moves the word to the next line. This causes that, especially with certain sizes, the words are very spaced. To avoid this problem, hyphens are used and Word divides the word by syllables, just as we see in books or magazines.
You can find this option in the Layout menu – scripts
- In this same menu, we can choose the page breaks, for example, when starting a new chapter. Thus, if we change part of the text, the beginning of the chapter will never move from the beginning of the page or the texts of each chapter will not be joined.
If you want to add images such as borders, QR codes, photos, etc. go to the menu Insert – images.
- You can also add links to pages by right-clicking on a selected word or words and choosing the “link” option.
That’s all! Word has many more utilities, but I think I have explained the most basic ones and the ones that will help you have a decent book.
So You Want to Write a Book with MS Word
If you intend to assemble and manipulate large amounts of text in Word and would like to minimize the time you spend fighting Word, it’s a good idea to have an understanding of how Word works.
If you are hoping for an easy template for a book, you should realize that there is no such single item. There are as many potential templates as there are books. However, if you format your text according to the structure of your book, following the principles introduced and linked here, you can plug the same text into any template to control the visual appearance, and reformat and reorganize your entire book very quickly.
This webpage will also point you toward how to set up Word to write a book, a dissertation, or other long document projects that require multiple chapters. If you follow the principles introduced in this article, Word will automatically update all those things that change as you edit. For instance, it will create a table of contents and update the page numbers as you shuffle chapters, and will re-number your figures and fix the cross-references when you add another figure.
The title of this article refers to “books,” but these are principles that apply to many types of long documents. Word has been known to handle 10,000 pages in a single file, and these approaches probably start being extremely useful at about 30 pages. This article is designed to redirect you to some of the most useful pages on the web that elucidate the necessary concepts in detail, although there is also a fair amount of introductory overview on this page. This page is also designed as a gateway so that you only have to bookmark or share one link that will direct you to many useful references.
This one article answers ninety percent of the most common questions relating to books and theses, so if you are looking for a quick fix, start there. You could also try these Step by Step Instructions from a Professional Writer, which will point you toward some of the most fundamental concepts—it’s a rather more efficient but also more elliptical introduction to the process than this page. Otherwise, this compilation of links assumes that you are interested in learning how to control Word, and attempts to get you started on that task.
Although each version of Word has different features, these are general principles that apply to all versions since Word 97, including versions for the Macintosh. Note: The next versions of Word after WinWord 2003/MacWord 2004 will incorporate a new file format, XML. XML should make long document writing easier, but it is not yet clear how or whether XML will change Word. These principles should still apply, however.
Is This the Right Article for You?
If you are actually hoping to print a bunch of pages that you can fold in half and staple into a booklet, see here: WinWord;MacWord. These principles may not be necessary for you, although they should be useful if your booklet has a lot of text.
If your book is going to have multiple graphics on every page and will resemble a coffee-table book more than a novel, you may want to consider page layout software, programs that will give you more control over graphic placement than Word does and will let you flow text around images. For Windows, try Microsoft’s Publisher; on a Mac, try Apple’s Pages. The more powerful incarnations of such features are found in Adobe InDesign or Quark Xpress, both offering 30-day trials.
Contents
Overview
General Principles
- How Word Thinks
- Working Efficiently
- Keep Your Doc Fast
- Prevent Corruption
Basic Techniques
- Styles
- Templates
- Sections
- Understanding Your Document
- Navigating Your Document
- Appearance
Special Cases
- Numbering
- Tables of Contents
- Images, Tables, Figures, Equations
- References and Bibliography
- Dealing With Other People: Reviewers, Multiple Authors, Printers
- Keeping Chapters in Separate Files
- Master Documents
More Information
- Customizing Word
- Additional Resources
- If You Still Have Questions
| Full Contents | General Principles | Basic Techniques | Special Cases | More Information |
Overview
Authors generally write one chapter at a time, so that each chapter takes life as a separate entity. However, it’s tricky to print sequentially numbered pages, create a table of contents, or use cross-references when each chapter is a separate file. Word promises to make combining chapters easy with the Master Document feature, but this is likely to corrupt your documents and you are advised to avoid it.
Instead, you will generally be best off if you combine your entire document into one file and format it consistently. To do this, the most fundamental concepts you need to understand are Styles, Templates, and Sections. Section breaks between your chapters will let you mimic many of the things that you thought you needed separate files to do. Styles and templates help you enforce consistency while minimizing the work you have to do.
Styles are about structure. Working so extensively with Word demands that you learn to think a little bit like Word thinks. There are two facets to writing a book in Word. In the manuscript phase, you write and collect all the text that is part of the book. In the formatting phase, you decide what the book will look like. These are very different actions. In the first phase, you need to format the text according to the structure of the book, not according to what you want it to look like. You don’t tell Word that you want the text under the picture to be centered and bold, you tell Word that this piece of text is a caption, by applying the Caption style. In the second phase, you tell Word what you want a caption to look like, by defining the Caption style. As long as the book is formatted according to the role each piece of text plays, it is very easy to change your mind about what you want a caption, or a heading, or a footnote, to look like. Formatting according to structure allows you to implement the final touches very easily. When the thesis czars demand 12pt footnotes, not 10pt, it only takes you a few seconds to change the Footnote style to 12pt. When the publisher asks you to use underline instead of italics, it only takes you a few seconds to change the Emphasis style.
Templates hold sets of style definitions. Templates also hold layout instructions, such as margin size and the location of page numbers. As long as all of the text is formatted according to structure, you can simply change the template you are using and redo the look of your entire manuscript in just a few seconds. If you want to use one font for print and another for the web, you simply insert the same text into a Print Template and a Web Template, and voilà, all the appearance changes are made for you.
You should realize that Word is designed for user customization and if you are writing or editing long documents, it will definitely be worth the trouble to add your own keyboard shortcuts, create your own toolbars, and record the occasional macro. This page does not emphasize such tricks, but there is a section at the end to get you started customizing Word. This page also finishes off with links to additional resources. In particular, an article titled “Bend Word to Your Will” may be useful, as it is an even more extensive compilation of tips on using and customizing Word, many of them addressed to people who are doing long documents. Also realize that there are usually multiple ways to accomplish the same task in Word.
If you are already well into the writing process, it is not too late to apply these suggestions. In fact, it’s easier to understand how styles and templates work if you already have a lot of text you can play around with, and it’s easier to design a template when you have a rough sense of the structure of your document. Just do a Save As… TestFileName to protect your work in progress, and experiment to your heart’s content. Experimentation is often the best way to learn to control Word.
If you choose not to combine the chapters, you can and should still use most of these techniques. Basing each chapter on the same custom template and using styles will still be the best way to achieve consistent formatting. Word offers slightly more complex features that enable you to manage sequential page numbering and tables of contents, etc., across multiple files. Those tips are not so well documented, but you will find a few links below.
This article is divided into a number of subsections. As the linked articles were usually written to answer specific questions, not designed to walk someone through the process of writing a book, you may find repetition, and you may find indirect answers that require you to apply what you learn and your understanding of Word to your particular situation.
Mac users: articles written based on WinWord usually hold true for MacWord, but keyboard shortcuts often need to be translated; for references to Tools>Options, substitute Word>Preferences. Many of these links (any at http://word.mvps.org) will require you to hit refresh several times if you try to access them with Safari.
If you are familiar with web design, using styles in Word instead of directly applied formatting is very similiar to using CSS, and is based on the same principle of separating content from presentation. Cascading styles in Word, however, refers to the ability for a style to be based on a different style and to inherit most of its properties from that style. Templates in Word are not nearly as powerful as templates in a program such as Dreamweaver or GoLive—once the document has been created the link with the template is broken, and you can no longer update layout or text elements, as you can with web templates. You can still use the Word template to change style definitions, however, rather like a CSS stylesheet, but you have to consciously enable it.
| Full Contents | General Principles | Basic Techniques | Special Cases | More Information |
General Principles
- How Word Thinks
- Working Efficiently
- Keep Your Doc Fast
- Prevent Corruption
How Word Thinks
This article has a brief discussion of how Word understands the composition of a document, which is very different from the way you might understand it.
You should also realize that Word doesn’t think in terms of pages. A somewhat more extended and less technical discussion of what that means may be found here.
Though I know it may be hard to believe, the Help system can often be extremely helpful. There is a lot of information in the Help topics. It’s often tricky to find the right topic, so you might have to try a few guesses, but Help pleasantly surprises me more often than not.
Working Efficiently
Word is supposedly set up to «help» the novice user. For anyone writing a book, you want to turn off most of Word’s «helpful» features. In general, taking control of Word requires overriding many of its defaults.
Setting Up Word
Word has a number of features that let you quickly enter repetitive material, whether that material consists of plain text abbreviations for long words, accented or formatted text, tables, graphics, or fields.
Exploiting AutoCorrect
Using AutoText
When you are in composition mode, try to keep your hands on the keyboard as much as possible. This might mean you leave layout and some formatting for the editing process, rather than the composing process.
Useful Keyboard Shortcuts
Creating a Keyboard Shortcut
Keeping Your Long Document Fast
Word is a memory hog, and can slow down when working on very long documents. You will be happiest with plenty of RAM, or memory (and of course plenty of free hard drive space). In addition:
- Use styles conscientiously. Keeping track of style tags imposes less load on Word than keeping track of an infinitude of direct formatting.
- Work in Normal view as much as possible; turn off background repagination if you can bear it (Tools>Options>General), but note that it will be turned on again automatically if you shift to Print Layout view.
- Images, tables, graphics, and equations will all slow down your document, but see below for tips on those.
Keeping Your Long Document Uncorrupted
Again, styles reduce the possibility of corruption by giving Word less to keep track of. Here is an article discussing other causes of corruption.
Realize that Word does not have an AutoSave feature, only an AutoRecover in case of crashes. You can, however, set Word to automatically create backups, which will keep a copy of the last saved version of the file. In Tools>Options>Save, check the box for “always create backup copy”.
You should also try to train your fingers to hit Ctrl-S to save whenever they are not busy. My personal preference is to do a File>Save As FileName# at the beginning of every major editing session, whether I’m editing for textual content or for format. Avoid using Word’s Version feature, as it has been linked to corruption.
You should also set up a good backup strategy.
If your document does become corrupted, see these links:
- WinWord versions
- MacWord versions
Section breaks hold a great deal of information about the document, and can sometimes corrupt. Many experts will advise you toavoid section breaks. As long as these are used for good reason (beginning a chapter with «different first page” header/footer, a change in page orientation or number of columns), they should be acceptable. You can use StyleRef fields to change the text of a header/footer without section breaks, as detailed in this article.
| Full Contents | General Principles | Basic Techniques | Special Cases | More Information |
Basic Techniques
- Styles
- Templates
- Sections
- Understanding Your Document
- Navigating Your Document
- Appearance
Styles
Styles are collections of formatting instructions that let you change the formatting of large amounts of text with just a few simple steps. If you select all your text, then go up to the toolbar and change it from 10pt to 12pt, that is called direct formatting, because you have directly applied formatting to the text. An alternative is style-based formatting. Styles deal with structure, not appearance. You assign styles to text depending on the role that text plays—chapter heading, footnote, block quotation—not depending on what you want that text to look like.
You need to understand styles because Word thinks in terms of styles, and if you use direct formatting in a book, Word will fight you on every single page. You might compare it to giving a person directions in Italian when that person speaks Spanish.
An introduction to styles
Why use Word’s built-in heading styles?
How to save yourself hours by using Outline View properly
Why does text change format when I copy it into another document?
How to Apply A Style
How to Modify A Style
How styles in Word cascade
What is the difference between the Normal and Body Text styles?
Default Paragraph Font Explained
One neat trick: you can use Find & Replace to easily change styles throughout a document. [Article forthcoming]
Templates
Custom templates let you set the layout you want, and can hold a set of custom styles so that Heading 1 in the Web version of your book does not look the same as Heading 1 in the print version of your book.
Creating a Template — The Basics (Part I)
Creating a Template (Part II)
If you start by creating a custom template for your book, you will invariably find that you keep changing the style definitions and what the layout looks like. It’s very easy to switch templates by using Insert>File to insert the book into a new doc based on a different template, or to attach a different template through Tools>Templates and Add-ins. If you attach a template, all it will do is update the styles. If you have changed layout elements such as margins, or text in the header/footer, you need to use Insert>File. Insert>File has the additional benefit of creating another backup.
What Happens When You Attach a Template
Sections
As said above, section breaks between your chapters let you mimic many of the things that you thought you needed separate files to accomplish. You can have different headers and footers, you can restart page numbering, you can restart footnote numbering, etc. However, if possible, you should avoid section breaks. The more section breaks a document has, the more complex it is, and the more chances for corruption.
Making the most of headers and footers
How to set up a document with front matter numbered separately
Working with sections
How is it possible to copy an entire document into another document without bringing across the header and footer?
Where section breaks are necessary, it may be easier to leave adding them until the end. If you know what you want as the end result, you can take advantage of the fact that Word links sections by default, but once you have unlinked the headers and footers, you may find you need to repeat actions as you change what you want. You can use StyleRef fields to change the text of a header/footer without section breaks, as detailed toward the end of this article.
More Useful StyleRef Tricks
Understanding Your Document
With long documents, it is especially important to know what is going on behind the scenes. If you don’t take advantage of all the ways that Word offers to see the structure of your document, you will cripple your ability to manipulate Word and control your document.
The most important of these tools, the Style Width area and nonprinting characters, are introduced here.
What do all those funny marks, like the dots between the words in my document, and the square bullets in the left margin, mean?
How the Styles and Formatting Pane Works
Navigating Your Document
How to save yourself hours by using Outline View properly. Actually, you can do a lot more with Outline View than just navigate—you can rearrange entire sections. Be sure to read this article.
How the Document Map works in Microsoft Word
Document Map Glitches and Fixes
You can also use the Browse Object to easily navigate to specific items in your document.
I Want My Document to Look Perfect!
One thing that might help is to remember the separation between the composing/editing and the formatting process. You don’t really need to worry about what the book will look like until someone else is going to see it, and even then, you might want to ignore formatting, for various reasons. Until then, use the format that works best for your comfort as you type and edit the text.
If your book has a lot of graphics or tables, however, you do want to think about the layout in advance. There are some questions to consider in Layout Planning: Advice from a Professional Typesetter.
Typographical Tips from Microsoft Publisher
Improving the Bottom Line: Toward a more uniform page length
Creating a book, as opposed to writing a manuscript, is as much an artistic endeavor as a technical one. Consistent use of styles and templates build the foundation for a manuscript you can work with easily, but the formatting layered on top of that can be as unique and individual as the book itself. If the publisher has not laid down rules, and you are designing the appearance of the book yourself, you might start by browsing the appropriate section of a library or bookstore, the section where you want to see your book. When you find books you find visually appealing, copy the title page and table of contents, and make some notes to use for inspiration.
| Full Contents | General Principles | Basic Techniques | Special Cases | More Information |
Special Cases
- Numbering
- Tables of Contents
- Images, Tables, Figures, Equations
- References and Bibliography
- Dealing With Other People: Reviewers, Multiple Authors, Printers
- Keeping Chapters in Separate Files
- Master Documents
Numbering
Are you using outline numbering in your book? For example: Chapter 3 has a section 3.1 then a subsection 3.1.1. You need to set up outline numbering. Numbering in Word can be extremely complicated, but follow these directions for an unbreakable system.
Create Numbered Headings
Number Headings and Figures in Appendixes
If all you want is a chapter number in the header and table of contents, see here.
Word’s Numbering Explained
Page Numbering in Word
Tables of Contents, Index, and Glossary
If you use Word properly, it will create a table of contents for you, and update the numbers as the text changes.
How to create a table of contents in Microsoft Word
TOC Tips and Tricks—make your table of contents do exactly what you want
Customizing your table of contents with switches
How can I include just part of a paragraph in my table of contents?
Whenever I update my Table of Contents it acquires unwanted tabs, and I have to press Ctrl+Q to get rid of them
Creating a Table of Contents Spanning Multiple Documents
Creating an Index in Word
How can I automatically generate an index in Word?
How to create a glossary
If Your Document Has Tables or Graphics (Equations, Figures, Images)
The Insert>Caption feature will automatically number and renumber images, tables, equations for you, and let you set cross-references to the captions, which will also update to match changed numbers. You can use a custom label, such as Exhibit, if you prefer. If you want Word to include the chapter number with the figure number, however, you must set up outline numbering.
Tables and Images can slow down your document. Link graphics as much as possible and don’t display them except when absolutely necessary. On the View tab of Tools>Options, check the box for «Picture placeholders» and clear the box for «Drawings.» This will suppress the display of all graphics, so that Word does not waste energy displaying them when you are editing the main text.
Avoid long tables, especially single-row tables. If you must have long tables, find ways to split them: for example, let subheads be in text paragraphs outside the table. In addition, the Document Map will not see headings that are inside a table. Individual tables can also become corrupted.
Table Basics
How can I create a landscape section—and still have a portrait page number?
The draw layer: a metaphysical space (and how to bring it back down to earth)
There are many more articles on the Word MVP FAQ site, well worth browsing—a whole page of links for Drawing/Graphics and another page for Tables, Fields, Forms.
If you are using equations, you might want to consider MathType, the big brother to the built-in Equation Editor. The makers of MathType provide Equation Editor to Microsoft for use in Word. If you download the trial version but do not purchase it, MathType will automatically convert to MathType Lite after thirty days. Even MathType Lite has a few more features than Equation Editor, and MathType Lite is cross-platform, while Equation Editor is not.
References and Bibliography, Etc.
This article gives a general overview of academic citations in Word and answers several questions, including how to put an appendix after your endnotes, what to do when random lines appear, and how to create endnotes in alphabetical order, yet still have them autonumbered by Word.
Why do my footnotes sometimes end up on a different page from their references in the text?
I want the numbers in my footnotes not to be superscripted, and I want the numbers to be followed by a dot and a tab
Dealing with Other People: Reviewers, Multiple Authors, Printers
If other people are reading your work, and they intend to use Word’s Track Changes feature to edit and respond to it, be sure to read this link so that you know how Track Changes works. You might need to send it to the reviewer too.
If you are coordinating multiple authors, you may choose not to worry about all of this (styles, templates, sections) until the book has finished the editing process. At that point, go through and reformat it. The tedious drudgery of reformatting is likely to be far less frustrating than attempting to force multiple collaborators to follow these suggestions. See Understanding Your Documentfor some tips to make the process easier, as well as Customizing Word. Also see this more detailed Advice from a Professional on coordinating multiple authors and dealing with multiple levels of review.
One exception: you may want to use templates to share macros and custom toolbars with collaborators.
If you are sending camera-ready copy to a professional printer, see here for a procedure to create crop marks.
If You Choose Not to Combine the Chapters
Creating a Table of Contents Spanning Multiple Documents
See the “Number Pages Across Files” section here.
IncludeText Fields can partially substitute for the Master Document feature.
Steve Hudson (aka Word Heretic) on how to make Master Documents work safely
Master Documents
Why Master Documents corrupt
How to recover a Master Document
With care, long document professionals who are expert in their use of Word manage to use Master Documents safely, particularly in more recent versions. Here are some instructions.
Steve Hudson (aka Word Heretic) on how to make Master Documents work safely
| Full Contents | General Principles | Basic Techniques | Special Cases | More Information |
More Information
- Customizing Word
- Additional Resources
- If You Still Have Questions
Customizing Word
The Word MVP FAQ site has an entire section on Customizing Word, but these three articles are the most frequently useful.
How to assign a command or a macro to a toolbar
How to assign a command or a macro to a keyboard shortcut
Creating a macro with no programming experience using the recorder
Don’t forget about the Tools>Customize dialog—there are far more predefined commands in that dialog than there are on the menus or common toolbars, and you can set up Word to access them quickly.
Additional Resources
Check out the Word MVP FAQ site, of course, but it almost has too much information to easily find what you need. (What’s an MVP?) Here are some sites that are likely to be most useful with reference to long documents:
The Editorium is directed toward those who edit, write, or typeset in MS Word, and its free newsletter has a wealth of useful tips. You can read the current and back issues online.
MVP Suzanne S. Barnhill’s site (author of many of the articles linked above, she also provided much of the advice in the text).
MVP Shauna Kelly’s site (author of many of the articles linked above).
MVP Stephanie Krieger’s blog concentrates on long and complex documents.
MVP Margaret Aldis has some articles that may be useful.
MVP Clive Huggan’s “Bend Word to Your Will” is a massive, dictionary-style compilation of tips and tricks for using Word, written especially with reference to MacWord.
Microsoft also provides training on their Office Online site. In particular, users of Office 2003 can take online tutorials, including some on headers and footers, and Tables of Contents.
If You Still Have Questions
This article is not designed to answer all questions, but merely to provide a convenient access point for existing webpages that are useful for long documents. If you still have questions or run into specific problems, you can ask on a newsgroup. If you have never heard of newsgroups, start with this article, which also explains the different ways you can access various newsgroups.
Tips from MVPs on posting to Word newsgroups
Google Groups archives the questions and answers on newsgroups, as well as offering access to most newsgroups. You can click here to search the archives of the Word-dedicated newsgroups hosted by Microsoft, mostly with reference to Windows versions.
If you want to use Microsoft’s Web interface to the newsgroups they host, start here for Word and other products within Office. This interface requires a Passport account to post, but you can search on that link without signing in.
Mac Users: there are Mac-specific newsgroups, although Mac-specific answers are not required for most long document questions. If you have problems with any of the linked articles, you can ask in those newsgroups to confirm whether the articles should hold true on the Mac, and for translation to Mac-speak if necessary. Again, when you see a references to Tools>Options, substitute Word>Preferences. Many of these links (any at http://word.mvps.org) will require you to hit refresh several times if you try to access them with Safari.
| Full Contents | General Principles | Basic Techniques | Special Cases | More Information |