
Office helps you find and create graphics to enliven your documents.
Clip art and pictures
Stock images, icons, and more
There are new kinds of clip art (only available in Microsoft 365, Office 2019, and Office 2021):
-
Stock images, cutout people, and stickers
-
Icons
-
3D models
-
How to work with SVG images
Shapes
Video: Draw shapes
Video: Format shapes
Draw a shape
Wrap text around a circle or other shape
Group or ungroup shapes, pictures, or other objects
Crop a picture to fit in a shape
Draw a picture by combining and merging shapes
SmartArt
Insert WordArt
Create a flow chart with SmartArt
Create a SmartArt graphic
Learn about SmartArt graphics
Create an organization chart
Create a timeline
Rotate or flip a text box, shape, WordArt, or picture
Draw or write with touch
Draw and write with ink in Office
Edit your Word document with natural gestures
Animations in PowerPoint
Animate text or objects
Add an animated GIF to a slide
Charts
Types of charts
Create a chart in Excel
Create a chart in Word
Create a chart in PowerPoint
Web sites where you can find pictures
Some web sites that offer free illustrations or photos:
Picture Manager
(Office 2010 and Office 2007 only)
About Picture Manager
Where is Picture Manager?
Editing photos without Picture Manager
See Also
Insert or link to a video on YouTube
Need more help?
Want more options?
Explore subscription benefits, browse training courses, learn how to secure your device, and more.
Communities help you ask and answer questions, give feedback, and hear from experts with rich knowledge.
Some documents have digital photographs and images created and saved in other programs that make documents entertaining or convey information better than words. These types of images are referred to as pictures.
Insert an image
To insert a picture in a Word document, on the Insert tab, in the Illustrations group, click the Pictures button, then choose the option you prefer:

- Select This Device to choose an image stored on the local computer, laptop, shared locations, or network server:

Select an image in the Insert Picture dialog box and click the Insert button.
- Select Stock Images to choose Stock Images, Icons, Cutout People, Stickers, and Illustrations from the stock image library:

Select one or several objects (see the number near the Insert label) and click the Insert button.
- Select Online Pictures to find and insert images from Bing, Microsoft’s search engine, or OneDrive:
Select one or a few objects (see the number near the Insert label) and click the Insert button.


Note: Another option is to insert the image as a linked object that creates a link between the document and the external image but does not embed the image in the Word document. Using linked objects can help minimize the file size of the final document while preserving images, photographs, and other objects that can take up storage space. However, if image files are not available when you open a Word document, the images are not displayed. This option is not recommended to create documents distributed to other users, as they may not access the images.
When you click on a picture, Word shows the Picture Format tab:

Using features from that tab, you can:
- Adjust picture characteristics:
- Remove the background by designating either the areas you want to keep or those you want to remove
- Sharpen, soften, and adjust the brightness of images for better printing or on-screen presentation
- Apply different color masks to achieve antiquing, sepia tone, grayscale, and a variety of other color effects
- Choose one of 23 special effects, such as pencil sketch, blurring, charcoal sketch, paint strokes, and others
- Apply effects such as shadows, reflections, and borders; or apply combinations of these effects
- Choose a picture transparency
- Compress the pictures in the document
- Format picture by using predefined picture styles or choosing some of the proposed features such as shape and orientation, borders, and other effects
- Arrange the picture to specify its relationship to the page and other elements on the page
- Crop the parts of the picture or crop the picture to a shape
- Resize, scale, and rotate the picture by using its sizing handles or appropriate fields in the Layout dialog box (see below)
- Position the object in any of several predefined locations on the page
- Specify how other text should wrap around the object.
Resize an image
To resize a picture, select it and do one of the following:
- On the Picture Format tab, in the Size group, change the Height and Width for the picture in the appropriate fields:

- Click and drag the side sizing handles to stretch it horizontally or vertically:


Scale an image
To scale a picture, select it and do one of the following:
- On the Picture Format tab, in the Size group, click the dialog box launcher:
- Click and drag one of the corner sizing handles to maintain the image’s current shape. The image will change size while keeping the same proportions:
- Open the Layout dialog box by one of the methods:
- On the Picture Format tab, in the Size group, click the dialog box launcher.
- Right-click the selected picture and choose Size and Position… in the popup menu:


In the Layout dialog box, on the Size tab, in the Scale section:

- Rescale the picture by changing the height and width percentages.
- Select the Lock aspect ratio check box (selected by default) to scale the picture by height and width using the same percentage.
Deselect the Lock aspect ratio check box to scale height and width separately.
- Select the Relative to original picture size check box (selected by default) to scale the picture height and width as percentages of the original size.
Note: See the picture’s original size in the Original size section.
Rotate an image
To rotate a picture, do one of the following:
- Click and drag the rotation handle at the top of the border:

- Open the Layout dialog box by one of the methods:
- On the Picture Format tab, in the Size group, click the dialog box launcher.
- Right-click the selected picture and choose Size and Position… in the popup menu.
In the Layout dialog box, on the Size tab, select or type a rotation in the Rotation field.

Hide and display images on the page
The picture can be hidden using the Selection pane (see how to open it). For example, Picture 6:

To hide the picture, click the Showing icon ![]() to the right of the object name. After clicking that icon, it will change to a simple icon indicating that the object is Hidden
to the right of the object name. After clicking that icon, it will change to a simple icon indicating that the object is Hidden ![]() from view. To show the object once again, click the Hidden icon
from view. To show the object once again, click the Hidden icon ![]() , and it will reappear.
, and it will reappear.
Note: You can hide all images in the document by changing global Word options:

See Hiding pictures for more details.
Copy the formatting
To copy the formatting of one picture to another picture, do the following:
1. Select the formatted picture, which formatting you need to copy.
2. On the Home tab, in the Clipboard group, click the Format Painter button:

3. Click another picture to apply the color adjustments, color corrections, or picture style from the first picture.
Add an Alternative text for images
The Alternative text (Alt text) for pictures is a common requirement. By default, Word generates Alt text for all inserted pictures (see how to turn off that feature).
Alt text is:
- Read aloud when a screen reader will encounter such an image.
- Shown if there are some problems with displaying an image.
You can see the generated Alt text at the bottom of the object immediately after inserting it in a document:

or

To change or add Alt text to a picture, do the following:
1. Select the picture.
2. Open the Alt text pane by doing one of the following:
- On the Picture Format tab, in the Accessibility group, click the Alt Text button:

- Right-click and choose Edit Alt Text… in the popup menu:
- On the Review tab, in the Accessibility group, click the Check Accessibility button, then choose Alt Text:


3. On the Alt Text pane:

- Modify or enter an Alt text you need.
Alt text should briefly describe the purpose or content of the image, photo, icon, table, or equation. It is recommended to use no more than 15 words.
- Select the Mark as decorative check box if the picture is purely decorative and does not provide helpful information for the document content.
Note: If the option for automatic generation of Alt text for pictures is turned on (see how to turn on and turn off that feature), after modifying a generated Alt text, you can regenerate it by clicking the Generate a description for me:

See also how to create picture captions.

Word allows you to do much more than simply insert or place graphics. For our fourth lesson in this series, we will focus on the graphic design functions in Word such as pictures, SmartArt, screenshots, and other items that can be found on the “Insert” tab.
These functions really breathe life into your drab black and white text documents. With a simple picture or chart, you can turn your term paper from meh to yeah! Luckily, there’s a whole range of ways you can add images to better illustrate (no pun intended) your point.
We’ll wrap the lesson by changing gears a bit and discussing how to use more than one language in Word 2013.
Images and Multimedia
You don’t have to think of Word as simply a word processing program. It has requisite tools for doing some pretty nifty page layout. While it’s not a feature-complete or robust as a professional page layout program such as Adobe InDesign. You can still get very professional looking results if you know what’s in your toolbox and how to use it.

Pictures and Online Pictures
Both “Pictures” and “Online Pictures” accomplish the same goal. The only difference is that “Pictures” means you can insert pictures locally, while “Online Pictures” allows you to insert images from an internet-based source such as clip art from Office.com, Bing, or OneDrive (formerly SkyDrive).
You can also insert pictures from your Facebook profile or Flickr although you could always just save the pictures you want to insert to your computer and then insert them from there if you don’t want to connect Office to these profiles.
Picture Tools
As always, when you want to edit a picture or any element place in a Word document, you can click on it and the appropriate tab will appear on the Ribbon.
With pictures, that tab is “Picture Tools.” Here we see you can make all kinds of corrections to the picture on-the-fly. For example, you can correct brightness and contrast, the color, add a border.
Where you position and how you wrap text will also play a large role in formatting your documents.
Here we see those controls. In our documents, we don’t worry so much about word wrapping or positioning because Word isn’t the final step toward publishing online. However, if you’re going to produce something WYSIWYG (What You See is What You Get), such as for a PDF or print publication, then these things will definitely matter.
Also, there are a couple ways you make changes to your pictures inline, such as resizing, rotating, and moving them. In the following image, you see these controls, many of which you will likely be familiar with.
When you click on an image in your document, you get a box on each corner, which will let you resize a picture. At the top, in the middle, is a circular arrow, grab this to freely rotate your picture. To move the image, hover the mouse over the image until the pointer is the four arrows, you can then click and drag the image anywhere you like.
Finally, if you click on the little “Layout Options” button, you can change your text wrapping without going to the Ribbon.
Clicking on “See more…” at the bottom of the “Layout Options” opens the full-blown “Layout” dialog.
Note, the size tab both on the Ribbon the “Layout” dialog allows you to specifically resize, rotate, and scale your pictures, rather than relying wholly on winging it:
We’d like to spend the whole day talking about formatting images in Word, but as you can see, there’s a ton of options at your disposal. Let’s move on now to other objects you can insert into your documents, starting with “Shapes.”
Shapes
Microsoft Word 2013 comes with an array of built-in shapes, which you can use to create callouts, boxes, stars, and other shapes.
When you choose a shape, you simply draw it on a blank space on the page. It doesn’t matter if you get it perfect or just the way you want it because you can adjust it to your heart’s content once it is placed in your document.
Note in the screenshot, the previously mentioned little “handles” you can use to resize and rotate your shapes.
At the bottom of the “Shapes” menu, there’s an option to create a “new drawing canvas.” This will open, what is essentially a text box for shapes. With this drawing canvas, you can create drawings using these shapes allowing you to create things like diagrams and flowcharts.
SmartArt and WordArt
SmartArt and WordArt tend to have some overlap, particularly if you create something using WordArt and then customize any of the text within it. Of course, you can use one or the other and never the twain shall meet, but we’re going to talk about them in the same section because one often leads to the other.
Think of SmartArt as premade drawing canvases that you can insert into your document and then customize as you like. Simply pick an arrangement, such as a list, process, or cycle.
As you can see, we created a graphic based on a “Continuous Block Process.” When we click on the text boxes, we can edit what is inside. There are also the usual grab handles needed to resize the image, and the “Layout Options” allowing you to wrap text to your preference.
If you use SmartArt, note that the Ribbon changes to reflect this. The “SmartArt Tools” features two tabs: “Design” and “Format.” Let’s cover each one and its features.
The right half of the “Format” tab allows you to pick from a number of “SmartArt Styles” and you can also “Change Colors.”
If you look at our previous example, you can see we applied an embossed, shiny effect and changed the colors of our text boxes and arrow.
On the left half of the “Design” tab, you can “Create Graphic” so you can add shapes, bullets, text, and move things around.
The “Layouts” section lets you change how your graphic looks on the fly. Simply hover over any of the built-in options to see how it would look utilizing a different layout. Changes to the layout are not applied unless you first click on a style.
The right side of the “Format” tab is used for affecting changes to text. These include “WordArt Styles” and other effects suchs as fill and outline. Beyond that, you can arrange multiple layers by sending them forward and backward.
The “Layout” dialog pops out if you select the little arrow in the bottom-right corner of the “size” section or you can choose more options from any of the drop-down menus including “Position”, “Align”, and “Rotate.”
On the left side of the “Format” tab you can select any of your shapes and change them to another, and also make them larger or smaller.
If you click on “Shape Styles” you will be able to choose from a selection of pre-defined shapes and colors.
Shift right just slightly and you will find controls to alter the fill. Choose from various “Theme Colors” or select your own. You an also use pictures, gradients, and textures for even more fill options.
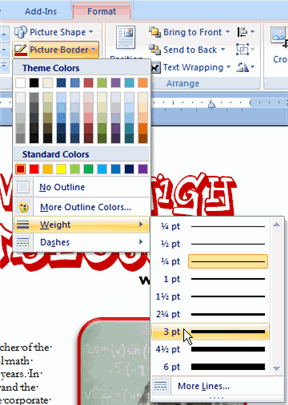
If you want to refine the outline around your shape(s), you can choose any color, weight, or dashes.
Finally, “Shape Effects” has quite a few options for enhancing your shapes, many of which will give them a cool 3D effect that you can adjust by clicking 3D Options at the bottom of the of the menu.
Format Text Effects
Let’s take a closer look at this because it contains a pretty sizable amount of features. We’ll cover the basics so that you’re more aware of them. The pane titled, “Format Text Effects,” slides out from the right edge.
As with any other panes in Word 2013, it can be detached, which you can then stick out of the way to save screen area, or keep it nearby so it is handy. Regardless, this dialog box will allow you to quickly work with text, so you don’t have to repeatedly keep going to the ribbon to change things. Note also that the dialog is split into functions, “Text Fill and Outline” and “Text Effects.” “Text Fill and Outline” is simple enough to figure out, and is used to enhance how text appears.
Say, for instance, we want to write How-To Geek School and enhance it so that it is size 48 pt., blue with a black 1 pt. outline. We simply select the text we want, increase to the size to 48, then in the “Format Text Effects” dialog, we can change the color (we can also do this in the “Font” section of the “Home” tab. Then under “Text Outline” we choose “Solid line” and choose block and 1 pt. for the outline width.
That looks pretty good, but we really want it to pop, let’s add some more text effects, such as a shadow, a reflection, and we’ll add a bit of a 3d bezel to round the lettering out.
The result is a bit more striking and while it’s not likely to make it into any final designs, it does give you an idea of what you can do with WordArt.
Chart
Who doesn’t like charts? Charts are a great way to visually display data sets and Word 2013 comes jam packed with a large assortment of Charts to choose from, including columns, pie, bar charts and much, much more. Check out the screenshot for an idea of just how many options there are:
When you choose a style, you’ll get a spreadsheet, which will allow you to enter the data points on your x and y axes. As you enter data, the chart will change.
Manipulating and formatting charts is easy. Whenever you click on a chart in your document, you’ll get the “Chart Tools,” which, as you might have guessed, is the Ribbon tab devoted solely to charts.
Using the “Design” tab, if you don’t like the colors or style of your chart, you can instantly apply changes to it without having to generate a new one.
If you decide you don’t think the layout works for this particular type of data, change it using “Quick Layout” or add another element such as another axis, chart title, gridlines, and more.
On the right side of the “Design” tab you will find essential tools for altering your data and you can also go back and completely change the type of chart you’re using.
So, if you think a pie chart would work better, you can change to that. Note however, some data points, such as “breakfast,” “lunch,” and “dinner” aren’t represented on this chart.
The “Chart Tools” also give you a “Format” tab so you can dress things up a bit by adding shapes and then being able to change the style, fill, and outline.
Turning to the right side of the “Format” tab, you are given options for adding and changing WordArt, arranging elements, and adjusting the size of your chart (which you can also do with the grab handles).
It’s easy also to affect changes inline too. When you click on a chart in your document, formatting controls appear along the upper-right corner. From top-to-bottom, you get “Layout options” so you can set your text wrapping. You can change chart elements with the plus (+) symbol, so if you want to change chart titles, add gridlines, and stuff like that.
The paintbrush icon is for setting a style and color them, and finally, the sieve icon is for “Chart Filters,” so you can edit data points and names on your chart.
Screenshot
The “Screenshot” feature will allow you to take a screen clip, which is automatically pasted in you document.
When you use the screenshot function, it will let you choose between any currently open windows, or you can select “Screen Clipping,” which will minimize Word allowing you to take a selection or full shot of your desktop. So for example, if you want to simply insert a shot of your desktop and its icons, you would first need to minimize everything you have open.
There’s a myriad of ways you can take and add screenshots, so we’re not going to dwell on it. Just note this feature, if you’re unfamiliar with adding screenshots, and you want an easy way to do it in Word.
Online Video
You can insert “Online Video” such as Bing, YouTube, or video embed code into your document.
When you embed a video, it will appear as if it is a regular picture, complete with grab handles and text wrap controls.
Further, you can adjust how the emedded video thumbnail appears (as a picture) using the “Picture Tools” so you can make adjustments to the color, add a border, correct the contrast and brightness, and more.
So you see, we simply applied a “picture style” and add a purple border. This is only a fraction of the stuff you can do, so if you to add some really nice looking effects and create a nice looking document that really pops, you should take your time to familiarize yourself with everything.
On the other hand, if you don’t like your changes and you want to go back to the default, simply click “Reset Picture” and it will revert to normal.
Other Text Features
Here are few more text features that you might want to be aware of though you will probably rarely use them.
Text Box
Text boxes are like their own little islands in Word. What we mean is, when you add a “Text Box” to your documents, it is immune to changes you make to the rest of the document. It is like a document within a document.
This is useful if you want to present something “as is” in your work, be able to make overarching changes to the document’s formatting, but have something you’ve pasted remain unchanged.
For the most part, text boxes are something of a bane to an editor’s existence because they don’t play nice with styles (Lesson 5). You may find them extremely convenient and that’s perfectly fine, but if you want something that conforms to your document’s style and formatting, but still place it in a box or have a border around it, then we recommend simply adding a border, which we covered in Lesson 2 – Shading and Borders.
Drop Cap
Drop caps are simply that one letter at the beginning of a chapter or book that is larger than the rest:
You can either make your drop cap “Dropped” (the text below it shifts underneath it) or “In Margin.” Check out the “Drop Cap” options for more power over how your drop caps behave.
Using More than One Language
If you want to produce content in a language other than the one that comes with Word by default, you will likely need to purchase it. Open the Word “Options” and click on “Language.”
Pick the language you want to add from the dropdown list and then click the “Add” button. When you add a language, you will need to enable it, which means that you will have to turn it on in the “Control Panel.”
From here, you can write in the language, but Word won’t display in it, in other words, menus and help systems will still appear in the default language. To get the full multilingual experience, you may need to purchase a language pack from Microsoft.
To see what languages are available for purchase, and how much, click on “Not installed” and you will be whisked to the Microsoft Office website.
If you want to add proofing tools, such as spellcheck, grammar check, and/or screen tooltips, then you may be able to simply download them for free.
While it’s doubtful you’ll be using Word in full multilingual mode, it’s nice to know how you can affect those changes. Moreover, most languages are freely available to use system-wide so actually creating a document in another language is well within your reach, for free.
Coming up Next…
So that concludes this section. We know it’s been a lot to absorb but you’ll see that after a while, this stuff is a cinch!
Once you get the hang of one skill, the rest is pretty similar and comes easier. By now you should have more than enough knowledge to create awesome documents with lists, tables, pictures, video, and anything you need to create a true multimedia publication!
Don’t forget though, if you’ve missed anything in this series you can always go back and read our introduction in Lesson 1, all that stuff on paragraphs and lists in Lesson 2, and all-important tables and other formatting options in Lesson 3.
In our final lesson, Lesson 5, we will cover styles, templates, and themes. It doesn’t sound like much, but they can be a fantastic way to not only save tons of time and create consistently formatted documents, but quickly apply themes that will instantly affect the entire appearance of your documents, as well as create templates that you can later use over and over again!
READ NEXT
- › The New NVIDIA GeForce RTX 4070 Is Like an RTX 3080 for $599
- › HoloLens Now Has Windows 11 and Incredible 3D Ink Features
- › This New Google TV Streaming Device Costs Just $20
- › BLUETTI Slashed Hundreds off Its Best Power Stations for Easter Sale
- › How to Adjust and Change Discord Fonts
- › Google Chrome Is Getting Faster
![]()
Download Article
Step-by-step guide to inserting pictures in Word
![]()
Download Article
- Windows
- Mac
- Web App
- Video
- Q&A
- Tips
|
|
|
|
|
Whether you’re working on a hefty research project or a friendly holiday greeting card, adding images to your Word document can really add value to your project. Whether you want to insert a picture from your computer or find one online, it’s easy to add photos in Word. This wikiHow teaches you how to insert an image into a Microsoft Word document using Windows, a Mac, and the free web version of Word.
Things You Should Know
- Use the Insert tab on Windows, Mac, and the web app to add a picture.
- Select Pictures > This Device to use an image on your computer.
- Click the image to resize and reformat it.
-

1
Click the place in your document where you want to insert the picture. Word’s insertion cursor, a vertical blinking bar, will appear at this point. When you insert the image, its bottom-left corner will be at this point.
- This method works for all modern versions of Word beginning with Word 2016. You can also use it as a guide for earlier versions of Windows, although there will be fewer tools and features.
- Changing the background is done through a different method, using the Design tab.
-
2
Click the Insert tab. It’s near the top of Word between «Home» and «Draw» (or «Home» and «Design» in some versions).
Advertisement
-
3
Click the Pictures tool. It’s in the «Illustrations» section of the toolbar running along the top of Word. Some location options will appear. If you’re using Word 2019 or later, a menu will expand. If you’re using Word 2016 or earlier, your file browser will appear.
-
4
Select the type of image you want to insert. You can choose an image on your computer, a stock image from Microsoft, or an image from the internet.
- Word 2019 or later:
- Click This Device if the picture is on your computer.
- Click Stock Images to select a free stock image from Microsoft’s collection.
- Click Online Pictures to use Bing’s image search to find photos on the web.
- If the photo is on your OneDrive, select Online Pictures and click OneDrive at the bottom-left corner.
- Word 2016:
- If the picture is on your computer, simply navigate to it in the file browser.
- If you want to search for a photo online or insert one from Facebook, Flickr, or your OneDrive, close the file browser and click the Online Pictures icon next to the «Pictures» in the toolbar. You can then select an image from Bing image search, Flickr, or Facebook.
- If the picture is on your OneDrive, click Online Pictures instead of Pictures and click Browse next to «OneDrive.»
- Word 2019 or later:
-
5
Select the image you want to insert. When you find the picture, click it once to select it.
- If you’re selecting from stock images or online images, you can click multiple pictures to add more than one.
- If you’re choosing files from your computer and want to add more than one picture, hold the Ctrl button down as you click each image.
-
6
Click Insert. It’ll be near the bottom-right corner of the window no matter where you’ve selected your image(s). You’re done! Continue to the next steps for formatting information, or print the document when you’re ready.
-
7
Resize the picture. If you want to change the picture’s size, click it once to select it, and then drag any of the corner circles in or out.[1]
- You can also specify the size if you want. Double-click the picture to open the Picture Format tab at the top, and then set your desired measurements next to «Height» and «Width.»
-
8
Use the curved arrow at the top of the picture to rotate it. It’s above the dot at the top-center part of the picture. To rotate, place the mouse cursor over the curved arrow, and then click and drag the cursor left or right until you’re satisfied.
-
9
Double-click the picture to access more editing tools. This opens the «Picture Format» (2019 and later) or «Format» (2016) tab at the top of Word. On this tab, you can:
- In the «Arrange» panel in the top-right area, click Wrap Text to choose how to situate the picture in blocks of text. You can also set alignment preferences here. Wrapping the text is a good way to get your document formatted exactly the way you want.
- To crop the picture, click the Crop tool in the «Size» panel at the top-right corner.
- The «Adjust» panel near the top-left corner has additional tools for background removal, color effects, and corrections.
- To add a border or effect around the picture, select one of the «Picture Styles» at the center of the Format bar, or choose any of the other options in the section to have more control over the style.


Advertisement
-
1
Click the place in your document where you’d like to insert a picture. This places the cursor at that location.
-
2
Click the Insert tab. It’s at the top of Word between the «Home» and «Design» or «Home» and «Draw» tabs.
-
3
Click the Pictures icon. It’s on the toolbar that runs along the top of Word. Look for an icon of a green mountain with a yellow sun between «Tables» and «Shapes.»
-
4
Click Photo Browser or Picture from File. If you want to browse images in your Mac’s Photos app, use Photo Browser. To select an image file using Finder, choose Picture from File.
-
5
Insert the picture into the document. If you’re using the Photo Browser option, simply drag the photo into your document. If you’re using Picture from File, select the image and click Insert.
-
6
Resize the picture. If you want to increase or reduce the picture’s size, click the image to select it, and then do one of the following:
- To maintain the picture’s proportions so it doesn’t stretch or warp, hold down the Shift key as you drag any of the sizing handles (the circles) inward or outward.[2]
- To keep the image’s center in place as you resize, hold down the Option key as you drag the handles.
- You can also specify a size. Double-click the Picture to open the Picture Format tab, then enter your desired measurements next to «Height» and «Width.»
- To maintain the picture’s proportions so it doesn’t stretch or warp, hold down the Shift key as you drag any of the sizing handles (the circles) inward or outward.[2]
-
7
Drag the curved arrow at the top of the picture to rotate it. It’s above the dot at the top-center edge of the picture. Just place the mouse cursor over the curved arrow, and then click and drag it left or right until it’s correct.
-
8
Double-click the picture to access more editing tools. This opens the «Picture Format» tab at the top of Word, which has a bunch of editing features, including the ability to remove the background and add styles.
- Click Corrections near the top-left corner to correct lighting and color problems.
- Click Artistic Effects to play around with filters, and Transparency to make the picture more see-through.
- To crop the picture, click the Crop tool next to the height and width controls.
- Click Wrap Text to choose how to situate the picture in blocks of text, and use Align and Position to ensure correct placement.
- Click Quick Styles to choose pre-styled borders, shadows, and other options.


Advertisement
-
1
Click the place in your document where you’d like to insert a picture. This places the cursor at that location.
- If it’s your first time using Office Online on the web, go to https://www.office.com, sign in with your Microsoft account, and select Word to get started.
-
2
Click Insert. This opens the Insert tab.
-
3
Click Pictures. This opens a drop down options menu.
-
4
Select a picture type. There are four options to choose from:
- This Device — choose a picture on your computer
- OneDrive — choose an image from your OneDrive
- Stock Images — insert a stock image or sticker
- Bing Pictures — search Bing for an image
-
5
Select an image. If you choose the This Device option, you’ll be prompted to select an image from your computer. Click it to select it.
-
6
Click Open. This is in the bottom right corner of the image selection window. This will confirm your selected image and insert it into the document.
-
7
Resize the picture. If you want to change the picture’s size, click it once to select it, and then drag any of the corner circles in or out.
- You can also specify the size if you want. Double-click the picture to open the Picture tab at the top, and then set your desired measurements next to «Height» and «Width.»
-
8
Use the curved arrow at the top of the picture to rotate it. It’s above the dot at the top-center part of the picture. To rotate, place the mouse cursor over the curved arrow, and then click and drag the cursor left or right until you’re satisfied.
-
9
Double-click the picture to access more editing tools. This opens the «Picture» tab at the top of the Word web app. On this tab, you can:
- In the «Arrange» panel in the top-right area, click Wrap Text to choose how to situate the picture in blocks of text. You can also set alignment preferences here.
- To crop the picture, click the Crop tool in the «Image Size» panel at the top-right corner.
- To add a border or effect around the picture, select one of the «Picture Styles» at the center of the bar, or choose any of the other options in the section to have more control over the style.


Advertisement
Add New Question
-
Question
How do I take screenshots?

On a Mac, shift command 3 to screenshot the whole screen. If you want to take a screenshot of a certain area on the screen, press shift command 4. On a Windows PC, press control and print screen at the same time, then you can paste the image into Paint or Microsoft Word.
-
Question
When I insert several photos on an age in a Word document, the photos often won’t stay in place. How do I stop the photos from bumping each other around?
You can right-click the image, hold the cursor over the «Wrap Text» menu option, and select an option from the list that is NOT «In Line with Text» (usually selected by default), such as «Tight» or «Behind/In Front of Text.» Then you should be able to move the image freely around the page.
-
Question
How do I format images in a Word document?
Try double-tapping the photo. A photo format menu should come up on the right side.
See more answers
Ask a Question
200 characters left
Include your email address to get a message when this question is answered.
Submit
Advertisement
Video
-
Adding photos to your Word document increases its size.
-
Other photo modification features available in newer versions of Microsoft Word include the ability to add borders, cutout styles, shadows, beveled edges, glows, and drop shadows.
-
When you crop a picture, the actual cropped part of the picture is hidden, not removed; unless you check the «Delete Cropped Areas of Pictures» box in the «Compression Settings» dialog box. Any compressed pictures with their cropped areas deleted cannot be restored to their original appearance.
Show More Tips
Thanks for submitting a tip for review!
Advertisement
About This Article
Article SummaryX
1. Click the place you want to insert the image.
2. Click the Insert tab.
3. Click Pictures.
4. Choose a location.
5. Select the image and click Insert.
6. Double-click the picture to open editing and format tools.
Did this summary help you?
Thanks to all authors for creating a page that has been read 650,203 times.
Is this article up to date?
More than ever, pictures are critical to the effectiveness of your communication materials. With the image formatting and layout tools in Microsoft Word, it’s possible to add and manipulate pictures in your document—even if you’re a beginner.


Starting with a Microsoft Word template makes it even easier. With a well-designed Word template, the positioning and formatting of pictures have already been done for you. All you’ve got to do is to drag your pictures into the image placeholders.
Even if you’re using a template for Word, it’s good to know how to format pictures so you can make your document look exactly the way you want it to.
In this article, you’re going to see, step-by-step, how to work with pictures in Microsoft Word.
(Note: The screenshots below show Microsoft Word for Mac. The screens and steps may be slightly different if you’re using a different version of Word.)
How to Insert a Picture in Word
To add a picture to a Word document, click Insert > Pictures. From here, you’ve got three options:
1. Photo Browser
If you choose this option, you’ll be able to select an image from the existing photo sets on your computer. On a Mac, that includes photos in iPhoto and Photo Booth. When you find the picture you want to use, click on it, then drag it into the document.


2. Picture From File
This option lets you insert an image from another location on your computer. Find the image file, select it, then click Insert.


3. Online Pictures
Insert pictures in Word from the web by selecting Online Pictures…. This opens a Bing image search right inside your document. Type a keyword or phrase in the search bar.


By default, the Creative Commons only filter is checked. Keep this selected to make sure you don’t violate any copyright laws. Click on the filter icon to filter the image results by other parameters.


Select an image by clicking on it, then click Insert. You can select several images before clicking the Insert button.


Microsoft Word automatically includes the image attribution and license details as a caption.


Note: While you can import many image formats into Word, the ones that work best are JPG and PNG.
How to Format Pictures in Word
After importing pictures into Word, you can apply different formatting settings to each Microsoft Word picture and control its appearance. Below are some of the most basic image formatting you can apply in Word:
1. Resize an Image
Resize a picture in two ways:
Resizing Method 1
Click on the picture. Press and hold the Shift key, then click and drag one of the sizing handles either towards or away from the center.


Holding the Shift key ensures that the proportion of the picture is retained. Otherwise, it would become distorted and your entire document will look amateurish.
Resizing Method 2
This method allows you to resize the picture to a specific length or width. Click on the picture, then click on the Picture Format tab. Type the length or width you wish the image to have.


By default, the original proportion of the image is retained even when you change either the length or width of the image. Keep this checked to avoid distorting the image.
2. Rotate or Flip Images
To rotate an image, do so either manually or by a specific amount.
Manual Image Rotation
To rotate an image manually, click on the image to select it. Click on the rotation handle and drag it in the direction you want.


Flip or Rotate an Image By a Specific Amount
Rotate a picture by a specific amount. Click on the picture, then go to Picture Format > Rotate. From here, you’ve got the option to:
- Rotate Right 90°
- Rotate Left 90°
- Flip Vertical
- Flip Horizontal
- Select More Rotation Options
To rotate a picture to an exact angle, choose Select More Rotation Options.


Type in the amount you wish to rotate the object, then click OK.


How to Crop Photos in Word
If you’re wondering how to crop a picture in Microsoft Word, it’s not difficult. Follow the steps below to not only crop an image, but also to dress it up by cropping it to a shape or adding decorative borders:
1. Basic Image Cropping
To crop a picture, select the picture, then go to Picture Format > Crop > Crop.
Black cropping handles appear on the sides of the picture. From here:
- Crop one side. Drag one side handle inward.
- Crop two adjacent sides at the same time. Drag one corner inward.
Click outside the image to apply the crop.
2. Crop Image to a Shape
To crop the picture to a specific shape, select the picture. Go to Picture Format > Crop > Crop to Shape. Select a shape from the selection that appears.


Click away from the picture to apply the new shape.


3. Frames and Borders
Borders are an easy way to dress up a picture in Microsoft Word. To add a border, select the picture, go to Picture Format. Click on the Picture Border button on the ribbon to reveal the border options.


From here, choose the color, weight, and dash style you wish to use for the border.


To add a frame, click on the picture, then go to Picture Format. Click on the Picture Quick Styles button on the ribbon. Select the border you want to use.


How to Use Image Editing Tools
There are many Word image editing tools. Learn how to format pictures in Word by removing the background or adjusting the brightness. Here’s how:
1. Remove Background
Microsoft Word allows you to remove the background from your pictures. This feature works best if the color of the background is distinct from the colors on the main subject of the picture.
To remove the background, select the image. Go to Picture Format > Remove Background.


Use the tools provided to select which parts of the image you wish to keep and which parts you want to remove.


The parts that’ll be removed are colored pink.
When you’re happy with the selection, click Keep Changes.


2. Sharpness and Brightness Corrections
Improve the sharpness and brightness of your pictures in Microsoft Word. To adjust these, select the picture. Go to Picture Format > Corrections. Select the sharpness and brightness/contrast settings you wish to use.


To more finely control these settings, go to Picture Format > Corrections > Picture Corrections Options. The Format Picture sidebar appears. It allows you to provide specific settings for sharpness, brightness, and contrast.


3. Picture Color
Microsoft Word also allows you to control the color saturation and tone of your picture. And you can recolor the entire picture for special effects. Select the picture, go to Picture Format > Color. Select any of the options that appear.


From here choose:
- More Variations. Recolors the image with a different color from the options provided.
- Set Transparent Color. Makes certain colors transparent so that the color of the background shows through.
- Picture Color Options. Opens the Format Picture sidebar, where you can fine-tune the settings for color saturation, tone, and recolor.
How to Use Layout Options
Microsoft Word’s layout options for images lets you control how photos are displayed alongside text.
By default, a picture is set to be «In line with text.» This means the picture is treated as an object that moves with the text. This means whatever formatting is applied to the text applies to the picture as well, which may not be how you want it to appear. When a picture is in line with text, you won’t be able to drag and drop it to a different part of the document.
To set up a picture’s layout options, select the image, then go to Picture Format > Position. Select one of the pre-configured layout options to position your picture on the page.


Gain more control by going to Picture Format > Wrap Text.


Select one of the text wrapping options:
- Square — wraps text around the picture in a square shape


- Tight — wraps text following the shape of the picture


- Through — shows text through all the “open” parts of the picture (may only be visible with certain picture shapes)


- Top and Bottom — wraps text only above and below the picture


These text wrapping options allow you to overlay pictures in Word or merge them together into a collage-type layout.
You’ve got other options:
- Behind text. Overlays the text in front of the picture
- In Front of Text. Places text behind the picture, covering it
- Edit Wrap Boundary. Lets you fine-tune how text wraps around the picture, which is especially useful if it’s irregularly shaped
- Move with text. Keeps the picture anchored to the text
- Fix position on page. Keeps the picture on the same position relative to the page, even if the text moves
- More Layout Options …. Gives you precise control over the picture layout
How to Move Pictures in Word and Arrange them on the Page
You may be wondering how to move a picture in Microsoft Word. The easiest way to move a picture is by clicking and dragging it. If this doesn’t work, the picture is probably set to be inline with text. Follow the instructions above to select a different text wrapping option.
To move multiple images, hold the shift key down as you click on each picture. Then, drag and drop them into place.
You can also move images using precise measurements. Select the image, go to Picture Format > Position > More Layout Options …. Specify the horizontal and vertical position of the picture relative to an element of the page.


Get Creative With Pictures in Word
Use the skills you learned above to add pictures in your Word documents and display them exactly the way you envision. As you’ve seen, it’s easy to control the appearance and placement of images on the page. By following the steps above, you can produce professional-looking documents all by yourself. However, we’ve only scratched the surface of the many ways you can work with pictures in Word!
Of course, if you prefer to have these design choices made for you, you’ve got the option to start with a Microsoft Word template. If you make a lot of Word documents, then you’ll like the cost-effectiveness of Envato Elements. You get unlimited downloads of templates as well as fonts, stock photos, and more for one low subscription price. On the other hand, GraphicRiver may be a better option if you only need the one-off template.
This gives you the ultimate convenience because professionally-designed Word templates have image placeholders. All you’ve got to do is to drag and drop your own pictures into the placeholders. The picture formatting steps in this article will help you fine-tune the image settings as you wish.
Now you, too, can get more creative—and effective—with pictures in Microsoft Word. But first, get your head start by downloading your favorite MS Word Template from Envato Elements or GraphicRiver.
How to Edit, Reposition, and Compress Images in Microsoft Word
Ways to work with images in Word
Updated on October 17, 2021
When you insert an image in a Microsoft Word document, resize and position it to customize the document layout and choose how the text appears around the image, for example, have it seamlessly wrap around the photo. An image with a large file size can be compressed so that the document downloads quickly from a web page or is suitable for an email attachment. And, for images that need more explanation, add a caption.
Instructions in this article apply to Word for Microsoft 365, Word 2019, Word 2016, Word 2013, and Word 2010. For Microsoft Word Online, disable the Simplified Ribbon.
How to Insert a Picture in Word
The easiest way to insert a picture is to drag the photo from Windows File Explorer to the Word document. However, if you want more control over the image placement, use the Word Insert menu.
-
Place the cursor where you want the image to appear.
-
Go to the Insert tab, then select Pictures. In Word 2010, select Picture. In Word Online, select Picture or Online Pictures.
-
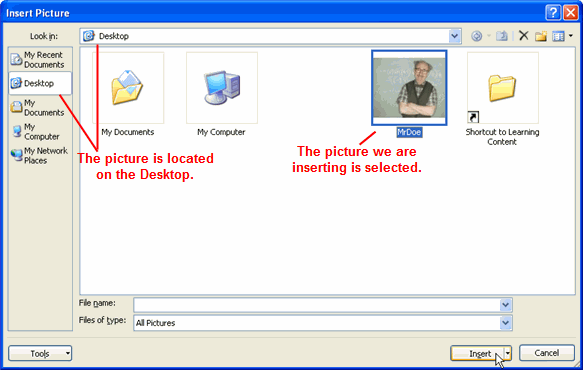
In the Insert Picture dialog box, choose an image to insert into the document, then select Insert or Open.
To insert several images simultaneously, hold Ctrl and select each image.
-
To move the image, drag the image to a different location in the document.
How to Edit the Picture Size in Word
Ideally, pictures should be enhanced in a photo editing program, but Microsoft Word contains a few simple editing tools. To quickly resize a photo in Word, select the image, then drag a sizing handle in or out to make the picture smaller or larger.
To set a specific size for the image:
-
Right-click the image, then select Size and Position.
-
In the Layout dialog box, go to the Size tab and select Lock aspect ratio to ensure that the height and width remain proportional.
-
Change the value in the Height or Width text box to adjust the size of the image in inches.
To change the height and width by percentage, go to the Scale section and change the Height or Width value. For example, make the image 75% or 120% of the size it was.
-
Select OK.
How to Compress an Image in Word
Compressing photos in Word reduces the file size of documents that contain images.
Images cannot be compressed in Word Online.
-
Select the picture you want to compress.
To compress all the images in a Word document, select any photo.
-
Go to the Picture Format tab and select Compress Pictures.
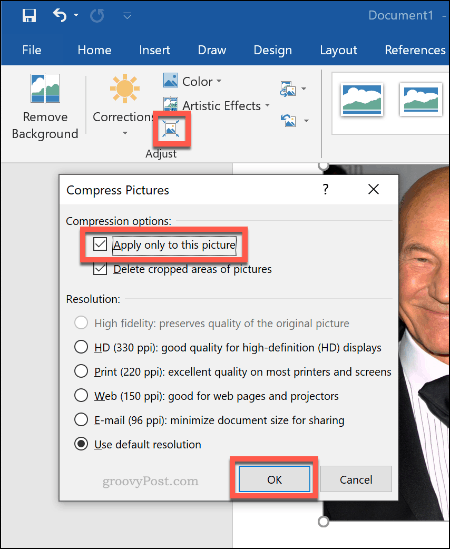
-
In the Compress Pictures dialog box, select Apply only to this picture to compress only the selected image. Clear the Apply only to this picture check box to compress all the photos in the Word document.
-
Select Delete cropped areas of pictures to remove the parts of the images that were cropped.
Cropped areas are hidden so that you can undo the crop. When cropped areas are deleted, file size is reduced because cropped pieces are permanently removed.
-
In the Resolution section, choose a resolution or target output option to compress the image and save it with a specific number of pixels per inch, which indicates the picture quality. If you’re not sure what to select, choose Use default resolution or Use document resolution.
-
Select OK.
How to Edit the Picture Layout in Word
Word provides a variety of options that change the layout of pictures. For example, have the text wrap around the photo or insert the picture inline with the document text.
To change how the image appears in the document, select the image, then go to the Layout tab. In Word 2013 and 2010, go to the Format tab. In the Arrange group, you’ll find options that allow for more precise placement of the image and the content that surrounds it.
- Select Position, then choose where the image should appear on the page.
- Select Wrap Text, then choose how the text should flow around the image.
Hover over an option to see a preview of how the layout or text wrapping will appear in the document.
In Word Online, you can only customize the wrap text options, not the image layout. To make this adjustment, select Format > Wrap Text.
How to Add a Caption to a Photo in Word
A caption clarifies your picture to readers. It can be used to attribute the photo to a specific source or to reference a picture in another part of the document.
Captions are not supported in Microsoft Word Online.
To add a caption, right-click the image and select Insert Caption. In the Caption dialog box, enter a caption, then choose the type of label and the position of the caption. Select Numbering to configure automatic captioning based on a specific number style or chapter number.
To edit the caption, highlight the text and type a new caption.
Thanks for letting us know!
Get the Latest Tech News Delivered Every Day
Subscribe

Microsoft Word includes several image editing tools that allow you to make changes to images in your documents. Here’s how to use them.
You don’t need expensive photo editing software like Photoshop to edit photos and other images for Microsoft Word documents. Although the Microsoft Office Picture Manager has been retired, there are still plenty of built-in tools to edit images in Word.
Microsoft Word allows you to format colors and brightness, add borders, crop image sizes, add special effects, and more, so here’s how to do it. While the instructions may vary, these instructions should work for Word 2016 and higher, including Microsoft 365 (formerly O365) and Online.
There are a few ways to crop an image in Microsoft Word. Start by inserting the image into your Word document (Insert > Pictures) and selecting the image.

To begin formatting your selected image, click Format > Crop (or Format > Crop > Crop). You can also enter the image cropping mode by right-clicking the image and selecting Crop.
This will change the outline around your image from resizing to cropping.

Move the crop outline tools around your image to reduce the image area to its final size. Grayed-out areas will be removed from the final image once the crop edit has been confirmed.
Once you’re happy, click once outside of the image or press Enter on your keyboard.

Formatting Image Colors
Word allows you to format the colors used in your image without exporting it to a photo editor first. You can customize the image sharpness, brightness, saturation, tone, and contrast levels, either manually or using one of several preset filters.
To access the image formatting tools, right-click on your image and press Format Picture at the bottom.

This will bring up the Format Picture menu on the right-hand side. Click the Picture icon (furthest right) to access the image color editing tools.
Under Picture Corrections, move the sliders for each category to sharpen or soften an image or increase or decrease the brightness and contrast levels. You can also click Presets for each category, selecting one of the thumbnails to apply those changes to your image instead.

Under Picture Color, you can change the tone and saturation levels for your selected image. Move the sliders for each option left or right to increase or decrease each level.
Click Presets to set these levels using one of the provided preset options.

If you’re unhappy with any of the color changes you’ve made, click the Reset button underneath each category to return your image to its original state.
Adding Special Effects to Images
Microsoft Word also includes several special effects that can be easily applied to images. These include image shadow, glow and reflection, soft edges, and a 3D bevel effect.
To add these special effects, enter the Format Picture menu (right-click > Format Picture) and click the Effects icon (second from the left). Click on each sub-category to access each setting.
To add a shadow to your image, click Shadow and move the sliders to set transparency, size, angle, color, etc. You can also click Preset to preview and add a Word-defined drop shadow instead.

Click Reflection and follow the same instructions to add a custom or preset image reflection to your image. Do the same to Glow to add an image glow and Soft Edges to soften the edges around your image.
To add a 3D bevel effect to your image, click 3-D Format. Select the effect you want for both the top and bottom sections of your image by clicking Top Bevel and Bottom Bevel, selecting one of the pre-defined options.
You can also customize the depth, contour, material effect, and lighting levels for your 3D bevel effect using the drop-down menus and option boxes.

You can also add one of several preset artistic effects to your image. These combine several effects into one to change your image design.
To do this, click the Artistic Effects sub-category, then click the Artistic Effects icon. Select one of the preset options using your mouse to apply it to your image.

Compressing Images in Microsoft Word
Adding images to a Word document can vastly increase its size. By compressing the images, you can reduce the file size of your document as a whole.
To format a single picture, click Format > Compress Images and ensure that the Apply only to this picture checkbox is enabled. If you want to compress all of your attached images, click to uncheck this checkbox.
Compressing images will reduce the quality on a sliding scale from HD quality (330 pixels per inch) to basic email quality (96 pixels per inch).
The higher the quality, the bigger the Word file, so choose your preferred quality, then click OK to compress your images.
Basic Image Editing Made Easy
These editing tools make it easy to make basic changes to images in Microsoft Word. You can also resize images in Windows 10 without needing an image editor too.
If you need to make bigger changes to your images, you can try some of these free Photoshop alternatives instead.
![]()
How to Insert and Crop Pictures in Word
- Click in your document where you want to insert your picture.
- Click the Insert tab.
- Click Pictures button.
- Navigate to the picture you want to insert and select it.
- Click Insert button.
Contents
- 1 How do I place multiple pictures in Word?
- 2 How do I insert a picture in Word without moving the text?
- 3 How do you make a picture visible on word?
- 4 How do I insert a photo into a Word document without it being embedded?
- 5 How do I insert a picture in Word without resizing?
- 6 How do I make a picture 4 by 6 in Word?
- 7 Why can’t I see images on Word?
- 8 Why is Word not showing pictures?
- 9 Why are my pictures not showing up on Microsoft Word 365?
- 10 How do I copy and paste a picture into a Word document?
- 11 What is the size of 4R picture in Microsoft Word?
- 12 How do I insert a JPEG into a Word document?
- 13 Where is options in Word?
- 14 What is compatibility mode in Word?
- 15 How do I fix pictures not displaying?
- 16 How do I insert a picture in Word 2010?
- 17 How do I insert a picture placeholder in Word?
- 18 Where Footnotes appear in a document?
- 19 How do I copy and paste a picture in Word 2016?
- 20 What is MS Office button?
How do I place multiple pictures in Word?
Click and drag the first image to where you want it on the page. Release the mouse button. Click and drag the second image next to the first, where you want it to align. As the sides come close to each other, Word will automatically snap the second image into place next to the first.
How do I insert a picture in Word without moving the text?
To insert an image into Word without moving any text is to set the image’s default wrapping to no wrapping before entering it into the document.
- Click the location in your document where you want to insert a picture.
- On the Insert tab, click Pictures.
- Select the option you want to use for inserting pictures.
How do you make a picture visible on word?
Click the Microsoft Office Button, and then click Word Options. Click Advanced. Under Show document content, click to select the Show drawings and text boxes on screen check box. Click OK.
How do I insert a photo into a Word document without it being embedded?
Luckily, there’s a simple workaround. In the Insert Picture dialog box, click the down arrow next to the Insert button, and then click either “Link to File” or “Insert and Link”.
How do I insert a picture in Word without resizing?
CTRL+Arrow key(s). and have the ability to move it around. text-area from the drawing options and then insert a picture into it. EXACTLY its original size.
How do I make a picture 4 by 6 in Word?
Click the picture you want to resize. Go to the Picture Format tab, and then click “Position” > “More Layout Options.” Click the “Size” tab, and then in the “Scale” section, make sure the “Lock Aspect Ratio” checkbox is clear. Now enter percentages for Height and Width.
Why can’t I see images on Word?
To show the images: Click on the top left round button, and then on “Word Options” at the bottom of the popup box. In the dialog that appears click on “Advanced” on the left. Scroll down, and then under “Show document content” uncheck “Show picture placeholders”. Click OK.
Why is Word not showing pictures?
Assuming that you are using a recent version of Office, in Word, go to File>Options>Advanced>Show document content and uncheck the box for “Show picture placeholders”.
Why are my pictures not showing up on Microsoft Word 365?
Go to File > Options > Advanced > Show document content>check the box of Show background colors and images in Print Layout view and check the box of Show drawings and text boxes on screen and uncheck the box of Show picture placeholders. 2. Run Word in the safe mode to have a check.
How do I copy and paste a picture into a Word document?
Right click image and choose copy/copy image. Open your document and right click the place where you want to add the image. Select Paste Options in menu and click it. After that image will be there.
What is the size of 4R picture in Microsoft Word?
The 4R (4″ x 6″) is most common and standard print, and it’s the easiest to find frames for.
How do I insert a JPEG into a Word document?
How to Insert a JPG in Microsoft Word
- Click the cursor at the location in your Word document at which you’d like to insert the JPG.
- Click the “Insert” tab at the top of the Word Ribbon.
- Navigate to the JPG.
- Click the arrow next to “Insert” and choose “Link to File” if you’d like to insert a link to the image.
Where is options in Word?
To see general options for working with Word, click File > Options > General.
What is compatibility mode in Word?
When you’re using a version of Word that’s newer than the version used to create your document, you typically see Compatibility Mode in the title bar. Compatibility Mode temporarily disables new or enhanced Word features so that the document can still be edited by people using the earlier version of Word.
How do I fix pictures not displaying?
What can I do if images are not loading in Chrome?
- Try Opera.
- Clear cache and cookies.
- Browse incognito.
- Disable installed extensions in Google Chrome.
- Enable JavaScript.
- Turn off hardware acceleration.
- Update Google Chrome.
How do I insert a picture in Word 2010?
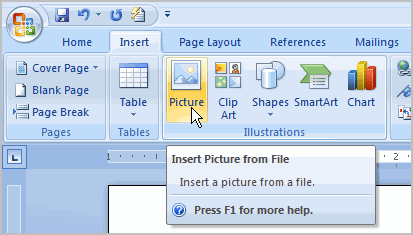
To insert a picture from a file:
- Place your insertion point where you want the image to appear.
- Select the Insert tab.
- Click the Picture command in the Illustrations group. The Insert Picture dialog box appears.
- Select the desired image file, then click Insert to add it to your document. Selecting an image file.
How do I insert a picture placeholder in Word?
To turn on picture placeholders, follow these steps:
- Display the Word Options dialog box.
- Click Advanced at the left side of the dialog box.
- Scroll down to the Show Document Content section.
- Click to turn on the Show Picture Placeholders check box.
- Click on OK.
Where Footnotes appear in a document?
Footnotes appear at the bottom of the page and endnotes come at the end of the document. A number or symbol on the footnote or endnote matches up with a reference mark in the document.
How do I copy and paste a picture in Word 2016?
Replies (6)
- Open the Word 2016 application and then choose Blank document.
- Click on File and then select Options.
- Choose Advanced.
- Under the Cut, Copy, and Paste section, set the value of Pasting from other programs to Keep Source Formatting (Default).
What is MS Office button?
The OFFICE BUTTON allows you to open, save, and print documents, and perform other document output functions (e.g., fax and email). The OFFICE BUTTON is also where you go to change Word’s options and preferences, by clicking the new Options button (e.g., Word Options, Excel Options, PowerPoint Options).
Lesson 16: Working with Pictures
/en/word2007/modifying-page-layout/content/
Introduction
 Pictures can be added to Word documents and then formatted in various ways. The picture tools in Word 2007 make it easy to incorporate images into your documents and modify these images in innovative ways.
In this lesson, you will learn how to insert a picture from your computer, change the picture style and shape, add a border, and crop and compress pictures.
Inserting and modifying pictures
Download the example to work along with the video.
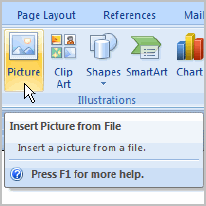
To insert a picture:
- Place your insertion point where you want the image to appear.
- Select the Insert tab.
- Click the Picture command in the Illustrations group. The Insert Picture dialog box appears.
- Select the image file on your computer.
- Click Insert, and it will appear in your document.
Left-click a corner sizing handle, and while holding down the mouse button resize the image. The image retains its proportions.
To wrap text around an image:
- Select the image.
- Select the Picture Tools Format tab.
- Click the Text Wrapping command in the Arrange group.
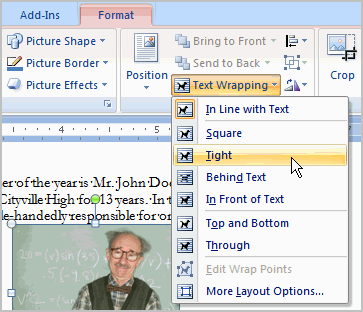
- Left-click a menu option to select it. In this example, we selected Tight.
- Move the image around to see how the text wraps for each setting.
- The Position button has predefined text wrapping settings. The Position button is located to the left of the Text Wrapping button.
- Click the Position button, and a drop-down list of text wrapping options will appear. Hover over an option to see what it does.
If you can’t get your text to wrap the way you want, click the Text Wrapping command and select More Layout Options from the menu. You can make more precise changes in the Advanced Layout dialog box that appears.
To crop an image:
- Select the image.
- Select the Format tab.
- Click the Crop command. The black cropping handles appear.
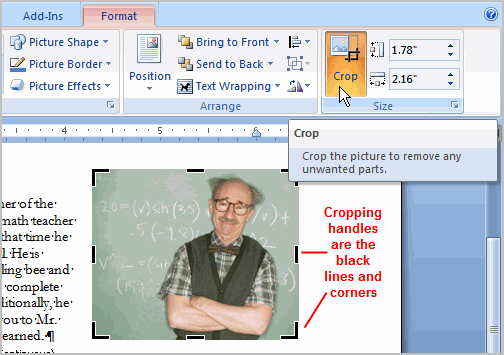
- Left-click and move a handle to crop an image.
- Click the Crop command to deselect the crop tool.
Corner handles will crop the image proportionally.
To compress a picture:
- Select the picture.
- Select the Format tab.
- Click the Compress Pictures command in the Adjust group. A dialog box appears.
- Click the Options button to access the Compression Setting dialog box.

- Choose the target output.
- Change any of the default picture settings you want.
- Click OK in the Compression Settings dialog box.
- Click OK in the Compress Pictures dialog box.
You need to monitor the file size of your images and documents that include images, especially if you send them via email. Cropping and resizing an image doesn’t decrease the image file size, but compression does.
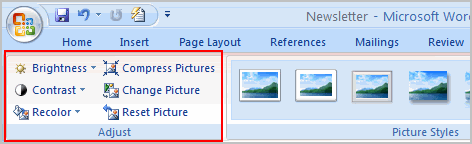
Other picture tools
There are many other things you can do to modify a picture. From the Format tab, some of the other useful commands include:
- Change Picture: Selects a new picture from your computer
- Reset Picture: Reverts to original image
- Brightness: Adjusts the brightness of an image
- Color: Adjusts the contrast of an image from light to dark
- Recolor: Modifies the color in a variety of ways, including black and white, sepia, pink, and purple
To change the shape of a picture:
- Select the picture.
- Select the Format tab.
- Click the Picture Shape icon. A menu appears.
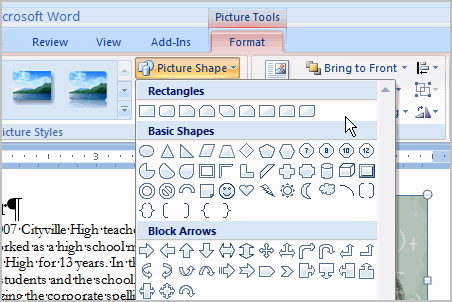
- Left-click a shape to select it.
To apply a picture style:
- Select the picture.
- Select the Format tab.
- Click the More drop-down arrow to display all of the picture styles.
- Hover over a picture style to display a live preview of the style in the document.
- Left-click a style to select it.
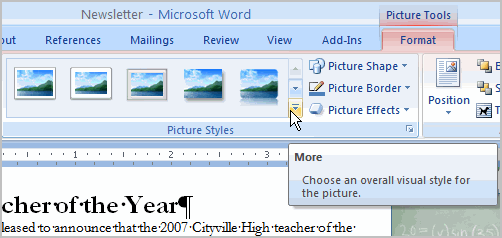
To add a border to a picture manually:
- Select the picture.
- Select the Format tab.
- Left-click the Picture Border command, and select a color.
OR
- Select Weight from the menu and choose a line weight.
Challenge!
Use the newsletter or any Word document you choose to complete this challenge.
- Insert a picture into a document.
- Crop the image proportionally.
- Apply a picture style to the image.
- Compress the picture.
/en/word2007/columns-and-ordering/content/

Documents wouldn’t be complete if you couldn’t add images and graphics. You can even add graphs that you’ve created in Microsoft Excel to Word documents, because any Microsoft product works well with the developer’s other products. Whether it’s graphs or pictures, you can copy and paste them to your documents but usually you’ll need to format them to work with other text in the document.
Adding Pictures to a Document
Word supports insert images from either the Internet or your local computer. If you’re able to copy an image, you can paste it to your document. You can use your own images stored on your computer, or you can copy an image from the Internet and use it in your document. Before you copy an image from the Internet, ensure that the owner offers free use without attribution or payment. Some image owners require payment before you can use them either on your site or in private documents.
To copy an image from the Internet, open your browser and go to the web page that contains the image that you want to copy. Right click the image and select «Copy» (the wording in the context menu is slightly different across browsers). When you copy an image from a web page, it gets copied to your clipboard, which runs in the background of your computer and isn’t visible from the desktop.
Go back to your document and click the section of the document where you want to paste the image. Right click the document and select «Paste.» The image is pasted to your document, but it still must be formatted for your text. We’ll discuss formatting a picture after explaining how to insert an image from Microsoft Word’s long list of freely usable clipart available from Microsoft Office software.
(Illustration controls menu)
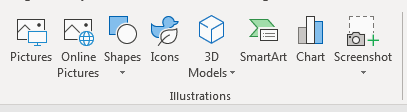
Notice from the list of options that you can add pictures located online or locally, but you can also add shapes, icons, models charts and even screenshots. Word has several options for image insertion into your documents. Inserting the different types of images and shapes is the similar for each control.
First, let’s take a look at the «Picture» option. A window opens asking you to select an image. Double click the image and it displays in your document. What if you need ideas for an image or don’t have one of your own? You can use Microsoft’s online search for images located in the cloud.
Click the «Online Pictures» button. This time, a window opens with an online search prompt.
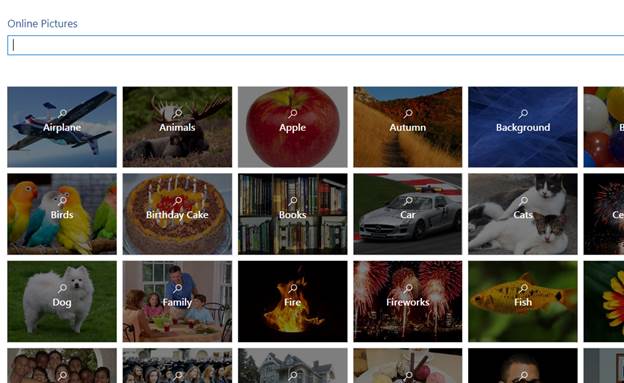
(Online picture search)
Word’s online picture search is powered by Bing, so you might notice some images should you also perform a Bing search. Notice how the images are categorized. You can click one of these categories to view a list of available images related to the category. For instance, click the «Apple» category.
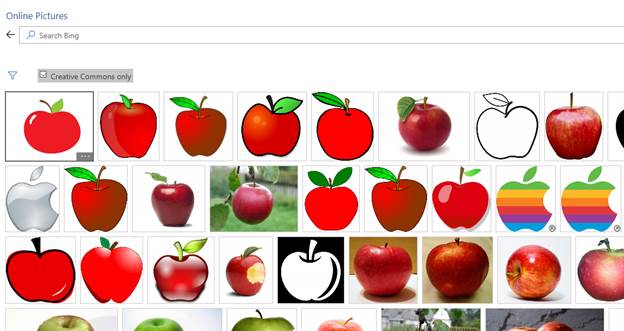
(Apple category image search)
When you click the «Apple» category, several images display. Clipart, photography and even the Apple technology company’s logo is displayed. Microsoft’s online image search gives you a large sample of possible images that you can use, but you aren’t limited to just category searches.
At the top of the image search, you see a «Search Bing» input text box. Type any phrase into this text box and press «Enter.» Word searches Bing to find images related to your search and displays them.
Double click an image that you want to include in your document, and Microsoft transfers it from the online search window to your document. In this example, an apple image is added to the document.
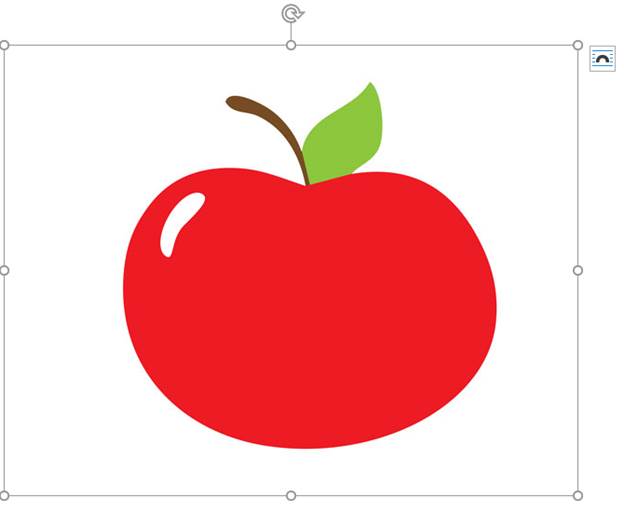
(Apple image added to document)
Notice that the image has a border around it with an arrow at the top and an icon in the upper-right corner. These prompts are significant as they provide ways to configure the way the image looks in your document.
The borders around the image with circles located on each line lets you resize the image. Using the corner circles, you can resize the image on all sizes to avoid skewing the way the image looks in the document.
The arrow at the top lets you rotate it. You can rotate it to the left or right. Click the arrow and then move your cursor in the direction that you want to set the rotation. After you rotate the image, release your hold on the mouse and it will display in your document.
The most important part of formatting an image is setting text to flow around it. Word has several options for this style. You can get to it by clicking the «Layout Options» icon in the upper-right corner of the image. A menu opens that displays the text formatting and wrapping of content around the image.
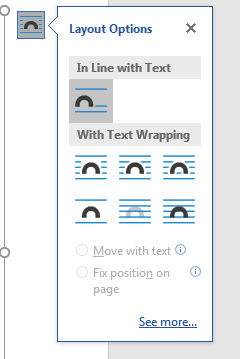
(Layout text options)
The default layout is highlighted in the image above. It’s «Inline with text» sets an image to work similarly like text on the page. The text that you place in the document does not wrap around the image but rather treats it like text albeit large text within the paragraph. This default is enough for an image placed within text without the need for text wrapping, but you have other options that can be seen in the menu.
The way text wraps around an image can be seen in the icons in the Layout Options menu. You can even have text flow over or under an image. Hover your mouse over each option and review the text that displays in the popup. The text that displays indicates the way text will align with the image. For instance, select «Tight» and text will wrap and flow around the image without creating a carriage return and line feed within the document. This option will show text similarly to when you view a web page with an image that has text flow around it without creating any page breaks.
Inserting Shapes
Microsoft Word has a number of shapes that you can add to your documents. These shapes are beneficial for workflows and charts that require simple shapes. Click the «Shapes» menu option and a list of shapes that can be included in your documents is displayed.
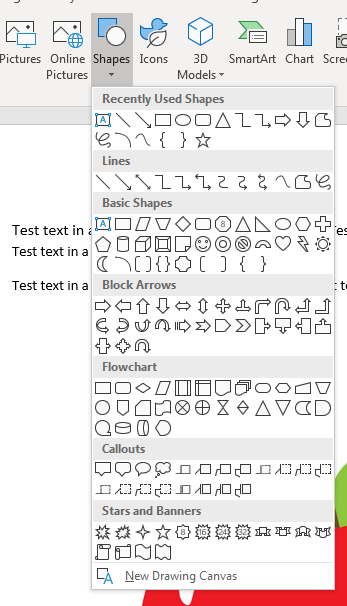
(List of shapes available in Word)
Any of these shapes can be added to your Word document by clicking the menu item. After you click the menu item, your cursor changes to prompt you to draw the same. For instance, click the rectangular icon in the «Recently Used Shapes» section. The cursor changes to a cross icon prompting you to draw the rectangle. Go to your document and draw the rectangle on your document and it’s drawn once you release the cursor.
(Inserted shape)
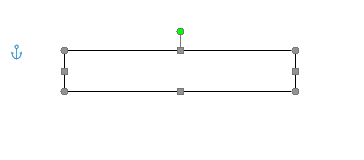
Notice that the inserted shape also has points along each line and at the corners. These points are where you can resize and reshape the rectangle. Each shape that you add to your document can be resized by clicking these points and dragging the mouse to make the shape larger or smaller. The anchor is used to lock the object to the document and text surrounding it. In the image above, no text is surrounding the shape, but should you have text around it, you can use the anchor to determine the way text is formatted around the shape.
View the other options in the Illustrations category and you can insert these additional images and shapes. For instance, the «Icons» button will open a window similar to the «Online Pictures» button where you can search and view icon images to insert into your document. The other options in this menu list work similarly. You just need to determine what type of image that you want to add to your file.
Use these menu items to insert any images that you want to add to your documentation. You can use either Word images included with your installation or ones that you store on your local hard drive.
Crop a Picture
When you crop a picture, you cut away the outer edge of the picture to create a new version.
Let’s crop the picture below.
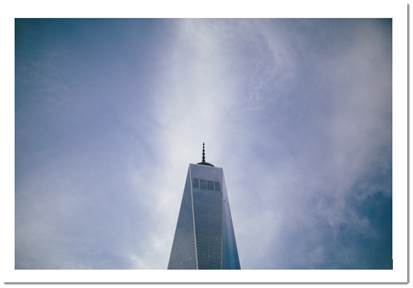
Click on the image to select it. You will see a bounding box around the image.
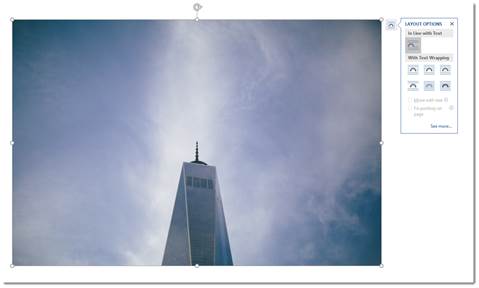
Right click on the image, and you’ll see the Crop option in the menu. We’ve highlighted it below.
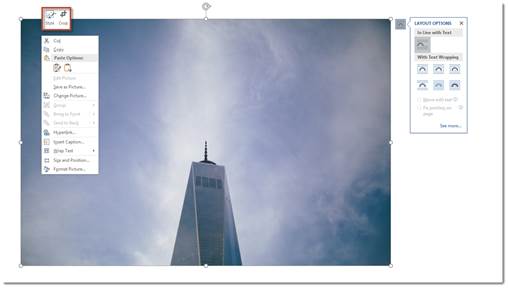
Click Crop.
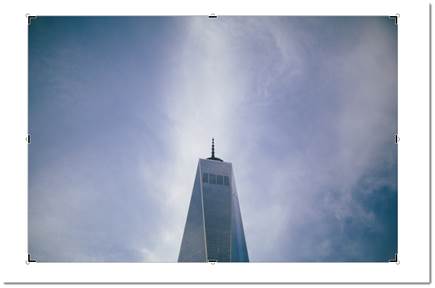
You’ll now see crop marks around the image – at all four corners and on each side. These are the black marks. Click and drag your mouse on any of these marks. Click and drag inward on the image until you have cropped away the area you want to get rid of in the image.
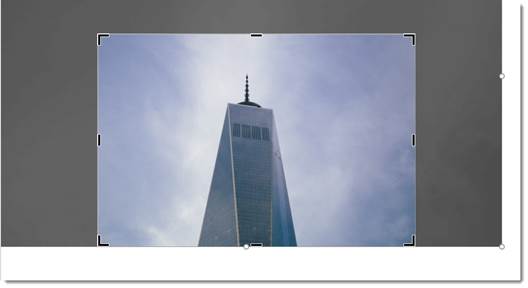
The area you’re cropping away is shaded in gray.
Click outside of the image and gray area to remove the cropped area.
NOTE: You can also click on the Insert tab after you’ve selected the image, and go to Crop>Crop.
Color
You can easily adjust the color of any image you place in your documents.
To do this, double click on the image.
You’ll then see the Picture Tools Format Tab.

Click the Color button.
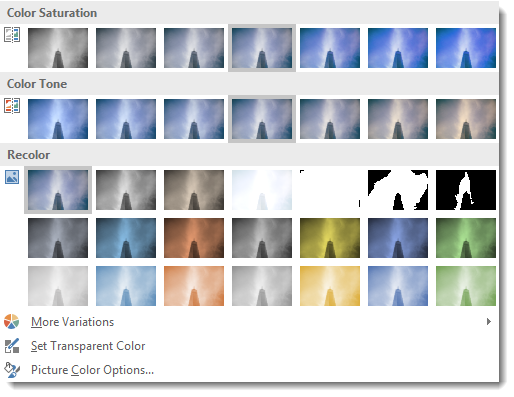
Choose the color effect you want to apply to your image.
Color Correction
You can also adjust and modify the colors in your image through color correction. Once again, go to the Picture Tools Format tab by double clicking your image.
Click the Corrections button.
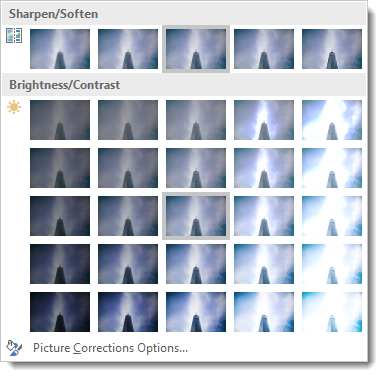
Choose a color correction.
Artistic Effects
Just as you can use Photoshop and other photo editing software programs to add effects to your images, you can also use Word for this.
Double click your picture to bring up the Format tab, then click the Artistic Effects button.

Choose the artistic effect that you want to apply to your image.
Removing Backgrounds from Images
Although Microsoft Word is a word processing program, it also offers some photo editing tools, as we’ve already seen in this lesson. Perhaps one of the most useful photo editing tools found in Word is the background removal tool. This tool allows you to remove backgrounds from your images.
We are going to remove the background from our image:
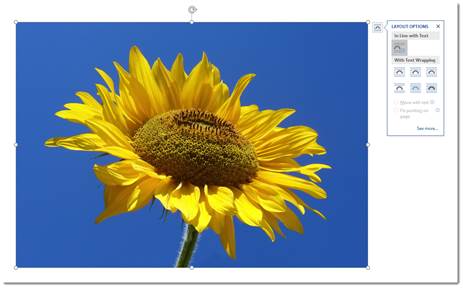
To use this tool, double click on the image for which you want to remove the background. Click on the Remove Background button in the Adjust group under the Picture Tools Format tab.
When you click the Remove Background button, you will see the Background Removal tab appear on the Ribbon. Your image’s background – and possibly your image – will also change colors. Don’t worry. This is temporary.
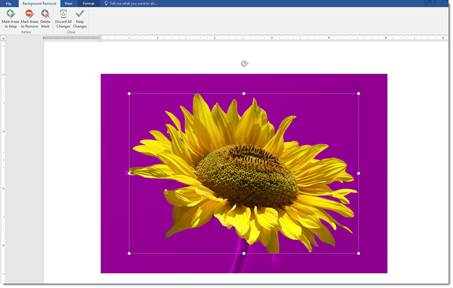
The areas that appear in purple are the areas that Word has determined are background areas that it needs to remove. If there is purple on any areas of your image that you want to keep, you can drag the handles of the bounding box that appears over the image. Drag the handles outward to keep more of the image.
In the snapshot above, you can see that the stem of the flower and part of a petal appear purple. If we leave them purple, they will be removed from the image. We can drag the hands of the bounding box to fix this, as pictured below.
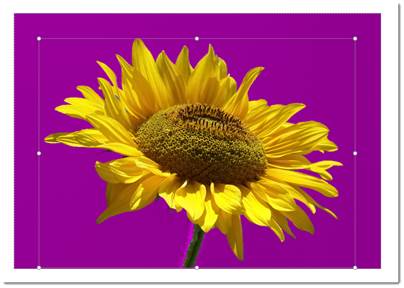
After you adjust the bounding box, if there are still areas of your image that are purple that are not supposed to be purple, go to the Background Removal tab in the Ribbon. Remember, any areas that are purple are considered background areas by Word.
Click the Mark Areas to Keep button.
Your cursor will turn into a pencil.
Simply click on an area that you want to keep.
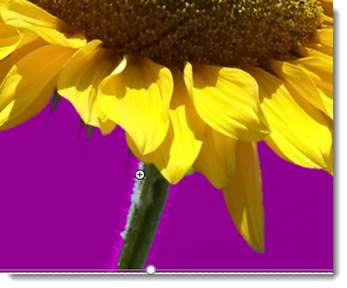
As shown in the snapshot above, a plus sign appears where you clicked. If you look at our previous snapshot, you can see this area used to be purple, but by clicking on it, it’s restored to its original color.
We can now click on all areas we want to keep.
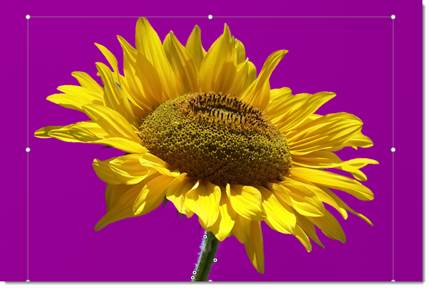
You can also mark areas of your image for removal. It’s quite possible that Word will not detect all background areas, so those areas will not appear purple. To mark areas you want the tool to remove, go to the Ribbon and click Mark Areas to Remove.
Click on the areas to remove just as you clicked on the areas you wanted to keep. However, this time, those areas will turn purple.
When you’re finished, click the Keep Changes button in the Ribbon.
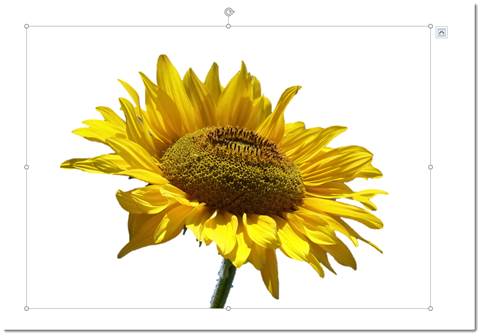
Wrap and Position Text around Images
Word can also wrap paragraphs around a picture, charts and graphs as in the example below.
To wrap text around a picture or art object, double click on the image. The Format tab will appear in the Ribbon. Go to the Arrange group.
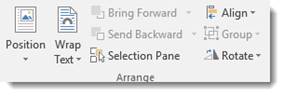
In the Arrange group, click Position to view the dropdown menu.
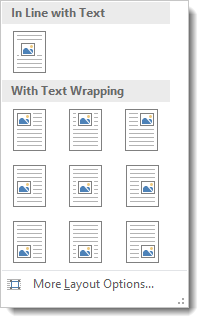
In the dropdown menu, you will see thumbnail-sized illustrations of documents with images in them. The location of the image in the illustration shows you where your image will be placed in relation to your text.
To wrap text around an image, click the Wrap Text button to wrap the text around an image. When you click the button, the following dropdown menu will appear:
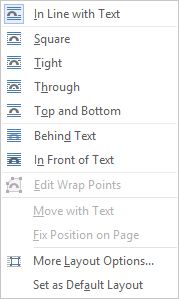
-
Square means your image sits on the same plane as the text. The text flows around the image in a square pattern.
-
Tight text flows around the image, hugging its shape. If you insert a circular shape, the text will take a circular pattern around the text.
-
Through means that the text will flow around the image as best as possible.
-
Top and Bottom means text will appear on top of the image and at the bottom.
-
Behind Text means the image is behind the text. The image looks like it is part of the paper.
-
In Front of Text means the image is on top of your text. It’s the same as if you printed a document and dropped a photograph on top of it.
You can lock an image to text so that if you move the text, the image moves also. To do this, click the Text Wrapping button, choose More Layout Options. Under the Position tab select Move Object with Text.
NOTE: You can also wrap text around an image as soon as you insert it into your document without having to go to the Ribbon. Look at the text wrap icon in the snapshot below. Clicking on it reveals the Layout Options menu.

WordArt
WordArt is a very popular feature in Word. To use WordArt, go to the Text group under the Insert tab.
The WordArt button looks like this:
When you click the downward arrow, you’ll see the WordArt menu:

Select the way you want your text to look and click on it.
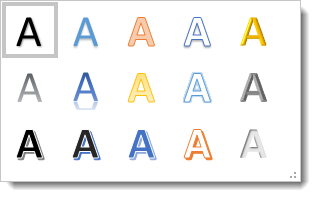
You can now format WordArt the same way you did shapes and images.
Insert Video
You can insert videos into your documents just as easily as you can insert images. To insert a video, go to the Insert tab and click the Online Video button in the Media group.
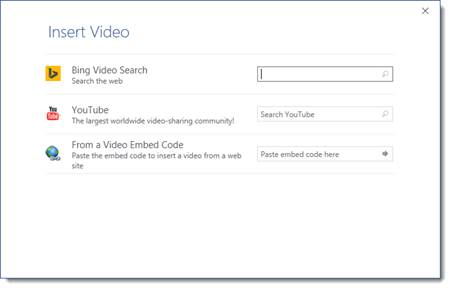
You can insert videos by searching for them on Bing, from a video embed code that you find on video webpages such as YouTube, and even from YouTube itself.
Let’s search for a video of a cat on Bing.
Type «cat» into the Bing Video Search field.
You will then see the search results appear.
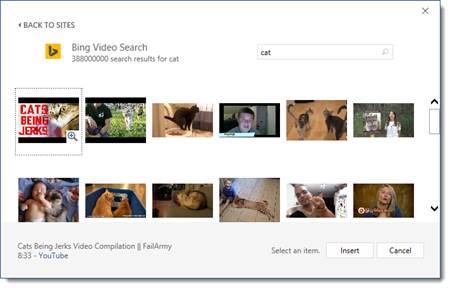
Click on a thumbnail of a video to select it, then click the Insert button.
The video is inserted into your document.
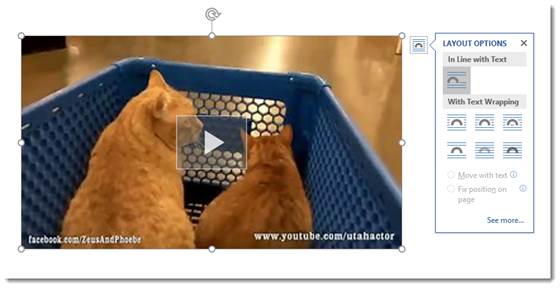
You can then rotate, resize, and position the video just as you would an image.
Formatting ClipArt and Pictures Using the Picture Tools and Format Ribbon
Whenever a picture is inserted or selected, the Format tab will automatically appear as a tab in the Ribbon. It provides you with a few of the most commonly used features available in image editing software like Photoshop. You can change the contrast, add artistic effects, remove backgrounds, or crop them. To view the Format tab, select a picture by double clicking on it.

In the center of this ribbon, you’ll see styles you can add to pictures. You can add frames, drop shadows, reflections, etc.

You can also add your own formatting to your images. Remember, a style is just a chunk of formatting heaped together.
To add formatting to your picture, you can click the Picture Border, Picture Effects, or Picture Layout, as shown below. These are located in the Styles group under the Format tab.
When you add a picture border, you can choose the color of the border, the weight (or thickness) of the line, and even the type of line (dashed, etc.).
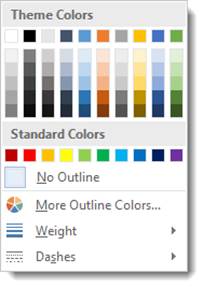
If you remember, earlier in this course you learned how to add text effects such as shadows and reflections. You can also add these to your pictures by clicking on Picture Effects.
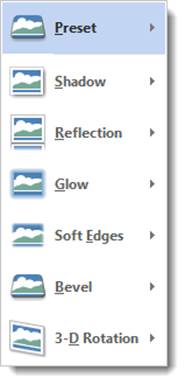
If you choose Picture Layout, you can format your picture with a caption or more information.
Here are the choices when you click Picture Layout:
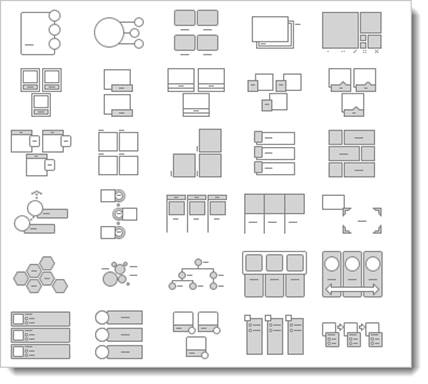
Choose the layout you want to use. We chose:

Word also provides a box where we can enter the caption:
NOTE: You can also right click on an image and select Add Caption. The method above gives your image additional formatting.
Using the Screenshot Tool
The screenshot feature was new with Word 2010. It gives you the ability take a screenshot and have it appear instantly in your documents. To use this feature, position the cursor in the place you want the screenshot to appear. Select the Insert tab and click the Screenshot button. It looks like this:

Be aware though, that this feature is somewhat limited, allowing you to only take screenshots of active windows. Windows that have been minimized to the taskbar will not be available. When we click the Screenshot button, we’ll see a list of the windows that are available, as in the following example.
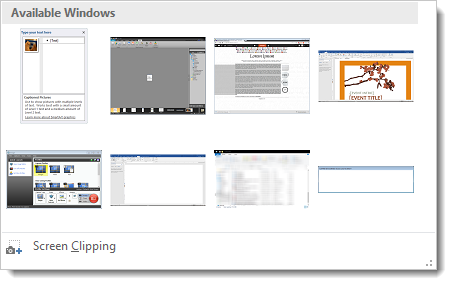
Selecting an available window will take a screenshot of the entire thing and insert it into your document. You can then use the Format ribbon to crop the screenshot or change other attributes.
If you do not want to take a screenshot of the entire window, you can select the Screen Clipping command at the bottom of the window.
When you select the Screen Clipping command, the entire window will be opaque. Click the left mouse button and drag the pointer over the area you want to capture. This selected area will become clear. Release the mouse to capture the screenshot, and it will automatically appear in your document.
Using SmartArt and SmartArt Tools
According to Microsoft, SmartArt is a quick and convenient way to create a visual representation of the information in your document. That’s a mouthful, isn’t it? What they really mean is it’s a quick and convenient way to create flow charts. The following is an example of an available SmartArt template.
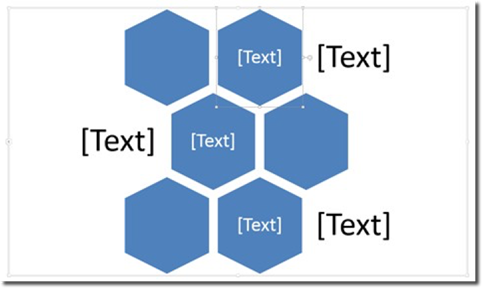
The SmartArt button is located on the Illustrations section of the Insert tab. It looks like this:

Click it and a dialogue box opens. It gives you a different categories of SmartArt to choose froom. There are lists, processes, cycles, hierarchys, etc.
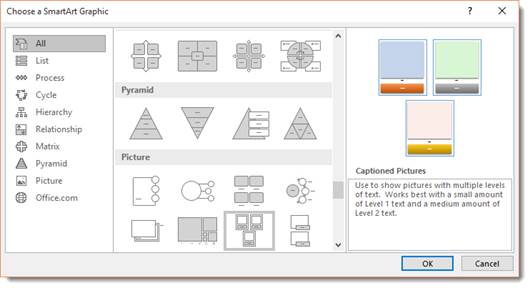
If you have access to Word, take a moment to explore the different SmartArt graphics available in each section. Seeing them all for yourself will give you the best exposure to all of the possibilities. You can even click «Office.com» and find SmartArt graphics that were created by other Office users.
When you’ve found a SmartArt graphic that you like, select it and click OK.
When the graphic opens in your document, or when it is selected, a pane opens up beside it. You can either click the areas marked [Text] in the graphic or in the pane. Click on these, then type your text. In some templates, you can also insert pictures.
Inserting Charts
To insert a chart, navigate to the Insert tab and click the Chart button. It looks like this:

The Insert Chart dialogue will open.

The chart types are arranged along the left side of the window.
Select the chart you want to use, then click OK.
If Microsoft Excel is installed on your computer, it will also open with your chart. You can input data into Excel which will then be conveyed by your chart.
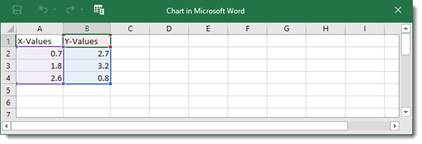
Chart Types
Word brings with it some new chart types to help you better illustrate data that you include in your documents.
These chart types include:
- Treemap. A treemap chart displays hierarchically structured data. The data appears as rectangles that contain other rectangles. A set of rectangles on the save level in the hierarchy equal a column or an expression. Individual rectangles on the same level equal a category in a column. For example, a rectangle that represents a state may contain other rectangles that represent cities in that state.
- Waterfall. As explained by Microsoft, «Waterfall charts are ideal for showing how you have arrived at a net value, by breaking down the cumulative effect of positive and negative contributions. This is very helpful for many different scenarios, from visualizing financial statements to navigating data about population, births and deaths».
- Pareto. A Pareto chart contains both bars and a line graph. Individual values are represented by bars. The cumulative total is represented by the line.
- Histogram. A histogram chart displays numerical data in bins. The bins are represented by bars. It’s used for continuous data.
- Box and Whisker. A Box and Whisker chart, as explained by Microsoft, is «A box and whisker chart shows distribution of data into quartiles, highlighting the mean and outliers. The boxes may have lines extending vertically called ‘whiskers’. These lines indicate variability outside the upper and lower quartiles, and any point outside those lines or whiskers is considered an outlier.»
- Sunburst. A sunburst chart is a pie chart that shows relational datasets. The inner rings of the chart relate to the outer rings. It’s a hierarchal chart with the inner rings at the top of the hierarchy.
Using the Chart Tools
Whenever you insert a new chart into your document, the Chart Design and Chart Format tabs will open, as pictured below.
This is the Chart Design tab. By default, it’s the tab you’ll see.

You can also click on the chart Format tab, to the right of the Chart Design tab.

Let’s take a look at the chart tools available on the Design tab.

Just like in the text ribbon, you have a choice of Chart Quick Styles. You can apply them just like you would with text, paragraphs, and pictures.
Use the Chart Layouts group on the Ribbon to add chart elements or change the layout.
Now look at the Type and Data Sections. The data section lets us select an existing data set, or edit one.
With these, we can change the chart type, switch rows to columns or vice versa, select, and edit data. Say, for example, that after we entered our data, we realized that maybe a pie chart wasn’t the right way to convey it. We’ve decided instead to use a graph chart. To do so, we’d click the Change Chart Type button and select a new chart.
Now let’s take a look at the Format tab for charts:

Use the Current Selection group to change the formatting of the current selection.
Use the Insert Shapes group to add and insert shapes. Use the Shape Styles section to change the style of your shapes. You can also change WordArt styles that appear in your chart.
The Arrange group lets you arrange your data and images, including text wrap and position.
The Size group allows you to adjust the size of your chart (in inches).