
Содержание
- Способ 1: Вставка видео из интернета
- Вариант 1: Word 2013—2021
- Вариант 2: Word Online
- Способ 2: Создание объекта из локального файла
- Вариант 1: Word 2007—2021
- Вариант 2: Word 2003
- Вопросы и ответы

Способ 1: Вставка видео из интернета
Актуальные версии текстового процессора позволяют интегрировать видеоролики напрямую из интернета. Для этого достаточно открыть специальное меню и вставить ссылку на нужную запись.
Обратите внимание! Вставить видеоролик в документ можно только в Word 2013—2021 годов выпуска и в Word Online, остальные версии текстового редактора не поддерживают такую функцию.
Читайте также: Как вставить файл Excel в документ Word
Вариант 1: Word 2013—2021
Чтобы выполнить поставленную задачу в Word 2013—2021, сделайте следующее:
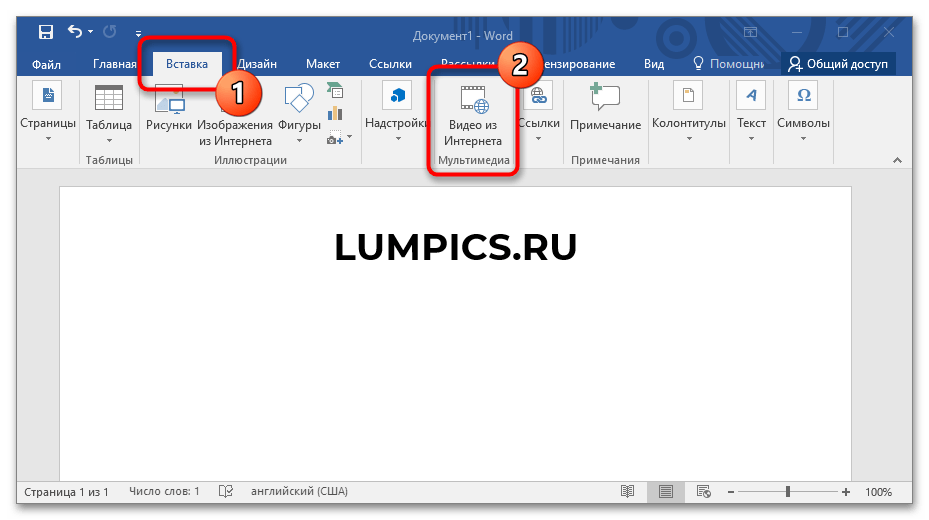
- Откройте документ, в который нужно вставить видео, и перейдите во вкладку «Вставка». На панели инструментов кликните по пункту «Видео из Интернета», который находится в блоке «Мультимедиа».
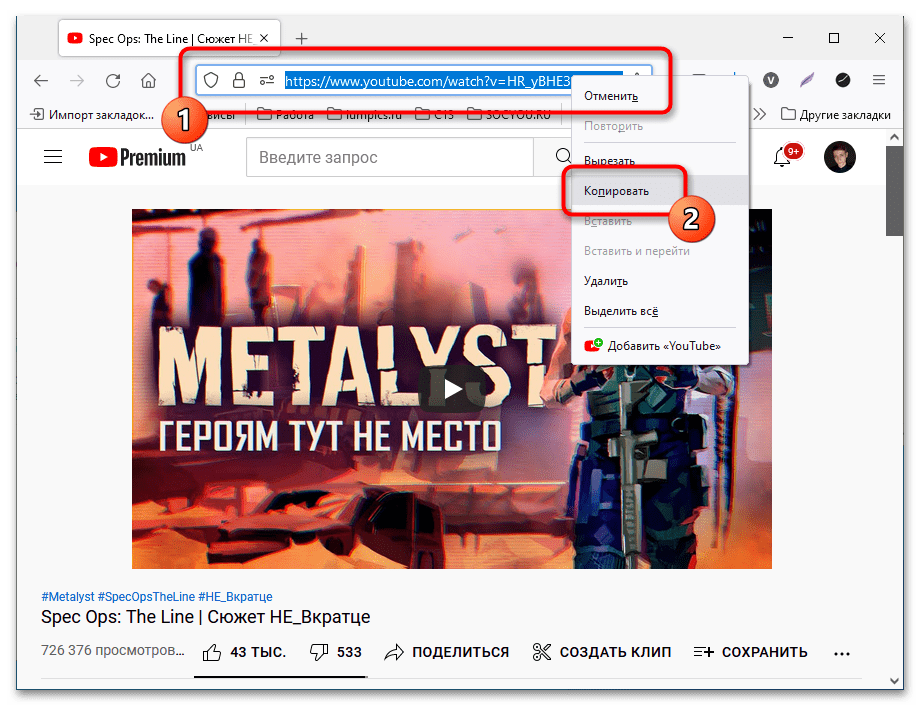
- Если предполагаемый ролик будет взят с сайта YouTube, перейдите на соответствующую страницу и скопируйте из адресной строки ссылку на него.
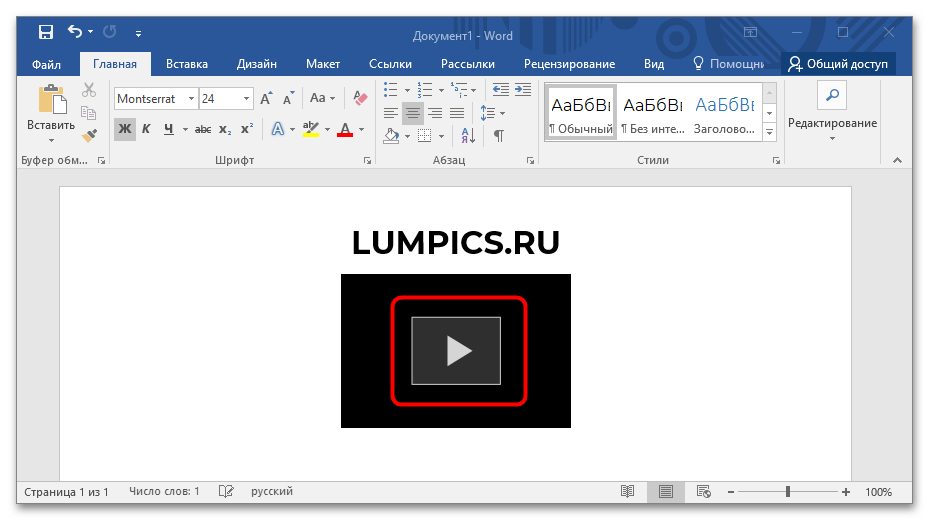
- Вернитесь в Word и в ранее открытом окне «Вставка видео» поместите скопированную гиперссылку из буфера обмена в соответствующее поле. После этого нажмите клавишу Enter. Далее из списка выберите ролик и нажмите «Вставить».

Если видеозапись взята с другой площадки, ссылку на нее нужно вставлять в поле «Из кода внедрения видео». После этого ролик сразу же будет размещен на странице документа и его можно будет воспроизвести нажатием по кнопке Play.
Важно! На различных веб-ресурсах ссылка на видеоролик может находиться в разных местах, поэтому четких инструкций предоставлено не будет. Но зачастую код внедрения можно взять из контекстного меню проигрывателя.
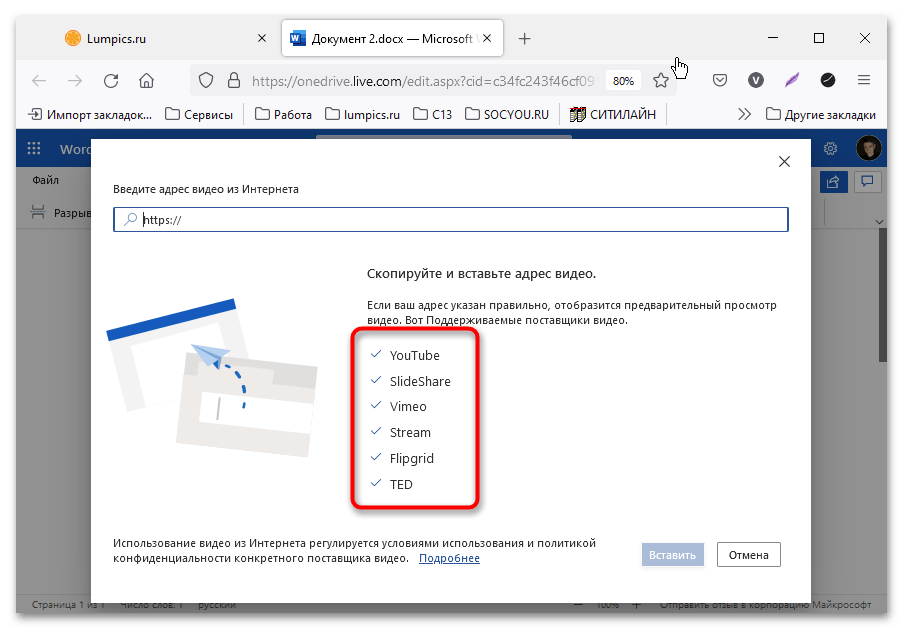
Вариант 2: Word Online
В онлайн-версии текстового редактора процедура добавления видеозаписи отличается, так как графический интерфейс был полностью переработан.
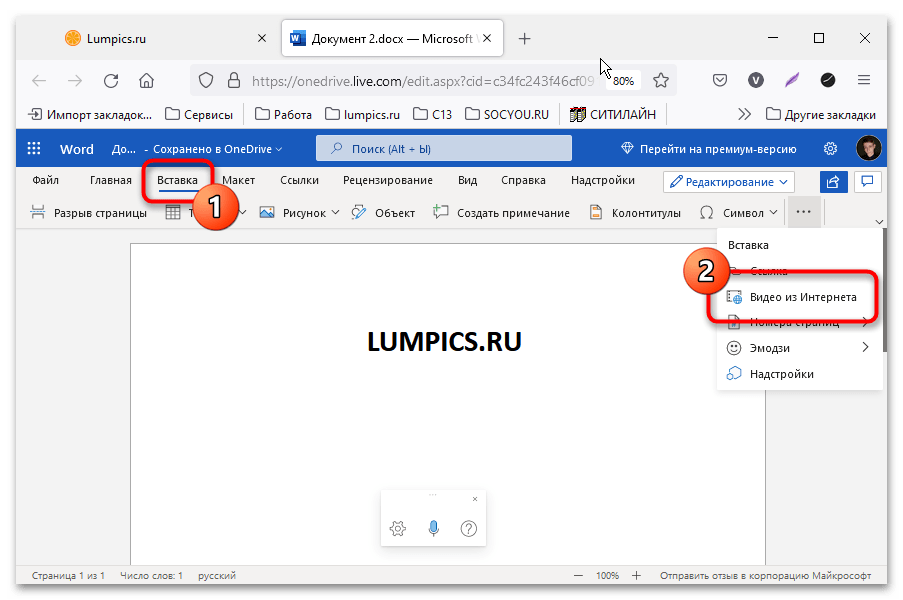
- Откройте сервис в браузере и перейдите на вкладку «Вставка». При необходимости раскройте дополнительное меню панели инструментов и кликните по пункту «Видео из Интернета».
- В появившемся окне ознакомьтесь со списком ресурсов, со страниц которых можно добавлять ролики в документ. Информация на изображении ниже может быть неактуальна, так как Word Online постоянно обновляется разработчиками.
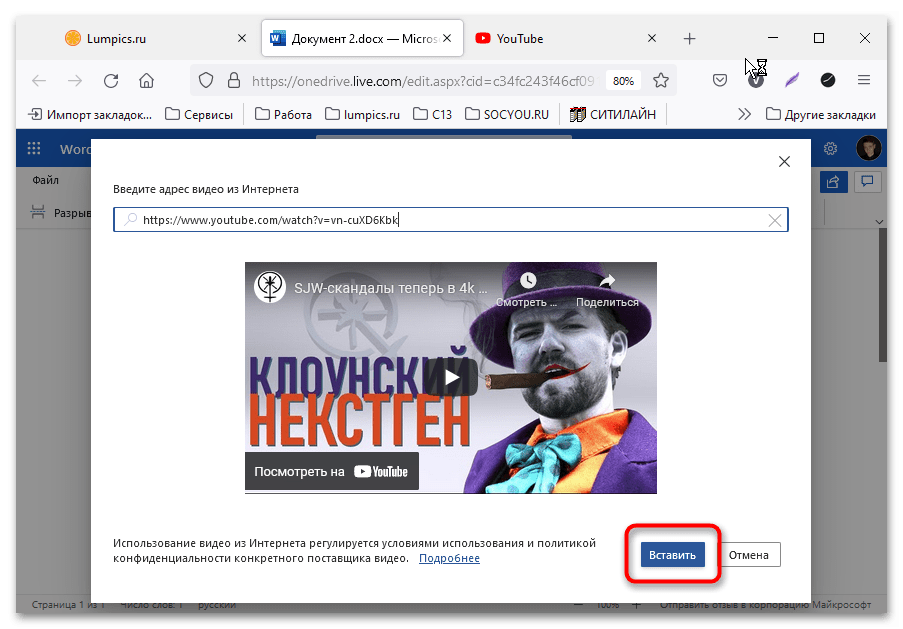
- Перейдите на сайт, откуда будет взято видео, и скопируйте ссылку из адресной строки. После этого вернитесь к документу и вставьте данные из буфера обмена в соответствующее поле в диалоговом окне.
- Завершите интеграцию видеоролика в документ нажатием по кнопке «Вставить».

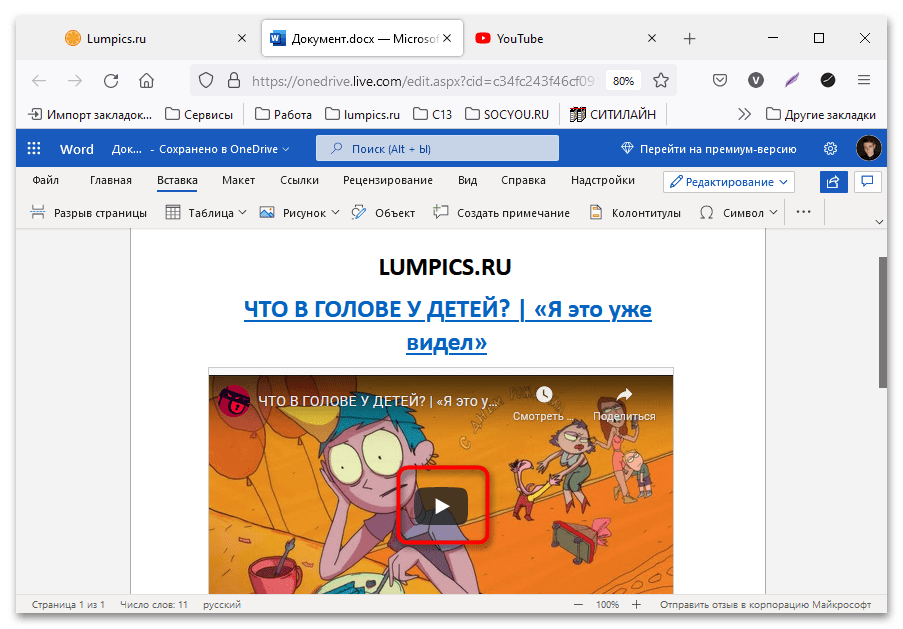
После этого запись можно будет воспроизвести непосредственно в Word Online, кликнув по кнопке Play в отображающемся проигрывателе.

Способ 2: Создание объекта из локального файла
Если видео, которое нужно поместить в документ, находится во внутренней памяти компьютера, его интеграция выполняется через отдельное меню. Стоит отметить, что после добавления ролик не будет воспроизводиться непосредственно на странице, для этих целей откроется штатный проигрыватель.
Обратите внимание! Разместить видео из внутренней памяти компьютера в документе можно только в установленных программах, онлайн-версия Microsoft Office эту функцию не поддерживает.
Читайте также: Как вставить изображение в документ Microsoft Word
Вариант 1: Word 2007—2021
Чтобы вставить видеозапись, которая находится на диске компьютера, необходимо сделать следующее:
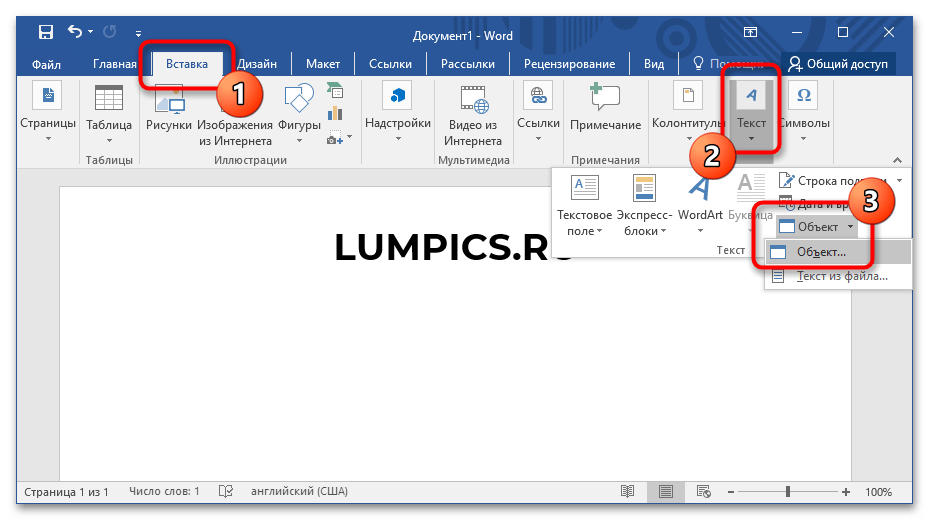
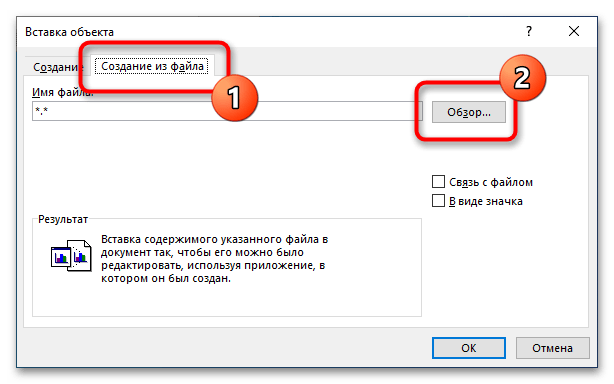
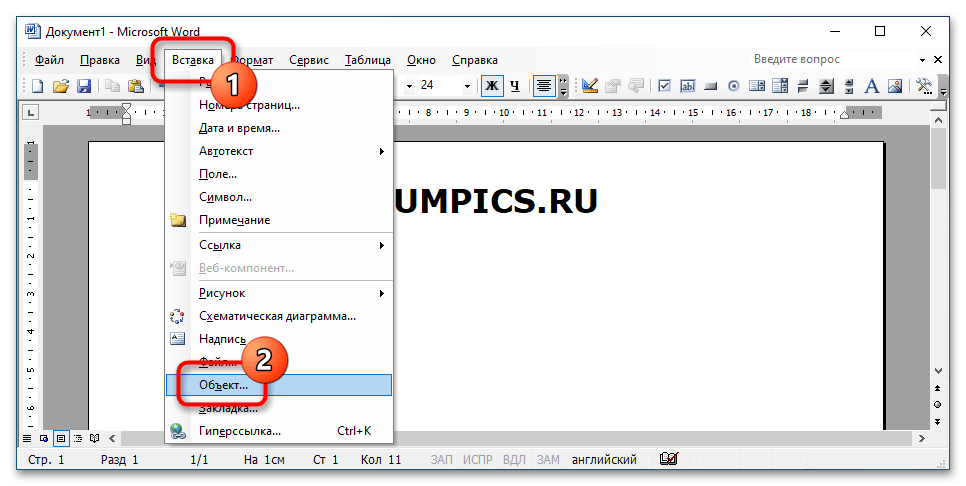
- Откройте документ и перейдите во вкладку «Вставка». В блоке «Текст» раскройте выпадающее меню «Объект» и выберите пункт «Объект».
- В появившемся окне перейдите на вкладку «Создание из файла» и кликните по кнопке «Обзор».
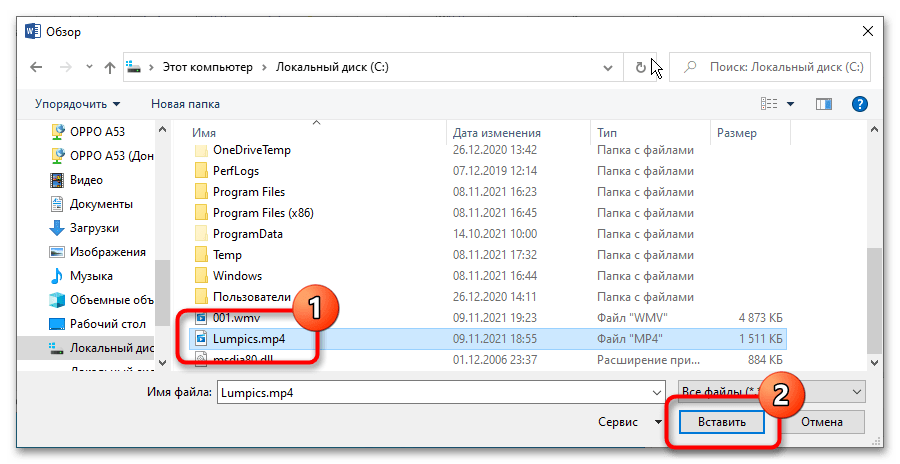
- После открытия файлового менеджера перейдите в директорию, где находится видеофайл, выделите его и кликните «Вставить».
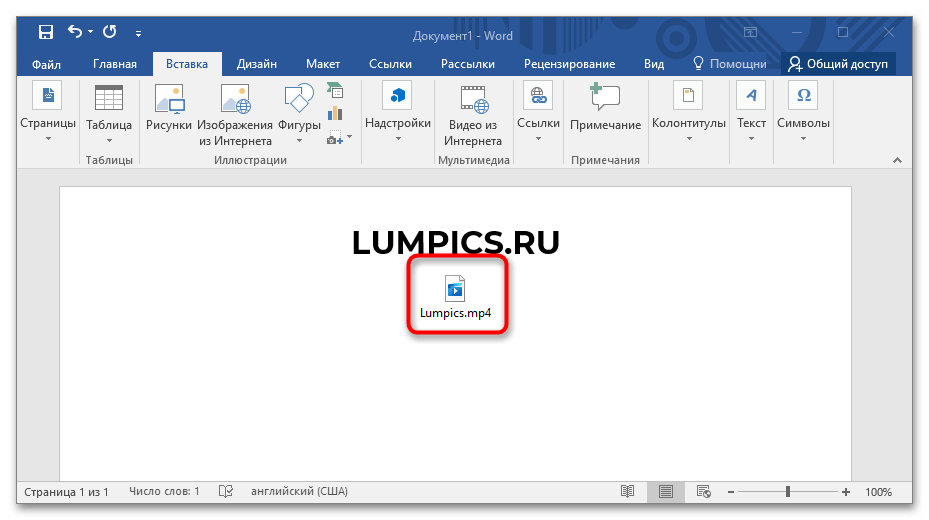
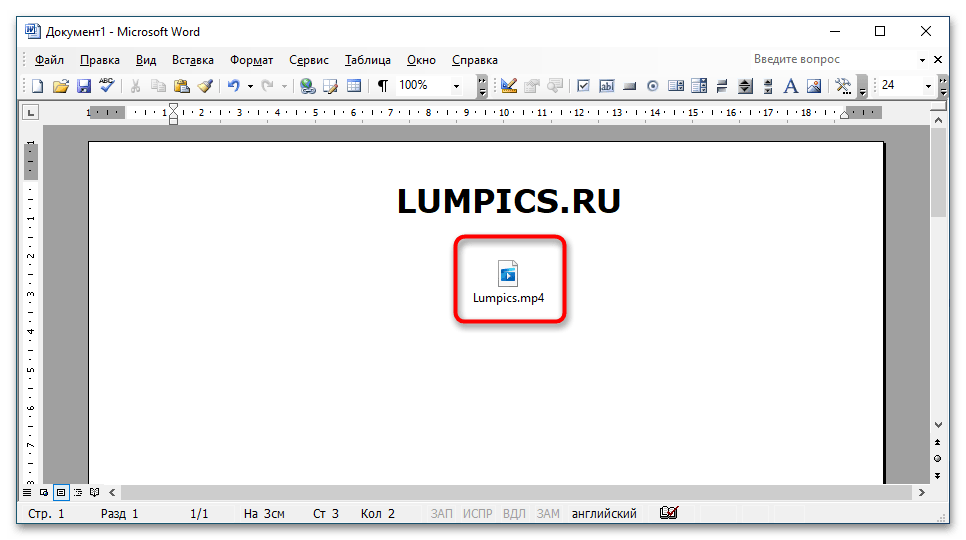
- Завершите процесс интеграции внешнего ролика нажатием по кнопке «ОК». После этого запустить видео можно двойным нажатием по добавленному объекту.
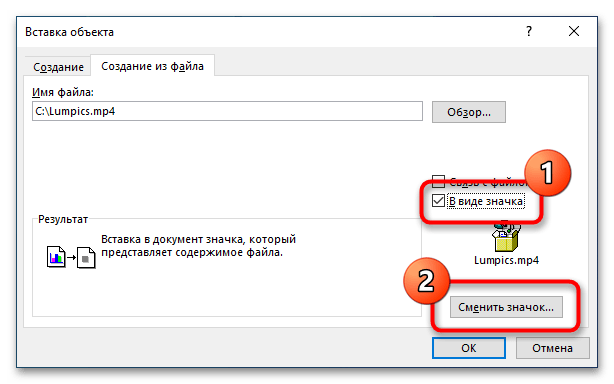
Обратите внимание! Итоговый значок для запуска видеозаписи можно изменить на любой другой. Для этого нужно установить отметку напротив пункта «В виде значка» и нажать по кнопке «Сменить значок». После в окне файлового менеджера потребуется выбрать картинку, которая заменит стандартную иконку.
Вариант 2: Word 2003
Разместить видео в качестве объекта в документе можно аналогичным образом и в Word 2003, но разница заключается в интерфейсе программ, особенно на начальном этапе. Чтобы раскрыть окно для добавления ролика с компьютера, необходимо развернуть выпадающее меню «Вставка» и выбрать опцию «Объект».
После этого потребуется выполнить все действия, представленные в предыдущей инструкции, начиная со второго шага. В результате на странице разместится интерактивный объект, после нажатия по которому запустится проигрыватель.
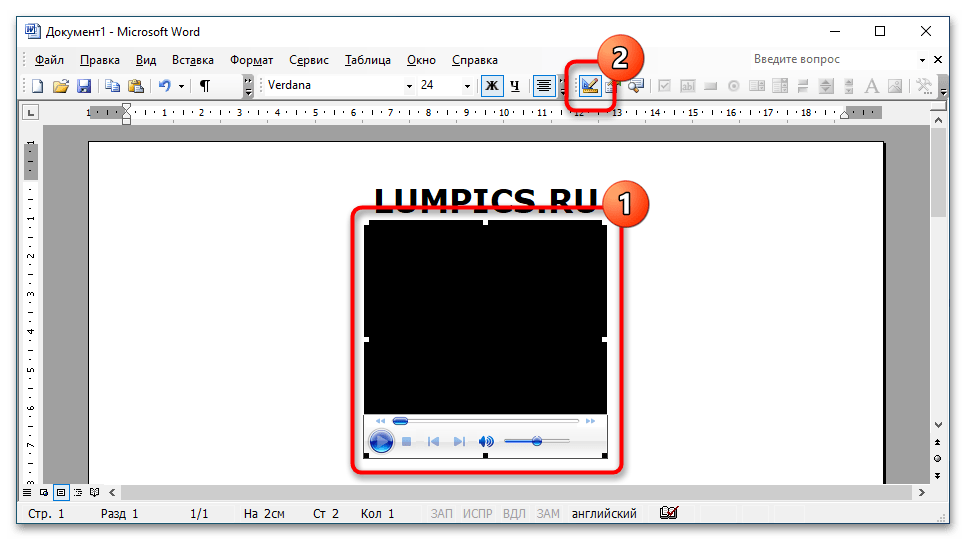
В отличие от всех остальных версий текстового процессора, в Word 2003 есть возможность вставить в документ видео со внутренней памяти компьютера с возможностью воспроизведения непосредственно в программе. Для этого сделайте следующее:
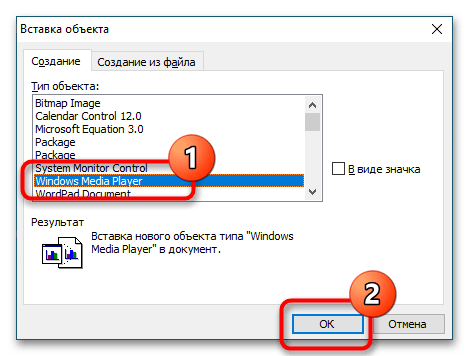
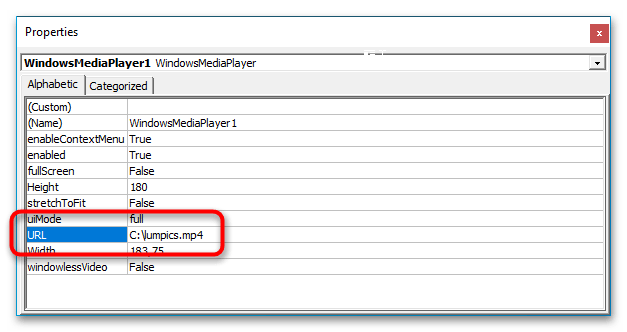
- Раскройте меню «Вставка» и выберите пункт «Объект». В открывшемся окне на вкладке «Создание» выделите в списке строку «Windows Media Player» и кликните по кнопке «ОК».
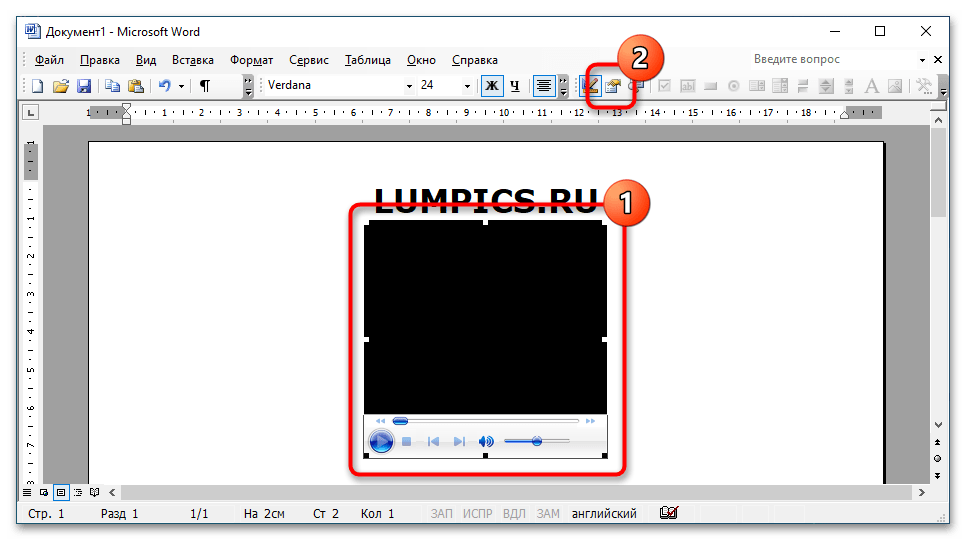
- В окне программы появится проигрыватель, размещенный на странице документа. Кликните по нему левой кнопкой мыши, после чего на панели инструментов нажмите по пункту «Окно свойств».
- В появившемся диалоговом меню в строке «URL» укажите путь к видеоролику, который нужно интегрировать в Word 2003. Вписывать информацию потребуется вручную. После этого закройте окно.
Чтобы в будущем воспроизвести видеозапись, необходимо кликнуть один раз по проигрывателю, а затем нажать по кнопке «Конструктор форм», расположенной на панели инструментов.
Еще статьи по данной теме:
Помогла ли Вам статья?
The best way to learn about Word 2013 is to start using it. Create a blank document and learn the basics of adding and formatting text.
Want more?
Basic tasks in Word 2013
What’s new in Word 2013
When you first open Word 2013, this is what you see.
You can open an existing file here, or choose a template and create a new document.
Since we are just starting out, let’s keep it simple and open the Blank document template.
Your new document opens here.
This area at the top is called the ribbon.
As you work on your document, you can use the tools in the ribbon to modify your text, or add pictures, or change the margins, things like that.
Word has a lot of useful tools and features, but you don’t need to know all of this to create a document.
In fact, you can just start typing. Press Enter to start a new paragraph.
Otherwise, keep typing, and Word moves you to the next line automatically.
Press Backspace to remove characters to the left, press the arrow keys to move the cursor, and press Delete to remove characters to the right.
If you want to go faster, you can use the mouse to move the cursor.
As you get more comfortable with Word, you’ll find yourself wanting to do more.
For example, you can take advantage of Word’s spellchecker.
Word points out potential spelling errors by underlining the text in red.
You can retype the word, if you want, or better yet, right-click the word and get a list of suggested correct spellings.
Select one, or tell Word to Ignore the spelling.
Word also checks your grammar and word usage with a blue underline.
As your document grows and begins to take shape, there will be times when you’ll want to move some things around.
You can do that by cutting, or copying and pasting.
Watch while I switch these two paragraphs around. First, I select the second paragraph, Cut it, click the beginning of the first paragraph, and click Paste.
Let’s go back and take a closer look at that.
First, you select what you want to move.
Click and hold the left mouse button at the beginning and drag the mouse to the end. The area you select turns gray.
If you want to get rid of the selection, just click some place.
Now if you want to go faster, you can make a selection without dragging the mouse.
Just double-click to select a word. Click three times and you select the whole paragraph.
You’ll see that there is always more than one way to do things in Word.
Next, we need to cut the text.
But you can’t do that by pressing Delete, because that will permanently remove the text.
We need to use the Cut and Paste commands up here on the ribbon.
These words at the top are called Tabs.
When you click one, you display all the commands and options in the tab.
The Cut and Paste commands are on the HOME tab.
When you click Cut, Word removes the text and places it in the computer’s memory in a location called the Clipboard.
Word also rearranges the document, so you don’t see where the text was cut.
Word will do this anytime when something is added or removed.
Next, we select where we want to move the paragraph.
Then, come back to the ribbon and click Paste. And Word inserts the text from the clipboard.
Notice that you can click Copy instead of Cut, if you don’t want to remove the original text.
So cutting and pasting is one way to move text.
But let’s go back, and I’ll show you even a faster way by using the mouse.
Instead of using the clipboard buttons, you can just click the selected text, and hold the left mouse button as you drag it to a new location.
So, now you have all the information you need to create a basic document or a rough draft. Up next, we’ll save our document and move on.
As part of the Microsoft Office Suite, MS Word is one of the most popular office productivity tools in the world.
In this guide, you’ll learn the basics of how to use Microsoft’s word processing software. Whether you’re just getting started with Word or have years of experience, you’ll find this guide helpful.

With Microsoft Word, you’ll be creating useful business documents in no time. Also, many other file formats can be converted to MS Word (.doc) format. And Word documents can be saved as .pdf files.
How to Use Microsoft Word to Create Professional Business Documents
One of the best and easiest ways to create an effective business document with Word is to use a template. There are hundreds of professional Word templates you can use available through Envato Elements and GraphicRiver. Here are just some of them:
-

25 Microsoft MS Word Business Proposal Templates to Make Deals in 2022
-
25 Free Creative Resume Templates (Word & PSD Downloads for 2022)
-
20 Best Free Microsoft Word Resume CV Cover Letter Templates 2022


How to Use This Tutorial Guide
Learn how to work with Word’s tools to make great business documents quickly. We’ll explore everything from formatting basic text styles to making awesome page layout designs to using headers and footers.
Note: Be sure to bookmark this Microsoft Word tutorial guide to start working through each tutorial at your own pace.
I spent part of my lunch hour today remoted into a friend’s computer who was having a lot of trouble with Microsoft Word. Like most of you she’s an «experience Word user» and would happily put «Proficient in Microsoft Word» on her resume. However, it was pretty clear that there’s some powerful aspect to Word that folks aren’t exploiting. These kinds of features will save you HOURS reformatting documents later, especially when those docs get long like books and long reports or essays.
I figured I’d do a quick YouTube video and see if there’s an interested in a series of these. I like not to waste time OR keystrokes so this was the most efficient way to get the information out there. Within an hour this video already got these nice compliments:
- Absolutely fantastic. This totally blew my mind. I’m not too proud to say that I didn’t know any of this.
- Thanks so much. You just saved me a ton of time editing lab documents.
- Time to update my resume and this time the indents will be perfect.
- This video is magic.
So that’s telling me that there IS value in videos like this. Check it out and let me know! More importantly, share it with your family and friends and SUBSCRIBE to my YouTube channel.
TIP: If you’re using Windows 8 and are confused, I have a whole SERIES of videos at http://hanselman.com/windows8. Please spread the word and share!
Here’s my Word video. Hope this helps.
Microsoft Word: The Power of Tabs and Indents
What Office related topics would you be interested in seeing, done in this style?
Sponsor: Big thanks to the folks at Infragistics for sponsoring the feed this week! Responsive web design on any browser, any platform and any device with Infragistics jQuery/HTML5 Controls. Get super-charged performance with the world’s fastest HTML5 Grid — Download for free now!
About Scott
Scott Hanselman is a former professor, former Chief Architect in finance, now speaker, consultant, father, diabetic, and Microsoft employee. He is a failed stand-up comic, a cornrower, and a book author.
![]()
![]()
![]()
About Newsletter
Hosting By

Concentrate and type more
Sometimes when you’re writing an important Word document, it’s too easy to be distracted by all the menus and buttons. Did you know you can remove the clutter from Word and put it into Focus mode… with just one click? Here’s how.
Do whatever you want with one click
If you spend a lot of time searching through menus and tools in Word, then your life is about to become a lot easier. Here’s how to create your own Quick Access Toolbar, so you can get to the tools and settings you use most often with just one click.
Get rid of the annoying welcome screen
The Word welcome screen is great… the first time. Did you know you can skip it every time you open Word, so you can get straight to work? Here’s how to do that.
Insert chunks of text with a click
If you use Word a lot, you’re probably typing in the same information again and again and again. Save time by using the Auto Text function. Let us show you how.
Insert chunks of text with short codes
Always typing the same information into Word documents? Save time and get it right by using short codes. You’ll wonder how you ever lived without them. Here’s how to set them up.