
What is the correct word to use here and why:
I will get there quicker [than you]
vs.
I will get there faster [than you]
There must be similar adverbs for «slower».
![]()
Daniel
57.1k75 gold badges256 silver badges377 bronze badges
asked Jun 27, 2011 at 13:15
![]()
Anderson SilvaAnderson Silva
11.1k71 gold badges116 silver badges147 bronze badges
4
The definition of the two words makes them synonymous in virtually all cases. However, they do have slightly different connotations that lead to preference in usage. I generally think of something as «fast» if it can achieve a high speed. I think of something as «quick» if it responds rapidly to input. This generally leads to preference of one word over the other in context; «fast» is used in context of speed, while «quick» is used in context of time. So, you would travel fast to get somewhere quickly.
In the same vein, «quick» is used to describe the quality of an action that is short and powerful, e.g. a «quick head-fake». «Fast» is generally used to describe actions that are more sustained, e.g. «a fast sprint down the field».
None of this is concrete; you hear of someone, say in a race, having «the fastest time» much more often than «the quickest time». Clearly, the context is time, not speed, but use of «fast» is preferred anyway.
answered Jun 27, 2011 at 16:04
![]()
4
In sports, fast typically refers to speed and quick is more likely to refer to reflexes.
A quick basketball player is more likely to get a rebound or steal the ball, while a fast one will arrive at the other end of the court sooner.
answered Jun 27, 2011 at 13:48
![]()
jimreedjimreed
4,5121 gold badge22 silver badges27 bronze badges
Faster is a comparison of speed. (100mph v 120mph)
Quicker is a comparison of time. (10min v 20min)
In modern conversation they are often used interchangeably.
answered Jun 27, 2011 at 17:20
![]()
3
According to the entries in Dictionary.com for fast and quick, they are almost exact synonyms, and neither is incorrect.
If you want a quick answer, read no further than this: choose whichever you have heard most or whichever sounds right to you. If you’re not sure, remember that you can’t go far wrong when you are choosing between fast and quick.
To expound, from my experience, I would say that «getting somewhere quicker» is less commonly used than «getting somewhere faster», and if I were to choose between your examples, I would tend toward the more common word faster. A good general rule for colloquial or casual speech or writing is: use the word that is most readily known and understood.
The difference between quick and fast is very slight. In your examples, I believe faster is the more usual word; hence I would use it. However, in the sentence «A humane death is quick and painless», fast would not be my choice, because «fast death» is much less common than «quick death». Also, as you have already read, I used the word quick when referring to my shorter answer (higher up). That is because a «fast answer» did not sound as usual to me.
In cases like this, in which there are two synonyms being decided between, you have a lot of freedom, and ultimately you ought to choose which, from your experience, is more common, and more readily understood.
answered Jun 27, 2011 at 13:28
![]()
DanielDaniel
57.1k75 gold badges256 silver badges377 bronze badges
2
In a ‘scientific’ context:
-
‘quicker’ usually refers to
acceleration, that is the rate at
which an object gains speed. -
‘faster’ usually refers to velocity,
that is the speed of the object in a
given direction.
A real-life example would be as follows:
A car that could travel at 200 mph, but took an hour to get to that speed and had a 0-60mph time of 3 minutes would very fast, but not quick at all.
A car that could only travel at a top speed of 60mph, but could go from 0-60mph in half a second would be extremely quick, but not very fast.
EDIT:
To more directly answer your question… both are correct grammatically, and simply have slightly different connotations. The person who got there ‘quicker’ may have spent last time traveling. The person who got there ‘faster’ was traveling at a higher speed. In general, the first one is probably would people MEAN to say, though the second isn’t necessarily wrong.
answered Jun 27, 2011 at 19:23
1
Most of the time, there is no difference between faster and quicker but there is a difference between fast and quick.
Often fast refers to over all speed whereas quick often relates to more immediate, «out of the gate» speed. There are some topics of speech in which the two terms have a notable difference and others where there is none at all.
In sports, one often will say that Person A is fast but Person B is quick. That means that in a race over a distance, Person A would win. However, in terms of the first few steps, Person B would have the better speed. In American Football, one type of player, called a receiver, is fast and able run 50-100m in very short times. However, other players called linemen have twice the weight of receivers (and then some) are typically fat but are often called quick because of their speed from a sitting stance to point of hitting their opponent is very short. This is one of the few contexts where faster and quicker would also have different meanings.
In speech related to decisions, quick often implies limited or no planning or analysis whereas fast simply means «in less time than is typical». A person that makes fast decisions might mean taking an hour, a day or a week. The reader must make some assumptions as to a point of comparison (i.e., fast in comparison to what?). A person that makes quick decisions implies that they do not expend much or any time in analysis. Often it means that a decision is made almost immediately after hearing the problem. However, in this example, quicker and faster would mean the same. She makes quick decisions means something different than She makes fast decisions. However, Alice decides quicker than Bob means the same as Alice decides faster than Bob.
answered Jun 27, 2011 at 16:47
![]()
ThomasThomas
2411 silver badge3 bronze badges
1
Quicker means in a smaller amount of time.
Faster means at a higher rate of speed.
Compare walking to the local store with flying an B1 Bomber to Afghanistan.
The first would be quick, it might only take five minutes, but it would be slow because only walk at 3mph.
The second would not be quick, it would take 30 hours of flight time, but it would be fast, because you flew near the speed of sound.
answered Jun 27, 2011 at 18:56
![]()
Fraser OrrFraser Orr
16.3k3 gold badges46 silver badges59 bronze badges
I personally hear a distinct difference.
I could get there faster than you—I will be travelling using a faster method than you — taking a plane instead of a bus for example.
I could get there quicker than you—I know a short cut that you do not
UPDATE: If I get there faster than you, I will arrive before you. If I get there quicker than you, I may be there at the same time as you, but I spent less time travelling. Again this is my subjective, unsubstantiated feelings on this.
answered Jun 27, 2011 at 14:14
![]()
mplungjanmplungjan
29.7k5 gold badges80 silver badges116 bronze badges
5
In that context, they mean the same, but in general fast refers to getting somewhere in the shortest amount of time, whereas quick refers to the ability to change direction in a small amount of time, or to accelerate/decelerate in a small amount of time.
from the Online Etymological Dictionary:
«fast may apply to rapid motion of any duration, while in quick (in accordance with its original sense of ‘live, lively’) there is a notion of ‘sudden'»
answered Jun 27, 2011 at 18:17
![]()
Neil McGuiganNeil McGuigan
3081 gold badge2 silver badges10 bronze badges
Generally quick refers to time, fast refers to speed.
answered Jun 27, 2011 at 20:42
![]()
In common usage, such as basketball, «quick» refers to acceleration while «speed» refers to velocity.
answered Jun 27, 2011 at 21:29
![]()
In general usage, there is no difference in meaning. In this context, both words are referring to arriving at a place in a shorter amount of time.
However, to be completely correct, the first sentence should say
I will get there more quickly [than you].
While faster is and can be used as both an adverb and and adjective, quicker can be used only as an adjective.
Correct: I want a quicker response. (Adjective modifying response)
Incorrect: I want the response to come quicker. (Adverb modifying come)
Fixed: I want the response to come more quickly.
and
Correct: I want a faster response. (Same)
Also Correct: I want the response to come faster. (Same)
![]()
answered Aug 7, 2011 at 20:46
![]()
narxnarx
2,3971 gold badge14 silver badges11 bronze badges
Become a professional master in Microsoft Word by learning these useful tips and tricks to help you management your emails better and work more productivity.
Table of Content
- CTRL Key Shortcuts
- Save as PDF
- Scroll Zoom
- Add a Horizontal Line
- Shrink One Page
- Have Word Read To You
- Add Random Text
- rand()
- rand(paragraphs,sentences)
- lorem() (for Latin Text)
- Convert Text to Table
- Insert Hyperlinks
- Insert Date/Time
- Insert a File Path/Location
- Insert a Screenshot/Screen Clipping
- File Share Email
- AutoCorrect
- Triple Click to Highlight a Paragraph
- Show Formatting Marks
![]()
1. CTRL Key Shortcuts
In Microsoft Word, the CTRL key can be used to navigate through your document more efficiently.
- Hold CTRL and press Right Arrow to go right one word at a time.
- Hold CTRL and press the Left Arrow to go left one word at a time.
- Hold CTRL and Backspace to delete a whole word at a time.
- CTRL + SHIFT + Right Arrow will highlight one word at a time
- CTRL + END to move cursor to the end of the line.
- CTRL + HOME to move cursor to the beginning of the line.
- CTRL + Page Up to move up one page.
- CTRL + Page Down to move down one page.
- CTRL + UP Arrow to move cursor up one paragraph at a time.
- CTRL + Down Arrow to move cursor down one paragraph at a time.
2. Save as PDF
If you need to share your document in a fashion that can not be edited by others and will preserve the pagination and formatting as you’ve designed it, save it as a PDF. This file format (Portable Document Format) was developed by Adobe in the early 1990s as a way for people to share documents and have it appear exactly the same no matter what computing platform is use to view it from. There are other benefits of PDF as is the defacto standard for business documents.
Follow these step to save your Microsoft Word document as a PDF:
- Open the Word document you want to create a PDF of.
- From the menu bar, click File > Save As, as highlighted in the illustration below.
- From the drop-down list, find and select PDF (*.pdf) and then click Save.


3. Scroll Zoom
You can quickly zoom in and out of your Microsoft Word document with this easy keyboard and mouse combination.
- Press and hold down the CTRL key on your keyboard.
- Then scroll your mouse wheel forward and backward to zoom in and out, respectively.

4. Add a Horizontal Line
Easily add a horizontal line across your page, extending from the left margin to the right margin, by typing three hyphens (---) and then pressing Enter
In Word, a horizontal line is a type of border. To delete it, perform the following:
- Place the cursor immediately above the horizontal line.
- On the Home tab, click the arrow next to the Borders and Shading button.
- Click No Border.
5. Shrink One Page
As you finalize your Word document, you may find yourself with the last page looking a bit odd by it having just only a few lines of text. You can use the Shrink One Page feature of Microsoft Word to easily have it attempt to adjust your document to include those few lines of text without having to print that last extra page. It does this by reducing the size and spacing of your text with adversely affecting the overall presentation of your document.
Before using this feature, we’ll need to make the Shrink One Page icon accessible to us on our Quick Access Toolbar by performing this one-time setup:
- Click on the down arrow on the Quick Access Toolbar.

- Select More Commands from the list of options that appears.
- In the Word Options dialog box, from the Choose Command From drop-down list, select All Commands.
- From the list of commands, scroll down to find and highlight Shrink One Page.
- Click the Add button to add the Shrink One Page option to your Quick Access Toolbar.
- Click OK to close the dialog box.


The Shrink One Page option is now accessible through your quick access toolbar. To use this feature, simply follow these steps:
- Highlight all the text in your Microsoft Word document (you can press CTRL + A)
- Then click on the Shrink One Page icon, as illustrated below.

6. Have Word Read To You
Microsoft Word has a built-in text-to-speech feature that is able to read your document to you. You’ll be able to hear it speak your text out loud. Having Microsoft Word read aloud is a great feature for the visually-impaired. For others, this feature can be a time saving by having Word read to you while you are working on other things.
Before using it, we’ll need to make the Speak icon accessible to us on our Quick Access Toolbar by performing this one-time setup:
- Click on the down arrow on the Quick Access Toolbar.
- Select More Commands from the list of options that appears.
- In the Word Options dialog box, from the Choose Command From drop-down list, select All Commands.
- From the list of commands, scroll down to find and highlight Speak.
- Click the Add button to add the Speak option to your Quick Access Toolbar.
- Click OK to close the dialog box.

The Speak option is now accessible through your quick access toolbar. To have Word speak your text, simply follow these steps:
- Highlight the text you want Microsoft Word to read to you.
- Click on the Speak icon, as illustrated below.

You can stop speak at anytime by clicking on the Speak icon again.
7. Add Random Text
At times, you may find a need to quickly add filler text into your Microsoft Word document preview your document flow or a set of document design format. Word allows you to use one easy-to-use command to quickly populate your document with English or Latin text.
rand()
The =rand() will quickly add a few paragraphs into your document. To use, follow these steps:
- In your document, position the Microsoft Word cursor (not your mouse cursor) where you want random text to be inserted. The cursor needs to be at the beginning of a line. It does need to be a blank line, the cursor just needs to be at the beginning. This command will not work if you attempt to use it within a sentence.
- Type
=rand()and press Enter. Random text is now added to your document as illustrated below.

rand(paragraphs, sentences)
The rand command allows you to customize the random text generated by specifying the number of paragraphs and the number of sentences per paragraph to created.
For example to generate 2 paragraphs with 6 sentences each, follow these steps:
- In your document, position the Microsoft Word cursor (not your mouse cursor) where you want random text to be inserted. The cursor needs to be at the beginning of a line. It does need to be a blank line, the cursor just needs to be at the beginning. This command will not work if you attempt to use it within a sentence.
- Type
=rand(2,6)and press Enter. Random text is now added to your document as illustrated below.

lorem()
Instead of English text, you can use the lorem command in insert random Latin text. You use this command in the same manner as rand as illustrated above. In its simplest form type in =lorem() and press Enter.
To specify the number of paragraphs and sentences to generate, use command syntax is lorem(paragraphs, sentences).As an example, to insert 3 paragraphs with 4 sentences each, type =lorem(3,4) and press Enter. The result is illustrated below.

8. Convert Tabbed Text to Table
If you create rows and columns of text using tab, you can easily convert them into a table using the built-in Convert Text to Table feature in Microsoft Word. This feature will also work if you have a delimited list (e.g, comma delimited text). To use, follow these simple steps:
- In Microsoft Word, highlight your text.
- From the menu bar, click Insert tab > Table > Convert Text to Table, as illustrated below.
- In the dialog box that appear, define the criteria for the text you want to convert to a table then click OK.
- Your tabbed text (or delimited text) is now converted into a table, as illustrated below.


9. Insert Hyperlinks
You can add links to websites (or even to a different section of your document) into your document easily. This enables your reader to click on the hyperlink to go to the external resources. This is a great tool to use if you want to share or reference additional information from websites.
To insert a hyperlink, follow these steps:
- Highlight the text you make to make a hyperlink
- Press CTRL + K
- In the Insert Hyperlink dialog box that appears, select one of four available choices
- Link to Existing File of Web Page
- Link to Place in This Document
- Link to Create New Document
- Link to E-mail Address
- Enter the URL or select the target destination for your link
- For links to a web page, enter the website address (URL), as illustrated below.
- For links to a place within your document, select the position from the list of available places
- For a link to create a document, specify the folder path for your new file
- For e-mail address, enter the email address in textbox provided
- For links to a web page, enter the website address (URL), as illustrated below.
- Your highlighted text will now turns to a blue clickable hyperlink. To test the link, hold CTRL then click on the link.

10. Insert Date/Time
You can quickly insert the current date and/or time into your document with the Date & Time button. This feature enables to define whether to insert the current date only or with the time. You are also able to define the format of how the date and time should appear. This is a great time saver if you constantly need to add date or time into your document, such as for your work logs, laboratory workbooks, and similar.
Before using it, we’ll need to make the Date & Time icon accessible to us on our Quick Access Toolbar by performing this one-time setup:
- Click on the down arrow on the Quick Access Toolbar.
- Select More Commands from the list of options that appears.
- In the Word Options dialog box, from the Choose Command From drop-down list, select All Commands.
- From the list of commands, scroll down to find and highlight Date & Time.
- Click the Add button to add the Speak option to your Quick Access Toolbar.
- Click OK to close the dialog box.

The Date & Time option is now accessible through your quick access toolbar. To have Word insert the current date and time into your document, simply follow these steps:
- Position your cursor in your document where you want to insert the file path.
- Click on the Date & Time icon, as illustrated below.
- From the Date & Time dialog box, select the format on how you want your data/time to appear then click OK.


The current data and/or time is now inserted into your document.
11. Insert a File Path/Location
As you and your colleagues share Word documents with each other, you may find yourself needing to know where a particular document is saved. This is particularly the case if you have a printed copy of the document or the document was emailed to you as an attachment. By using the Insert File Path command in Microsoft Word, you can easily include the full file path of your document so others can locate it when needed (e.g., network file share).
Before using it, we’ll need to make the Insert File Path icon accessible to us on our Quick Access Toolbar by performing this one-time setup:
- Click on the down arrow on the Quick Access Toolbar.
- Select More Commands from the list of options that appears.
- In the Word Options dialog box, from the Choose Command From drop-down list, select All Commands.
- From the list of commands, scroll down to find and highlight Insert File Path.
- Click the Add button to add the Speak option to your Quick Access Toolbar.
- Click OK to close the dialog box.

The Insert File Path option is now accessible through your quick access toolbar. To have Word insert the file path of your document, simply follow these steps:
- Position your cursor in your document where you want to insert the file path. A good spot may be on your cover page or in the document footer.
- Click on the Insert File Path icon, as illustrated below.

Your document’s file path is now inserted into your document.
12. Insert a Screenshot/Screen Clipping
Microsoft Word includes a built-in feature to enable you to easily insert a screenshot (or screen clipping) into your document without the need of using the Print Screen key on your keyboard and then using Microsoft Paint to crop your image. This feature provides you with a list of selectable thumbnail preview of the windows you have open (windows that are minimized will not be included in this list).
To insert a screenshot into your Word document, follow these steps:
- In your Microsoft Word document, position the cursor where you want the screenshot to be inserted.
- From the menu bar, click on Insert > Screenshot.
- From the list of thumbnail images, click to select the screenshot you want to insert, as illustrated below.
- Your screenshot is now inserted and you can resize and re-position as needed.

Screen Clipping
If you need the ability to manually select a specific area of your screen to capture and insert into your document, use the Screen Clipping feature. You’ll be able to select a rectangular area of your screen to capture and insert.
You access this feature as follows:
- In your Microsoft Word document, position the cursor where you want the screenshot to be inserted.
- From the menu bar, click on Insert > Screenshot > Screen Clipping.
- Using the drawing pointer that appears, draw a rectangular area of your screen to capture.
- Your screenshot is now inserted and you can resize and re-position as needed.
13. File Share Email
If you are like most, you will often need to share your Microsoft Word documents with your team or colleagues for peer review, edits, and feedback. With the Share feature in Microsoft Word, you can quickly and easily attach open Microsoft Outlook and attached your document with a few clicks of the mouse.
Follow these steps to use this feature:
- While in Microsoft Word, click File > Share > Email.
- Click Send as Attachment.

An Outlook new message window will automatically open with your document attached.
14. AutoCorrect
The AutoCorrect feature can be used to automatically insert frequently used text or sentences with a simple short keystroke combination. Long disclaimer statements, reference terms, and any other long series of text can easily be inserted by typing in just a few letters.
- In Microsoft Word, click on File > Option.
- In the Word Options dialog box, select Proofing from the left side bar.
- Then click the AutoCorrect Options button.
- In the AutoCorrect dialog box, type in a short key stroke combination you want to use and type in the sentence(s) you want Word to automatically replace it with. In the example below, we use the key strokes
!safeto have Word insert the sentenceSafety is our #1 priority and everyone's responsibility! - Click Add and the OK button.


Now, as you edit your document, when you type !safe and press Space Bar, Word will automatically replace it with Safety is our #1 priority and everyone's responsibility!
This is a quick and easy shortcut to type in repetitive text into your documents.
15. Triple Click to Highlight a Paragraph
This tip quickly highlights the entire paragraph. Simply triple click on your left mouse button anywhere within a paragraph to highlight.
16. Show Formatting Marks
There are many formatting options in Microsoft Word that you can use to make your document look perfect. These include spaces, tabs, and page breaks. Why many of these are visible as you edit your document, there are some that are not. This can be a cause of frustration if you are trying to format text but are not getting the desired effect as invisible formatting are working against you.
You can have all the formatting options used in your document become visible by using the show/hide formatting mark option in Microsoft Word. Do one of the following to show and hide the formatting marks.
- Click on the paragraph symbol ¶ on the toolbar to show/hide, as illustrated below.
- Or press CTRL + SHIFT + * to show/hide.

Once displayed, formatting marks are shown, as illustrated in the example below.

If Microsoft Word is your go to Text Editor, then you should learn these most helpful 113 MS Word keyboard shortcuts to speed up your work.

Microsoft Office is being used by over 1.2 billion people worldwide and Microsoft Word is the most widely used word processing and document creation software in the world. It is used to create documents, such as letters, articles, resumes, reports, forms, tests, students’ homework assignments, and countless other purposes.
Learning how to use Microsoft Word is one of the basic and required skills for any job position. All kinds of businesses, professionals, and students rely on Microsoft Word for content creation. That being said, not everyone knows how to fully utilize the capabilities of the software.
Word gives a number of functions and features to make document creation faster and easier. One such function is Keyboard Shortcuts. It is a more convenient and faster way to perform certain actions in MS Word, like copying and pasting text, printing and saving, and much more.
Because when you are typing, you might have both hands on the keyboard and you probably don’t want to reach for the mouse every time you need to invoke a command in the program. That’s why Microsoft Word has shortcuts, to help you be more efficient in your work. Let’s take a look at lists of shortcut keys everyone should learn.
Most Frequently Used Shortcut Keys in Microsoft Word
Let us start off with the most frequently used shortcut keys for MS Word which help users save time and work productively. We are going to list Microsoft Word shortcut keys for both Windows and Mac pc. The shortcuts keys are mostly similar for both Operating systems, one of the few differences is that you press the ‘Ctrl’ key on Windows while you press ‘Command’ (which is ⌘ symbol) on a Mac computer.
Here are the most commonly used hotkeys in MS Word for Microsoft Windows and macOS.
| Windows Shortcuts | MAC Shortcuts | Description |
|---|---|---|
| Ctrl + C | Command + C | Copy the selected content to the clipboard |
| Ctrl + X | Command + X | Cut the selected content to the clipboard |
| Ctrl + V | Command + V | Paste the select the content from the clipboard |
| Ctrl + S | Command + S | Save the Word document |
| F12 | Command + Shift + S | Save As the Word document |
| Ctrl + Z | Command + Z | Undo the last action |
| Ctrl + P | Command + P | Open the Print window to print current page |
| Ctrl + A | Command + A | Select all the content on all pages |
| Ctrl + O | Command + O | Opens an existing document |
| Ctrl + N | Command + N | Open a new document |
| Ctrl + W | Command + W | Close the current document |
| Alt + F4 | Command + Q | Close the Microsoft Word software |
| Ctrl+ F | Command + F | Open the Find dialog box to find text within the current document |
| Ctrl + Y | Command + Y | Redo the last action |
| Ctrl + B | Command + B | Bold the highlighted text |
| Ctrl + I | Command + I | Italicise the highlighted text |
| Ctrl + U | Command + U | Underline the highlighted text |
| Ctrl + Home | fn + Left Arrow Key | Move to the beginning of a document |
| Ctrl + End | fn + Right Arrow Key | Move to the end of a document |
| Ctrl + H | Ctrl + H | Find and replace |
| Esc | Esc | Cancel a command |
Formatting Shortcuts in Microsoft Word
You can use the following shortcuts to apply formatting to text in MS document.
| WINDOWS SHORTCUTS | MAC SHORTCUTS | DESCRIPTION |
|---|---|---|
| Ctrl + ] | Command + ] | Increase the font size by 1 unit |
| Ctrl + [ | Command + [ | Decrease the font size by 1 unit |
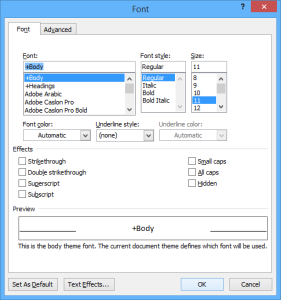
| Ctrl + D | Command + D | Open the font dialog box |
| Shift + F3 | fn + Shift + F3 | Cycle through case format (all UPPERCASE, all lowercase, or Capital First Letter In Each Word) |
| Ctrl + Shift + A | Command + Shift + A | Change all letter to Capitals |
| Ctrl + = | Command + = | Apply subscript format to the text |
| Ctrl + Shift + = | Command + Shift + = | Apply superscript format to the text |
| Ctrl + E | Command + E | Aligns the selected text to the center |
| Ctrl + L | Command + L | Aligns the selected text to the Left |
| Ctrl + R | Command + R | Aligns the selected text to the Right |
| Ctrl + J | Command + J | Justify the alignment |
| Ctrl + Shift + D | Command + Shift + D | Apply double underline |
| Ctrl + Shift + C | Command + Shift + D | Copy only formatting of the selected text |
| Ctrl + Shift + V | Command + Shift + V | Paste formatting onto a selected text |
| Ctrl + K | Command + K | Add a hyperlink to the selected text. |
| Ctrl + 1 | Command + 1 | Set line spacing to single |
| Ctrl + 2 | Command + 2 | Set line spacing to double |
| Ctrl + 5 | Command + 5 | Set line spacing to 1.5 |
| Ctrl + Shift + S | Command + Shift + S | Open the Apply styles dialog box to change styles |
| Ctrl + Alt+ 1 | Command + Option + 1 | Apply the Heading 1 style |
| Ctrl + Alt+ 2 | Command + Option + 2 | Apply the Heading 2 style |
| Ctrl + Alt+ 3 | Command + Option + 3 | Apply the Heading 3 style |
| Ctrl + Shift + L | Command + Option + L | Apply the list style to the paragraph |
| Ctrl + M | Command + Right/Left Arrow | Indent the paragraph from the margin |
Selection Shortcuts in Microsoft Word
You can use the following hotkeys to extend selection to text in different ways:
| WINDOWS SHORTCUTS | MAC SHORTCUTS | DESCRIPTION |
|---|---|---|
| Shift + Left Arrow key | Shift + Left Right Arrow key | Extent selection one character to the left |
| Shift + Right Arrow key | Shift + Right Arrow key | Extend selection one character to the Right |
| Ctrl + Shift + Left | Command + Shift + Left | Select one word to the left |
| Ctrl + Shift + Right | Command + Shift + Right | Select one word to the right. |
| Shift + Up Arrow | Shift + Up Arrow | Select one line up |
| Shift + Down Arrow | Shift + Down Arrow | Select one line down |
| Ctrl + Shift + Up | Command + Shift + Up | Expand selection to the beginning of the paragraph |
| Ctrl + Shift + Down Arrow | Command + Shift + Down Arrow | Expand selection to the end of the paragraph |
| Ctrl + Shift + Home | Command + Shift + Home | Extend your selection to the beginning of a document |
| Ctrl + Shift + End | Command + Shift + End | Extend your selection to the end of a document |
| Ctrl + Shift + * | Command + 8 | View or Hide non-printing characters |
Navigation Shortcuts
You can use any of the below shortcuts to move around in MS Word document:
| WINDOWS SHORTCUTS | MAC SHORTCUTS | DESCRIPTION |
|---|---|---|
| Left/Right Arrow key | Left/Right Arrow key | Move the cursor one character to the left or right |
| Up/Down Arrow key | Up/Down Arrow key | Move the cursor up or down one line |
| Ctrl + Left/Right Arrow key | Command + Left/Right Arrow key | Move the cursor one word to the left or right |
| Ctrl + Up/Down Arrow | Command + Up/Down Arrow | Move the cursor one paragraph up or down |
| Home | Command + Left Arrow key | Move the cursor to the beginning of the line |
| End | Command + Right Arrow key | Move the cursor to the end of the line |
| Ctrl + Home | Command + Home | Move the cursor to the top of the document |
| Ctrl + End | Command + End | Move the cursor to the end of the document |
| Ctrl + G | Command + G | Open the ‘Go to’ dialog box, where you can specify to move to a specific page, section, line, etc. |
| Shift + F5 | Shift + F5 | Cycle through the last three locations where your cursor was placed. |
Insertion Shortcuts in Microsoft Word
Sometimes, you may want to insert some commonly used symbols or some fields using keyboards, instead of combing through the menus. Use these hotkeys to insert things in MS word:
| WINDOWS SHORTCUTS | MAC SHORTCUTS | DESCRIPTION |
|---|---|---|
| Alt + Shift + D | Control + Shift + D | Insert a Date field |
| ALT + Shift + T | Control + Shift + T | Insert a Time field |
| ALT + Shift + L | Control + Shift + L | Insert a list field |
| ALT + Shift + P | Control + Shift + P | Insert a page field |
| Ctrl + F9 | fn + Command + F9 | Insert an empty field |
| Alt + N, M | Command + Control + M | Open the SmartArt graphic dialog box to insert a graphic |
| Alt + Ctrl + F | Command + Option + F | Insert a footnote |
| Alt + Ctrl + D | Command + Option + D | Insert an endnote |
| Alt + Ctrl + C | Option + G | Insert a copyright symbol (©) |
| Alt + Ctrl + T | Option + 2 | Insert a trademark symbol (™) |
| Alt + Ctrl + . | Option + ; | Insert an ellipsis |
| Shift + Enter | Shift + Return | Insert a line break |
| Ctrl + Enter | Command + Enter | Insert a page break |
Help Shortcuts in MS Word
Here are the shortcut keys you can use to access help menus in Microsoft Word:
| WINDOWS SHORTCUTS | MAC SHORTCUTS | DESCRIPTION |
|---|---|---|
| F7 | Command + Option + L | Open spellcheck |
| Shift + F7 | Fn + Shift + F7 | Open Thesaurus |
| F1 | F1 | Open Help guide |
| Ctrl + O | Command + O | Open Options |
Ribbon Keyboard Shortcuts for Windows
Microsoft Windows has an ‘Alt’ key control which allows access to all the tabs and their functions in the Ribbon. Unfortunately, Mac PCs lack this ‘Alt’ key control of the menus in Office. But if you are a Windows user, you can use these Acces key shortcuts via keyboards. When you press the ‘Alt’ key, it will show you ‘Key Tips’ letters. You can combine the ‘Alt’ key with these ‘Key Tips’ letter to make the following Access Keys for the ribbon options:
| Windows Shortcuts | Description |
|---|---|
| Alt + F | Open the File tab to access the Backstage view |
| Alt + H | Open the Home tab |
| Alt + N | Open the Insert tab |
| Alt + G | Open the Design tab |
| Alt + P | Open the Layout tab |
| Alt + S | Open the References tab |
| Alt + M | Open the Mailings tab |
| Alt + R | Open the Review tab |
| Alt + W | Open the View tab |
| Alt + Q | Open the Tell me or Search box on the Ribbon to search for Help content. |
Shortcuts for Tables in MS Word
These are the shortcut keys to move around in tables in Microsoft Word:
| WINDOWS SHORTCUTS | MAC SHORTCUTS | DESCRIPTION |
|---|---|---|
| Alt + Home | Control + Home | Move to the first cell in a row |
| Alt + End | Control + End | Move to the last cell in a row |
| Alt + Page up | Control + Page up | Move to the first cell in a column |
| Alt + Page down | Control + Page down | Move to the last cell in a column |
| Tab key | Tab key | Move to the next cell in a row and select its contents, |
| Shift + Tab | Shift + Tab | Move to the previous cell in a row and select its content |
| Shift + Up/Down | Shift + Up/Down | Extend selection to the row above or below |
| Shift + Left/Right | Shift + Left/Right | Extend selection to the column left or right |
Shortcuts for Outlines in MS Word
You can use any of these keyboard shortcuts to edit your outlines in MS Word.
| WINDOWS SHORTCUTS | MAC SHORTCUTS | DESCRIPTION |
|---|---|---|
| Alt + Shift + Left arrow key | Control + Shift + Left arrow key | Promote the numbered paragraph |
| Alt + Shift + Right arrow key | Control + Shift + Right arrow key | Demote the numbered paragraph |
| Ctrl + Shift + N | Command + Shift + N | Demote paragraph to body text |
| Alt + Shift + Up arrow | Control + Shift + Up arrow key | Move selected paragraphs up |
| Alt + Shift + Down arrow key | Control + Shift + Down arrow key | Move selected paragraphs Down |
| Alt + Shift + Plus Sign | Control + Shift + Plus Sign | Expand text under a heading |
| Alt + Shift + Minus Sign | Control + Shift + Minus Sign | Collapse text under a heading |
| Alt + Shift + A | Control + Shift + A | Toggle between expand or collapse all text or headings in an outline |
| Alt + Shift + L | Control + Shift + L | Show the first line of text or all body text |
| Alt + Shift + 1 | Control + Shift + 1 | Show all headings with Heading 1 style |
| Alt + Shift + n | Control + Shift + n | Show all headings up to ‘n’ level |
| Ctrl + Tab | Command + Tab | Insert a Tab character |
Everyone uses microsoft word irrespective of whether he is in business or in his student life. But, most of the people are unaware of the powerful hidden features which can let them use ms word 2016 more efficiently and intelligently. So, here goes a list of 100 such tips and tricks to make you a ms word master quickly.
- Type =rand(7,10) and hit enter. 7 paragraphs each with 10 lines will be generated quickly.
- Type three hyphens and press enter. A horizontal line will be generated.
- Press CTRL key and click any sentence to select that sentence.
- After opening a word file, Press Shift + F5 and cursor will move to the location, when you last saved the file.
- Also while working on a word document, pressing Shift + F5 will take you to the last edited locations.
- Pressing CTRL+Shift+> makes the font bigger for the selected text, similarly CTRL+Shift+< makes it smaller in size.
- Just use tell me what to do to quickly find what you want to do in microsoft word 2016.

- Keeping CTRL key pressed and then hitting backspace key deletes the whole word.

- To insert links quickly just press CTRL + K and type the url in the address field.
- Select any term and Right click on it and then choose smart lookup to quickly find information about that term from the web.
- To apply a format just copy the format by selecting the piece of text and then clicking on format painter. After that, just select another piece of text on which you want to apply the format.

- Click three times to select any paragraph in Microsoft word .
- Select any sentence and press shift + F3 to change the sentence to lower upper or capital case.

- To write on any place in Microsoft window just Double click on that location.
- When you copy any piece of text from internet or anywhere, the formatting of that piece comes attached with that.
- To remove the formatting quickly, just select that piece of text and then CTRL + Space key.
- The fastest method to cut and paste is not CTRL + X and CTRL + V . Just select any piece of text and press F2. Now, click on that location and then hit enter , paste that piece of text.
- To insert Unicode character in your Doc, just type the code and then press ALT + X . For example, to insert $ in your document, just type U+0024 and press ALT + X.
- For quickly inserting serial numbers in a table inside microsoft word, just select the column in which you want to put the serial numbers. Now, click the numbered bullet to quickly fill all the serial numbers in that column.

- There is a hidden calculator in your Microsoft Word. Just Go to File -> Options -> Quick access toolbar.

Now, Choose Commands not in the ribbon option from the dropdown (Choose commands from). Now, select calculator and click on add and finally click on OK.
Now, write select any math equation in the microsoft word and click on calculator icon on the top toolbar. You can see the result instantly on the bottom.

- To change the font settings quickly, just click on small arrow to the right of the font section in the toolbar as shown below.

- Turn of red and blue spell error warnings (Proofing) in Microsoft word. Just Go to File -> Options. Choose proofing and then check both options for the current document saying hide spelling and grammar errors in this document only.

- To open the last document in Microsoft word 2016, just search winword.exe /mfile1 in search box of windows PC. You can also run this in run command box to open the last word file.
- To password protect a file, Just click on file and click on protect document -> Encrypt with password. Choose and set a password.
- To remove the password, just click on protect document -> Encrypt with password again and clear password.

- To replace all the images in a word document, first of all copy any image first to stick it to clipboard. Now, press CTRL + H to open find and replace window. Now, enter ^g in find what and enter ^c in replace with field. Now, Click on replace all to replace all images with the copied image.

- Choosing mark as final, make the document as read-only.


Whooosh! Zooom! Wheee! Today, we have a need for speed, so we’re looking at the words “quick” and “fast.” Both terms are related to rapidity, but there is a subtle difference between them that many people overlook. So, join us for a speedy look at how to use these words correctly!
Quick (Speedily or in a Short Time)
One use of the adjective “quick” is to refer to something that happens at speed:
John was always quick to respond.
The emphasis here is brevity of action. We also see this in another use of this term, which is to show that something happens in a short amount of time:
I’ll give your essay a quick look before you hand it in.
These uses are similar, but the second doesn’t necessarily require speed. You could have a “quick nap,” for example, which would be short but static (unless you fall asleep on a skateboard at the top of a hill).

(Photo: John Chapman/Pyrope)
The adverbial form of this word is “quickly.” “Quick” and “quickly” are sometimes used interchangeably, but you should always use “quick” for nouns and “quickly” for verbs in formal writing.
Fast (At High Speed)
“Fast” is another adjective that refers to something happening at speed:
John was always fast to respond.
However, it can also be used to describe something that is capable of moving quickly. Or it can indicate that something happens at a high pace:
I’ve always loved fast cars.
Find this useful?
Subscribe to our newsletter and get writing tips from our editors straight to your inbox.
The fast pace of change took some by surprise.
In these cases, it is the sustained speed/rate of something that matters, not the time it takes to occur. We say that a car is “fast,” for example, because this reflects its potential for sustained speed, whereas “quick” would imply a brief action.
An important exception to this is “fast food,” which is so called because it is made quickly. It does not usually move fast unless you throw it across the room, which is widely considered impolite.

In addition, we can use “fast” as an adverb when describing an action:
You always drive too fast.
“Fast” has some other meanings, too, such as “hard to move” or to abstain from food for a period of time. However, these are much harder to confuse with the word “quick”!
Quick or Fast?
These words are often interchangeable when referring to something that happens at speed. But this is not always the case. The key to avoiding errors is therefore considering whether time is relevant.
If you’re describing something that happens in a short time, it will typically be “quick.” But if it is something that is capable of moving fast or that occurs at a high rate, the correct word will be “fast.”
Quick = Happening at speed or in a short time
Fast = Happening at a high speed or rate, or capable of moving at speed
Try These Great Keyboard Shortcuts to Speed Up Formatting in Word
by Avantix Learning Team | Updated March 14, 2021
Applies to: Microsoft® Word® 2010, 2013, 2016, 2019 and 365 (Windows)
You can save a lot of time using formatting shortcuts in Microsoft Word. Keep in mind that character formatting applies to one or more characters. Paragraph formatting applies to entire paragraphs.
Recommended article: 3 Strikethrough Shortcuts in Microsoft Word
Do you want to learn more about Microsoft Word? Check out our virtual classroom or live classroom Word courses >
1. Display the Font dialog box
Select the text and press Ctrl + D to display the Font dialog box.
2. Remove formatting from the selected text
To remove character formatting from the selected text, press Ctrl + spacebar.
To remove paragraph formatting (such as alignment or line spacing) from the selected text, press Ctrl + Q.
3. Increase font size by standard increments
Select the text and press Ctrl + Shift + > to increase font size by standard increments.
4. Decrease font size by standard increments
Select the text and press Ctrl + Shift + < to decrease font size by standard increments.
5. Increase font size by point
Select the text and press Ctrl + ] to increase font size by point.
6. Decrease font size by point
Select the text and press Ctrl + [ to decrease font size by point.
7. Align left
Select the paragraph(s) and press Ctrl + L to align to the left.
8. Align right
Select the paragraph(s) and press Ctrl + R to align to the right.
9. Align centre
Select the paragraph(s) and press Ctrl + E to align centre.
10. Copy formatting
Select the text with the formatting you want to copy and press Ctrl + Shift + C to copy to the clipboard.
11. Paste formatting
Copy formatting and then select the text you wish to copy the formatting to and press Ctrl + Shift + V to paste the formatting.
12. Apply italics
Select the text and press Ctrl + I to apply italics.
13. Apply bold
Select the text and press Ctrl + B to apply bold.
14. Apply underline
Select the text and press Ctrl + U to apply single underline.
15. Apply/remove all caps
Select the text and press Ctrl + Shift + A to apply or remove all caps.
16. Apply single spacing
Select the paragraph(s) and press Ctrl + 1.
17. Apply double spacing
Select the paragraph(s) and press Ctrl + 2.
18. Apply 1.5 spacing
Select the paragraph(s) and press Ctrl + 5.
19. Apply bullets
Select the paragraphs and press Ctrl + Shift + L to apply the default bullets.
20. Increase/Decrease Indent
To increase indent of the selected paragraph, press Ctrl + M. To decrease indent, press Ctrl + Shift + M.
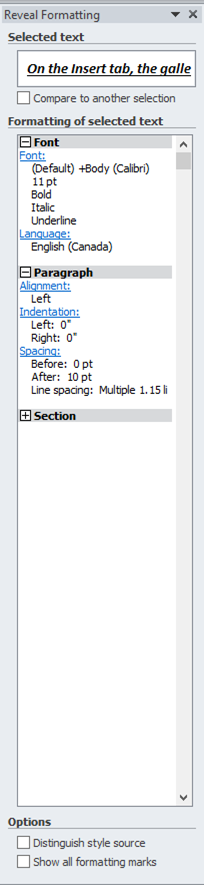
21. Display the Reveal Formatting task pane
To display the extremely useful Reveal Formatting task pane (which displays the formatting of the selected text), select the text and press Shift + F1.
Try them out. There are more shortcuts but these are the most useful for formatting.
Subscribe to get more articles like this one
Did you find this article helpful? If you would like to receive new articles, join our email list.
More resources
14+ Word Selection Shortcuts to Quickly Select Text
How to Superscript or Subscript in Word (with Shortcuts)
5 Ways to Insert the Division Symbol in Word (Type or Insert ÷)
3 Strikethrough Shortcuts in Excel to Cross Out Text or Values in Cells
How to Create Shortcuts in Word for Keep with Next and Keep Lines Together
Related courses
Microsoft Word: Intermediate / Advanced
Microsoft Excel: Intermediate / Advanced
Microsoft PowerPoint: Intermediate / Advanced
Microsoft Word: Long Documents Master Class
Microsoft Word: Styles, Templates and Tables of Contents
Microsoft Word: Designing Dynamic Word Documents Using Fields
VIEW MORE COURSES >
To request this page in an alternate format, contact us.
Our instructor-led courses are delivered in virtual classroom format or at our downtown Toronto location at 18 King Street East, Suite 1400, Toronto, Ontario, Canada (some in-person classroom courses may also be delivered at an alternate downtown Toronto location). Contact us at info@avantixlearning.ca if you’d like to arrange custom instructor-led virtual classroom or onsite training on a date that’s convenient for you.
Copyright 2023 Avantix® Learning
Microsoft, the Microsoft logo, Microsoft Office and related Microsoft applications and logos are registered trademarks of Microsoft Corporation in Canada, US and other countries. All other trademarks are the property of the registered owners.
Avantix Learning |18 King Street East, Suite 1400, Toronto, Ontario, Canada M5C 1C4 | Contact us at info@avantixlearning.ca
Microsoft Word, a program that is part of the famous office suite Microsoft Office, is an application widely extended and used all over the world, in fact for many users it is a fundamental tool for their daily work.
This is why they spend a good part of the day almost continuously using this particular program which focuses on the creation and the text editing , as most of you may already know. It is an element that can be used both individually and in conjunction with the rest of the applications that are part of the office suite we have mentioned, Microsoft Office .
Well, although many think that Word is a simple text editor with an spelling and grammar checker , you have to take into account that it is much more than that, because it has a good number of functions who over the years have come to the program to increase its potential and versatility . And it is necessary to keep in mind that this is one of the most widely used tools globally of all those in Redmond to their credit, hence the efforts that they have deployed to improve it.
Therefore, due to the huge amount of functions , features and menus that it makes available to us, while we work in Word it It can be a bit annoying to have to navigate through some of the multiple menus offered by the application, to perform certain tasks fluently. tasks used. So, as we will see in these same lines, it will never hurt to use some of the main keyboard shortcuts which Microsoft itself has integrated into Word, all in order to streamline work with the application .
Here are the main Microsoft Word keyboard shortcuts
Therefore, if you want to speed up your daily work with the editor of Redmond, we recommend that you take a look at the shortcuts which we will show you below, because some of them will certainly be of great help to you. In fact, some of them are valid for others applications of the same suite such as Microsoft Excel ou Power point .
- CTRL + N: apply bold to selected text
- CTRL + K: italicize the selected text
- CTRL + S: apply the underline to the selected text
- CTRL + U: create a new document
- CTRL + A: open a document
- CTRL + R: close a document
- CTRL+G: Save En
- CTRL+C: Copier
- CTRL+X: Cut
- CTRL+V: paste
- CTRL+B: Search in Word
- CTRL + L: replace
- CTRL+P: Print
- CTRL + T: center a paragraph
- CTRL + J: justify a paragraph
- CTRL+1: spacing tailored
- CTRL + 2: double space
- CTRL + <: Decrease the size of the police
- CTRL + SHIFT +>: increase the font size
- ALT + CTRL + C: insert the symbol of copyright
- ALT + CTRL + R: insert the symbol of the trademark
- ALT + CTRL + T: insert the symbol of the trademark
- CTRL + SHIFT + Arrows: select until the end of a word
- CTRL + SHIFT + U: switch to uppercase or lowercase
- ALT + CTRL + D: switch to mode Layout

Microsoft Word is one of the popular text processing applications available. Though there are many alternate apps, Word is an ultimate document app due to universal use. However, slow performance of Microsoft Word is quite common on many computers due to various reasons. This may result in reduced productivity for business professionals and normal computer users. In this article let us explain how to fix slow Word when opening, typing and saving documents to speedup productivity.
Related: How to fix slow Microsoft Excel and speedup your productivity.
Fix Slow Microsoft Office Problems
Here are the fixes to solve the performance problem with Microsoft Word.
- Deleting default template file
- Disable graphics acceleration in Word settings
- Use registry editor to disable graphics acceleration
- Install updates
- Update your OS
- Reinstall Microsoft Office
- Delete temporary files
- Optimize the document
- Open Word in safe mode
- Check locked files
- Disable add-ins
Method #1: Delete Normal.dot File
Microsoft Word uses template files to create documents. Normal.dot is the global template file that Word uses for creating a blank document file. This essentially means, the template file is always in use when Word is in use. Word also stores all style related settings, such as font size and font type in this template. So, problematic or corrupted ‘Normal.dot’ template can cause slow performance when opening or closing your documents.
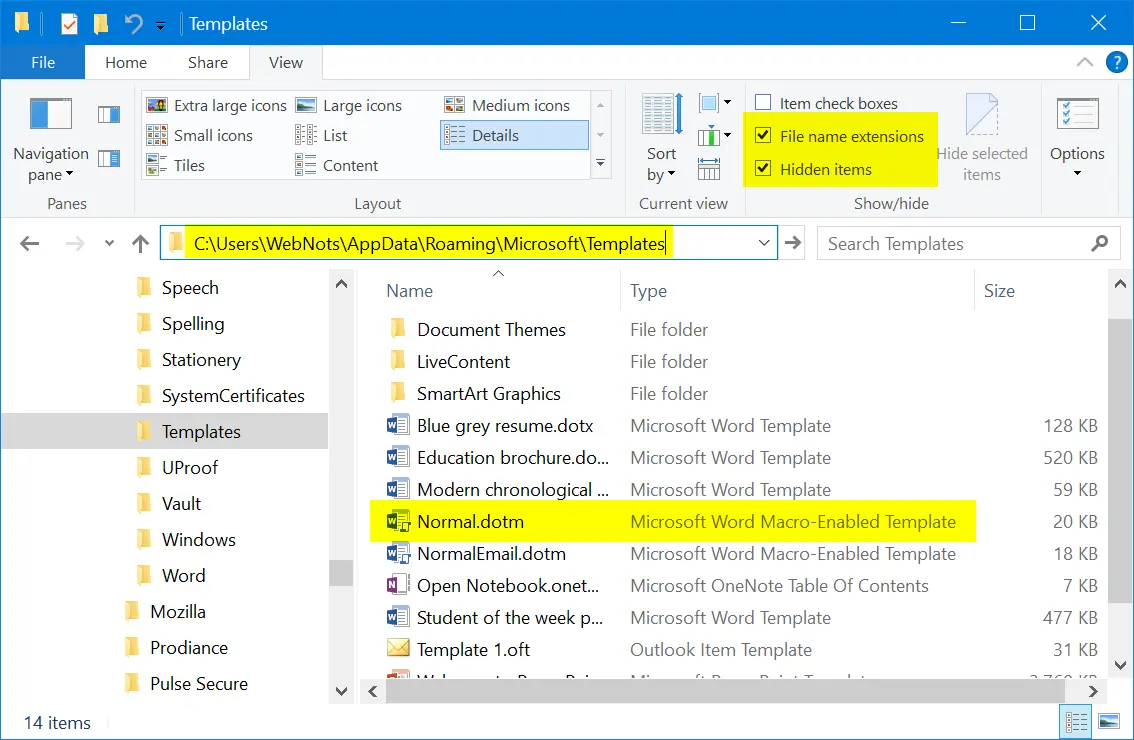
An effective solution is to delete the Nomal.dot or Normal.dotm template file. You don’t need to worry about deleting this file as Word will recreate a fresh Normal.dot file when you open the application. However, it is a bit tricky task, since Normal.dot or Normal.dotm file is a hidden file. Therefore, you need to first enable the option in Windows to show hidden files. Then save all your open documents and close Microsoft Word.
The file location may be different depending upon your Windows version. Generally you can find the Normal.dot (Word 2007) or Normal.dotm (Word 2007/10) or Normal.dotx (Word 2013 and above) file in the following location:
C:UsersUsernameappdataMicrosoftTemplates
In Windows 10, you can look for the file in the below path:
C:UsersYour User NameAppDataRoamingMicrosoftTemplates
If you use Office on Mac, go to Finder and press “Command + Shift + G” to open “Go to folder” box. Type the following location and press enter key.
~/Library/Application Support/Microsoft/Office/User Templates/
After locating the template file in your PC or Mac, simply delete it. Now, open Microsoft Word to create a new Normal.dot/dotm/dotx file. Check whether this helps to solve the slow processing issues in Microsoft Word.
Related: How to quickly insert dividers in Microsoft Word?
Method #2: Disable Hardware Graphics Acceleration
In some cases, when you type on a Word document, it will lag for few seconds or longer from the moment you press the key. This will badly affect your productivity by causing delay and diverting your concentration when doing important work. Newer Office versions use hardware graphics acceleration to speed up the performance. However, slow computers often have limited hardware resources, which make Word less responsive. Follow these steps to disable hardware acceleration in Word:
- Open Microsoft Word and create a blank document.
- Click “File” menu and choose “Options” in the left pane to go to backstage view.
- On the “Word Options” screen, choose “Advanced” in the left pane.
- Look for “Disable hardware graphics acceleration” option at the right pane under the “Display” section and enable it.
- Click the OK button to apply your changes.

Restart Microsoft Word and verify whether the problem has been resolved.
Method #3: Disable Hardware Acceleration in Registry Editor
If Microsoft Word still performs slowly, it may be a good idea to perform changes in the registry. Note that modifying registry is not recommended and you may not have access in the administered computers. If you have access to registry editor then backup your data and follow the below steps:
- Press “Win + R” keys to open Run prompt. Type the command “regedit” and hit enter. Alternatively, use Windows search box and type in “regedit” to open Registry Editor.
- Navigate to the entry HKEY_CURRENT_USERSoftwareMicrosoftOffice16.0common.
- Note that 16.0 is the version of Microsoft Office 2016, your version could be different.
- Right click on the right pane select “New > Key” to create a new key under the “common” folder.
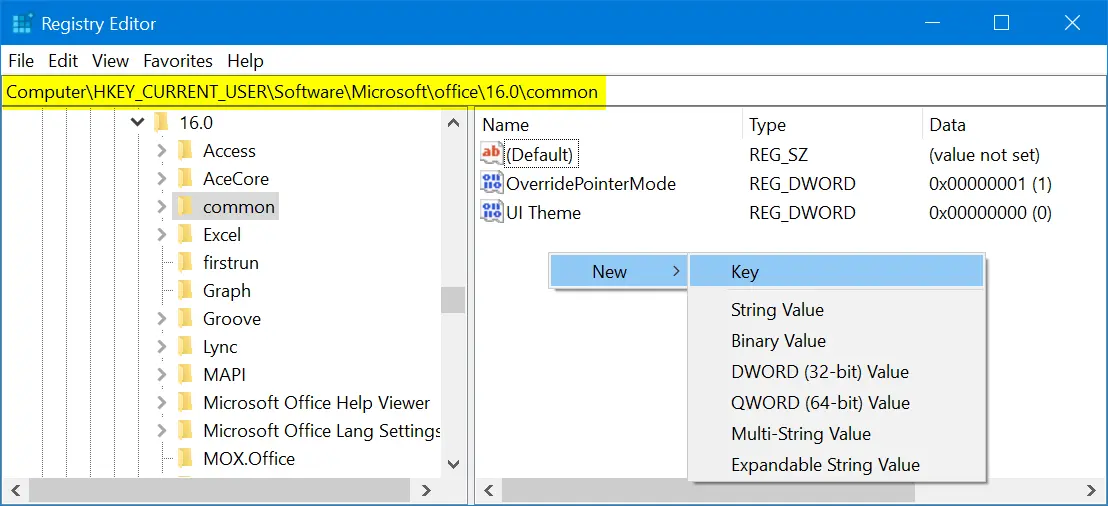
- Windows will create a key with the name as “New Key #1” with an option to edit. Type in “Graphics” for the name of the key.
- Click the newly created “Graphics” key and right click on the right pane. Select “New > DWORD (32-bit) Value” option.

- Type in “DisableHardwareAcceleration” as the name of the new DWORD value.
- Double click on the new DWORD and change its value from 0 to 1.

Close the registry editor and restart your computer. Check Word works smoother now.
Related: Fix slow Microsoft PowerPoint presentations.
Method #4: Install Latest Updates
If Microsoft Word seems to react poorly to any command for processing a task, you may need to look for updating to the latest service pack. The latest service pack may provide you with bug fixes and performance optimization. Microsoft releases service pack regularly, generally they are installed automatically if you have auto update enabled. Otherwise you need to check and update them manually. Often, by installing a new service pack, you can regain lost performance.

Note that Apple stopped supporting 32-bit applications from macOS Catalina. Hence the 32-bit Mac Word 2011 or 2016 apps will no more work on your Mac. Ensure to purchase Office 365 subscription to work with 64-bit compatible Office apps on your Mac.
Method #5: Update Your OS
Also ensure your Windows OS is getting automatic security updates to make sure that rest of the system is working properly. Microsoft updates Windows 10 automatically, however follow the below steps to check the status and manually update:
- Press “Win + I” keys to open Windows Settings app.
- Click on “Update & Security” section.
- Click on the “Check for updates” button to update your Windows 10 to the latest version.

If you have Mac, you can install the latest updates by following the below instructions:
- Go to “Apple menu” by clicking the Apple icon on top left corner of your Mac.
- Select “System Preferences…” and click on the “Software Update” option.
- Check any update is available and install the latest version.
Related: How to change embedded document name in Word?
Method #6: Reinstall Microsoft Office
If you use Microsoft Office regularly for creating complex documents, spreadsheets and presentations, there’s a possibility that it will become faulty or corrupted. You may remedy it easily by reinstalling Office package. Prepare your Microsoft Office DVD and product key to complete the re-installation process. Follow these steps to uninstall and re-install Office in Windows 10:
- Go to “Control Panel” and choose “Uninstall a program” under “Programs” section.
- Find Microsoft Office and click the “Change” button. Follow steps on the screen to remove the program.
- Use the installation disk or download from the Windows Store for re-installing again.
Note that Word 2000, 2002 and 2003 can be restored to original settings by choosing ‘”Detect and Repair” in the “Help” menu.
On Mac, you can simply drag the application file to trash bin and reinstall from the App Store.
Method #7: Delete “~.dot” or “~.doc” Files
When you open a document, Word will have a temporary file in the same folder indicated by the ~ (tilde) sign at the beginning. Generally, Word will delete them automatically when you save and close your document. however, if you accumulate lot of these temporary files, Word would become slow and sluggish. For example, if you zip the content when the document is open then the compressed folder will include the temporary file in addition to the original file. Follow these steps to cleanup the temporary files:
- Go to Windows Search box and type in ~*.dot.
- Hit enter and wait until you get all the files on your computer. Select all of them, right click and choose “Delete”.
- Repeat the process by typing in ~*.doc in the search box. Also select all of them, right click and choose “Delete”.
- You can also empty your Recycle Bin to save storage space on your PC.
Open Microsoft Word and make sure that the problem has been resolved
Method #8: Optimize Document Files
Often, less optimized document files cause slow performance. Check whether your document has plenty of embedded macros and remove any of them if possible. Many people also put high quality pictures with large resolution inside documents. You need to optimize the pictures by changing the dimension that matches the size of the page. You may also use Adobe Photoshop or Snagit to save these images in optimized format to reduce the file sizes without sacrificing the quality too much.
Method #9: Open Word in Safe Mode
One of the reasons for slow Word app is the corrupted documents. When you try to open corrupted document, Word will show a message like “Microsoft Word is not responding” indicating the problem. You can choose “Restart the program” option to cancel the current operation and try to reopen the file again.

If that does not help, then press “Win + R” keys and open Run Command box. Type “winword /safe” to open Word in safe mode. This will help you to speedup the document as Word will disable extensions and other unnecessary stuffs in safe mode. Sometimes, Word will also suggest to open a document in safe mode. Choose “Yes” to check whether the safe mode can help in improving the performance at least when processing that document.

Related: Fix slow Microsoft Outlook emails.
Method #10: Check File Lock
Some times people share the locked file in chat, emails or SharePoint. When you try to open locked file, Word will show you the “File in Use” warning and ask you to choose the action.

You may notice, slow response time in Word when you open and read locked documents. We recommend you to open the locked file in “Read Only” mode to open it faster. Otherwise, you can request the owner to share the file without edit lock.
Method #11: Disable Add-ins
If you use add-ins to enhance the functionalities then ensure to disable them when you have problem with Word.
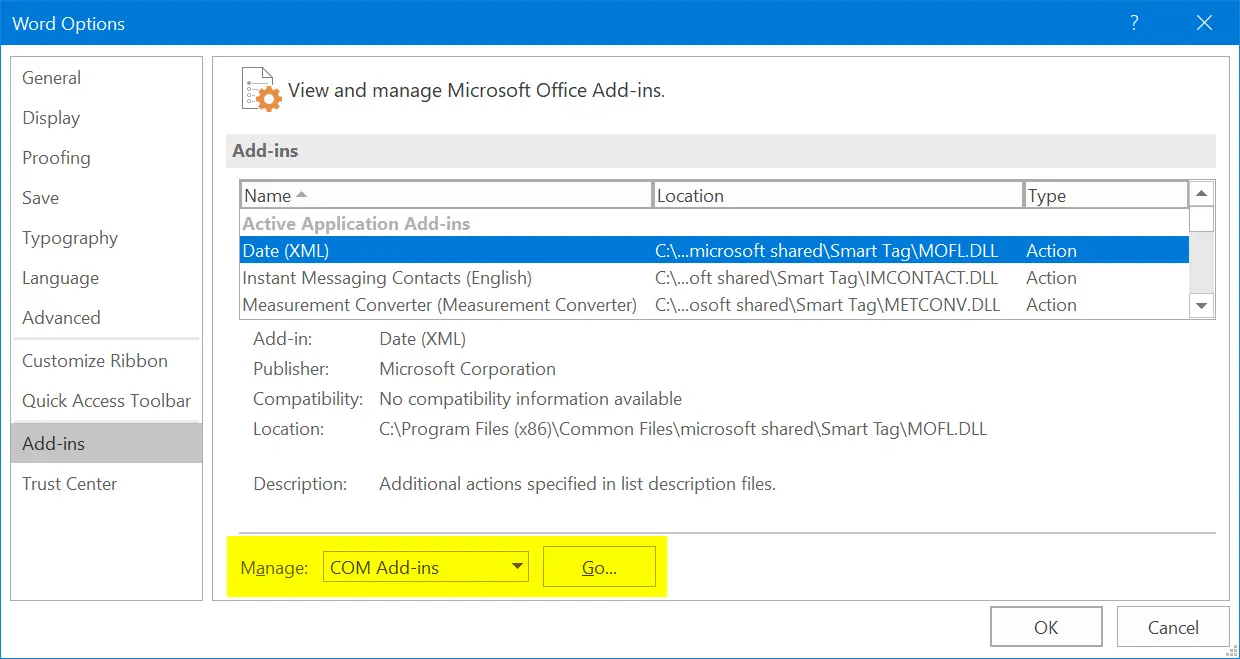
- Go to “File > Options” menu in Word.
- Choose “Add-ins” to view all installed on your Word installation. you can click each add-in to check the function it does.
- Select the add-ins type from the “Manage” drop-down and click on “Go…” button.
- Uncheck the add-ins to disable them.
Check whether this helps to resolve your problems. You can enable the add-ins back any time when needed.
Conclusion
Microsoft Word is almost an essential utility in office workers and many user’s daily life. So when you experience slow response, typing delay or any other problem, it is a good idea to check all the above steps. This will ensure to fix the problems and focus on creating documents with improved productivity.