
Select Review > Track Changes to turn it on. Make edits in your document and Word captures any edits you make. Select Review > Track Changes to turn it off.
Try it!
- Select Review > Display for Review.
- Select the option you want:
- In the Show Markup list, select the types of revisions you’d like to see:
Contents
- 1 How do you use reviews?
- 2 How do I add a review pane in Word?
- 3 How do we write a review?
- 4 How do you write a good review example?
- 5 How do I show comments in Word?
- 6 How do I use the review pane?
- 7 How do I view comments in Word?
- 8 How do you write a feedback review?
- 9 How do you write a positive review?
- 10 How do you write a review essay?
- 11 How do you write a five star review?
- 12 How do you start a review paper?
- 13 How do you write a positive review response example?
- 14 How do you inspect a document for issues?
- 15 How do I Uncollapse a comment in Word?
- 16 What is review in MS Word?
- 17 How do I edit comments in a Word document?
- 18 What is review format?
- 19 How do you share a review?
- 20 How do you get a review?
How do you use reviews?
“The restaurant received bad reviews.” “I gave the movie a good review.” “The school board is conducting a review of the curriculum.” “The teacher is holding a review for the upcoming test.”
How do I add a review pane in Word?
If you prefer to display the Reviewing Pane, follow these steps:
- Make sure the Review tab of the ribbon is displayed.
- In the Tracking group you see the Reviewing Pane tool. Click the down-arrow at the right of the tool.
- Choose either Reviewing Pane Vertical or Reviewing Pane Horizontal, according to your desires.
How do we write a review?
Top tips for writing a review
- 1 Read, watch, or listen to the work more than once.
- 2 Provide essential information.
- 3 Understand your audience.
- 4 Take a stand.
- 5 Explain how you’re judging the work.
- 6 Introduce evidence to support your criteria.
- 7 Know the conventions of the genre.
- 8 Compare and contrast.
How do you write a good review example?
Table of contents
- Provide useful, constructive feedback.
- Talk about a range of elements, including customer service.
- Be detailed, specific, and honest.
- Leave out links and personal information.
- Keep it civil and friendly.
- Feel free to update your review if needed.
- Check you’ve got the right domain name or company.
Find the “Review” tab, select the “Tracking” group, and click on “Show Markup”. Rest your pointer on Balloons, and then select “Show All Revisions inline” to display comments inline and deletions with strikethroughs. Rest your pointer on a comment inside the document. The comment will appear in a ScreenTip.
How do I use the review pane?
On the Review tab, in the Tracking group, choose Reviewing Pane. NOTE: The summary section at the top of the Reviewing Pane displays the exact number of tracked changes and comments that remain in your document.
To view all comments, no matter which document view is chosen, summon the Reviewing pane: Click the Review tab, and in the Tracking group, click the Reviewing Pane button. Choose either the horizontal or vertical display to summon the Reviewing pane and peruse comments as well as text revisions.
How do you write a feedback review?
5 Steps for Writing Effective Performance Review Comments
- Be positive and comprehensive.
- Share specific feedback and provide examples.
- Pair constructive feedback with developmental suggestions.
- Use the right words.
- Organize your feedback.
How do you write a positive review?
Tips for giving positive feedback
- Make it specific. If your positive feedback is vague, they won’t know which of their skills are good and which ones they need to improve.
- Give it in a timely manner.
- Let others see it.
- Praise everyone eventually.
- Explain their impact.
- Give the right amount of praise.
How do you write a review essay?
On writing the review…
- Reviews should include concise statements of the subject matter, problems, or issues to which the books are directed.
- Essays should include brief summaries of the authors’ major arguments and conclusions and a discussion of the manner in which they developed their conclusions.
How do you write a five star review?
Tips for Writing an Awesome 5 Star Review
- Tip 1: Share something special. Did you hire an Electrical Contractor who performed beyond your expectations?
- Tip 2: Write with personality. Be creative and thoughtful in your review and express what impressed you most about our service to you.
- Tip 3: Include variety.
How do you start a review paper?
Introduction
- Introduce your topic. It may sound redundant to “introduce” your topic in the introduction, but often times writer’s fail to do so.
- State your topic’s relevance. Think of your review paper as a statement in the larger conversation of your academic community.
- Reveal your thesis to the reader.
How do you write a positive review response example?
Example: Thank you so much for your kind words, Jane. We really appreciate you taking the time out to share your experience with us — and we agree, Jordan is truly a gem to have on our team! We count ourselves lucky for customers like you. We look forward to working with you again in the future!
How do you inspect a document for issues?
Click the File tab to go to Backstage view. From the Info pane, click Check for Issues, then select Inspect Document from the drop-down menu. Document Inspector will appear. Check or uncheck the boxes, depending on the content you want to review, then click Inspect.
To hide your comments and tacked changes using the No Markup view, simply:
- Navigate to the Review tab.
- Open the Display Review dropdown menu (click on the downward facing arrow at the end)
- Choose No Markup.
What is review in MS Word?
The review tab is useful in a number of ways.For instance, you can use it for proofing your document, adding or removing comments, and tracking changes among other things.
How to edit a comment in Microsoft Word documents
- Open the Word document.
- Make all comments visible.
- Click in the comment.
- Edit the text for that comment.
- Click out of the comment to save changes.
What is review format?
Typically, reviews include an abstract, an introduction, a literature review section, sometimes a methods section if you have specifics to include, and a discussion and conclusion section.
Follow these simple steps to get your Google review on the radar of your Facebook audience in no time:
- Step #1: Search for your business on Google Maps.
- Step #2: Find the star review you want to share.
- Step #3: Click on the Share button.
- Step #4: Copy the Short URL.
- Step #5: Post it on your Facebook page.
How do you get a review?
10 ways to increase and improve your customer reviews
- Put your reviews front and center.
- Get on the same sites as your customers.
- Follow up with buyers.
- Ask the right questions.
- Contact those who leave you glowing reviews.
- Contact those who leave you negative reviews.
- Run a contest.
- Reward those who review.
Word for Microsoft 365 Word for Microsoft 365 for Mac Word 2021 Word 2021 for Mac Word 2019 Word 2019 for Mac Word for iPad Word Web App Word for iPhone More…Less

Working with a team
Working in Word with multiple authors is an opportunity to combine the efforts of several contributors who might be widely separated from each other by location or time zones—even on opposite sides of the world.
You can share a document across multiple platforms such as Windows, MacOS, iOS, and the web. All contributions to the document are saved in real time to a single file in OneDrive. There is only one version, so the changes multiple authors make are always in sync.
Preparing a document for sharing
When you share a document with multiple authors, you give them permission to make changes and insert comments. To learn how to share a document, see Share OneDrive files and folders.
When you share a document, be sure to select Allow editing to let the people you’re sharing with make changes to it. Otherwise, they can only read the document.
If you allow editing, you can also ensure that the changes other authors make will be tracked. To do this, when you share the document, turn on Open in review mode only.
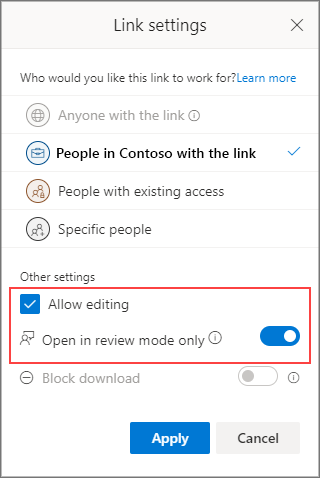
Important: Open in review mode is currently supported only in Word for Web. When you share a document, people will receive a link that opens the document in Word for Web. If they open the document in Word for the desktop, they’ll see a yellow banner across the top of the document telling them that they can only edit the document in Word for web.
Giving feedback
Feedback is essential to any team effort. In Word, you can give feedback to fellow authors in two ways: By inserting comments that are tied to a specific place in the document or by directly making tracked changes to the text.
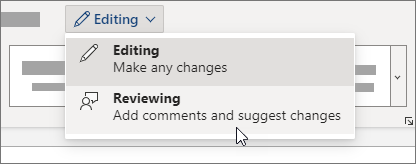
Using Reviewing in Word for web
When you put yourself in Reviewing in Word for web, changes are tracked and other users can see your additions to the document.
Use Track Changes in Word for desktop or iOS
If you’re working in Word for desktop or iOS, make sure you have Track Changes on.
For more information about working with Track Changes, see Track changes in Word.
Insert comments
Use comments to ask questions and make suggestions or corrections without changing the text. Comments refer to a specific place in the document that you choose by selecting a section of text or simply by clicking or tapping in the document. To learn how to insert comments in Word for Windows or web, see Insert or delete a comment. For Word for MacOS, see Insert, delete, or change a comment.
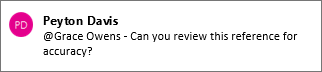
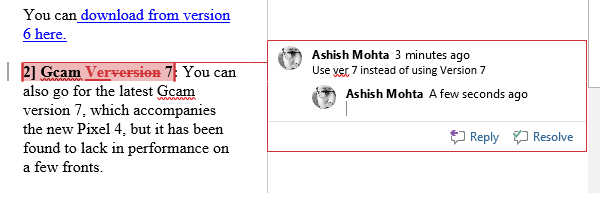
When you insert or reply to a comment, you can use an @mention in Microsoft 365 to address a specific author. To learn how to use an @mention, see Use @mention in comments to tag someone for feedback.
When you reply to a comment, you begin a thread that all authors can see and respond to in real time, like a chat session. Using an @mention in the thread doesn’t exclude anyone, it just calls out the comment to the attention of that person and notifies them by email that there’s a comment or reply for them.
Responding to feedback
The feedback you receive will be comments and tracked changes.
Resolve comments
When someone inserts a comment in a document, you can reply to it, resolve it, or delete it. For more information about replying to a comment, see Reply to a comment.
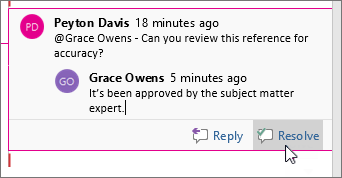
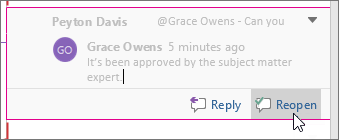
After you resolve a thread, it remains in the document until you delete it, but is inactive unless someone reopens it.
Delete comments
After you’ve resolved or replied to any comments, you can clean up the document by deleting them. When you delete a comment, it’s gone for good, so it’s best to keep comments around until you’re finalizing the document. Resolved comments only appear in the Comments pane.
For more information about deleting comments, see Track changes in Word or Delete a comment.
Resolve tracked changes
You resolve tracked changes by either accepting or rejecting them. For more information about working with Track Changes, see Track changes in Word.
Need more help?
Microsoft Office Word offers a Review Feature, which allows one to Track Changes in a document. In this guide, we are sharing how you can use the Review Feature or Track Changes feature in Microsoft Word.
I have broken down the Review Feature feature into multiple sections and explained how each of them is useful:
- Enable Track Changes
- Reviewing and Commenting
- View Changes
- Accepting and Rejecting Changes
- Finalizing the document
- Merging Comments and Changes into One Document
- Compare two documents without Tracking
Merging and comparing documents are optional features, and you need to use it in different scenarios.
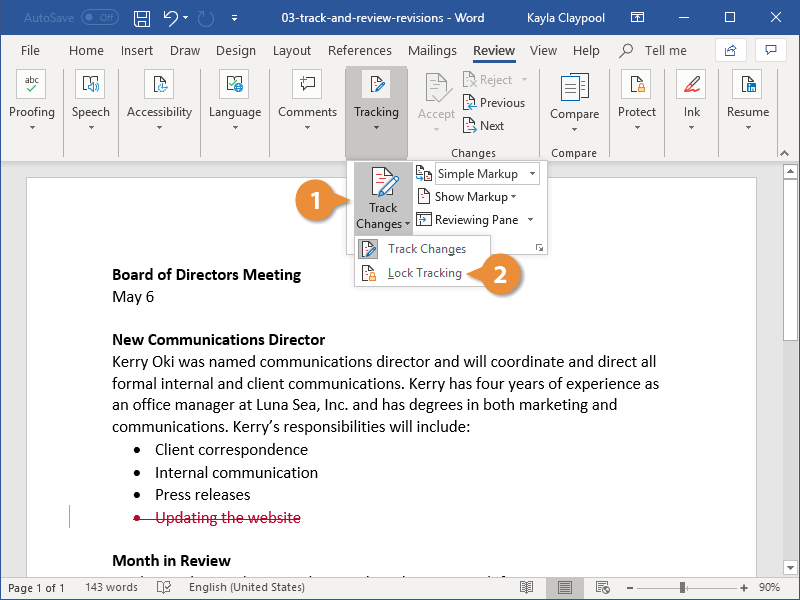
1] Enable Track Changes

Before you send a document that will go through a review, make sure to enable the Track Changes feature. Once it is turned on, changes made by any of the reviewers will be recorded with their name. Those changes can be approved or rejected by another person. The feature also offers a way to lock Track Changes so that nobody can disable it. Let’s learn both of them.
- Make sure the document is ready for review.
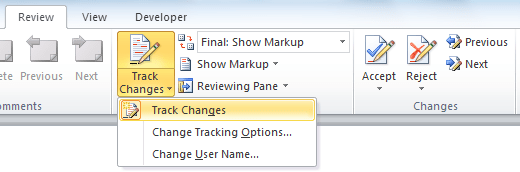
- Open the document, and then go to Review section > click on Track Changes, and then click on Track Changes menu again.
- Once enabled, you should notice that the button has a grey background.
- Next, click on Lock Tracking, and enter a password, confirm and click ok.
- After this, Track Changes will be disabled for you or anybody else unless disabled by using the same password again.
Note: If you lose or forget your password, Microsoft won’t be able to recover it for you. Make sure to note it somewhere regarding the document.
2] Reviewing and Commenting
After this, whatever changes are made to the document will be recorded no matter where the document is shared and edited. Here is how the changes will be recorded:
- Deletions are marked with a strikethrough
- Additions are shown with an underline
- Every author gets its color for the changes
- Select a paragraph or set of words, and click on the comment button to add your comments
A red horizontal line will show up next to the line or paragraph, making it easier to identify. Click on it, and all changes and comments will be visible. Adding to this, you can further customize colors by clicking on the arrow on the right-bottom corner of the Tracking section.
Note: Even if you turn off tracking, the colored underlines and strikethrough will be visible in the document.
3] View Changes
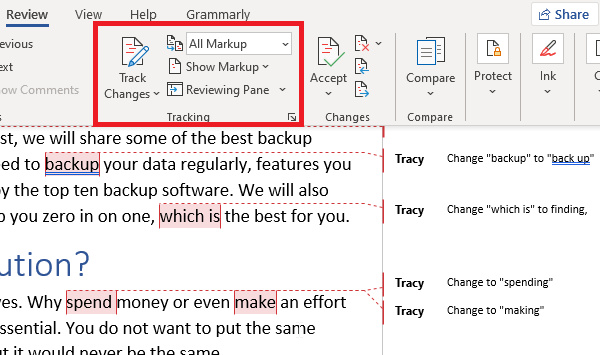
Assuming a document has come back to you after review, and you need to find all the changes and comments. Go to Review > Tracking > Display for Review.
- Go to Review > tracking > change from Simple Markup to All Markup
- If you choose No Markup, then the document will display as the final version only
- If you select Original, you can view the original document without any changes
4] Accepting and Rejecting Changes
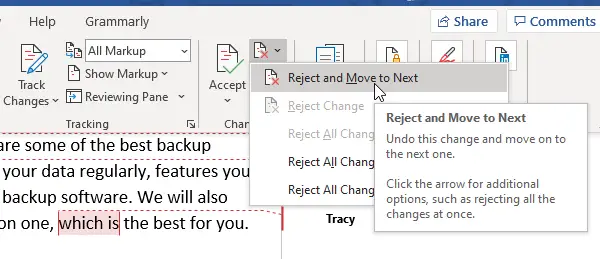
If you are ok with a difference, then click on Accept and move next, but if you do not like it, click on Reject and jump to next. It will undo the change to the previous revision. You should see that the difference is marked with an underline. You also have options to
- Accept All Changes in Document
- Reject All Changes in Document.
You also have the comments section, which can help you navigate through all the comments. You can reply to comments, mark it as resolved when you have made a change or delete it.
5] Finalizing the document
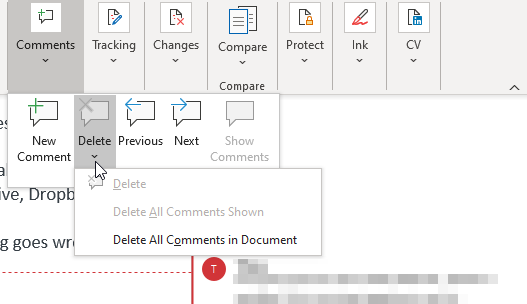
When you know everything is complete, follow these steps to remove any visible markups and comments.
- Delete all the comments by clicking on Comments > Delete > Delete all comments
- Click on Accept All changes and stop tracking
- You might be asked to enter the password if the tracking was locked.
Done this, the Review feature in Office Word document is complete. However, there are two more features that we have added to the guide. They can be handy in a different scenario.
6] Merge comments & changes from different documents into one Document

If you have given a document to be reviewed by multiple users, then you can combine them into one final document for review.
- Open a blank Microsoft document, and go to Review > Compare > Combine
- Select two documents, original on the left side, and edited on the right.
- Click ok and repeat for all documents until it is over.
Change made by the authors will be visible in different colors. If you want to filter by author, you can click on Show Markup > Specific people and remove authors you don’t need.
When doing so, make sure to use the Protect feature to lock authors and setup editing restrictions. It is useful when a document is available on a shared location.
7] Compare two documents without Tracking
Lastly, if there was no tracking enabled, and changes were made, you can use the Compare tool to find the differences.
- Open a blank document, and then go to Review > click on the Compare button, and then click on the Compare again.
- It will show a similar dialogue box where you can select the original document, revised document, author name, and more.
- You can also choose to compare comments, headers, footers, tables, and more.
That concludes our guide on how you can use the review features to track, comment, compare in Microsoft Word. It’s a powerful tool for companies where the documents are reviewed at different levels.
I hope the guide was easy to understand and follow.
Microsoft Word allows the users to review the documents and provide their review comments inside the document. You can also enable tracking the changes in the document. So it will be useful later at the time of reviewing or finalizing the document.
Below are the steps to track changes in the Word document, Create/Delete the comments and Accept/Reject the changes made in the document.
This article applies to:
- Microsoft Word 2010
Step (1). Open your Word document into the Microsoft Word application.
Step (2). Click on the Review tab on Ribbon control. It will display review-related icons on Ribbon control.
Step (3). Check whether the Track Changes feature is already enabled or not. If it is not enabled, click on the Track Changes icon to enable Track Changes. Remember that before reviewing the document you must enable track changes. So this enables you to track all the changes you make to the document including insertions, deletions, and even formatting changes. This will be useful at the time of finalizing the changes in the document to accept or reject the changes you make to the document.
Step (4). Review the document and make any corrections to the document. The changes will be tracked and Word will create tracking entries in the document. So these tracking entries are useful to accept or reject while re-reviewing or finalizing the document.
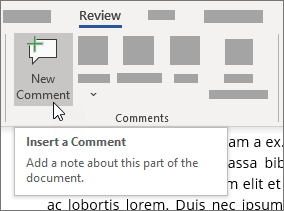
Step (5). Insert the review comments by selecting the text or paragraph for which you want to provide your review comments and click on the New Comment icon. It will insert a comment and allow you to provide the text for your comment.

Step (6). Select the comment and update the text you want to provide into it or you can also delete the comment by clicking on the Delete comment icon.

- You can also delete multiple comments at a time. Click on the arrow mark below the Delete icon. It will display a pull-down menu. Select Delete All Comments Shown to delete all displayed comments or click on Delete All Comments in Document to delete all the comments in the document.
Step (7). Usually, documents are on multiple pages and while reviewing the documents it is a bit difficult to navigate between the items which you want to review. You may not be required to review all the documents but may be required to review portions of the document or may be required to review particular reviewers’ changes in the document.
Step (8). Click on the Show Markup button which is under the Tracking group. It will display a pull-down menu. From Show Markup pull-down menu:
![]()
- Select the items you want to review. Once you selected, those markups only showed in the document. For eg: You need to review only the comments made by reviewers, just select Comments and un-select the rest of the items. So in the document, it displays only the markups related to the comments.
- Select Reviewers menu item. It will display a sub-menu with a list of reviewers. Select the reviewers whose changes you want to track and un-select the rest of the reviewers. So in the document, it will show the markups related to the selected reviewers only.
Step (9). While reviewing the document, you may need to Accept or Reject the changes made in the document.
- Click on Accept button which is under the Changes group to accept the selected change.

Microsoft Word – Review – Accept changes - You can also accept multiple changes at a time:
- Click on the arrow symbol under Accept button. It will display a pull-down menu.
- From the pull-down menu, click on Accept All Changes in Document to accept all the changes in the document or click on Accept All Changes Shown to accept only the changes currently shown in the document.
- By clicking on the Reject button you can reject the selected change.

Microsoft Word – Review – Reject changes - You can also reject multiple changes at a time:
- Click on the arrow symbol under the Reject button. It will display a pull-down menu.
- From the pull-down menu, click on Reject All Changes in Document to reject all the changes in the document or click on Reject All Changes Shown to reject only the changes currently shown in the document.
- Navigate between the changes by clicking on the Previous or Next buttons.


Step (10). You can also see the summary of review changes by clicking on Reviewing Pane button which is under the Tracking group in Review ribbon control. This window is useful while reviewing the changes because it will display all the changes in one place in the respective section.

- Once you click on Reviewing Pane button it displays a Reviewing Pane either horizontal or vertical depending on your selection in Reviewing Pane pull-down menu. This menu will display when you click on the arrow button next to Reviewing Pane button from the Tracking group.

Microsoft Word – Reviewing Pane pull-down menu - Even you can Accept/Reject the changes from Reviewing Pane. Select the review item and right-click on it. It will display a pop-up menu. You can select Accept Deletion or Reject Deletion to accept or reject the selected change.

Microsoft Word – Reviewing Pane pop-up menu - On top of the Reviewing Pane, it displays a summary of revisions, types of changes along the count.


Once you are going to finalize the review of the document, you must review all the changes and you should not leave any of the changes left it either accepted or rejected before going to release the document.
Revising a document with tracked changes in Word works just like revising a printed copy with a red pen. You can easily see the original text, and any additions, deletions, or changes made to the document are clearly marked.
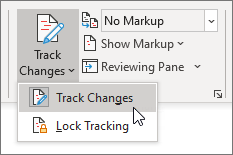
Use Track Changes
In order for changes to be marked up, you need to first track the changes.
- Click the Review tab on the ribbon.
- Expand the Tracking group, if necessary.
- Click the Track Changes button.

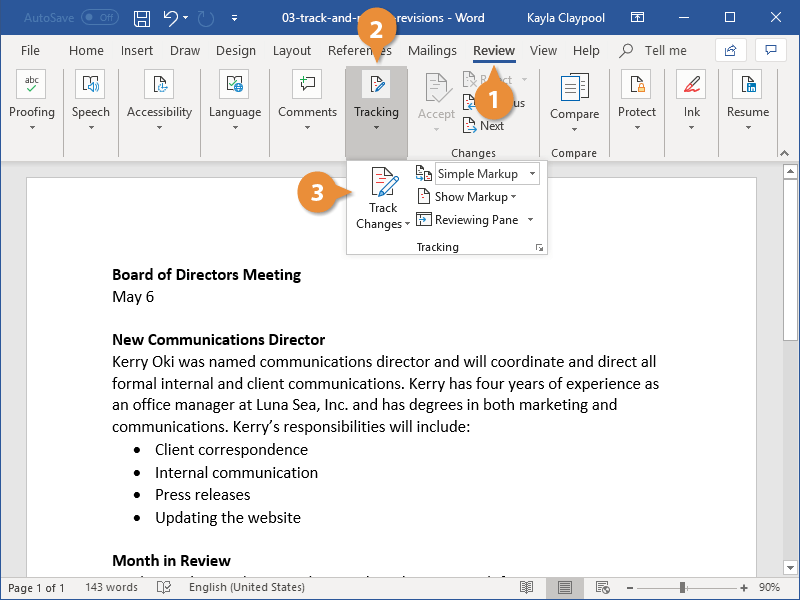
Now, any changes made to the document will be tracked and marked up.
Right-click the status bar and select Track Changes to toggle it on or off.
View Markup
Once changes are tracked, you can choose which changes appear marked up.
- Expand the Tracking group, if necessary.
- Click the Show Markup button.
You can toggle whether or not tracking shows Comments, Ink, Insertions and Deletions, and Formatting changes. You can also toggle what appears in the balloons in the right margins, and hide revisions from certain people.
- Select a type of markup to hide or show.
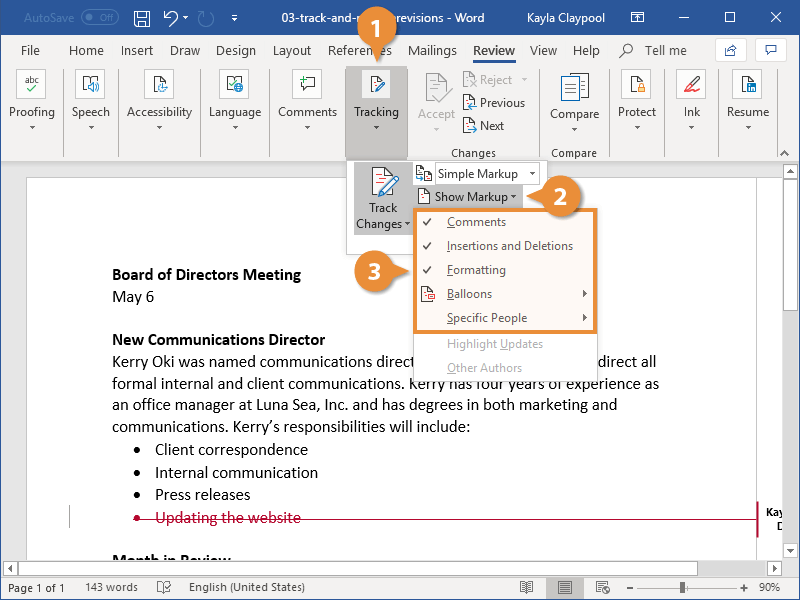
The selected type of markup is toggled on or off.
You can also use the Display for Review menu, directly above the Show Markup button, to control how detailed the markup that appears is.
- Simple Markup: Comments will appear, and text changes will be marked with a line in the margin.
- All Markup: Every change will be described in the margin, including what the change was and who made it.
- No Markup: No changes will be marked up.
- Original: The original document will be shown, without any of the changes that have been made.
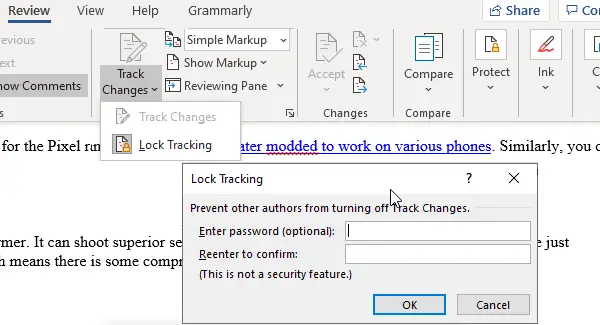
Lock Tracking
To make sure that everyone’s changes get tracked, you can lock tracking so that it can’t be disabled without a password.
- Click the Track Changes button’s list arrow.
- Select Lock Tracking.
A dialog box opens, where you can enter a password that will be required to turn Track Changes off.
- Enter and confirm a password.
- Click OK.
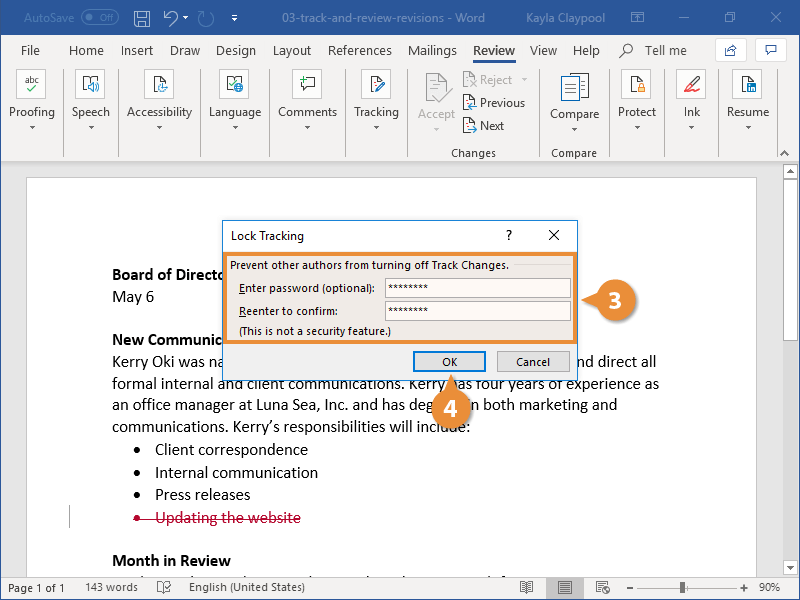
Track Changes is locked and can only be disabled with the password. Also, you cannot accept or reject changes while Track Changes is locked.
To unlock Track Changes, click the Track Changes button list arrow again, select Lock Tracking, enter the password, then click OK.
Review Revisions
Revising documents using Word’s revision features can save a lot of time, because the changes are already entered in your document. If you accept the changes, Word automatically incorporates the changes into your document. If you reject the changes, Word uses your original text.
- Select a change, or use the Next Change and Previous Change buttons to move through changes.
- Click Accept or Reject to accept or reject changes.
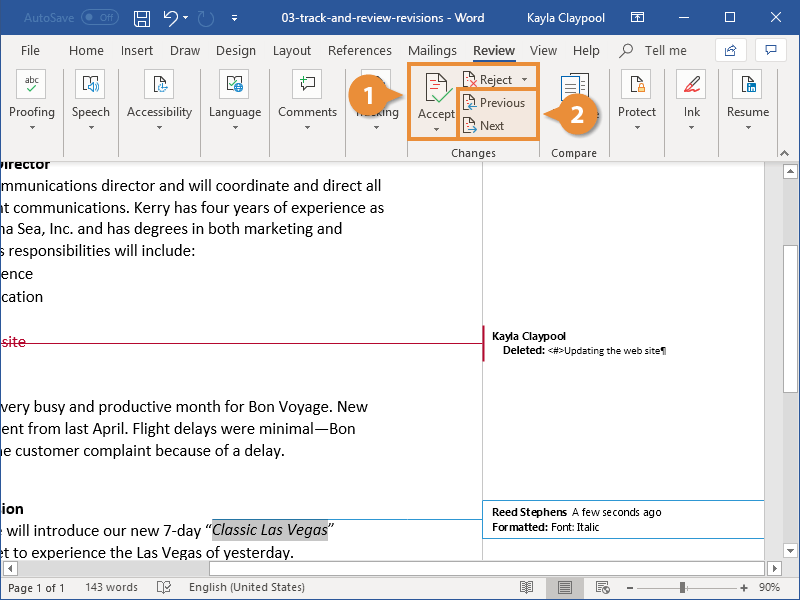
Changes that are accepted are incorporated into the document, removing the markup and moving on to the next change. Changes that are rejected are removed and replaced with the original text.
Right-click a revision and select Accept or Reject.
Review all tracked changes at once with the Reviewing Pane. Turn it on by clicking the Reviewing Pane button in the Tracking group.

FREE Quick Reference
Click to Download
Free to distribute with our compliments; we hope you will consider our paid training.