
An Excel add-in can be really useful when you have to run a macro often in different workbooks.
For example, suppose you want to highlight all the cells that have an error in it, you can easily create an Excel add-in that will highlight errors with a click of a button.
Something as shown below (the macro has been added to the Quick Access Toolbar to run it with a single click):

Similarly, you may want to create a custom Excel function and use it in all the Excel workbooks, instead of copy pasting the code again and again.
If you’re interested in learning VBA the easy way, check out my Online Excel VBA Training.
Creating an Excel Add-in
In this tutorial, you’ll learn how to create an Excel add-in. There are three steps to create an add-in and make it available in the QAT.
- Write/Record the code in a module.
- Save as an Excel Add-in.
- Add the macro to the Quick Access Toolbar.
Write/Record the Code in a Module
In this example, we will use a simple code to highlight all the cells that have error values:
Sub HighlightErrors()
 Selection.SpecialCells(xlCellTypeFormulas, xlErrors).Select
 Selection.Interior.Color = vbRed
End Sub
If you are writing code (or copy-pasting it from somewhere), here are steps:
Note: If you are recording a macro, Excel automatically takes care of inserting a module and putting the code in it.
Now let’s go ahead and create an add-in out of this code.
Save and Install the Add-in
Follow the below steps when you are in the workbook where you have inserted the code.
Now the add-in has been activated.
You may not see any tab or option appear in the ribbon, but the add-in gets activated at this stage and the code is available to be used now.
The next step is to add the macro to the Quick Access Toolbar so that you can run the macro with a single click.
Note: If you are creating an add-in that has a custom function, then you don’t need to go to step 3. By the end of step 2, you’ll have the function available in all the workbook. Step 3 is for such codes, where you want something to happen when you run the code (such as highlight cells with errors).
Save and Install the Add-in
To do this:
Now to run this code in any workbook, select the dataset and click on the macro icon in the QAT.
This will highlight all the cells with errors in red color. You can also use this macro in any workbook since you have enabled the add-in.
Caution: The changes done by the macro can’t be undone using Control + Z.
You can also create custom functions and then save it as an Excel add-in. Now, when you enable the add-in, the custom functions would be available in all your Excel workbooks.
You May Also Like the Following Excel Tutorials:
- Working with Cells and Ranges in Excel VBA.
- Working with Worksheets in VBA.
- Working with Workbooks in VBA.
- Using Loops in Excel VBA.
- Using IF Then Else Statement in Excel VBA.
- How to Create and Use Personal Macro Workbook in Excel.
- Useful Excel Macro Code Examples.
- Using For Next Loop in Excel VBA.
- Excel VBA Events – An Easy (and Complete) Guide.
- Excel VBA Error Handling
What are Add-ins in Excel?
An add-ins is an extension that adds more features and options to Microsoft Excel. Providing additional functions to the user increases the power of Excel. An add-in needs to be enabled for usage. Once enabled, it activates as Excel is started.
For example, Excel add-ins can perform tasks like creating, deleting, and updating the data of a workbook. Moreover, one can add buttons to the Excel ribbon and run custom functions with add-ins.
The Solver, Data Analysis (Analysis ToolPakExcel’s data analysis toolpak can be used by users to perform data analysis and other important calculations. It can be manually enabled from the addins section of the files tab by clicking on manage addins, and then checking analysis toolpak.read more), and Analysis ToolPak-VBA are some essential add-ins.
The purposes of activating add-ins are listed as follows: –
- To interact with the objects of Excel
- To avail an extended range of functions and buttons
- To facilitate the setting up of standard add-ins throughout an organization
- To serve the varied needs of a broad audience
In Excel, one can access several Add-ins from “Add-ins” under the “Options” button of the “File” tab. In addition, one can select from the drop-down “Manage” in the “Add-ins” window for more add-ins.
By default, it might hide some add-ins. One can view the unhidden add-ins in the “Data” tab on the Excel ribbonThe ribbon is an element of the UI (User Interface) which is seen as a strip that consists of buttons or tabs; it is available at the top of the excel sheet. This option was first introduced in the Microsoft Excel 2007.read more. For example, it is shown in the following image.

Table of contents
- What are Add-ins in Excel?
- How to Install Add-ins in Excel?
- Types of Add-ins in Excel
- The Data Analysis Add-in
- Create Custom Functions and Install as an Excel Add-in
- Example #1–Extract Comments from the Cells of Excel
- Example #2–Hide Worksheets in Excel
- Example #3–Unhide the Hidden Sheets of Excel
- The Cautions While Creating Add-ins
- Frequently Asked Questions
- Recommended Articles
How to Install Add-ins in Excel?
If Excel is not displaying the add-ins, they need to be installed. The steps to install Excel add-ins are listed as follows:
- First, click on the “File” tab located at the top left corner of Excel.

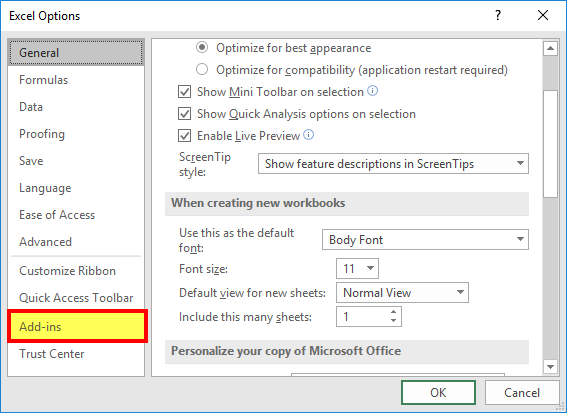
- Click “Options,” as shown in the following image.

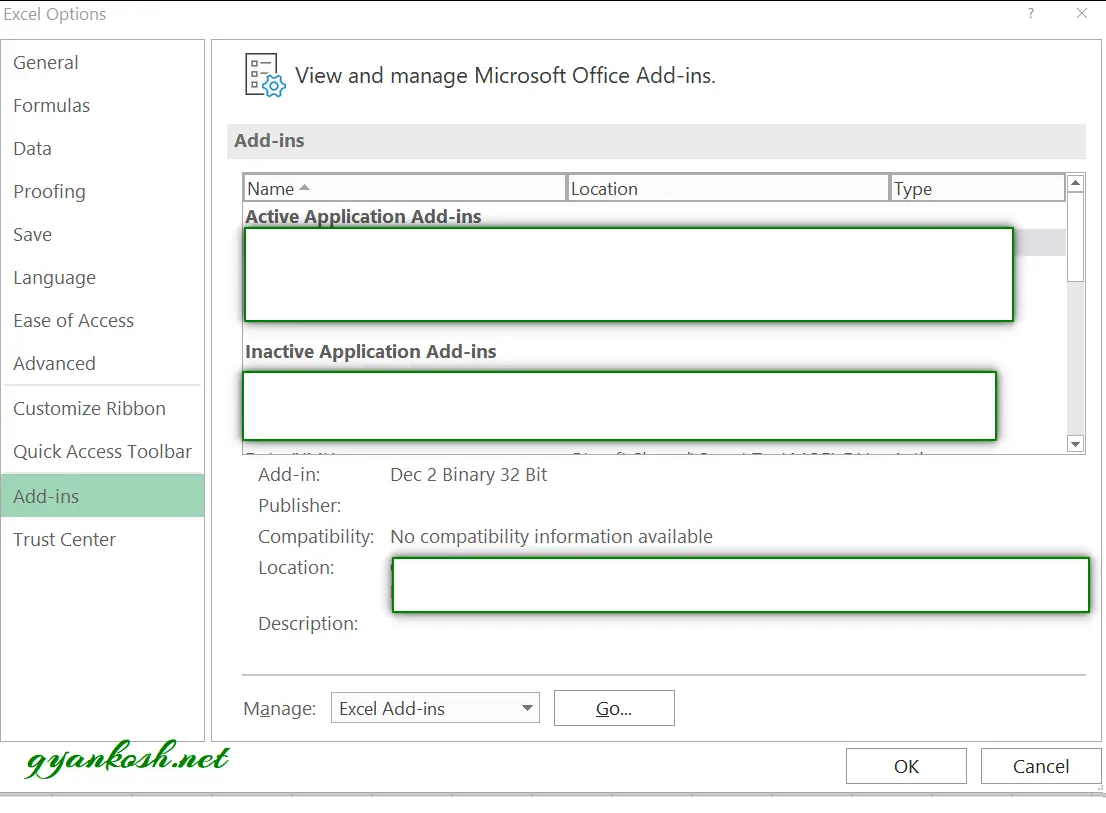
- The “Excel Options” window opens. Select “Add-ins.”

- There is a box to the right of “Manage” at the bottom. Click the arrow to view the drop-down menu. Select “Excel add-ins” and click “Go.”

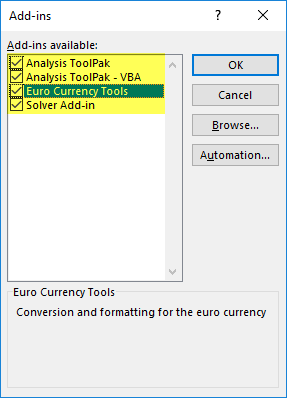
- The “Add-ins” dialog box appears. Select the required checkboxes and click “OK.” We have selected all four add-ins.

- The “Data Analysis” and “Solver” options appear under the “Data tab” of the Excel ribbon.


Types of Add-ins in Excel
The types of add-ins are listed as follows:
- Inbuilt add-ins: These are built into the system. One can unhide them by performing the steps listed under the preceding heading (how to install add-ins in Excel?).
- Downloadable add-ins: These can be downloaded from the Microsoft website (www.office.com).
- Custom add-ins: These are designed to support the basic functionality of Excel. They may be free or chargeable.
The Data Analysis Add-in
The “Data Analysis Tools” pack analyzes statistics, finance, and engineering data.

The various tools available under the “Data Analysis” add-in are shown in the following image.

Create Custom Functions and Install them as an Excel Add-in
Generally, an add-in is created with the help of VBA macrosVBA Macros are the lines of code that instruct the excel to do specific tasks, i.e., once the code is written in Visual Basic Editor (VBE), the user can quickly execute the same task at any time in the workbook. It thus eliminates the repetitive, monotonous tasks and automates the process.read more. Let us learn to create an add-in (in all Excel files) for a custom functionCustom Functions, also known as UDF (User Defined Functions) in Excel, are personalized functions that the users create through VBA programming code to fulfill their particular requirements. read more. For this, first, we make a custom function.
Let us consider some examples.
You can download this Excel Add-Ins Excel Template here – Excel Add-Ins Excel Template
We want to extract comments from specific cells of Excel. Then, create an add-in for the same.
The steps for creating an add-in and extracting comments from cells are listed as follows:
Step 1: Open a new workbook.
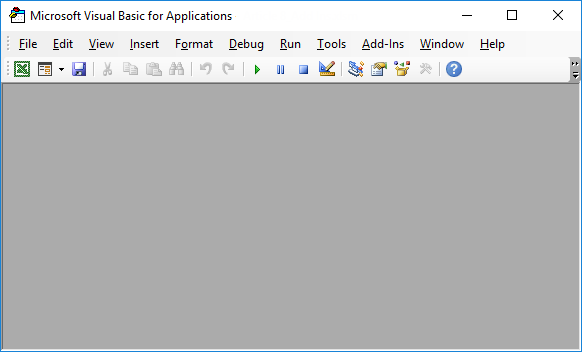
Step 2: Press the shortcutAn Excel shortcut is a technique of performing a manual task in a quicker way.read more “ALT+F11” to access the “Visual Basic Editor.” The following image shows the main screen of Microsoft Visual Basic for Applications.
Step 3: Click “Module” under the “Insert” tab, shown in the following image.

Step 4: Enter the following code in the “module” window.
Function TakeOutComment(CommentCell As Range) As String
TakeOutComment = CommentCell.Comment.Text
End Function

Step 5: Once the code is entered, save the file with the type “Excel add-in.”

Step 6: Open the file containing comments.
Step 7: Select ” Options ” in the “File” tab and select “Options.” Choose “Add-ins.” In the box to the right of “Manage,” select “Excel Add-ins.” Click “Go.”
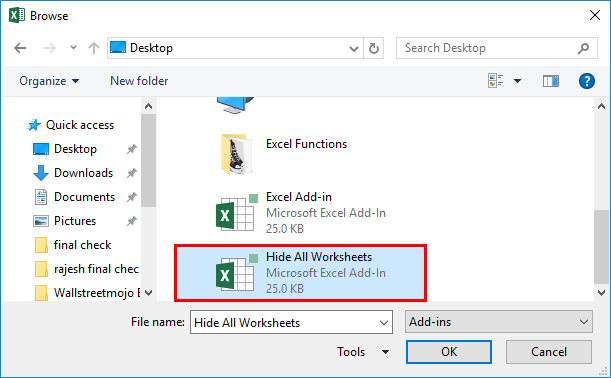
Click the “Browse” option in the “Add-ins” dialog box.

Step 8: Select the add-in file that had been saved. Click “Ok.”
We saved the file with the name “Excel Add-in.”

Step 9: The workbook’s name (Excel Add-in) that we had saved appears as an add-in, as shown in the following image.
This add-in can be applied as an Excel formula to extract comments.

Step 10: Go to the sheet containing comments. The names of three cities appear with comments, as shown in the following image.

Step 11: In cell B1, enter the symbol “equal to” followed by the function’s name. Type “TakeOutComment,” as shown in the following image.

Step 12: Select cell A1 as the reference. It extracts the comment from the mentioned cell.
Since there are no comments in cells A2 and A3, the formula returns “#VALUE!.”

Example #2–Hide Worksheets in Excel
We want to hide Excel worksheets except for the active sheet. Create an add-in and icon on the Excel toolbar for the same.
The steps to hide worksheets (except for the currently active sheet) and, after that, create an add-in and icon are listed as follows:
Step 1: Open a new workbook.
Step 2: In the “Visual Basic” window, insert a “Module” from the Insert tab. The same is shown in the following image.
Step 3: Copy and paste the following code into the module.
Sub Hide_All_Worksheets_()
Dim As Worksheet
For Each Ws In ActiveWorkbook.Worksheets
If Ws.Name <> ActiveSheet.Name Then
Ws.Visible = xlSheetVeryHidden
End If
Next Ws
End Sub

Step 4: Save this workbook with the type “Excel add-in.”
Step 5: Add this add-in to the new workbook. For this, click “Options” under the “File” tab. Select “Add-ins.” In the box to the right of “Manage,” select “Excel add-in” Click “Go.”
In the “Add-ins” window, choose “Browse.”

Step 6: Select the saved add-in file. Click “Ok.”
We have saved the file with the name “Hide All Worksheets.”
Step 7: The new add-in “Hide All Worksheets” appears in the “Add-ins” window.

Step 8: Right-click the Excel ribbon and select “Customize the Ribbon.”

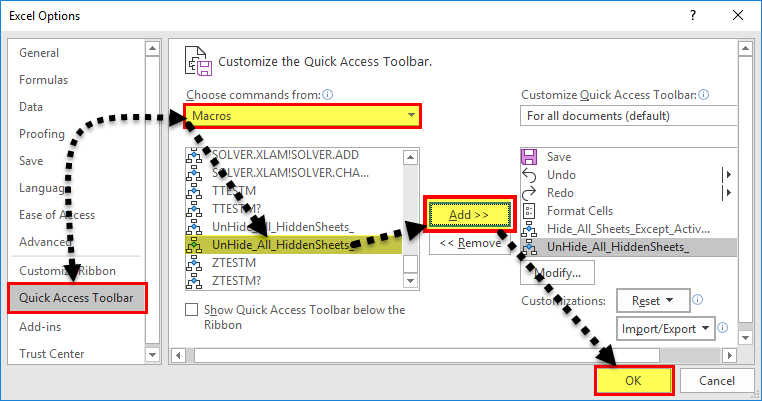
Step 9: The “Excel Options” window appears. Click “Quick Access Toolbar.” Under the drop-down of “Choose commands from,” select “macrosA macro in excel is a series of instructions in the form of code that helps automate manual tasks, thereby saving time. Excel executes those instructions in a step-by-step manner on the given data. For example, it can be used to automate repetitive tasks such as summation, cell formatting, information copying, etc. thereby rapidly replacing repetitious operations with a few clicks.
read more.”
In the box following this drop-down, choose the name of the macro. Then, click “Add” followed by “OK.” The tasks of this step are shown with the help of black arrows in the following image.

Step 10: A small icon appears on the toolbar. Clicking this icon hides all worksheets except for the currently active sheet.

Example #3–Unhide the Hidden Sheets of Excel
If we want to unhide the sheetsThere are different methods to Unhide Sheets in Excel as per the need to unhide all, all except one, multiple, or a particular worksheet. You can use Right Click, Excel Shortcut Key, or write a VBA code in Excel. read more hidden in the preceding example (example #2). Create an add-in and toolbar icon for the same.
The steps to unhide the sheets and, after that, create an add-in and toolbar icon are listed as follows:
Step 1: Copy and paste the following code to the “Module” inserted in Microsoft Visual Basic for Applications.
Sub UnHide_All_HiddenSheets_()
Dim Ws As Worksheet
For Each Ws In ActiveWorkbook.Worksheets
Ws.Visible = xlSheetVisible
Next Ws
End Sub

Step 2: Save the file as “Excel add-in.” Add this add-in to the sheet.
Right-click the Excel ribbon and choose the option “Customize the ribbon.” Then, in the “Quick Access Toolbar,” select “Macros” under the drop-down of “Choose commands from.”
Choose the macro’s name, click “Add” and “OK.” The tasks of this step are shown with the help of black arrows in the following image.
Step 3: Another icon appears on the toolbar. Clicking this icon unhides the hidden worksheets.

The Cautions While Creating Add-ins
The points to be observed while working with add-ins are listed as follows:
- First, remember to save the file in Excel’s “Add-in” extensionExcel extensions represent the file format. It helps the user to save different types of excel files in various formats. For instance, .xlsx is used for simple data, and XLSM is used to store the VBA code.read more of Excel.
- Be careful while selecting the add-ins to be inserted by browsing in the “Add-ins” window.
Note: It is possible to uninstall the unnecessary add-ins at any time.
Frequently Asked Questions
1. What is an add-in? where is it in Excel?
An add-in extends the functions of Excel. It provides more features to the user. It is also possible to create custom functions and insert them as an add-in in Excel.
An add-in can be created, used, and shared with an audience. One can find the add-ins in the “Add-ins” window of Excel.
The steps to access the add-ins in Excel are listed as follows:
a. Click “Options” in the “File” tab of Excel. Select “Add-ins.”
b. In the box to the right of “Manage,” select “Excel add-ins.” Click “Go.”
c. The “Add-ins” window opens. Click “Browse.”
d. Select the required add-in file and click “OK.”
Note: The add-ins already present in the system can be accessed by browsing. Select the corresponding checkbox in the “Add-ins” window and click “OK” to activate an add-in.
2. How to remove an Add-in from Excel?
For removing an add-in from the Excel ribbon, it needs to be inactivated. The steps to inactivate an add-in of Excel are listed as follows:
a. In the File tab, click “Options” and choose “Add-ins”.
b. From the drop-down menu of the “Manage” box, select “Excel add-ins.” Click “Go.”c.
c. In the “Add-ins” window, deselect the checkboxes of the add-ins to be inactivated. Click “OK.”
The deselected add-ins are inactivated. Sometimes, one may need to restart Excel after inactivation. It helps remove the add-in from the ribbon.
Note: Inactivation does not remove an add-in from the computer. For removing an inactivated add-in from the computer, it needs to be uninstalled.
3. How to add an Add-in to the Excel toolbar?
The steps to add an Add-in to the Excel toolbar are listed as follows:
a. In an Excel workbook, press “Alt+F11” to open the Visual Basic Editor. Enter the code by inserting a “module.”
b. Press “Alt+F11” to return to Excel. Save the file as “Excel add-in” (.xlam).
c. In File, select “Options” followed by “Add-ins.” Select “Excel add-ins” in the “Manage” box and click “Go.”
d. Browse this file in the “Add-ins” window. Select the required checkbox and click “OK.”
e. Right-click the ribbon and choose “Customize the Ribbon.” Click “Quick Access Toolbar.”
f. Select “Macros” from the drop-down of “Choose commands from.”
g. Choose the required macro, click “Add” and” OK.”
The icon appears on the toolbar. This icon works in all Excel workbooks as the add-in has been enabled.
Recommended Articles
This article is a step-by-step guide to creating, installing, and using add-ins in Excel. Here, we also discuss the types of Excel add-ins and create a custom function. Take a look at these useful functions of Excel: –
- What is the Quick Access Toolbar in Excel?
- “Save As” Shortcut in Excel
- Remove Duplicates in Excel
- How to Show Formula in Excel?
It is observed that over 50% of Excel users don’t use add-ins to save time or make their lives a little easier.


And we can’t blame them. Because they might be scared of coding or any technical complications. Here, we will talk about ChartExpo Add-in which is very easy to configure to create amazing visualizations.
Let’s dive in.
Table of Content:
- How to Add Excel Add-in: ChartExpo?
- How to access ChartExpo Add-in in Excel?
- Let’s Create Data Story With Excel Add-in ChartExpo:
Video Tutorial:
How to Add Excel Add-in: ChartExpo?
Note: If you are using excel version of 2013 make sure to install office service pack 1.
There are two ways to configure ChartExpo Excel Add-in:
- Directly from Microsoft App Store:
i. You can click here to install the ChartExpo add-in for your Excel application.
ii. Following page will appear in your browser, you can click on “Get it now” button to proceed with installation steps.

iii. Log in with your Microsoft account or create a new account.

iv. Now you will see a window which will ask you to enter your credentials.
v. After log in, another ChartExpo window will appear. Here you can provide the required information and click on “Continue” button. It will automatically add ChartExpo dd-in in your Excel application.

Now you can click on “Open in Excel” button to continue using this Add-in.

- Install From Excel Application
i. To get started, open your Excel application.
ii. Open the worksheet and click on the “Insert” menu.
iii. You’ll see the “My Apps”

iv. In office Add-ins window, click on “Store” and search for ChartExpo on my Apps Store.
v. Click on “Add” button to install ChartExpo in your Excel.

Once your ChartExpo is successfully installed now below you will learn how you can access and use it in Excel.
How to access ChartExpo Add-in in Excel?
- Click on the “Insert” menu on top toolbar.
- You’ll see the My Apps option as highlighted below.

- Select ChartExpo for Excel and click on the “Insert”

- The add-in will be added to the Excel application, as shown below but it will ask you to log in to continue.
- You can log in with your Microsoft account or Google account or create a new account in ChartExpo and start using the add-in.

- You’re only required to log in for the first time. Next time, ChartExpo won’t ask for log in again.

- Once ChartExpo is loaded. By default you will see list view of charts.

- Click on Category and you can access 6 different categories of charts by clicking on Category.

Voila! Your ChartExpo add-in is ready to use in your Excel application. You can explore all the charts available in this library and convert your data into amazing visualizations.
Why ChartExpo is a Favorite Library for 20,000+ Users?
ChartExpo is an Excel add-in that’s amazingly easy to use, especially when working with complex data.
We recommend this app because it has a free trial, and most importantly, it has advanced charts. Yes, it comes loaded with charts you’ll never see in your Excel, such as Sankey Diagrams, Word Cloud, and Gauge Chart, among others.
Its ultra-friendly user interface (UI) needs no video tutorial or a written manual to make its usage easier. And this means its learning curve is absolutely short. Yes, you read that right.
Look no further if you want to boost your productivity through the roof or save hours whenever working with complex data.
The last time we checked, ChartExpo had over 50-plus advanced charts you can use to create irresistible business reports and data stories.
And it gets better! This tool is incredibly light. So your Excel won’t crash or slow down, even when working with large data sets.
It creates a visual appeal: As humans are notorious for having an ever-shrinking attention span, ChartExpo can go a long way in communicating your results which boil down to creating a visual appeal to the end-user. The reality is that clients not only want to interact with hard numbers but also need to visualize the success story behind the results. ChartExpo helps users in combining elements of data, information, knowledge, and insights into a visual format that can be understandable by everyone.
Identify Trends Faster: The majority of human communication is visual as the human brain processes graphics magnitudes faster than it does text. Direct manipulation of analyzed data via ChartExpo makes it easy to understand and act on valuable information.
Identify Relationships More Effectively: ChartExpo enables users to identify otherwise overlooked cause-and-effect relationships throughout definable timeframes. This is especially useful in identifying how daily operations affect an organization’s goals.
Useful Data Storytelling: Humans best understand a data story when its development over time is presented in a clear, linear fashion. ChartExpo helps users to highlight relevant information, filter, and change the parameters promotes better understanding of the data by presenting multiple viewpoints of the data.
Simplify Complex Data: A large data set with a complex data story may present itself visually as a chaotic, intertwined hairball. ChartExpo can help untangle and make these messes of data more manageable, and can help users glean better insights.
Faster and easier access to important business insights:
ChartExpo can help businesses boost their ability to seek the information they need anytime, anywhere. And with the right solution, these businesses will be able to do so more efficiently than their competitors.
Visualizing your data helps quickly identify any errors in the data. If the data tends to suggest the wrong actions, ChartExpo help identify erroneous data when you try to visualize your data.
Let’s head to the data storytelling examples using our graph add-in for Excel: ChartExpo.
Let’s Create Data Story With Excel Add-in ChartExpo:
There are many charts available in this library. We will pick “Sankey Diagram” to convert your data into amazing visualization story.
Sankey Diagram
Sankey Diagrams (also known as Energy Flow Diagrams) are charts used to visualize data with flow-like attributes, such as energy flow, revenue flow, etc.
In other words, these charts depict the flow from one set of values to another. The widths of its arrows are proportional to the flow rate.
You can use this visualization to communicate sources and uses of the costs, materials, and resources represented.
Let’s take a look at an example with Sankey Charts.
Imagine you want to create a report data story of energy generation and usage of a country. You’ve collected secondary data from the country’s only power generation company. You intend to extract insights, such as the amount of energy wasted, domestic usage percentage, etc.
Let’s use the table below for our scenario.
| Energy Type | Main Source | Source Type | Energy Source | Usage | End-User | Megawatt |
| Agricultural waste | Bio-conversion | Solid | Thermal generation | Losses in process | Lost | 5 |
| Agricultural waste | Bio-conversion | Solid | Thermal generation | Electricity grid | Industry | 7.3 |
| Agricultural waste | Bio-conversion | Solid | Thermal generation | Electricity grid | Heating and cooling – commercial | 5.1 |
| Agricultural waste | Bio-conversion | Solid | Thermal generation | Electricity grid | Heating and cooling – homes | 3.7 |
| Agricultural waste | Bio-conversion | Solid | Thermal generation | Electricity grid | Lighting & appliances – commercial | 4.9 |
| Agricultural waste | Bio-conversion | Solid | Thermal generation | Electricity grid | Lighting & appliances – homes | 2 |
| Other waste | Bio-conversion | Solid | Thermal generation | Losses in process | Lost | 7.2 |
| Other waste | Bio-conversion | Solid | Thermal generation | Electricity grid | Industry | 5.4 |
| Other waste | Bio-conversion | Solid | Thermal generation | Electricity grid | Heating and cooling – commercial | 6.7 |
| Other waste | Bio-conversion | Solid | Thermal generation | Electricity grid | Heating and cooling – homes | 4.8 |
| Other waste | Bio-conversion | Solid | Thermal generation | Electricity grid | Lighting & appliances – commercial | 7.4 |
| Other waste | Bio-conversion | Solid | Thermal generation | Electricity grid | Lighting & appliances – homes | 2.5 |
| Marina algae | Bio-conversion | Solid | Thermal generation | Losses in process | Lost | 0.7 |
| Marina algae | Bio-conversion | Solid | Thermal generation | Electricity grid | Industry | 0.5 |
| Marina algae | Bio-conversion | Solid | Thermal generation | Electricity grid | Heating and cooling – commercial | 0.9 |
| Marina algae | Bio-conversion | Solid | Thermal generation | Electricity grid | Heating and cooling – homes | 0.5 |
Follow the simple and easy steps below to visualize your data using “Sankey Chart” in ChartExpo add-in for Excel.
- Click on Add-ins> ChartExpo > Insert > Sankey Chart

- Select data which available in the
- Click on Create Chart From Selection as shown.

- Your “Sankey Chart” should look like the one below.

You can add header, give different color to nodes, and change different properties of chart by clicking on “Edit Chart” button.

Now you will see pencil icons on the screen you can click on any icon to explore and change the properties accordingly.

FAQs:
How do you add Excel Add-ins?
- How to add Excel add-in step-by-step
- Click the File tab> Options> Add-Ins category.
- In the Manage box, click Excel Add-ins, and then click Go.
- Select the check box next to the add-in you want to activate in the Add-Ins Available box and click
What is a Microsoft Excel add-in?
An add-in is an application that increases more features and options to your Microsoft Excel spreadsheet. By providing additional functions, an add-in increases the power and reliability of the tool. Remember to enable your add-in for it to activate when Excel is started.
How do I enable add-ins in Excel 2016?
- Open a new Microsoft Excel worksheet.
- Select File > Options. When the Excel Options dialog box appears, click Add-Ins.
- In the Manage drop-down list, click Excel Add-ins and click Go.
- How to add Microsoft Excel add-ins made easy (using the steps above)
Wrap Up
Like we said, using graph add-ins for Excel will save you hours every day and supercharge your productivity. Besides, you’ll access pretty advanced charts and other functions you’ll never find in your beloved spreadsheet app.
How to add Excel add-ins does not have to be a struggle or even time-intensive. This blog is full of tips and strategies you should steal if you’re yet to get started with add-ins.
The Excel add-in we recommend to our readers is ChartExpo because it has a super-friendly user interface. Besides, it produces charts that are incredibly insightful and easy to read, even for non-technical audiences.
So whether you’re looking to create a compelling data story or get the most out of your data, ChartExpo add-in has everything you need.
Do you want to take your spreadsheet game to the next level?
Try ChartExpo today to supercharge your productivity and save a ton of time every day.
Learn how to install an Excel add-in and fix the disappearing add-in ribbon using a few simple steps. Don’t forget to enable the Developer tab!
The Developer Tab
This section will learn how to enable and show the Developer tab on the ribbon. It’s a key step before you install an Excel add-in. Locate the Developer Tab first because it’s hidden by default.
Steps to enable the Developer tab:
- Locate the ribbon and right-click on the Home Tab.
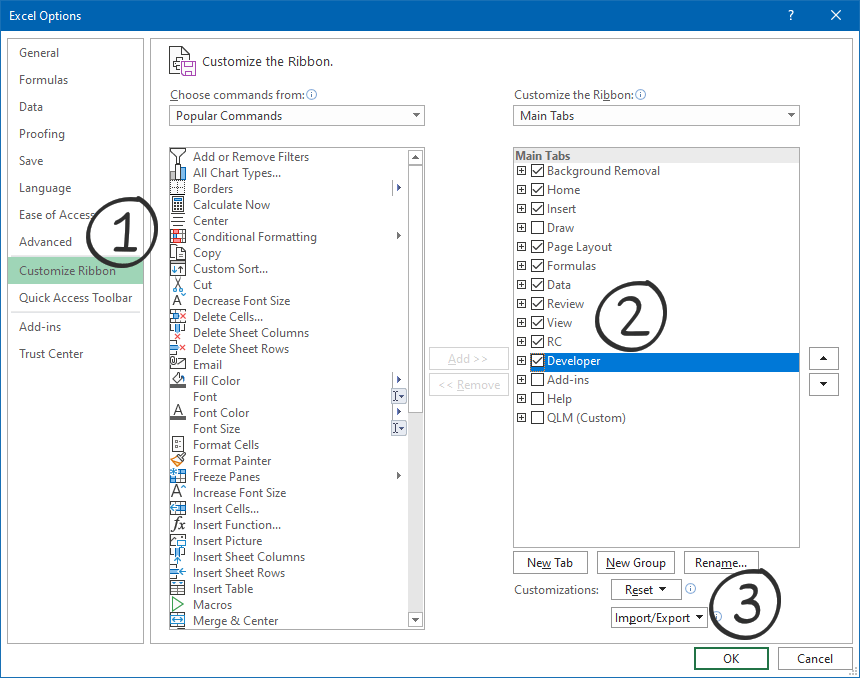
- Click the ‘Customize the ribbon…’ option, and the Excel Options box will appear.
- Choose the ‘Customize the ribbon’ option.
Tip: We have a much better solution, also. We are using keyboard shortcuts to make it appear faster! First, press the “R” after right-clicking.
- OK, now we have the Excel Options box.
- You’ll see the active tabs on the right side of the main window. Activate the Developer Tab.
- After clicking OK, the Developer tab will appear.
To install an Excel add-in, follow these simple steps below:
- First, download the file to your local drive. Next, unzip the file if it has a zip format. Finally, place the “xlam” file in your Documents folder or your preferred location.
- Locate the Developer tab and click the Excel add-ins section. After clicking this tab, you will get a new window.
- Click Browse and locate the main file.
- The installed file will appear in the list. Finally, click OK to close the window.
Watch this tutorial below if you want to install an add-in using a faster way.
Disappearing Add-in ribbon
Sometimes you need to do additional steps. One of the most frustrating issues is the disappearing add-in ribbon effect. A recent Excel update has caused add-in Ribbon Menu Bars to disappear when Excel is opened. We’ll show the solution on how to fix it. Let us see the answers!
If your add-in has not appeared on the ribbon, unblock the file or move the file to a trusted location. You will learn how to do it.
The difference between .xlsx and .xlsm (.xlam) files is that nothing will happen if you open a regular (macro-free) Excel file. If you work with add-in files, Excel will never inform you; you can open the file without any security message.
Unblocking add-ins
The file is blocked by default when you get the macro-enabled file from the internet.
Steps the unblock an Excel file:
- Right-click the add-in file
- Select Properties
- Locate the General tab, Security section.
- Mark the Unblock box checked
- Click the OK
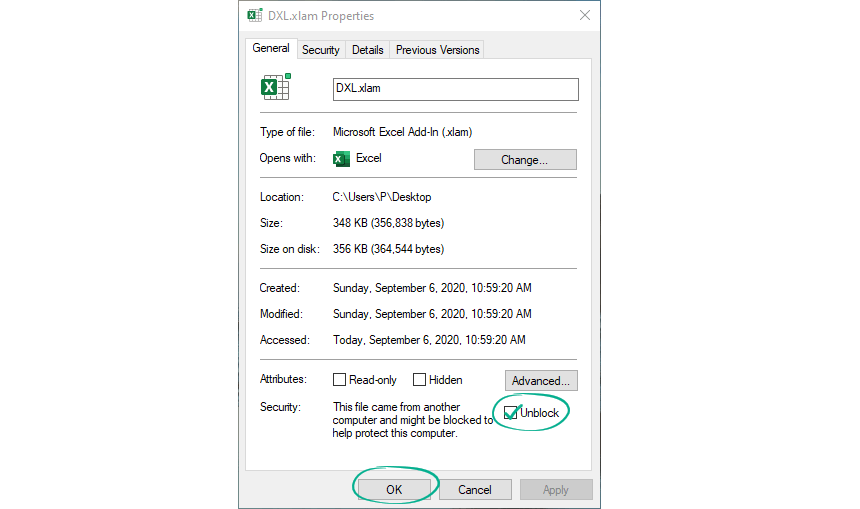
Restart Excel, and your add-in will appear on the ribbon.
Trusted locations
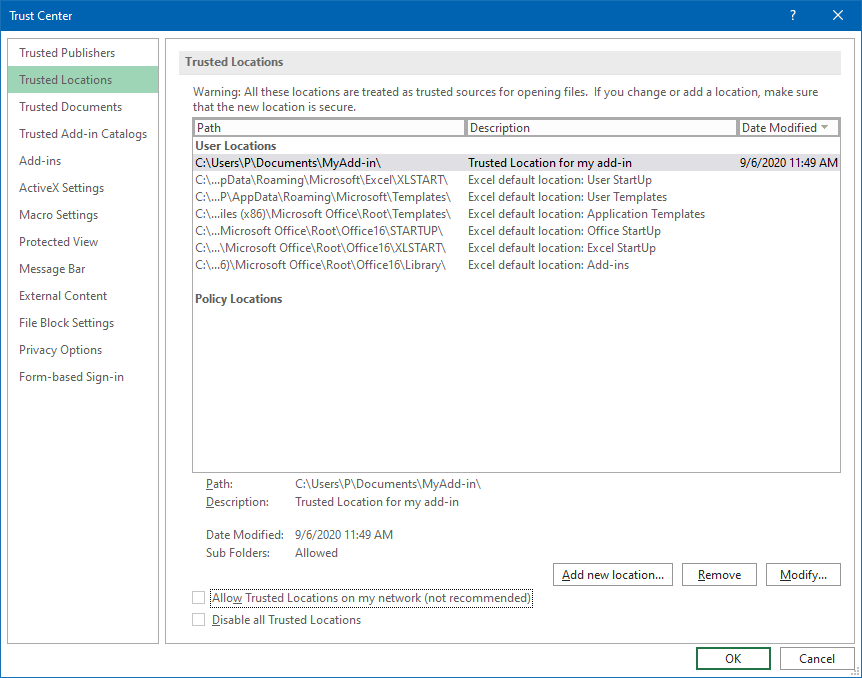
When the unblocking method does not help, you must move the file (folder) to a trusted location.
How to add an Excel add-in to the Trusted Location?
- Select the following path: File > Options > Trust Center > Trust Center Settings > Trusted Location
- Click ‘Add new Location’
- Click ‘Browse’ to select the folder that contains the main file
- Select OK to close the Trust Center window
- Finally, restart Microsoft Excel
If you have not found your default add-in folder, use the path below:
C:UsersAppDataRoamingMicrosoftAddIns
Important: You must add this folder to the Trusted Locations list because it is not trusted by default.
For more information, please watch this video below:
Additional resources:
- Organizatonal Chart Tool

Istvan is the co-founder of Visual Analytics Ltd. He writes blog posts and helps people to reach the top in Excel.
Table of Contents
- INTRODUCTION
- WHAT IS AN ADDIN IN EXCEL?
- HOW TO CREATE AN EXCEL ADDIN ?
- FOLLOW THE STEPS TO CREATE AN ADDIN
- HOW TO INSTALL ADDIN IN EXCEL ?
- HOW TO USE ADDIN IN EXCEL?
- FOLLOW THE STEPS TO USE THE CUSTOM FUNCTION INSTALLED THROUGH ADDIN.
INTRODUCTION
In this article, we’ll learn the way to install addin in Excel.
Excel is a great tool and almost a ESSENTIAL TO KNOW kind of application these days.
Excel has completed over 25 years and every time they come up with the new and innovative utilities for the easy working. But even after that, there are so many more requirements which can be SPECIFIC and not addressed to by the Excel.
In such cases, Excel has given a complete option for the user to create his own functionality which will work for him.
This utility is known as an ADDIN.
AN ADDIN IS A SMALL FILE WHICH CAN BE CREATED FOR A CUSTOM FUNCTIONALITY AND CAN BE EASILY INSTALLED IN OUR COPY OF EXCEL.
The ADDIN will behave just like the integrated Excel Functionalities.
In this article we’ll try find out
- What is ADDIN in Excel ?
- How to Create an ADDIN?
- How to Install ADDIN in Excel ?
- How to use an ADDIN Functionality in Excel?
and a few more questions.
WHAT IS AN ADDIN IN EXCEL?
We can define the ADDIN as following.
An ADDIN is an additional utility which is installed in our copy of EXCEL and help us to extend the usability and ability of the EXCEL
For the example,
a function DEC2BIN converts the decimal numbers to binary numbers.
but there is a limitation.
DEC2BIN will convert the numbers up to 511 [ Decimal number ] only an after that it’ll create an error and won’t let us use the function further.
So, does it mean that we would never create binary numbers for the decimal numbers greater than 511?
The answer is , NO!!!
So, in this case , we have the option to program the function in VBA , create an ADDIN , install it and simply use it.
HOW TO CREATE AN EXCEL ADDIN ?
An EXCEL ADDIN is a simple file.
Most of the time it contains the CUSTOM FUNCTIONS and SUB PROCEDURES which are written in VBA and saved with an extension .XLAM
Let us take an example and we’ll go through the example as we learn the new steps with the complete installation.
Let us create a custom function to return the parameter of a rectangle.
FOLLOW THE STEPS TO CREATE AN ADDIN
- ENTER THE VBA CODE
- Open the EXCEL.
- Go to DEVELOPER TAB.
- Click VISUAL BASIC.
- The visual basic environment will open.
A COMPLETE PICTORIAL REPRESENTATION ABOUT OPENING THE VBA AND DIFFERENT AREAS IS GIVEN HERE.
- ENTER THE CODE
- In the project, right click and choose ADD MODULE. [ CLICK HERE TO LEARN THE DESCRIPTIVE PROCESS OF CREATING A CUSTOM FUNCTION ]
- Double click the module to open the workspace.
- Enter the following code in the workspace.
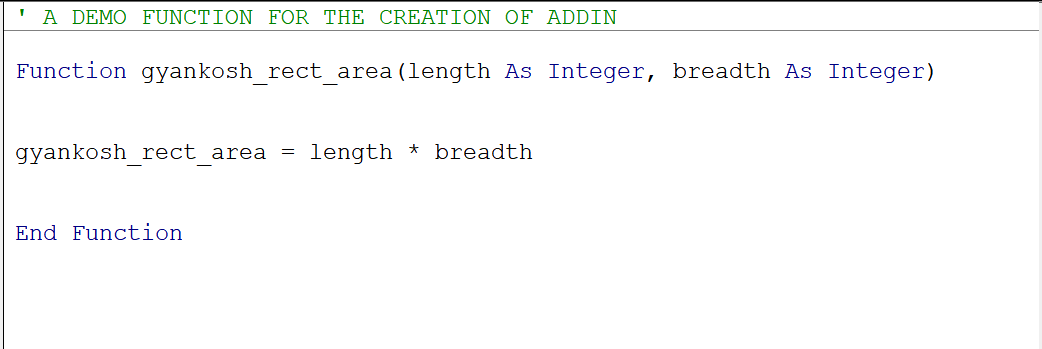
CODE:
' A DEMO FUNCTION FOR THE CREATION OF ADDIN

Function gyankosh_rect_area(length As Integer, breadth As Integer)
         gyankosh_rect_area = length * breadth
End Function
The code will look like the one shown in the picture below.
- SAVE THE FILE AS AN ADDIN [ WITH .XLAM EXTENSION]
- After the coding has been done, go to FILE > SAVE , either in the VBA WINDOW or the main EXCEL WINDOW.
- Choose the location, Enter the name of your choice, but choose the extension as .xlam.
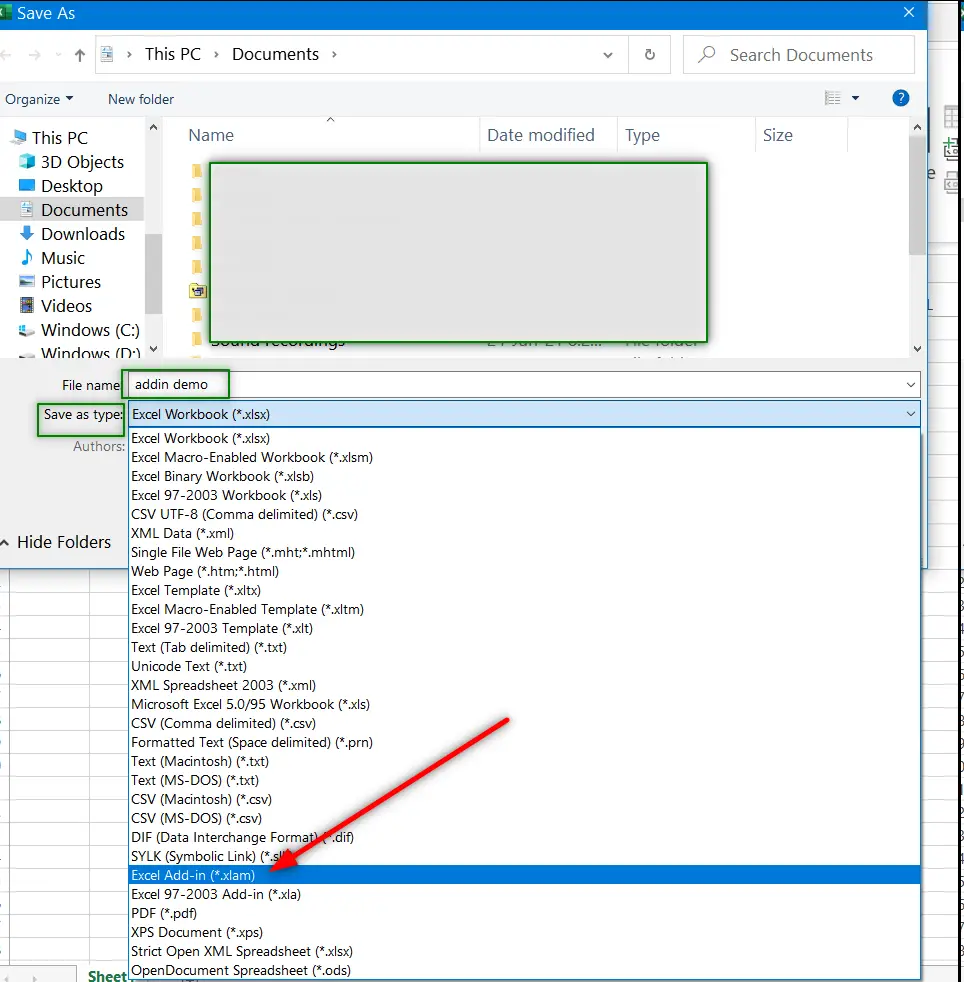
The file is saved as EXCEL ADDIN.
After the addin has been created ,let us learn to install this to our EXCEL.
FOLLOW THE STEPS TO INSTALL THE EXCEL ADDIN IN EXCEL
- Open the excel.
- Go to FILE OPTION.
.
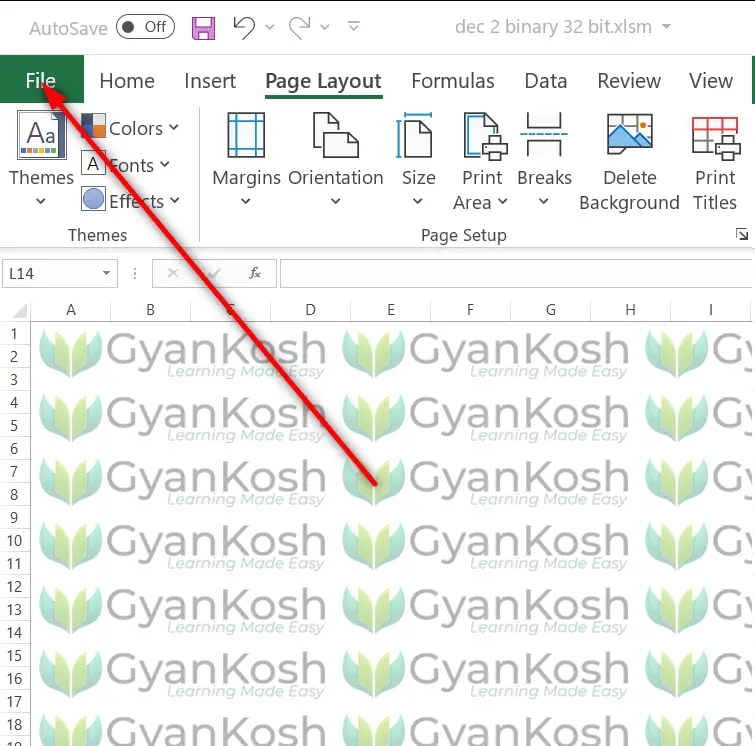
- After going to FILE MENU choose OPTIONS.

- An options windows will open.
- Go to ADDINS option from the left hand side pane.
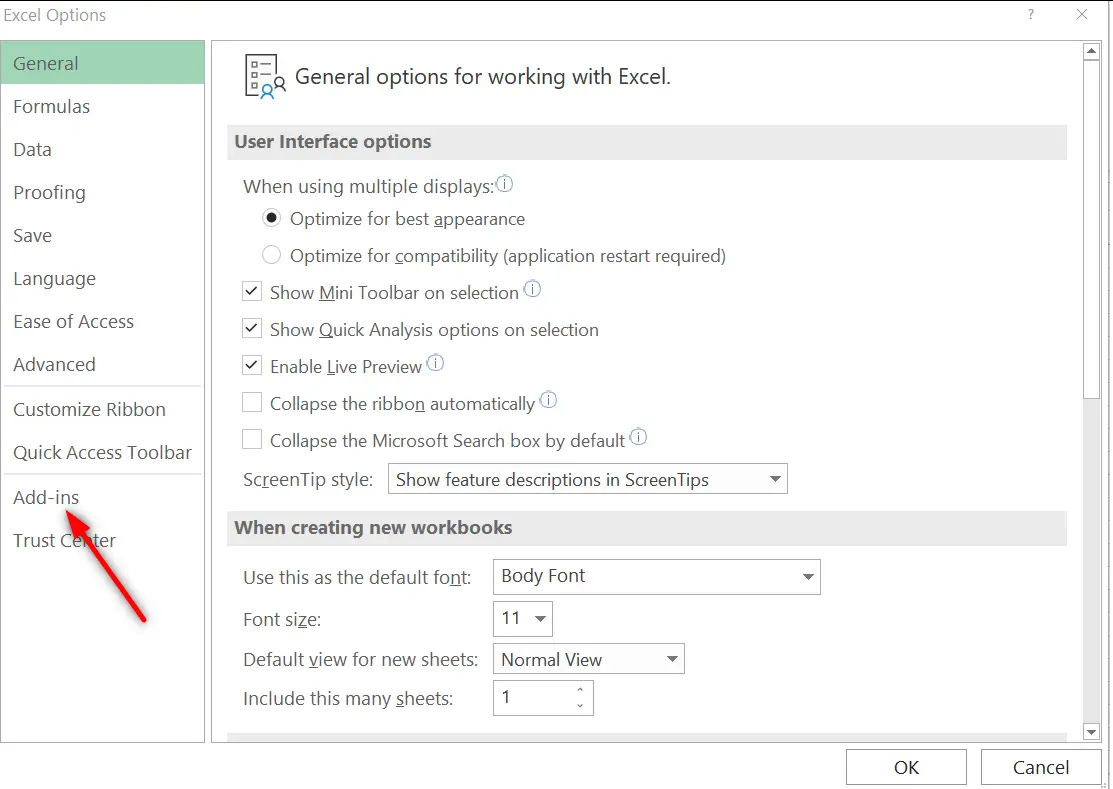
- Choose ADDINS from the left hand side options.
- Click on EXCEL ADD INS FROM THE MANAGE DROPDOWN in the lower portion of the window.
- Click GO.
- A small ADD-INS windows will open.
- Click BROWSE.
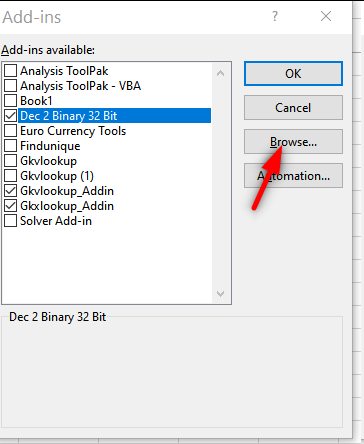
- As we click on the browse button , it will open the file browser.
- Locate your previously created ADD IN file and select it.
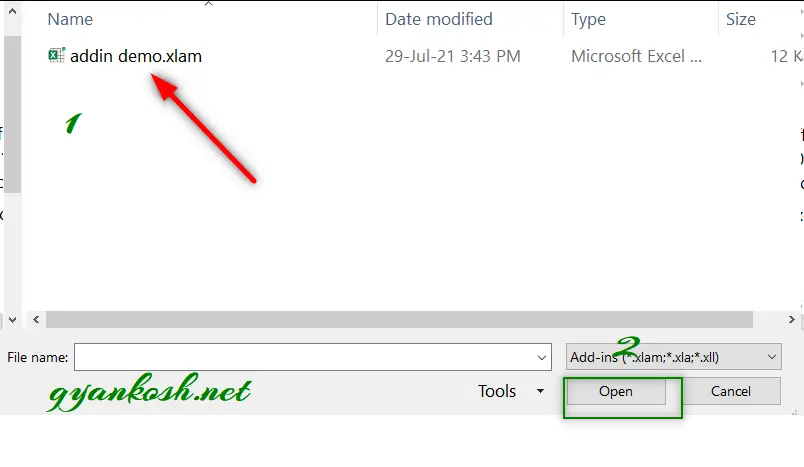
- After selecting the Addin File, click OPEN.
- The addin will be shown in the ADD INS window as shown in the picture below.
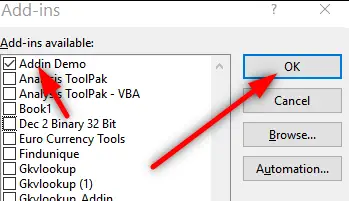
- CONGRATULATIONS!!!
The ADD-IN has been installed.
HOW TO USE ADDIN IN EXCEL?
After we have created and installed the Addin, let us try to use this.
An Addin has been installed and it’ll behave like the part of the EXCEL only.
THE SUB PROCEDURES CAN BE USED WITH THE HELP OF BUTTONS AND ASSIGNING THEM THE MACROS FROM THE ADDIN.
THE FUNCTIONS WILL BE AVAILABLE TO USE JUST LIKE THE STANDARD FUNCTIONS.
We have created an Addin which contains a function. We’ll try to use that function in Excel.
ALWAYS REMEMBER!
IF YOU RELY ON THE FUNCTIONS GIVEN IN ANY ADDIN , YOU SHOULD BE HAVING THE ADDIN INSTALLED IN THAT PARTICULAR COPY OF EXCEL, WHERE YOU WANT TO USE THOSE FUNCTION.
FOLLOW THE STEPS TO USE THE CUSTOM FUNCTION INSTALLED THROUGH ADDIN.
- Simply use the function as =GYANKOSH_RECT_AREA( LENGTH, BREADTH).
- Let us take the LENGTH AS 40 AND BREADTH AS 20 which can be put directly in the function or the cell address containing the values can also be used.
- So, the function becomes =GYANKOSH_RECT_AREA(40,20)
- The result comes out to be 800, which is correct.
You can see that we simply used the function, the same way we use the integrated functions.
IF WE HAVE MACROS OR SUB PROCEDURES IN THE ADDIN, WE CAN ADD THEM AND USE THEM BY ASSIGNING THE MACROS TO THE BUTTONS,
OR
MAUALLY USING THE MACROS OR
BY PUTTING THEM IN THE CUSTOM TABS.
So, in this article we learnt about the Excel Addins, How to create an addin, how to install an addin and how to use the addin in the Excel.