
To prevent other users from accidentally or deliberately changing, moving, or deleting data in a worksheet, you can lock the cells on your Excel worksheet and then protect the sheet with a password. Say you own the team status report worksheet, where you want team members to add data in specific cells only and not be able to modify anything else. With worksheet protection, you can make only certain parts of the sheet editable and users will not be able to modify data in any other region in the sheet.
Important: Worksheet level protection is not intended as a security feature. It simply prevents users from modifying locked cells within the worksheet. Protecting a worksheet is not the same as protecting an Excel file or a workbook with a password. See below for more information:
-
To lock your file so that other users can’t open it, see Protect an Excel file.
-
To prevent users from adding, modifying, moving, copying, or hiding/unhiding sheets within a workbook, see Protect a workbook.
-
To know the difference between protecting your Excel file, workbook, or a worksheet see Protection and security in Excel.
The following sections describe how to protect and unprotect a worksheet in Excel for Windows.
Here’s what you can lock in an unprotected sheet:
-
Formulas: If you don’t want other users to see your formulas, you can hide them from being seen in cells or the Formula bar. For more information, see Display or hide formulas.
-
Ranges: You can enable users to work in specific ranges within a protected sheet. For more information, see Lock or unlock specific areas of a protected worksheet.
Note: ActiveX controls, form controls, shapes, charts, SmartArt, Sparklines, Slicers, Timelines, to name a few, are already locked when you add them to a spreadsheet. But the lock will work only when you enable sheet protection. See the subsequent section for more information on how to enable sheet protection.
Worksheet protection is a two-step process: the first step is to unlock cells that others can edit, and then you can protect the worksheet with or without a password.
Step 1: Unlock any cells that needs to be editable
-
In your Excel file, select the worksheet tab that you want to protect.
-
Select the cells that others can edit.
Tip: You can select multiple, non-contiguous cells by pressing Ctrl+Left-Click.
-
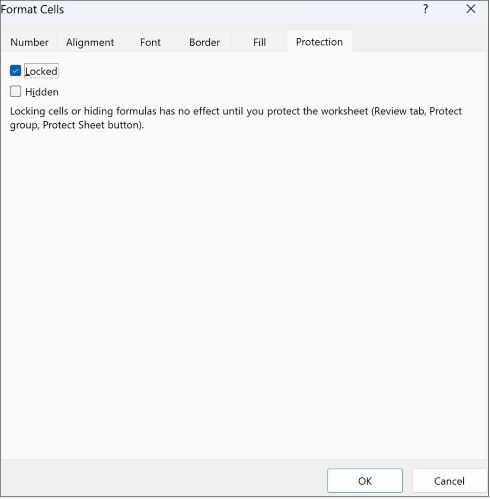
Right-click anywhere in the sheet and select Format Cells (or use Ctrl+1, or Command+1 on the Mac), and then go to the Protection tab and clear Locked.

Step 2: Protect the worksheet
Next, select the actions that users should be allowed to take on the sheet, such as insert or delete columns or rows, edit objects, sort, or use AutoFilter, to name a few. Additionally, you can also specify a password to lock your worksheet. A password prevents other people from removing the worksheet protection—it needs to be entered to unprotect the sheet.
Given below are the steps to protect your sheet.
-
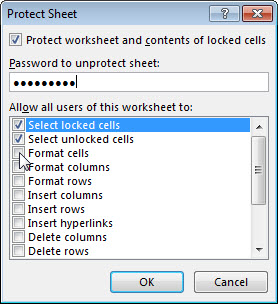
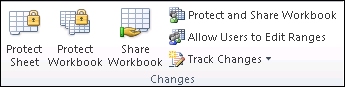
On the Review tab, click Protect Sheet.
-
In the Allow all users of this worksheet to list, select the elements you want people to be able to change.
Option
Allows users to
Select locked cells
Move the pointer to cells for which the Locked box is checked on the Protection tab of the Format Cells dialog box. By default, users are allowed to select locked cells.
Select unlocked cells
Move the pointer to cells for which the Locked box is unchecked on the Protection tab of the Format Cells dialog box. By default, users can select unlocked cells, and they can press the TAB key to move between the unlocked cells on a protected worksheet.
Format cells
Change any of the options in the Format Cells or Conditional Formatting dialog boxes. If you applied conditional formatting before you protected the worksheet, the formatting continues to change when a user enters a value that satisfies a different condition.
Format columns
Use any of the column formatting commands, including changing column width or hiding columns (Home tab, Cells group, Format button).
Format rows
Use any of the row formatting commands, including changing row height or hiding rows (Home tab, Cells group, Format button).
Insert columns
Insert columns.
Insert rows
Insert rows.
Insert hyperlinks
Insert new hyperlinks, even in unlocked cells.
Delete columns
Delete columns.
Note: If Delete columns is protected and Insert columns is not protected, a user can insert columns but cannot delete them.
Delete rows
Delete rows.
Note: If Delete rows is protected and Insert rows is not protected, a user can insert rows but cannot delete them.
Sort
Use any commands to sort data (Data tab, Sort & Filter group).
Note: Users can’t sort ranges that contain locked cells on a protected worksheet, regardless of this setting.
Use AutoFilter
Use the drop-down arrows to change the filter on ranges when AutoFilters are applied.
Note: Users cannot apply or remove AutoFilter on a protected worksheet, regardless of this setting.
Use PivotTable reports
Format, change the layout, refresh, or otherwise modify PivotTable reports, or create new reports.
Edit objects
Doing any of the following:
-
Make changes to graphic objects including maps, embedded charts, shapes, text boxes, and controls that you did not unlock before you protected the worksheet. For example, if a worksheet has a button that runs a macro, you can click the button to run the macro, but you cannot delete the button.
-
Make any changes, such as formatting, to an embedded chart. The chart continues to be updated when you change its source data.
-
Add or edit notes.
Edit scenarios
View scenarios that you have hidden, making changes to scenarios that you have prevented changes to, and deleting these scenarios. Users can change the values in the changing cells, if the cells are not protected, and add new scenarios.
-
-
Optionally, enter a password in the Password to unprotect sheet box and click OK. Reenter the password in the Confirm Password dialog box and click OK.
Important:
-
Use strong passwords that combine uppercase and lowercase letters, numbers, and symbols. Weak passwords don’t mix these elements. Passwords should be 8 or more characters in length. A passphrase that uses 14 or more characters is better.
-
It is critical that you remember your password. If you forget your password, Microsoft cannot retrieve it.
-
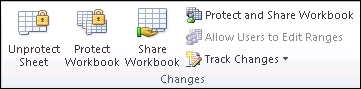
The Protect Sheet option on the ribbon changes to Unprotect Sheet when a sheet is protected. To view this option, click the Review tab on the ribbon, and in Changes, see Unprotect Sheet.
To unprotect a sheet, follow these steps:
-
Go to the worksheet you want to unprotect.
-
Go to File > Info > Protect > Unprotect Sheet, or from the Review tab > Changes > Unprotect Sheet.
-
If the sheet is protected with a password, then enter the password in the Unprotect Sheet dialog box and click OK.
The following sections describe how to protect and unprotect a worksheet in Excel for the Web.
-
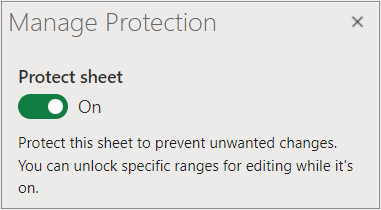
Select Review > Manage Protection.
-
To turn on protection, in the Manage Protection task pane, select Protect sheet.
Note Although you can selectively protect parts of the sheet by setting various options in the Options section, these settings only apply when the Protect sheet setting is on.
-
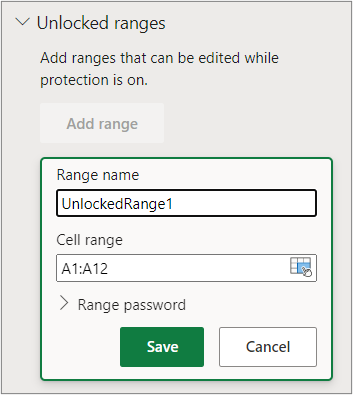
By default, the entire sheet is locked and protected. To unlock specific ranges, select Unlocked ranges, and then enter a range name and cell range. You can add more than one range.
-
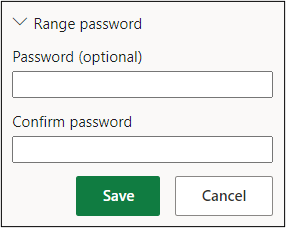
Optionally, to require a password to edit a range, select Range password, enter and confirm the password, and then select Save. Make sure sheet protection is turned on.
-
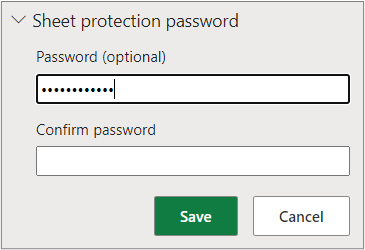
Optionally, to control the ability to edit protections for the entire sheet with a password, select Sheet protection password, enter and confirm the password, and then select Save.
Important-
Use strong passwords that combine uppercase and lowercase letters, numbers, and symbols. Weak passwords don’t mix these elements. Passwords should be 8 or more characters in length. Make sure the CAPS LOCK key is off and use correct capitalization. Passwords are case-sensitive.
-
It is critical that you remember your password. If you forget your password, Microsoft cannot retrieve it.
-
-
Optionally, if you want to selectively enable and disable specific sheet elements, select the Options section, and then select one or more options.
Option
Allows users to
Select locked cells
Move the pointer to cells for which the Locked box is checked on the Protection tab of the Format Cells dialog box. By default, users are allowed to select locked cells.
Select unlocked cells
Move the pointer to cells for which the Locked box is unchecked on the Protection tab of the Format Cells dialog box. By default, users can select unlocked cells, and they can press the TAB key to move between the unlocked cells on a protected worksheet.
Format cells
Change any of the options in the Font and Alignment groups of the Home tab.
Note If cell formatting and hidden properties were previously protected by using the Format Cells or Conditional Formatting dialog boxes, they remain protected, but you can only modify options in these dialog boxes by using Excel for Windows. If you applied conditional formatting before you protected the worksheet, the formatting continues to change when a user enters a value that satisfies a different condition.
Format columns
Use any of the column formatting commands, including changing column width or hiding columns (Home tab, Cells group, Format button).
Format rows
Use any of the row formatting commands, including changing row height or hiding rows (Home tab, Cells group, Format button).
Insert columns
Insert columns.
Insert rows
Insert rows.
Insert hyperlinks
Insert new hyperlinks, even in unlocked cells.
Delete columns
Delete columns.
Note: If Delete columns is protected and Insert columns is not protected, a user can insert columns but cannot delete them.
Delete rows
Delete rows.
Note: If Delete rows is protected and Insert rows is not protected, a user can insert rows but cannot delete them.
Sort
Use any commands to sort data (Data tab, Sort & Filter group).
Note: Users can’t sort ranges that contain locked cells on a protected worksheet, regardless of this setting.
Use AutoFilter
Use the drop-down arrows to change the filter on ranges when AutoFilters are applied.
Note: Users cannot apply or remove AutoFilter on a protected worksheet, regardless of this setting.
Use PivotTable reports
Format, change the layout, refresh, or otherwise modify PivotTable reports, or create new reports.
Edit objects
Doing any of the following:
-
Make changes to graphic objects including maps, embedded charts, shapes, text boxes, and controls that you did not unlock before you protected the worksheet. For example, if a worksheet has a button that runs a macro, you can click the button to run the macro, but you cannot delete the button.
-
Make any changes, such as formatting, to an embedded chart. The chart continues to be updated when you change its source data.
-
Add or edit notes.
Edit scenarios
View scenarios that you have hidden, making changes to scenarios that you have prevented changes to, and deleting these scenarios. Users can change the values in the changing cells, if the cells are not protected, and add new scenarios.
Notes
-
If you don’t want other users to see your formulas, you can hide them from being seen in cells or the Formula bar. For more information, see Display or hide formulas.
-
ActiveX controls, form controls, shapes, charts, SmartArt, Sparklines, Slicers, Timelines, and so on, are already locked when you add them to a spreadsheet. But the lock works only when you enable sheet protection. For more information, see Protect controls and linked cells on a worksheet.
-
There are two ways to unprotect a sheet, disable it or pause it.
Disable protection
-
Select Review > Manage Protection.
-
To turn off protection, In the Manage Protection task pane, turn off Protect sheet.

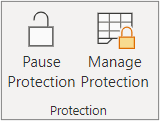
Pause protection
Pausing protection turns off protection for the current editing session while maintaining the protection for other users in the workbook. For example, you can pause protection to edit a locked range but maintain protection for other users.
-
To pause sheet protection, select Review > Pause Protection.
Note If the sheet has a protection password, you must enter that password to pause protection.
-
To resume sheet protection, select Review > Resume Protection.
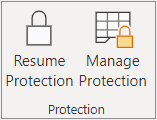
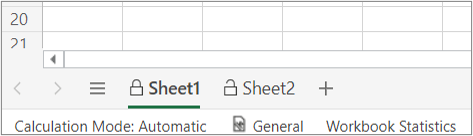
At the bottom of the sheet, the sheet tab displays a locked icon if the sheet is protected (Sheet1), and an unlocked icon if it is paused (Sheet2).
See Also
Protection and security in Excel
Protect an Excel file
Protect a workbook
Lock or unlock specific areas of a protected worksheet
Lock cells to protect them
Display or hide formulas
Protect controls and linked cells on a worksheet
Copy and paste in a protected worksheet
Video: Password protect workbooks and worksheets (Excel 2013)
![]()
Download Article
![]()
Download Article
Do you need to view or edit a protected Excel worksheet? If the sheet is locked with a password and you’re not sure what it is, you can easily use Google Sheets or a VBA script (in earlier versions of Excel) to remove the password. This wikiHow article will show you how to unlock a protected Excel spreadsheet with or without the password. If your entire Excel workbook is password-protected and you can’t open it, you’ll need to unlock the file first.
-
1
Open the workbook with a protected sheet in Microsoft Excel. You can usually do this by double-clicking the file’s name on your computer.
-
2
Right-click the tab for the protected sheet. Each sheet’s tab appears along the bottom of Excel. The protected sheet often has a padlock icon in some versions of Excel. Right-click the tab (or the lock icon) to open the context menu.[1]
- If multiple sheets are protected, you’ll need to remove protection on each sheet separately.
Advertisement
-
3
Click Unprotect Sheet. If the sheet is not password-protected, it will unlock immediately. If not, you’ll be prompted to enter a password into a pop-up window.
-
4
Enter the password and click OK. If the password is correct, the sheet will become unprotected.
- If you don’t know the password, see the Using Google Sheets method. This method lets you upload the file to Google Sheets, which removes all protections added in Excel.
- If you’re using Excel 2010 or earlier and prefer not to upload to Google Sheets, see the Using VBA Code in Excel 2010 and Earlier method.


Advertisement
-
1
Go to https://drive.google.com in a web browser. If you have a Google account, you can use Google Sheets (a free online app that’s similar to Excel) to remove protection from all sheets in a workbook—even if you don’t know the password.
- If you’re not already signed into your Google account, follow the on-screen instructions to sign in now.
- If you don’t have a Google account, see How to Make a Google Account.
-
2
Click + New. It’s at the top-left corner of the page.
-
3
Click File Upload. This opens your computer’s Open panel.
-
4
Select the Excel file you want to edit and click Open. This uploads the file to your Google Drive.
-
5
Double-click the Excel file in your Google Drive. You’ll probably have to scroll down to find it. This opens a preview of the file.
-
6
Click the Open with menu. It’s at the top of the preview. A menu will expand.
-
7
Click Google Sheets. Now that the file is open for editing in Google Sheets, any sheet protections added in Excel have been removed.
-
8
Re-download the file to your computer. If you want to keep working on the file in Microsoft Excel rather than Google Sheets, you can download this newly-unprotected version of your workbook using the following steps:
- Click the File menu at the top-left corner of your sheet.
- Click Download As.
- Click Microsoft Excel (.xlsx) .
- Select a folder to save the file. If you want to keep the original version of the file (the one with a protected sheet) intact, type a new name for the file as well.
- Click Save to download the file.


Advertisement
-
1
Search «password find online» and find an online password removal service.
-
2
Click «Unprotect your file».
-
3
Click «Browse» and choose the protected file.
-
4
Choose «Remove password» radio button.
-
5
Wait while the service removes your password.
-
6
Download the unprotected file, if your file is small.
-
7
Download a demo-file if your file is big. To get the whole file, you’ll need to enter a license key.


Advertisement
-
1
Open the workbook that has a protected sheet in Excel. You can usually do this by double-clicking the file’s name on your computer. Excel files usually end with the file extension .xls or .xlsx.
- Use this method if you have already tried unlocking a sheet but found that it’s password-protected (and you don’t know the password).
- This method will not work in Excel 2013 or later.
-
2
Re-save the file in the xls format. If the file you’re working on has the «.xlsx» extension (common if it was created or edited in newer versions of Excel), you’ll only be able to use this method if you first convert it to the Excel 97-2003 (.xls) format. Here’s how to do this:[2]
- Click the File menu at the top-right corner.
- Click Save As.
- Go to the folder in which you want to save the file.
- Select Excel 97-2003 (.xls) from the «Save as type» or «File Format» menu.
- Click Save.
Follow the on-screen prompts to make any necessary conversions.
-
3
Press Alt+F11 to open the Visual Basic Editor.
-
4
Right-click the workbook’s file name in the «Project — VBAProject» panel. It’s at the top of the left panel. Make sure you right-click the option that contains the file’s name (ends with «.xls»), which should be at the top. A menu will expand.[3]
-
5
Click Insert on the menu. Another menu will expand.
-
6
Click Module. This inserts a new module in which you’ll paste some code.
-
7
Copy the code. Highlight the code that follows this text, then press Ctrl+C (PC) or ⌘ Command+C to copy it:
Sub PasswordBreaker()
'Breaks worksheet password protection.
    Dim i As Integer, j As Integer, k As Integer
    Dim l As Integer, m As Integer, n As Integer
    Dim i1 As Integer, i2 As Integer, i3 As Integer
    Dim i4 As Integer, i5 As Integer, i6 As Integer

    On Error Resume Next
    For i = 65 To 66: For j = 65 To 66: For k = 65 To 66
    For l = 65 To 66: For m = 65 To 66: For i1 = 65 To 66
    For i2 = 65 To 66: For i3 = 65 To 66: For i4 = 65 To 66
    For i5 = 65 To 66: For i6 = 65 To 66: For n = 32 To 126
         ActiveSheet.Unprotect Chr(i) & Chr(j) & Chr(k) & _
            Chr(l) & Chr(m) & Chr(i1) & Chr(i2) & Chr(i3) & _
            Chr(i4) & Chr(i5) & Chr(i6) & Chr(n)
         If ActiveSheet.ProtectContents = False Then
            MsgBox "Password is " & Chr(i) & Chr(j) & _
                Chr(k) & Chr(l) & Chr(m) & Chr(i1) & Chr(i2) & _
                Chr(i3) & Chr(i4) & Chr(i5) & Chr(i6) & Chr(n)
         	Exit Sub
         End If
    Next: Next: Next: Next: Next: Next
    Next: Next: Next: Next: Next: Next
End Sub
-
8
Right-click the new module and select Paste. The copied code now appears in the module window.
-
9
Press F5 to run the code. Excel will now run the code, which can take several minutes. Once the code is finished running, a new password will appear on a pop-up window.
- The new password will be a random number of «As» rather than the original password.
-
10
Click OK on the Password pop-up. A new password will appear but you won’t need to write it down. Clicking OK will remove sheet protection automatically.[4]
- If you had to convert the file to an earlier format, you can now save the workbook again as an .xlsx file.


Advertisement
Add New Question
-
Question
What if I forgot the password to the document?

Try to use method 2 above (Uploading to Google Sheets). The downloaded Excel sheet from Google Sheets will be unprotected, so no password is needed.
-
Question
The Google sheet method is not working.
Margot Fontenaut
Community Answer
It won’t work for a password to open the document, but it works fine for passwords restricting shared access. If you can open your file, but can’t edit it, this method will work. If you can’t open you file without entering password, it won’t work. In such case you will need to use password cracking tools like Password-find, Rixler password cracker, Password recovery lastic to remove protection from your file. It’s impossible to restore or bypass a password to open the document without special software.
-
Question
I received Compile error Syntax error.
Margot Fontenaut
Community Answer
You need to delete the phrase Breaks worksheet password protection. Compiler don’t understand it and there you have the compile error cause of the syntax error. If VBA code is not your thing, you can use password removal apps like Password-find or Password Lastic to remove the password from your sheet.

Ask a Question
200 characters left
Include your email address to get a message when this question is answered.
Submit
Advertisement
Video
Thanks for submitting a tip for review!
References
About This Article
Article SummaryX
To unlock a sheet in an Excel workbook, right-click the sheet’s tab and click Unprotect sheet. Enter the password, if prompted.
If you don’t know the password, upload the sheet to your Google Drive, open it in Google Sheets, then re-download it to your computer.
Did this summary help you?
Thanks to all authors for creating a page that has been read 562,695 times.
Reader Success Stories
-

«I had to save the Excel sheet as a Google sheet and then download it again as Microsoft Excel, that is unless I…» more
Is this article up to date?
Password protection in Microsoft Excel is often used in workplaces to protect important data. Microsoft Excel allows users to protect the worksheets and prevents others from making changes to the original data.
There are two ways a spreadsheet can be secured. One of the ways is using no password, which can be unprotected by anyone. In the other case, the worksheet or workbook is password protected, which means you’ll need to have the password to unlock it. In this article, we will show you how to unprotect worksheets or workbooks with or without a password in Excel.
Unprotect Worksheets/Workbook in Excel. One of the best features of Excel is that it can protect your Excel files at the cell, spreadsheet, and/or workbook level. After locking and protecting worksheets or workbooks, if you want to allow others to edit data, you need to unprotect them.
If you know the password it’s really easy to unprotect a worksheet. Though unlocking an Excel spreadsheet without a password is not simple but you can still do it by using the following tricks.
How to Unprotect Excel Sheet with Password/No Password
It’s very easy to unprotect an Excel sheet and allow users to edit and modify the spreadsheets. If you already know the password of the protected sheet, you can easily remove protection. Just follow any of these steps:
Open the protected spreadsheet, and switch to the ‘Review’ tab and click the ‘Unprotect Sheet’ icon in the Changes group.
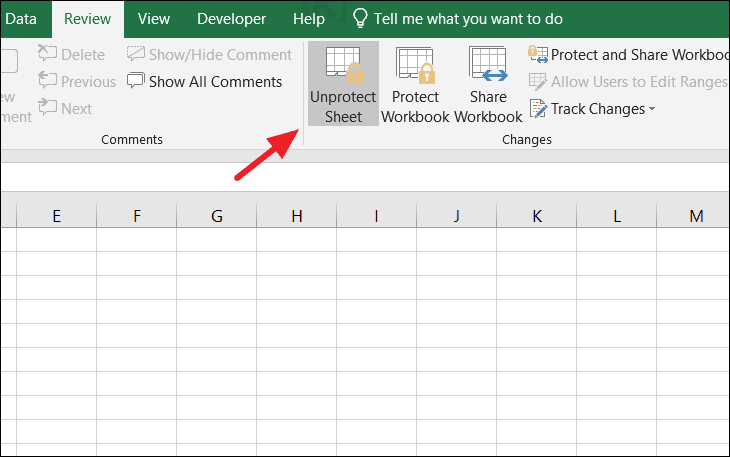
You can access the same above option by right-clicking the protected spreadsheet tab, then select the ‘Unprotect Sheet’ option from the context menu.
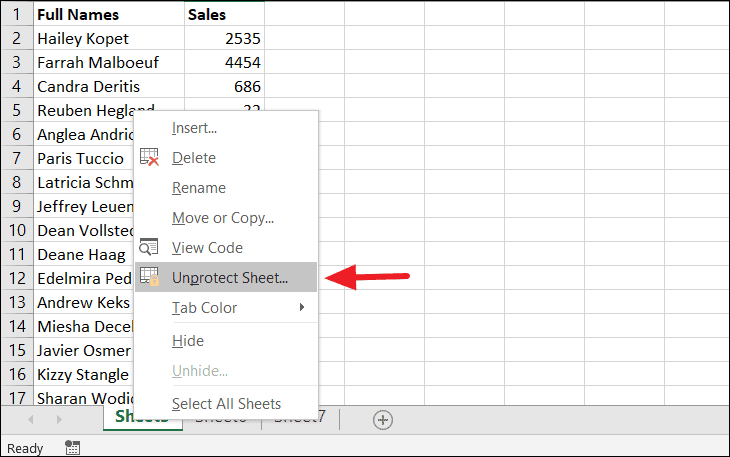
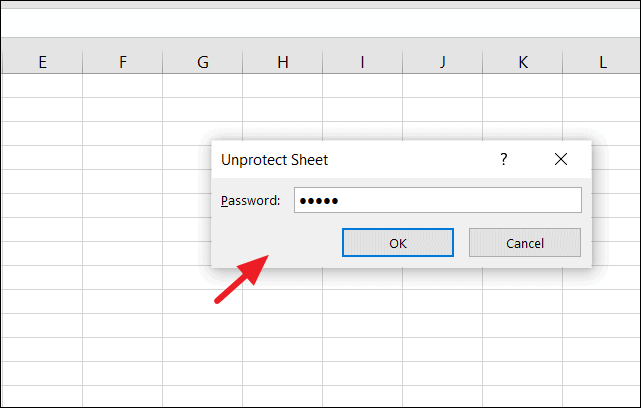
If your sheet is a password-protected worksheet, Excel will prompt you to enter the password. Type the password in the Unprotect Sheet dialog box and click ‘OK’.
If your worksheet was not protected with a password, clicking the ‘Unprotect Sheet’ option is enough to unlock your sheet.
How to Unprotect Excel Workbook with Password/No Password
When your password-protect your Excel workbook, you can’t change the structure of the workbook, such as add, move, rename, or delete worksheets, and view hidden sheets. But you still are able to edit the data on the worksheets even if your workbook is password-protected. If you wish to change the Excel workbook structure like adding or removing worksheets, you must unprotect the Excel Workbook structure first.
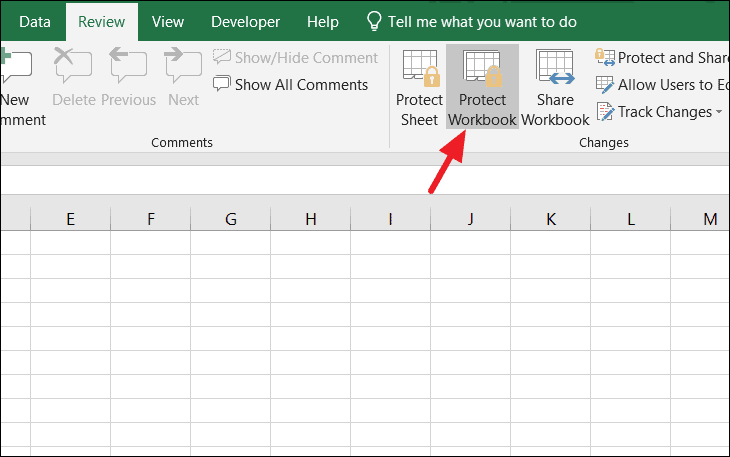
To remove the workbook protection, open the protected workbook, and click the ‘Protect Workbook’ button (option would be highlighted in gray color) under the Review tab.
Type the password in the Unprotect Workbook prompt box and save the workbook.
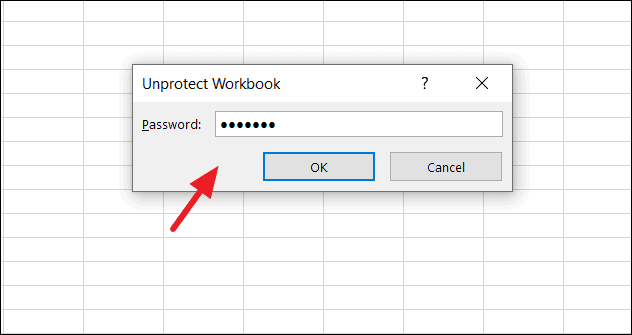
Now your workbook is unlocked, you are free to edit the Excel Workbook structure.
How to Unprotect Excel Worksheet Without Password
If you have a password secured worksheet and you have no idea what the password is or you haven’t unlocked it for a long time and you forgot it, there are few ways to unprotect that excel sheet.
Unprotect Excel Worksheet with VBA Code
Excel’s worksheet protection is based on a simple encryption algorithm. Even when you protect your Excel worksheet with a password, anyone with the below VBA code can crack it in minutes.
You can unlock a password-protected sheet by using a VBA code as a macro to identify the password. Here’s How:
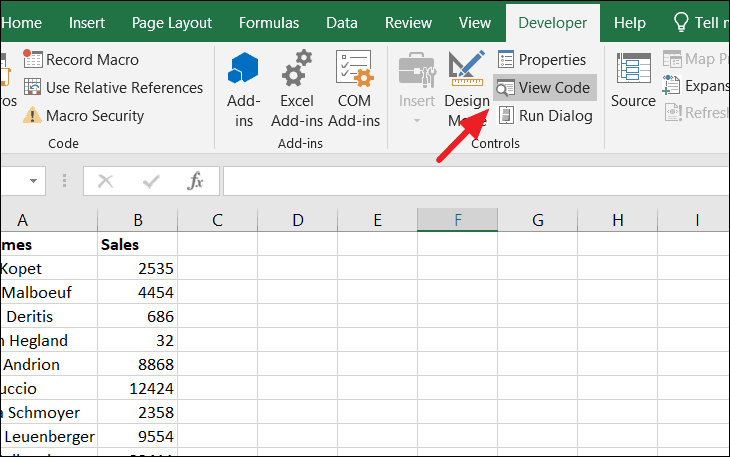
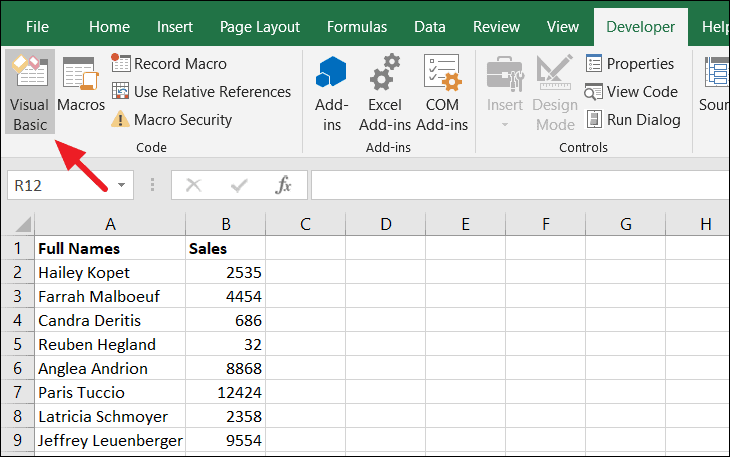
Open the password-protected sheet and go to the ‘Developer’ tab and click the ‘View Code’ button on the ribbon. This will open up the code editor window in Microsoft Visual Basic for Applications.
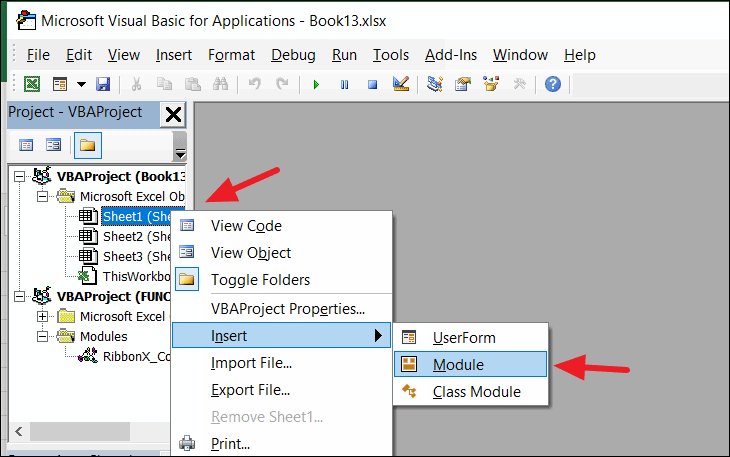
Or you can go to the ‘Developer’ tab and click the ‘Visual Basic’ button. In the Visual Basic code editor, expand the ‘Microsoft Excel Objects’ option on the left pane, right-click the worksheet that is password-protected, and select Insert –> Module from the context menu.
In the Code window of the protected sheet, copy and paste the following VBA code:
Sub PasswordBreaker()
Dim i As Integer, j As Integer, k As Integer
Dim l As Integer, m As Integer, n As Integer
Dim i1 As Integer, i2 As Integer, i3 As Integer
Dim i4 As Integer, i5 As Integer, i6 As Integer
On Error Resume Next
For i = 65 To 66: For j = 65 To 66: For k = 65 To 66
For l = 65 To 66: For m = 65 To 66: For i1 = 65 To 66
For i2 = 65 To 66: For i3 = 65 To 66: For i4 = 65 To 66
For i5 = 65 To 66: For i6 = 65 To 66: For n = 32 To 126
ActiveSheet.Unprotect Chr(i) & Chr(j) & Chr(k) & _
Chr(l) & Chr(m) & Chr(i1) & Chr(i2) & Chr(i3) & _
Chr(i4) & Chr(i5) & Chr(i6) & Chr(n)
If ActiveSheet.ProtectContents = False Then
MsgBox "One usable password is " & Chr(i) & Chr(j) & _
Chr(k) & Chr(l) & Chr(m) & Chr(i1) & Chr(i2) & _
Chr(i3) & Chr(i4) & Chr(i5) & Chr(i6) & Chr(n)
Exit Sub
End If
Next: Next: Next: Next: Next: Next
Next: Next: Next: Next: Next: Next
End Sub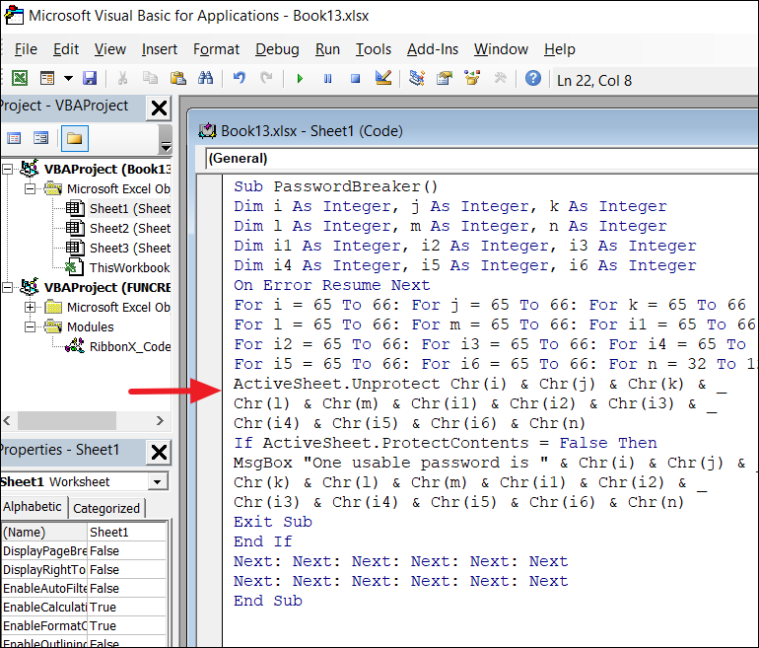
Click the ‘Run’ button on the toolbar and select the ‘Run Sub/UserForm’ option or press ‘F5’ to execute the code.
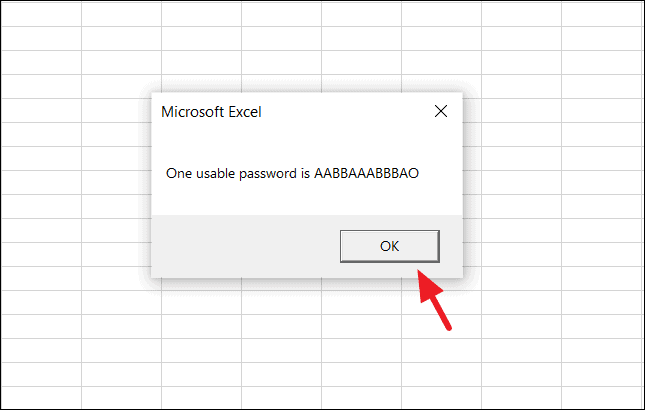
The code will take a couple of minutes to crack the password. Once it’s done, you’ll receive a pop-up with a cracked password, which is not the original one (it’s usually some combination of A’s and B’s), but still, it works. Click ‘OK’ and the sheet will be unprotected.
You need to save the Excel file before closing (as Macro-Enabled Workbook) after pasting the code to the module.
Unprotect Excel Sheet Without Password Using Zip
There’s another trick you can use to Unprotect a worksheet. Just follow theses steps:
First, navigate to Control Panel and open ‘File Explorer options’.
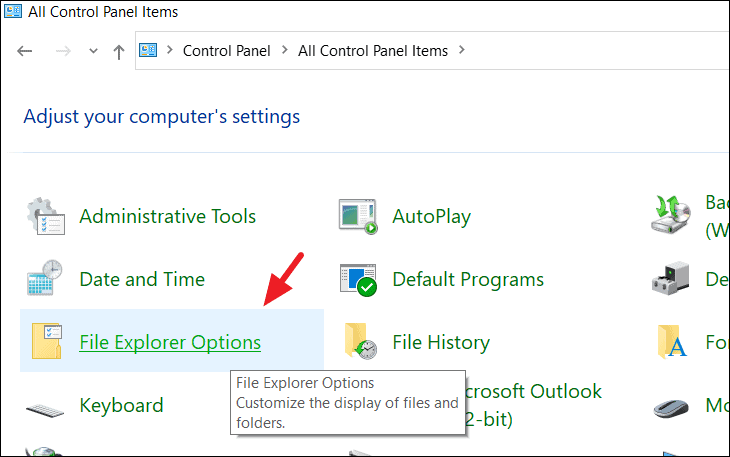
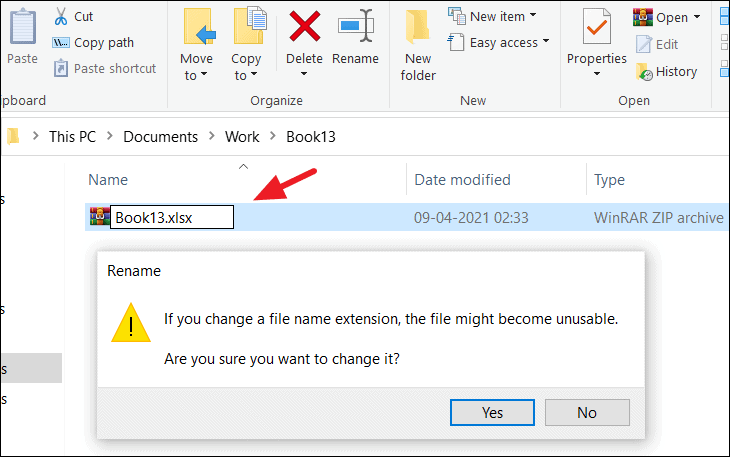
In the File Explorer Options window, uncheck the ‘Hide Extensions for known file types’ to enable your file extensions. Then, click ‘Apply’ to apply the changes and click ‘OK’ to close the window. Now your file extensions of files will be visible.

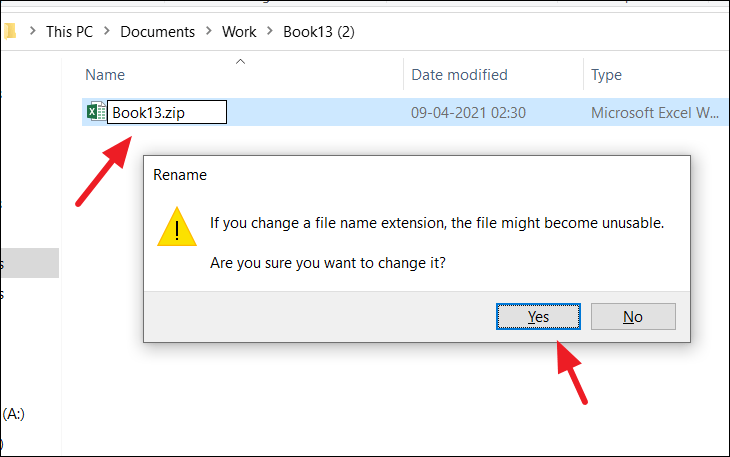
Now located your protected excel file in your drive and rename and change its extension from .xlsx to .zip.
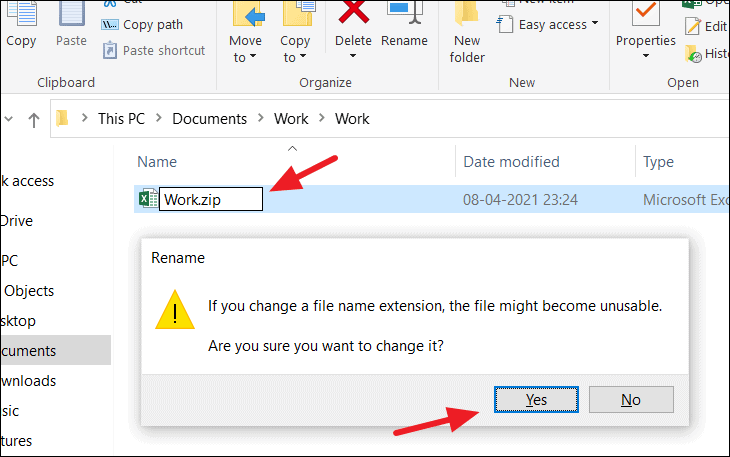
To change extension, right-click on the file, select ‘Rename’ option and replace ‘.xlsx’ with ‘.zip’. Then hit ‘Enter’ and click ‘Yes’ in Rename prompt box.
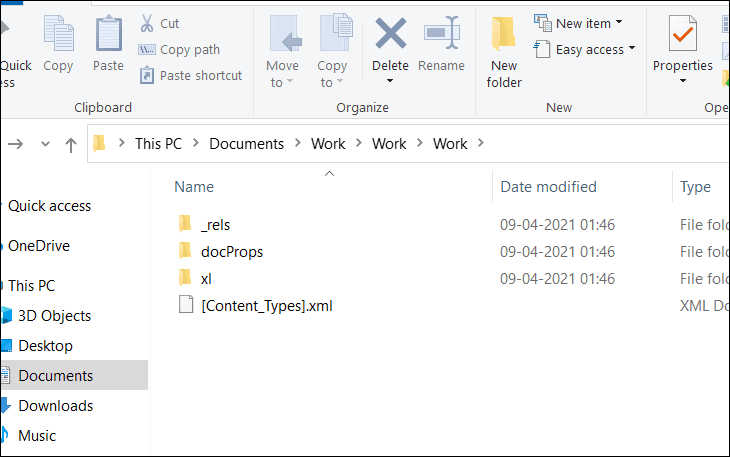
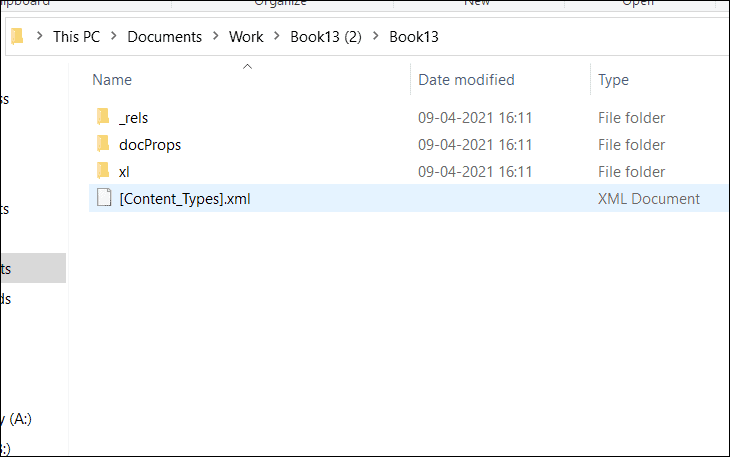
Now, your Excel file is a Zip file.
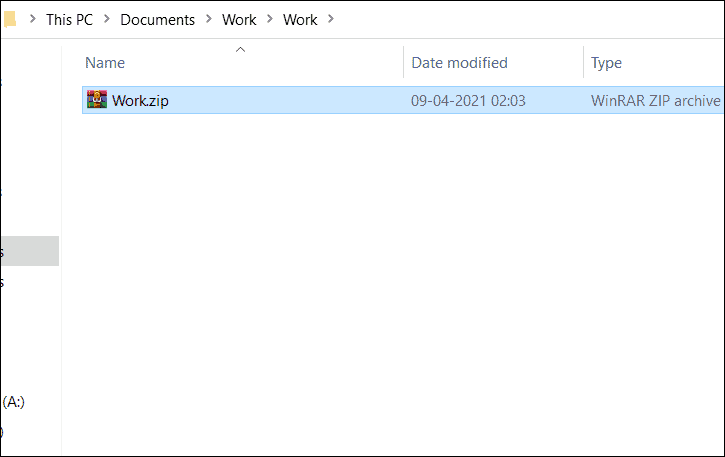
Next, extract the Zip file as shown below. In our case, the most important files to open are located in the /xl/ folder, where we have basically all that has been included in our Excel workbook. Now we can see it as separate .xml files.
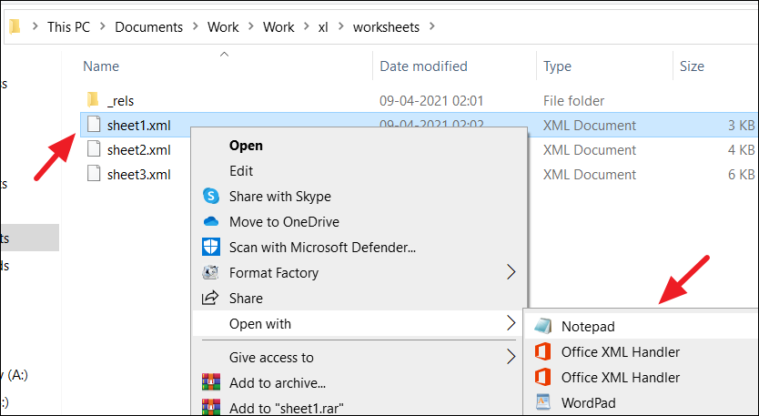
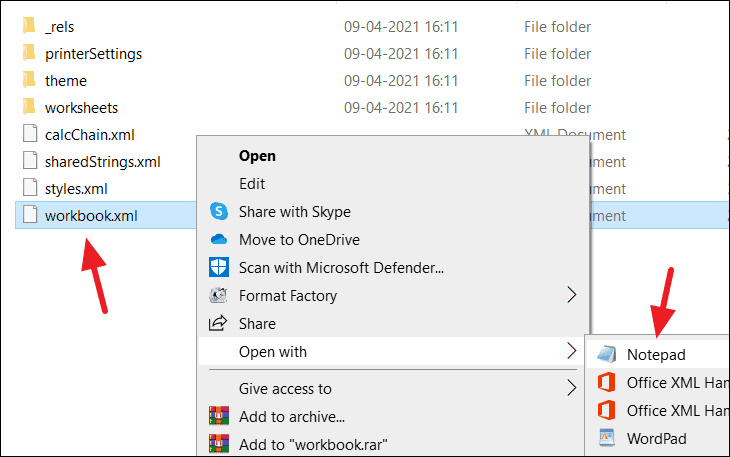
Now navigate to ‘xl –>worksheets –> sheet 1.xml’ (which is the protected sheet). When you open the ‘/xl/worksheets/’ directory, you will see the list of all sheets (in XML format) available in your workbook. Then, open the sheet 1.xml file with Notepad or WordPad (right-click on the file and select a text editor from the ‘Open with’ context menu).
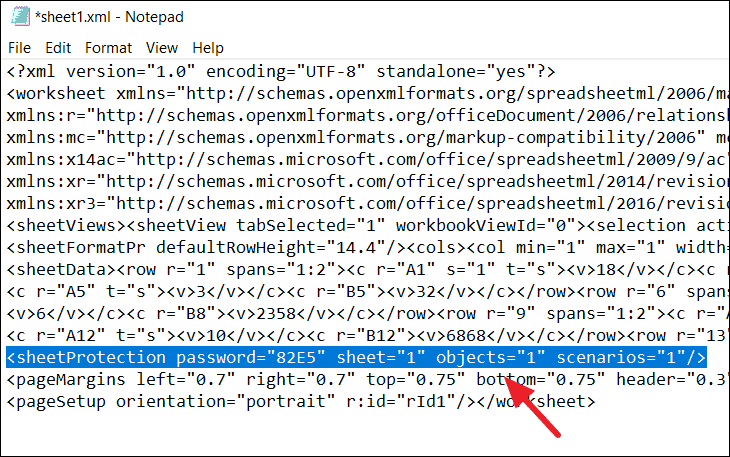
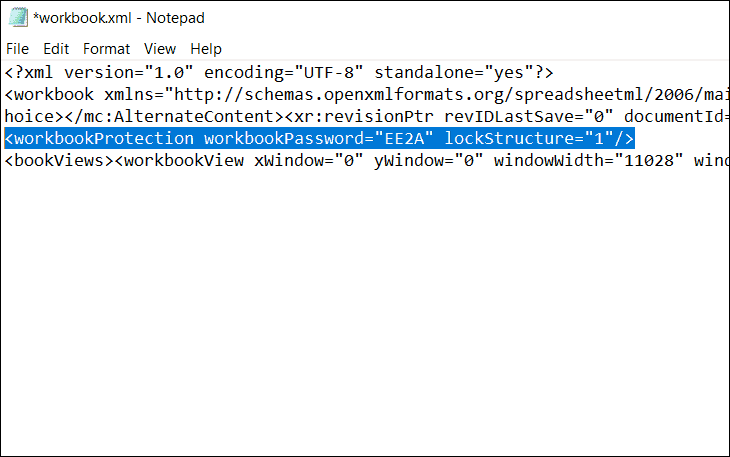
Find the following tag and delete it:
<sheetProtection password=… />
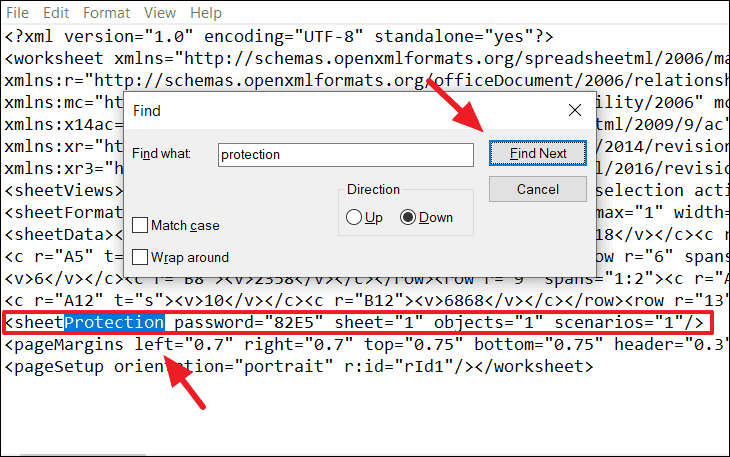
If you have a large amount of information in the worksheet, it will be hard to locate the ‘sheetProtection’ tag. So press Ctrl + F to open the Find feature, type ‘protection’ in ‘Find what’, and click ‘Find Next’. It will find the word ‘Protection’ and highlight it. Now, you can select the ‘sheetProtection’ and delete it.
After that, save the XML file and re-zip all the extracted files into a zip file again. Then, change the extension back from .zip to .xlsx.
Now, open and check your spreadsheet. It will be unprotected.
This method only works in password-protected workbooks. If the file is protected with the ‘Encrypt with Password’ feature, this method won’t work.
Unprotect an Excel Sheet with a Google Sheets
Yet another workaround that allows you to unprotect an Excel worksheet without a password. You’ll need a Google Drive account to do this.
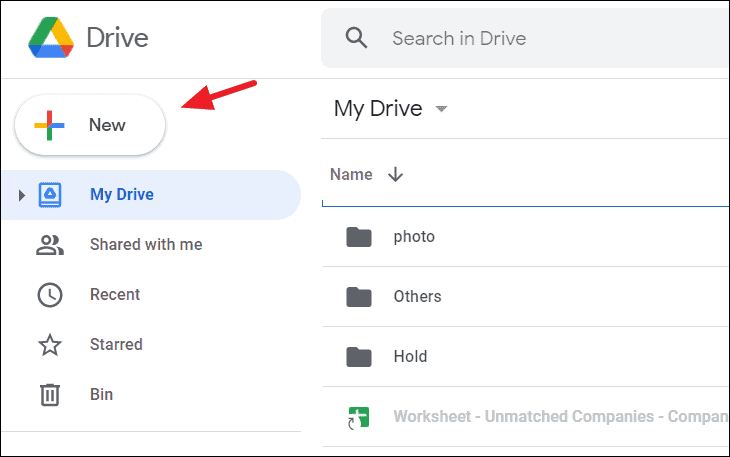
Open your Google Drive account and click the ‘New’ button at the top left corner.
From the New menu, select ‘Google Sheets’ and click ‘Blank spreadsheet’.

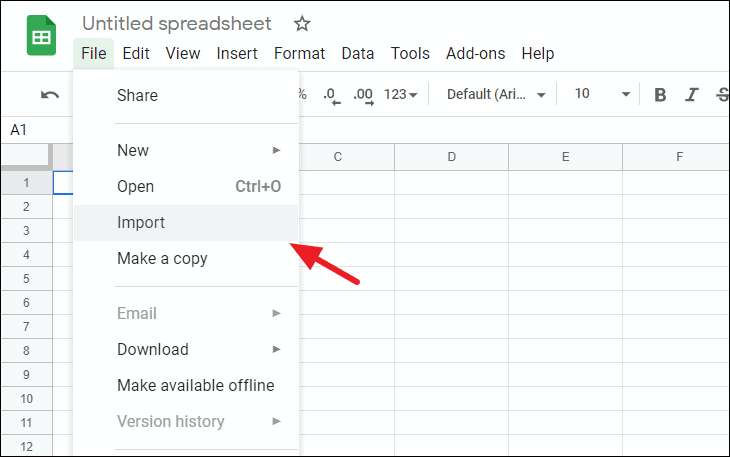
In the blank spreadsheet, click ‘File’ in the toolbar and select ‘Import’.
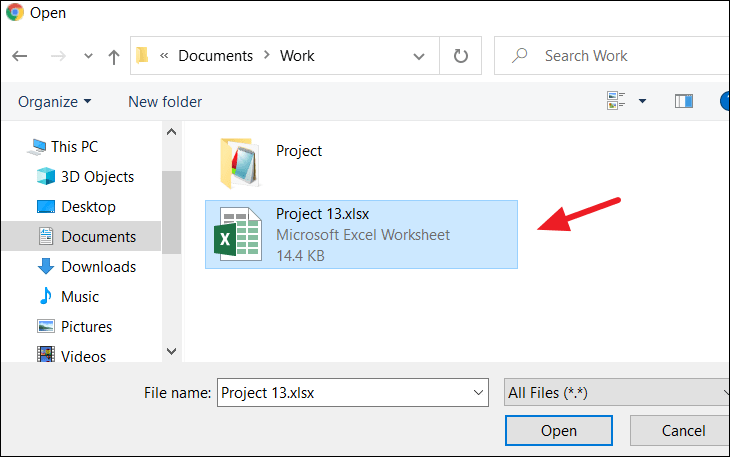
In the Import file dialogue box, select the ‘Upload’ tab from the menu and click the ‘Select a file from your device’ button.
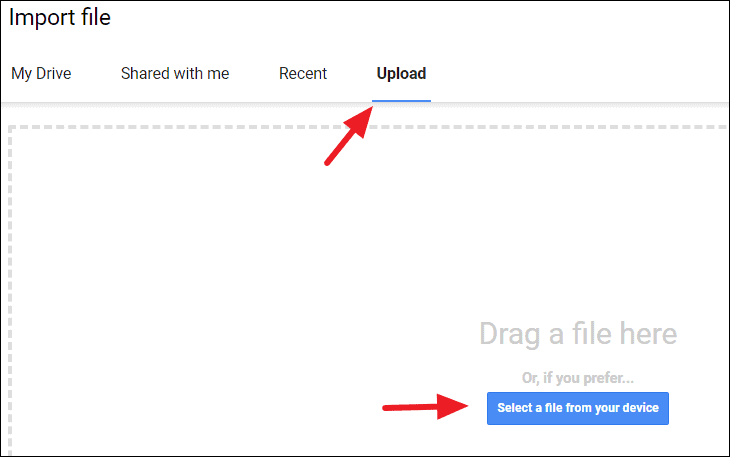
Browse and find the Excel workbook on your local drive, select it, and click ‘Open’ to upload. Or you can simply drag and drop the excel file into the Import file box.
In the Import file window, select the ‘Replace spreadsheet’ option and click the ‘Import Data’ button.
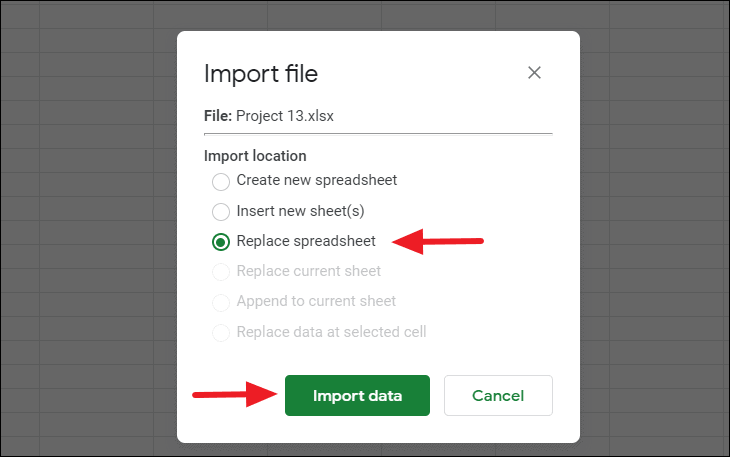
This will import your protected Excel worksheet into your Google Sheets with all the data. Now, you’ll notice that the worksheet is no longer protected and you are free to edit the data.
You can now export the worksheet back to Excel format again.
In the now unprotected Google sheet, click the ‘File’ menu from the toolbar and select the ‘Download’ option. Then choose ‘Microsoft Excel (.xlsx)’ from the context menu.
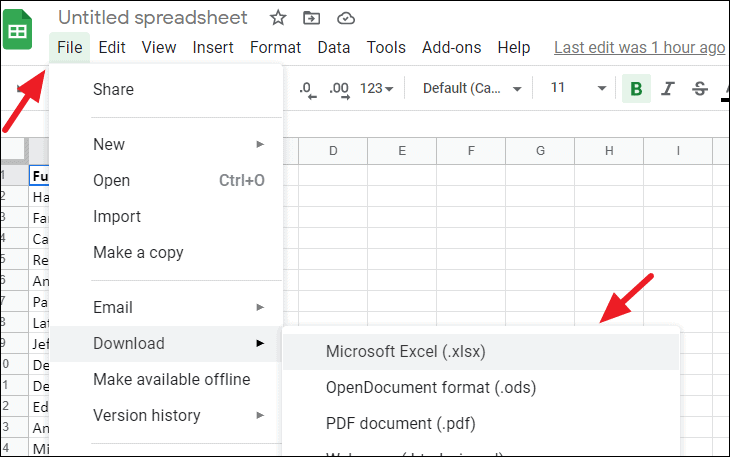
Then give the file a new name and click ‘Save’.
Now you have the same exact Excel sheet, but it is no longer password-protected.
How to Unprotect an Excel Workbook Without Password
If you have a password protected workbook for which you can’t remember the password, then use the VBA Code and ZIP methods to unprotect the workbook as discussed below.
Unprotect Excel Workbook Without Password Using VBA Code
You can also unprotect workbook structure in Excel using Microsoft Visual Basic for Application (VBA) feature. Here’s How:
Open the Excel file with the protected workbook structure and then go to the ‘Developer’ tab and click the ‘Visual Basic’ button.
In the Visual Basic code editor, click the ‘Insert’ tab and select ‘Module’ option.
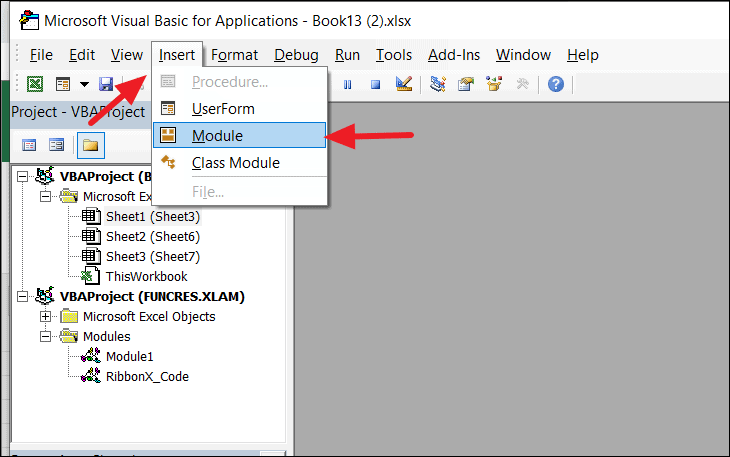
On the popup module (code) window, copy and paste the following code to unlock the workbook structure.
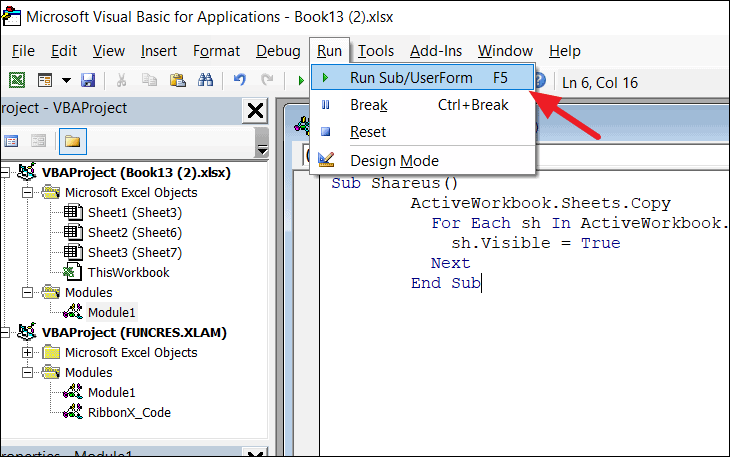
Sub Shareus()
        ActiveWorkbook.Sheets.Copy
          For Each sh In ActiveWorkbook.Sheets
            sh.Visible = True
          Next
        End Sub
Hit the ‘F5’ button or click the ‘Run’ button on the toolbar and select the ‘Run Sub/UserForm’ option to run the macro.
Then a new workbook opens up with a different name. It is the same as the original workbook but without workbook structure protection. Now you unprotected the workbook structure in Excel without knowing the password.
Unprotect Excel Workbook Without Password Using Zip
You can unprotect the Excel workbook safely without a password by changing the file extension and manipulating its constituents.
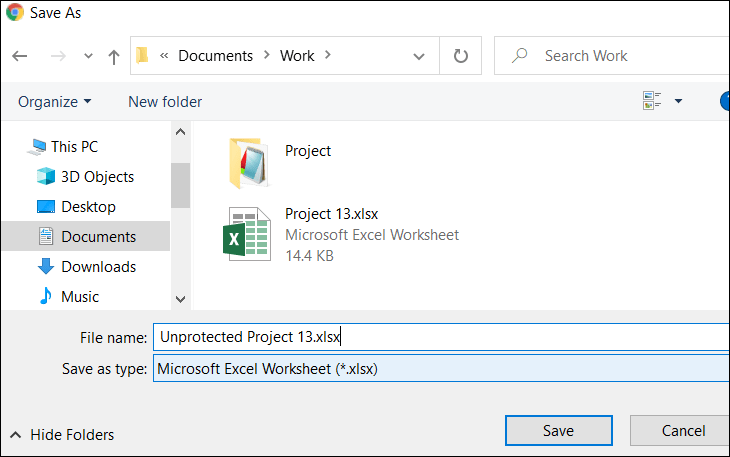
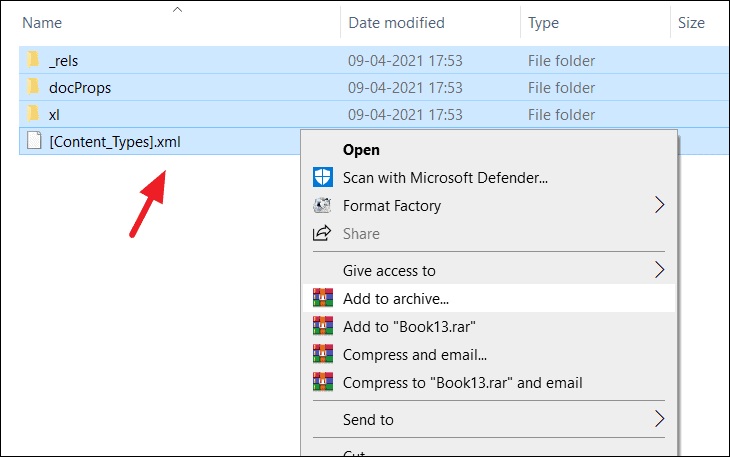
Get the excel file with the protected workbook structure, rename and change its extension from .xlsx to .zip as we did earlier for the protected worksheet. Before you do that make a copy of it for backup.
Then extract the zip file using some file archiver software like WinRAR or 7zip and you’ll get some folders and files as shown below.
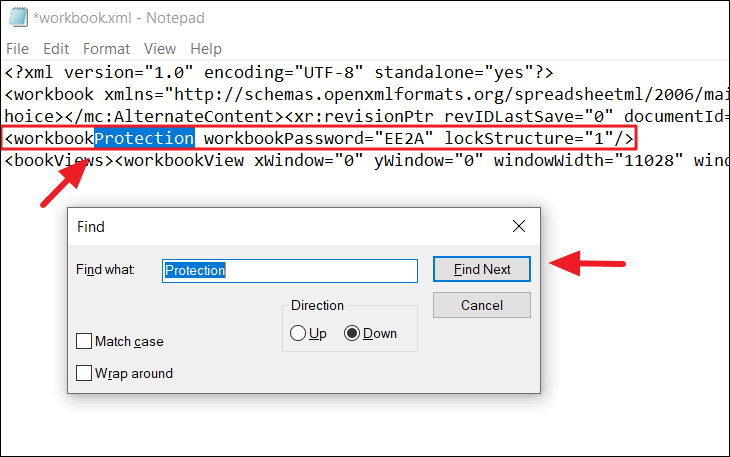
Then open the ‘xl’ folder and open the ‘workbook.xml’ file with Notepad (which contains protection tag)
Now find and select this whole protection tag and delete it:
<workbookProtection workbookPassword= …/>
If you are having a hard time finding this tag, just press Ctrl + F to open the Find dialog, type ‘protection’ in ‘Find what’, and click ‘Find Next’. It will find the word ‘Protection’ and highlight it for you. Now, you can highlight the ‘workbookProtection’ tag and delete it.
After removing the protection tag, save the ‘workbook.xml’ file. Then, zip (compress) all the extracted files back into a zip file.
Now all you have to do is change the extension of the file from ‘.zip’ to ‘.xlsx’.
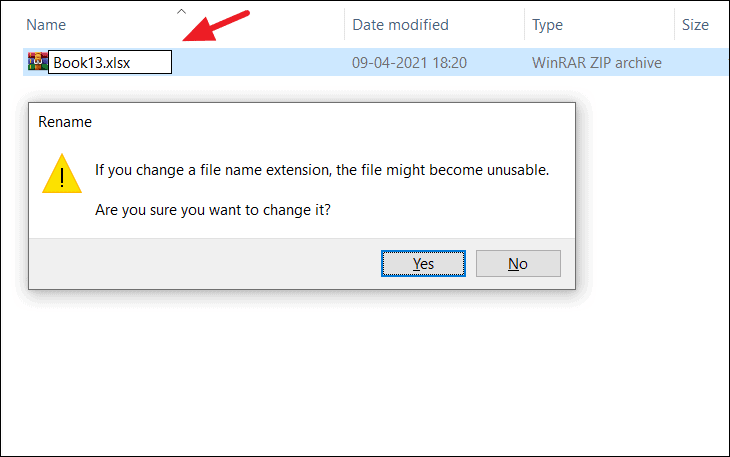
Now the zip file will be converted back to the Excel file and you will find the protected password has been removed from the workbook.
That’s how you unprotect Excel worksheet/workbook.
I recently had the circumstance where a client sent me a copy of a spreadsheet that was password protected, however the client no longer had the password to unlock the content. They were wondering if there was anything we could do…
Unfortunately, there is no quick and simple way for your to view or recover a lost password in Excel.
So what do you do when you need to unprotect an Excel spreadsheet but you have lost or don’t have access to the password?
- ExcelSuperSite – Ultimate Guide
- ExcelSuperSite – How to unprotect a password protected worksheet [using VBA code]
- ExcelSuperSite – Alternate method
Microsoft’s official stand on this matter is:
[URL] – Microsoft
ExcelSuperSite Ultimate Guide
How to Unprotect an Excel Spreadsheet (when I have forgotten the password)
Here at ExcelSuperSite, we come across many situations where our clients have locked their spreadsheets to prevent access or accidental changes being made, but then, forget or lose access (staff leave and don’t share passwords etc) to the passwords used.
So often in fact that we created the following Ultimate Guide on how to remove passwords from within Excel. Simply click the following link to access the guide.
How to Unprotect an Excel Spreadsheet (when I have forgotten the password)
This guide presents simple to understand and follow, step-by-step instructions to lead you through all the steps you need to regain full access to Excel spreadsheets.
Recover a password to open a workbook or worksheet
Excel lets you easily lock and password protect your workbooks and your worksheets. But, what happens when you forget or misplace these passwords. Unfortunately, if this has happened to you, there is no simple and easy way to recover a lost password.
Excel doesn’t store the passwords you use to lock your spreadsheet nor can Microsoft can “look them up” for you. This is also true for the other software in the Office suite that lets you protect files.
It is always a good idea to make sure you store your passwords someplace safe so you have access to them when required.
So what do you do if you have lost the password to unprotect an excel workbook or worksheet?
The following method MAY work for you if you created and saved your spreadsheet Excel 2003 or earlier versions of the software. We have had a good amount of success using this method but it has not worked 100% of the time. Having said that, the method does not harm your spreadsheet nor data, so you have nothing to lose from trying it.
If you created and saved your spreadsheet in a version of Excel from 2007 to present, we recommend using an alternate method we discuss in the following article to remove the passwords from your spreadsheet.
Click this link to read an alternate method to removing passwords from Excel worksheets.
This alternate method is the primary way we utilise at ExcelSuperSite to help our clients regain access to their spreadsheets.
How to unprotect a password protected worksheet.
Step 1 Press ALT + F11 or click View Code on the Developer Tab.
(Nb: By default, the Developer Tab is not displayed as a menu option in Excel. You can add it by following the steps outlined in this article – How to show the Developer Tab in Excel.)

Step 2 Double click on the worksheet that is password protected.

Step 3 Copy and paste the code below into the (Code) window. (Do not change any of the code, just copy and paste it as it is.)
Sub PasswordBreaker()
Dim i As Integer, j As Integer, k As Integer
Dim l As Integer, m As Integer, n As Integer
Dim i1 As Integer, i2 As Integer, i3 As Integer
Dim i4 As Integer, i5 As Integer, i6 As Integer
On Error Resume Next
For i = 65 To 66: For j = 65 To 66: For k = 65 To 66
For l = 65 To 66: For m = 65 To 66: For i1 = 65 To 66
For i2 = 65 To 66: For i3 = 65 To 66: For i4 = 65 To 66
For i5 = 65 To 66: For i6 = 65 To 66: For n = 32 To 126
ActiveSheet.Unprotect Chr(i) & Chr(j) & Chr(k) & _
Chr(l) & Chr(m) & Chr(i1) & Chr(i2) & Chr(i3) & _
Chr(i4) & Chr(i5) & Chr(i6) & Chr(n)
If ActiveSheet.ProtectContents = False Then
MsgBox "One usable password is " & Chr(i) & Chr(j) & _
Chr(k) & Chr(l) & Chr(m) & Chr(i1) & Chr(i2) & _
Chr(i3) & Chr(i4) & Chr(i5) & Chr(i6) & Chr(n)
Exit Sub
End If
Next: Next: Next: Next: Next: Next
Next: Next: Next: Next: Next: Next
End Sub
Step 4 Click on the Run Button or press F5.

And there you have it.
If this method worked and was able to unprotect your worksheet you’ll a small pop-up window saying “One usable password is XXXYYYZZZXXXY”.
If the above method did not work for you then you can try an updated method for removing passwords from an Excel spreadsheet – Click this link to read an alternate method to removing passwords from Excel worksheets.
This alternate method is the primary way we now utilise at ExcelSuperSite to help our clients regain access to their spreadsheets.
ExcelSuperSite Ultimate Guide
How to Unprotect an Excel Spreadsheet (when I have forgotten the password)
Still stuck trying to unlock your spreadsheet. Download our Ultimate Guide to follow the very same, simple to understand and follow, step-by-step methods we use here at ExcelSuperSite to help our clients. Click the following link to access the guide.
How to Unprotect an Excel Spreadsheet (when I have forgotten the password)
Help support ExcelSuperSite to continue to share content such as this.
- Be the envy of all your friends.
- Show off our unique designs.
- Extremely comfortable and suitable for everyday wear.
- Styles suit both guys and girls.


Having Trouble and Need some help?
Have you followed the steps outlined above, but are still having trouble restoring full access to your worksheet?
We can help you!
Since writing this article we have received many, many requests for help from people needing to remove the passwords from their spreadsheets.
To request our help, please click the following link:
Click here to request help from ExcelSuperSite
Continue the Discussion
Have you had to unprotect a password protected spreadsheet? If so, how do you do it? Did you use a similar format to above or another method? Continue the discussion and add your thoughts in the comments section at the bottom of this article.
Please Share
If you liked this article or know someone who could benefit from this information, please feel free to share it with your friends and colleagues and spread the word on Facebook, Twitter and/or Linkedin.
Some of our most popular downloads are …


Unprotect as an owner under the Review tab or without a password using the Visual Basic code editor
Updated on December 4, 2022
What to Know
- Unprotect as owner: Select Review > Unprotect Sheet and enter the password.
- Unprotect without password: Open Visual Basic code editor by selecting Developer > View code.
- Then, enter the code supplied in this article and select Run. In a few minutes, a password is revealed. Choose OK.
This article explains how to unprotect Excel workbooks. The information applies to Excel workbooks in Microsoft Excel 365, Microsoft Excel 2019, 2016, and 2013.
How to Unlock an Excel Workbook as the Owner
Microsoft Excel is packed with features. One such feature is the ability to protect your Excel files at the cell, spreadsheet, or workbook level. Sometimes it’s necessary to unprotect Excel workbooks to ensure data changes apply correctly.
This method assumes that as the owner of the file, you remember the password used to protect the spreadsheet.
-
Open the protected spreadsheet, and select Review > Unprotect Sheet. You could also right-click the protected spreadsheet, then select Unprotect Sheet.
You can identify a protected spreadsheet under the Changes section of the Review tab on the ribbon. If the spreadsheet is protected, you see the Unprotect Sheet option.
-
Enter the password used to protect the spreadsheet, then select OK.
-
Your spreadsheet will now be unprotected and it can be modified.
How to Unprotect an Excel Workbook Without Knowing the Password
You may have protected your Excel workbook or spreadsheet and haven’t had to modify it in some time, even years. Now that you need to make changes, you no longer remember the password you used to protect this spreadsheet.
Fortunately, these steps will allow you to unprotect your workbook using a Virtual Basic script as a macro to identify the password.
-
Open the protected spreadsheet.
-
Access the Visual Basic code editor by either pressing ALT+F11 or select Developer > View Code.
-
In the Code window of the protected sheet, enter the following code:
Sub PasswordBreaker()
Dim i As Integer, j As Integer, k As Integer
Dim l As Integer, m As Integer, n As Integer
Dim i1 As Integer, i2 As Integer, i3 As Integer
Dim i4 As Integer, i5 As Integer, i6 As Integer
On Error Resume Next
For i = 65 To 66: For j = 65 To 66: For k = 65 To 66
For l = 65 To 66: For m = 65 To 66: For i1 = 65 To 66
For i2 = 65 To 66: For i3 = 65 To 66: For i4 = 65 To 66
For i5 = 65 To 66: For i6 = 65 To 66: For n = 32 To 126
ActiveSheet.Unprotect Chr(i) & Chr(j) & Chr(k) & _
Chr(l) & Chr(m) & Chr(i1) & Chr(i2) & Chr(i3) & _
Chr(i4) & Chr(i5) & Chr(i6) & Chr(n)
If ActiveSheet.ProtectContents = False Then
MsgBox "One usable password is " & Chr(i) & Chr(j) & _
Chr(k) & Chr(l) & Chr(m) & Chr(i1) & Chr(i2) & _
Chr(i3) & Chr(i4) & Chr(i5) & Chr(i6) & Chr(n)
Exit Sub
End If
Next: Next: Next: Next: Next: Next
Next: Next: Next: Next: Next: Next
End Sub
-
Select Run or press F5 to execute the code.
-
The code will take several minutes to run. Once finished, you’ll receive a pop-up with a password. Select OK and your spreadsheet will be unprotected.
This is not the original password and you don’t need to remember it.
FAQ
-
How do I protect workbooks in Excel?
To password-protect Excel workbooks, open the workbook and select File > Info > Protect Password > Protect Workbook > Encrypt with Password.
-
How do I protect cells in Excel?
Thanks for letting us know!
Get the Latest Tech News Delivered Every Day
Subscribe