
Important: This article explains an older method of tracking changes using a «Shared Workbook.» The Shared Workbook feature has many limitations and has been replaced by co-authoring. Co-authoring doesn’t provide the ability to track changes. However, if you and others have the file open at the same time, you can see each other’s selections and changes as they happen. Also, if the file is stored on the cloud, it’s possible to view past versions so you can see each person’s changes. Learn more about co-authoring.
-
Be certain that you want to use this method before continuing. Shared Workbooks have limitations, and one in particular is the inability to edit using Excel for the web. Therefore we highly recommend co-authoring, which is the replacement for Shared Workbooks.
-
Click Review > Share Workbook.
Note that in newer versions of Excel, the Share Workbook button has been hidden. Here’s how to unhide it.
-
In the Share Workbook dialog box, on the Editing tab, select the Allow changes by more than one user at the same time check box.
-
Click the Advanced tab.
-
Under Track changes, click Keep change history for and, in the days box, type the number of days of change history that you want to keep. By default, Excel keeps the change history for 30 days and permanently erases any change history that is older than this number of days. To keep change history for a longer than 30 days, enter a number that is larger than 30.
-
Click OK and, if you are prompted to save the workbook, click OK to save the workbook.
-
Click Review > Track Changes, and then click Accept or Reject Changes.
Note that in newer versions of Excel, the Track Changes button has been hidden. Here’s how to unhide it.
-
If prompted to save the workbook, click OK.
-
In the Select Changes to Accept or Reject dialog box, do the following:
-
To accept or reject changes that are made after a particular date, select the When check box, click Since date in the When list, and then type the earliest date for which you want to review the changes.
-
To accept or reject changes that are made by another user, select the Who check box and then, in the Who list, click the user whose changes you want to review.
-
To accept or reject changes that are made by all users, clear the Who check box.
-
To accept or reject changes that are made to a specific area, select the Where check box, and then type the cell reference of the worksheet range.
-
To accept or reject changes to the entire workbook, clear the Where check box.
-
-
Click OK, and then review the information about each change in the Accept or Reject Changes dialog box.
-
To accept or reject each change, click Accept or Reject.
-
If prompted to select a value for a cell, click the value that you want, and then click Accept.
Notes:
-
You must accept or reject a change before you can advance to the next change.
-
You can accept or reject all remaining changes at once by clicking Accept All or Reject All.
-
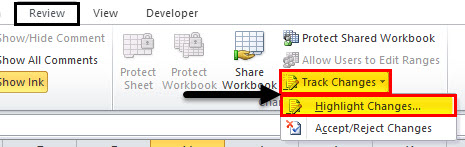
Click Review > Track Changes, and then click Highlight Changes.
Note that in newer versions of Excel, the Track Changes button has been hidden. Here’s how to unhide it.
-
To select the changes that you want to see, do the following:
-
To view all changes that have been tracked, select the When check box, click All in the When list, and then clear the Who and Where check boxes.
-
To view changes that were made after a particular date, select the When check box, click Since date in the When list, and then type the earliest date for which you want to view changes.
-
To view changes that were made by a specific user, select the Who check box and then, in the Who list, click the user whose changes you want to view.
-
To view changes to a specific range of cells, select the Where check box, and then type the cell reference of the worksheet range.
-
-
To specify how you want to view the changes, do the following:
-
To highlight changes on the worksheet, select the Highlight changes on screen check box.
-
To create a list of changes on a separate worksheet, select the List changes on a new sheet check box to display the history worksheet.
Note: This check box is available only after you turn on change tracking and save the file with at least one trackable change.
-
Turning off change tracking deletes the change history. To keep a copy of this information, do the following to print the history worksheet or copy it to another workbook:
-
Click Review > Track Changes > Highlight Changes.
Note that in newer versions of Excel, the Track Changes button has been hidden. Here’s how to unhide it.
-
Under Highlight which changes, select the When check box, and then in the When list, click All.
-
Clear the Who and Where check boxes.
-
Select the List changes on a new sheet check box.
-
Click OK.
-
You can now print, or copy the history to another workbook.
When you highlight changes as you work, Excel marks any revisions (such as changes, insertions, and deletions) with a highlighting color.
-
Click Review > Track Changes, and then click Highlight Changes.
Note that in newer versions of Excel, the Track Changes button has been hidden. Here’s how to unhide it.
-
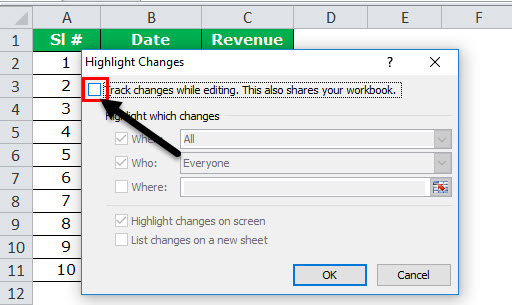
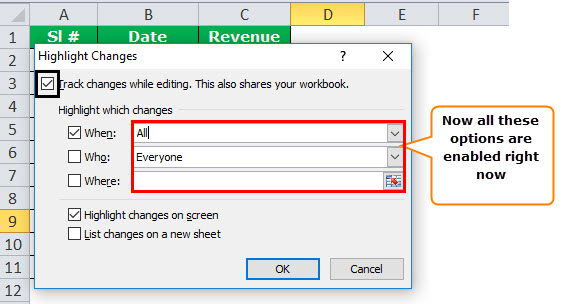
In the Highlight Changes dialog box, select the Track changes while editing check box. Selecting this check box shares the workbook and highlights changes that you or other users make.
-
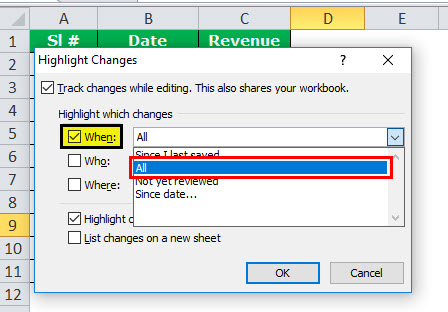
Under Highlight which changes, select the When check box and then, in the When list, click the option that you want.
-
To specify the users for whom you want to highlight changes, select the Who check box and then, in the Who list, click the option that you want.
-
To specify the worksheet area where you want changes to be highlighted, select the Where check box and then, in the Where box, type the cell reference of the worksheet range.
-
Make sure that the Highlight changes on screen check box is selected.
-
Click OK. If prompted, save the workbook.
-
On the worksheet, make the changes that you want. Please note that some changes, such as formatting, are not tracked and therefore are not marked with a highlighting color.
When you no longer want changes to be highlighted, you can turn off change highlighting.
-
Click Review > Track Changes, and then click Highlight Changes.
Note that in newer versions of Excel, the Track Changes button has been hidden. Here’s how to unhide it.
-
In the Highlight Changes dialog box, clear the Track changes while editing check box.
-
Click Review > Track Changes > Highlight Changes.
Note that in newer versions of Excel, the Track Changes button has been hidden. Here’s how to unhide it.
-
Under Highlight which changes, select the When check box and then, in the When list, click All.
-
Clear the Who and Where check boxes.
-
Select the List changes on a new sheet check box.
-
Click OK.
-
In the history worksheet, click the filter arrows next to the column labels to find the information that you want.
Note: Saving the workbook hides the history worksheet. To view the history worksheet after saving, you must display it again by selecting the List changes on a new sheet check box in the Highlight Changes dialog box.
By using the Track Changes feature in Excel for Mac, you can track, maintain, and display information about the changes that are made to a shared workbook.
Important:
-
The Track Changes button is no longer available in the ribbon in the newer versions of Excel for Mac. In order to use this feature, you will need to add Track Changes back to the ribbon first. For more information, see Add the Track Changes button to the ribbon.
-
Change tracking is available only in shared workbooks. In fact, when you turn on change tracking, the workbook automatically becomes a shared workbook. Although a shared workbook is typically stored in a location where other users can access it, you can also track changes in a local copy of a shared workbook.
Add the Track Changes button to the ribbon
To add the Track Changes button in the ribbon, you will need to create a custom group and then add the button to the group.
-
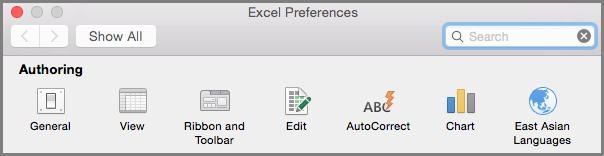
Click Excel > Preferences > Ribbon & Toolbar.

-
Under Customize the Ribbon, under Main tabs, select Review.
-
Below the Main Tabs list, click
, and select New group. -
You can now rename this custom group. Just select New Group (Custom), click
> Rename > and type a name in the Display name box, and click Save. -
Under Choose commands from, select Main Tabs, and then in the list select Review > Changes > Track Changes (Legacy), and then click > (Add arrow) to move the item under the custom group you created.
-
Click Save and close the Excel Preferences dialog box.
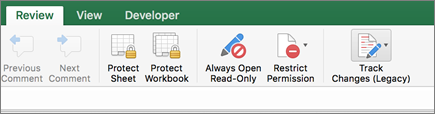
You should see the Track Changes (Legacy) option in the Review tab on the ribbon.
 , and select New group.
 > Rename > and type a name in the Display name box, and click Save.
-
On the Review tab, click Track Changes, and then click Highlight Changes.
-
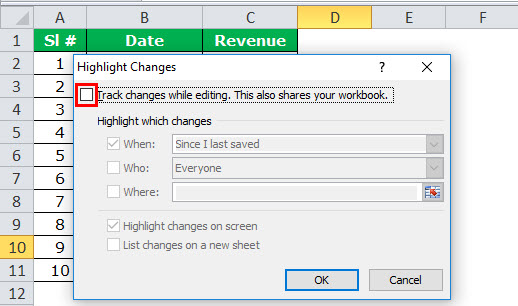
Select or clear the Track changes while editing. This also shares your workbook check box.
Selecting this check box shares the workbook and highlights changes that you or other users make. If you clear the check box, you will receive a message indicating that this action will remove the workbook from shared use.
When you highlight changes as you work, Excel outlines any revisions (such as changes, insertions, and deletions) with a highlighting color.
-
On the Review tab, click Track Changes, and then click Highlight Changes.
-
Select the Track changes while editing. This also shares your workbook check box.
-
Under Highlight which changes, select the When check box, and then in the dropdown list, click the option that you want.
-
Do any of the following:
To specify
Do this
The users for whom you want to highlight changes
Select the Who check box, and then in the Who menu, click the option that you want.
The sheet area where you want changes to be highlighted
Select the Where check box, and then in the Where box, type the cell reference of the sheet range.
Tip: You can also click the Collapse Dialog icon at the right end of the Where box and then select the range that you want to use on the sheet. After you finish, click Collapse Dialog again to display the entire dialog box.
-
Make sure that the Highlight changes on-screen check box is selected.
-
Click OK.
If you are prompted to save the workbook, click OK.
-
On the sheet, make the changes that you want.
Note: Some changes, such as formatting, are not tracked and therefore are not marked with a highlighting color.
When you no longer want changes to be highlighted, you can stop highlighting them.
-
On the Review tab, click Track Changes, and then click Highlight Changes.
-
Clear the Highlight changes on-screen check box.
-
On the Review tab, click Track Changes, and then click Highlight Changes.
Note: If the Track changes while editing. This also shares your workbook is not selected, Excel has not recorded any change history for the workbook.
-
To select the changes that you want to see, do any of the following:
To view
Do this
All changes that have been tracked
Select the When check box, select All from the When pop-up menu, and then clear the Who and Where check boxes.
Changes that were made after a particular date
Select the When check box, click Since date in the When list, and then type the earliest date for which you want to view changes.
Changes that were made by a specific user
Select the Who check box and then, in the Who list, click the user whose changes you want to view.
Changes to a specific range of cells
Select the Where check box, and then type the cell reference of the sheet range.
-
You can also click Collapse Dialog at the right end of the Where box and then select the range that you want to use on the sheet. After you finish, click Collapse Dialog again to display the entire dialog box.
-
To specify how you want to view the changes, do any of the following:
To
Do this
Highlight changes on the sheet
Select the Highlight changes on screen check box.
This enables you to view the details about a change by resting the pointer over a highlighted cell.
Create a list of changes on a separate sheet
Select the List changes on a new sheet check box to display the history sheet.
This check box is available only after you turn on change tracking and save the file with at least one trackable change.
-
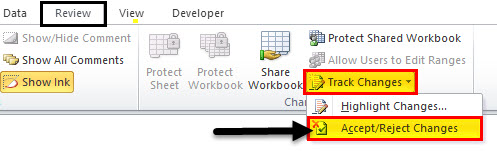
On the Review tab, click Track Changes, and then click Accept or Reject Changes. .
If you are prompted to save the workbook, click OK.
-
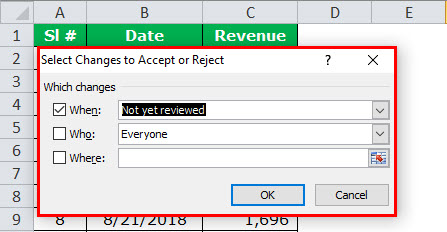
In the Select Changes to Accept or Reject dialog box, do any of the following:
To accept or reject
Do this
Changes that are made after a particular date
Select the When check box, click Since date in the When list, and then type the earliest date after which you want to review the changes.
Changes that are made by another user
Select the Who check box and then, in the Who list, click the user whose changes you want to review.
Changes that are made by all users
Clear the Who check box.
Changes that are made to a specific area
Select the Where check box, and then type the cell reference of the sheet range.
You can also click Collapse Dialog at the right end of the Where box and then select the range that you want to use on the sheet. After you finish, click Collapse Dialog again to display the entire dialog box.
Changes to the entire workbook
Clear the Where check box.
-
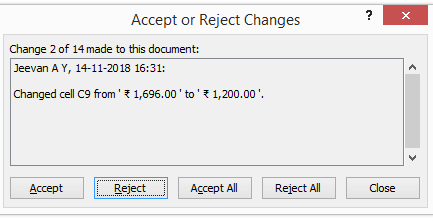
Click OK, and then review the information about each change in the Accept or Reject Changes dialog box.
The information includes other changes that are affected by the changes you make. You can scroll to see all the information as needed.
-
For each change, click Accept or Reject.
Notes:
-
If you are prompted to select a value for a cell, click the value that you want, and then click Accept.
-
You must accept or reject a change before you can advance to the next change.
-
You can accept or reject all remaining changes at once by clicking Accept All or Reject All.
-
All changes must be saved before they can be listed on the history sheet.
-
When you reject a change, the history sheet records the rejection with «Undo» or «Result of rejected action» in the Action Type column. To view the history sheet, see View the history sheet for more information.
-
-
On the Review tab, click Track Changes, and then click Highlight Changes.
Note: If the Track changes while editing. This also shares your workbook check box is not selected, Excel has not recorded any change history for the workbook.
-
Under Highlight which changes, select the When check box, and then in the When pop-up menu, click All.
-
Clear the Who and Where check boxes.
-
Select the List changes on a new sheet check box, and then click OK.
-
Click OK.
The history sheet appears.
-
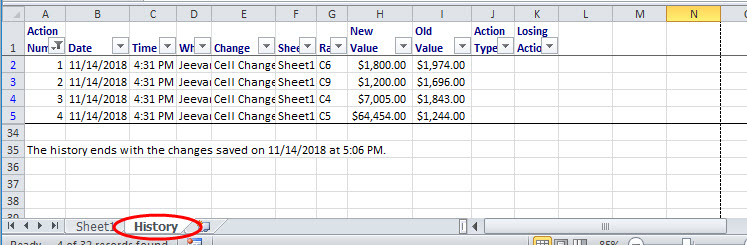
In the history sheet, click the filter arrows next to the column labels to find the information that you want.
Note: Saving the workbook hides the history sheet. To view the history sheet after saving, you must display it again by selecting the List changes on a new sheet check box in the Highlight Changes dialog box.
Because the change history is deleted when you turn off change tracking, you may want to save a copy of the history. You can print the history sheet or copy it to another workbook.
-
On the Review tab, click Track Changes, and then click Highlight Changes.
-
Under Highlight which changes, select the When check box, and then, in the When list, click All.
-
Clear the Who and Where check boxes.
-
Select the List changes on a new sheet check box.
-
Click OK.
Tips:
-
To print the history sheet, click Print on the File menu, select the print options you want, and then click Print.
-
To copy the history sheet to another workbook, follow these steps:
-
Hold down CONTROL and click the History tab at the bottom of the history sheet, and then click Move or Copy.
-
In the To book area, click the name of the workbook you want to move the sheet to, or click (new book).
-
Select the Create a copy check box, and then click OK.
-
Save the workbook that contains the copied history sheet.
-
You can use change tracking to log details about workbook changes every time that you save a workbook. This change history can help you identify any changes that were made to the data in the workbook, and you can then accept or reject those changes.
Change tracking is especially useful when several users edit a workbook. It is also useful when you submit a workbook to reviewers for comments and then want to merge the input that you receive into one copy of that workbook, incorporating the changes and comments that you want to keep.
When changes are made in the shared workbook, you can view the change history directly on the sheet or on a separate history sheet. Either way, you can instantly review the details of each change. For example, you can see who made the change, what type of change was made, when it was made, what cells were affected, and what data was added or deleted.
When you use change tracking, consider the following:
-
Change tracking differs from the undo operation and does not create a backup copy
You might expect that change tracking creates a backup copy of the workbook before changes are made, or that you can undo any of those changes. Unfortunately, you cannot use the change history to revert changes by undoing them or by restoring an earlier version of the workbook. However, the history sheet includes a record of all deleted data so that you can copy that data back to the original cells in the shared workbook.
Because change tracking is not designed to help you return to earlier versions of a workbook, you should continue to back up workbooks that have change tracking in effect.
-
Some types of changes are not tracked
Changes that you make to cell contents are tracked, but other changes, such as formatting changes, are not tracked. Some Excel features are unavailable in shared workbooks and therefore cannot be tracked.
-
The change history is kept only for a specific interval
By default, when you turn on change tracking, the change history is kept for 30 days to keep the size of the workbook manageable. However, you can increase or decrease the number of days of the change history that you want to keep. To keep the change history indefinitely, you can specify a large number of days. You can also make periodic copies of the history information.
-
The oldest part of the change history is periodically deleted
Excel determines the change history that is kept by counting back from the current date. Each time that you close the workbook, Excel deletes any part of the change history that is older than the number of days that were in effect the last time the workbook was saved.
For example, if you are keeping 30 days of change history, and you open a workbook for the first time in two months, you will be able to view the history from two months ago. However, when you close this workbook, the history from the previous 30 days (31 to 60 days ago) is deleted.
Important: When you turn off change tracking or stop sharing the workbook, all change history is permanently deleted.
Excel provides the following ways to access and use the stored change history.
-
Onscreen highlighting
Excel can outline changed areas in a different color for each user and display the basic details as a comment when you rest the pointer over each changed cell. Onscreen highlighting is useful when a workbook does not have many changes or when you want to see at a glance what has changed.
-
History tracking
Excel can display a separate history sheet that provides a printable list of change details on which you can filter to find the changes that you are interested in. The history sheet is useful when a workbook has many changes or when you want to investigate what occurred in a series of changes.
-
Change reviewing
Excel can step you through the changes in sequence so that you can decide whether to accept or reject each change. This method is useful when you are evaluating comments from other users.
Need more help?
You can always ask an expert in the Excel Tech Community or get support in the Answers community.
Watch Video – How to Track Changes in Excel
If you work with an Excel file that needs to be updated or reviewed by other people, the option to track changes can come in handy.
You can also use it when you’re updating a file and need to keep a track of all the changes you do yourself. This can be helpful when you revisit it sometime later.
In this tutorial, I will show you how to track changes in Excel.
Enabling the Track Changes in Excel Feature
By default, this feature is disabled in Excel.
Here are the steps to enable track changes in Excel:
The above steps would enable ‘Track Changes’ in Excel and now it will highlight any change done to the workbook.
Note: For this option to work, you need to have the workbook saved on your system or a network drive. If the file has not been saved, it will first ask you to save it before enabling the ‘Track Changes’ option. If the file is already saved, it will still save it before enabling the tracking.
How do ‘Track Changes’ work in Excel?
Once you have enabled the tracking, whenever you or anybody who accesses the workbook makes any changes to it, it will get highlighted with a blue border and get a small blue triangle in the top left of the cell. This is similar to the red triangle you see when you insert a comment in a cell.
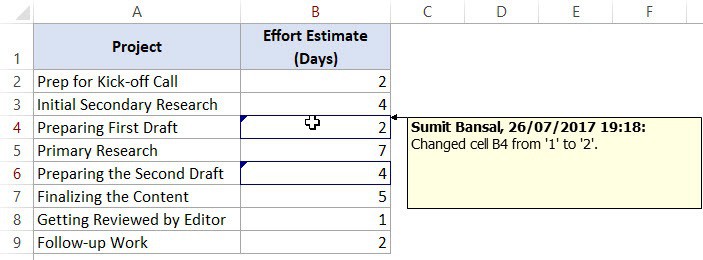
For example, below I have a dummy project plan and I have made changes in column B (cell B4 and B6).
![]()
When you hover the cursor over the cell that has a change, it will show a message that specifies what the change is, who made the change, and when it was done.
Note that when ‘track changes’ option is enabled in Excel, the workbook is shared and some of the features are automatically disabled. For example, you will not be able to protect a sheet when ‘track changes’ are ON. You will notice that some of the options in the ribbon are grayed out.
Getting a List of All the Changes
If you have a workbook that has a lot of changes made to it, you may want to get a list of all the changes separately as a list.
Here are the steps to get a list of all the changes in a new worksheet:
This will instantly create a new worksheet that will list all the changes that you have made.
Accepting/Rejecting Changes
When the changes are made, these are not final until you review these changes. This can be useful when you have the reviewed file from your colleague/boss/client, and you have to decide on what changes are to be kept and which ones are to be rejected.
Here are the steps to accept/reject changes in Excel:
If you reject a change, it will revert back to the original value.
Note that when you accept a change, you can not undo it.
Disabling Track Changes in Excel
Once your work is finalized, you can disable the track changes feature in Excel. That will remove any existing blue box in the cells and will stop tracking any further changes.
Here are the steps to disable ‘track changes’ in Excel:
Difference Between Comments and Track Changes
A lot of people prefer adding comments while reviewing other people’s work in Excel.
Here are the major differences in ‘comments’ and the ‘track changes’ functionality:
- You don’t need to edit a cell’s content in order to leave a comment. Track changes, on the other hand, would insert a note whenever there is any change in the cell.
- Adding comment is a manual process, while track changes, when enabled, would automatically record everything that happens in the worksheet.
- You can not get a list of all the comments separately in a worksheet (unless you use VBA as shown here) while you can get it with the tracking functionality with a simple click.
- When you enable track changes in Excel, some of the functionalities are disabled. This is not the case with comments.
You May Also Like the Following Tutorials:
- How to Use Spell Check in Excel.
- Using Input Message in Excel to Display Message when a Cell is Selected.
How to Track Changes in Excel? (Step by Step)
Tracking Excel changes is a technique used to highlight changes done by any user in an excel shared workbook”Toread more. For example, it highlights the cell changed into a different color. This option can be enabled when we share a workbook and is available in the “Changes” section of the “Review” tab. It gives us certain options, such as when to highlight changes and whether to reflect them on the screen.
You can download this Track Changes Excel Template here – Track Changes Excel Template
Before we head into the topic of track changes in Excel, firstly, we need to know exactly where the option to use it is. Then, follow the below steps to find that option.
- Go to the “Review” tab.

- Now, in this tab, go to the “Track Changes” option, which is there under the “Changes” section.


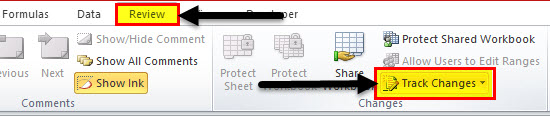
Table of contents
- How to Track Changes in Excel? (Step by Step)
- Work With Track Changes Option in Excel
- How to make the List of Track Changes in a separate sheet
- Validate Changes and Accept or Reject
- How to Disable this?
- Track Changes vs. Normal Comments
- Recommended Articles
Work With Track Changes Option in Excel
Now, we will see how exactly Excel tracks the changes we made in Excel. Consider the below data for this example.

Now, before making any changes, enable the track changes option. Then, follow these steps to find the track changes option step.
From the above image, select the Highlight Changes option. Once this option is selected below, the dialog box will open.
Now, check the box Track Changes while editing. This also shares your workbook”Toread more. Once this button is checked, it will enable all the below options.
Now, we have multiple options: When, Who, and Where. Before we go to the next step, let us understand these options.
When: This option includes multiple other options as well: “Whether you want to track since you last saved,” “All,” “Not yet reviewed,” and “Since date” option.
Who: This option has a couple of options. One is “Everyone” and “Everyone but Me.”

Where: This is where you need to track changes in excel. If you want to track the whole sheet, do not check the “Where” box, or you can specify the range.

Now, click on the “OK” button. Excel will ask your permission to save the workbook. Click on “OK” to save it.

Now, make anyone change to one of the cells within this range. For example, we must change the cell C6 value from 2,208 to 1,800. Track changes automatically inserted the comment for me.

Look how the track changes option has done the trick for me. It included the name, the date we made the changes, the time, and the cell we changed. It also mentions the previous value along with the new values.
How to make the List of Track Changes in a separate sheet
We have learned how we can track our changes. We can record all those changes in the separate sheet itself. We think that is the coolest option you will ever get. Follow the below steps to explore this option.
- Step 1: Again, click on the “Highlight Changes” option and select the option List changes on a new sheet.

- Step 2: Click on the “OK” button. It would instantly create a new sheet named History.
- Step 3: You can see this sheet. This sheet is read-only. If you save the workbook, then this sheet will disappear.
Validate Changes and Accept or Reject
At any given time, the admin can accept or reject changes. When the users make changes, review those changes. Again, you can either accept or reject the changes.
Follow the below steps to explore this option.
- Step 1: Click the “Track Changes” dropdown and select the Accept / Reject Changes option.
- Step 2: Click the ” Select Changes to Accept or Reject” option. It will open up the below dialog box.
- Step 3: You can explore the options under each section to accept or reject the changes. Click on the “OK” button, which will open up the box below. It will show the changes one by one.
- Step 4: If the changes are ok, go ahead, click on “Accept,” or click on the “Reject” option. If you want to accept once and for all, click “Accept All.” If you wish to reject it once and for all, click “Reject All.”
How to Disable this?
We can disable this option anytime by unchecking Track Changes while editing. This also shares your workbook”Toread more. Once this box is unchecked, the “Track Changes” option stops tracking the changes.
Now, we will see the major differences between Track Changes and Normal Comments.
| Track Changes | Normal Comments |
|---|---|
| Track changes comments are auto-inserted by Excel. No need for manually typing. | Unlike track change comments, these types of comments are not auto-inserted. |
| We can extract all the comments on a separate sheet. | We cannot extract comments unless we use VBA codingVBA code refers to a set of instructions written by the user in the Visual Basic Applications programming language on a Visual Basic Editor (VBE) to perform a specific task.read more. |
| Easy and super-fast. | Tedious and time-consuming |
Recommended Articles
This article has been a guide to Track Changes in Excel. Here, we discuss how to track changes in Excel, list them, and validate changes, along with practical examples. You may learn more about Excel from the following articles: –
- Calculating Tracking ErrorTracking Error Formula is used in order to measure the divergence arising between the price behavior of portfolio and price behavior of the respective benchmark and according to the formula Tracking Error calculation is done by calculating the standard deviation of the difference in return of the portfolio and the benchmark over the period of time.read more
- How to Create a Drop-Down List in Excel?A drop-down list in excel is a pre-defined list of inputs that allows users to select an option.read more
- Time Tracking TemplateA time tracking template helps keep the organization track of the hours dedicated by its employees during a designated period.read more
- Pivot Table Group by MonthIn Excel, a pivot table group by month helps to summarize the data by incorporating all of the dates in the month and providing a single total for each month so that we have a maximum of 12 lines for each year.read more
When collaborating on a spreadsheet with others simultaneously, it’s important to get an instant view of the changes that have been made. Moreover, if you’re responsible for filtering the data, then you’ll definitely benefit from a quick system that allows you to accept or reject changes. Although it’s possible to track changes in all Excel versions, it’s easier to find in Excel 2016 and older versions. To be able to review changes to a shared workbook in Excel 365 or 2019, you’ll need to add this command to your Ribbon.
In this article, you’ll find a step-by-step illustration of how to track changes in Excel 365. First, you’ll learn how to enable the feature to track changes in your Ribbon. Then, you’ll learn how to accept and reject the changes and, finally, how to turn off this feature to finalize the document.
Can you track changes in Excel?
Excel’s co-authoring feature has replaced the former Shared Workbooks function from previous versions. Although co-authoring allows you to highlight the changes other users make to the spreadsheet in real time, it’s not the same as tracking changes. For example, co-authoring won’t let you accept or reject the changes to the original data.
It’s important to check the Excel version you’re working on, as this will determine whether you need to add the feature yourself to the Ribbon. Whereas in Excel 2016 and older versions, the Track Changes command appears in the “Review” tab by default, in Excel 365 and 2019, you’ll have to add it manually.
How to turn on track changes in Excel?
If you work in Excel 365 or 2019, you can still enjoy the full potential of collaboration features. However, before turning on the track changes feature, you need to add it to your Ribbon. This is how to enable the Track Changes command in your Excel “Review” tab.
How to add the Track Changes command to the Review tab?
- 1. Open your Excel spreadsheets and go to File > Options.

How to Track Changes in Excel (Step-by-Step) — Options
- 2. Select “Customize Ribbon” on the left-side menu.

How to Track Changes in Excel (Step-by-Step) — Customize Ribbon
- 3. In the “Choose command from” drop-down menu, select “All commands”.

How to Track Changes in Excel (Step-by-Step) — All commands
- 4. In the “Customize the Ribbon” drop-down menu, select “Main Tabs”.

How to Track Changes in Excel (Step-by-Step) — Main Tabs
- 5. Click on the “+” button to expand the “Review” category. Then, select the “New Group” button below.

How to Track Changes in Excel (Step-by-Step) — Expand Review
- 6. Click on “New Group (Custom)” and then “Rename”.

How to Track Changes in Excel (Step-by-Step) — Rename
- 7. Enter “Track Changes” as the new name for the group. Click “OK” to save the changes and close the Rename dialog box.

How to Track Changes in Excel (Step-by-Step) — Rename Track Changes
- 8. Go to the “All Commands” list and click on the following options: Compare and Merge Workbooks (Legacy), Protect Sharing (Legacy), Share Workbook (Legacy), Track Changes (Legacy). Click on “Add” after clicking on each option. These would now appear under the “Track Changes” group in the “Main Tabs” list to the right.

How to Track Changes in Excel (Step-by-Step) — Add commands
- 9. Click “OK” to save and apply all changes. Close the window and head over to your “Review” tab. All of these commands should now appear to the far right.

How to Track Changes in Excel (Step-by-Step) — Track Changes in Review tab
And that’s done! Now, you’re ready to start using Track Changes.
The Beginner’s Guide to Excel Version Control
Discover what Excel version control is, the version control features Excel has to offer, and how to use them to share, merge, and review Excel changes
READ MORE

How to customize the Track Changes feature?
Once you’re ready to share your workbook to allow other users to edit, you can turn on the Track Changes option and customize how these are highlighted for later review.
- 1. Go to Review > Track Changes > Highlight Changes.

How to Track Changes in Excel (Step-by-Step) — Highlight Changes
- 2. Check the box for “Track changes while editing”.

How to Track Changes in Excel (Step-by-Step) — Track changes while editing
- 3. Choose the following options to make sure all changes are highlighted. In “When”, select “All”, and in “Who”, select “Everyone”. Make sure that the box for “Highlight changes on screen” is ticked and click “OK” to save.

How to Track Changes in Excel (Step-by-Step) — Highlight with changes options
For this command to function properly, you need to share the workbook using the command you just created.
- 1. Go to Review > Share Workbook.

How to Track Changes in Excel (Step-by-Step) — Share Workbook
- 2. In the “Editing” tab, make sure the option “Use the old shared workbooks feature instead of the new co-authoring experience” is checked. Click “OK” and close the window.

How to Track Changes in Excel (Step-by-Step) — Editing tab
- 3. The “Advanced” tab allows you to customize how the changes are tracked to give you a more in-depth tracking history. Once you finish, click “OK” and close.

How to Track Changes in Excel (Step-by-Step) — Advanced tab
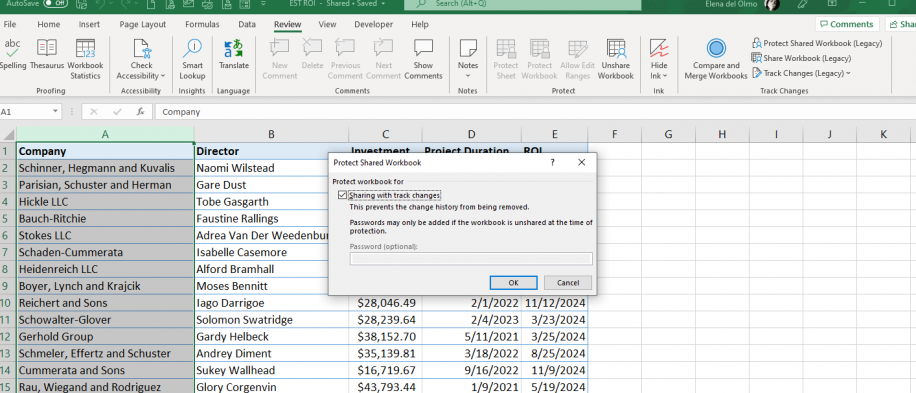
- 4. Go to Review > Protect Shared Workbook. Select “Sharing with track changes” to prevent other users to remove the change history. Click “OK” to finish.
How to Track Changes in Excel (Step-by-Step) — Protect Shared Workbook
How to view, accept, and reject changes?
Once your team has modified the data, you can review all edits and accept or reject those changes. This is how you can view, accept, and reject changes to your spreadsheet.
- 1. Go to Review > Track Changes > Accept or Reject Changes.

How to Track Changes in Excel (Step-by-Step) — Accept or Reject Changes
- 2. Make sure the “Where” checkbox is not ticked so that Excel shows the changes from the entire workbook.

How to Track Changes in Excel (Step-by-Step) — Accept or Reject Changes
- 3. For each change, you can “Accept” or “Reject”. If you select “Accept All” or “Reject All” Excel will automatically apply all changes. Once you finish, select “Close”.

How to Track Changes in Excel (Step-by-Step) — Accept or Reject
The “Accept or Reject Changes” dialog box is essentially Excel’s. Unlike tracking changes in Google Sheets or accessing its edit history feature, the steps to follow to see the history log or edit history in Excel are a bit more complex. However, once you’ve added the Track Changes command to your Ribbon, accessing it will be quicker.
How to turn off track changes in Excel?
Once you’ve finished reviewing your workbook and don’t want any further changes to be saved or reflected, you can turn off Track Changes. This is how you can turn off Track Changes in Excel.
- 1. Go to the Review > Track Changes > Highlight Changes.

How to Track Changes in Excel (Step-by-Step) — Highlight Changes
- 2. Clear all the options in the “Highlight Changes” window, and click “OK” to save changes.

How to Track Changes in Excel (Step-by-Step) — Clear all options
Want to Boost Your Team’s Productivity and Efficiency?
Transform the way your team collaborates with Confluence, a remote-friendly workspace designed to bring knowledge and collaboration together. Say goodbye to scattered information and disjointed communication, and embrace a platform that empowers your team to accomplish more, together.
Key Features and Benefits:
- Centralized Knowledge: Access your team’s collective wisdom with ease.
- Collaborative Workspace: Foster engagement with flexible project tools.
- Seamless Communication: Connect your entire organization effortlessly.
- Preserve Ideas: Capture insights without losing them in chats or notifications.
- Comprehensive Platform: Manage all content in one organized location.
- Open Teamwork: Empower employees to contribute, share, and grow.
- Superior Integrations: Sync with tools like Slack, Jira, Trello, and more.
Limited-Time Offer: Sign up for Confluence today and claim your forever-free plan, revolutionizing your team’s collaboration experience.
Conclusion
If there is one feature that stands out in Excel for not being readily accessible, it’s “Track Changes”. In Word, for example, this feature is more accessible to users, and it’s widely used. Whether you are responsible for editing the data or reviewing later, knowing that all edits are registered will definitely help you work with less pressure.
If you’re working on Excel 365 or 2019 you should now be able to use the track changes command without issues. As you’ve seen, creating a group for the “Track Changes” and “Share Workbook” commands might require more steps than in other spreadsheet apps; however, you will only have to do it once, and you can then turn on and off in a quick and easy way.
If you want to learn more about Excel and how to use its version control features, you’ll find the following articles very useful:
- AutoRecover an Excel File (& AutoRecover Location)
- How To Restore A Previous Version Of An Excel File?
This tutorial will give you the ins and outs of Track Changes Feature in Excel. Everything from what Track Changes is and what it does, how to turn it on and off and everything that you can do with the tracked changes is right here. We also clear up the confusion between comments and Track Changes.
If your spreadsheet has multiple users, changes in the file may be inevitable. You can protect the sheet and lock the cells but your sheet needs constant updates. You are fine with those updates but it won’t hurt if the other users had your approval, right? Well, Track Changes is the feature with proof of change and electronic approval. All changes made to the data will be highlighted and left up to you to take up or turn down. Ready to learn how it’s all done?
Let’s get tracking!
 1")
What is Track Changes Feature in Excel
Track Changes in Excel allows users to review changes made to the worksheet. These changes can be viewed as highlighted on the worksheet and also enlisted in a separate sheet. The changes can be accepted or rejected, switching the rejected changes back to the original values.
Learn how Track Changes works and what it does right ahead.
How Does The Track Changes Feature Work?
Once Track Changes has been enabled, any changes made to the cells are tracked. If you have turned on Track Changes with the settings mentioned above, this is how a change made to a cell value will appear:
Note the current value of cell G13:
 2")
After changing the date from the 7th to 8th, the change is marked by surrounding the cell with a dark blue border with a small blue arrow on the top-left corner:
 3")
Hover the cursor over this cell to see the infotip related to the change made to the cell:
 4")
The infotip displays the author, date and time of the change, the location of the changed cell, and the value of the cell before and after the change.
The color of the column header of the changed cell goes from black to purple:
 5")
- All changes are denoted by the same blue border and the change in color of the column header. Changes made by other users are denoted by different color borders.
 6")
- Only manual changes will be tracked. Automatic changes in cell values as a result of formulas will not be marked.
 7")
- Track Changes only applies to shared workbooks. When Track Changes are enabled, note that the previously grayed-out Unshare Workbook button is now also enabled. This is because Tracked Changes is only applicable to shared workbooks with multiple simultaneous users.
The disadvantage of shared workbooks and henceforth of Tracked Changes is that many other features would be grayed out and unavailable. If you attempt to use Unshare Workbook, Track Changes will also be disabled.
 8")
How to Turn Track Changes On In Excel
This depends on the version of Excel you are using. For the older versions, you should find the Track Changes button in the Review tab. And in the later versions, you will have to add Track Changes to your Quick Access Toolbar or the Review tab. We will make the addition to the Review tab. The details on turning Track Changes on for both older and later versions are below.
Note that the Track Changes button will be grayed out if the worksheet contains Excel Tables. If you want to use Track Changes, the tables will need to be converted to ranges.
Latest Versions
In the later versions of Excel after Excel 2016, the Track Changes feature is not directly accessible. That is because the features under Shared Workbook have been replaced with co-authoring due to several limitations. Co-authoring, however, does not include the Track Changes feature.
So if you’re looking to recreate the features under Shared Workbook from the older Excel versions, we will show you how to add them to the Review tab by customizing the ribbon. Track Changes can then be turned on from the Review tab. Let’s start with the steps for customizing the Review tab:
Step 1 – Adding Track Changes to the Review tab by customizing the ribbon:
- In the Review tab, right-click anywhere on the ribbon and select the Customize the Ribbon
 9")
The Excel Options window will open:
 10")
- Click on the drop arrow under Choose commands from: and select All Commands.
 11")
- Select the New Group button from the bottom-right of the window.
 12")
- Then select the Rename button to open a small Rename
 13")
- In the Display name: field, enter a name for the group such as Track Changes.
- Click on the OK button to close the Rename
 14")
- Now from the list of commands on the left, select the following commands and click on the Add > > button after selecting each command to add them to the new group one by one. Read note below.
- Track Changes (Legacy)
- Share Workbook (Legacy)
- Protect Sharing (Legacy)
 15")
- If needed, adjust the commands in the new group by clicking and dragging the commands up or down.
- When done, click on the OK command to close the Excel Options
 16")
The new group will appear on the ribbon with the added commands:
 17")
Note: The other two commands are added only for recreating the Changes group from the older versions. Only add the Track Changes command if that is all you need to use.
Step 2 – Turning Track Changes On:
Click on the Track Changes button in the Track Changes
 18")
- Select the Highlight Changes
 19")
- In the Highlight Changes window, check the Track changes while editing checkbox. The rest are the default settings which you can change as per preference.
 20")
- Click on the OK button when done. Confirm the prompt window by clicking on OK.
 21")
Now any changes made will be tracked:
 22")
Older Versions
The older versions, up to Excel 2016, have the Track Changes feature accessible in the Review tab. Enabling Track Changes is the same for the older versions as it is for the newer versions. Here’s how to turn on Track Changes for Excel versions up to Excel 2016:
The Track Changes button is already available in the Review tab:
- Select the Review tab > Changes group > Track Changes button > Highlight Changes.
 23")
- Check the first checkbox in the Highlight Changes window to turn on Track Changes.
- Click on OK.
 24")
Track Changes will have been enabled.
Getting a List of All the Changes
If all the changes are marked on the sheet and there are a lot of them, your worksheet might look like badly done homework checked by a teacher. If it’s becoming difficult separating what are changes and what aren’t, you can get a list of all the changes in a new temporary sheet with all the details of the change infotip also mentioned.
These are the steps to get all the changes enlisted in a new sheet:
- Make sure Track Changes is on before making any changes to the data.
- Save the workbook for any changes made to the data.
- From the Review tab, select the Track Changes button and select Highlight Changes to go to the Highlight Changes
 25")
- Select the last checkbox reading List changes on a new sheet.
 26")
- Click on OK.
Only saved changes can be enlisted so make sure you have saved the file before attempting to enlist the changes otherwise at this point, you will receive a prompt encouraging to save the file and you will have to do the steps again. The changes will not enlist until the file is saved.
If the file was saved, the changes will be enlisted and you will be redirected to a new tab named History:
 27")
Notes:
Bear in mind that the History tab is not dynamic and will not be updated with changes made to the sheet. For enlisting any new changes, the steps will have to be repeated.
The History list is a temporary tab that disappears when the workbook is saved or closed or when Track Changes are disabled. If you wish to keep the history, you can copy-paste the contents of the History sheet to another worksheet and save the workbook.
The History list will only enlist changes made after turning on Track Changes.
Accepting/Rejecting Changes
Tracked changes can be accepted or rejected. The rejected changes are restored and the accepted changes are kept. Here we have the steps to accept or reject changes made under Track Changes:
- Go to the Review tab, open the Track Changes menu and select the Accept/Reject Changes
 28")
- Below are the default settings in the Select Changes to Accept or Reject dialog box. You can change these as required.
- Click on the OK command button.
 29")
- Accept or reject changes individually or all together using the command buttons in the Accept or Reject Changes dialog box.
 30")
If a cell has been changed multiple times, you will also have a choice of which change you want to keep:
 31")
Accepted changes keep their changed cell values and values of rejected changes revert to the original value.
We have highlighted a rejected and accepted change each below:
 32")
How to Turn Track Changes Off
Turning off Track Changes is as simple as turning it on. The changes borders and History sheet will disappear and changes made to the data won’t be marked anymore. Follow these steps to turn off Track Changes:
- Go to the Review tab and select the Track Changes button and then the Highlight Changes
 33")
- Uncheck the Track changes while editing checkbox to disable Track Changes.
 34")
- Then click on OK.
 35")
As you can see, the highlighted borders have gone. Any changes made to the data won’t be highlighted anymore.
Comments Vs Track Changes
A comment is a note added by the user to a cell. A Track Changes infotip is added automatically to a cell changed while Track Changes is enabled.
Right off, let’s see the obvious visual differences between comments and Track Changes:
 36")
When a comment is inserted, the username is added automatically but the note of the comment itself is manually added by the user:
 37")
With Track Changes on, when a cell is changed, an infotip is automatically added, displaying the user, the date, time, and location of the altered cell, and the altered and former value of the cell:
 38")
A Track Changes infotip comes from the result of changing a cell with the feature on. A comment has no prerequisites for adding.
To enlist all comments in a separate sheet, you need a VBA Macro code. To enlist a complete tracked history of changes, you can use the preset option provided with the Track Changes feature.
Enabling Track Changes disables some features while inserting comments has no indirect impact.
Comments can be added, edited, or deleted easily. An accepted tracked change cannot be reverted.
That was everything on Track Changes. Next, when you’re having trouble with anything on Track Changes, come back here for some guidance. We are certain that with our Excel tricks, you’ll become quite the Excel wizards. We’ll be back with more sprinklings of Excel stardust. Remember your magic words!