Excel for Microsoft 365 Excel 2021 Excel 2019 Excel 2016 Excel 2013 Excel 2010 Excel 2007 More…Less
If you often use the same layout or data in a workbook, save it as a template so you can use the template to create more workbooks instead of starting from scratch.
You can use one of your own templates to create a new workbook, or you can use one of the many predefined templates that you can download from Microsoft Office Online.
Save a workbook as a template
-
If you’re saving a workbook to a template for the first time, start by setting the default personal templates location:
-
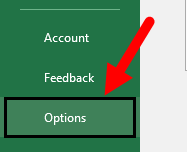
Click File > Options.
-
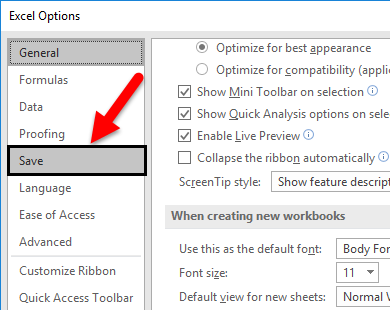
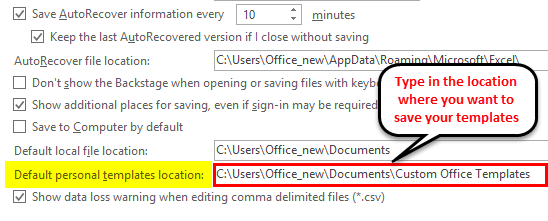
Click Save, and then under Save workbooks, enter the path to the personal templates location in the Default personal templates location box.
This path is typically: C:Users[UserName]DocumentsCustom Office Templates.
-
Click OK.
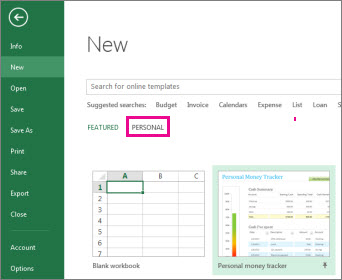
Once this option is set, all custom templates you save to the My Templates folder automatically appear under Personal on the New page (File > New).
-
-
Open the workbook you want to use as a template.
-
Click File > Export.
-
Under Export, click Change File Type.
-
In the Workbook File Types box, double-click Template.
-
In the File name box, type the name you want to use for the template.
-
Click Save, and then close the template.
Create a workbook based on the template
With the template you created above, you can create a new workbook. This section tells you how to do that.
Note: Alternately, you can browse for various online templates in Excel and use them instead. For more information, see Download free, pre-built templates.
-
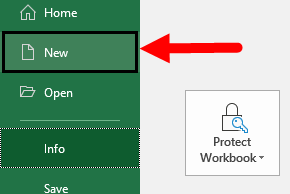
Click File > New.
-
Click Personal.
-
Double-click the template you just created.
Excel creates a new workbook that is based on your template.
Save a workbook as a template
-
Open the workbook that you want to use as a template.
-
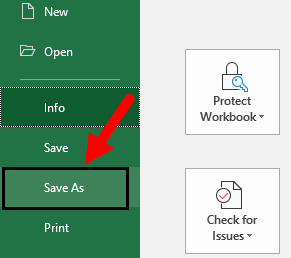
Click File, and then click Save As.
-
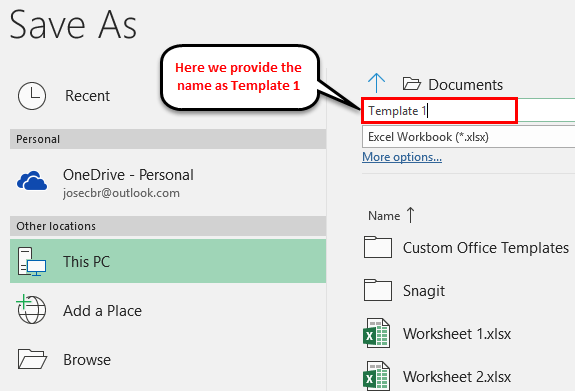
In the File name box, type the name that you want to use for the template.
-
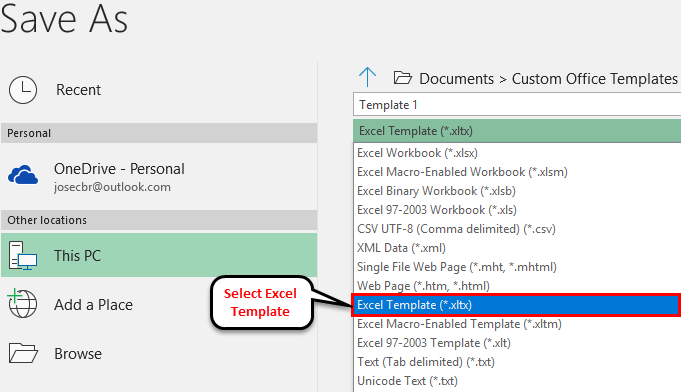
In the Save as type box, click Excel Template, or click Excel Macro-Enabled Template if the workbook contains macros that you want to make available in the template.
-
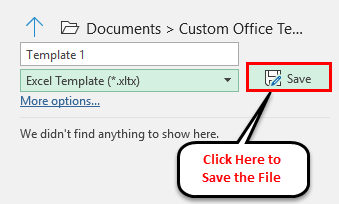
Click Save.
The template is automatically placed in the Templates folder to ensure that it will be available when you want to use it to create a new workbook.
Tip: You can copy any Excel workbook into the Templates folder, then you can use the workbook as a template without saving it in the template file format (.xltx or .xltm). In Windows Vista, the Templates folder is usually C:Users<your name>AppDataRoamingMicrosoftTemplates. In Microsoft Windows XP, the Templates folder is usually C:Documents and Settings<your name>Application DataMicrosoftTemplates.
Use a template to create a new workbook
-
Click File and then click New.
-
Under Available Templates, do one of the following:
-
To base the workbook on a recently used template, click Recent Templates, and then double-click the template that you want to use.
-
To base the workbook on an installed template, click Sample templates and then double-click the template that you want to use.
-
To base the workbook on a template that you created, click My templates, and then on the Personal Templates tab, double-click the template that you want to use.
-
To base the workbook on another workbook, click New from Existing, and then double-click the workbook that you want to use.
-
Tip: When you are connected to the Internet, you can also access templates that are available from Office.com. Under Office.Com Templates, click a template category, and then under that category, double-click the template that you want to download. If the template that you want to download has been supplied by a member of the Microsoft Office.com Community, you must click I accept to accept the License Agreement for Community Templates Terms of Use before you can download that template.
Save a workbook as a template
-
Open the workbook that you want to use as a template.
-
Click the Microsoft Office Button
, and then click Save As.
-
In the File name box, type the name that you want to use for the template.
-
In the Save as type box, click Excel Template, or click Excel Macro-Enabled Template if the workbook contains macros that you want to make available in the template.
-
Click Save.
The template is automatically placed in the Templates folder to ensure that it will be available when you want to use it to create a new workbook.
Tip: You can copy any Excel workbook into the Templates folder, then you can use the workbook as a template without saving it in the template file format (.xltx or .xltm). In Windows Vista, the Templates folder is usually C:Users<your name>AppDataRoamingMicrosoftTemplates. In Microsoft Windows XP, the Templates folder is usually C:Documents and Settings<your name>Application DataMicrosoftTemplates.
Use a template to create a new workbook
-
Click the Microsoft Office Button
, and then click New.
-
Under Templates, do one of the following:
-
To base the workbook on a recently used template, click Blank and recent, and then under Recently Used Templates, double-click the template that you want to use.
-
To base the workbook on an installed template, click Installed Templates, and then under Installed Templates, double-click the template that you want to use.
-
To base the workbook on a template that you created, click My templates, and then on the My Templates tab, double-click the template that you want to use.
-
To base the workbook on another workbook, click New from Existing, and then double-click the workbook that you want to use.
-
Tip: When you are connected to the Internet, you can also access templates that are available from Office Online. Under Microsoft Office Online, click a template category, and then under that category, double-click the template that you want to download. If the template that you want to download has been supplied by a member of the Microsoft Office Online Community, you must click I accept to accept the License Agreement for Community Templates Terms of Use before you can download that template.
Need more help?
Create Excel Template (Table of Contents)
- Create Templates in Excel
- How to Create Templates in Excel?
- Examples to Create Templates in Excel
Create Templates in Excel
We have different types and categories of templates available in Excel, which we can be accessed from the File menu ribbon’s New section. This has a different types of Templates such as Business, Calendar, Budget, Planner, Financial Management, etc. To create customize templates other than these, we can use Data Validation for drop-down, Table, Images and give them proper header names. We can also insert a logo for our template. To standardize the template, always fix the theme or template, and visuals should see the purpose of creation.
How to create Templates?
Templates can be made by saving an excel file with a specialized extension and then saving the file in a specified directory.
What type of content can be stored as a Template?
Text data can be stored as a template. Various sections of a document, such as page titles, column and row labels, text and section headings, any cell in Excel that contains text or numbers, or any kind of data, can all be included in a template. We can also include any graphical shapes, logos of companies, or any background image and even Excel formulae.
The type of text formattings such as font or color, or size can be saved as a template along with the data. Formats of cells or worksheets, such as column width or background fill color or alignment of text and even formats of numbers and dates, and a number of sheets can be saved in templates.
What are the advanced features that can be saved as Templates?
All hidden and protected areas such as locked cells that cannot be altered and hidden columns and rows, or even worksheets that may contain data that is not meant for general view.
All Macros are specially customized toolbars that may contain frequently used options; macros, as well as the quick access toolbar, can be saved as templates.
How to Create Templates in Excel?
To create a template in recent versions of Excel, there is actually very little work that has to be done.
Excel 2013 & later versions – Prior to saving a file as a template, one has to define the custom template directory.
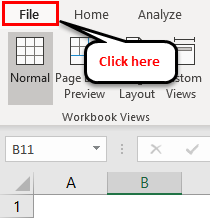
- Go to File.
- Click on Options.
- Select the option Save in the menu ribbon.
- Find the option Default personal templates location among the various options.
- Provide the choice of a directory where you want to save all the templates. DocumentsCustom Office Templates is regarded as a good choice.
Excel 2007 and Excel 2010
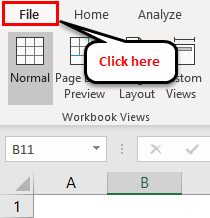
- Firstly, go to the File.
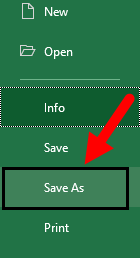
- Click on Save As.
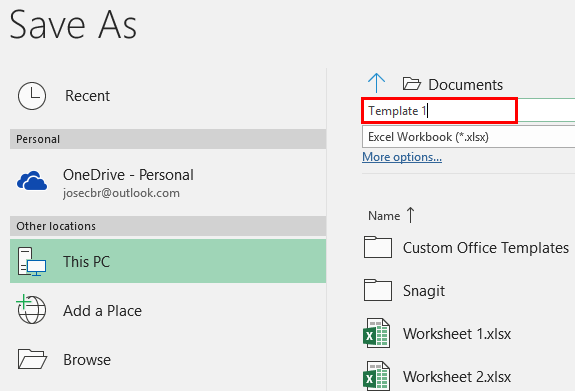
- Now, the option to provide a name to your template file appears.
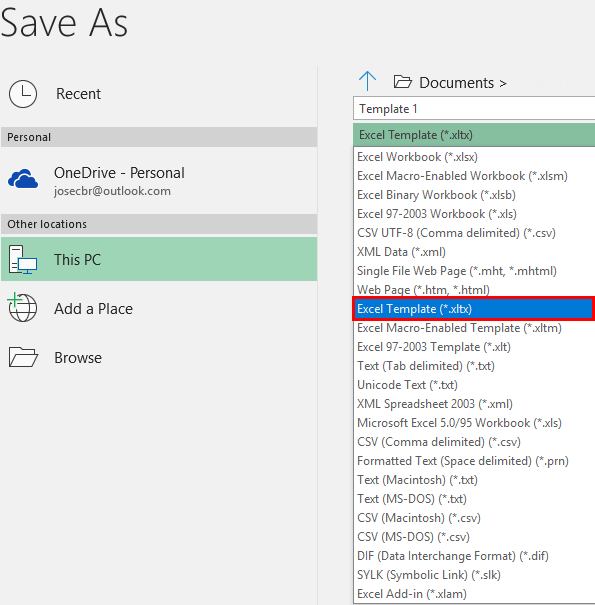
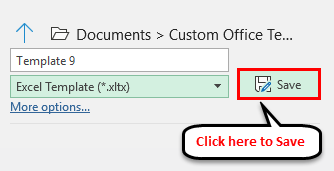
- Here we see that in the drop-down menu, there is an option called Excel Template (*.xltx)
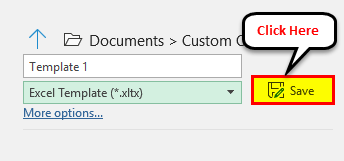
- Click on the Save button to save the template.
Note: It is better to choose “Excel Macro-Enabled Template” (.xltm) for cases where the workbook might contain macros. “Excel 97-2003 Template” (.xlt) is to be chosen for the cases where the version of the Excel workbook is very old. “Excel Template” (.xltx) should be chosen for all other cases.
Examples to Create Templates in Excel
Below are some examples to create templates in excel.
Example #1
Now, firstly we will make all the changes in a new file, modify it till all the items that you wish to save in the template are ready. Then you have to save the file as a template. Template files have a special extension.
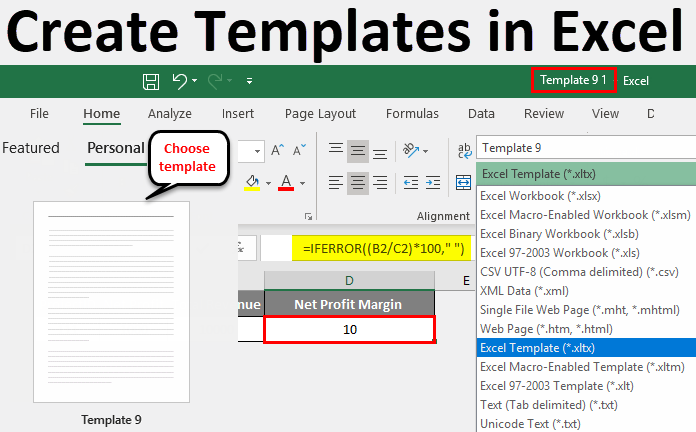
In the screenshot above, we have added an image and text as the structure of the template. Now we shall follow the steps below to create the excel template.
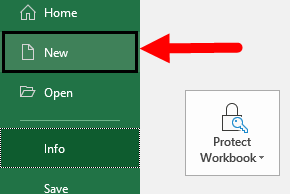
Step 1 – Firstly, go to File.
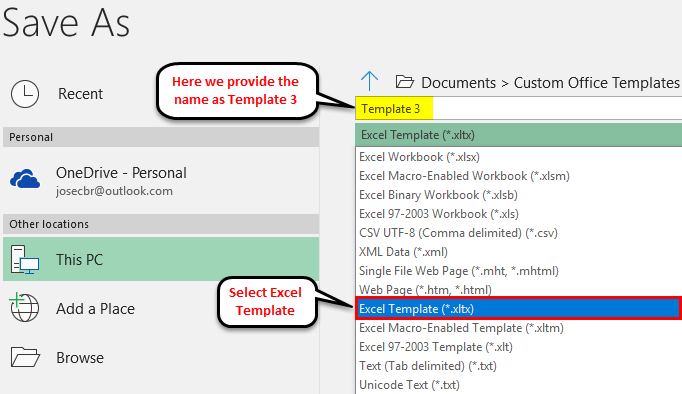
Step 2 – Click on Save As.
Now, the option to provide a name to your template file appears.
Step 3 – Here, we see that in the drop-down menu, select Excel Template (*.xltx)
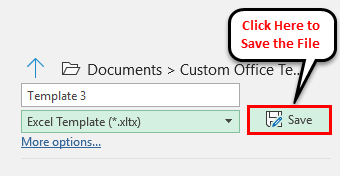
Step 4 – Click on the Save button to save the template.
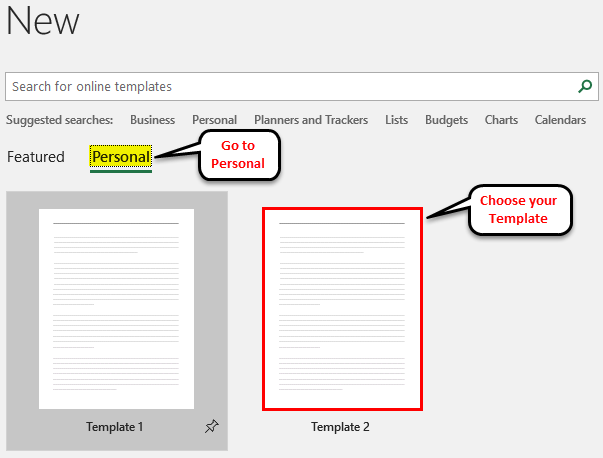
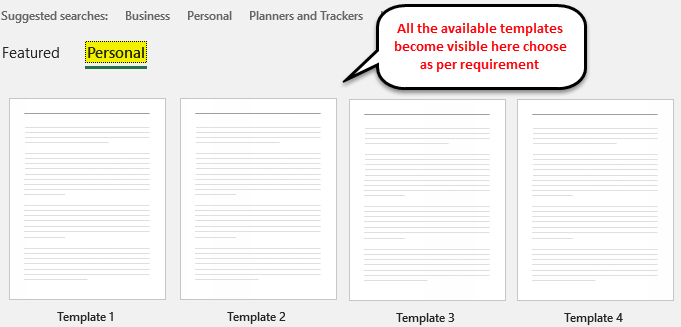
Now, automatically, Excel will place this template file in the appropriate directory. And new Excel documents can be created based on this template file by navigating and choosing “Personal” in the new file window (which is right next to Featured) and then choosing the appropriate template.
Concepts always become much clearer when we have more examples. So, let us look at yet another example to create Excel Templates.
Example #2
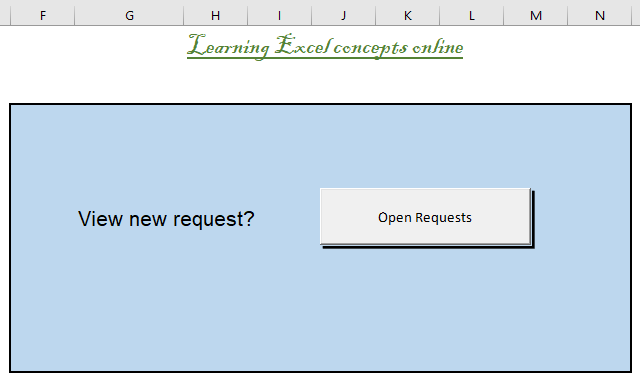
Let us now explore how to save a Macro-Enabled Excel template through an example. Suppose we have an excel with some macros(s) that is to be used as a base for other files, then we need to save this Excel as a macro-enabled excel template.
In the screenshots above, we have added a macro in the template file, and now we shall proceed to create the template in excel.
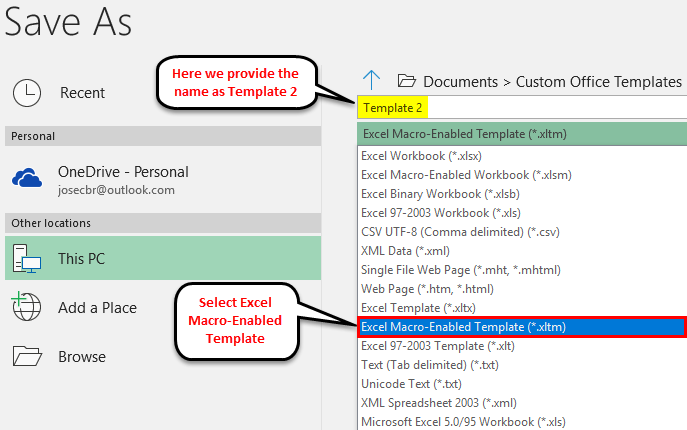
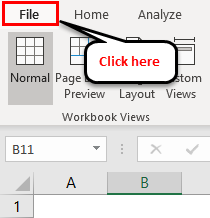
- Firstly, go to File –> Save As (As shown in the above Example)
- Now, the option to provide a name to your template file appears.
- Here we see that in the drop-down menu, there is an option called Excel Macro-Enabled Template (*.xltm)
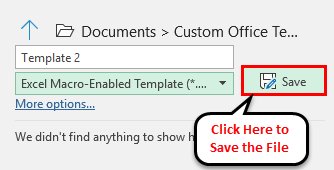
- Click on the Save button to save the template.
Now, automatically, Excel will place this template file in the appropriate directory. And new Excel documents can be created based on this template file by navigating.
- Firstly, go to File.
- Click on New.
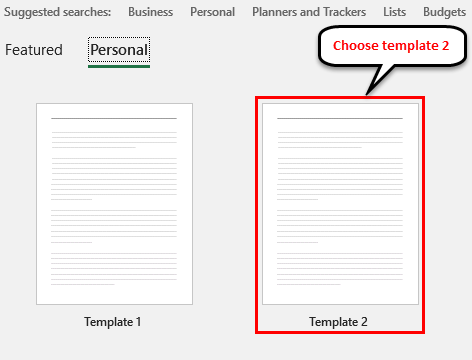
- Choose Personal in the new file window (which is right next to Featured) and then choose Template 2.
Example #3
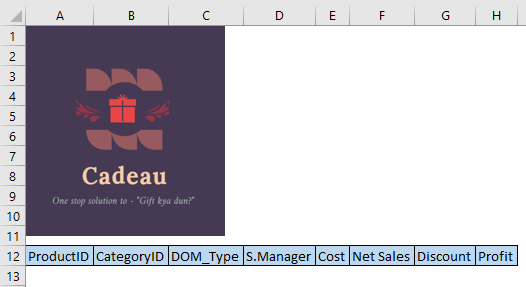
Now, let us look at another example. Firstly, we will make all the changes in the new file, modify it till all the items that you wish to save in the template are ready. Then you have to save the file as a template. Template files have a special extension.
In the above screenshot, we have added an image and text as the structure of the template. Now we shall follow the steps below to create the excel template.
Step 1 – Firstly, go to File and then click on Save As an option (As shown in the above examples).
Now, the option to provide a name to your template file appears.
Step 2 – Here, we see that in the drop-down menu, select Excel Template (*.xltx)
Step 3 – Click on the Save button to save the template.
Example #4
Now, let us look at yet another example. Now, we will make all the changes in a new file, modify it till all the items that you wish to save in the template are ready. Then you have to save the file as a template. Template files have a special extension.
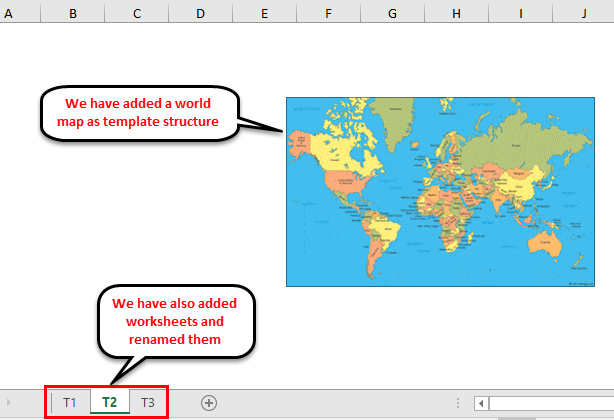
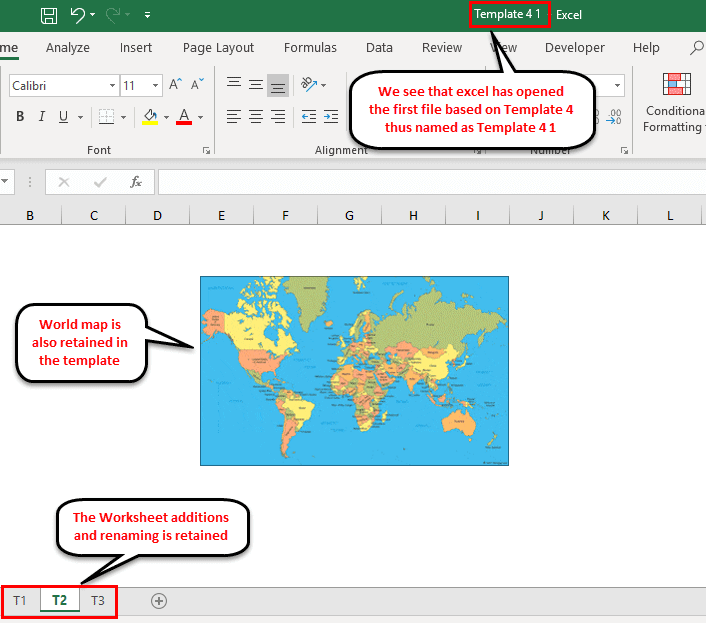
In the screenshot above, as you can see, we have added the template structure – we have added a world map and increased the default worksheets and renamed them, and now we shall proceed to save this file as a template.
Now we shall follow the steps below to create the excel template.
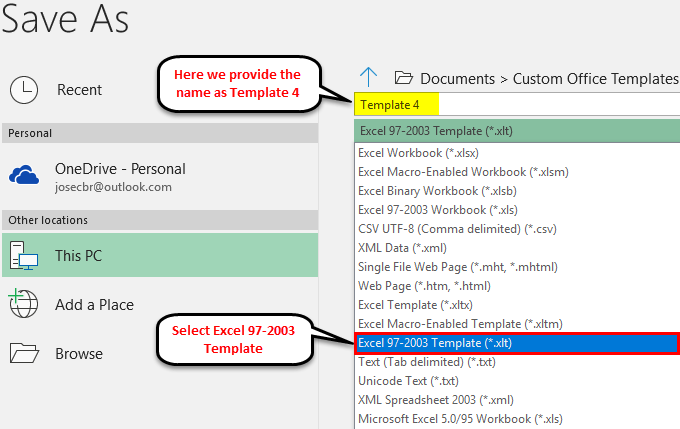
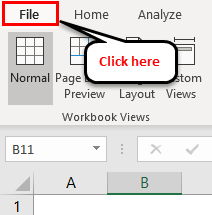
Step 1 – Firstly, go to File and then click on Save As an option (As shown in the above examples).
Now, the option to provide a name to your template file appears.
Step 2 – Here from the drop-down menu, select Excel 97-2003 Template (*.xlt)
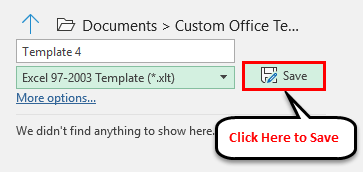
Step 3 – Click on Save to save the template.
Example #5
Now we shall proceed to use a template file to create a new file in excel. We will make use of the Example #4 template file.
- Firstly, go to File.
- Click on New.
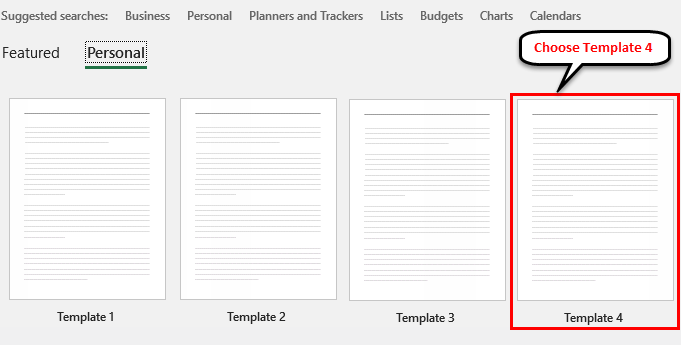
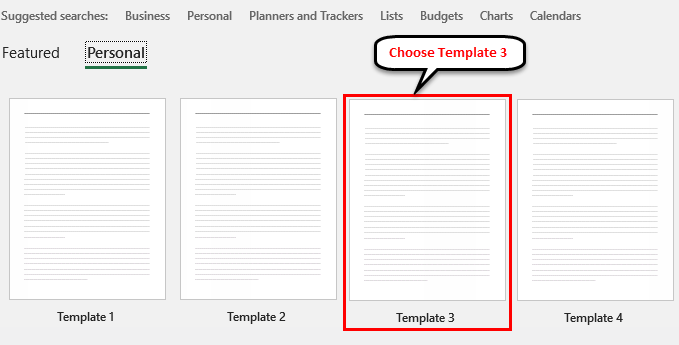
- Choose “Personal” in the new file window (which is right next to Featured) and then choose the appropriate template.
- We shall choose Template 4 as the base and create a new file in excel.
- As we can see, all the template structures are retained, and the new file is named Template4 1 – the first file based on Template 4.
Example #6
Now we shall proceed to use another template file to create a new file in excel. We will make use of the Example #3 template file.
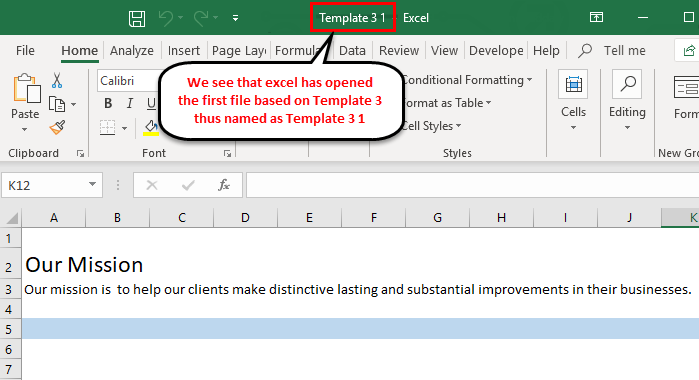
We shall choose Template 3 as the base and create a new file in excel.
Hence, we can see that the image and the header structure is retained in the new file. And it is also important to note that this new file is named Template3 1 – signifying that it is the first file based on Template 3.
Example #7
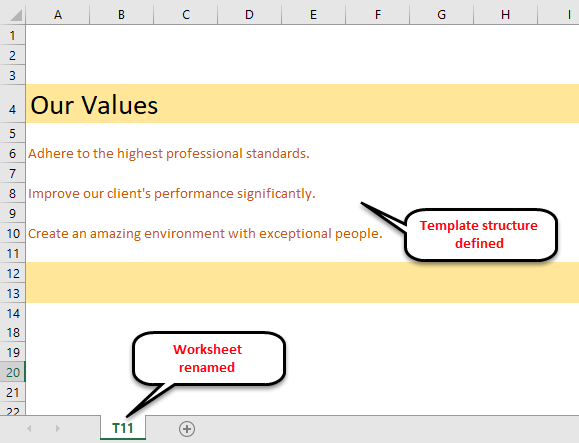
Now we shall create another new template. We will create the template structure in excel, as shown below.
Now we shall follow the steps below to create the excel template.
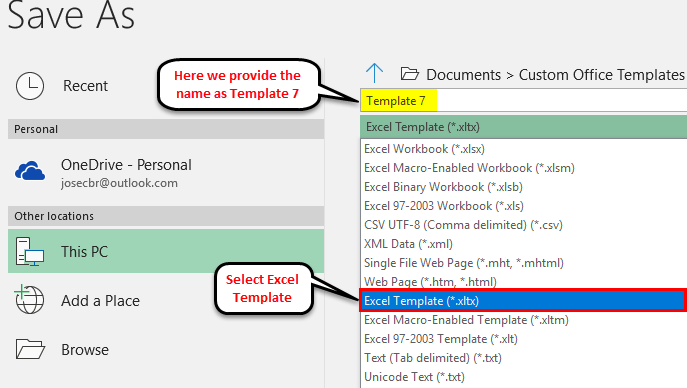
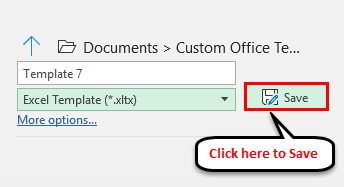
Step 1 – Firstly, go to File and then click on Save As an option (As shown in the above example).
Now, the option to provide a name to your template file appears.
Step 2 – Here, from the drop-down menu, select Excel Template (*.xltx)
Step 3 – Click on the Save button to save the template.
This will create a Template 7 template with the template structure defined in the Default Template location in excel.
Example #8
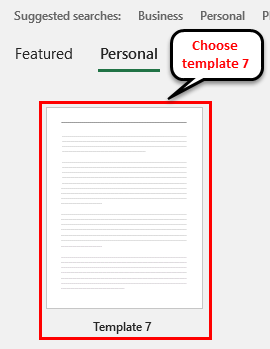
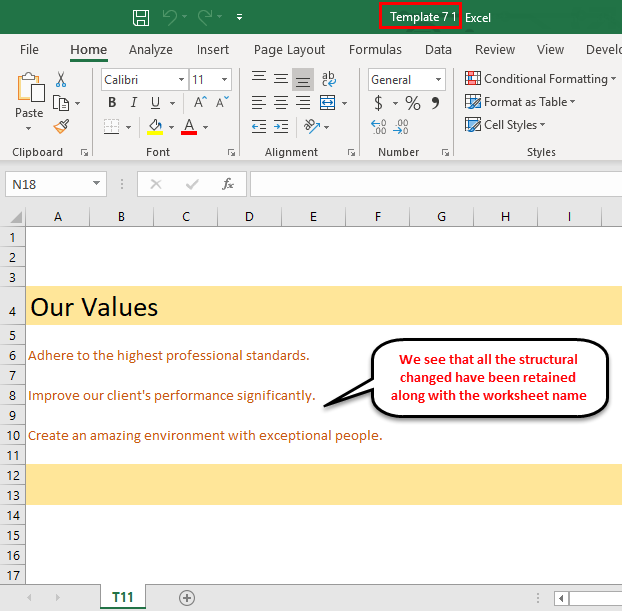
Now we shall attempt to use Template 7 to create another file in excel.
Here we see that we have Template 7 listed. Click on it to create a new file based on Template 7.
Now, automatically, Excel will place this file in the appropriate directory.
Example #9
Now, let us see an example where we have Excel formulae in the Template file.
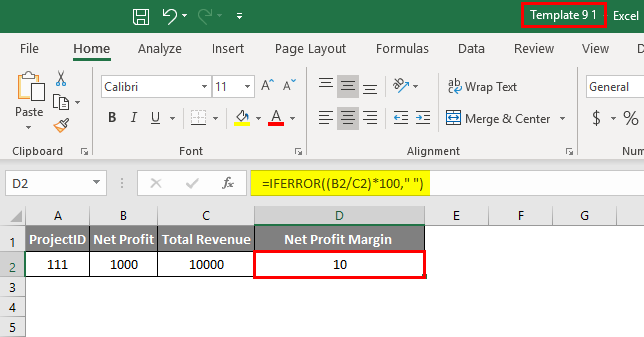
As we can see above, we have created a Template structure with the formula for Net Profit Margin defined as:
Net Profit Margin = (Net Profit/Total Revenue)*100
Since this is the template, no data is present here. Let us see how to create the template file in excel.
Now we shall follow the steps below to create the excel template.
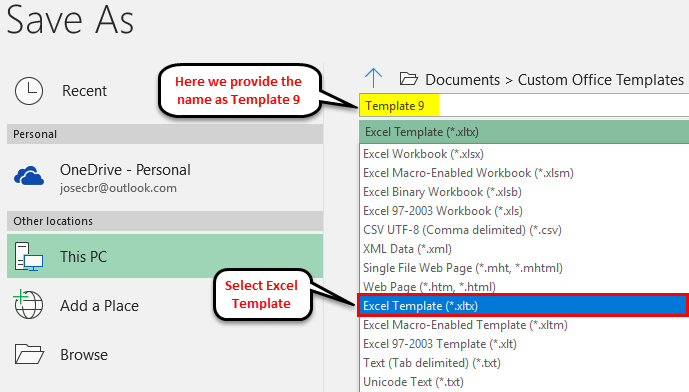
Step 1 – Firstly, go to File and then click on Save As an option (As shown in the above examples).
Now, the option to provide a name to your template file appears.
Step 2 – Here, from the drop-down menu, select Excel Template (*.xltx)
Step 3 – Click on the Save button to save the template.
This will create a Template 9.xltx template with the template structure defined in the Default Template location.
Example #10
Now, we shall attempt to use the previous example template to create a new file and see if that works in excel.
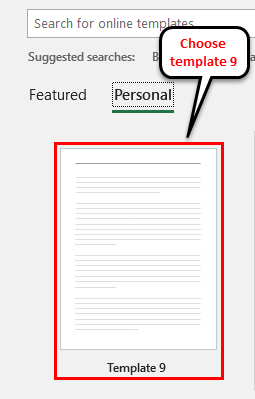
We will go to File -> New -> personal and then find our Template file (in this case, it is Template 9) and click on it to select it.
We see that in the new file, we have the structure defined and once we feed in the data on Column A, B, and C, the Net Profit Margin in Column D is automatically calculated by using the formula from the Template File.
Example #11
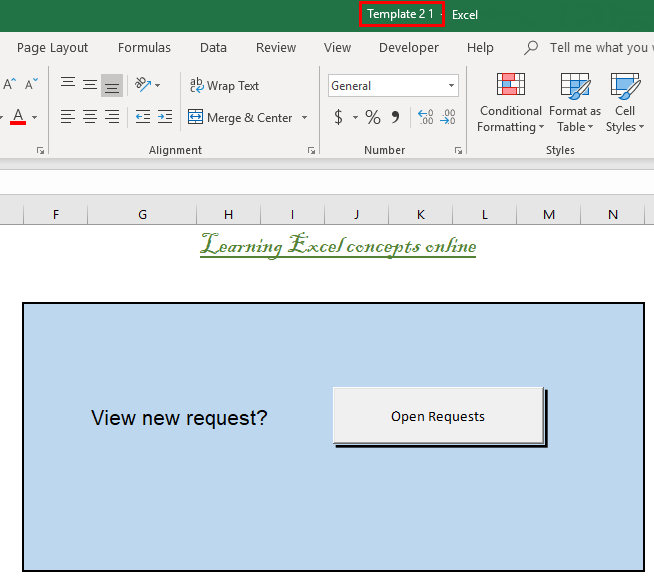
Let us now use our second example – Template 2 to create a new file in excel. Template2 has a macro defined in it, so let us see if the same is available in the new file.
Now let us see what happens when we select “Template2”.
It opens up a new file with the same macro (that was defined in the template file) loaded automatically.
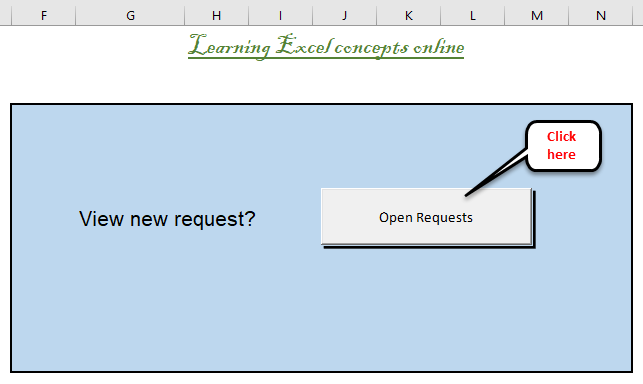
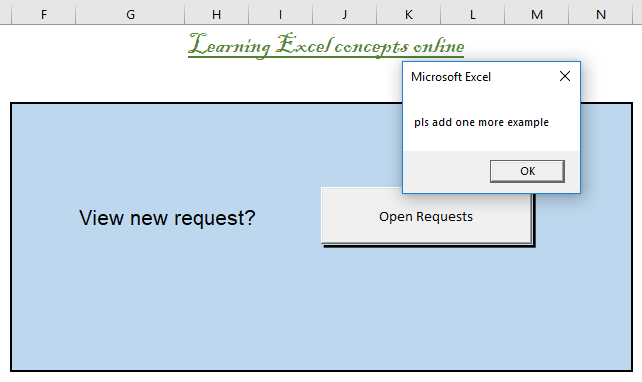
We will need to click on “Enable Content” in the pop-up to enable the macro upon enabling content once we click on the Open Requests button.
We will get the desired result.
Things to Remember
- For versions of Excel 2013 and later, it is possible to change Excel’s default template for a workbook by saving the template at the appropriate location. All default templates must have a specific name – Book.xltx or Book.xltm and must be saved in Excel’s startup directory.
C:Users%username%AppDataRoamingMicrosoftExcelXLSTART
- In order to modify the template used to add new sheets in already existing files, the template has to be named xltx or Sheet.xltm and must be saved in the same folder.
Recommended Articles
This has been a guide to Create Templates in Excel. Here we discuss how to Create Templates in Excel along with practical examples and type of content can be stored as a Template. You can also go through our other suggested articles –
- Excel Chart Templates
- Free Excel Template
- Estimate Template in Excel
- Excel Business Plan Template
Creating Excel templates helps you avoid cumbersome, repetitive tasks and allow you to focus on the real deal. These templates can be standard and already present in MS Excel for their readymade use. You can create your template and utilize them later.
Table of contents
- Create Excel Templates
- How to Select Standard Excel Template?
- How to Create a Custom Excel Template?
- How to use the Created Excel Template?
- Things to Remember
- Recommended Articles
How to Select Standard Excel Template?
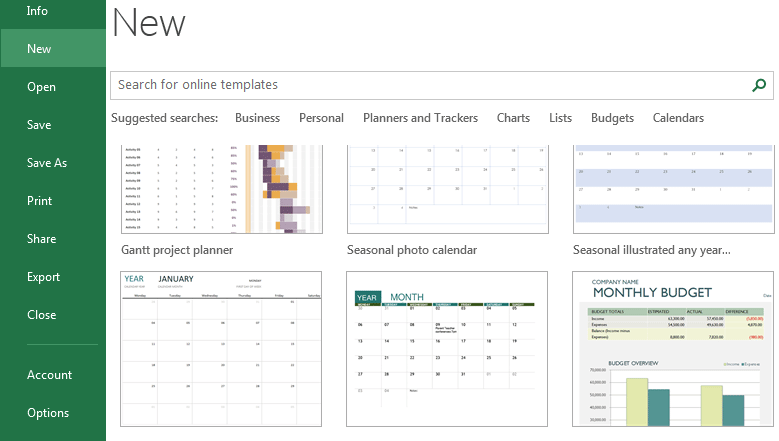
First, we must open an Excel workbook and Go to File >- New >-
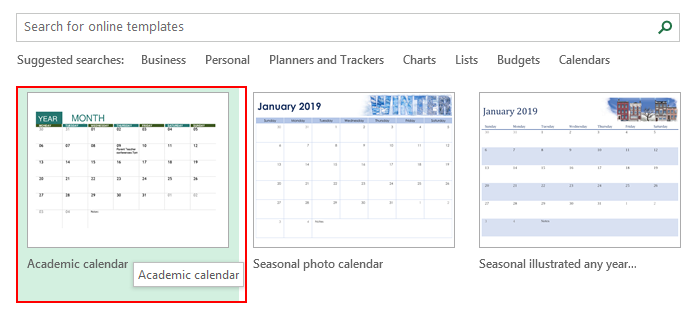
We may see a similar screen to the below screenshot.
It allows us to select from some predefined options divided by various categories. Then, you can choose the one relevant to your requirement and double click on it to use that template. For example, suppose we select the “Academic calendar” (any year) and double-click on it.
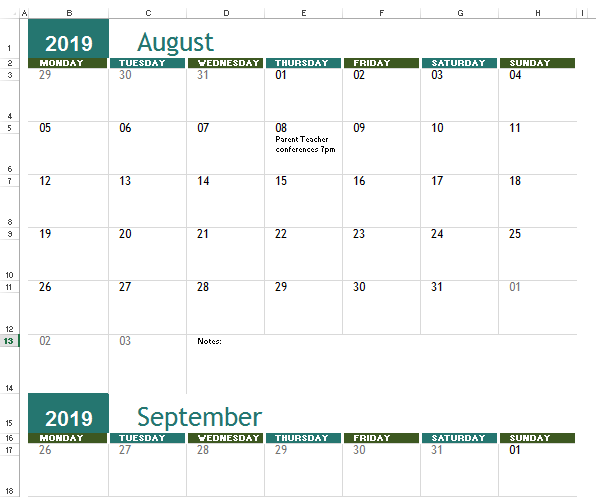
We may see a screenshot like the one below. We can see here that we can change the year and start using it for a different year than the one in which it was built, giving us the flexibility to use it whenever we want.
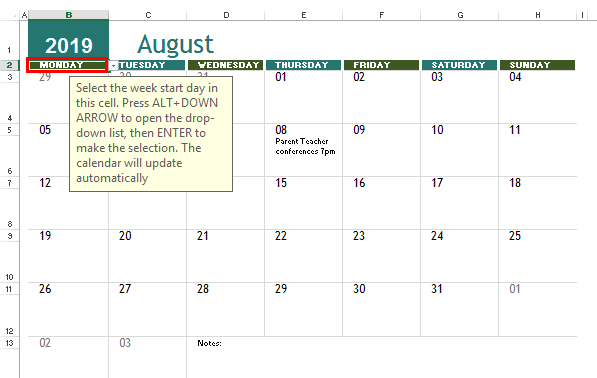
Here, we will need to make another change: “select the week start day” for a month. The screenshot is below.
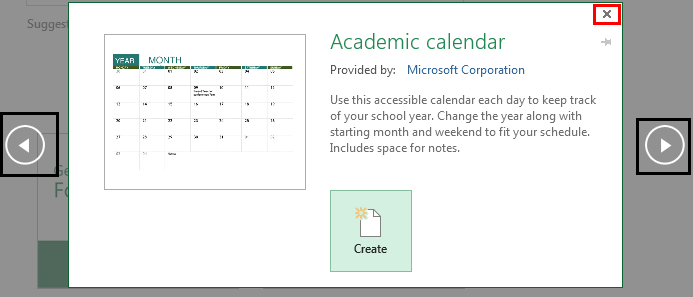
However, if we want to see a preview first and then decide if we wish to select that template or not, do a single click.
If satisfied with it, we must click on the “Create” button to proceed with it. Otherwise, we need to close it by clicking on the “X” symbol in the dialog box and proceeding again. We can also move forward and backward to select the required one among the standard templates by clicking on the two symbols on the side of the dialog box (marked above in black).
Like this, in any template that we choose, there will be some things that we need to tweak to reuse for our purposes.
How to Create a Custom Excel Template?
It will be like the way copies are done from the original piece. We take the utmost care in implementing the changes in the original work, making sure all the formatting, headers, placeholders, etc., are perfectly done. Please devote a sufficient amount of time here, as it will replicate anything and everything (example, style, formatting, graphics, etc.) related to this workbook in its entirety.
What changes can be saved when we create a custom template?
It can save anything we can do in a workbook in a template. Some of these include:
- Data Validation in ExcelThe data validation in excel helps control the kind of input entered by a user in the worksheet.read more (selecting values from a list).
- Having a macro button.
- We can format some cells as we like (e.g., cells highlighted in yellow).
- Protect a range of cells from making any changes to it.
- Hide certain rows and columns, charts, images, excel hyperlinks, etc.
- Merge certain cells in excelMerging a cell in excel refers to combining two or more adjacent cells either vertically, horizontally or both ways. Merging excel cells is specifically required when a heading or title has to be centered over an area of a worksheet.read more or wrap excel textWrap text in Excel belongs to the “Formatting” class of excel function that does not make any changes to the value of the cell but just change the way a sentence is displayed in the cell. This means that a sentence that is formatted as warp text is always the same as that sentence that is not formatted as a wrap text.read more in some.
- Change the cell type to a specific format (e.g., date format in a cell)
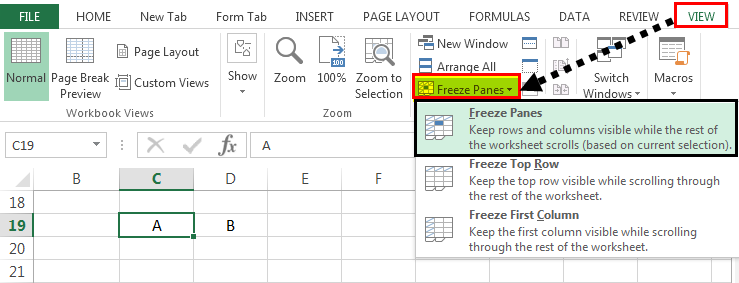
- Freeze Excel cells so that header columns are always visible.
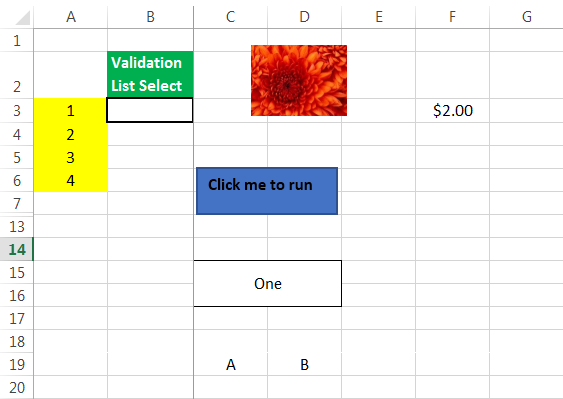
In the below screenshot, we have shown some of these examples in an Excel template we have created.
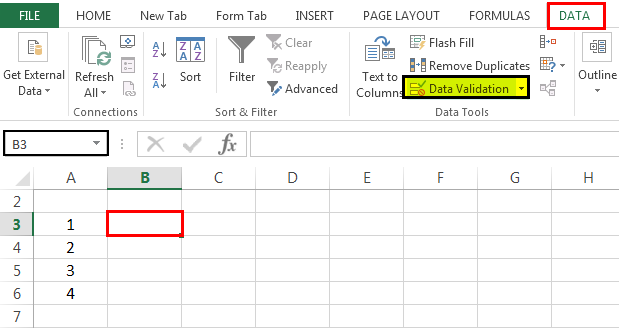
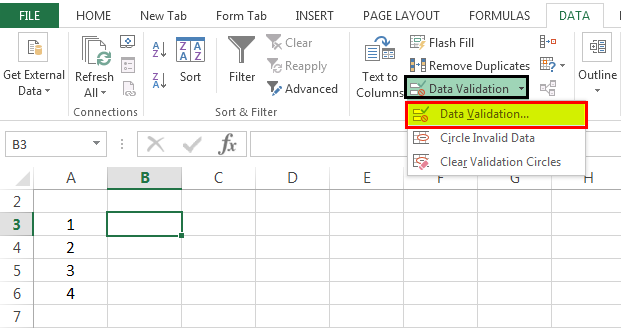
- Cell B3 will only take inputs from a pre-specified list. (Go to cell B3, then go to the “Data” tab. Select “Data Validation”).
In the drop-down, we must select the first one, “Data Validation.”
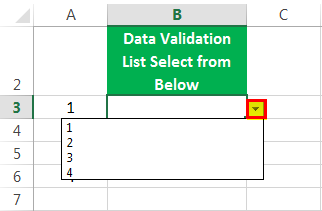
- Then make the following changes as shown in the below screenshot.
As a result, a drop-down list is created.
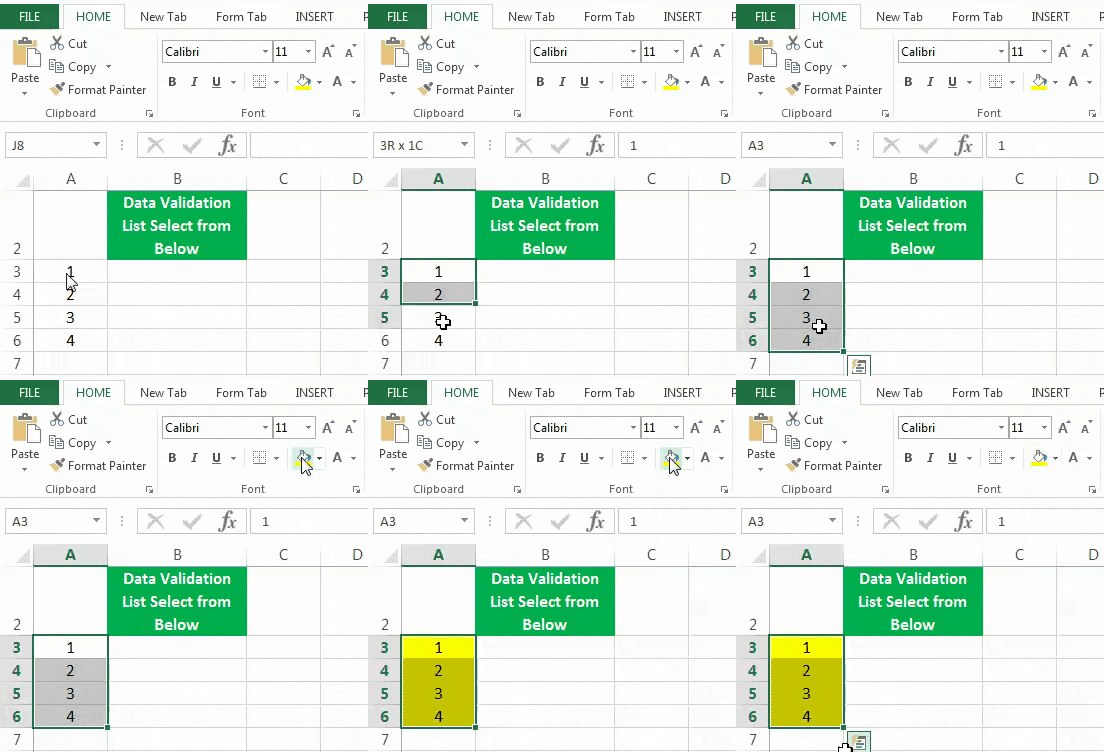
- Cells A3 to A6 will be highlighted in yellow. (We need to select Cell “A3:A6”, go to “Home Tab,” then click on “Fill Color”)
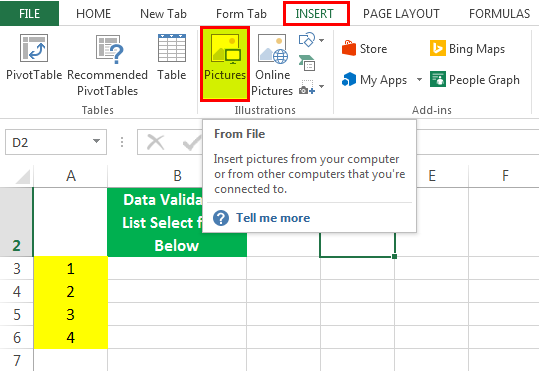
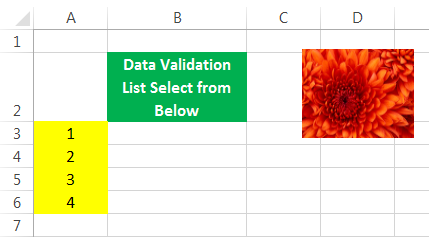
- The image will be there at the place shown (For this, we must go to the cell where we want to insert the picture, then go to the “Insert” tab, click on “Pictures,” and then upload the image where it is stored on your computer).
A picture is uploaded to that cell.
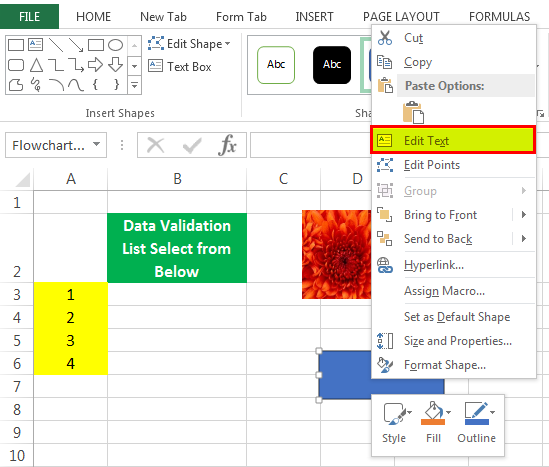
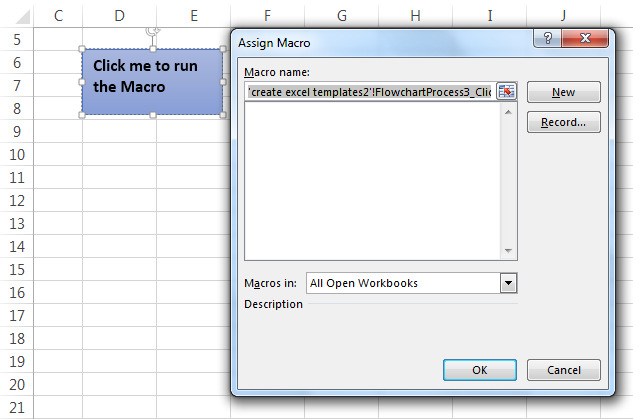
- A button is present, which will run the required macro on clicking. (We must go to the cell where we want to place the button, then go to the “Insert” tab, and go to “Shapes.”)
- Then, we must choose the “Shapes”; Right-click on it to select “Edit Text” if we want to write anything in it.
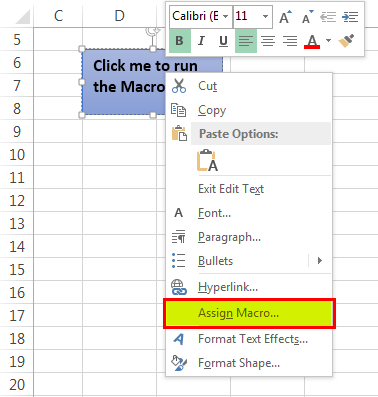
Then, we need to write, “Click me to run the Macro.”
- Once done, right-click again and choose “Assign Macro.”
As a result, it will open a dialog box wherein we can assign the relevant macro we wrote in VBA.
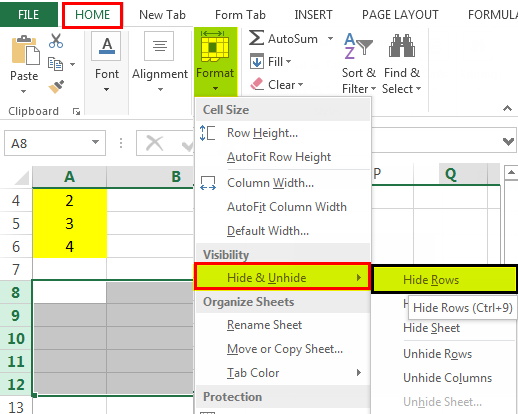
- Rows from 8 to 12 are hidden. (For this, we must, select rowsTo select a row, press shift+space on your keyboard.read more 8 to 12).
Then, we need to go to the “Home” tab, then go to “Format,’” then to “Visibility,” then to “Hide & Unhide,” and then “Hide Rows.”
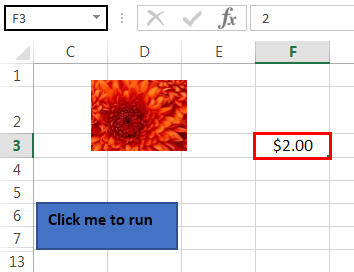
Similarly, in the above screenshot, apart from the ones mentioned above, we can see:
- Cell F2 will always be in currency format. (For this, we must go to cell J2, do “Ctrl+1,” then change the type to “Currency”)
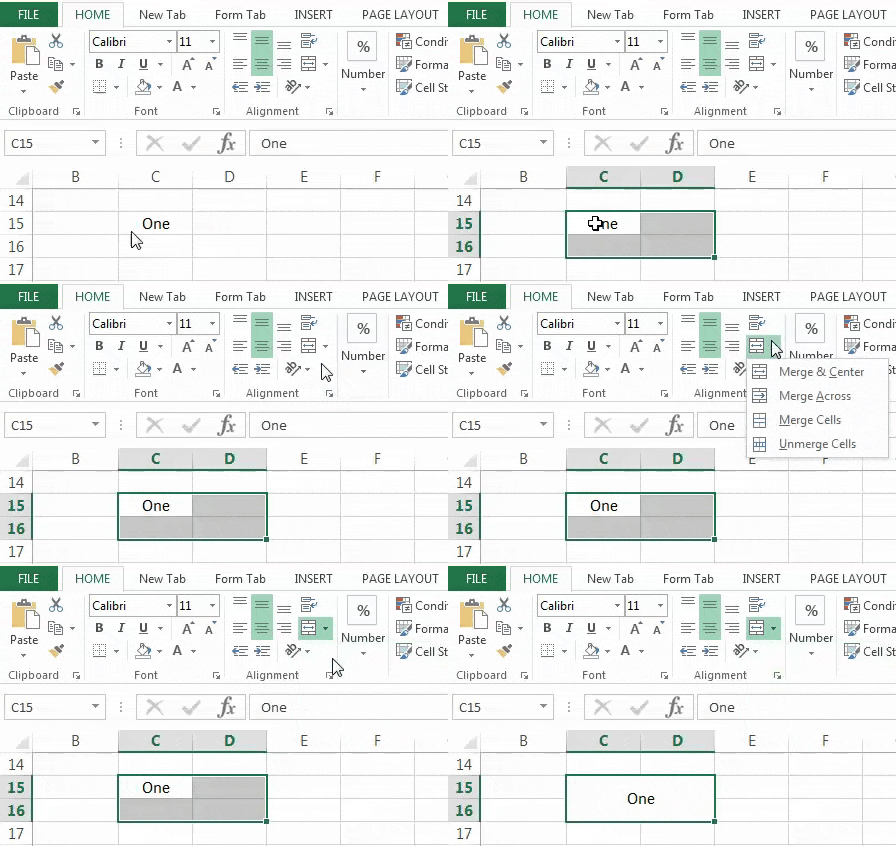
- Cells C15: D16 are merged into one. (For this, we need to select cell C15: D16 and then click on “Merge & Center in Excel“)
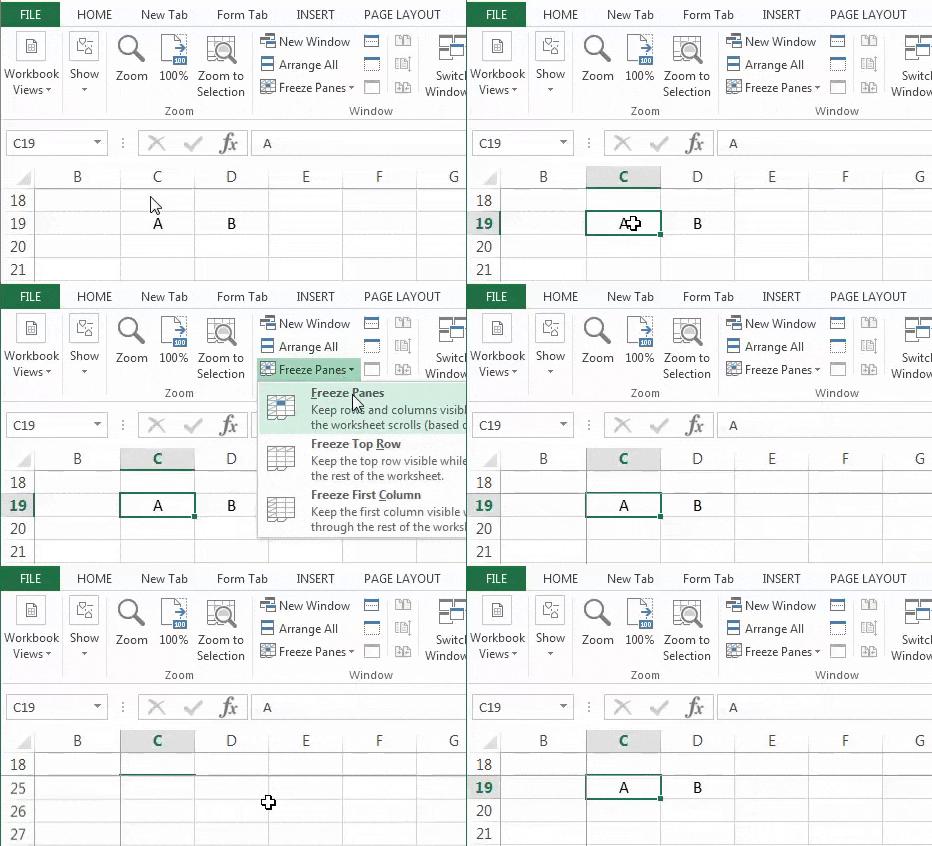
- A worksheet is a freeze at cellFreezing cells in excel is when we move up or down in the sheet, we freeze desired cells, not to be moved. To freeze cells in excel, select the cells to freeze. Then, in the View tab of the windows section, click on freeze panes.read more C19 so that despite scrolling down, contents on row 19 will always be visible. We can use this when we always want to see the headers in our worksheet. (For this, we must go to cell N20, then go to the “View” tab and click on “Freeze Panes.”
The output is shown below.
Now, assuming we have done everything that needs to be done in our workbook, we will show you the process that needs to be followed to save this created template and utilize it the next time.
How to use the Created Excel Template?
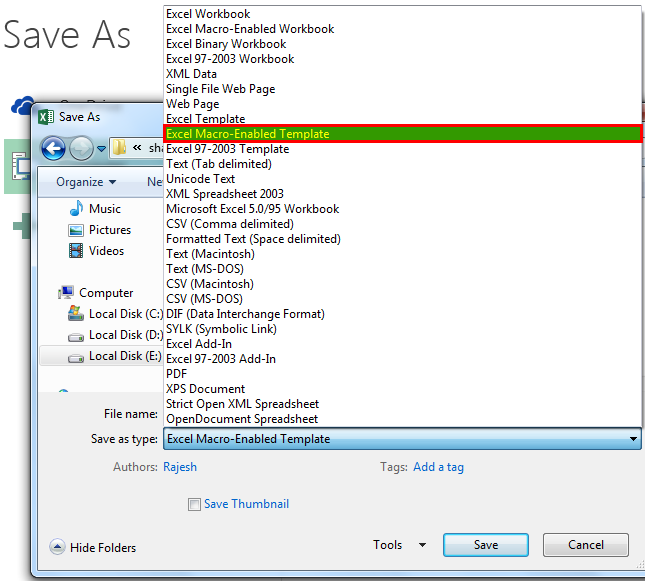
Once we have created our templates and are made the changes to the workbook or worksheet, we must click “Save As Type,” and we can save it in the format “Excel Template” (*.xltx)’ if there is no macro. (Using Office 2016). However, if a macro is present, we must use the format “Excel Macro-Enabled Template” (*.xltm).
The screenshot is shown below:
We saved it as ‘xltm’ since there was a macro present.
- Now that we have saved the created Excel template, we can utilize it like the way we showed when selecting a standard template. Now, we need to open an Excel workbook.
- Then, go to File >- New >-
We may see a similar screen like the below screenshot.
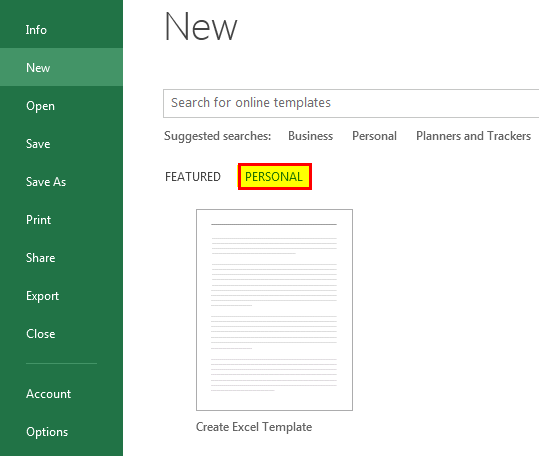
We can see a “PERSONAL” category adjacent to the “FEATURED” one. All our templates will be present here.
We will go to the “Personal” one and double click the template “Personal” template (the name that we gave to your template). On clicking it, we may see a workbook with all the initial settings already present, which we do not need to do again.
You may see the screenshot below for reference.
Things to Remember
- Using an Excel template is about creating a perfect first copy and duplicating it many times. So, invest an awful lot of time in designing the first copy.
- Depending on whether a macro is present or not in our template, save it accordingly. Save it as the “.xltm” file if the macro is present. Otherwise, you can save it in the “xlt” excel extensionExcel extensions represent the file format. It helps the user to save different types of excel files in various formats. For instance, .xlsx is used for simple data, and XLSM is used to store the VBA code.read more.
- The created Excel templates will be present in a different section called “PERSONAL,” apart from the already present ones in the “FEATURED” section.
Recommended Articles
This article is a guide to Create Templates in Excel. We discuss creating a custom Excel template, practical examples, and a downloadable template here. You may learn more about Excel from the following articles: –
- Calendar Template in Excel
- Excel Inventory Template
- Creating a Dashboard in Excel
- Combination Charts in Excel
Данная статья будет полезна не только начинающим, но и тем, кто уже освоился в Microsoft Excel. В ней я расскажу обо всех известных методах поиска и использования шаблонов, а также покажу, как самостоятельно экспортировать таблицу как шаблон, чтобы выложить ее в открытый доступ. Однако начнем с методов поиска заготовок на любую тему.
Способ 1: Встроенный поиск в Microsoft Excel
Использование встроенного поиска по шаблонам в Экселе – самый простой и быстрый метод нахождения подходящей для вас заготовки, которая поможет решить задачи разной сложности без траты времени на самостоятельное оформление и создание функций. Для перехода к меню с шаблонами понадобится выполнить всего несколько простых действий:
-
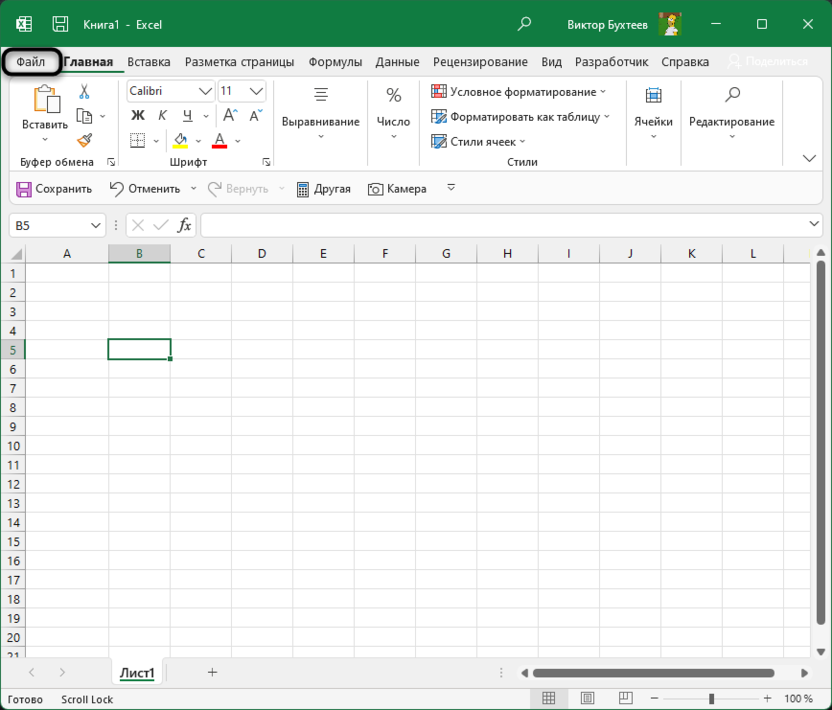
Если вы уже запустили Эксель или создали новый лист, на верхней панели выберите вкладку «Файл».
-
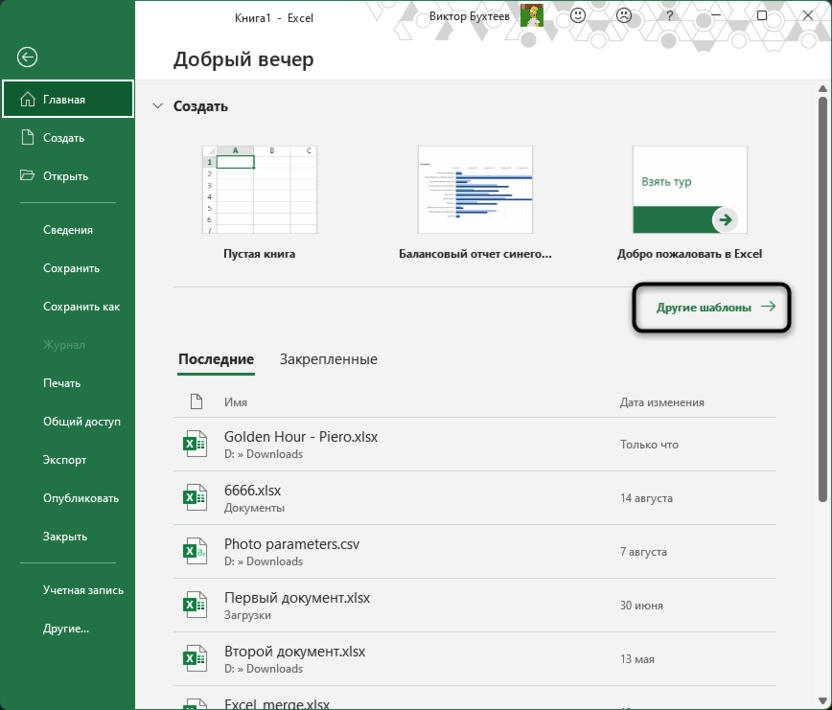
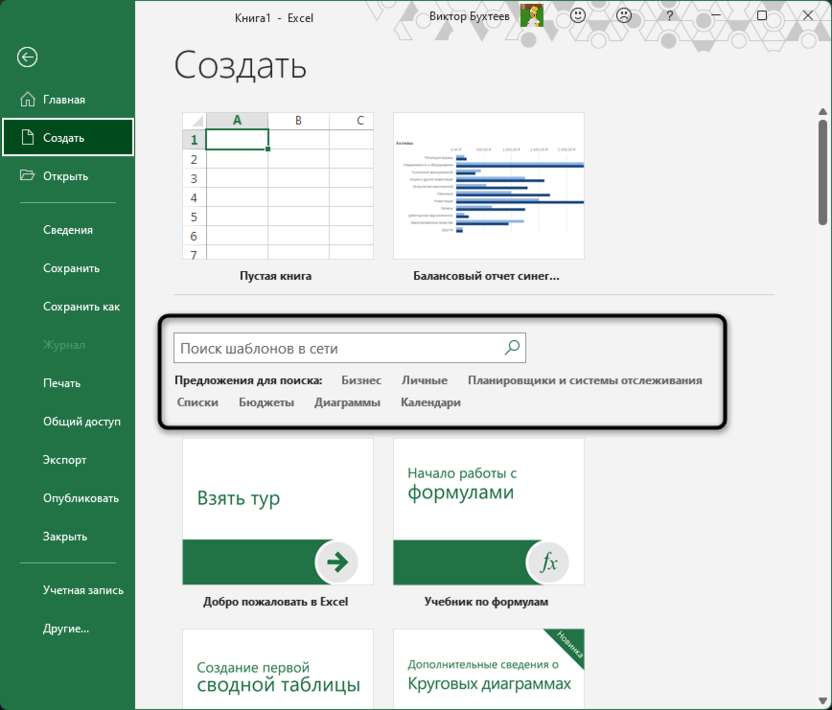
По умолчанию тут всего два базовых шаблона, поэтому лучше открыть полный список, щелкнув по кнопке «Другие шаблоны».
-
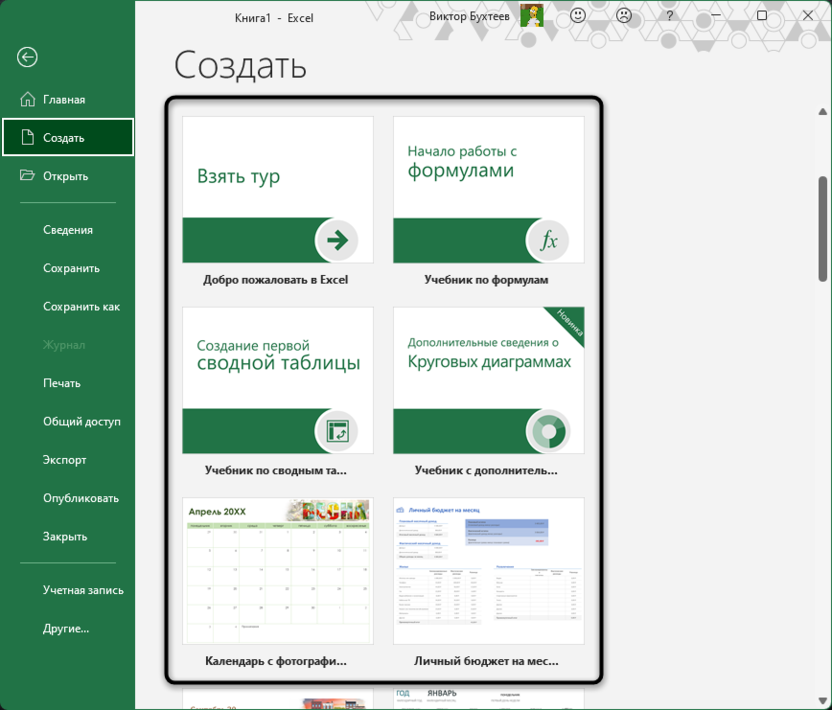
Ознакомьтесь с названиями, применениями и миниатюрами популярных заготовок. Среди них есть таблицы для ведения бюджета, расписания, календари и многое другое, что может пригодиться как обычному юзеру, так и сотрудникам компаний.
-
Если вас интересует конкретная категория заготовок, нажмите кнопку «Поиск шаблонов в сети» или следуйте подсказкам в списке ниже.
-
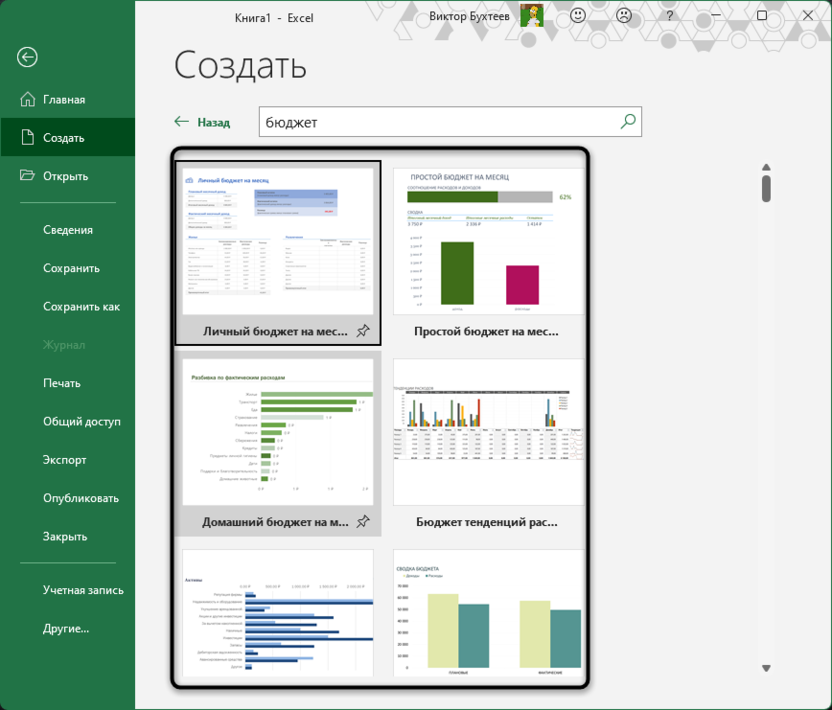
Теперь результаты будут сформированы исключительно из вашего запроса. Точно так же отображаются названия и миниатюры, что позволит составить оценочное суждение о шаблоне и решить, стоит ли загружать его для дальнейшего использования.
-
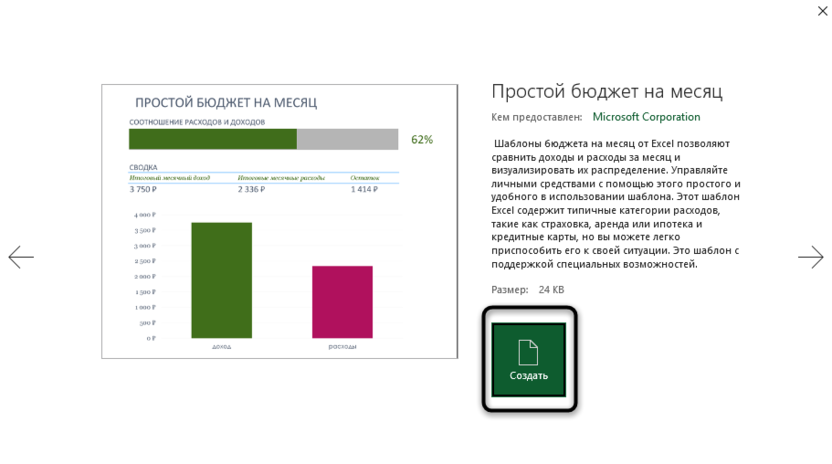
Нажмите по шаблону дважды левой кнопкой мыши, чтобы выбрать его. В новом окне подтвердите создание.
-
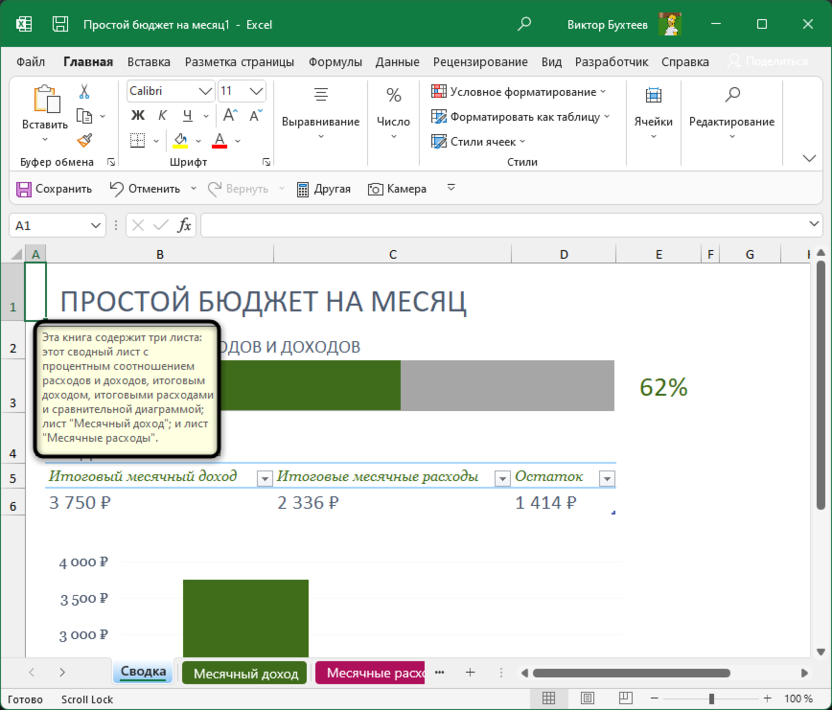
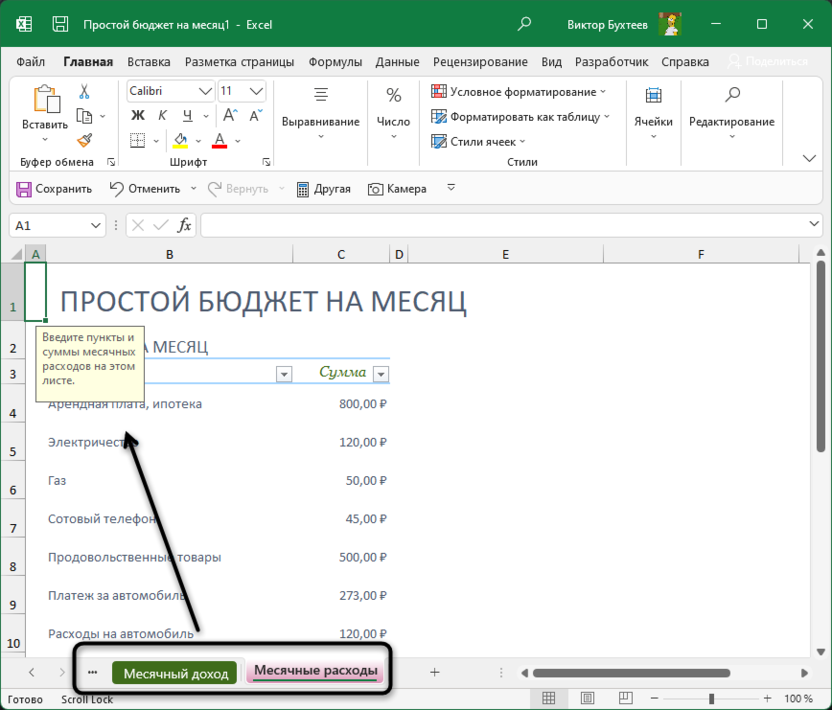
Вы будете перенаправлены в лист со стандартным содержимым заготовки. Прочитайте отобразившиеся на экране подсказки, чтобы понять, какие ячейки нужно редактировать, а какие не стоит, чтобы не нарушать работу созданных формул.
-
При переключении между листами вы часто будете видеть дополнительную информацию, которая тоже поможет разобраться с содержимым таблицы и понять, как ее применить для своих целей.
Это самый базовый и простой метод того, как вы можете находить уже готовые таблицы для разных задач, смотреть, какие функции в них используются, как реализовано форматирование и многое другое.
Комьюнити теперь в Телеграм
Подпишитесь и будьте в курсе последних IT-новостей
Подписаться
Способ 2: Официальный сайт Microsoft
По сути, этот метод повторяет предыдущий, однако имеет свои особенности. Иногда браузером для поиска пользоваться проще, дополнительно на странице с шаблоном можно прочитать его описание и рассмотреть стандартный лист более детально. Вместе с этим разработчики предложат приобрести премиум-шаблоны, которые по своей сложности и детализации отличаются от стандартных.
-
Откройте главную страницу сайта Office.com и на верхней панели выберите пункт «Шаблоны».
-
Если вам уже известна категория заготовки, которую вы желаете отыскать и открыть через Microsoft Excel, активируйте строку поиска и введите свой запрос.
-
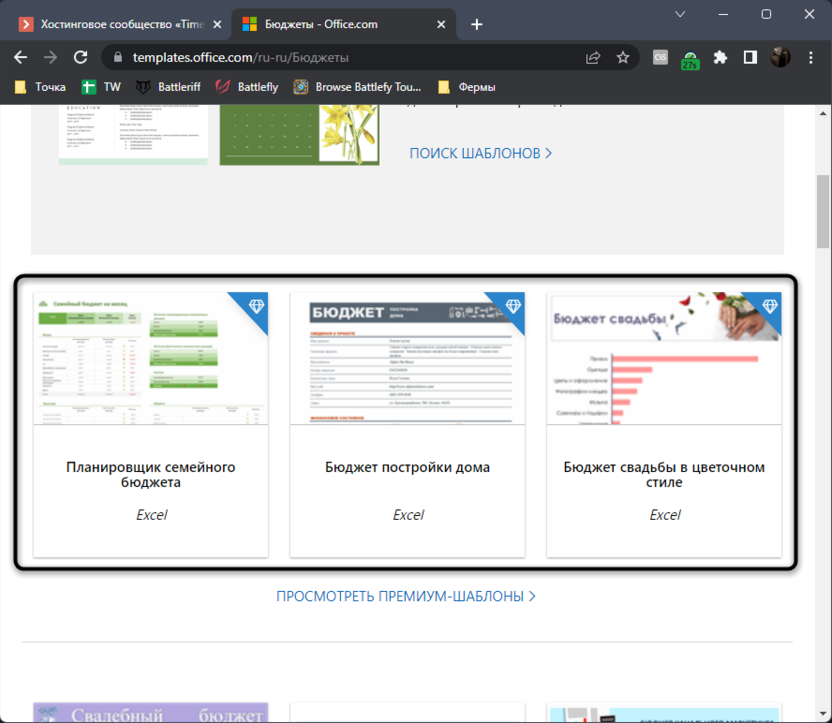
В противном случае предлагаем ознакомиться со всеми результатами категорий, выбрав одну из них среди плиток ниже.
-
Премиум-шаблоны будут отмечены синим ярлыком с бриллиантом сверху. Можете развернуть весь список платных заготовок и посмотреть, чем они отличаются от бесплатных и могут ли оказаться полезными для вас.
-
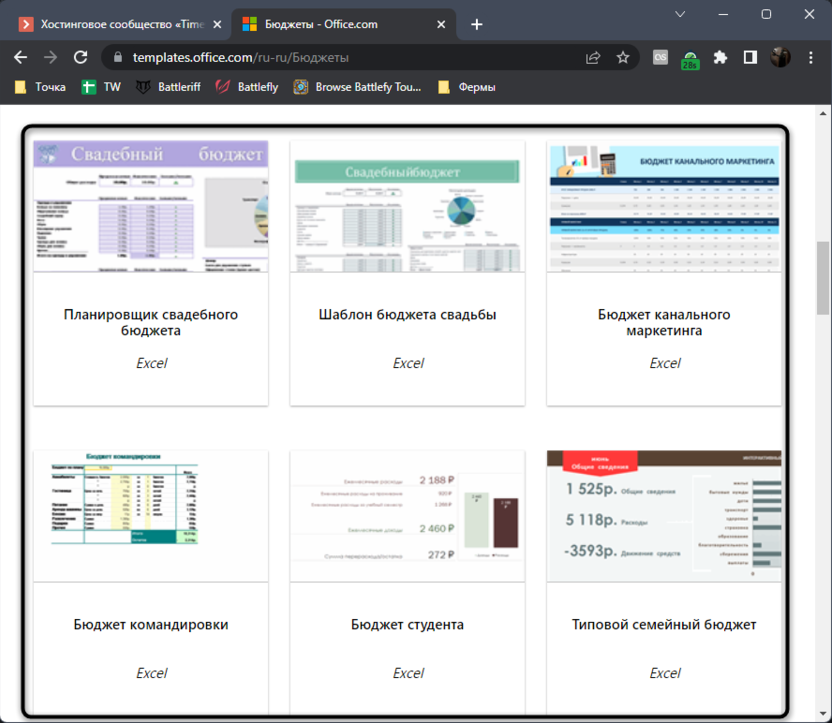
Большинство заготовок распространяются свободно. Их действительно тысячи, на самые разные темы. Предлагаю убедиться в этом самостоятельно, пролистав выдачу на официальном сайте.
-
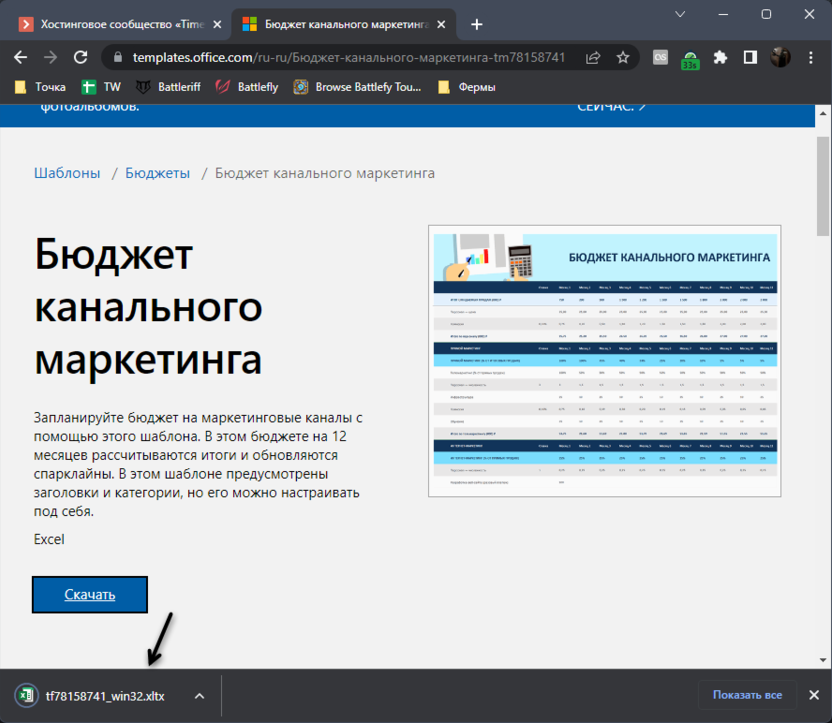
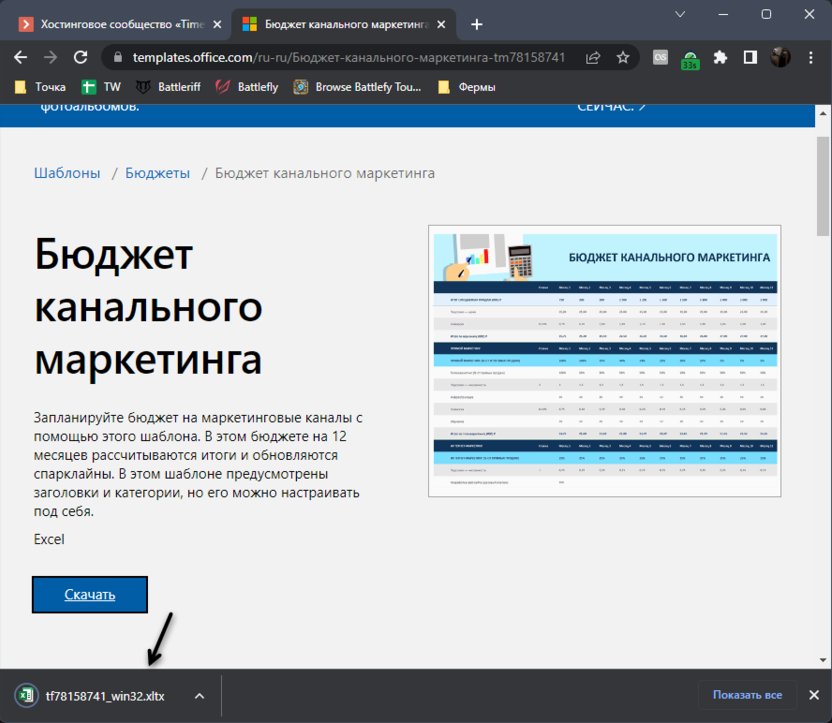
После выбора шаблона нажмите «Скачать», чтобы получить его в виде файла в соответствующем формате.
-
Ожидайте окончания загрузки и откройте шаблон в Excel для проверки листов и дальнейшего редактирования.
Способ 3: Сторонние сайты с шаблонами
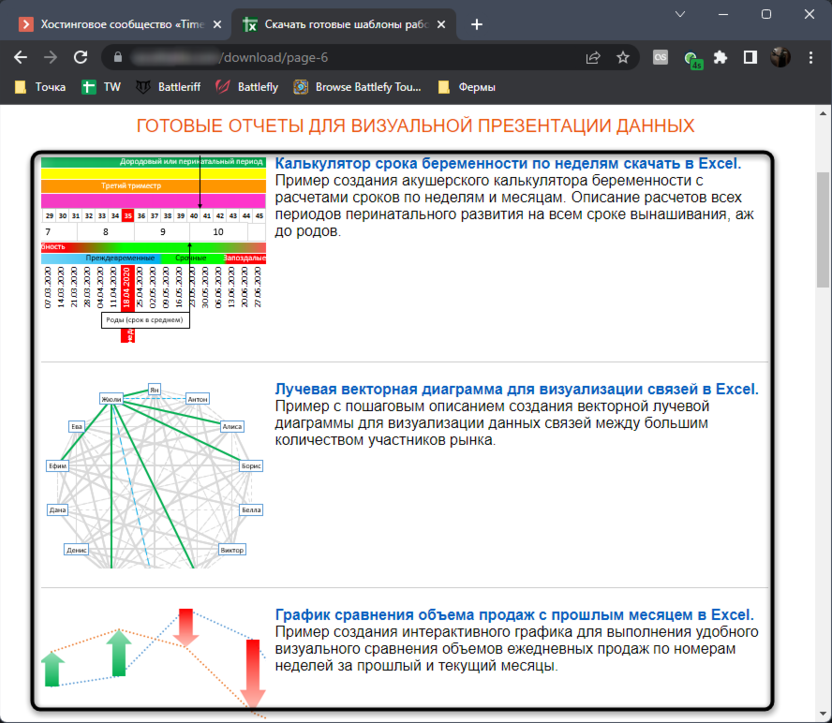
Энтузиасты и владельцы тематических сайтов предлагают альтернативные варианты шаблонов, размещая их в свободном доступе. Многие такие таблицы являются авторскими, узконаправленными или имеющими другие особенности, из-за которых они не были добавлены в общую библиотеку. Если вы решите использовать сторонние сайты, главное – скачивайте файлы исключительно Excel-формата, чтобы не нарваться на вирусы.
-
Поиск шаблонов на таких сайтах выглядит точно так же, как это было показано выше. Разве что иногда разработчики таких веб-ресурсов дают больше информации о файлах перед их скачиванием.
-
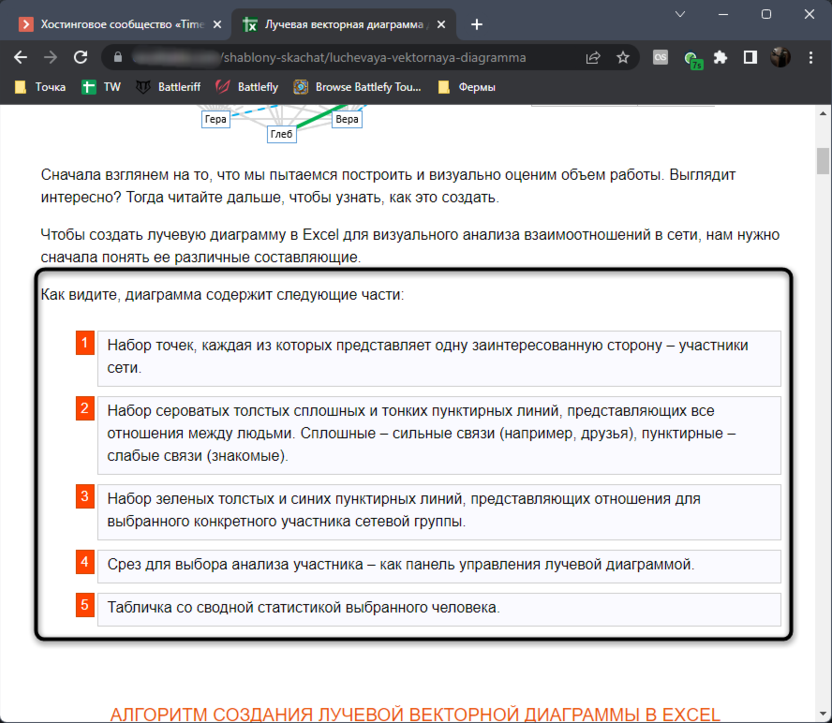
Многие размещают целые инструкции, в которых рассказано о каждом составляющем шаблона, обо всех функциях, их работе и взаимосвязях. Это будет очень полезно тем, кто ищет заготовку для Excel, чтобы по ней выучить новые функции и узнать, как правильно их использовать.
-
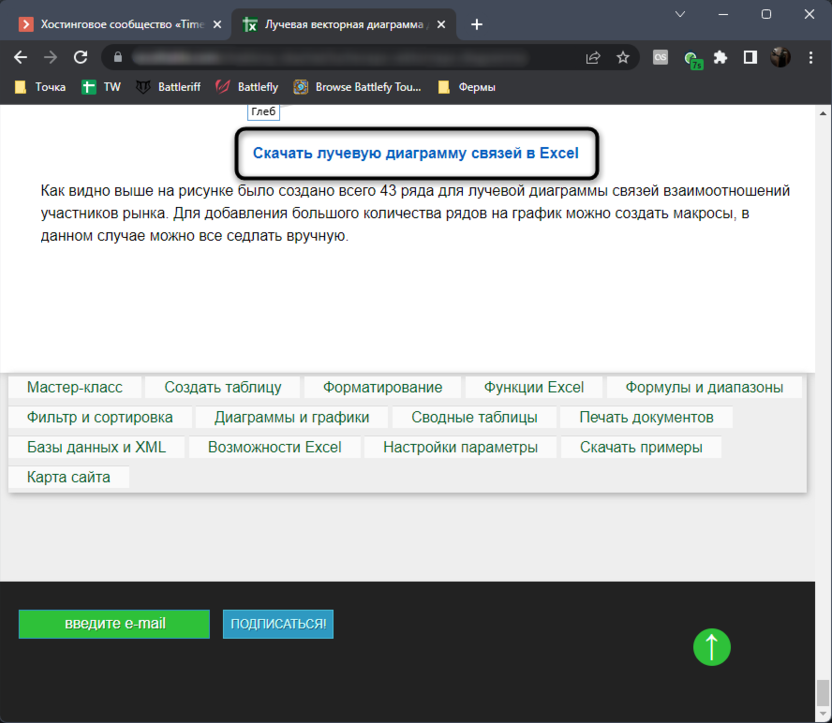
На странице с шаблоном нужно отыскать кнопку скачивания.
-
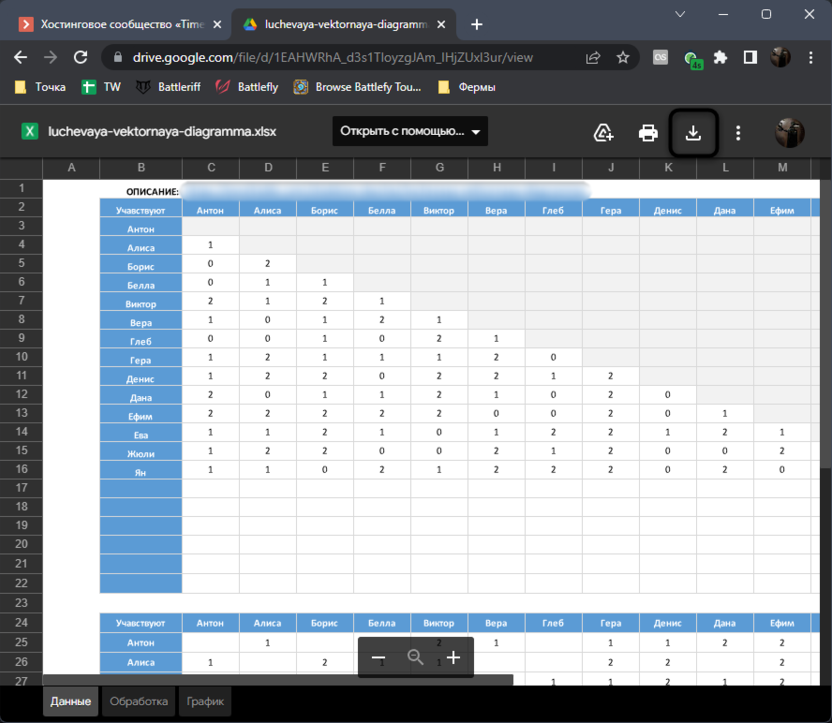
Иногда шаблон будет открыт для предпросмотра через Google Диск, что дополнительно позволяет убедиться в его безопасности. Если как раз произошло такое открытие, для скачивания файла нажмите кнопку со стрелкой вниз на верхней панели.
Экспорт файла как шаблона
Допустим, вы хотите выложить свой шаблон в официальной библиотеке от Microsoft или просто в открытый доступ, чтобы другие пользователи могли с ним взаимодействовать. Конечно, в таком случае можно использовать сохранение в простом XLSX-формате, но это не совсем актуально для такого рода проектов. В Экселе есть специальный формат экспорта шаблонов, перевод в который осуществляется следующим образом:
-
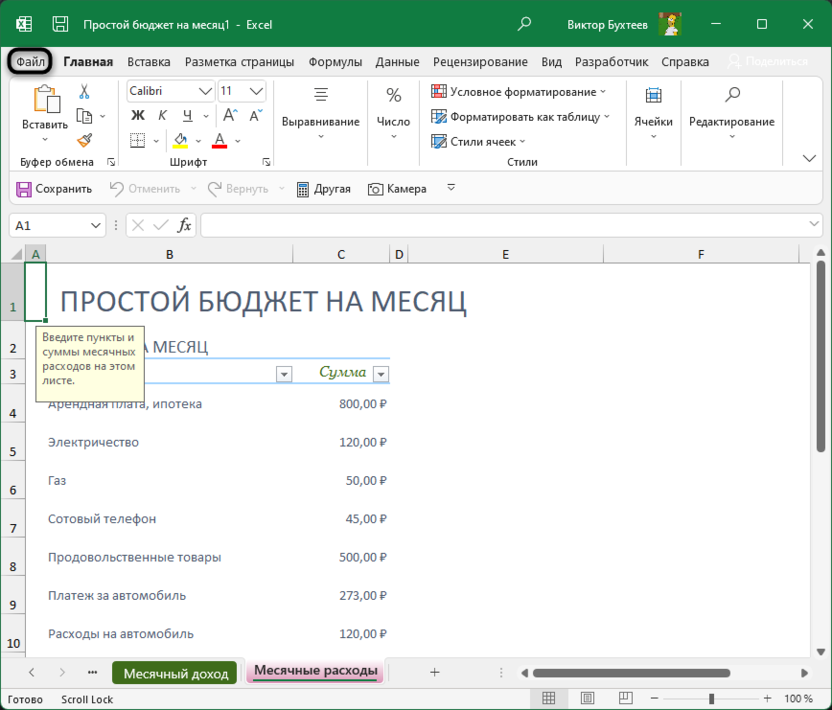
Откройте электронную таблицу, из которой хотите сделать шаблон. На панели сверху выберите раздел «Файл».
-
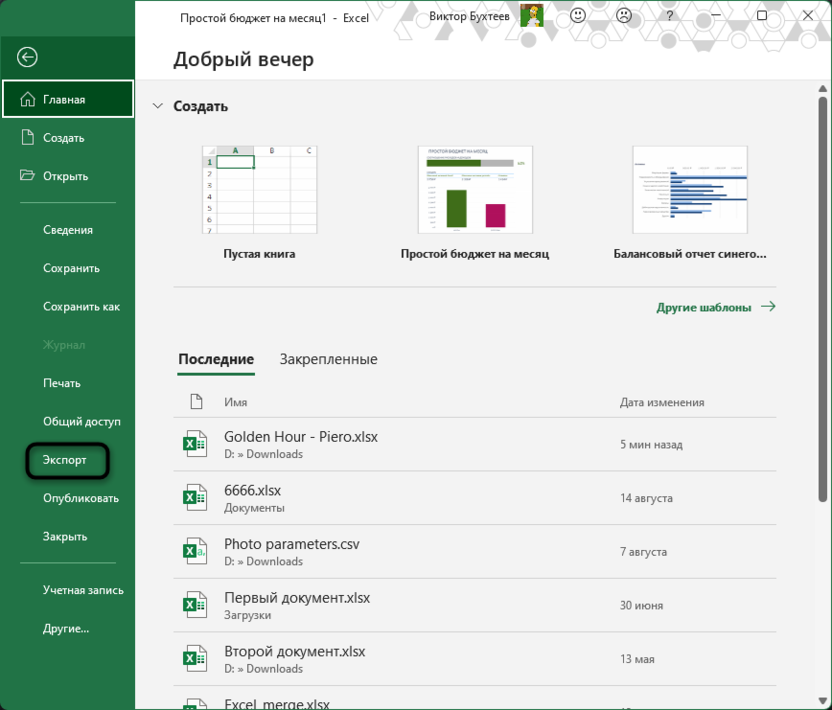
Появится дополнительное окно, в котором на левой панели нужно найти пункт «Экспорт».
-
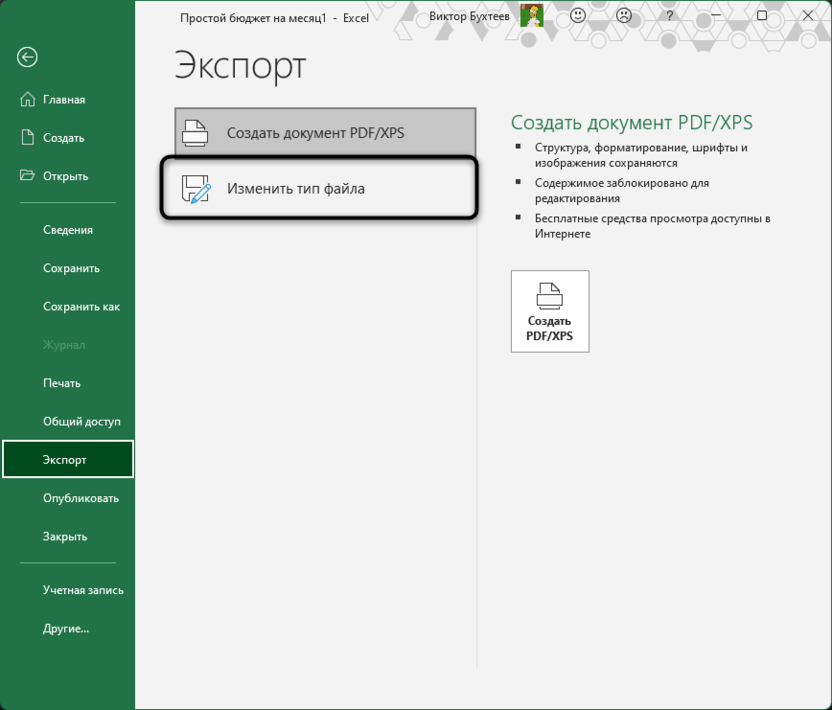
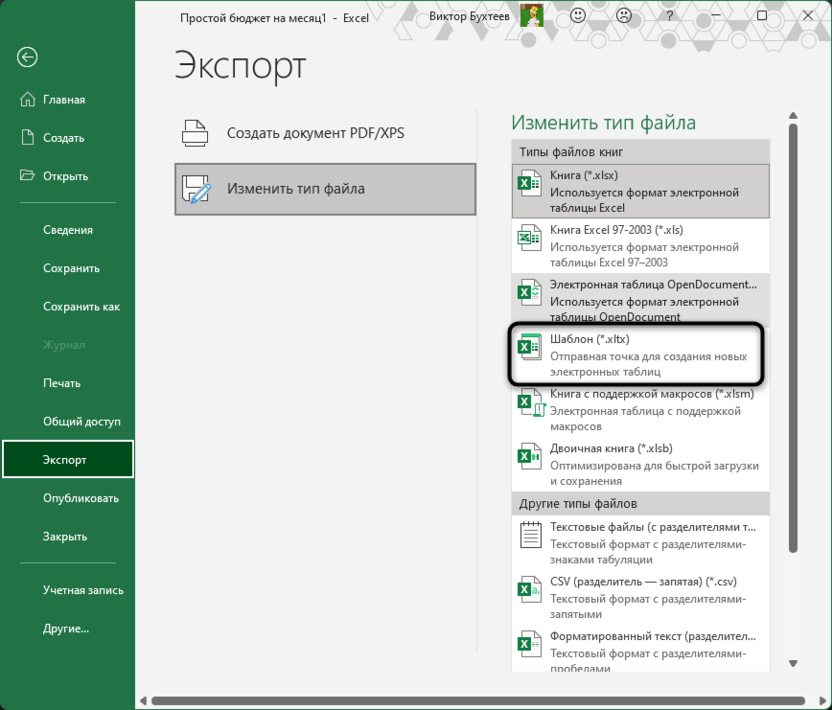
После нажатия по нему появится два варианта выбора сохранения, вам следует указать «Изменить тип файла».
-
Остается только выбрать формат шаблона, отыскав его в общем списке. Кликните по данному пункту дважды левой кнопкой мыши.
-
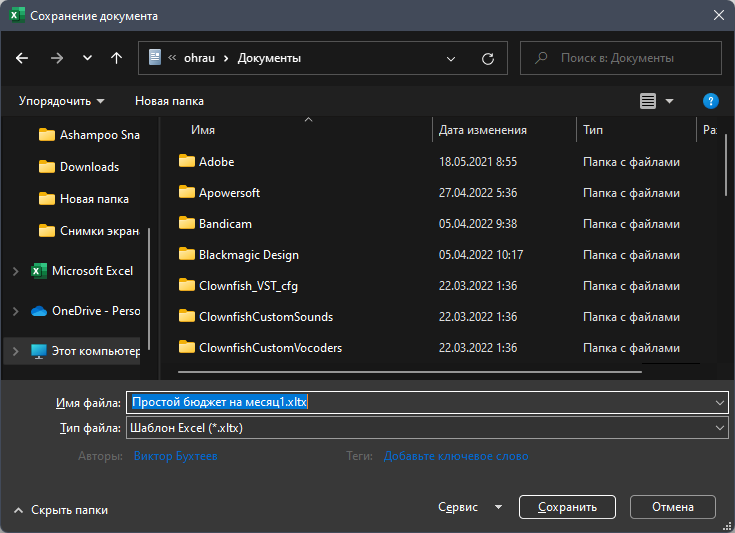
Задайте для файла шаблона название и сохраните в любом месте на компьютере, которое посчитаете удобным.
Шаблоны в Microsoft Excel – очень интересный тип документов, ведь с их помощью можно начать работу с электронной таблицей не с нуля, а с уже имеющимися общими данными и красивым оформлением. Используйте один из методов поиска заготовок или экспортируйте свои шаблоны так, как это было показано выше.
Existing Templates | Create a Template
Instead of creating an Excel workbook from scratch, you can create a workbook based on a template. There are many free templates available, waiting to be used.
Existing Templates
To create a workbook based on an existing template, execute the following steps.
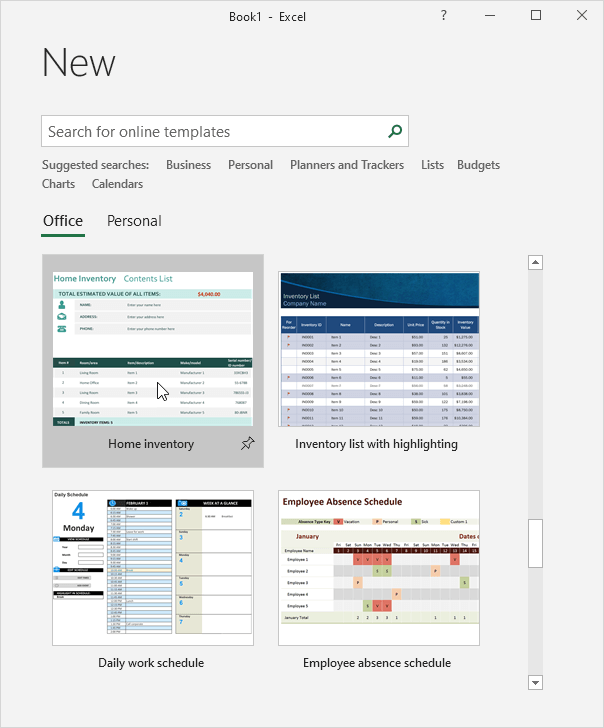
1. On the File tab, click New.
2. Use the search box to search for online templates or click a template from one of the Office templates.
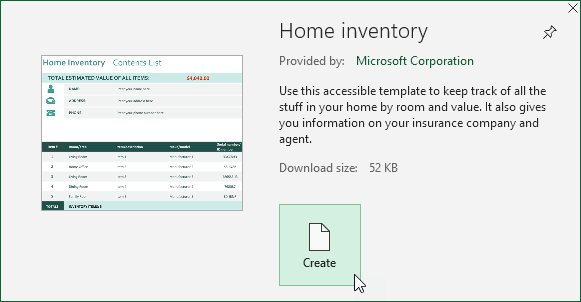
3. Click Create to download the template.
Excel creates the workbook Home inventory1.xlsx based on this template.
Create a Template
If you create your own template, you can safely store it in the Templates folder. As a result, you can create new workbooks based on this template without worrying that you overwrite the original file.
To create a template, execute the following steps.
1. Create a workbook.
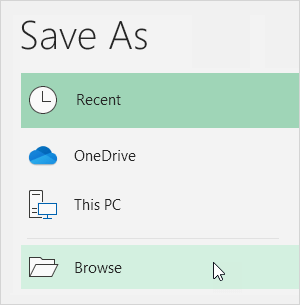
2. On the File tab, click Save As.
3. Click Browse.
4. Enter a file name.
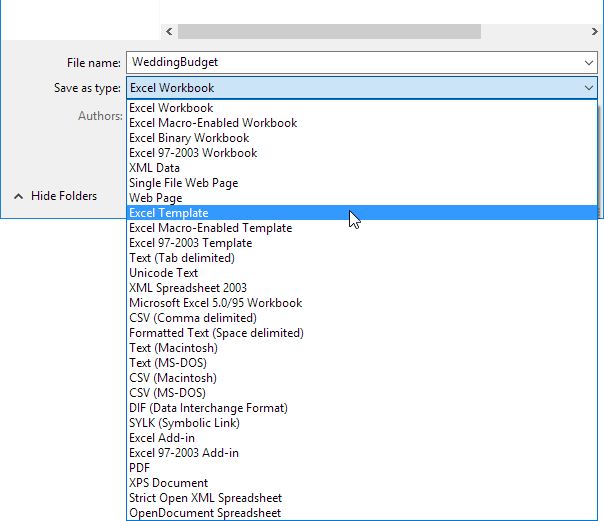
5. Select Excel Template (*.xltx) from the drop-down list.
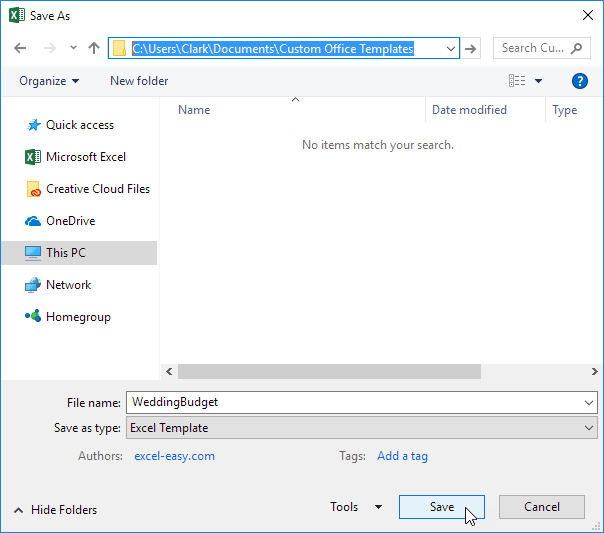
Excel automatically activates the Templates folder. Notice the location of the Templates folder on your computer. It’s usually located here:
C:Users<username>DocumentsCustom Office Templates
6. Click Save.
To create a workbook based on this template, execute the following steps.
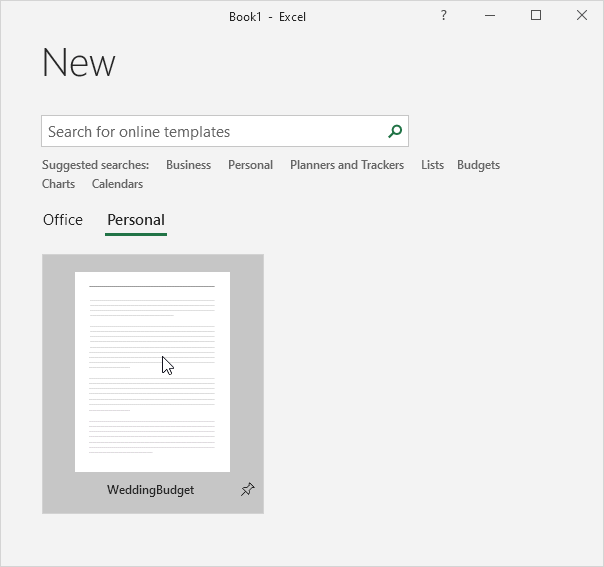
7. On the File tab, click New.
8. Click Personal.
9. Click WeddingBudget.
Excel creates the workbook WeddingBudget1.xlsx based on this template.
Note: to edit a template, on the File tab, click Open and then click Browse, to open the template. Edit the file and save the file to its original location.


 , and then click Save As.