
Taking notes during a class can be complicated. Often, it’s all going too fast for you to jot it down. There are even moments where you have to decide between being fully present and understand the lecture or write it down for future reference but at the expense of complete understanding.
These challenges only get magnified in online classes. It’s already too difficult to focus in virtual classes. What with a completely different setup than a normal classroom and other constraints of a “virtual meetup”, everyone knows virtual classes are overwhelming, whether you are a younger or an older student. Now, add note-taking to the mix, you’ve got a recipe for disaster at your hands.
Fortunately, with Microsoft Word, the crisis can be averted firmly. You can dedicate your focus to being present in the class and let Word take care of the notes for you. We’re talking about the Dictate tool here. Sounds intriguing, doesn’t it? Let’s jump right into the details.
What is the Dictate tool in Microsoft Word?
Microsoft Word’s wonderful feature, Dictate, can convert the speech into text on your Word page. Dictate is available across devices – Windows, Mac, iOS, Android, and even the Web. So, you can use it no matter the type of device you’re using to meet.
Dictate is available for nearly 20 languages with more set to come in the future. The supported languages include:
- English (United States)
- Chinese (China)
- English (Canada)
- English (United Kingdom)
- German (Germany)
- Italian (Italy
- Spanish (Spain)
- Spanish (Mexico)
- Danish
- Dutch (Netherlands)
- English (Australia)
- English (India)
- Finnish
- French (Canada)
- Japanese
- Norwegian (Bokmål)
- Portuguese (Brazil)
- Swedish (Sweden)
Some of these languages (the latter part of the list from Dutch to Swedish) are still in preview, though. So, dictation may not be entirely accurate sometimes or punctuation may be limited.
Dictate is available on Microsoft Word for Web for free. But for the Windows and Mac desktop apps, the tool is only available to Microsoft 365 subscribers.
Using Dictate in Microsoft Word
Open Microsoft Word, either the desktop app if you’re a Microsoft 365 subscriber, or in Chrome, Edge, or Firefox browsers if you’re using Office for Web. Log in to your Microsoft account if you’re using Word Online.
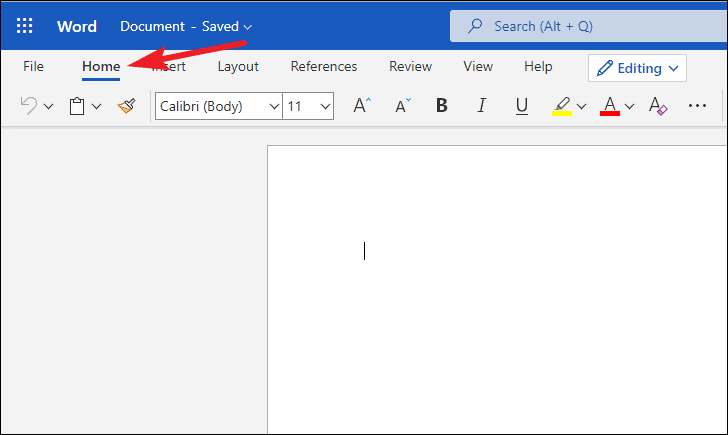
Now, go to the ‘Home’ tab from the menu bar.
From the Home tab, go to ‘Dictate’. Instead of Dictate, the toolbar might have only the ‘Microphone’ icon but it’ll say ‘Dictate’ when you hover over it. Click the icon to start dictating.

Note: When using a Windows PC, you can also the Alt + ` (backquote) keyboard shortcut to turn on Dictate.
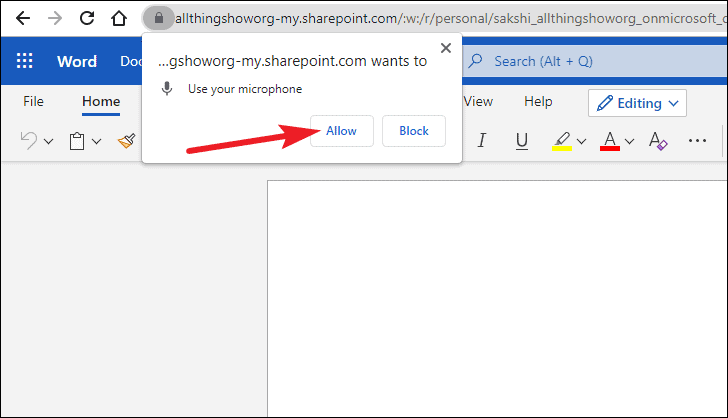
For web users, if you’re using dictation for the first time, you’d have to provide browser access to your microphone. Click ‘Allow’ from the pop-up box that appears.
The Dictate tool will become active. You’ll know as a small pop-up box with a Microphone will appear on the screen. You can move it around on the screen anywhere. The Microphone will have a red dot when it’s actively listening.
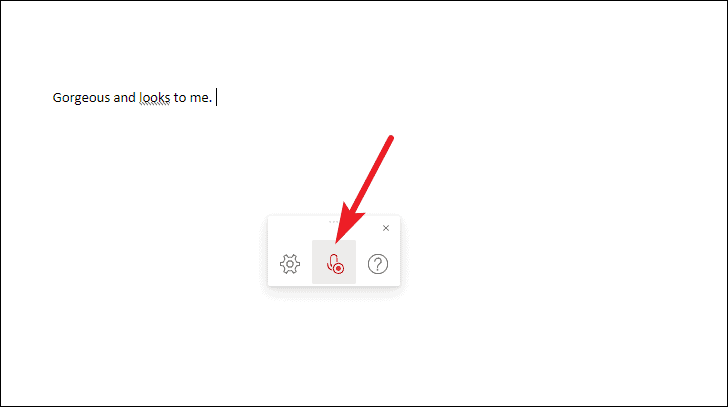
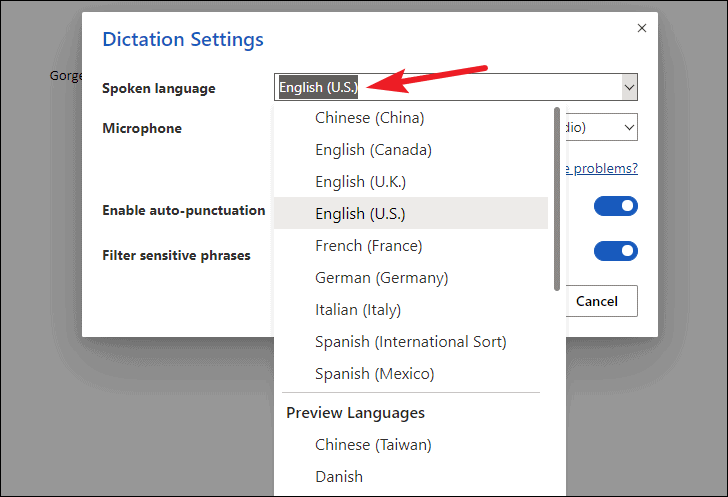
To change the language of the dictation tool, go to the Dictate pop-up and click the ‘Settings’ (gear) icon.

The dictation settings window will open. Click the drop-down menu next to the ‘Spoken Language’ option and select one of the available languages.
Now, you can enter punctuation or start a new line by dictating those commands explicitly. Generally, it’s as good a way as any. But when using Dictate to take notes, it’s best to turn on auto-punctuation. To enable ‘Auto-punctuation’, go to Settings for Dictate.
From the options that appear, turn on the toggle for ‘Enable Auto-Punctuation’. Auto-punctuation might not always be spot-on, especially for Preview languages. But it’ll still make your notes more legible than no punctuation at all.

Dictate also has a filter for sensitive phrases that is on by default. It automatically masks potentially sensitive words or phrases with ****
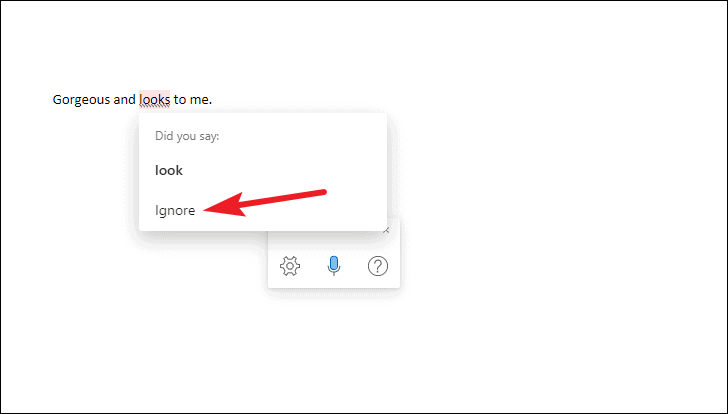
Sometimes, markings may appear under some words. They indicate alternatives that Word may have misheard. When you click it, suggestions will appear. You can choose one of the suggestions, or click ‘Ignore’ if it was already correct.
You can also correct anything using your keyboard without stopping the dictation.
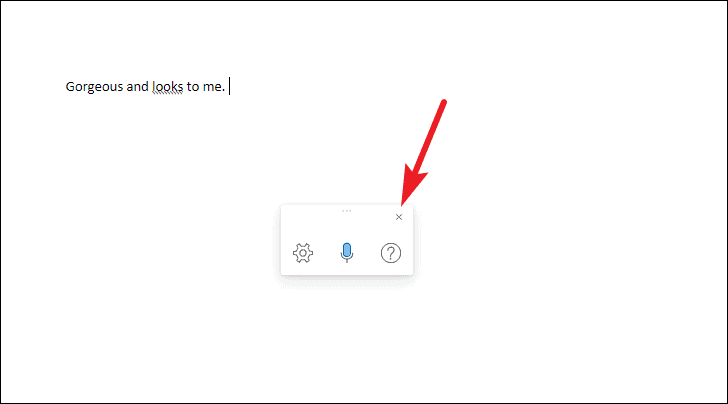
To pause the dictation, click the Microphone from the pop-up. To exit dictation, click the ‘Close’ (X) button on the Dictate pop-up.
Note: Dictation might stop if the Word window is not active on the screen. So, place your meeting and Word windows side-by-side for this to work perfectly.
There you go! A perfect way to take notes in your online classes, just make sure that you’re using the speaker and not headphones to listen to the meeting. Of course, you can use the tool in not just online but in normal classes as well.

Part 2 of Recruiters, Sourcing, Researchers – Use OneNote Linked Notes. This article explains how OneNote can be used to take automatically linked notes with Word and PowerPoint documents.
The need
There are various scenarios where we read or review a Word document or PowerPoint presentation and take notes ABOUT the document. The notes are not taken WITHIN the document in the form of comments or tracked changes. Here are some common scenarios where this situation arises:
- You have received a tender document or Request for Proposal (RFP) and you want to note down important things about what is mentioned in the document.
- Some new regulation is released from some statutory body and you are trying to note down the impact of each clause on your business.
- Your teacher / professor has given you notes about some subject in PowerPoint. That itself has embedded notes. Now you are looking at each slide (not in presentation mode) and want to take notes about each slide.
Of course, there are many more scenarios like this. I am sure you are already thinking of similar situations in your context.
Linked Notes
Concept is similar to what we did earlier with Internet Explorer. I am not going to repeat all the details here, please refer to the previous article mentioned above.
Click on the Dock to Desktop button on the QAT. You can also go to View tab and choose Dock to Desktop.

Now the screen will split and OneNote will occupy only a third of the screen. Open the Word document now and maximize it.

Read the Word document as usual. Note that IRM protected document cannot be used for this purpose.
When you want to note down something, click inside the OneNote page and type your notes. No Copy paste is required. You will notice that a Word icon appears automatically. This means Linked Notes are active.
If you want, select some area in the Word document and then type notes in the OneNote page. Make sure each set of notes are started on a new paragraph in OneNote.
If you Copy Paste – Linked Notes are NOT created.
When you finish, click on the Normal view button to stop taking Linked notes. There is also a dropdown below the link icon. This allows you to be in docked mode but stop taking linked notes. This may be required if you want to do some other editing in an unrelated Word document and you don’t want OneNote to capture those linked notes.
Close the Word document.
Retrieving the context
If you just want to remember which paragraph was the current one while you wrote something in OneNote, hover the mouse on the Word icon.

Now you can see the document name and the sentence where the cursor was at the time of capturing this particular note. If you want to actually see the document, click on the Word icon.
Now great things happen – like Internet Explorer – OneNote will open the Word document. OneNote remembers the path. Of course, if the path has changed, OneNote cannot find it.
But unlike Internet Explorer, OneNote goes one step further. It will not only open the document but also move the cursor to exactly the location where the cursor was at the time of capturing the notes.
If there was a selection, it will even select that area automatically.
Truly Amazing, Unexpected and Powerful.
Of course, if the document has been edited in the mean time and the context has changed, OneNote may not find the correct spot. But there is no technical solution to this issue.
Exactly the same concept works with PowerPoint. However, specific objects or text is not selected in PowerPoint. It remembers only the slide.
Linked notes do not work with INK – things you draw with mouse, finger or stylus.
Combine audio notes with Linked notes
This is a great way to take voice notes about a document, web page or presentation without typing too much.
Scroll to the area of interest – say, in Word – click inside OneNote (in Linked Notes mode) Press enter – type some short description and start talking about it. Instead of typing notes, you can just speak them out.
Continue like this for all areas of interest.
Now when you finish taking Linked notes, remember to stop the recording also.
Later you can go to any paragraph and get the audio notes as well as automatic linkage to the Word document. Extremely powerful idea. Try it out.

This feature works only with desktop version of OneNote. Linked notes do not work with Excel or other Office files. It does not work with PDF files either.
How to manage linked notes?
Now you have just learnt about linked notes. I am sure you will love this feature and end up using it extensively. Read this article for details on managing existing links.
Try this out and show off to your friends
This is a great demo to impress people around you. Try this out, use it and show it off. Make sure that everyone you know understands the importance of this feature and that they use it effectively.
![]()
![]()
![]()

Whether you use Microsoft Word for personal or professional writing, sometimes you may want to add supplemental notes to sections of your work. Maybe you want to make a side comment on one of your arguments, or you need to cite another author’s work without distracting from the main text. Luckily, Word has useful tools for adding footnotes and endnotes to your writing.
Note: We’re using Microsoft Word 2016, but Word has supported footnotes and endnotes since at least Word 2007. Depending on the version of Word you’re using, the menus we walk through in this guide may look a little different. But don’t worry—the features and functions are the same.
What Are Footnotes and Endnotes?
Footnotes and endnotes are both ways of adding extra bits of information to your writing outside of the main text. Think of them like verbal asides, only in writing. You can use footnotes and endnotes to add side comments to your work or to cite other publications like books, articles, or websites. The only difference between footnotes and endnotes is where they appear in your document.
As the name suggests, footnotes are attached to the bottom of the page containing the sentence they correspond to. Endnotes, on the other hand, are added to the end of a section or document. Which one you should use in your writing depends on your personal preference or—if you’re writing for school or work—your organization’s publication standards.
Fire up Microsoft Word, and then open the document to which you’d like to add footnotes (or create a new document if you’re just getting started). Switch to the “References” tab on Word’s Ribbon.

Here, you’ll find a bunch of useful features for annotating your text, including tools for inserting a table of contents, adding citations, and generating a bibliography. The second group on this tab contains the footnote and endnote features we want.
To add a footnote, place your insertion point in your text where you want the footnote to appear, and then click the “Insert Footnote” button.
Word adds a small superscript number where you placed the insertion point.
And then immediately shifts focus to the footnote pane and places the insertion point at your new footnote, so you can start typing it right away.
Footnotes appear at the bottom of the page beneath a short horizontal line. Each time you add a footnote on this page, another number will be added to the list.
Once you’ve added your footnotes, you can hover your cursor over each sentence’s reference marker to see a preview of the footnote within the text.
You can also quickly tab between footnotes in both the main text and the footnote list at the bottom of the page by clicking the “Next Footnote” button in the navigation bar.
Or, click the dropdown menu arrow on the “Next Footnote” button to select a different navigation option. You can choose to go to the previous footnote or navigate to the next or previous endnote.
The steps for inserting endnotes are essentially the same. Place your insertion point where you’d to annotate, and then click the “Insert Endnote” button on the “References” tab of Word’s Ribbon.
Just like with footnotes, Word attaches a superscript number containing an endnote. But this time, the list of notes it generates appears at the end of the current section or the end of the document (you can customize where they appear, and we’ll talk more about that in a bit).
How to Configure Footnotes and Endnotes in Word 2016
Word has basic default settings for footnotes and endnotes, but you can adjust these settings at any time from the menu on the References tab.
Click the arrow in the lower right corner of the “Footnotes” menu.
This brings up a Footnote and Endnote window where you can customize the location, appearance, and format of all your footnotes and endnotes.
Change the Location of Footnotes and Endnotes
By default, Word puts footnotes at the bottom of the page and endnotes at the end of the document, but you can change where these notes appear.
Under “Location” in the Footnote and Endnote menu, find the “Footnotes” option (it should be selected by default when you first open the menu). Open the dropdown menu to the right of that option and you can change your footnote location to either the bottom of the page or below the text. If you choose the latter option, Word places your footnotes immediately after the main body of text instead of at the bottom of the page.
To change the default location of endnotes, select the “Endnotes” option, and then open the dropdown menu to its right. There, you can change endnote placement to the end of the current section or the end of the document.
Convert Footnotes to Endnotes (and Vice Versa)
Another option is to convert all of your footnotes to endnotes or vice versa. Instead of changing each one individually, this option lets you change them all at once. If you’re working on a document with a lot of notes, this option can come in handy.
Under the “Location” section of the Footnote and Endnote menu, click the “Convert” button.
The Convert Notes dialog box pops up, giving you three options: 1) Convert All Footnotes to Endnotes, 2) Convert All Endnotes to Footnotes, and 3) Swap Footnotes and Endnotes. Select the option you want, and then click the “OK” button.
Change the Layout of Footnotes and Endnotes
By default, Word creates footnote and endnote lists with the same layout as the page on which they appear. However, you can adjust this from the Footnote and Endnote window by clicking the “Columns” dropdown menu and selecting the number of columns you’d like to use.
You can set your footnotes and endnotes to display in up to four different columns on the page.
Customize the Format of Footnotes and Endnotes
Word also lets you choose from several options for formatting how your footnotes and endnotes are numbered. It’s generally a good idea to choose a different numbering system for each note type, especially if you’re using a combination of footnotes and endnotes in the same document. This helps you and your reader quickly distinguish between the two at a glance.
In the Format section, click the dropdown arrow to the right of the “Number Format” option. Select your desired number format.
You can also label your notes with a custom symbol instead of a standard numbering system. Next to the Custom Mark option, click the “Symbol” button.
The Symbol menu will open. Select the symbol you’d like to use to label your notes, and then click the “OK” button.
Your selected icon should appear in the “Custom Mark” box, and Word will now use this symbol to label your notes.
By default, Word numbers footnotes and endnotes in individual series starting at “1” (or a, i, I, etc.) and continuing throughout the document. However, you can customize both the starting point and continuity of your notes.
If you want your footnotes or endnotes to start somewhere other than the first number in the series (for example, 2 instead of 1), click the arrows in the “Start At” dropdown box to increase or decrease the beginning value. One example of where this might be useful is if you’re writing a book that contains endnotes and you’re saving each chapter as a separate Word document. You could configure each chapter’s document to start numbering endnotes where the last chapter left off.
To change the continuity of your numbering series, click the dropdown menu arrow next to the “Numbering” option.
You’ll see three options for numbering your footnotes and endnotes: Continuous, Restart Each Section, and Restart Each Page. If you want your footnotes and endnotes to be numbered continuously from the beginning of your document to the end, select the “Continuous” option. If you’d prefer to have your notes numbered by chapter or section, select the “Restart Each Section” option. Or select “Restart Each Page” to number your notes by page.
Apply Your Changes to the Document
After configuring the above options, you’ll need to select how you want your changes applied to your document. At the bottom of the menu, click the dropdown menu arrow next to the “Apply Changes To” option.
If you want your changes to apply to every page and section of your document, select the “Whole Document” option. Or select “This Section” to apply changes only to the section of the document you’re currently in. (Note that this option will not appear if you have no section breaks in your document.)
Once you’re satisfied with your settings, click the “Apply” button in the bottom right of the menu.
You can also insert a new footnote using your selected settings by clicking the “Insert” button in the lower left corner of the menu.
How to Cross-Reference Footnotes and Endnotes in Word 2016
If you want to use the same footnote or endnote more than once throughout your text, there’s an easy way to do it without having to insert the same thing over and over again.
Place your insertion point where you want a reference inserted into the text. On the References tab, click the “Cross-Reference” button.
In the Cross-Reference window, choose either “Footnote” or “Endnote” from the “Reference Type” dropdown menu.
Next, click the “Insert Reference To” dropdown menu.
The “Footnote Number” option inserts the number of the footnote in regular text, while the “Footnote Number (Formatted)” option inserts the number of the footnote in superscript. The “Page Number” option inserts the number of the referenced page instead of the footnote number. The “Above/Below” option inserts either the word “Above” or “Below” depending on where the original footnote appears in relation to the cross-reference. Select your desired option.
Word lets you create hyperlinks between cross-references so you can easily find the same footnote everywhere it appears in your document. The “Insert as Hyperlink” option is checked by default, so you can click any cross-reference and automatically be taken to the part of the document containing the original footnote. We recommend leaving this option checked, but you can uncheck it if you prefer.
Under the “For Which Footnote” option, select the footnote you’d like to cross-reference, and then click the “Insert” button at the bottom of the menu.
READ NEXT
- › How to Add Footnotes in Google Docs
- › How to Cross-Reference in Microsoft Word
- › Learn These Microsoft Word Features to Make College Easier
- › How to Create Your Own Bibliography Template in Microsoft Word
- › Mozilla Wants Your Feature Suggestions for Thunderbird
- › How to Adjust and Change Discord Fonts
- › BLUETTI Slashed Hundreds off Its Best Power Stations for Easter Sale
- › Expand Your Tech Career Skills With Courses From Udemy
Hey so I go to York and unfortunately one of my Professors just uploads word documents as «lectures». I know it sounds stupid and a lot of people may argue it’s «easier» and you have direct text to quote and reference but honestly I can’t learn anything from it, I’ve been learning with a teacher at least verbally explaining stuff for the last 14 years of schooling, suddenly having to just read lecture notes does not register in my brain and I don’t know whether to be taking OneNote notes, or just edit the word doc myself.. it’s just confusing.
Looking at it, I just get confused and lost in all of his sections, the «lectures» visually look clean but their contents are scattered and nothing written down makes sense to me as I don’t understand what he is trying to convey the majority of the time and the context of his notes just doesn’t make sense to me a lot of the time.
Any tips? I do want to drop the course honestly especially as I can’t imagine doing this for a full year (full year course) but it’s my highest credit course so probably not able to drop…
Posted on: March 4, 2013 | By: Casey Brown | Filed under: Tech Tips
Historically, Microsoft Word has been the most popular word-processing program among computer users.  Users for this program range from business professionals writing important documents to undergraduate students writing a term paper to writers working on their next big story. Almost anyone can find a way to use Microsoft Word. However, for Mac computer users, Microsoft Word provides another feature that can be useful for students: the Notebook View.
The Notebook View
The Notebook View in Word visually looks like a notebook, with tabs on the side to split up notes in one document file. The feature, as advertised on its website, is best for taking notes during meetings and classes as well as making outlines. These features, along with some others, are appealing to the busy college student, and some Elon students have already utilized the feature in their academic lives.
Using Notebook View for written notes
Diane Bui, a junior business major with a minor in early education, acknowledges she is a disorganized person. In the past, she has struggled with keeping her files in order, whether they were physical copies or digital files. That is why Notebook View works for her; it offers her an easier way to organize.
“I found it very convenient to take notes on, as the subjects of the class or even different classes can be easily divided yet all in the same document,” Bui said. “No more searching for random files. It definitely helps me stay organized.”
The specific features of the program and the view’s easy-to-use nature make it Bui’s favorite way to take notes in the classroom.
“I love how easily you can create tabs and sections to continue the document,” Bui said. “This is very convenient, as my notes are in the same document. It’s also fairly easy to convert it back into a word document for easy printing. Not many of my professors have told me specifically to use the Notebook Layout, but I feel like it is the easiest way to take notes on a computer.”
Using Notebook for audio notes
Madison Smith, a sophomore English literature major, considers herself a traditionalist when it comes to writing notes. She prefers to do it by hand. However, Notebook View appeals to her because of its audio feature. With the Notebook View, users have the option to record audio notes to accompany their written notes.
“I started using Notebook View because I took a class that was very lecture and discussion-based,” Smith said. “A lot of times it was hard to keep up by hand writing notes, so this allowed me to type notes and record the class so I could go back and listen again.”
The audio notes were extremely beneficial for Smith during her Media Writing course last semester. As a student in a class that heavily relies on students to attend speakers and write articles, Smith liked the audio feature, so she could get accurate quotes and keep up with the information during lengthy speeches.
“Whenever I had to cover an event or interview someone, Notebook View made it 12 times easier,” Smith said. “I could type notes and record the event. One of the great things about Notebook View is that if it recognizes words in your typed notes and matches them up with the words it recognizes in the recordings. So it makes it super easy to find certain parts in a longer recording.”
A few kinks
Both Smith and Bui agree that the Notebook View could improve some of its features. For Smith, it is the fact that a user cannot personalize the bullet format to fit his or her note-taking style. For Bui, it is trying to record and type notes simultaneously.
“I don’t know if this is a Microsoft issue, but typing and recording at the same time definitely do not work well together,” Bui said.
Overall, the two agree that Microsoft Word’s Notebook View has a variety of benefits for their academic work. While Notebook View is only available for Mac users, PC users can find a similar program via Microsoft OneNote.
![]()
Casey Brown
Casey Brown is the Writing Intern for Technology with Elon University’s Teaching and Learning Technologies Department.
More Posts
Follow Me:
