
Hello guys, Today we will learn How to open MS Word?
In this post, I will explain How to open MS word on computer and laptop step by step.
This Article is Best on the whole internet.
If you read this article carefully, you can easily understand how to start Microsoft Word.
I Guaranteed you, after reading this article you will not need to read any other Articles. In fact, our reader’s satisfy in this blog post.
How to Open Microsoft Word?
There are different ways to open & Start MS word in computer.
If you follow these steps, you can easily do it.
Way 1.
This is the easiest way to open Microsoft Word in a computer.
If you are using any operating system of the window, this method will also work in it.
In this way, you can open any version of MS Word.
Step 1.
- Right-click with the help of a mouse on the blank screen of your computer.
- After clicking, the interface will open in front of you, as shown in the figure below.

Step 2.
- After doing step 1, you have to click on the New option, after clicking, you will see many options in front of you.
- As shown in the figure below.

Picture of How to Start MS Word
Step 3.
- After completing step 2, you now have to click on the Microsoft word Document option.
- As shown in the figure above.
- Clicking on the Microsoft word document option will open your MS Word.
We hope you understand.
Read Also — What is MS word and its Features?
Way 2.
Note — I am using the Windows 8.1 operating system, but this process that I am describing works on every window operating system like this.
Step 1.
- Click the Window button on the below-left side of a computer screen.
- As you can see in picture 1.0

How to open MS word Picture 1.0
- After clicking on the window button, a new interface will open in front of you.
- As shown in picture 1.1 below.

How to start Microsoft Word
Step 2.
- Now you have to type the Word from your computer keyboard.
- As you type the word, a search box will open in front of you.
- As shown in picture 1.2 below.

Picture 1.2
Note — As my computer has Microsoft Word 2013 installed.
Therefore, Microsoft Word 2013 version is appearing in our search box.
There are many versions of Microsoft Word, but the version of Microsoft Word that is installed in your computer system will appear in your search box.
Step 3.
After typing the word, a lot of options will appear below, but you have to click on Word 2013.
As shown in picture 1.2
After clicking on Word 2013, Microsoft Word will open.
Note — Word 2013 is installed on our computer, but any version of Word 2010, 2007, 2016 is installed on your computer.
As if Word 2010 is installed on your computer, then you have to click on Word 2010.
We hope you understand.
Way 3
Step 1.
- Click on the window button on your computer keyboard.
- After clicking, a new interface will open in front of you.
Step 2.
- After clicking the window button on your computer keyboard, now you type Microsoft Word.
- After that, a new interface will open in front of you And you will see that many options will appear on your computer screen.
Step 3
- After typing, you will see the word and its version together, click on that option.
- Whatever version of MS Word is installed on your computer, the same will appear in front of you.
Like — word 2007, word 2010, word 2013

How to Open MS Word from Run Command?
You can also open Microsoft word very easily with the Run command.
You follow these steps, you can easily do it.
Step 1
- Press Win + R button simultaneously on your computer keyboard.
Step 2.
- The run command opens as soon as you press Win + R button.
- After that, you have to type winword inside the Run box.
- As shown in the picture below.

Step 3.
- After typing winword, click on the OK option or press the Enter button.
- Clicking on the OK option, your Microsoft word will open.
- I Hope you Understand.
How to Open MS Word in Windows 10?
There are various ways to open Microsoft word in windows 10. But we are telling you the easiest way.
Go to the home screen of your windows 10. Then Right-click on the home screen of your windows then click on the new option, then click on the Microsoft Word document.
This will open your Microsoft Word.
If you want to understand this in detail then follow Way 1.
Or you can start Microsoft Word in Windows 10 in this way too.
- Click the Windows button or Start button on your computer. Type Word in the search box. Click the Microsoft Word 2010 in the list that appears.
Shortcut Key to Open MS Word
There is no shortcut key that will open MS Word directly.
If you have already created an MS Word file and saved it on your computer, then it can be opened MS word file with the help of a shortcut key.
If you follow my step carefully, you can also do it very easily.
Step 1.
- You need to press Ctrl + O button simultaneously from your computer keyboard.
- After pressing the Ctrl + O button, a dialog box will open in front of you.
- As given in the picture below.

Shortcut Key to Open MS Word
As we have already created an MS word file named DPL, and we have to open this file.
Step 2.
To open the DPL word file, we will click that file with the help of a mouse and then click on the Open option.
Your MS Word file will open once you click.
Note — This shortcut key will work only when you use any browser.
Suggested video of Shortcut Key to Open MS Word for better understanding.
FAQ Related to How to Start Microsoft Word
Q. Write the Steps to open MS word 2007.
5 steps to open MS word. These steps are based on window 7.
Step 1.
Click the start button on the left side below the computer or laptop screen corner.
Step 2.
Click the All Programs option.
Step 3.
find the Microsoft office and click this option.
Step 4.
After clicking the Microsoft office option then some more options appear in front of you.
Step 5.
and you click the Microsoft word option.
Q. How do I open Microsoft Office on my computer?
Open Microsoft office on your computer and laptop is very easy.
These steps are based on Window 10.
Step 1. — Click the window button on your computer keyboard.
Step 2. — After clicking the window button, a new dialog box opens in front of you.
Step 3. — After doing step 2, then scroll and find Microsoft Office.
Step 4. — After finding the Microsoft Office and click this option.
How many ways can you open Microsoft Word?
There are many ways to open Microsoft word in your laptop and computer.
I know my readers love this article.
If you any doubts in this article please check out contact us page.
I Hope you Understand How to open MS word. Share this post and mention your comment.
Things You Should Know
- To create a basic document, choose a template from the list provided or start with a blank document.
- Use the File tab to open, save, and start documents, and the Insert tab to add any images, symbols, or other media to your document.
- Highlight your text and play around with formatting options in the «Home» tab. You can change the font, italicize/bold/underline your words, and play around with font size.
-

1
Open the Microsoft Word application. Do this by double-clicking the Microsoft Word icon.
-
2
Review the available templates. On the right side of the screen, you’ll see several templates of interest:
- Blank document — A blank document with default formatting.
- Creative Resume/Cover Letter — A clean, pre-formatted resume (and accompanying cover letter) document.
- Student Report with Cover Photo — A document format geared toward an academic demographic.
- Fax Cover Sheet — A document to preface fax reports.
- You can also search for specific templates online from within Word by using the search bar at the top of this screen.
Advertisement
-
3
Choose a template. Doing so will open the template in Word with whatever pre-determined formatting applies to it. Now that your document is open, you’re ready to review your Toolbar options.
- When in doubt, open a blank document.


Advertisement
-
1
Click the File tab. It’s in the top left side of the screen (or in the menu bar for Mac users). From here, you have several useful options on the far left side of your screen:
- Info (PC only) — Click this to review the documents statistics, such as when it was last modified, as well as any potential issues with the document.
- New — Click this to bring up the «New Document» page that lists all of the pre-formatted templates. Opening a new document will prompt you to save your old one.
- Open — Click this to review a list of recently-opened documents. You can also select a directory (e.g., «This PC») in which to search.
- Save — Click this to save your document. If this is your first time saving this particular document, you’ll be prompted to enter a name, save location, and preferred file format as well.
- Save As — Click this to save your document «as» something (e.g., a different name or file format).
- Print — Click this to bring up your printer settings.
- Share — Click this to view sharing options for this document, including email and cloud options.
- Export — Click this to quickly create a PDF or change the file type.
-
2
Click ← in the top left corner of your screen. If you’re using a Mac, you won’t have this option—simply click your document to exit the «File» menu.
-
3
Review the Home tab to see your formatting options. At the top of your screen—from left to right—are five sub-sections of this tab:
- Clipboard — Whenever you copy text, it is saved on your clipboard. You can view copied text by clicking the Clipboard option here.
- Font — From this section, you can change your font style, size, color, formatting (e.g., bold or italic), and highlighting.
- Paragraph — You can change aspects of your paragraph formatting—such as line spacing, indentation, and bullet formatting—from this section.
- Styles — This section covers different types of text for various situations (e.g., headings, titles, and subtitles). You’ll also see the popular «No Spacing» option here, which removes excess spaces between lines of text.
- Editing — A couple of commonly-used tools—such as «Find and Replace», which allows you to quickly replace all appearances of one word with another—live here.
-
4
Click the Insert tab to review the types of media you can place in your document. Insert is to the right of the Home tab. The Insert tab allows you to add things like graphics and page numbers to your document. From left to right, a couple of notable options include the following:
- Table — Clicking this option will allow you to create an Excel-style table right in your document.
- Pictures — Use this feature to insert a picture into your document.
- Header, Footer, and Page Number — These options are all essential for writing in MLA- or APA-style formatting. The Header places a space at the top of the document for comment, while the Footer goes at the bottom—page numbers are customizable.
- Equation/Symbol — These options use special formatting to accurately display simple equations. You can select these equations or symbols from the pertinent drop-down menu.
-
5
Click the Design tab to create your own template. It’s to the right of the Insert tab.
- The Design tab contains pre-designed themes and formats listed across the top of the page.
-
6
Click the Layout tab to customize your page’s formatting. This tab contains options for changing the following aspects of your document:
- Margins
- Page orientation (vertical or horizontal)
- Page size
- Number of columns (defaults to one)
- Location of page breaks
- Indentation
-
7
Click the References to manage your citations. If you have a bibliography page, you can also manage it from here.
- For quick bibliography formatting, click the Bibliography drop-down menu and select a template.
- In the «Citations & Bibliography» group of options, you can change your bibliography formatting from APA to MLA (or other citation styles).
- The «Captions» group has an option to insert a table of figures. This is useful for scientific review papers or similar documents in which statistical data is prioritized over quotations.
-
8
Click the Mailings tab to review your document sharing options. You can review your email settings and share your documents from within this section.
- You can also print an envelope or label template by clicking the pertinent option in the top left corner of your screen.
- The Select Recipients drop-down menu allows you to choose Outlook contacts as well as an existing contact list within Word.
-
9
Click the Review tab. The Review section is geared towards editing, so it includes options for marking up documents and proofreading. A couple of important options include:
- Spelling & Grammar — Click this option (far left corner) to underline any spelling or grammatical errors.
- The «Changes» section — This is to the far right of the toolbar. From here, you can enable the «Track Changes» feature which automatically formats any additions or deletions you make in a document to appear in red print.
-
10
Decide on the set of options that best apply to your work. If you’re a student, for example, you’ll likely use the Insert and References tab often. Now that you’re familiar with the toolbar options, you can format your first Word document.


Advertisement
-
1
Open a new Blank Document in Word. If you have an existing document, you can open that instead.
-
2
Enter text. Do this by clicking on the blank section of the document and typing away.
- If you opened an existing document, be sure to save your work before re-formatting.
-
3
Highlight a section of text. To do this, click and drag your cursor across your writing, then let go when you’ve highlighted the section you wish to edit.
-
4
Consider what you want to do to the writing. Some potential options include:
- Quickly format your writing. Do this by right-clicking (or two-finger clicking) your highlighted text and then selecting an option from the right-click menu.
- Change the font of your selection. You can do this by clicking the drop-down bar at the top of the «Font» section (Home tab) and then selecting a new font.
- Bold, italicize, or underline your highlighted section. To do this, click the B, I, or U in the «Font» section of the Home tab.
- Change your document’s spacing. This is easiest to accomplish by right-clicking your selected text, clicking Paragraph, and modifying the «Line Spacing» value in the bottom right corner of this window.
-
5
Continue working with Word. Your preferred options for your documents will differ based on the intention behind creating them, so the more you work within your own particular format, the more proficient you’ll become.


Advertisement
Add New Question
-
Question
How do I copy and paste?

To copy a certain piece of text, highlight it and press Ctrl + C. Then click the spot you want to place the copied text and press Ctrl + V to paste.
-
Question
How do I place a logo in MS Word?
Press the Insert tab and then press the Pictures button. You will then be allowed to select the image.
-
Question
How can I save a document to a specific location?
Click File —> Save As… and you’ll be allowed to select the destination location (and filename and format) of the file.
Ask a Question
200 characters left
Include your email address to get a message when this question is answered.
Submit
Advertisement
-
A red line under a word means the word is misspelled, a green underline suggests a grammatical error, and a blue underline pertains to formatting.
-
If you right-click (or two-finger click) an underlined word, you’ll see a replacement suggestion at the top of the right-click menu.
-
You can quick-save your document by holding down Control (or Command on Mac) and tapping S.
Thanks for submitting a tip for review!
Advertisement
-
Don’t forget to save your work before closing Word.
Advertisement
About This Article
Article SummaryX
1. Create blank documents or from templates.
2. Format text colors, fonts, and sizes.
3. Insert media like photos and animations.
4. Insert data like tables, page numbers, headers, and equations.
5. Customize the on-screen and print layouts.
6. Add references and citations.
Did this summary help you?
Thanks to all authors for creating a page that has been read 213,472 times.
Is this article up to date?
This Microsoft Word beginner guide provides free & basic lessons, tutorials & fundamentals for learning MS Office Word software. Microsoft Word is everyone’s favorite text editor. With so many features, it can meet all your requirements. It may look complicated to use initially, but once you get the hang of it, things start falling in place. This blog post is for those who want to learn the basic functions and features and know more about Microsoft Word.
To start the Microsoft Word application, click on the START button > Microsoft Office > Word or simply search for ‘Word’ in the search box and then click on the result. Once it is opened, select New document.
This is how the opened blank Microsoft Word document will look like.

Now let us take a look at the features that it has to offer.
1] Title and the Quick Access Toolbar
At the top, you have the Title of the document, the Quick Access Toolbar and a few other functions such as Minimize, Restore Down / Maximize, Close and Ribbon Display Options.
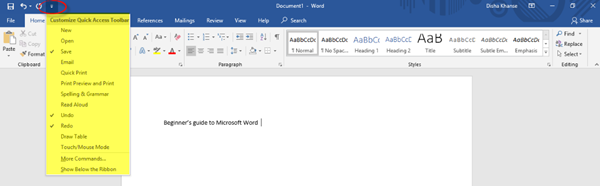
In the Quick Access Toolbar to the left of the Title Bar, you will find the Save button (Ctrl+S), wherein you can save the document in the desired folder; the Undo Typing button (Ctrl+Z); the Repeat Typing button (Ctrl+Y); and the Customize Quick Access Toolbar, wherein you have the various commands as shown in the image below.
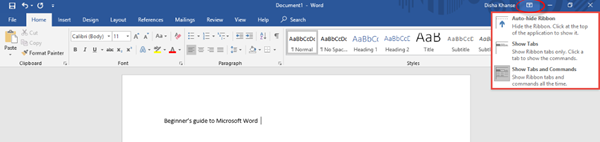
In the Ribbon Display Options, it is possible to Auto-hide the ribbon, show the ribbon tabs only or show the tabs and commands all the time. Refer to the image below.
Below the Title Bar, you will see what is called the Ribbon which consists of various tabs such as File, Home, Insert, Design, Layout, References, Mailings, Review, View, Help, Search. Now let us go through every Tab and its commands.
2] Home
The Home tab is the default tab in Microsoft Word. This tab comprises of features related to the clipboard, font, paragraph, styles, and editing.
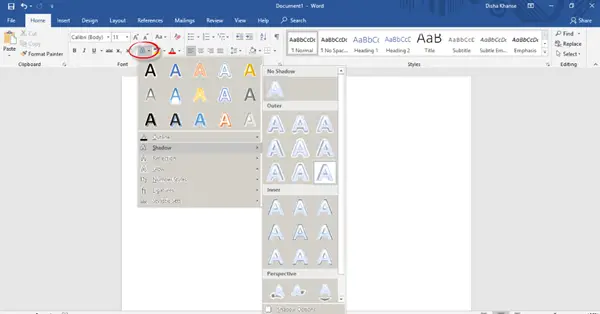
In the Clipboard section, you will find commands such as copy, cut and paste. Next, we have the Font section. Here you can change the font and the font size for your text, change the case, apply bold or italic formatting, underline, change the font color and highlight text and also add various text effects and typography. Go ahead and explore all the different options to make your text look great and innovative!

The Paragraph section includes the alignment options where you can choose to align your text in the center, left, right or justify it (that is, evenly distribute the text between the margins).
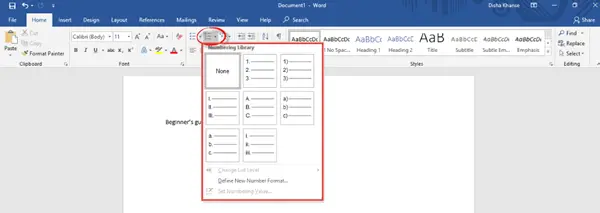
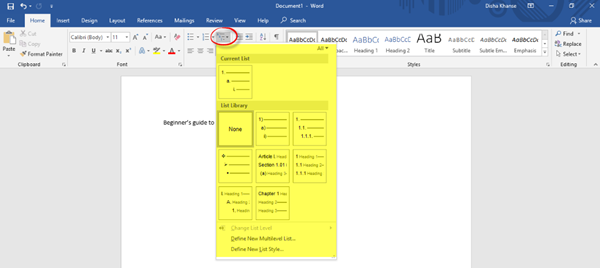
You can add or remove borders, increase or decrease indent, adjust the line and paragraph spacing, and also add bullets and numbers from the bullets and numbering libraries.
You can also create a multilevel list to organize items or create an outline.
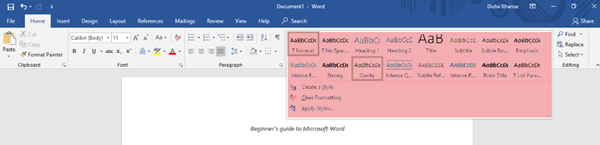
From the Styles section, you can select any style of your choice to change the way your document looks. In the Editing section, you can find text or any content in the document and also replace a specific word or text with something else.
3] Insert
The next tab is the Insert tab.

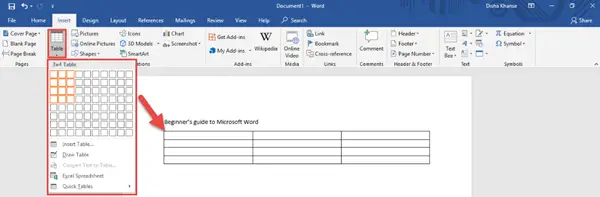
You can add a stylish cover page from the numerous styles available to make your document look more professional and also add a blank page from the Pages section. Another important feature is inserting a table, a picture from your picture gallery, an online picture from the web, shapes, 3D models, charts, SmartArt and screenshots from the Tables and the Illustrations section. Refer to the images below for guidance.
You can insert Tables.
You can insert Shapes.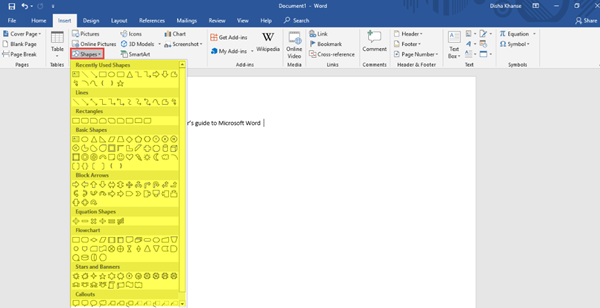
You can insert SmartArt – and more!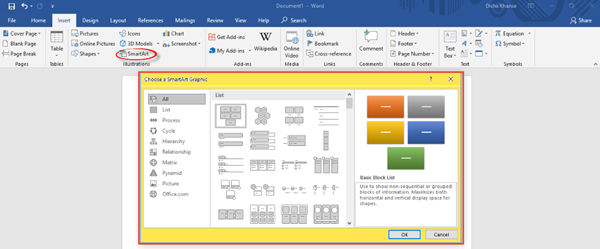
In the Header & Footer section, you can add a built-in header and a footer or from online sources. You can also add page numbers to your document.
Similarly, there are a lot of other features and commands in the Add-ins, Media, Links, Comments, Text and Symbols sections.
4] Design
The Design tab comprises of commands related to Document Formatting and Page Background. To make your document look more consistent and classy, choose the right theme of your liking from the various options available. Additional features include colors, fonts, effects, and paragraph spacing.
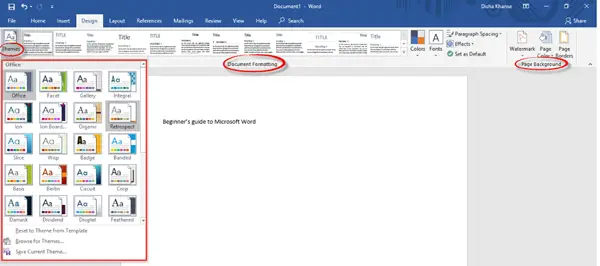
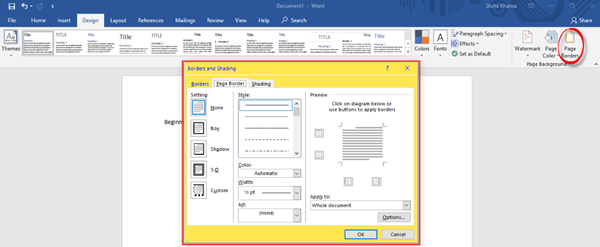
If you wish to go for a splash of color for the document background, you can change the page color as well, add Watermark and page borders.
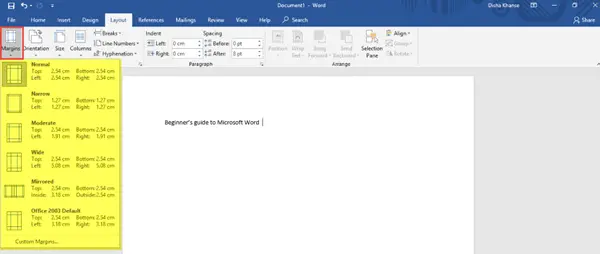
5] Layout
In this tab, in the Page Setup section, you can adjust margins for the entire document or for a particular section; and also customize it. You can change the Page Orientation to Landscape or Portrait; choose the page size for your document, and add or remove columns.
You can also decide the Size for the document.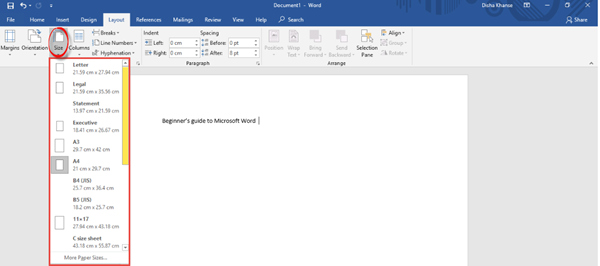
Find the settings to increase or decrease the Indent and Spacing in the Paragraph section.
Other features related to the placement of text and pictures, grouping multiple images and rotation options will be found in the Arrange section.
6] References
In the References tab, you will find different commands related to the table of contents, footnotes, research, citations and bibliography, captions, index and table of authorities.

7] Mailings
Here, you will find settings that will help you to create envelopes and labels, start the mail merge wherein you can send it to multiple recipients, write and insert fields, preview results and finish mail merge.

8] Review
The Review tab includes various functions related to proofing, speech, accessibility, language, comments, tracking, changes, compare, protect and ink. Out of all these, the Spelling and Grammar function (F7) is of utmost importance. Do check for spelling and grammatical errors after you are done writing your document.

9] View
In the View tab, you can change the views such as Read Mode, Print Layout, Web Layout, etc. Feel free to explore the additional features from the immersive, page movement, show, zoom, window, macros, and SharePoint sections.

10] Help
In the Help tab, you can contact an office support agent and give feedback.

11] Search
In the Search tab, you can type any feature that you are looking for and get help.
12] File
In the File tab, you can save the document, print and share the document, and also publish it.

In this post, I have tried to cover all the basic and useful features and functions of Microsoft Word.
This is my first blog post and I hope it was helpful to you. Your suggestions are most welcome.
Do try out all these features in order to make your MS Word document absolutely presentable and perfect!
Next, you might want to take a look at our Microsoft Word Tips And Tricks post.
Learn how to create, navigate, and format a document in Microsoft Word.
What to Know
- To create a Word document, choose a pre-built template or begin with a blank document.
- Open, save, and start documents using the File tab, and insert images, symbols, or other media using the Insert tab.
- In the “Home” tab, highlight your text and experiment with formatting options. You can alter the font, italicize/bold/underline your text, and experiment with font size.

If you’re new to MS Word or have just typed the occasional letter or short paper, you may be surprised at how much more it can do.
Word has hundreds of settings and tools to help you make professional-looking documents and use them for personal purposes.
Learning Microsoft Word like a pro will help you save time, increase productivity, and make your work and life easier, like comparing Word documents to know the differences.
You can download and use Microsoft Word for free if you only need to use basic features. There is also a version of Word for free on Mac.
RELATED: How To Get Microsoft Word For Free On Mac
How to Use Microsoft Word Step-by-Step
Here’s how to use Microsoft Word step by step.
Note: Instructions in this article apply to Microsoft Office Word 2007, Word 2010, Word 2013, Word 2016, Word 2019, Word 2021, Word for Microsoft 365, and Word for Mac. In this article, we are using Word 365 as an example.
Part 1: Creating a Basic Document

1. Open the Microsoft Word application: Double-click the Microsoft Word icon to open it.

2. Review the available templates: You’ll notice several templates of interest at the top of the screen:
- Blank document – A blank Word document with the standard formatting.
- Welcome to Word – Take a tour of Word using this template to learn and do the basics.
- Creative Resume/Cover Letter – A neat, pre-formatted resume (and cover letter) document.
- Student Report with Cover Photo – A document format aimed at an academic audience.
- Fax Cover Sheet – A document used to preface fax reports.
- Cards – Premade templates to create postcards.
- You can also use the search bar on the Home screen to look for specific templates online from within Word.

3. Choose a template: It will open the template in Word with whatever pre-determined formatting it has. Now that your document is open, you can review your Toolbar options.
- When in doubt, start with a blank document.
RELATED: How to Download and use Microsoft Word for Free
Part 2: Navigating the Microsoft Word Toolbar

1. Click the File tab: It’s in the upper left corner of the screen (or in the menu bar for Mac users). On the left side of your screen, you have several valuable options:
- New – Click this to open the “New Document” page, which contains a list of all the pre-formatted templates. When you open a new document, it will prompt you to save your previous one.
- Open – See a list of recently opened or pinned documents. You can also search in a specific directory (for example, “This PC“).
- Info (PC only) – Click this to review the document’s statistics, such as when it was last modified or created and any potential issues like Spelling errors, etc.
- Save – To save your document, click Save. If you’ve saved this document the first time, you’ll see a prompt to enter a name, save location, and preferred file format.
- Save As – Click this option to save your document “as” something (e.g., save under a different name or file format). You can also use this option to save a Word document to a pdf file.
- Print – Click this option to access your printer settings to print a Word document.
- Share – Click this tab to see the document’s sharing options, including email and cloud options.
- Export – Click this to create a PDF, create a PDF/XPS document, or change the file type quickly.
- Transform – Click this to transform your document to a Microsoft Sway web page.
- Close – Click this option to close your document (you’ll see a prompt asking to Save or Don’t Save your document’s content).
RELATED: How to Save or Export a Word Document As a PDF

2. Click ← in the top left corner of your screen. You won’t have this option on a Mac; click your document to exit the “File” menu.

3. Review the Home tab to see your formatting options. At the top of your document screen–from left to right–you’ll see six sub-sections of this tab:
- Clipboard – Text is saved on your clipboard whenever you copy it. By selecting the Clipboard option, you can view copied text.
- Font – You can change text case, font style, size, color, formatting (e.g., bold or italic), effects, and highlighting from this section.
- Paragraph – This section allows you to change aspects of your paragraph formatting, such as line spacing, alignment, indentation, and bullet formatting.
- Styles – This section discusses various text types for different situations (e.g., headings, titles, and subtitles). You’ll also notice the famous “No Spacing” option, which eliminates extra spaces between lines of text.
- Editing – Here, you’ll find frequently used tools, such as “Find and Replace,” which quickly allows you to replace all appearances of one Word with another. You can also use the Select option to select objects or text in your document.
- Dictate (Voice) – This Office Dictation option allows you to use speech-to-text to create drafts or outlines, capture notes, and get your thoughts out. Click the Dictate button and wait for it to turn on. Start speaking to see text appear on the Word document.

4. Click the Insert tab to review the media types you can place in your document. It is to the right of the Home tab. Use the Insert tab to add graphics, pictures, comments, and page numbers to your documents. Among the notable options, from left to right, are the following:
- Table – By selecting this option, you can create an Excel-style table directly within your document.
- Pictures – Insert an image into your document using this feature.
- Shapes – Insert readymade Shapes using this feature.
- Comment – Add a note in your document using this feature.
- Header, Footer, and Page Number – These options are required when writing in MLA or APA format. The Header adds a space at the top of the document for comments, while the Footer adds at the bottom—you can customize page numbers.
- Equation/Symbol – These options use special formatting to display simple equations correctly. You can choose these equations or symbols from the relevant drop-down menu.
- Link – Add clickable hyperlinks to take readers or users to webpages or files within or outside your document.

5. Click the Draw tab to create your drawings. It’s to the right of the Insert tab.
- The drawing features in Word can help you add notes, create shapes, edit text, and more. The Draw tab is also available in Excel and PowerPoint.
- The Draw tab provides three drawing textures: pen, pencil, and highlighter, each with a unique look. Click one to select it, and you’re ready to begin drawing.
- If you want to change the color or thickness of the pen, click the drop-down arrow next to it and choose your preference. Click away from the menu to return to your drawing when you’ve finished.
- You can use the Ink to Shape feature to convert your ink drawings to various shapes.

6. Click the Design tab to create your template. It’s to the right of the Draw tab.
- The Design tab displays pre-designed themes and document formatting options at the top of the page.

7. Select the Layout tab to change the formatting of your page. This tab includes options for modifying the following aspects of your document:
- Margins – Set the margin sizes for the entire document using this feature.
- Orientation – Change your page orientation to landscape or portrait.
- Page size – Choose a document size for your page using this option.
- Columns – Number of columns on the page (defaults to one). You can also Add or Remove Columns.
- Breaks – Insert a section break to your page and select where the section starts using this option.
- Hyphenation – Hyphenate a word using this feature.
- Indentation (left or right)
- Spacing (before or after)
- Selection Pane – Select the object to change its order or visibility using this option.

8. Click the References tab to manage your citations. You can also manage your bibliography page from here.
- Click the Bibliography drop-down menu and choose a template for quick bibliography formatting.
- You can change the bibliography formatting from APA to MLA in the “Citations & Bibliography” group of options (or other citation styles).
- You can insert a table of figures from the “Captions” group. It is helpful in scientific review papers or other documents where statistical data is more critical than quotations.
- You can insert Authorities from the “Table of Authorities” group. It allows you to add statutes and other citations to your document.
- You can create a table of contents from the “Table of Contents” group. It allows you to give an overview of your document.

9. Click the Mailings tab to review your document-sharing options. You can check your email settings, start mail merge, select recipients, and share documents from within this section.
- You can also create and print an envelope or label template by selecting it from the “Create” group in the upper left corner of your screen.
- The Start Mail Merge drop-down menu allows sending a document to multiple people. You can also insert different fields, such as Name and Address.
- The Select Recipients drop-down menu lets you choose between Outlook contacts and an existing contact list in Word. Or you can type a new list of recipients.

10. Click the Review tab. Since you can use the Review section for editing, it includes document marking and proofreading options. Among the essential options are:
- Spelling & Grammar (Editor): Select this option (far left corner) to highlight spelling or grammatical mistakes and writing suggestions.
- The “Proofing” section is on the far left side of the Word toolbar. Use the Word Count feature to count the number of characters, Pages, Words, Paragraphs, and Lines in your document.
- The “Changes” section: This section is on the far right side of the toolbar. You can enable the “Track Changes” feature from here, which automatically formats any additions or deletions you make in a document in red print. You can also jump from the Previous to the Next tracked change.
- The “Protect” section: Use Restrict Editing option to prevent formatting changes, track changes, or allow only commenting on the document.
Tip: In the newer versions of Microsoft Word, you’ll see the “Editor” option in the “Proofing group” instead of Spelling & Grammar.

11. Click the Focus Mode to eliminate distractions. It’s in the status bar of your document. Or you can select the View tab at the top to find this feature. It’s to the right of the Review tab.
- It’s for eliminating distractions from your document to improve productivity.
- Press the Esc key on your keyboard to exit focus mode.

12. Decide on the options that best apply to your work. For example, if you’re a student, you’ll almost certainly use the Insert and References tabs. You can format your first Word document now that you’re familiar with the toolbar options.
Part 3: Formatting Your Writing

1. Open a new Blank Document in Word. If you already have a document, you can open it instead.

2. Enter text. Click on the blank section of the document and start typing.
- If you opened an existing document, make a backup before reformatting.

3. Highlight a section of text. Click and drag your cursor across your writing and let go of the cursor when you’ve highlighted the area you wish to edit.

4. Consider what you want to do to the writing. Some potential options include:
- Format your writing quickly. Right-click (or two-finger click) on your highlighted text and choose an option from the right-click menu.
- Change the font of your choice. You can select a new font from the drop-down bar at the top of the “Font” section (Home tab).
- Make your highlighted section bold, italicized, or underlined. Click the B, I, or U in the “Font” section of the Home tab.
- Change the color of your text. You can click the drop-down bar next to Font Color in the Font group of the Home tab and then choose a color.
- Change your document’s spacing. It is easiest to do by right-clicking your selected text, selecting Paragraph, and adjusting the “Line Spacing” value in the bottom right corner of this window.

5. Continue working with Word. Your preferred options for your documents will vary depending on the purpose of creating them. So the more you work within your format, the more experienced you’ll become.
RELATED: How to Update Microsoft Word on Windows PC and Mac
Tips
- A red line under a word indicates a misspelling, a green line indicates a grammatical error and a blue line indicates formatting.
- If you right-click (or two-finger click) on an underlined word, a replacement suggestion will appear at the top of the right-click menu.
- Hold down the Control (or ⌘ Command key on a Mac) and tap S to save your document quickly.
Warning
- Don’t forget to save your work before exiting Word.
Is Microsoft Word free?
Yes absolutely! Microsoft Word is free to download and use from the Apple App Store or Google Play Store. You can also use the free web version of Word online in your browser.
How can I install Word for free?
Go to the free Office website and sign up for free. Then log in to your Microsoft account and start using Word for free. You can also save your work in the cloud with OneDrive.
How to use Microsoft Word for free?
To start using Office apps for free. open your browser, go to www.office.com, and sign up for free. Select the Word app to use it for free. You can choose from free online versions of Excel, PowerPoint, Outlook, OneNote, and OneDrive online storage.
Reference:
- https://support.microsoft.com/en-us/office/basic-tasks-in-word-87b3243c-b0bf-4a29-82aa-09a681999fdc
Step 1: Open Microsoft Word
Step 1:
From the desktop or from your ‘Start’ menu, open Microsoft
Word.

Next page
Step 2: Microsoft Word Startup »

Gratitude
Express Gratitude 🙏
Self Gratitude
Send Gratitude
Submit
Player
View Profile
Send Gratitude
Gratitude Sent!
Thank you for fueling guides with your gratitude.
Embed This Guide
Embed Card
Copy the text above to add this widget to your blog or website.
Embed Guide
Or use a custom size:
update
Select and copy the text above and paste it in your code.