
Word for Microsoft 365 Word 2021 Word 2019 Word 2016 Word 2013 More…Less
Once you have a table in Word, you might decide to split that table into two or more tables. This way, you can create smaller tables, or add text in between two tables.
-
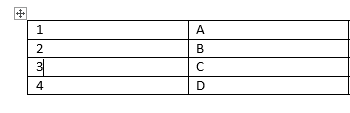
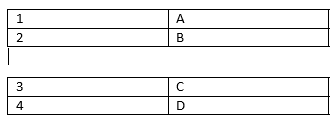
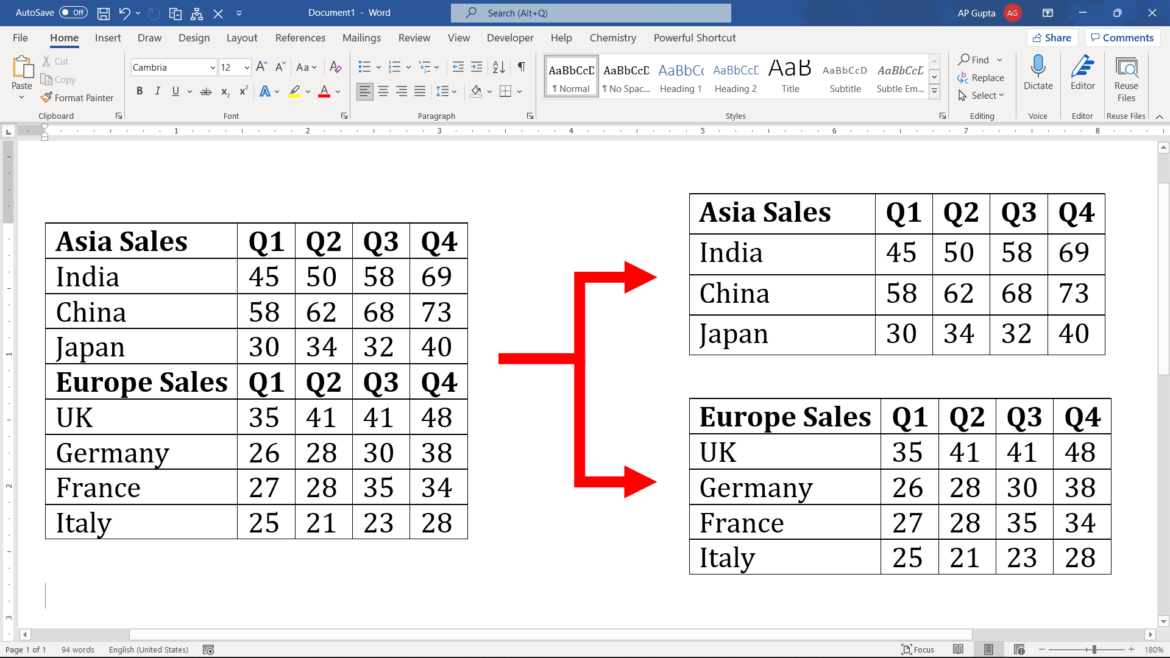
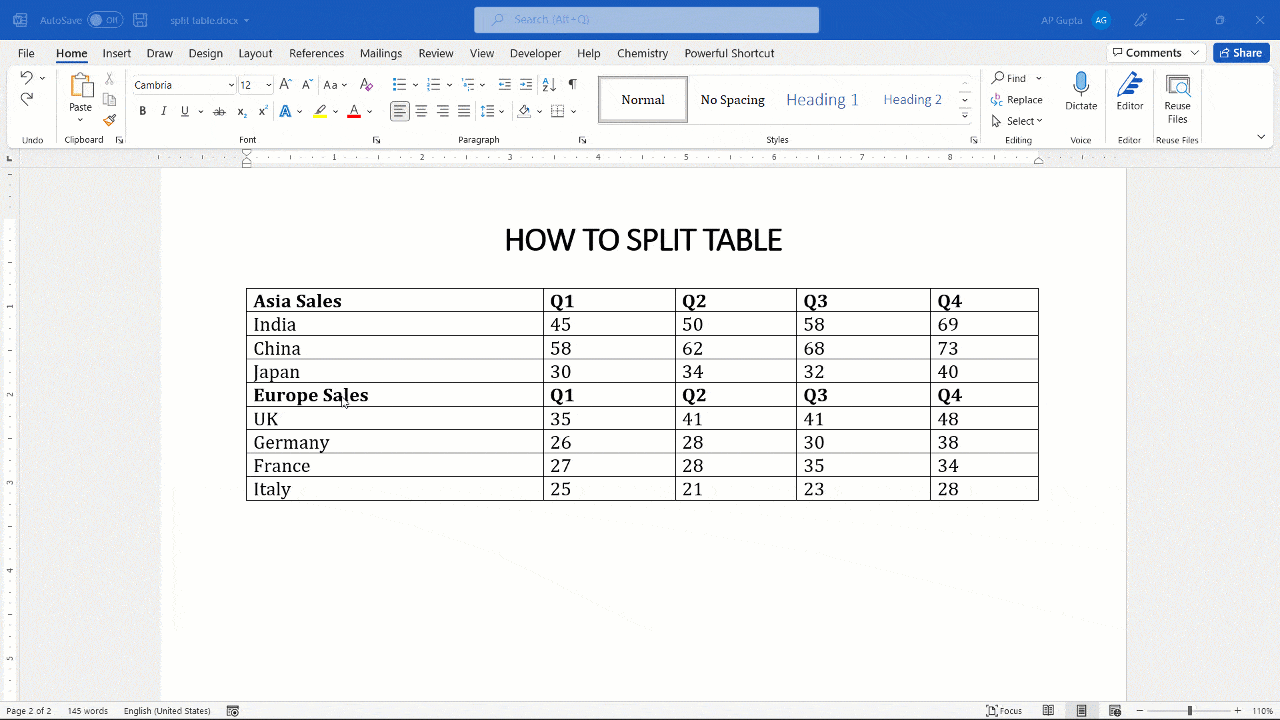
Put your cursor on the row that you want as the first row of your second table. In the example table, it’s on the third row.

When you click inside the table, two new Table tools tabs appear on the ribbon: DESIGN and LAYOUT. These tools are visible only when you are in the table, for example, when you add content to the cells.
-
On the LAYOUT tab, in the Merge group, click Split Table.
The table splits into two tables.
You can split the table further, as long as there are multiple rows.

See Also
Insert a table — Word
Convert text to a table or a table to text
Use a formula in a Word or Outlook table
How to merge two tables
Need more help?
Want more options?
Explore subscription benefits, browse training courses, learn how to secure your device, and more.
Communities help you ask and answer questions, give feedback, and hear from experts with rich knowledge.
![]()
Download Article
![]()
Download Article
What if you have one table of data in Word and you want to split it? Splitting a table in Word could be useful in a myriad of ways, like if you want to create smaller tables or add text and other document elements to your data. This wikiHow article teaches you how to split a table in Word on your computer since the feature isn’t available on the mobile app.
-
1
Open the Word document you want to edit. Find and double-click the file you want to edit on your computer, and open it in Microsoft Word.
-
2
Click the table you want to split. This will reveal two new tabs above the toolbar ribbon at the top of your document: Design and Layout.
- If you want to add a new table to your document, click the Insert tab at the top, and click Table on the toolbar.
Advertisement
-
3
Click the row where you want to split your table. The row you select here will be the first row of your second table after splitting.
- For example, if you click the third row of your table, your first table will have two rows after splitting, and your second table will start from the third row.
-
4
Click the Layout tab on the toolbar ribbon. When your table is selected, you can use the tools in this tab to edit its layout.
-
5
Click Split Table icon on the Layout toolbar. This button looks like a four-row table icon split in the middle. You can find it next to Merge Cells and Split Cells in the Merge group.
- This icon will not be visible if you don’t have your cursor clicked in a table row.
- This will split your table into two tables.[1]
- You can also press the keyboard shortcut: Ctrl + Shift + Enter to split the table at your cursor.


Advertisement
Ask a Question
200 characters left
Include your email address to get a message when this question is answered.
Submit
Advertisement
Thanks for submitting a tip for review!
About This Article
Article SummaryX
1. Open the Word document.
2. Click the table.
3. Click the row you want to split from.
4. Click the Layout tab on the toolbar.
5. Click Split Table.
Did this summary help you?
Thanks to all authors for creating a page that has been read 52,140 times.
Is this article up to date?
Split a table
- Put your cursor on the row that you want as the first row of your second table. In the example table, it’s on the third row.
- On the LAYOUT tab, in the Merge group, click Split Table. The table splits into two tables.
Contents
- 1 What is the shortcut to split a table in Word?
- 2 Why can I not split a table across pages in Word?
- 3 Can you split a table vertically in Word?
- 4 Why is table splitting in Word?
- 5 How do I split a column in a table in Word?
- 6 How do I join two tables in Word?
- 7 What Ctrl Z do?
- 8 How do I break a table across pages in Pages?
- 9 How do you make a table not break across pages?
- 10 How do I make a table in Word continue onto the next page?
- 11 How do I split a Word document into two vertical sections?
- 12 How do I split a word page in two?
- 13 How do I split a Word document into two horizontal sections?
- 14 Where is table Tools in Word?
- 15 What are two methods to select a table?
- 16 How do I separate columns in a table?
- 17 How do I split a line in Microsoft Word?
- 18 How do I link tables in Word?
- 19 What does Ctrl Shift Alt R do?
- 20 What does Alt Tab do?
What is the shortcut to split a table in Word?
You can also use an easy shortcut key to split a table into multiple tables, please put the cursor at the cell where you want to split from, and then press Ctrl+ Shift+ Enter keys together to split the table into two parts.
Why can I not split a table across pages in Word?
Select the table which breaks across two pages, and then click Layout (under Table Tools) > Properties. See screenshot: 2. In the popping out Table Properties dialog box, (1) enable the Row tab, (2) uncheck the Allow row to break across pages option, and (3) click the OK button.
Can you split a table vertically in Word?
Merging two tables in Word is as easy as splitting them. To merge split tables vertically, simply select the second table, click it then drag it to the right border of the top-right cell. Be careful not to drag the table by the Move table icon, as this will only move the second table next to the first table.
Why is table splitting in Word?
As your tables get larger, Word automatically breaks tables so the most information can get on each page.Word displays the Cell Height and Width dialog box with the Row tab selected. Make sure the Allow Row to Break Across Pages check box is cleared. Click your mouse on OK.
How do I split a column in a table in Word?
Split cells
- Click in a cell, or select multiple cells that you want to split.
- Under Table Tools, on the Layout tab, in the Merge group, click Split Cells.
- Enter the number of columns or rows that you want to split the selected cells into.
How do I join two tables in Word?
1. Click on the table you want to drag, then the cross sign will be appeared, then click the cross sign to select the whole table. 2. Press Shift + Alt + Up arrow until the selected table is joined to above one.
What Ctrl Z do?
To reverse your last action, press CTRL+Z. You can reverse more than one action. To reverse your last Undo, press CTRL+Y. You can reverse more than one action that has been undone.
How do I break a table across pages in Pages?
If you have a large table that breaks across pages, you can specify where the table will break.
- Select the row before which you want the table to break.
- Choose Table > Table Properties.
- In the Row tab, choose Force under the Page Break Before Row option.
How do you make a table not break across pages?
Questions and answers
- Click into a cell in the row.
- Open the Layout tab under Table Tools and from the Table group select the Properties icon.
- Select the Row tab.
- Turn off the option to ‘Allow row to break across pages’
- Repeat for any other rows in the table.
- Click on OK.
How do I make a table in Word continue onto the next page?
In the table, right-click in the row that you want to repeat, and then click Table Properties. In the Table Properties dialog box, on the Row tab, select the Repeat as header row at the top of each page check box. Select OK.
How do I split a Word document into two vertical sections?
How can I split my Word document vertically and duplicate the text on both halves?
- Select & copy the existing text.
- On the Layout tab of the Ribbon in the Text Layout group click the Columns button, select Two.
- Click at the very bottom of the existing text.
- On the Layout tab, Page Setup group click Break, select Column.
How do I split a word page in two?
Highlight the text you wish to split into columns. Select the “Page Layout” tab. Choose “Columns” then select the type of columns you wish to apply. For this to fully work, you must have enough text typed to fill the first column before the text will start filling into the second column.
How do I split a Word document into two horizontal sections?
Microsoft Access Divide Word documents into sections using horizontal lines
- Put your cursor in the document where you want to insert the horizontal line.
- Go to Format | Borders And Shading.
- On the Borders tab, click the Horizontal Line button.
- Scroll through the options and select the desired line.
- Click OK.
Where is table Tools in Word?
When working within a table, the Table Tools tab appears in the Ribbon, and includes the Design and Layout tabs. You can easily sort data in a table in either ascending or descending order.
What are two methods to select a table?
To select an entire table using a keyboard, position the cursor in the first cell of the table. Press Alt + Shift + End on your keyboard to select to the end of the first row and then press Alt + Shift + Page Down to select to the last cell.
How do I separate columns in a table?
Split cells
- In the table, click the cell that you want to split.
- Click the Layout tab.
- In the Merge group, click Split Cells.
- In the Split Cells dialog, select the number of columns and rows that you want and then click OK.
How do I split a line in Microsoft Word?
Press and hold down the “Ctrl” key, which keeps your divider line straight. Position the cursor near the left margin under the place you want to divide. Press and hold down the left mouse button and drag the cursor to the right, drawing the divider. Release the mouse button and the “Ctrl” key.
How do I link tables in Word?
Add the link
- Select the text or object you want to use as a hyperlink.
- Right-click and then click Hyperlink .
- Under Link to, click Place in This Document.
- In the list, select the heading or bookmark that you want to link to.
What does Ctrl Shift Alt R do?
You can make a video recording of what is happening on your screen: Press Ctrl + Alt + Shift + R to start recording what is on your screen. A red circle is displayed in the top right corner of the screen when the recording is in progress. Once you have finished, press Ctrl + Alt + Shift + R again to stop the recording.
What does Alt Tab do?
Pressing Alt-Tab switches between all open applications in the Taskbar. The Alt key is held down while the Tab key is pressed to cycle through the icons of all the windows. When the Tab key is released, the highlighted window is brought to the foreground.
Organizing text and numerical information on a table is a great way to present them. After all, the rows and columns can be customized. However, you may encounter difficulties like splitting a table horizontally into two separate ones. This is because it’s usually already too late before you realize that the data in your table is best split up. Well, you’re in luck! MS Word offers more than one way to split tables horizontally in your document.

Now, there are about two ways to split a table horizontally in Word.
- Using the Split Table button
- Using shortcut keys
Let’s dive right in.
Method 1: Using the Split Table button.
If you prefer using just your mouse to split a table, you are only around three clicks away with this method. Here, we will be looking at the Ribbon or the basic toolbar located at the top of your MS Word window.
Below are steps to access the Split Table button in Word.
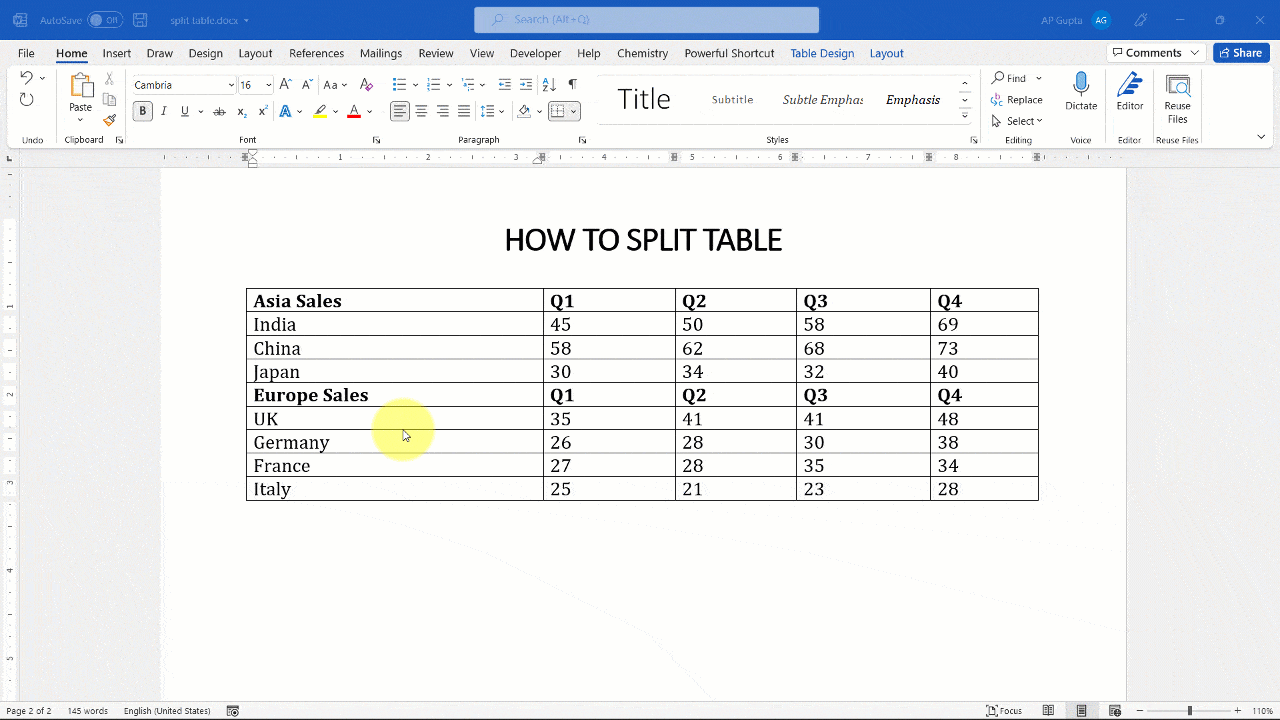
Step 1: Open up a Word document.
First off, we’ll need to open up a Word document. Feel free to use your own personal file if you already have one open. Otherwise, you can always choose to create a new blank one. Just make sure to insert a table before proceeding to the next step.

Step 2: Click on a table row.
Once your document is ready, go ahead and click on the row that you want to turn into the header of the new table.
For this example, we’ll click on the third row.

Step 3: Access the Split Table button.
With your cursor staying on the table, you can click the Layout tab under the Table Tools category displayed last on the Ribbon. As mentioned earlier, the Ribbon is a basic toolbar found at the top of your MS Word window. From the Layout tab and click the Split Table button.

Note that the Table Tools tab will only be visible if the table is selected beforehand.
Congratulations! You’ve just used the Split Table button to fix the problem. Still a little puzzled? Don’t fret, here’s an easier one.
Method 2: Using Shortcut Keys
There’s no faster way to split a table horizontally in Word than by simply pressing a combination of keys on your keyboard. This method allows you to split your table without removing your focus from the screen.
Here’s how you can do just that.
Step 1: Open up a Word document.
Before we get started, we’ll need to open up a Word document. If you don’t have one yet, then you can start a new one and make sure there’s a table in it. With this, we’re already halfway done.

Step 2: Click on the row.
Once your document is open, click on the row where you want the table to be split. Note that MS Word will turn the selected row into a new table header. Next, press the CTRL + SHIFT + Enter keys on your keyboard.
For this example, we’ll click on the fourth row.

After using the shortcut keys, this is the result we got.

Wonderful job! You’ve just used a shortcut key to split a table horizontally in Word.
Merging Split Tables in Word
If you happen to be in a situation where you need to reattach two separate tables, we got you. In this section, we’ll show you the steps on how to merge split tables when the Undo button just won’t cut it.
Take note that the method presented below simply connects the whole row of the selected cells on a table to the one it is directed to.
To merge a table with one below it, simply select the entire first table and press the ALT + SHIFT + ARROW DOWN keys on your keyboard. Conversely, use the ALT + SHIFT + ARROW UP keys after selecting the second table.
If there are text or other objects between the tables, just continue pressing the arrow key to the direction of the table you want to keep. You can even move the selected cells in between the rows of that table.
For this example, we’ll select the first table and merge it with the second one.

If you have fewer columns on the second table, applying the same steps will give us a table like the one below.

Conclusion
Congratulations! You’ve reached the end of this tutorial. We hope we helped you figure out how to split a table horizontally in Word. Before you go, allow us to give you a quick rundown of what we’ve discussed.
There are a handful of reasons why you’d split tables horizontally in Word. Whatever yours is, you’ll surely find it to be essential. In this article, we showed you two methods to easily split tables in Word. We demonstrated how to access the Split Table button and what the keyboard shortcut is.
We hope you’ve found this article helpful!
Tables provides one of the best and compact way to organize and represent data as rows and columns. Sometimes we make a big table and then later on wonder that splitting table into smaller tables may better idea. If find yourself into a situation where you need to split table vertically then the following two methods (Split Table option or a faster keyboard shortcut) may help you do the task in few clicks.
1: Using “Split Table” option
The steps to split the table vertically are
- Bring the cursor to the row that you want to have as a first row in the next table
- Go to “Layout” Tab and click “Split Table“. Alternatively, you can also hit Alt, J, L, Q keys successively.
2: Using keyboard shortcut
You can also use keyboard shortcut to move rows down to split table. The steps are as follows.
- Select all the rows that you need to move to the next table.
- Press “Alt+Shift+DownArrow(↓)” to separate the selected rows from the current table.
Video Demonstration
You can also watch all the above shortcut in my following YouTube video.