
To extend content across multiple rows or columns in a table, merge cells to create a larger cell. Or, split cells into smaller cells.
Merge cells
-
Select the cells that you want to merge.
-
Select Layout > Merge Cells.
To unmerge cells, select the cells and select Unmerge Cells.
Note: In Excel, select the cells you want and select Merge & Center. To unmerge cells, select the cells and select Unmerge Cells.
Split cells
-
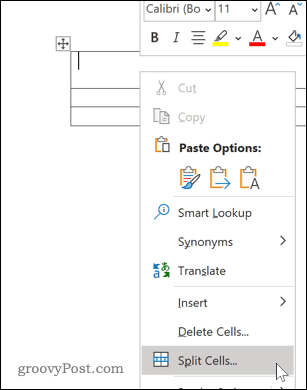
Select the cell that you want to split.
-
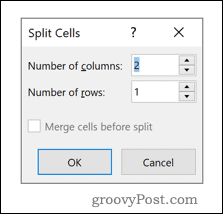
Select Layout > Split Cells.
-
Enter the number of columns or rows that you want to split the selected cell into, and then select OK.
Want more?
Merge or split cells in a table
Word training
PowerPoint training
Excel training
Outlook training
You can merge or split table cells however you’d like, to better organize your table.
For example, to make Monthly Sales the header for all of the months rather than for a single column.
Select the cells you want to combine.
Select Layout, and then Merge Cells.
And center the heading, Monthly Sales.
To add a quarterly sales heading, select the header row, and then select Split Cells.
To have a column for quarter 1 and one for quarter 2, leave the number of columns as 2 and select OK.
And add your header text: «Q1 Sales» and «Q2 Sales»
In Excel, you can’t merge cells in tables, but you can in spreadsheets.
To make Monthly Sales the header for all of the months, select the cells you want to merge, and then in Home, select Merge & Center. When you merge cells, you lose any data in the second cell.
To unmerge them, select Unmerge Cells.
Содержание
- Способ 1: Контекстное меню
- Способ 2: Инструменты вкладки «Макет»
- Способ 3: Самостоятельное рисование
- Вопросы и ответы

Способ 1: Контекстное меню
Наиболее простым способом разделения ячеек в таблице Ворд является обращение к контекстному меню, вызываемом на соответствующем элементе.
Важно! Если в ячейке содержатся данные, в результате они будут помещены в первую из них – левую, верхнюю или левую верхнюю, в зависимости от того, каким образом и на какое количество элементов осуществляется разделение.

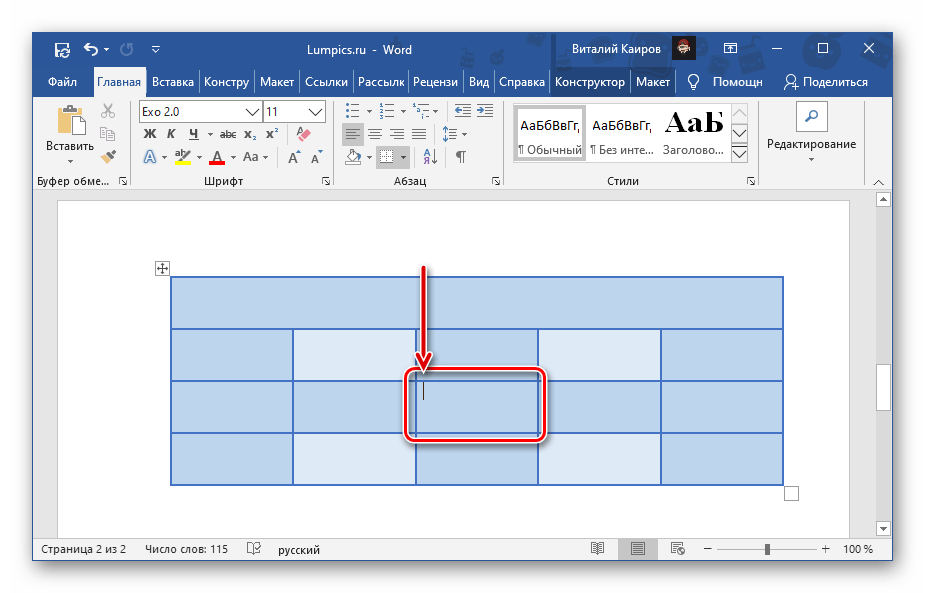
- Кликните правой кнопкой мышки (ПКМ) по той ячейке, которую требуется «разбить».
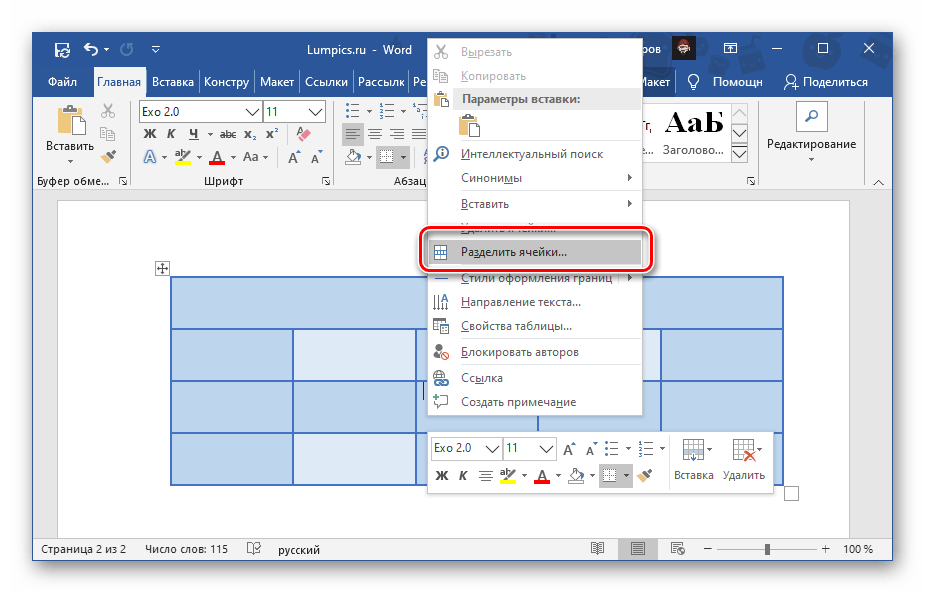
- Выберите пункт «Разделить ячейки».
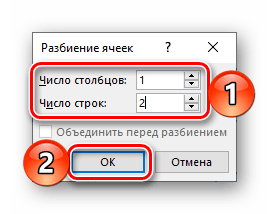
- В появившемся окошке укажите «Число столбцов» и «Число строк», которое вы хотите получить в данном элементе таблицы. Нажмите «ОК» для подтверждения.

Примечание: Для разбиения по вертикали необходимо указывать количество столбцов, по горизонтали – строк. В примере ниже показана одна ячейка, деленная на две вертикально, то есть теперь в ней две колонки. Количество получаемых в результате выполнения данного действия элементов не ограничено, однако стоит учитывать их будущий размер и объем данных, которые потребуется вводить.


Если при разделении ячеек вы допустили ошибку, либо воспользуйтесь клавишами «Ctrl+Z» для отмены действия, либо выделите полученные в результате деления элементы таблицы, вызовите контекстное меню и выберите пункт «Объединить ячейки».

Читайте также:
Как отменить последнее действие в Word
Как объединить ячейки в таблице Word
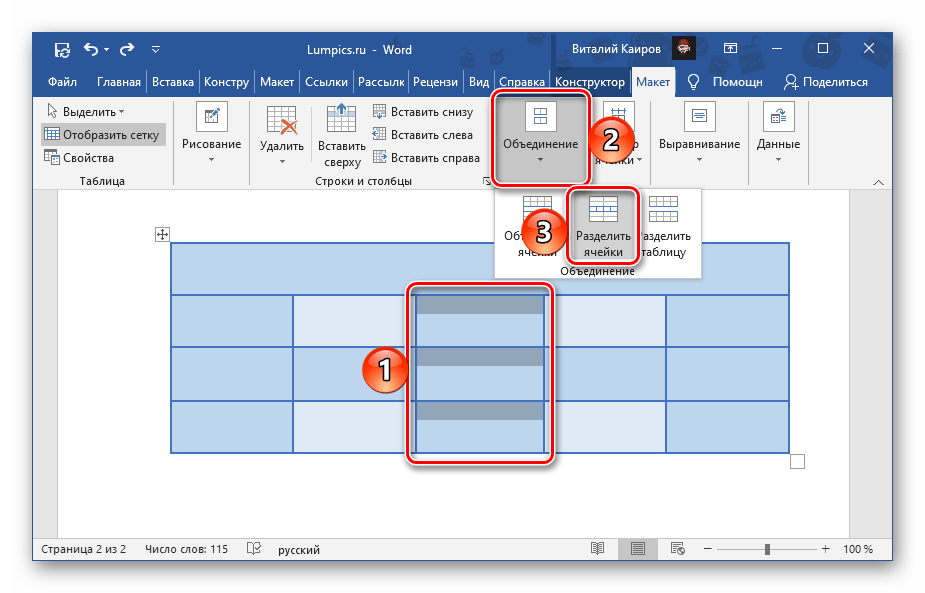
Способ 2: Инструменты вкладки «Макет»
Сразу после создания таблицы и/или ее выделения на панели инструментов Ворд появляется группа «Работа с таблицами», состоящая из двух вкладок – «Конструктор» и «Макет». Обратившись к последней, можно решить озвученную в заголовке статьи задачу, главное – не путайте ее с вкладкой, которая изначально представлена в панели инструментов.
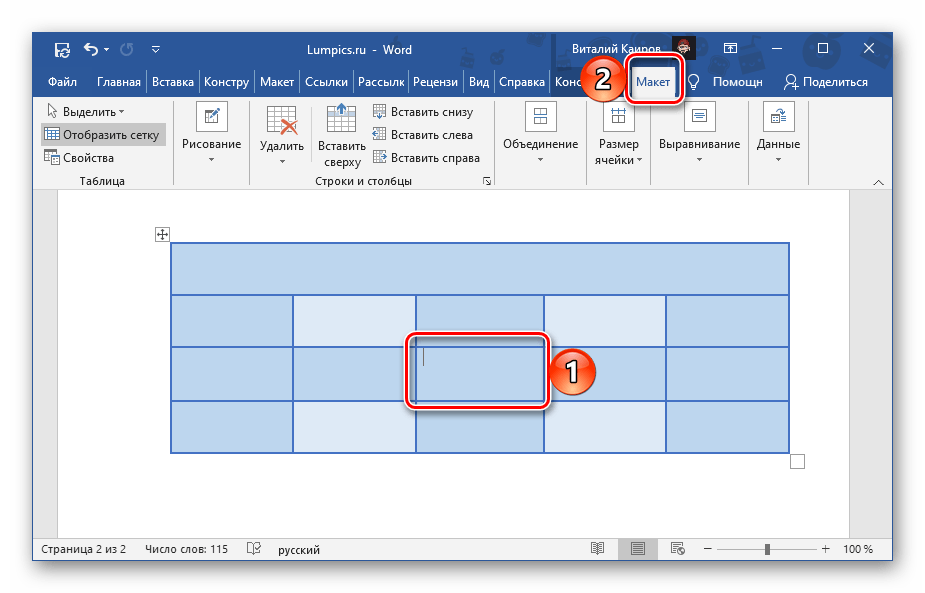
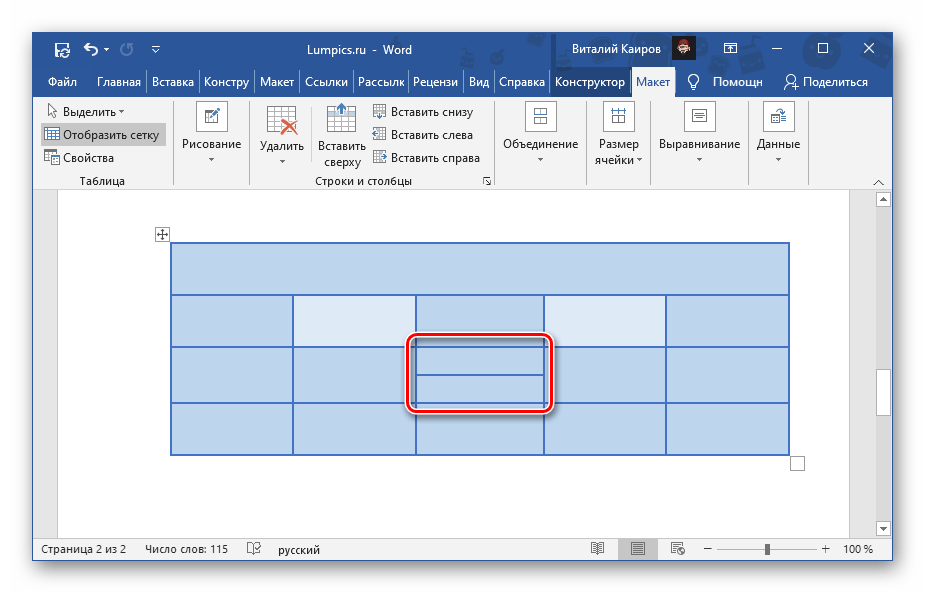
- Кликните левой кнопкой мышки (ЛКМ) по той ячейке, которую требуется разбить, и перейдите в показанную на изображении ниже вкладку «Макет».
- Нажмите на кнопку «Разделить ячейку», расположенную в группе «Объединение».
- Выполните те же действия, что и на последнем шаге предыдущей инструкции, то есть укажите нужное число столбцов и/или строк, на которые требуется разделить выбранный элемент, после чего кликните «ОК».


Ключевое различие между этим и рассмотренным выше методом заключается в том, что с помощью инструмента вкладки «Макет» можно разбить не только одну,
но и сразу две и более ячеек. Контекстное меню этого сделать не позволяет.
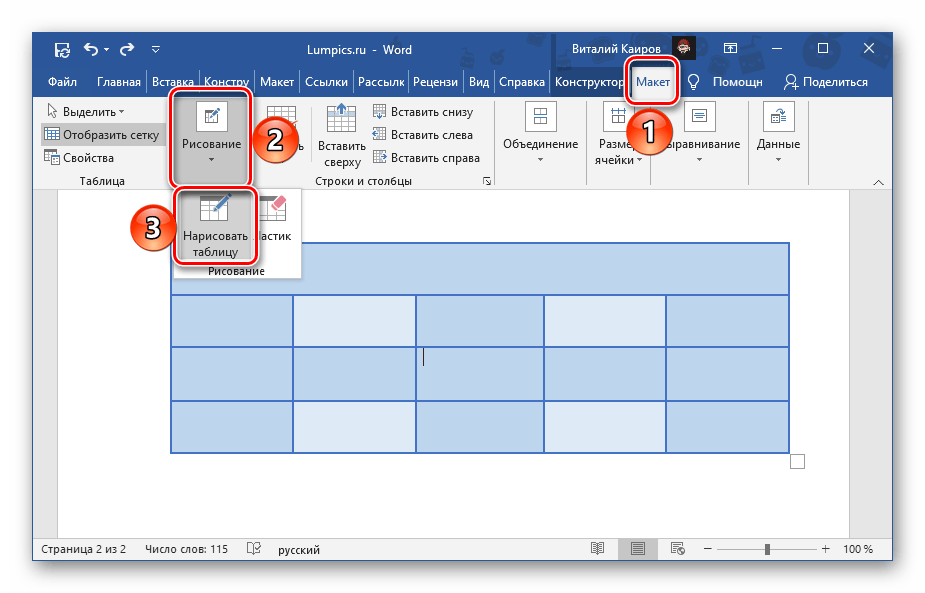
Способ 3: Самостоятельное рисование
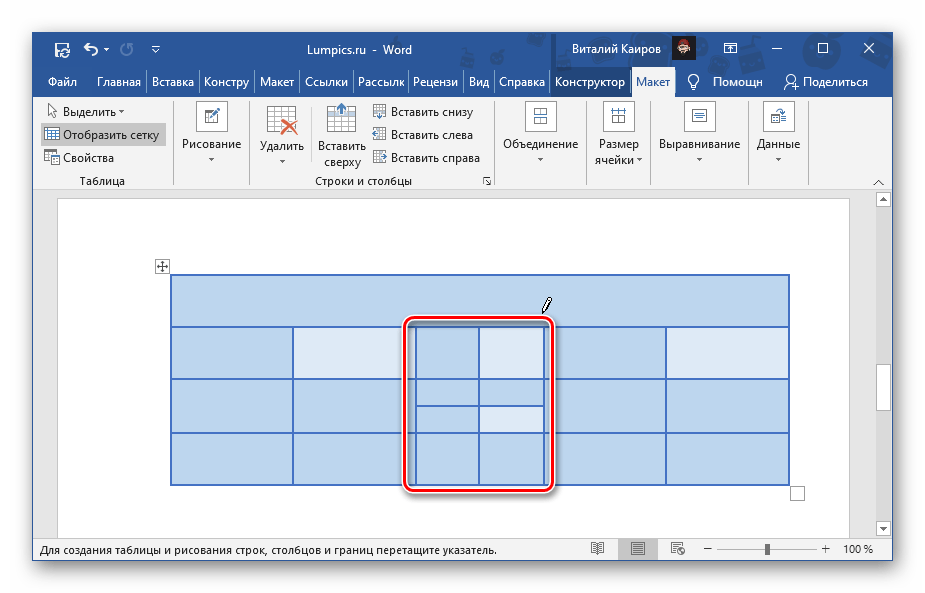
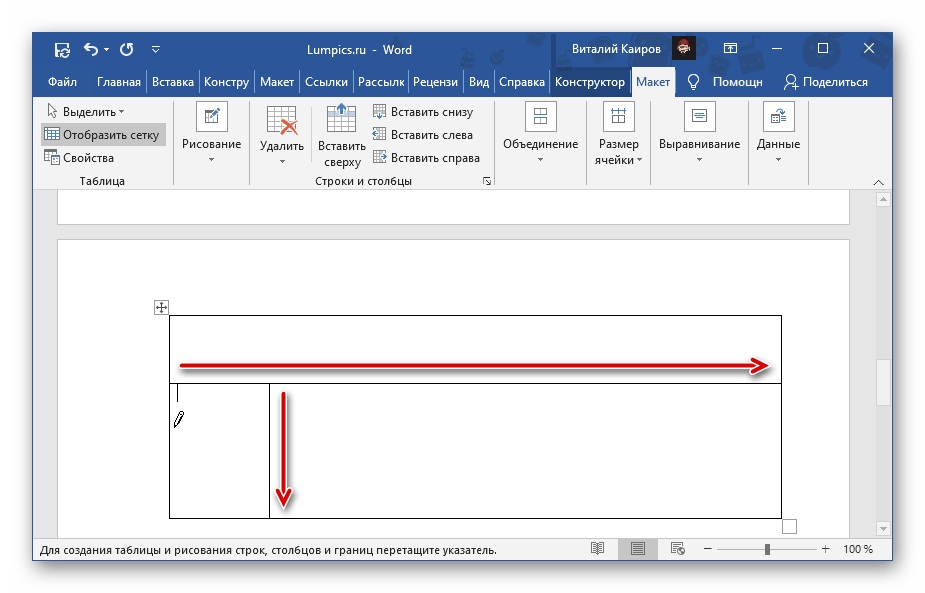
Существует еще один метод разделения ячеек в таблице Ворд, который, в отличие от двух предыдущих, позволяет это сделать не только строго симметрично, а еще и произвольно, вручную нарисовав линию, которая поделит элемент на столбцы и/или строки.
- Перейдите во вкладку «Вставка», нажмите на кнопку «Таблица» и выберите пункт «Нарисовать таблицу».

Примечание: Вызвать этот же инструмент можно через вкладку «Макет», предварительно выделив всю таблицу или кликнув по любой ее части.
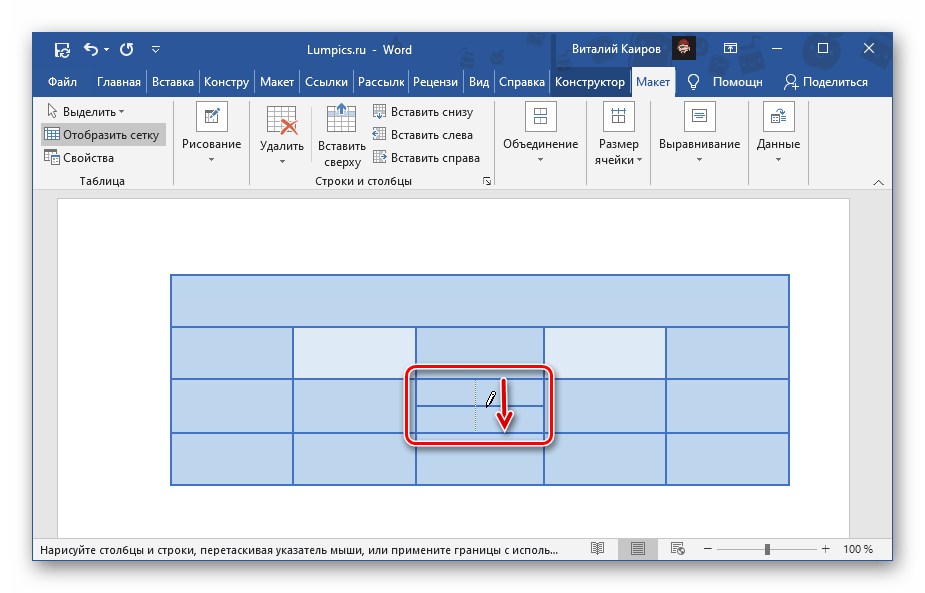
- Указатель курсора сменится на карандаш, с помощью которого мы с вами и разобьем ячейку.
Для этого достаточно провести в ней вертикальную или горизонтальную черту (обязательно делать это строго от границы до границы и максимально ровно), в зависимости от того, требуется ли сделать строки или столбцы.
При желании можно делить ячейку и на строки, и на столбцы.
- Несложно догадаться, что данный инструмент позволяет ячейку разделить на неограниченное число элементов.
К тому же, нарисовать границу можно не только в одной из них, но и сразу в нескольких.


Обо всех нюансах самостоятельного черчения таблиц мы ранее писали в отдельной статье.
Подробнее: Как начертить таблицу в Word
Еще статьи по данной теме:
Помогла ли Вам статья?

You can easily merge and split cells in Microsoft Word to make your tables more interesting and more suited to the data you are trying to share. When you merge two or more cells, you are bringing them together in one cell. When you split a cell, you are dividing it from one cell into multiple cells.
You can merge and split tables on the individual cell level, as well as on the larger, table-wide level. In this article, I’ll show you how to merge and split table cells and tables in Word.
Merging cells in a table combines two or more adjacent cells of the same size into one larger cell.
First, select the cells you want to merge. They can be adjacent cells in a row or column.

Or they can be adjacent cells that span multiple rows and columns.
When you have your cells selected, right-click any of the selected cells, and then choose the “Merge Cells” command on the context menu.
If you prefer using Word’s menus, you can also head to the Table Tools “Layout” tab, and then click the “Merge Cells” button there.
Either way, your cells are now merged.
How to Split Cells In A Word Table
Splitting table cells in Word is only slightly more complicated than merging them. You can use the split command to one or more cells into a set number of rows and columns. Here’s how it works.
Let’s first say that we just one to split a single cell into two cells. First select the cell you want to split.
Then, right-click the selected cell and choose the “Split Cells” command from the context menu. (You can also head to Table Tools > Layout > Split Cells on the Word Ribbon if you prefer.)
This opens the Split Cells window. By default, it’s set up to split the selected cell(s) into two columns, which is exactly what we want. You can just go ahead and click the “OK” button to make the split. Input the number of rows and columns you would like to split your cell into.
And that cell we selected is now two cells.
As you probably guessed from the options in that Split Cells window, you can also get a little more complex with cell splitting. Let’s say we had a table like the one shown below. And we want to take those selected cells (the ones in gray under the second column header) and turn them into two big rows of three columns each.
We’d head to Table Tools > Layout > Split Cells (a lot of times the Split Cells command doesn’t show up on the context menu when you have multiple cells selected, so it’s easier to use the Ribbon button). In the Split Cells window, we’d select three columns and two rows. We also want those cells merged before being split, so make sure that option is selected.
When we hit “OK” the table turns out just like you’d expect.
And obviously, this is just a quick look. You can get just about as complicated with your table layout as you’d want.
How to Split a Table in Word
You can split an entire table in Word. This can be useful for splitting long tables into two separate tables—mostly in hopes of dealing with formatting issues that multi-page tables can sometimes cause.
First, click to place your insertion point in the cell where you would like your table split to begin. The cell that contains the insertion point will become the top row of the second table.
Head to Table Tools > Layout, and then click the “Split Table” button.
Your table is now split into two tables.
How to Merge a Table in Word
And as you might expect, you can also merge tables together. There’s no button on the menu for this one, though. You have to do it by dragging and dropping.
Hover your pointer over the table you would like to merge until the table’s handle (the plus sign) appears at its top left corner. You can click and drag the table using that handle.
Drag the table until its top row aligns with the bottom row of the table you’re merging into.
When you release your mouse button, Word merges the two tables.
Now you know how to easily merge and split tables and table cells in Microsoft Word. Of course, like with any other Word feature, this one takes some playing with. Especially if you’re doing complex merges and splits (or merging together long tables), formatting can sometimes get a little weird.
READ NEXT
- › How to Make Your Word Document More Accessible to Everyone
- › How to Merge and Split Tables in Google Docs
- › How to Make a Calendar in Microsoft Word
- › How to Adjust and Change Discord Fonts
- › The New NVIDIA GeForce RTX 4070 Is Like an RTX 3080 for $599
- › Expand Your Tech Career Skills With Courses From Udemy
- › Google Chrome Is Getting Faster
- › This New Google TV Streaming Device Costs Just $20

If you’re looking to manipulate your tables in Microsoft Word, you may want to split or merge cells together. Here’s how.
Microsoft Word is a great application for creating standard text documents, but it’s also very useful for other types of data, such as those presented in a table.
It’s a very easy process to create tables in Microsoft Word, but you may need to customize them. Thankfully, Word allows you to do this by merging and splitting table cells, letting you build your tables any way you want.
If you want to split or merge tables in Microsoft Word, here’s what you’ll need to know.
When you create a table in Word, it’ll have the same number of rows in every column, and the same number of columns in every row.
You may want to have a single row that is the full width of your table at the top to use as the title of your table. Alternatively, you may want other combinations of rows and columns that you can’t create using the default table settings.
The simplest way to do this is to merge cells together. For example, in a 3×3 table, you can merge the three cells in the top row to make one full-width row, with a 2×3 grid beneath it.

Once you know how to merge cells, it allows you to get a lot more creative when creating tables in Word.
Why Split Cells in Word?
The most obvious reason to split cells in Word is to undo any merging you have done previously, but you can split any existing cell into two.
If you no longer wish to have a single full-width cell at the top of your table, for example, then you could split those cells back up again. If you want to add one extra column to a single row of your table, you can split one of the cells in that row to do so.
Splitting cells allows you to play around with the design of your table until you’ve got it exactly how you want it.
How to Merge Cells in Word
Merging cells in Word is fairly simple to do, and there are a few ways you can do it.
Using the Merge Cells Button
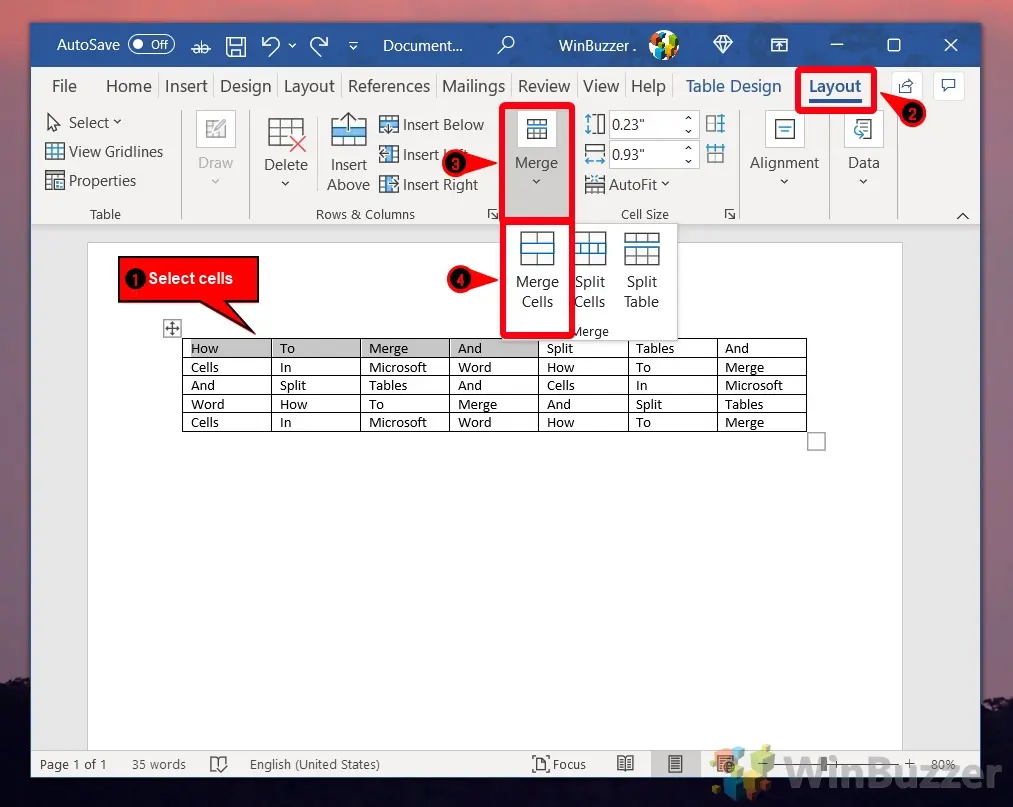
To use the Merge Cells button, first find or create the table that you want to edit, then highlight those cells.
These cells must be adjacent, but you can select multiple cells both horizontally and vertically.

In the Layout menu, click the Merge Cells button.
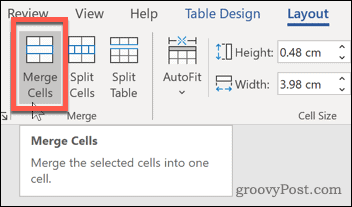
The cells you selected will now be merged together.

Using the Context Menu
You can also merge cells using the context menu, which appears when you right-click your table.
To do this, select the cells you want to merge, then right-click them once they’re highlighted. From the context menu that appears, click the Merge Cells option.
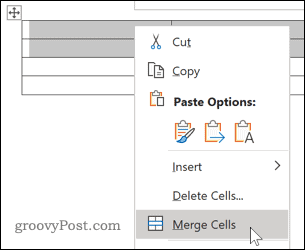
As with the method above, your cells will now appear merged after selecting this option.
How to Split Cells in a Microsoft Word Table
To split cells, you again have two options. You can use either method—both will split your table cells successfully.
Using the Split Cells Button
To use the Split Cells button on the ribbon bar, you’ll first need to select the cell (or merged cells) you wish to split.
Once your cells are selected, click the Split Cells button in the Layout tab of the main ribbon bar.

This will bring up a dialog box, giving you further options to choose from.
Enter the values for the number of rows and columns that you want to split the cell (or cells) into, and then click OK to confirm your choice.
Your cells will now be split using the values you selected in the Split Cells dialog box.
Using the Context Menu
As with cell merging, you can also split cells by right-clicking your cells and using the context menu that appears.
To do this, you’ll need to first select your cell or cells, then right-click. From the menu that appears, click the Split Cells option.
This will bring up the Split Cells dialog box. From here, you can set the number of new cells that will be created.
Enter the values for the number of rows and columns that you want to split the cell into, and then hit OK to confirm your choice.
Further Changes to Microsoft Word Tables
If you’re working with tables in Microsoft Word, there is plenty of additional things you can do to manipulate them into the perfect way to present your data.
You can learn how to sort tables alphabetically, use building blocks to create tables quickly, and even insert an Excel table into your Word to combine the features of both software into one document.
![]()
Contents
- 1 How to Merge Cells in Word
- 2 How to Split Cells In Word
- 3 How to Split a Table in Word
- 4 How to Merge Tables in Word
- 5 Extra: How to Duplicate a Page in Word
- 6 How to Add a Page Border in Word
Microsoft Word tables are a useful way to display information without having to resort to an Excel spreadsheet. Sometimes, however, it’s necessary to merge or split cells in a Word table to better get your point across. We’re going to be showing you how to merge cells in Word so that two columns become one, as well as how to split a cell in Word to do the opposite. We’ll be guiding you through the same for entire tables, too.
What do I mean by that? Let’s use an example: you have two tables, one above the other, but you want to combine them into a single, larger table. By using the merge function, you can do just that. If you then want to break them apart again, you can do so using the split function.
Whichever you choose, it’s quite a simple process. Just follow along below:
Merging cells in Word is extremely simple. We’ll show you two different ways to do it below.
- Method 1: Select the cells you want to merge, right-click, and choose “Merge Cells”

- Method 2: Select the Cells you want to merge and press the “Merge” button in the “Layout” tab of the ribbon
After you’ve pressed the button, choose “Merge Cells” from the dropdown.

- Enjoy your merged cells
You can see that the table automatically adapts to accommodate the additional text, increasing the cell size.


How to Split Cells In Word
The process to split cells in Word is every similar to merging them. You just have to make some minor adjustments, like so:
- Method 1: Select your merged cell, right-click it, and press “Split Cells…”

- Method 2: Select the cell and press the “Merge” dropdown in the “Layout” tab of your ribbon.
Once you press the “Merge” button you’ll be presented with a few options. Click “Split Cells”

- Choose the number of columns and rows to split into
In our case, we have four different words, so four columns, and we want these to be displayed on a single row. So we’ll choose 4 and 1. Press “OK” when you’re done.

- Enjoy your split cells
They should look something like below

- How to perform more complex cell splitting
You can also get a bit more advanced with cell splitting. Let’s take the example below. We have a single merge/split column. Instead of splitting a single cell we can select the entire column, right-click it, and press the split button.
Now, rather than choosing one row, this time we choose two rows and two columns.

- Split into four squares
When you’re done, you’ll have four equally sized squares in your merge/split column.


How to Split a Table in Word
Now we’ve covered cells, but what if you have a large table you’d like to split in two. Perhaps so you can have it presented nicely on two separate pages. Here’s how you can split a table in Word:
- Place your cursor in the row you want the table to split and press “Merge > Split table” in your ribbon
If you don’t already know, you can find the “Merge” button in the “Layout” section of your ribbon.

- Enjoy your newly split tables in Word


How to Merge Tables in Word
If you’re wondering how to combine tables in Word after you’ve split them or if you already made two separate tables, look no further. The process is even simpler than you might think.
- Hover over a table and grab the tables’ handle
It should look like a plus or cross symbol, and present as a square in the top-left corner.

- Drag it over your other table until its top row aligns with the bottom row of the other table
A grey box should appear indicating how the tables will merge.
- Release your cursor to merge the tables in Word
They should automatically fit together. If the layout of some of the cells doesn’t match up, you can use the splitting and cutting techniques above to fix them.


The process to copy a page in Word is simple, but it varies slightly depending on the document you have and your intentions. There’s some variation between whether you have a single page or multi-page document, for example. We show you how to duplicate a page in Word for both single and multi-page documents, as well as how to insert a new blank page to do with what you want.

How to Add a Page Border in Word
Page borders are a useful tool. They make your document stand out without looking tacky, while providing a guide should somebody want to staple or hole punch. We show you how to add a border in Word, which has various pre-built design options to spice up your document.
