By default, Word documents have only one column of text. There are several ways you can split a page in Word document to get two columns (i.e. Spit into Half). However, in this tutorial, I’ll walk you through the two most easy ways you can use to effortlessly split your pages in Word. One involved using columns and the other involved using tables.
By splitting a page in Word, you can divide the text so that it flows in separate columns across the page.
See screenshot:

Without further ado, below are the options you can use to split a page or pages in MS Word.
Using Two Columns to Vertically split a page (in half) in Word
To split pages in Word with the help of columns:
- Select the text on the page you want to split into two halves.
- Don’t select any text if you want to split all pages in your Word document.
- Click on the Layout tab.
- In the Page Setup group, click on the Columns button. A shortcut menu appears with five column options.
- To split your page or pages equally, choose the Two-column option.
- Use the Three column option to split your page or pages into three parts.

- However, if you want to split your page into more than three columns, click on More Columns.

- The column dialog box will appear. Make the necessary settings. In the Number of Columns box, type the number of columns you wish to split your pages in to. Click the Line between check-box if you want to split your pages with a line dividing the columns.

- Click OK.
In Word, section break affects columns. Thus, if your document has only one section, then the columns apply to all the pages. However, if your document contains more than one sections, the splitting will apply to only the pages on the current section
This is how you may split a page in Word using columns.
Splitting pages using tables
This option involves using grid tables as a layout to split your page the way you want. With the tables option, you can split your page into halves or even four grid parts if you want to display four separate images, charts or even blog of text.
Below is how it works:
- To split a page into two equal parts:
- Use the Insert table command to insert a table with two columns and one row.
- Using the table resizer at the bottom right corner of the table, click and drag to resize the table to cover the part of the page you want to split.

- Fill in your content on both sides of the table.
- Remove the borders or hide the table lines. To hide the line borders of a table, first, select the entire table and go to the Table Tools Design tab, click on Borders, the list of borders appears, choose No Border. This will remove all the table borders leaving you with two columns of text.

These are the two simple ways to split a page in Word.
On the View tab, click Arrange, and then click Split. If the window is wide enough, Word displays Split directly on the View tab. To adjust the relative sizes of the panes, move the mouse pointer to the dividing line, and when you see the split pointer, click and drag the dividing line to a new position.
Contents
- 1 How do I divide a page into sections?
- 2 How do I split a page in Word 2020?
- 3 How do I divide my Word document into 4 sections?
- 4 How do I split a Word document into 3 sections?
- 5 How do I make 2 pages into 1 page in Word?
- 6 How do I make 4 page invites in Word?
- 7 How do I split a Word document into 8 sections?
- 8 How do I make 4 columns in Word?
- 9 What are the 4 types of section breaks?
- 10 How do I split a Word document into two?
- 11 Is there a fit to page option in Word?
- 12 How do I fit to one page in Word?
- 13 How do I make 1/4 size in Word?
- 14 How do you Print quarter page flyers?
- 15 How do I Print 4 flyers on one page PDF?
- 16 How do I split a page into 6 sections in Word?
- 17 How do I fix columns in Word?
- 18 How do I type in different columns in Word?
- 19 How do I edit sections in Word?
- 20 What’s a section break on word?
How do I divide a page into sections?
Insert a section break
- Select where you want a new section to begin.
- Go to Page Layout > Breaks.
- Section break that you want to add: A Next Page section break starts the new section on the next page. A Continuous section break starts the new section on the same page.
How do I split a page in Word 2020?
Go to Layout > Breaks > Page.
- Click or tap in the document where you want a page break.
- Go to Insert > Page Break.
How do I divide my Word document into 4 sections?
To split a page to 4 parts, you can insert a table to deal with the job.
- Place the cursor at left-top of the page, then click Insert > Table, select 2×2 Table.
- The table has been inserted, then drag right-corner of the table to resize it as you need.
- Insert texts into the columns and rows separately.
How do I split a Word document into 3 sections?
Follow the steps outlined in this tutorial.
- Highlight the text you wish to split into columns.
- Select the “Page Layout” tab.
- Choose “Columns” then select the type of columns you wish to apply. One. Two. Three. Left. Right.
How do I make 2 pages into 1 page in Word?
Click the “1 Page Per Sheet” button to open a drop-down menu with more options. Click “2 Pages Per Sheet.”
How do I make 4 page invites in Word?
the following may answer your question: if you have a Word document with more than 4 pages, click File > Print and then in the lower right corner of the print dialog, under “Zoom,” select 4 pages per sheet.
How do I split a Word document into 8 sections?
Divide a Document into Sections
- Place the insertion point where you want the section break.
- Choose the Page Layout tab.
- Click the down-arrow next to the Breaks button. A menu appears.
- Click the type of section break you want. Word inserts the section break.
How do I make 4 columns in Word?
On the Layout tab, click Columns, then click the layout you want.
- To apply columns to only part of your document, with your cursor, select the text that you want to format.
- On the Layout tab, click Columns, then click More Columns.
- Click Selected text from the Apply to box.
What are the 4 types of section breaks?
The different kinds of section breaks include next page, continuous, even page, and odd page breaks.
How do I split a Word document into two?
How to Split a Word Document Into Two Columns
- Open a Word document that you want to format into columns. Video of the Day.
- Click the “Page Layout” tab.
- Select “Two.”
- Click “Columns” again, then “More Columns” to customize the columns further.
- Click the “Microsoft Office Button” or “File” tab.
Is there a fit to page option in Word?
“Shrink to Fit” changes the font size and margins to make the document fit on one page. In Microsoft Word 2007 and 2010, go to “Print,” “Print Preview” and then “Shrink to Fit” under the “Preview” option.
How do I fit to one page in Word?
How to Make a Word Document Fit on One Page
- Click the top, left “Office” button, point to “Print” and select “Print Preview.”
- Click “Shrink One Page” in the Preview group.
- Click the “Close Print Preview” button in the Preview group to exit print preview and retain your changes.
How do I make 1/4 size in Word?
Firstly open up a new Word document, go into Mailings on the ribbon and click on Labels in the Create section… This opens up a new dialogue box – click on Options… Select Microsoft as the Label vendor, and scroll down to 1/4 Letter, then click OK.
How do you Print quarter page flyers?
Click the “Properties” button when the Print dialog box pops up on your screen. Select “4 pages” from the “Pages per Sheet” drop-down box. Click the “OK” button. The printer produces a sheet with four copies of your party flyer.
How do I Print 4 flyers on one page PDF?
Choose File > Print. From the Page Scaling pop-up menu, select Multiple Pages Per Sheet. From the Pages Per Sheet pop-up menu, select a value. Click OK or Print.
How do I split a page into 6 sections in Word?
Follow these general steps:
- Open a new document and set the paper orientation and margins the way you want.
- Insert a three-column, single-row table in your document.
- Remove the borders around the table, if desired.
- Format the second (center) column to be rather narrow.
- Adjust the width of the other columns as desired.
How do I fix columns in Word?
To fit the columns to the text (or page margins if cells are empty), click [AutoFit] > select “AutoFit Contents.” To fit the table to the text, click [AutoFit] > select “AutoFit Window.” To keep Word from automatically adjusting your column size, click [AutoFit] > select “Fixed Column Width.”
How do I type in different columns in Word?
To add columns to a document:
- Select the text you want to format.
- Click the Page Layout tab.
- Click the Columns command. A drop-down menu will appear. Adding columns.
- Select the number of columns you want to insert. The text will then format into columns.
How do I edit sections in Word?
Change a section break
- Click or tap in the section break you want to change.
- Go to Layout and select the Page Setup launcher button .
- Select the Layout tab.
- Select a new section type from the Section Start drop down list.
- Select OK.
What’s a section break on word?
Section breaks are used to divide the document into sections. Once section breaks are inserted, you can format each section separately. For example, format a section as a single column for the introduction of a report, and then format the next section as two columns for the report’s body text.
Download PC Repair Tool to quickly find & fix Windows errors automatically
As important as the quality of your content may be, it is also essential to be visualized and represented neatly and easily. For example, if your Word document is riddled with words from top to bottom, splitting its content into four quarters can make it easy for the reader to comprehend. Today’s tutorial will look at a few ways to easily partition your Word document in four different quarters.
You can split and create four quarters or sections from a page in Microsoft Word in two ways.
- Using the Labels option
- By creating a 2×2 table
Check out each of these methods.
1] Split a Word page in 4 quarters using Labels
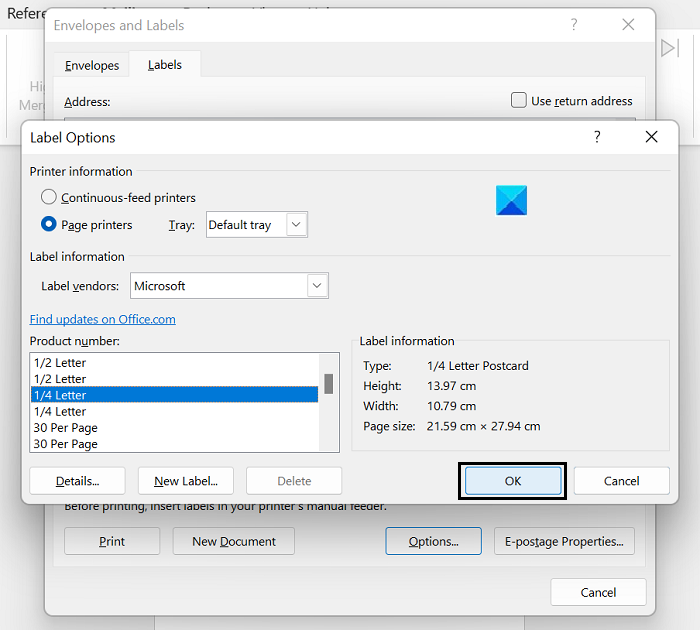
The proper, official way to complete the job is to split the A4 Word sheet into ¼ columns using the Labels option. Here’s what you need to do:
- Open a new Word document, and from the options ribbon at the top, click on Mailings
- In the Create section, you’ll see the Labels option. Click on it to open the Envelopes and Labels dialog box
- Here, click on options, and from the list of choices under Product Number, select ¼ Letter
- Click on Ok, and you’ll then be taken back to the Envelopes & Labels dialogue box
- Click on New document, and a new file will open that will be partitioned into 4 equal-sized boxes stretching from corner to corner of the page.
Selective information can go in the appropriate corner. Your page is now divided into four portions; you can write text on each separately.
2] Split a Word page in 4 quarters by creating a 2×2 table
Another way you can split the page of a Word document into 4 divisions, equal or unequal, the way you want is by inserting a 2×2 table and subsequently removing the borders from it, so it appears to be divided into 4 quarters.
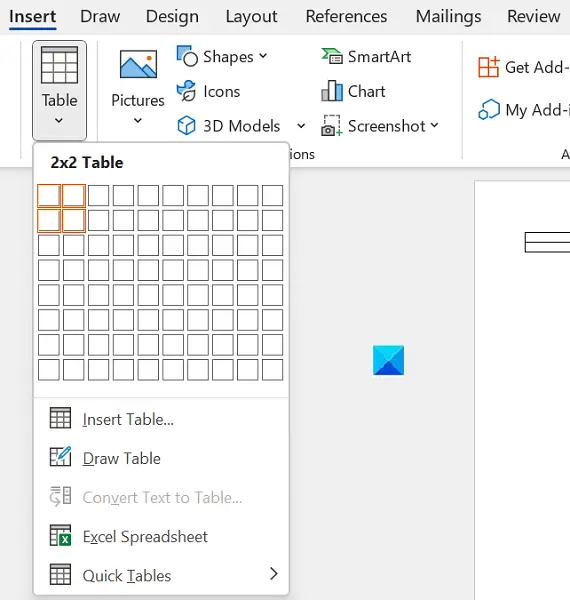
- Open a new Word document and from the Insert tab, click on Table and select enter a 2×2 table.
- To make the table span across the page and look like four quarters, drag the right and the bottom corner of the table accordingly
- Insert texts in the rows and columns, considering them different quarters.
- If you find the border lines too thick, you can modify them by clicking on the Design ribbon and selecting Page Borders.
This is also an easy way to make your page look like it has been divided into 4 quarters on MS Word.
How do I split a Word page into 3 columns?
Like a four-way partition, you can split a page into two or three halves in Microsoft Word. To lay out three columns on a single page of MS Word, click on the Layout tab. Open the Columns drop-down and select Three. You can go on to have more than three columns using the More columns option.
What is a section break in Word?
Using Section formatting, you can apply page layouts to different sections within the document. A section break is used to divide a page into different sections. Using them, each section can be formatted independently. For example, one section may be composed of a single column, while another may have two or more.
We hope that you will now be able to divide your Word page according to your needs.
An undergraduate student of Business Economics at Delhi University, Divyansh loves Cricket, Formula 1, Television and dabbles his interest in Tech on the side. Writing about the Windows ecosystem is what excites him.
(Note: This guide on how to split a page in Word is suitable for all MS Word versions including Office 365)
Microsoft Word is a great tool for reading. The layout and the tools it provides make reading lengthy paragraphs easy. One of the most used forms of formatting a document in Word is the Split Page formatting.
In this article, I will tell you how to split a page in Word using 4 easy ways.
You’ll Learn:
- What Is Splitting a Page in Word and Why Do We Do That?
- How to Split a Page in Word?
- Using the Layout Option
- Using Tables
- Changing to Read Layout
- Using Print
To download the sample Word document for reference, click on the button below.
Related Reads:
How to Double Space in Word? 4 Easy Ways
How to Wrap Text in Word? 6 Wrap Text Options Explained
How to Add Columns in Microsoft Word? All You Need to Know
What Is Splitting a Page in Word and Why Do We Do That?
The term “Splitting a page in Word” refers to dividing the page into partitions along with its contents. The page can be split into multiple parts either horizontally or vertically.
The layout of text in Microsoft Word by default is the Print Layout. This layout makes the content one after the other from top left to bottom right as a whole. But, this format might not be suitable everywhere. Sometimes, different emphasis on different parts of text and content might be needed. Also, when printing this layout occupies multiple pages that might not be viable.
In such cases, splitting a page will help you emphasize different parts of text in a single page and lessens the need for additional papers when printing. Additionally, this gives you an overall aesthetic look which makes your page more presentable.
How to Split a Page in Word?
There are multiple ways to split a page in Words. Let us see them one after the other.
Using the Layout Option
This is a simple yet straightforward method to split a page into multiple columns in Word. This method is better when you already have the content and you want to split them.
- Open the Word document.
- Navigate to the Layout option in the main menu.
- In the Page Setup section, click on the dropdown in Columns.
- Select the number of ways you want to split the page into. In this case, let us split the page into 2. So, select Two from the dropdown.
- This splits the page into two columns equally.
You can also split the page into three or four columns depending on your choice. From the Columns dropdown in the Layout menu, select the number of ways you want to split the page.
Note: You can notice that when you split a page, the ending of the first column is started in the second column of the same page.
In case you want additional customizations while splitting the page, click on the More Columns option from the dropdown.
You can easily split a page using the default columns from the presets or specify the number of columns in the text box below. You can choose to insert a line in between the split content on a page. (britespanbuildings) You can emphasize the contents of a page by increasing the width and spacing of the columns.
Page and Section break greatly affect the splitting of text in the document. Note that when the page break is set as Next Page, the content continues in the first column of the next page and then populates the second column. When the page break/section break is set to Continuous, the content is split equally on the second page.
- You can change the Page Break or Section Break from the Layout menu under the Breaks drop-down.
Using Tables
This is another way to split pages in Word. By using a table, you can split the text into two or four ways depending on your choice.
- First, insert a table using the Insert main menu. From the Table dropdown, select the number of columns you want to add. Since we want to split the page into two columns, select one row and two columns.
- Using the extend button in the bottom right, you can extend the table to the desired length. You can move the table to your desired position by dragging the move button in the top right of the table.
- If you want additional settings to the table, right-click and select Table Properties. You can adjust the height, width, border, and alignment of the cell and table of your choice.
- Now, type the content in the individual cells.
Though the contents are filled in the cells, it still doesn’t look like a page split. We need to remove the table leaving the contents intact.
- To remove the table, navigate to Table Design.
- Select all the text.
- Under the dropdown from Border, select No Border.
- This removes the border and makes the page split into two.
In case you want to split the page into 4, insert two columns and two rows into your Word document. Then fill in the text, images, or content in each section of the table. Select all the text entered in the table. Now, navigate to the table design, and select No Border from the Border dropdown.
Also Read:
How to Convert Speech to Text in Word? A step-by-Step Guide
How to Make a Checklist in Word? 3 Simple Steps
How to Find and Replace in Word? 7 Simple Methods
Changing to Read Layout
If you intend to read a long-form document, you can change the layout of the page to Reading mode. This splits the page into two making it easy for you to read. An additional advantage of this option is that this only changes the layout while reading and you can always revert to the original layout.
By default, the layout of the Word document will be Print Layout. You can see them towards the right bottom of the document near the zoom bar.
- Click on the Read Layout and Microsoft Word automatically changes the layout.
Using Print
There might be some instances where you only need to export the Word document with split pages and keep the original document intact. In such cases, you can just split a page and export the Word document as a PDF without altering the original file.
- Navigate to the File menu and click on Print. This opens the Print pane towards the right.
- In the last dropdown, select 2 Pages Per Sheet and click on Print.
- This opens up a dialog box asking you to save the document. Choose the file location, enter a file name, and click Save.
- Now, you can open the file in the saved location and see the page split into two.
In case you want to add additional settings and customization to the split pages in the PDF file, click on the Page Setup setting in the Print pane to personalize the page to your liking.
Suggested Reads:
How to Superscript in Word? 4 Easy Methods
How to Track Changes in Word? A Step-by-Step Guide
How to Delete a Page in Word?
Frequently Asked Questions
How to split a page horizontally in Word?
You can split a page horizontally in Word using the Tables option. Insert a table with multiple rows and a single column. Enter the contents and delete the borders by clicking on No Borders in the Borders dropdown in the Table Design menu.
How do I only split particular contents of the page and not the whole page?
If you only want to split particular contents of the page, either select the contents and use the Layout option or create a Table and then fill in the content.
What is the best method to split a page in Word?
If you already have the content in the standard format and want to split the page, changing the layout using the Columns dropdown is better. If you have to create or insert new content, then choosing a table first and entering your content would be ideal.
Closing Thoughts
In this article, we saw how to split a page in Word using 4 easy methods. You can use the Layout option from the main menu or use tables to split a page into partitions. Additionally, you can use the Print option to export a split page or just change the page’s layout while reading. You can choose the method that suits you the best.
For more high-quality guides on MS Word or Excel, please visit our free resources section.
SimonSezIT has been effectively teaching Excel for 15 years. We have a very comprehensive set of courses with in-depth training modules covering all major business software.
You can access all these 140+ courses for a low monthly fee. Please visit our courses section for more information about our offers.
Simon Calder
Chris “Simon” Calder was working as a Project Manager in IT for one of Los Angeles’ most prestigious cultural institutions, LACMA.He taught himself to use Microsoft Project from a giant textbook and hated every moment of it. Online learning was in its infancy then, but he spotted an opportunity and made an online MS Project course — the rest, as they say, is history!
Splitting your document allows you to place information side-by-side on the same page without it being in a column format. A feature often used to lay information side by side or in sections without borders.
If you are an old Wordperfect user and utilised the split page function, you may be wondering how to split your page in Word?
Unfortunately, it is not as simple to split your page in Microsoft Word but there are a few ways you can use other Word features to achieve a similar result.

In this post, we will show you how to use the table function in Microsoft Word to split your page like a pro.
How to create a split page in Word
- Open your Word Document
- Click the Insert Tab

- Click Table
- Under Table, Highlight 2 x 2 squares to create a table of ‘2’ high and ‘2’ wide

- Re-size your table according to your preferences by dragging the bottom right corner of the table
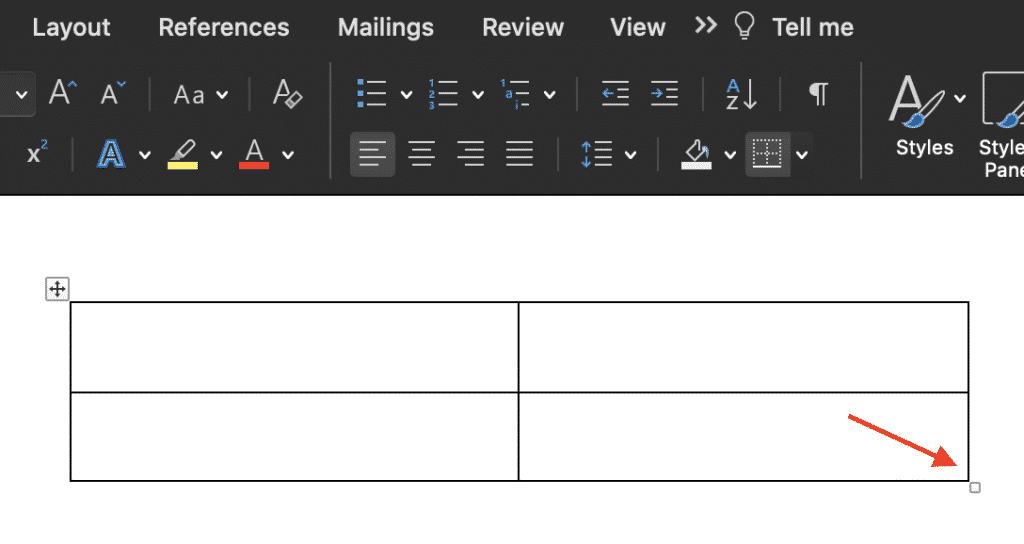
- Right Click anywhere in your box and select Borders and Shading
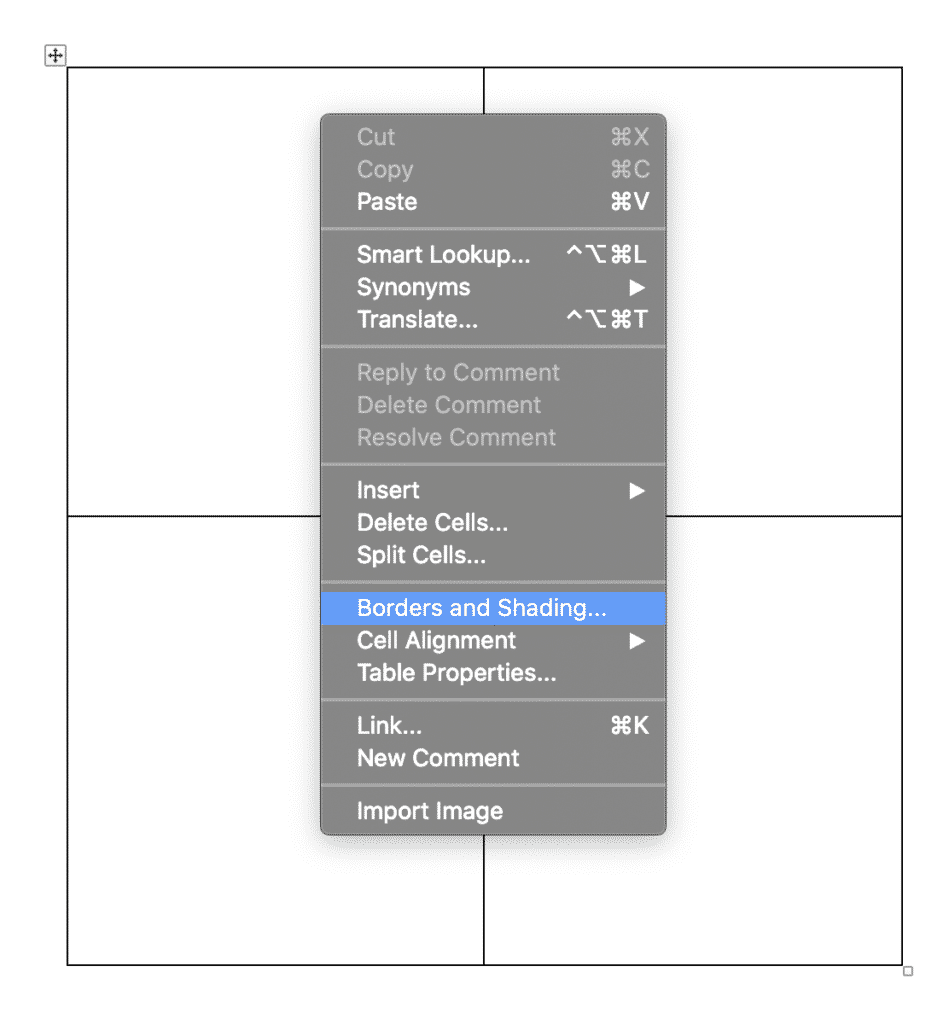
- Select None under Border Settings
- Press OK
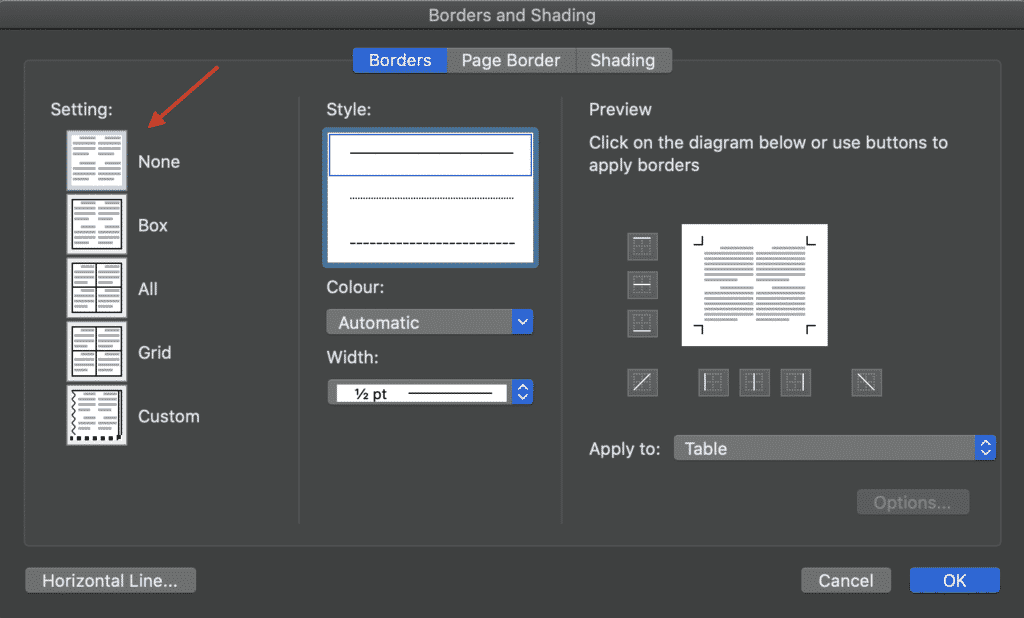
You have now successfully split your page, using the table feature in Microsoft Word. You are able to re-size the boxes by dragging out the invisible table at any time.
On the hunt for an easier way to collaborate and edit a Word Document?
Why isn’t collaborating in Microsoft Word easier?
Why do we always end up with 50 versions of the same document, before reaching a final file?
Why do we always seem to forget to turn tracked changes on before we start editing, even though its something we do daily?
Why do we still accidentally save over an old version, forgetting to re-name it as a new file before pressing save?

These are the most common pain points for almost all Microsoft Word users that are trying to collaborate on a document with their team. These pain points cause a lot of frustration, googling ‘how to undo’ and the loss of valuable billable hours.
With so many of us facing these frustrations, it was only a matter of time before someone created a solution. A solution now provided by Simul Docs.
Simul Docs knows that you want to collaborate without thinking about it.
Simul will always track your changes, even when you forget to turn them on. It’s automatic because without tracked changes you have no way of knowing what edits were made between each version and that’s frustrating.
Simul manages version control for you.
When you open the most recent version of your document and start making edits, Simul also knows that you probably don’t want to save over the old version and will automatically save your file as a new document giving it a new, easy to follow file name such as 0.0.3.
Simul will then give you a full history of the document, in an easy to use ‘versions’ list allowing you to refer back to any version at the click of a button.
When you open an older version, Simul will show you what changed in that version. So you can see who made the changes and where.
How easy is that!
Now that you have your changes tracked and version control sorted, what about the ability to share and collaborate with people outside of your organisation?
Well thats ok too!
If you would like to collaborate with somebody outside of your organisation, you can share the document with them via email, direct link or upload the file to commonly used shared drives such as Dropbox, GoogleDrive, OneDrive, Sharepoint and more.
Simul was built to make collaborating in Microsoft Word easier.
If you face any of these frustrations we suggest you sign up for a free trial.
Trust us, your team will thank you.

