
Written by: Dr. Grace Lee, Executive Contributor
Executive Contributors at Brainz Magazine are handpicked and invited to contribute because of their knowledge and valuable insight within their area of expertise.

Even If You Are Introverted, Can’t Find The Right Words, and Don’t Know How to Speak Eloquently
What comes to mind when you think of someone who is articulate? Maybe you picture someone on stage in front of 1,000 or more people. Or someone who’s done a TED talk that gets a lot of shares. Or perhaps it’s someone who is very eloquent and powerfully persuasive every time they open their mouth to speak.

Being articulate is nothing more than being able to express your ideas and your thoughts in a way that people understand exactly what you’re trying to say.
“Eloquent speech is nothing more than accurate communication.” — Dr. Grace Lee
As difficult as it may seem, learning how to articulate your thoughts into words is a gift that you give to others and a meaningful experience that speaks volumes to fulfilling your life purpose – pun intended. Since the beginning of time, humans have always desired to take the complex thoughts that have been developing inside the mind and deliver them to other people.
The deepest intention to do so comes from our human desire for connection, acceptance, and significance.
The problem is our thoughts are often complex as a result of having spend years going through unique life experiences to refine them. So, while the thoughts are clear inside our heads, it’s common to have trouble putting those well-aged thoughts into words.
In this article, I will share with you 7 powerful techniques you can use to articulate your thoughts into words clearly and compellingly.
1. Expand Your Vocabulary
Sometimes it’s a matter of not having the words for it. And you cannot speak that which you do not know.
Being articulate means expressing your thoughts, perspectives, feelings, or ideas in a way that flows from existing inside of you to exist in someone else’s world. If you don’t have a word to convey your thought, it cannot exist in someone else’s world.
Focus on expanding your vocabulary through reading literature that is outside your regular choice of reading material. If you normally read fiction novels, try reading biographies. If you always read books on business and finance, try reading books on psychology and self-help. (I used to read Oxford’s Dictionary of Difficult Words from A to Z – but I’m not necessarily recommending it unless you learn new words through rote memorization like I did!)
When you read, focus on descriptive words, especially words that describe emotions. This will give you more tools in your arsenal to reach for when you’re trying to express yourself, establish connection or build rapport.
This leads nicely into my second technique…
2. Practice Improvising
Learning how to be more expressive will help you convey the meaning and emotions behind what you’re trying to say. People connect with emotions, and emotions are more clearly conveyed by how you say the words rather than the exact words you’re using.
One of the best ways to elevate your skills of expression is to take an improv class or an acting class. Improv and acting will teach you how to become more expressive in your speech and body language.
Too shy? Start by watching an improv show. Take notes on the thought process of how the actors get their message across through spoken words, movement, and managing their facial expressions. Their messages are tried and true since there have been audiences enjoying their performances consistently. Dedicate some time into studying what works.
3. Lay It Down in Writing First
This technique is especially important if you take a long time to chew on your thoughts or finding the right words to explain what you mean. This is a common challenge for introverts because, by their nature, they process information by inwardly reflecting, chewing on ideas, and analyzing deeply.
If you are reading this and you are an introvert, chances are, you may have felt frustrated trying to locate the right words or anxious in social situations among fast-talking colleagues. Be still and know that your strengths have value.
Your brain stores long-term memories and operates by recalling those memories with cues that trigger the right words.
Permit yourself to take the time your mind needs to unlock the right words from your long-term memory. Let your mind go wherever it goes, and then express yourself in writing first.
Writing uses different neural pathways of the brain compared to speaking. Once you have your thoughts laid down in writing, it will free your bandwidth to focus on the mechanics of speaking instead of having to spend it searching for the right words.
4. Pay Attention to Tone and Accentuation
Tone is a change in pitch in your voice, which changes the meaning. In some languages like Chinese, tone is word specific. You change the tone, and you’re saying a completely different word.
For example, the Chinese word for “mom” and “horse” are homonyms. The pronunciation is “ma,” with the key difference being the tone, which conveys the intended meaning:
-
Mā (steady higher tone) means Mom.
-
Mǎ (falling then rising tone) means Horse.
In English, tone is statement-based. You change the tone and the meaning of what you’re saying changes. We express our emotions and attitude through changes in our intonation.
For example, let’s say we were to answer “yes” to this question without using body language: Do you think they’ll hire me? Depending on how we use our tone and vary our pitch when responding “yes,” we can convey sarcasm, certainty, uncertainty, or even pity in our response.
Accentuation is the act of making certain syllables clearly distinct from the other syllables by putting more effort into them, saying them more loudly, or using a higher pitch. When we accentuate a syllable, we make the vowel sound clearer and easy to understand.
For example, let’s take the word “present.” By accentuating different syllables, you can actually change the word from a noun to a verb:
-
PRES’ent makes it a noun
-
pre-SENT’ makes it a verb
— Strategically pause before and after the words and phrases you want to emphasize.
— It’s better to pause than to use filler words.
— Get used to silence. Not all silence is awkward! Use it as your weapon.
5. Listen to Yourself
Listen to yourself talk and pay attention to how you feel when you hear yourself talk.
Do you feel pleasant or irritated? Do you sound like you know what you’re talking about? Is the complexity of your thought or idea clearly conveyed? There may be a high chance that most people feel the same way when they hear your voice.
Try recording yourself as you’re talking in a normal conversation. You might be thinking that you hate the sound of your own voice. Rest assured that our voices sound different to us than to other people simply because when we hear our own voice, we hear it through two ways: 1. through the sound waves hitting our eardrum, and 2. sound transferred through vibrations of our skull from the vocal cords.
Don’t be surprised if your recorded voice sounds higher or different. The sound we hear through skull bone conduction has a lower frequency.
Ask for feedback from people about how you sound when you speak. Ask them to summarize what they have learned and pay attention to see if you have clearly conveyed our thoughts to them. Give them the green light to give you honest feedback without taking it personally.
6. Put A Framework Around It
One of the most powerful ways to articulate complex thoughts clearly is to create a framework for it. A framework is a representation to show the steps, sequences, or processes so that they can get a big picture of where your thoughts are headed.
For example, in this article, I am articulating my thoughts about putting words to thoughts so that you can clearly convey them to listeners. I have created a framework to represent my thoughts on this topic by creating a 7-point process.
During a live presentation, I would create a graphical representation of this process showing all 7 steps. Then my audience will know exactly what they’re going to get.
Not only does a framework allow you to express complex thoughts in a clearly structured way, but it also makes your content unique.
7. Understand Yourself
Gain a solid understanding of the reason for your lack of articulation. Maybe you have some tension and social anxiety that result from your own thoughts and perceptions. Or maybe it’s a fear of being the center of attention and embarrassing yourself.
Once you understand the root causes, you can work to overcome them. You’ll start to develop the peace of mind and confidence to articulate your speech carefully in situations that would normally intimidate you.
If you are serious about taking your communication to the next level in your career or business, as a gift to my valuable readers like you, I have created a guide that divulges the top speaker’s success secrets on how to get your message across clearly and confidently on any platform.
Click HERE and get your free gift.
Accountability is the multiplier for success. When we set out to make improvements to ourselves and our lives, transformation is key. Information alone doesn’t transform. My coaching program, Awaken to Vocation, is an empowerment program for educated, career-driven professionals who value making a meaningful contribution as much as they value making a good living. It is designed to help you master your professional destiny, elevate your vocational confidence, and dominate your life purpose. Guard your future.
Apply HERE for an opportunity to work with me.
Subscribe to my YouTube Channel for weekly insights that will transform your mind and transform your life.
Follow me on LinkedIn for motivation, education, and inspiration. Reach out to me to let me know you’ve read my article. I’d love to hear from you.
With gratitude from your #1 fan,
Grace
Dr. Grace Lee, Executive Contributor Brainz Magazine
Grace Lee, PhD, is the founder of Mastery Insights, host of Brain to Business and Career Revisionist podcasts, and creator of a practical, business & career channel on YouTube. Dr. Grace is sought after as a speaker and trainer in the areas of sales, business development, career development, public speaking, mindset, and neuroscience. Through her coaching firm, Mastery Insights, she is dedicated to enabling professionals to take their education, expertise, and experiences, and (1) turn it into a passion for profit online, or (2) leverage it to create greater income and impact in a meaningful career path. She has trained hundreds of people from 10+ countries all over the world. Using her expertise from her PhD in neuroscience, Dr. Grace’s methods empowers you to discover a different way of thinking to take the guesswork out of what to do next so you can grow fast. For more inspiration and strategies on growth, follow Dr. Grace on LinkedIn, YouTube, and Facebook.
- You can use speech-to-text on Microsoft Word through the «Dictate» feature.
- With Microsoft Word’s «Dictate» feature, you can write using a microphone and your own voice.
- When you use Dictate, you can say «new line» to create a new paragraph and add punctuation simply by saying the punctuation aloud.
- If you’re not satisfied with Word’s built-in speech-to-text feature, you can use a third-party program like Dragon Home.
- Visit Business Insider’s Tech Reference library for more stories.
While typing is certainly the most common way to create and edit documents in Microsoft Word, you’re not limited to using a keyboard.
Word supports speech-to-text, which lets you dictate your writing using voice recognition.
Speech-to-text in Word is convenient and surprisingly accurate, and can help anyone who has issues typing with a typical keyboard.
You can use speech-to-text in Microsoft Word in the same way on both Mac and PC.
Check out the products mentioned in this article:
Apple Macbook Pro (From $1,299.00 at Apple)
Acer Chromebook 15 (From $179.99 at Walmart)
How to use speech-to-text on Word using Dictate
Make sure you have a microphone connected to your computer. This can be built-in, like on a laptop, or a separate mic that you plug into the USB or audio jack.
It doesn’t matter which type you use, though the best kind of mic to use is a headset, as it won’t need to compete with as much background noise as a built-in microphone.
1. In Microsoft Word, make sure you’re in the «Home» tab at the top of the screen, and then click «Dictate.»
Dave Johnson/Business Insider
2. You should hear a beep, and the dictate button will change to include a red recording light. It’s now listening for your dictation.
Dave Johnson/Business Insider
3. Speak clearly, and Word should transcribe everything you say in the current document. Speak punctuation aloud as you go. You can also say «New line,» which has the same effect as pressing the Enter or Return key on the keyboard.
4. When you’re done dictating, click «Dictate» a second time or turn it off using your voice by saying, «Turn the dictate feature off.»
You can still type with the keyboard while Dictate is on, but if you click outside of Word or switch to another program, Dictate will turn itself off.
Want to change languages? You can click the downward arrow on the Dictate button to choose which of nine or so languages you want to speak. You might also see additional «Preview Languages,» which are still in beta and may have lower accuracy.
Dave Johnson/Business Insider
Speech-to-text alternatives
You’re not limited to using the Dictate feature built into Word. While not as popular as they once were, there are several commercial speech-to-text apps available which you can use with Word.
The most popular of these, Dragon Home, performs the same kind of voice recognition as Word’s Dictate, but it also lets you control Word, format text, and make edits to your text using your voice. It works with nearly any program, not just Word.

Related coverage from Tech Reference:
-
How to use speech-to-text on a Windows computer to quickly dictate text without typing
-
You can use text-to-speech in the Kindle app on an iPad using an accessibility feature— here’s how to turn it on
-
How to use text-to-speech on Discord, and have the desktop app read your messages aloud
-
How to use Google text-to-speech on your Android phone to hear text instead of reading it
-
2 ways to lock a Windows computer from your keyboard and quickly secure your data
Dave Johnson
Freelance Writer
Dave Johnson is a technology journalist who writes about consumer tech and how the industry is transforming the speculative world of science fiction into modern-day real life. Dave grew up in New Jersey before entering the Air Force to operate satellites, teach space operations, and do space launch planning. He then spent eight years as a content lead on the Windows team at Microsoft. As a photographer, Dave has photographed wolves in their natural environment; he’s also a scuba instructor and co-host of several podcasts. Dave is the author of more than two dozen books and has contributed to many sites and publications including CNET, Forbes, PC World, How To Geek, and Insider.
Read more
Read less
Master the skill of speech to text in Microsoft Word and you’ll be dictating documents with ease before you know it. Developed and refined over many years, Microsoft’s speech recognition and voice typing technology is an efficient way to get your thoughts out, create drafts and make notes.
Just like the best speech to text apps that make life easier for us when we’re using our phones, Microsoft’s offering is ideal for those of us who spend a lot of time using Word and don’t want to wear out our fingers or the keyboard with all that typing. While speech to text in Microsoft Word used to be prone to errors which you’d then have to go back and correct, the technology has come a long way in recent years and is now amongst the best text-to-speech software.
Regardless of whether you have the best computer or the best Windows laptop, speech to text in Microsoft Word is easy to access and a breeze to use. From connecting your microphone to inserting punctuation, you’ll find everything you need to know right here in this guide. Let’s take a look…
How to use speech to text in Microsoft Word: Preparation
The most important thing to check is whether you have a valid Microsoft 365 (opens in new tab) subscription, as voice typing is only available to paying customers. If you’re reading this article, it’s likely your business already has a Microsoft 365 enterprise subscription. If you don’t, however, find out more about Microsoft 365 for business via this link (opens in new tab).
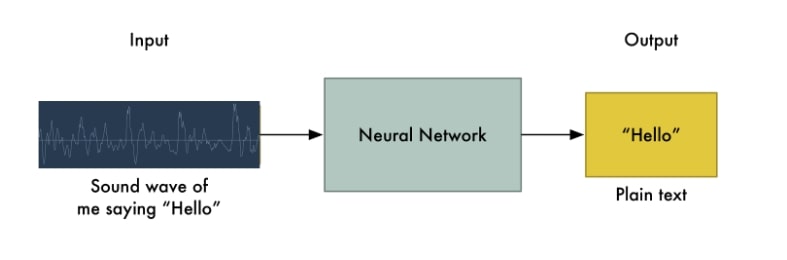
The second thing you’ll need before you start voice typing is a stable internet connection. This is because Microsoft Word’s dictation software processes your speech on external servers. These huge servers and lighting-fast processors use vast amounts of speech data to transcribe your text. In fact, they make use of advanced neural networks and deep learning technology, which enables the software to learn about human speech and continuously improve its accuracy.
These two technologies are the key reason why voice typing technology has improved so much in recent years, and why you should be happy that Microsoft dictation software requires an internet connection.
Once you’ve got a valid Microsoft 365 subscription and an internet connection, you’re ready to go!
Step 1: Open Microsoft Word
Simple but crucial. Open the Microsoft Word (opens in new tab) application on your device and create a new, blank document. We named our test document “How to use speech to text in Microsoft Word — Test” and saved it to the desktop so we could easily find it later.

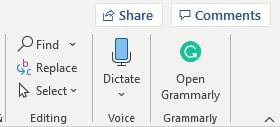
Step 2: Click on the Dictate button
Once you’ve created a blank document, you’ll see a Dictate button and drop-down menu on the top right-hand corner of the Home menu. It has a microphone symbol above it. From here, open the drop-down menu and double-check that the language is set to English.
One of the best parts of Microsoft Word’s speech to text software is its support for multiple languages. At the time of writing, nine languages were supported, with several others listed as preview languages. Preview languages have lower accuracy and limited punctuation support.

Step 3: Allow Microsoft Word access to the Microphone
If you haven’t used Microsoft Word’s speech to text software before, you’ll need to grant the application access to your microphone. This can be done at the click of a button when prompted.
It’s worth considering using an external microphone for your dictation, particularly if you plan on regularly using voice to text software within your organization. While built-in microphones will suffice for most general purposes, an external microphone can improve accuracy due to higher quality components and optimized placement of the microphone itself.
Step 4: Begin voice typing
Now we get to the fun stuff. After completing all of the above steps, click once again on the dictate button. The blue symbol will change to white, and a red recording symbol will appear. This means Microsoft Word has begun listening for your voice. If you have your sound turned up, a chime will also indicate that transcription has started.
Using voice typing is as simple as saying aloud the words you would like Microsoft to transcribe. It might seem a little strange at first, but you’ll soon develop a bit of flow, and everyone finds their strategies and style for getting the most out of the software.
These four steps alone will allow you to begin transcribing your voice to text. However, if you want to elevate your speech to text software skills, our fifth step is for you.
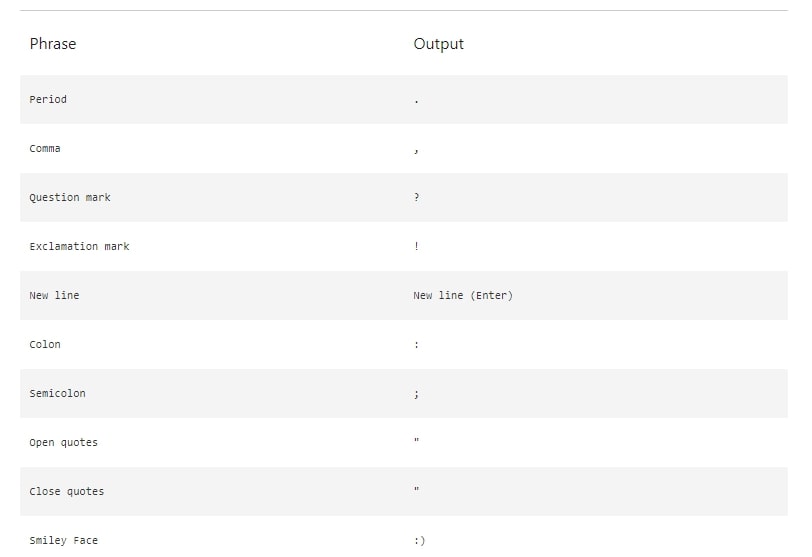
Step 5: Incorporate punctuation commands
Microsoft Word’s speech to text software goes well beyond simply converting spoken words to text. With the introduction and improvement of artificial neural networks, Microsoft’s voice typing technology listens not only to single words but to the phrase as a whole. This has enabled the company to introduce an extensive list of voice commands that allow you to insert punctuation marks and other formatting effects while speaking.
We can’t mention all of the punctuation commands here, but we’ll name some of the most useful. Saying the command “period” will insert a period, while the command “comma” will insert, unsurprisingly, a comma. The same rule applies for exclamation marks, colons, and quotations. If you’d like to finish a paragraph and leave a line break, you can say the command “new line.”
These tools are easy to use. In our testing, the software was consistently accurate in discerning words versus punctuation commands.
Summary
Microsoft’s speech to text software is powerful. Having tested most of the major platforms, we can say that Microsoft offers arguably the best product when balancing cost versus performance. This is because the software is built directly into Microsoft 365, which many businesses already use. If this applies to your business, you can begin using Microsoft’s voice typing technology straight away, with no additional costs.
We hope this article has taught you how to use speech to text software in Microsoft Word, and that you’ll now be able to apply these skills within your organization.
-
1
Press ⊞ Win+S to open the Search box.
-
2
Type speech recognition. A list of matching results will appear.
- This may be called “voice recognition” on some systems. The behavior will be the same.
Advertisement
-
3
Click Speech Recognition. This opens the Speech Recognition control panel.
-
4
Click Start Speech Recognition. If you’ve already set up Speech Recognition, you’ll see the voice recognition panel at the top of the screen. This means you’re ready to get started.
- If it’s your first time using Speech Recognition, you’ll have to click Next to go through the setup process. Follow the on-screen instructions to teach the computer to recognize your voice. Once you complete the process, you’ll see the voice recognition panel.
-
5
Click the microphone icon. It’s on the voice recognition panel. Now you’re ready to start dictating.
-
6
Open Word. You’ll find it in the Windows menu under “Microsoft Office.”
-
7
Click where you want your text to appear.
-
8
Start speaking. You will now see your words appear on the screen as you speak.


Advertisement
-
1
Click the Apple menu. It’s at the top-left corner of the screen.
-
2
Click System Preferences.
-
3
Click Keyboard.
-
4
Click Dictation. It’s one of the tabs at the top of the window.
-
5
Select “On” next to “Dictation.” Clicking the circle will turn it blue and add a white dot at its center.
-
6
Check the box next to “Use Enhanced Dictation.” This allows you to use dictation offline, as well as continuous dictation with live feedback.[1]
-
7
Click the red circle to close the Keyboard window.
-
8
Press Fn twice. Now you’ll see a window with a microphone icon. Dictation is now active and ready to use. This is the dictation window.
-
9
Open Word. You’ll usually find in the Applications folder or on the Launchpad.
-
10
Click the document where you want the text to appear.
-
11
Start talking. As you speak, your words will appear in the Word document.


Advertisement
Add New Question
-
Question
Does it work on Word Online?

No. Word Online is a very simplified version and, as such, lacks many of the functions of the full version, including dictation.
Ask a Question
200 characters left
Include your email address to get a message when this question is answered.
Submit
Advertisement
Thanks for submitting a tip for review!
About This Article
Thanks to all authors for creating a page that has been read 89,558 times.
Is this article up to date?
Windows includes voice-dictation software as an alternative to keyboard and mouse input. After setting up a microphone and training the software to recognize your voice, you can launch applications, control your desktop and create Word documents with voice commands.
Microphone Setup
-
Any microphone can work with Windows Speech Recognition, as long as its quality is high enough to record clear dictation. Connect a microphone to your computer’s audio input jack or USB port, depending on its connection type. Press the “Windows” key, type “Set Up a Microphone” (without quotes, here and throughout), click “Settings” and press “Enter.” When the microphone setup wizard opens, follow the onscreen instructions to optimize your voice input.
Voice Training
-
Since spoken English varies across regions, Speech Recognition needs training to understand your voice. Open the Speech Recognition window to start the voice training wizard. Press the “Windows” key, type “Speech Recognition” and press “Enter.” Click “Speech Recognition” and select “Train Your Computer to Better Understand You.” The voice training wizard opens and displays window prompts to guide you through the training. When prompted, speak the onscreen sentences into the microphone in your natural voice.
Creating Word Documents
-
With Speech Recognition running in the background, a microphone icon is displayed in the system tray. Click the icon to start using Speech Recognition, then say “Open Word” to launch Microsoft Word. Dictate text into the microphone, adding punctuation marks verbally. For example, say “Comma” or “Period” to add one of these symbols. Refer to the Speech Recognition table for a complete list of commands (link in Resources).