Download Article
Download Article
Whether you’re creating a brand-new document in Microsoft Word or saving changes to an existing document, saving your files in Word is pretty simple. In this article, we’ll talk you through the basics of saving Word documents in Windows or Mac, including how to use keyboard shortcuts to save, how to turn on AutoSave, and how to save your docs in different file formats.
Things You Should Know
- Click the «File» menu and select «Save As» to save a new document.
- To quickly save changes to an existing document, click the disk icon on the toolbar, or press Control + S on a PC or Command + S on a Mac.
- If you’re using Office 365, enable AutoSave to automatically save your changes to the cloud every few seconds.
-
This function lets you name your file and choose its location. Once you’ve created a new Word document, open the File menu and select Save As. A window will pop up prompting you to name the file and choose a location on your computer or a linked cloud account where the file will be stored. Choose the file type (e.g., .docx, .pdf, or .xml) from the drop-down menu at the bottom of the window. Then, select Save.[1]
- You can also use the keyboard shortcut F12 (in Windows) or ↑+⌘ Command+s (on a Mac) to open the Save As window.
- If you’re saving a document for the first time, using the Save command will prompt the Save As window to open.
- If the document is saved locally, you can use Save As to save a copy of an existing document with a new name, format, or location. However, for documents that are saved to OneDrive or another cloud service, you may need to use Save a Copy instead, depending on your version of Word.
Advertisement
-
Use this method to save changes to an existing document. With your document open, click the File menu in the toolbar at the top of the screen. Then, click Save. Any recent changes to your file will be saved.[2]
-
This option lets you save your changes with a single click. The Quick Access Tool Bar is located at the very top of your document window on the right side. Locate the Save button, which looks like an old-fashioned square floppy disk, and click on it to save your document.[3]
Advertisement
-
These keyboard shortcuts instantly save recent changes. You can also use the keyboard Save command to launch the Save As window if you’re saving a new document for the first time. On a Windows PC, use Control+s. If you’re using a Mac, hit ⌘ Command+s.[4]
-
AutoSave is only available for documents saved to the cloud. The AutoSave feature in the Office 365 version of Word prevents you from having to save manually. However, in order to use it, you must save your files to a OneDrive, Box, or SharePoint account. To use AutoSave:[5]
- Click the toggle switch next to AutoSave in the Quick Access Toolbar at the top right corner of your document window.
- A window will pop up prompting you to upload your file to a cloud location. You can also rename it, if you like. Select your preferred location using the dropdown Place menu.
- Click Upload to use the default location or select Choose Location if you pick a different option in the Place menu.
Advertisement
-
Most Word documents save automatically as .docx files. However, you can choose to save your document as a different format, such as .pdf, .doc (for compatibility with older versions of Word), or .txt.[6]
To do this:- For documents that are saved locally on your computer, open the File menu and select Save As. In the File Format dropdown menu near the bottom of the Save As window, select your desired format.
- If your document has AutoSave enabled, you’ll need to use the Save a Copy command instead, which is also located in the File menu. Select the type of file you want to create in the drop-down File Format menu at the bottom of the window.
- Click Save to confirm your choice.
- With some formats, such as .pdf, you will be prompted to Export the file rather than Save it after you select the format.
-
This option creates a separate copy of your document. This is a good option if you want to make changes to your document while also preserving the original version. To make a copy of your Word doc, open the File menu and select Save a Copy…. If you’re saving the copy in the same location as the original, give it a new name. Click Save at the bottom of the Save a Copy window when you’re done.
Advertisement
-
If you don’t like Word’s default Save options, you can change them. On a Windows PC, open the File menu, then select Options, then Save.[7]
If you’re using a Mac, open the main Word menu, then click Preferences… and select Save. From there, you can customize options such as:- The default format for your saved Word files
- How frequently Word saves AutoRecover information
- Where AutoRecover files are stored
- The default location for saved documents (e.g., a local folder on your computer or a location in the cloud)
Add New Question
-
Question
What is the process of creating a file in a folder?
Once the folder is created, go into it and right-click on a blank area, then select New -> Microsoft Word Document.
-
Question
Do I save documents as a Word doc, or Word 97 — 2003?
This depends on what the reader(s) are using. Word 97 — 2003 format is more universal, but may strip some advanced features from your document. If you save it in Word format, those using earlier versions can still view/edit the document using the free MS Office Compatibility Pack from Microsoft. If you’re just creating the document for your own personal use, save as Word.
-
Question
How do I see a saved document?
On any modern version of Windows, you would a view a saved document by navigating to its save location. For example, if you saved it in the default «My Documents» folder, you would open a file explorer window and locate that folder, where you would then find your document. Alternatively, recent versions of Microsoft Word show a list of recent documents when you open the program. Finally, you can click File, then Open on most versions of Microsoft Word, then navigate to the correct file location.
Ask a Question
200 characters left
Include your email address to get a message when this question is answered.
Submit
Advertisement
Video
Thanks for submitting a tip for review!
-
Failing to save your document before you close Microsoft Word will potentially delete the document or any changes you made to an existing one.
Advertisement
About This Article
Thanks to all authors for creating a page that has been read 324,086 times.
Is this article up to date?
Note: (This guide on how to save a word document is suitable for all Microsoft Word versions, including Office 365)
Saving your file/document is an important feature in almost every application. This feature is very helpful when you cannot complete a stipulated task in one go. Also, you would need to save your file when you share it with others. Saving your file prevents loss of data due to software crashes, power outages, or even, accidental closing of the application.
Saving a Word document is pretty simple and it can be done in a variety of ways. In this article, I will tell you how to save a Word document in 4 easy ways.
You’ll Learn:
- 4 Different Ways to Save a Word Document
- From the File Main Menu Ribbon
- Using the Keyboard Shortcut Keys
- Using the Quick Access Toolbar
- Save Your Word Document as a PDF
- AutoSave Feature in Word
Related Reads:
How to Merge Word Documents? – 3 Easy Methods
How to Change Orientation of One Page in Word? 3 Easy Ways
How to Wrap Text in Word? 6 Wrap Text Options Explained
4 Different to Save a Word Document
There are multiple ways to save a word document. Each method has its own steps, accessibilities, features, and functionalities.
Let us now see the different methods to save a word document in detail.
From the File Main Menu Ribbon
This is one of the most well-known methods to save a Word document ever since Word was launched.
- Open the Word document which you want to save.
- Click on the File in the main menu ribbon. This opens the backstage view which contains all the additional options relating to the document.
- In the left pane of the File window, click on Save.
- This eventually takes you to the Save As pane.
Note: The functionalities of Save and Save As options are alike. Save is commonly used when saving a file for the first time or overwriting the existing file. The Save As option is used to create copies, and change the location or format of the file.
- In the Save As pane, choose the folder to which you want to save, name the file, and choose the file format.
- For additional saving options relating to the location and format, click on Browse or More Options.
- Finally, click on Save.
This saves your Word document in the selected folder under the given file name.
By Using the Keyboard Shortcut
Shortcut keys are another easy way to help you save a Word document when clicking and navigating to Save options seems like a multi-step task.
- Once you have curated your Word document, just press the keys Ctrl+S.
- This opens the Save As dialog box. You can then rename the file and choose the location to save the document.
For additional options, click on More Options which takes you to the File menu backstage view. From there, you can access a variety of save options relating to the Word file.
Using the Quick Access Toolbar
The Quick Access Toolbar provides a single-click solution to a variety of options in Word. You can add a variety of buttons to the Quick Access Toolbar which you’ll be using often.
- Let us first enable the Quick Access Toolbar. Click on the Ribbon Display Options which can be seen as a small dropdown arrow. From the dropdown, click on Show Quick Access Toolbar.
- Once the Quick Access Toolbar is enabled, click on the dropdown from Customize Quick Access Toolbar, which can be seen as a small dropdown arrow in the left corner of the toolbar, and select More Commands.
- This in turn opens the Excel options dialog box. Click on the dropdown from choose commands and select All Commands.
- Now, scroll down and choose the options you want to add to the Quick Access Toolbar. In this case, let us add the Save button.
- Once you click on Add, you can see the chosen button move to the right side of the pane.
- Finally, click OK.
- Now, you can see the selected buttons in the Quick Access Toolbar.
When you want to save your Word document, you can just click on the Save button to open the Save As dialog box, without having to navigate through the File, Save, or Save As options.
Suggested Reads:
How to Insert Watermark in Word? 3 Easy Ways
How to Find and Replace in Word? 7 Simple Methods
How to Double Space in Word? 4 Easy Ways
Save Your Word Document as a PDF
Word documents can be converted into other file formats such as PDF using any additional third-party software or websites. However, you can just save the current word document you are working on into a PDF file without having to leave Word.
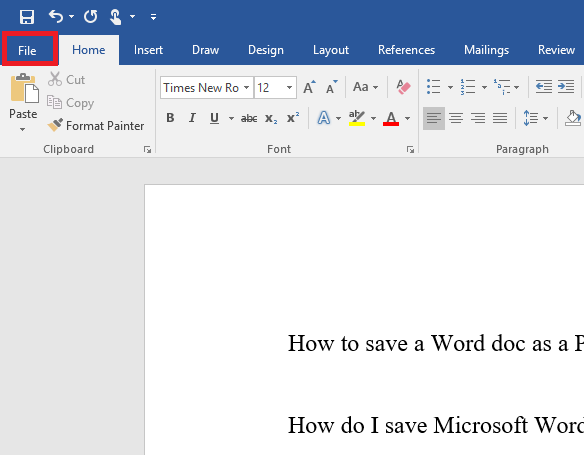
- To save the Word document as PDF, first, navigate to File.
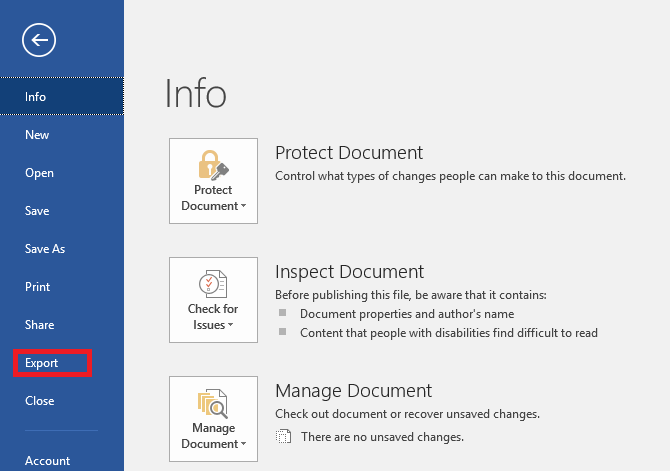
- Click on Export in the left pane of the File window.
- This opens the Export pane towards the right of the file window.
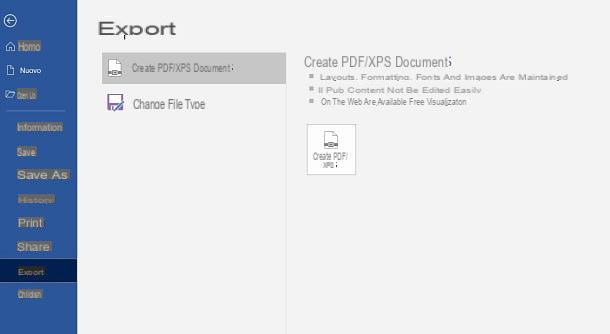
- To export the Word document to a PDF file, click on Create PDF/XPS Document button. Now, click on Create PDF/XPS.

- This opens the Publish As PDF or XPS dialog box. In the dialog box, choose the file location, rename the file, and from the Save As type dropdown choose the file format and click on Save.
- This saves your current word document as a PDF file.
AutoSave Feature in Word
Even though there are a variety of ways to save a Word document, sometimes even they might not be enough to save your document at appropriate times. To overcome this, Word has a feature called AutoSave.
The AutoSave feature automatically saves your Word document at regular intervals of time so you don’t have to worry about losing your progress again.
The Autosave feature only works on the document uploaded to the cloud and not when the files are on your local storage.
By default, the feature will be automatically enabled when uploaded to the cloud. Else, you can use the toggle ON/OFF button in the title bar in the top left corner to enable or disable the AutoSave feature.
For additional customizations relating to the AutoSave feature, go to the File main menu and click on the Options button. Word opens the Word Options dialog box. Under the Save category, you can see the options relating to the AutoSave feature.
Also Read:
How to Recover a Word Document ? 4 Proven Ways
How to Curve Text in Word? 2 Easy Ways
How to Insert a Placeholder in Word? 2 Different Types
Frequently Asked Questions
What is the shortcut to saving a Word document?
Using the keyboard shortcut keys is the easiest way to save a Word document. When you want to save the word document, click on Ctrl+S. This opens the Save As dialog box, from where you can save the document. And, going forward you can just press Ctrl+S to overwrite the document.
How do I save the document as PDF from the Save As dialog box?
Navigate to File and click on Save. Again, click on Browse or More Options. This opens the Save As dialog box. Specify the name and the location of the Word document. Now, click on the dropdown from Save Ss type and select the format of your choice(PDF).
Closing Thoughts
Remembering to save your word document is integral when working on important documents. Though it might be a couple of additional steps, Saving is always better than losing the files along with all your hard-working efforts.
In this article, we saw how to save a word document in 4 easy ways. You can save them from the File main menu, using keyboard shortcuts, using the Quick Access Toolbar, exporting them as PDF, and even enabling AutoSave in Word to save the documents. Choose the one that suits your purpose the best.
For more high-quality guides on MS Word or Excel, please visit our free resources section.
Ready to dive deep into Excel? Click here for advanced Excel courses with in-depth training modules.
Simon Sez IT has been teaching Excel and other business software for over ten years. For a low monthly fee, you can get access to 150+ IT training courses.
Simon Calder
Chris “Simon” Calder was working as a Project Manager in IT for one of Los Angeles’ most prestigious cultural institutions, LACMA.He taught himself to use Microsoft Project from a giant textbook and hated every moment of it. Online learning was in its infancy then, but he spotted an opportunity and made an online MS Project course — the rest, as they say, is history!
You can save a file to a folder on your hard disk drive, a network location, the cloud, a DVD, the desktop, or a flash drive. While you must identify the destination, if it is different than the default folder, the saving process is the same regardless of what destination you choose. By default, Microsoft 365 programs save files in the default working folder.
Additionally you can save a file in a different file format, such as RTF, CSV, or PDF.
Saving a file to OneDrive or SharePoint allows you to access it on any device and enables features such as AutoSave and Version History, which can help prevent data loss if your file closes unexpectedly.
To save your file:
-
Press CTRL+S or select File > Save.
Tip: You can also select Save
on the Quick Access Toolbar.
-
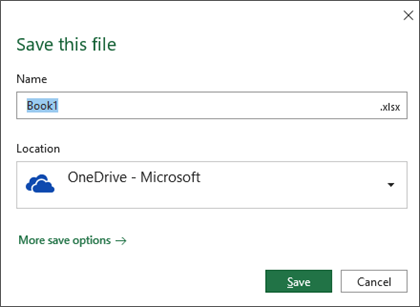
You must enter a name for the file if you are saving it for the first time.
Tip: Save your file to a cloud location, such as OneDrive or SharePoint, to be able to access it anywhere, collaborate with others in real-time, and access Version History.
By default, if you’re signed in, files are saved to your OneDrive. If you want to save the current file somewhere else, click the Location drop-down to see additional recently-used locations. If the location you want isn’t there, you can open the full Save As window by selecting More save options.
Tip: If you save your file to OneDrive or SharePoint, AutoSave will be enabled by default, so you don’t have to remember to save as you go.
If you’d like to change the default location for these saves to one of your other recently-used folders, select the Location drop-down, right-click the folder location you want to set as the default and select Set as Default Location.
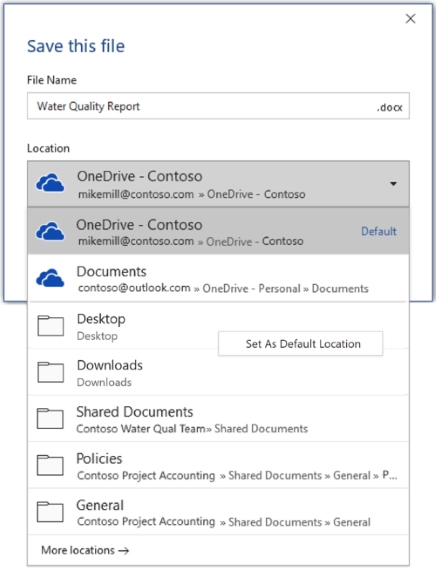
If you want to save to a location other than your recently-used folders, select More locations. If you haven’t received this update yet, your Office applications will continue to use the File menu for saving.
Tips:
-
You can also press F12 or select File > Save As to open the File menu.
-
If you’re used to using keyboard shortcuts when closing your document, such as ALT+F4, you can quickly choose to «Don’t Save» the file by using the keyboard accelerator key for that button (ALT+N).
Save a copy as a new file (Save As)
Tip: If you’re going to create a new file based on an existing file, but only want your changes saved in the new file, it’s a good idea to Save a Copy before you’ve made any changes. That way your original file will remain unchanged and all your edits will be in the new copy. You can also right-click the original file and select Open a copy.
-
Press F12 or click File > Save a Copy
-
By default Office will save the copy in the same location as the original. If you’re happy with the existing location go on to step 3. If you want to save the new copy in a different location choose it at this point.
Location
Description
Sites –
[Your Company Name]
SharePoint or Office 365 Groups document libraries
OneDrive –
[Your Company Name]
OneDrive for Business
OneDrive – Personal
OneDrive for consumers via your Microsoft account
This PC
Your local device, including any connected hard drives or flash drives
Browse
Opens the File Explorer so you can navigate to any location on your computer.
-
Give your new copy a name and click Save.
Your original file will be closed and you’ll now be working in the new copy you just created.
Tip: If you find yourself creating new files based on existing files often, you may want to use templates to make the process easier and safer. See Create a template for more information.
Save as a different format
You might want to save your file in another format so that you, or somebody else, can open the file in a different program or older version. For example, you might want to save your Word document as a Rich Text File (RTF) or your Excel workbook as a Comma-Separated Values (CSV) file.
Important: If you save an Office file in a format other than the Open XML format (such as .DOCX, .XLSX, or .PPTX) some connected experiences and modern features like AutoSave or Accessibility Checker won’t work on that file.
-
Click the File tab.
-
Click Save As.
-
Choose a file location, such as OneDrive or This PC to store your file.
-
In the File name box, enter a new name for the file.
-
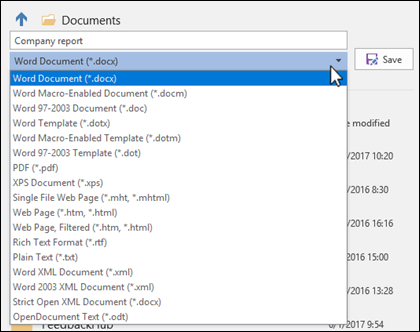
In the Save as type list, click the file format that you want to save the file in. For example, click Rich Text Format (.rtf), Word 97-2003 (.doc), Web Page (.htm or .html), or Comma Delimited (.csv).
For more information about how to save files in PDF (.pdf) or XPS (.xps) formats, see Save or convert to PDF or XPS.
-
Click Save.
Back up and recover your files
How you back up and recover your files depends on where and when you saved it. To learn more about a feature, including which versions of Office support it, select the name of the feature in the table below.
Saved to OneDrive
Saved to your device
If AutoRecover is turned on and your file closes unexpectedly, Document Recovery opens the next time you open the Office app. You can also recover an earlier version of an Office file.
Important: Even if AutoRecover is turned on, you should save the file frequently while you’re working on it to avoid losing data because of an unexpected power failure or other problem.
You can save a copy as a new file, or in a different format, or to a different location in Office 2016.
Save a copy as a new file (Save As)
Tip: If you’re going to create a new file, based on an existing file, but only want your changes saved in the new file it’s a good idea to do the Save a Copy process first thing; before you’ve made any changes. That way your original file will remain unchanged and all your edits will be in the new copy.
-
Press F12 or click File > Save a Copy
-
By default Office will save the copy in the same location as the original. If you want to save the new copy in a different location choose it at this point. If you’re happy with the existing location go on to step 3.
-
Give your new copy a name and click Save.
Your original file will be closed and you’ll now be working in the new copy you just created.
Tip: If you find yourself creating new files based on existing files often, you may want to use templates to make the process easier and safer. See Create a template for more information.
Choose a different location to save your file
During the Save, or Save a Copy, process described above you can choose a different location to save your file.
-
Select the cloud, web site, or device location where you want to save the file.
Location
Description
Sites –
[Your Company Name]
SharePoint or Office 365 Groups document libraries
OneDrive –
[Your Company Name]
OneDrive for Business
OneDrive – Personal
OneDrive for consumers via your Microsoft account
This PC
Your local device, including any connected hard drives or flash drives
Browse
Opens the File Explorer so you can navigate to any location on your computer.
-
Select a folder from the Recent Folders list, or click Browse if you don’t see the location you want listed there.
-
Confirm the filename you want to use and click Save.
Save as a different, or older, format
You might want to save your file in another format so that you, or somebody else, can open the file in a different program or older version. For example, you might want to save your Word 2016 document as a Rich Text File (RTF) or your Excel workbook as a Comma-Separated Values (CSV) file.
-
Click the File tab.
-
Click Save As.
-
Choose a file location, such as OneDrive or This PC to store your file.
-
In the File name box, enter a new name for the file.
-
In the Save as type list, click the file format that you want to save the file in. For example, click Rich Text Format (.rtf), Word 97-2003 (.doc), Web Page (.htm or .html), or Comma Delimited (.csv).
Note: For more information about how to save files in PDF (.pdf) or XPS (.xps) formats, see Save or convert to PDF or XPS.
-
Click Save.
Save as a copy, or to a different location in Office 2013.
-
Select the cloud, web site, or device location where you want to save the file.
Location
Description
Sites –
[Your Company Name]
SharePoint Server 2013 or earlier document libraries
OneDrive –
[Your Company Name]
OneDrive for work or school
OneDrive – Personal
OneDrive for consumers via your Microsoft account
Other web locations
Any other websites you have file storage access to.
Computer
Your local device
-
Select a folder from the Recent Folders list, or click Browse if you don’t see the location you want listed there.
-
Confirm the filename you want to use and click Save.
When you use the Save As dialog box, you can also save the file to a new location by using the Navigation pane.
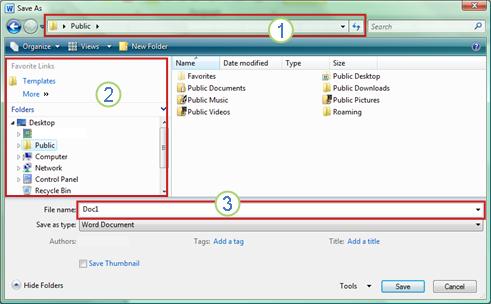
-
To choose a folder or type the path to a folder, use the Address Bar.
-
To quickly see locations you use often, use the Navigation pane.
-
To see more file types, click the arrow.
You can also use the Save As dialog box to rename a file or change the location of where you save the file by clicking a different folder.
You might want to save your file in another format so that you, or somebody else, can open the file in a different program or older version. For example, you might want to save your Word document as a Rich Text File (RTF) or your Excel workbook as a Comma-Separated Values (CSV) file.
-
Click the File tab.
-
Click Save As.
-
Choose a file location, such as OneDrive or This PC to store your file.
-
In the File name box, enter a new name for the file.
-
In the Save as type list, click the file format that you want to save the file in. For example, click Rich Text Format (.rtf), Web Page (.htm or .html), or Comma Delimited (.csv).
Note: For more information about how to save files in PDF (.pdf) or XPS (.xps) formats, see Save or convert to PDF or XPS.
-
Click Save.
If you are using Office 2010, you can save files in an earlier version of Microsoft 365 by selecting the version in the Save as type list in the Save As dialog box. For example, you can save your Word 2010 document (.docx) as a 97-2003 document (.doc).
Notes:
-
Office 2010 continues the use of the XML-based file formats, such as .docx, .xlsx, and .pptx, introduced in the 2007 Office release. Therefore, files created in Microsoft Word 2010, Microsoft Excel 2010, and Microsoft PowerPoint 2010 can be opened in the 2007 Office release programs without special add-ins or loss of functionality. For more information, see Open XML Formats and file name extensions.
-
For more information about compatibility between files from different releases, see Use the Compatibility Checker.
For information about saving Microsoft Access 2010 .ACCDB files into the older .MDB format see Convert an .accdb database to an earlier file format.
-
Click the File tab.
-
Click Save As.
-
In the File name box, enter a new name for the file.
-
Click Save.
When you use the Save As dialog box, you can also save the file to a new location by using the Navigation pane.

-
To choose a folder or type the path to a folder, use the Address Bar.
-
To quickly see locations you use often, use the Navigation pane.
-
To see more file types, click the arrow.
You can also use the Save As dialog box to rename a file or change the location of where you save the file by clicking a different folder.
You might want to save your file in another format so that you, or somebody else, can open the file in a different program or older version. For example, you might want to save your Word document as a Rich Text File (RTF) or your Excel workbook as a Comma-Separated Values (CSV) file.
-
Click the File tab.
-
Click Save As.
-
Choose a file location, such as OneDrive or This PC to store your file.
-
In the File name box, enter a new name for the file.
-
In the Save as type list, click the file format that you want to save the file in. For example, click Rich Text Format (.rtf), Web Page (.htm or .html), or Comma Delimited (.csv).
Note: For more information about how to save files in PDF (.pdf) or XPS (.xps) formats, see Save or convert to PDF or XPS.
-
Click Save.
If you are using Office 2010, you can save files in an earlier version of Microsoft 365 by selecting the version in the Save as type list in the Save As dialog box. For example, you can save your Word 2010 document (.docx) as a 97-2003 document (.doc).
Notes:
-
Office 2010 continues the use of the XML-based file formats, such as .docx, .xlsx, and .pptx, introduced in the 2007 Office release. Therefore, files created in Microsoft Word 2010, Microsoft Excel 2010, and Microsoft PowerPoint 2010 can be opened in the 2007 Office release programs without special add-ins or loss of functionality. For more information, see Open XML Formats and file name extensions.
-
For more information about compatibility between files from different releases, see Use the Compatibility Checker.
For information about saving Microsoft Access 2010 .ACCDB files into the older .MDB format see Convert an .accdb database to an earlier file format.
We’re listening
This article was updated January 29, 2020 as a result of your comments. If you found it helpful, and especially if you didn’t, please use the feedback controls below to let us know how we can make it better.
See Also
-
What is AutoSave?
-
Rename a file
-
Save or convert to PDF
-
Store, share, and sync your files
-
What happens when you sign out of Office

You use Microsoft Word for your various word-processing needs. It’s simple and easy-to-use, and it simply gets the job done in most cases. But what if someone else requests a file in a different format, such as PDF? What if you need the info in your Word doc to appear in plain text, without any font or paragraph styles?
Microsoft Word 2016 for Windows has a basic feature that lets you save documents in several different, but common, file formats. Here’s how to use it.
See on Microsoft Store (opens in new tab)
How to save a Microsoft Word doc as a PDF
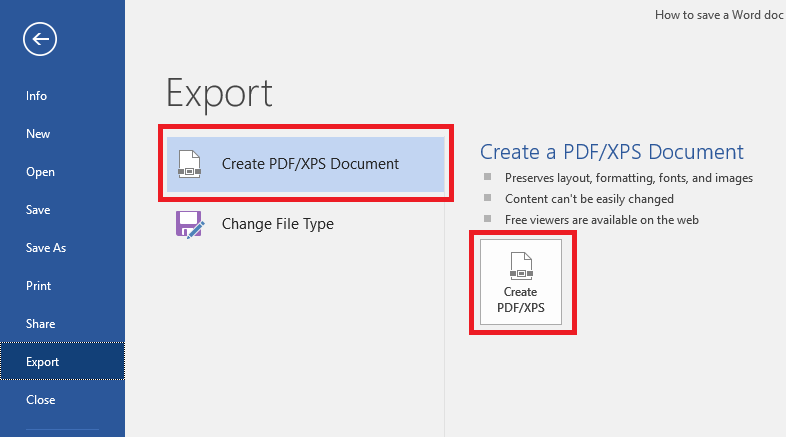
- Click the File tab in the top-left corner of your Word screen.
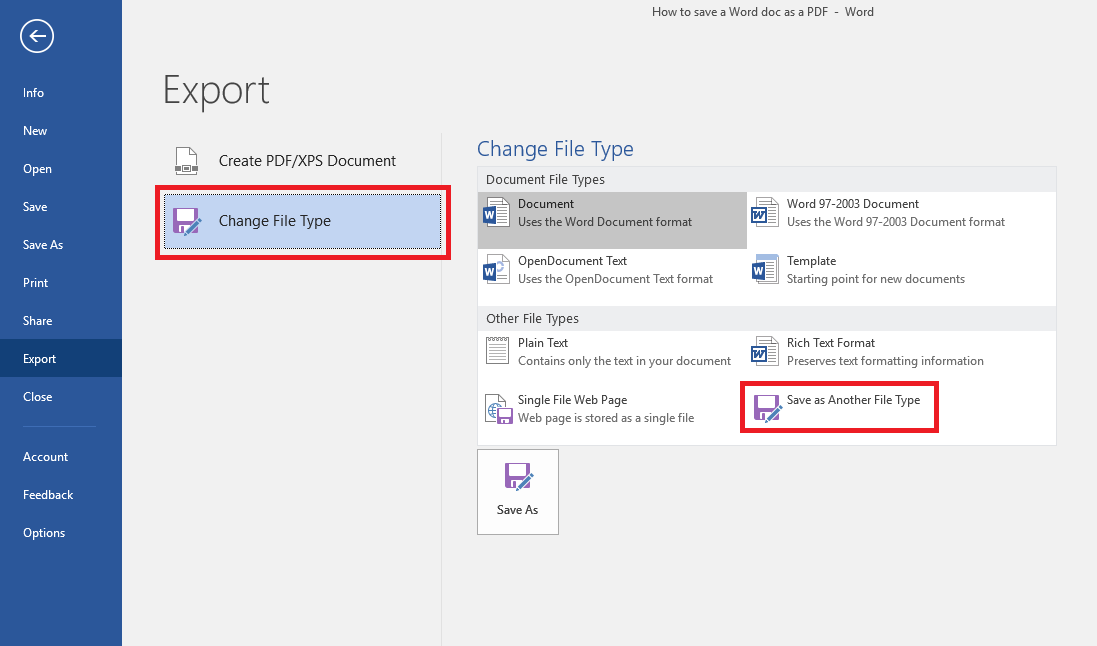
- Click Export in the blue vertical menu that runs along the left side of your screen.
- With the Create XPS/PDF Document option selected, click the corresponding box on the right side of your screen. (It looks like a document icon wearing a seatbelt.)
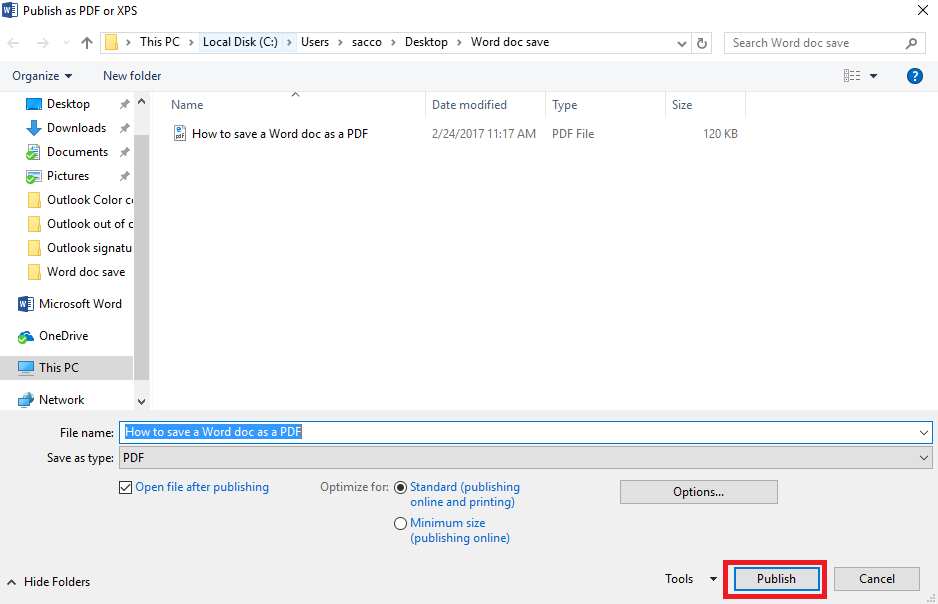
- A new box labeled Publish as PDF or XPS appears, and you should use it to navigate to the location on your PC where you want to save the new PDF.
- Click Publish to create and save your PDF.
- You may see a How do you want to open this file? pop-up box. By default, Windows will use the Edge browser but you can choose from other compatible browser apps installed on your PC, as well.
- If you want to continue using the same app to open PDFs in the future, check the Always use this app to open .pdf files option.
If the file format you want isn’t available in Microsoft’s default option, you can also dig a bit deeper for additional file format options.
How to save a Microsoft Word doc in different file formats
- Follow Steps No. 1 and No. 2 above.
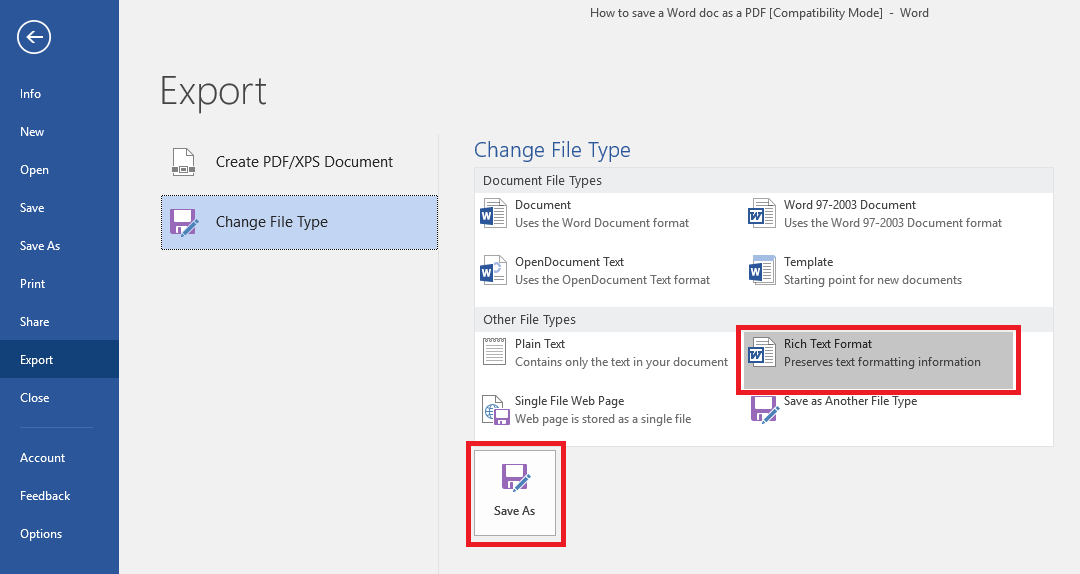
- Highlight the Change File Type option on the left side of the screen.
- You’ll see a number of different present options for new file formats, including OpenDocument Text, Word 97-2003 Document, Plain Text and Rich Text Format.
- If you want to use one of the default options, choose and click it accordingly and then hit the Save As box at the bottom of the screen.
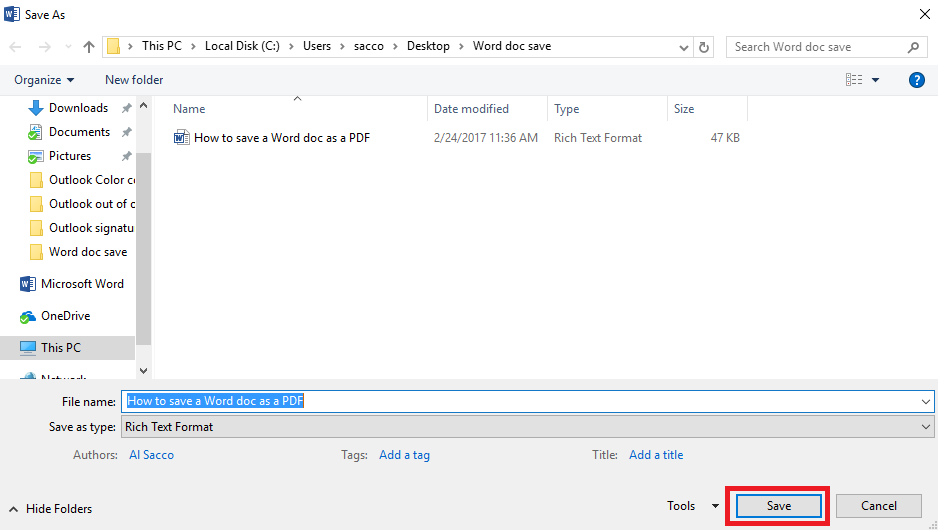
- Next, navigate to the location on your PC where you want to save the new file and click Save.
- If you want to save your Word doc in a format that’s not available in Word’s preset defaults, complete Steps No. 1 and No. 2 above, and then choose Save as Another File Type
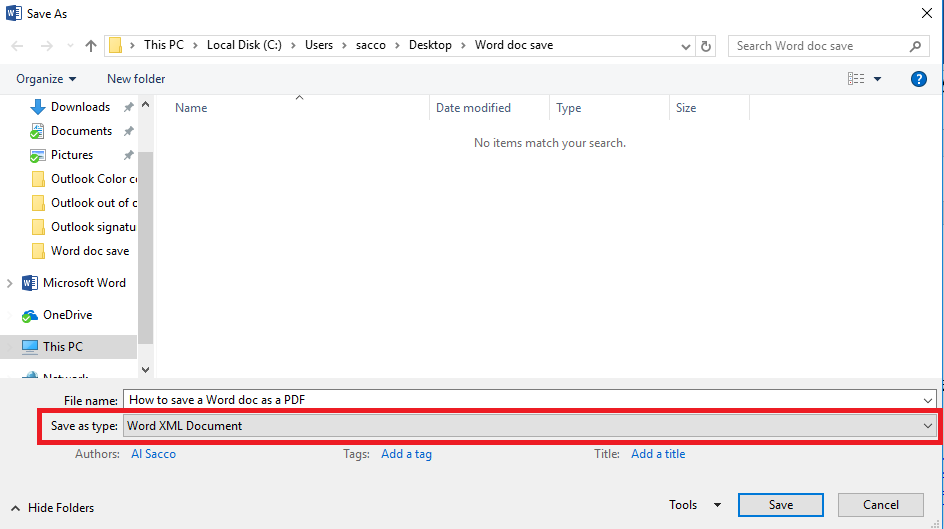
- Click the Save As box at the bottom of the screen.
- In the next box, navigate to the location on your PC where you want to save the new file.
- Open the drop-down menu next to Save as type to see a few additional options, such as Word XML Document, Strict Open XML document, and Web Page, Filtered.
- Choose the format you want and click Save.
Word 2016 for Windows lets you easily convert your documents into more than a dozen different formats, using the process detailed here.
For more Word help and how-to articles, read:
- 13 easy-to-remember Microsoft Word keyboard shortcuts
- How to skip the Start screen in Microsoft Word 2016 for Windows
- How to change font defaults in Microsoft Word 2016 for Windows
- How to master Zoom settings in Word 2016 for Windows
All the latest news, reviews, and guides for Windows and Xbox diehards.
Al Sacco is content director of Future PLC’s Mobile Technology Vertical, which includes AndroidCentral.com, iMore.com and WindowsCentral.com. He is a veteran reporter, writer, reviewer and editor who has professionally covered and evaluated IT and mobile technology, and countless associated gadgets and accessories, for more than a decade. You can keep up with Al on Twitter and Instagram.
How to save a Word document
If you want to know how to save a word document, in the next paragraphs you will find all the information you need to do so. First, know that Microsoft Word they are saved by default in the .DOCX format. However, you can change this format via the program’s save options.
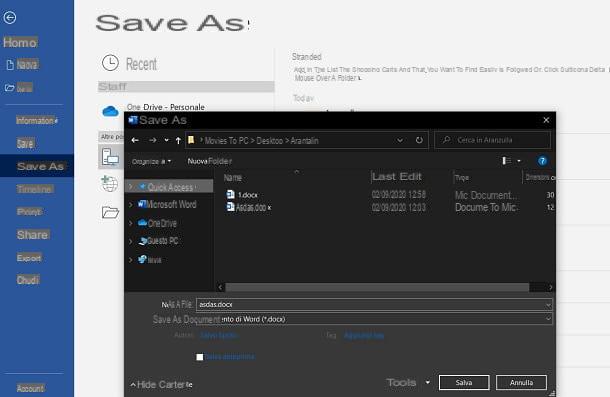
If you use the classic desktop version of Word for Windows or macOS, to save a document, go to the tab Fillet that you find at the top left and select the item Save with name from the menu that is proposed to you. Now he points to one local destination (i.e. a folder) or, if you prefer, choose to save the document on the OneDrive cloud and, in the screen that is shown to you, indicate the name to assign to the document (File name) that the target format of the same (Save eat).
As I have already mentioned, the default format is that . DOCX but, by clicking on the drop-down menu Save eat, you will be able to choose all other formats available and compatible with Microsoft Word, including DOC older versions of Word (pre-Office 2007), ODT (the OpenDocument format typical of OpenOffice and LibreOffice), RTF (the most «basic» formatted text files, compatible with almost all text editors that support rich text) and TXT (plain text files, also compatible with Notepad). Finally, press the button Save, to save the document to your chosen destination, and that’s it.
If you have already created and saved a document and you simply want to save the changes made, you just need to click on the items File> Save. If, however, you are interested in knowing how to save a word document with the keyboard, i.e. using quick shortcuts, you can use su Windows the combinations Ctrl + B (Save) or F12 (Save with name); its Macinstead, you can simply press the combination cmd + s.
In addition to this, you should know that a document can be automatically saved when the software is closed. Therefore, if you use Windows, first prize X located at the top right and answer affirmatively to the request to save the document. If you use a Mac, on the other hand, you can get the same result by pressing on red dot located at the top left.
You can also add thesave icon in Quick Access Toolbar, located at the top left: to do this, press the ▼ icon at the top and click on the item Save.
Finally, by default the automatic saving of the document each 10 minutes. If you want to change this parameter and save more frequently, click on the items File> Options (above) and, in the screen that is shown to you, select the tab Rescue.
Now, make sure the box next to the wording Save autosave information every X minutes is active and sets a value in the minutes box. Poi il tasto award OK per confermare I modify it apportate.
It was used Word Onlineinstead, know that saving a document happens automatically on OneDrive to every modification, without your intervention being necessary. However, you can save in any format (even other than DOCX by default), by going to the menu File> Save As and choosing whether to create a copy of the file in another location on OneDrive or to download a copy of the document in DOCX, PDF or ODT.
As for the Word (available for Android, on Play Store and alternative stores, and for iOS / iPadOS, downloadable from the App Store) and the app Office (also available for Android, on Play Store and alternative stores, and for iOS / iPadOS, downloadable from the App Store), the document is automatically saved with each modification, if it already exists. However, by tapping on the ⋮ icon, at the top, you can select the item Save with name, to save a copy of the document to another location in the Microsoft cloud or to your device.
In the case of a new document, however, if you use iPhone or iPad, you will have to save it «manually» by pressing the appropriate item in the app menu.
How to save Word document with password
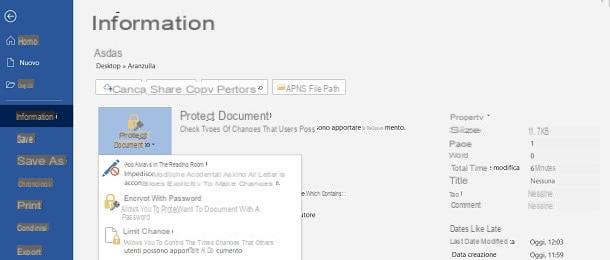
If you want save a Word document with password, in order to limit the changes, the procedure to follow is simple, but you can only do it on the desktop version of Microsoft Word. Therefore, open the document and select the items File> Info from the menu located at the top.
Adesso, click on the button Protect document and, in the box that is shown to you, select the option Encrypt with password. Then you just have to enter the Password twice in succession and click the button OK, to confirm.
Then save the document, as I explained to you in the previous chapter, and that’s it. In doing so, the password must be entered to both view and edit the file.
If you want to know instead how to save an uneditable Word document, that is, that it is opened only in mode Read only, in the box that is shown to you by pressing the key Protect document, scegli l’opzione Always open for read only and then save the document.
With this option enabled, a message will be shown when the document is opened warning you to open it in mode Read only but, by answering in the negative, it will still be possible to modify it. Therefore, I recommend that you also set a password, as I have explained to you in the previous paragraphs.
Finally, if you want to set restrictions on the type of changes you can make to the document, in the drop-down menu Protect document, choose the item Restrict editing and, in the box that is shown to you on the right of the document preview, put a check mark on the box Restrictions on modification and choose only the actions that can be performed between Post comments , revisions, Fill in forms e No changes (Read only).
At this point, press the button Yes, apply protection and, in the screen that is shown to you, enter the two consecutive times Password to be associated with the document. Finally, confirm the procedure by pressing the button OK and save the document.
How to save Word document without revisions
Do you want save a Word document without revisions? In this case you have two alternatives: accept all revisions or delete them. Either way, there will be no more pending revisions and you can safely save the document without this information.
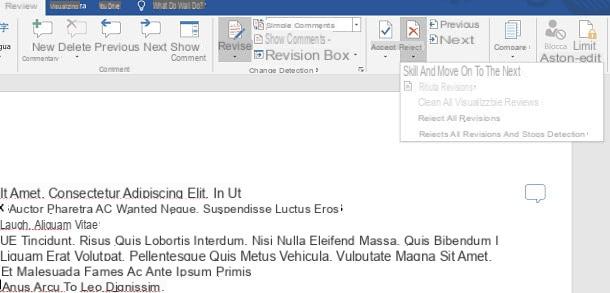
Therefore, after opening the document in Microsoft Word, click on the tab revision, at the top, press the button revisions, to activate the revisions, and then click the button Accept o Reject, respectively, to accept or reject each individual revision. Alternatively, click on the ▼ icon, which you find below these buttons and, from the respective boxes, select the items Accept all revisions o Reject all revisions. Poi il tasto award revisions to disable this feature, so as to avoid creating new revisions on the document.
Su Word Onlineinstead, the revisions must be accepted or deleted manually one by one. Therefore, select the tab revision placed at the top and press on the keys Accept o Reject. Then make sure the drop-down menu under the heading Detect changes (top) is set to the item Deactivate.
In the app of Word for smartphones and tablets, the procedure to follow is similar to that of the desktop client. Therefore, move to the tab revision, located at the top on a tablet or in the drop-down menu at the bottom of a smartphone.
At this point, among the items you see, select the button Accept o Reject to act on the individual revisions or tap the ▶ icons next to these buttons to activate the items respectively Accept all revisions or Reject all revisions.
Regardless of the platform on which you have acted to delete the revisions on the Word document, then save it, as I have explained to you in detail in the previous chapters of the tutorial.
How to save a Word document without comments
In case you want to know how save a Word document without comments, what you need to do is to act in a similar way to what you saw in the previous chapter on reviews.
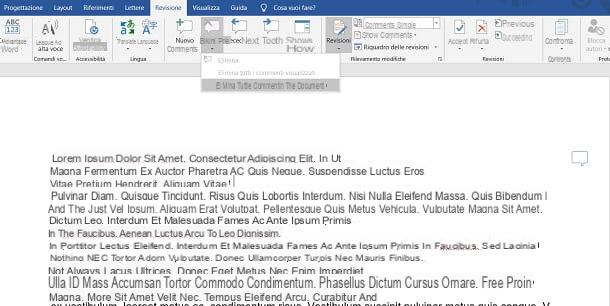
Therefore, in the desktop version of Word, click on the tab revision (at the top) and press the ▼ icon located under the button DeleteIn section Post comments . In the box that is shown to you, then select the item Delete all comments in the document And that’s it.
Su Word Onlineinstead, in the tab revision, first prize Show comments and then click on the icon … that you find above the box of each comment. In the menu that is shown to you, then choose the item Delete thread to perform the deletion of the comment. Unfortunately, since a functionality similar to that of the desktop software is not available, you will have to delete each single comment manually.
In the mobile apps of Wordinstead, go to the tab revision, located at the top of a tablet or in the drop-down menu at the bottom of a smartphone, press the icon ▶ next to the button Delete present nella sezione Post comments , and choose the option Delete all comments in the document.
At this point, you just have to save the document without comments. Regardless of the platform you are working on, finally save the document as I explained earlier.
How to save a Word document to PDF
Do you want save a Word document to PDF? Nothing simpler! Newer versions of Word integrate the PDF standard to generate a copy of documents in this format.
You can, therefore, save a document as a PDF in Word for Windows or macOS simply by pressing on the items File> Export> Create PDF / XPS Document and then clicking the button Create PDF / XPS. In the screen that is shown to you, then select the destination folder, indicates the file name and confirm the procedure by pressing the key Save.
Alternatively, do the normal save of the file to another destination (Save with name) and choose the PDF format from the available export formats. I told you in detail about how to save a file in this chapter.
If the version of Word you have is very old, it is possible that you will not be able to put these procedures into practice. Therefore, what you can do is use the system’s built-in PDF virtual printer or use a third-party one, such as doPDF. In any case, I recommend that you consult my guide on how to create PDF from Word.
For Word Online, you can proceed to export a copy of the document in PDF simply by clicking on the items File> Save with nome, at the top, and choosing the option Scarica come PDF give the menu that you come purpose.
In the mobile apps of Word e Office, you can export a document to PDF using the virtual printer integrated on Android and iOS / iPadOS, which you can find under the heading Print, present in the menu accessible by pressing the icon ⋮ up. To learn more about this topic, I suggest you read my guide on how to print in PDF.
How to save a Word document as an image
If you are wondering how to save a word document as an image, you must know that this operation is not directly possible. What you need to do is first create a document PDF, carefully following all the suggestions I gave you in this chapter.
After you have generated the PDF document, you can convert it into an image using the tools that I have indicated in my guide on how to convert PDF to images.
How to save a Word document


 on the Quick Access Toolbar.