
You can save a file to a folder on your hard disk drive, a network location, the cloud, a DVD, the desktop, or a flash drive. While you must identify the destination, if it is different than the default folder, the saving process is the same regardless of what destination you choose. By default, Microsoft 365 programs save files in the default working folder.
Additionally you can save a file in a different file format, such as RTF, CSV, or PDF.
Saving a file to OneDrive or SharePoint allows you to access it on any device and enables features such as AutoSave and Version History, which can help prevent data loss if your file closes unexpectedly.
To save your file:
-
Press CTRL+S or select File > Save.
Tip: You can also select Save
 on the Quick Access Toolbar.
 -
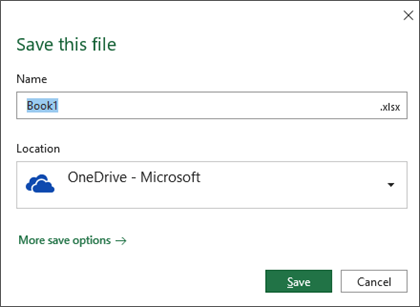
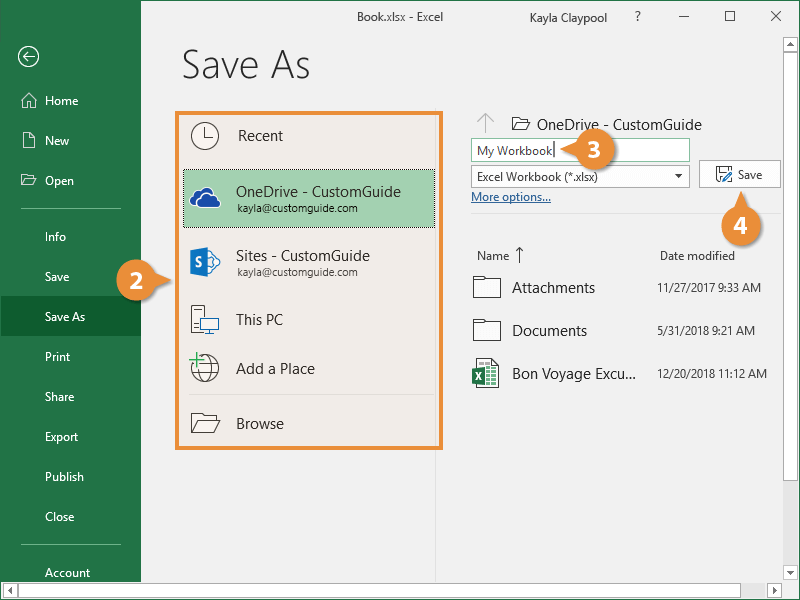
You must enter a name for the file if you are saving it for the first time.
 on the Quick Access Toolbar.
Tip: Save your file to a cloud location, such as OneDrive or SharePoint, to be able to access it anywhere, collaborate with others in real-time, and access Version History.
By default, if you’re signed in, files are saved to your OneDrive. If you want to save the current file somewhere else, click the Location drop-down to see additional recently-used locations. If the location you want isn’t there, you can open the full Save As window by selecting More save options.
Tip: If you save your file to OneDrive or SharePoint, AutoSave will be enabled by default, so you don’t have to remember to save as you go.
If you’d like to change the default location for these saves to one of your other recently-used folders, select the Location drop-down, right-click the folder location you want to set as the default and select Set as Default Location.
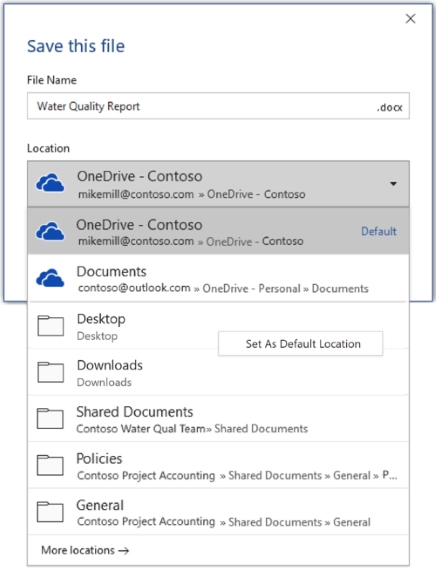
If you want to save to a location other than your recently-used folders, select More locations. If you haven’t received this update yet, your Office applications will continue to use the File menu for saving.
Tips:
-
You can also press F12 or select File > Save As to open the File menu.
-
If you’re used to using keyboard shortcuts when closing your document, such as ALT+F4, you can quickly choose to «Don’t Save» the file by using the keyboard accelerator key for that button (ALT+N).
Save a copy as a new file (Save As)
Tip: If you’re going to create a new file based on an existing file, but only want your changes saved in the new file, it’s a good idea to Save a Copy before you’ve made any changes. That way your original file will remain unchanged and all your edits will be in the new copy. You can also right-click the original file and select Open a copy.
-
Press F12 or click File > Save a Copy
-
By default Office will save the copy in the same location as the original. If you’re happy with the existing location go on to step 3. If you want to save the new copy in a different location choose it at this point.
Location
Description
Sites –
[Your Company Name]
SharePoint or Office 365 Groups document libraries
OneDrive –
[Your Company Name]
OneDrive for Business
OneDrive – Personal
OneDrive for consumers via your Microsoft account
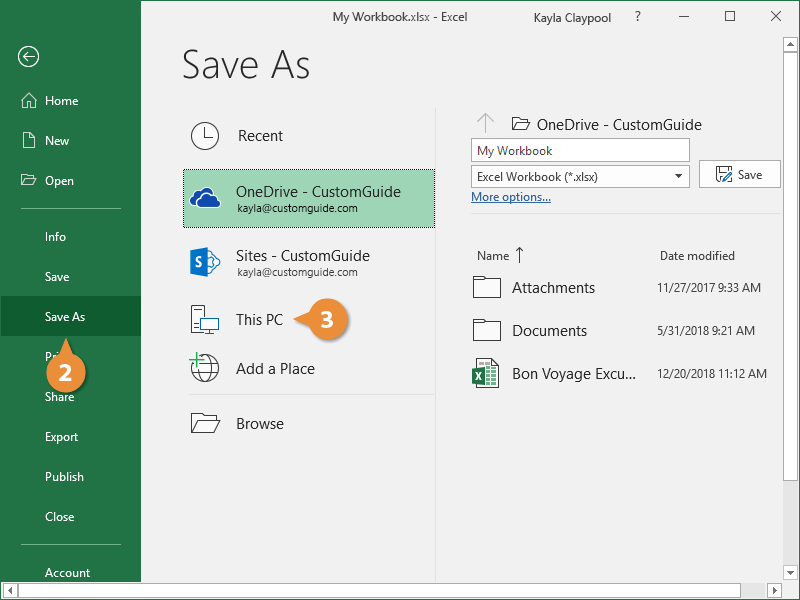
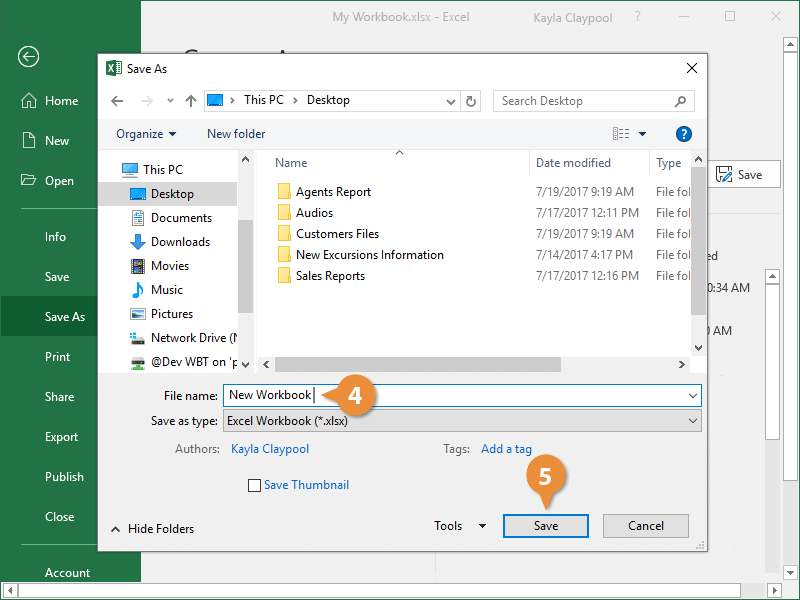
This PC
Your local device, including any connected hard drives or flash drives
Browse
Opens the File Explorer so you can navigate to any location on your computer.
-
Give your new copy a name and click Save.
Your original file will be closed and you’ll now be working in the new copy you just created.
Tip: If you find yourself creating new files based on existing files often, you may want to use templates to make the process easier and safer. See Create a template for more information.
Save as a different format
You might want to save your file in another format so that you, or somebody else, can open the file in a different program or older version. For example, you might want to save your Word document as a Rich Text File (RTF) or your Excel workbook as a Comma-Separated Values (CSV) file.
Important: If you save an Office file in a format other than the Open XML format (such as .DOCX, .XLSX, or .PPTX) some connected experiences and modern features like AutoSave or Accessibility Checker won’t work on that file.
-
Click the File tab.
-
Click Save As.
-
Choose a file location, such as OneDrive or This PC to store your file.
-
In the File name box, enter a new name for the file.
-
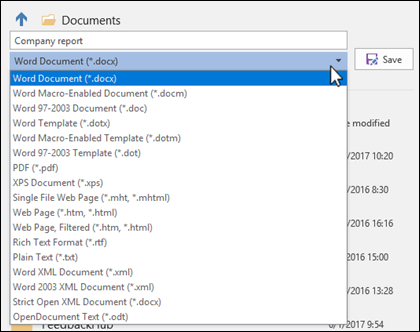
In the Save as type list, click the file format that you want to save the file in. For example, click Rich Text Format (.rtf), Word 97-2003 (.doc), Web Page (.htm or .html), or Comma Delimited (.csv).
For more information about how to save files in PDF (.pdf) or XPS (.xps) formats, see Save or convert to PDF or XPS.
-
Click Save.
Back up and recover your files
How you back up and recover your files depends on where and when you saved it. To learn more about a feature, including which versions of Office support it, select the name of the feature in the table below.
Saved to OneDrive
Saved to your device
If AutoRecover is turned on and your file closes unexpectedly, Document Recovery opens the next time you open the Office app. You can also recover an earlier version of an Office file.
Important: Even if AutoRecover is turned on, you should save the file frequently while you’re working on it to avoid losing data because of an unexpected power failure or other problem.
You can save a copy as a new file, or in a different format, or to a different location in Office 2016.
Save a copy as a new file (Save As)
Tip: If you’re going to create a new file, based on an existing file, but only want your changes saved in the new file it’s a good idea to do the Save a Copy process first thing; before you’ve made any changes. That way your original file will remain unchanged and all your edits will be in the new copy.
-
Press F12 or click File > Save a Copy
-
By default Office will save the copy in the same location as the original. If you want to save the new copy in a different location choose it at this point. If you’re happy with the existing location go on to step 3.
-
Give your new copy a name and click Save.
Your original file will be closed and you’ll now be working in the new copy you just created.
Tip: If you find yourself creating new files based on existing files often, you may want to use templates to make the process easier and safer. See Create a template for more information.
Choose a different location to save your file
During the Save, or Save a Copy, process described above you can choose a different location to save your file.
-
Select the cloud, web site, or device location where you want to save the file.
Location
Description
Sites –
[Your Company Name]
SharePoint or Office 365 Groups document libraries
OneDrive –
[Your Company Name]
OneDrive for Business
OneDrive – Personal
OneDrive for consumers via your Microsoft account
This PC
Your local device, including any connected hard drives or flash drives
Browse
Opens the File Explorer so you can navigate to any location on your computer.
-
Select a folder from the Recent Folders list, or click Browse if you don’t see the location you want listed there.
-
Confirm the filename you want to use and click Save.
Save as a different, or older, format
You might want to save your file in another format so that you, or somebody else, can open the file in a different program or older version. For example, you might want to save your Word 2016 document as a Rich Text File (RTF) or your Excel workbook as a Comma-Separated Values (CSV) file.
-
Click the File tab.
-
Click Save As.
-
Choose a file location, such as OneDrive or This PC to store your file.
-
In the File name box, enter a new name for the file.
-
In the Save as type list, click the file format that you want to save the file in. For example, click Rich Text Format (.rtf), Word 97-2003 (.doc), Web Page (.htm or .html), or Comma Delimited (.csv).
Note: For more information about how to save files in PDF (.pdf) or XPS (.xps) formats, see Save or convert to PDF or XPS.
-
Click Save.
Save as a copy, or to a different location in Office 2013.
-
Select the cloud, web site, or device location where you want to save the file.
Location
Description
Sites –
[Your Company Name]
SharePoint Server 2013 or earlier document libraries
OneDrive –
[Your Company Name]
OneDrive for work or school
OneDrive – Personal
OneDrive for consumers via your Microsoft account
Other web locations
Any other websites you have file storage access to.
Computer
Your local device
-
Select a folder from the Recent Folders list, or click Browse if you don’t see the location you want listed there.
-
Confirm the filename you want to use and click Save.
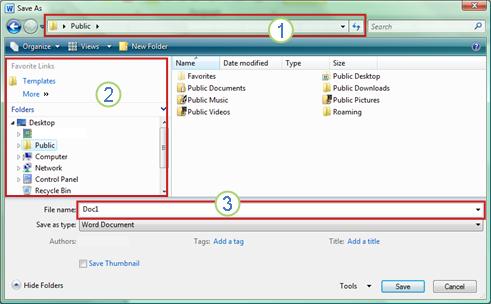
When you use the Save As dialog box, you can also save the file to a new location by using the Navigation pane.
-
To choose a folder or type the path to a folder, use the Address Bar.
-
To quickly see locations you use often, use the Navigation pane.
-
To see more file types, click the arrow.
You can also use the Save As dialog box to rename a file or change the location of where you save the file by clicking a different folder.
You might want to save your file in another format so that you, or somebody else, can open the file in a different program or older version. For example, you might want to save your Word document as a Rich Text File (RTF) or your Excel workbook as a Comma-Separated Values (CSV) file.
-
Click the File tab.
-
Click Save As.
-
Choose a file location, such as OneDrive or This PC to store your file.
-
In the File name box, enter a new name for the file.
-
In the Save as type list, click the file format that you want to save the file in. For example, click Rich Text Format (.rtf), Web Page (.htm or .html), or Comma Delimited (.csv).
Note: For more information about how to save files in PDF (.pdf) or XPS (.xps) formats, see Save or convert to PDF or XPS.
-
Click Save.
If you are using Office 2010, you can save files in an earlier version of Microsoft 365 by selecting the version in the Save as type list in the Save As dialog box. For example, you can save your Word 2010 document (.docx) as a 97-2003 document (.doc).
Notes:
-
Office 2010 continues the use of the XML-based file formats, such as .docx, .xlsx, and .pptx, introduced in the 2007 Office release. Therefore, files created in Microsoft Word 2010, Microsoft Excel 2010, and Microsoft PowerPoint 2010 can be opened in the 2007 Office release programs without special add-ins or loss of functionality. For more information, see Open XML Formats and file name extensions.
-
For more information about compatibility between files from different releases, see Use the Compatibility Checker.
For information about saving Microsoft Access 2010 .ACCDB files into the older .MDB format see Convert an .accdb database to an earlier file format.
-
Click the File tab.
-
Click Save As.
-
In the File name box, enter a new name for the file.
-
Click Save.
When you use the Save As dialog box, you can also save the file to a new location by using the Navigation pane.
-
To choose a folder or type the path to a folder, use the Address Bar.
-
To quickly see locations you use often, use the Navigation pane.
-
To see more file types, click the arrow.
You can also use the Save As dialog box to rename a file or change the location of where you save the file by clicking a different folder.
You might want to save your file in another format so that you, or somebody else, can open the file in a different program or older version. For example, you might want to save your Word document as a Rich Text File (RTF) or your Excel workbook as a Comma-Separated Values (CSV) file.
-
Click the File tab.
-
Click Save As.
-
Choose a file location, such as OneDrive or This PC to store your file.
-
In the File name box, enter a new name for the file.
-
In the Save as type list, click the file format that you want to save the file in. For example, click Rich Text Format (.rtf), Web Page (.htm or .html), or Comma Delimited (.csv).
Note: For more information about how to save files in PDF (.pdf) or XPS (.xps) formats, see Save or convert to PDF or XPS.
-
Click Save.
If you are using Office 2010, you can save files in an earlier version of Microsoft 365 by selecting the version in the Save as type list in the Save As dialog box. For example, you can save your Word 2010 document (.docx) as a 97-2003 document (.doc).
Notes:
-
Office 2010 continues the use of the XML-based file formats, such as .docx, .xlsx, and .pptx, introduced in the 2007 Office release. Therefore, files created in Microsoft Word 2010, Microsoft Excel 2010, and Microsoft PowerPoint 2010 can be opened in the 2007 Office release programs without special add-ins or loss of functionality. For more information, see Open XML Formats and file name extensions.
-
For more information about compatibility between files from different releases, see Use the Compatibility Checker.
For information about saving Microsoft Access 2010 .ACCDB files into the older .MDB format see Convert an .accdb database to an earlier file format.
We’re listening
This article was updated January 29, 2020 as a result of your comments. If you found it helpful, and especially if you didn’t, please use the feedback controls below to let us know how we can make it better.
See Also
-
What is AutoSave?
-
Rename a file
-
Save or convert to PDF
-
Store, share, and sync your files
-
What happens when you sign out of Office
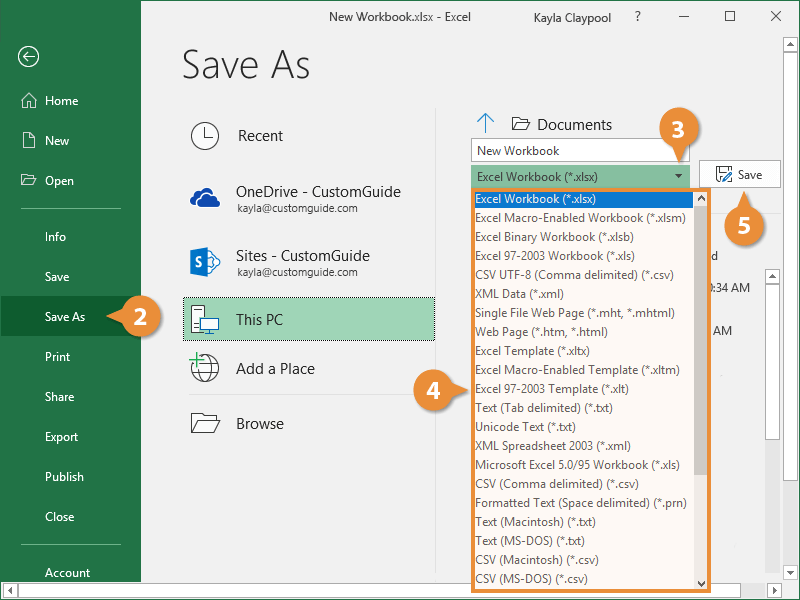
Sometimes, you might need to save a workbook in another file format, like a text (txt) or a comma-separated values format (csv). Just keep in mind that whenever you save a workbook in another file format, some of its formatting, data, and features might not be saved.
Caution: When you save a workbook in any of the text formats, all formatting will be removed.
Open the workbook you want to save.
Click File > Save As.
Pick the place where you want to save the workbook.
In the Save As dialog box, navigate to the location you want.
Click the arrow in the Save as type box and pick the type of text or CSV file format you want.
Note: The file formats you’ll see vary, depending on what type of sheet is active in your workbook (a worksheet, chart sheet, or other type of sheet).
In the File name box, accept the suggested name or type a new name for the workbook.
Lotus space-delimited format. Saves only the active sheet.
Saves a workbook as a tab-delimited text file for use on another Microsoft Windows operating system, and ensures that tab characters, line breaks, and other characters are interpreted correctly. Saves only the active sheet.
Saves a workbook as a tab-delimited text file for use on the Macintosh operating system, and ensures that tab characters, line breaks, and other characters are interpreted correctly. Saves only the active sheet.
Saves a workbook as a tab-delimited text file for use on the MS-DOS operating system, and ensures that tab characters, line breaks, and other characters are interpreted correctly. Saves only the active sheet.
Saves a workbook as Unicode text, a character encoding standard that was developed by the Unicode Consortium.
Saves a workbook as a comma-delimited text file for use on another Windows operating system, and ensures that tab characters, line breaks, and other characters are interpreted correctly. Saves only the active sheet.
Saves a workbook as a comma-delimited text file for use on the Macintosh operating system, and ensures that tab characters, line breaks, and other characters are interpreted correctly. Saves only the active sheet.
Saves a workbook as a comma-delimited text file for use on the MS-DOS operating system, and ensures that tab characters, line breaks, and other characters are interpreted correctly. Saves only the active sheet.
Data Interchange Format. Saves only the active sheet.
Symbolic Link Format. Saves only the active sheet.
After you’ve created a workbook, you need to save it if you want to use it again. Also, if you make changes to a workbook you’ll want to save it. You can even save a copy of an existing workbook with a new name, to a different location, or using a different file type.
Once you’ve created a new workbook, you’ll need to save it if you want to use it again.
Press Ctrl + S to quickly save a workbook.
If this is the first time you’ve saved the workbook, the Save As screen will appear.
File Types Commonly Saved to From Excel
| File Type | Extension | Description |
|---|---|---|
| CSV | .csv | Comma delimited text file, often used to import/export data. |
| Excel Workbook | .xlsx | The default XLM-based file format for Excel, in use since Excel 2007. |
| Excel 97-2003 Workbook | .xls | Excel files from Excel 2003 and older. |
| Excel Macro-Enabled Template | .xlsm | Excel template that contains macros. |
| Excel Template | .xltx | Excel template files. |
| Portable Document Format, a format that preserves document formatting and allows file sharing. | ||
| Web Page | .html | A web page that is saved as a folder and contains an .htm file and supporting files, such as images. |
FREE Quick Reference
Free to distribute with our compliments; we hope you will consider our paid training.
Источник
Import or export text (.txt or .csv) files
There are two ways to import data from a text file with Excel: you can open it in Excel, or you can import it as an external data range. To export data from Excel to a text file, use the Save As command and change the file type from the drop-down menu.
There are two commonly used text file formats:
Delimited text files (.txt), in which the TAB character (ASCII character code 009) typically separates each field of text.
Comma separated values text files (.csv), in which the comma character (,) typically separates each field of text.
You can change the separator character that is used in both delimited and .csv text files. This may be necessary to make sure that the import or export operation works the way that you want it to.
Note: You can import or export up to 1,048,576 rows and 16,384 columns.
Import a text file by opening it in Excel
You can open a text file that you created in another program as an Excel workbook by using the Open command. Opening a text file in Excel does not change the format of the file — you can see this in the Excel title bar, where the name of the file retains the text file name extension (for example, .txt or .csv).
Go to File > Open and browse to the location that contains the text file.
Select Text Files in the file type dropdown list in the Open dialog box.
Locate and double-click the text file that you want to open.
If the file is a text file (.txt), Excel starts the Import Text Wizard. When you are done with the steps, click Finish to complete the import operation. See Text Import Wizard for more information about delimiters and advanced options.
If the file is a .csv file, Excel automatically opens the text file and displays the data in a new workbook.
Note: When Excel opens a .csv file, it uses the current default data format settings to interpret how to import each column of data. If you want more flexibility in converting columns to different data formats, you can use the Import Text Wizard. For example, the format of a data column in the .csv file may be MDY, but Excel’s default data format is YMD, or you want to convert a column of numbers that contains leading zeros to text so you can preserve the leading zeros. To force Excel to run the Import Text Wizard, you can change the file name extension from .csv to .txt before you open it, or you can import a text file by connecting to it (for more information, see the following section).
Import a text file by connecting to it (Power Query)
You can import data from a text file into an existing worksheet.
On the Data tab, in the Get & Transform Data group, click From Text/CSV.
In the Import Data dialog box, locate and double-click the text file that you want to import, and click Import.
In the preview dialog box, you have several options:
Select Load if you want to load the data directly to a new worksheet.
Alternatively, select Load to if you want to load the data to a table, PivotTable/PivotChart, an existing/new Excel worksheet, or simply create a connection. You also have the choice of adding your data to the Data Model.
Select Transform Data if you want to load the data to Power Query, and edit it before bringing it to Excel.
If Excel doesn’t convert a particular column of data to the format that you want, then you can convert the data after you import it. For more information, see Convert numbers stored as text to numbers and Convert dates stored as text to dates.
Export data to a text file by saving it
You can convert an Excel worksheet to a text file by using the Save As command.
Go to File > Save As.
In the Save As dialog box, under Save as type box, choose the text file format for the worksheet; for example, click Text (Tab delimited) or CSV (Comma delimited).
Note: The different formats support different feature sets. For more information about the feature sets that are supported by the different text file formats, see File formats that are supported in Excel.
Browse to the location where you want to save the new text file, and then click Save.
A dialog box appears, reminding you that only the current worksheet will be saved to the new file. If you are certain that the current worksheet is the one that you want to save as a text file, click OK. You can save other worksheets as separate text files by repeating this procedure for each worksheet.
You may also see an alert below the ribbon that some features might be lost if you save the workbook in a CSV format.
For more information about saving files in other formats, see Save a workbook in another file format.
Import a text file by connecting to it
You can import data from a text file into an existing worksheet.
Click the cell where you want to put the data from the text file.
On the Data tab, in the Get External Data group, click From Text.
In the Import Data dialog box, locate and double-click the text file that you want to import, and click Import.
Follow the instructions in the Text Import Wizard. Click Help  on any page of the Text Import Wizard for more information about using the wizard. When you are done with the steps in the wizard, click Finish to complete the import operation.
In the Import Data dialog box, do the following:
Under Where do you want to put the data?, do one of the following:
To return the data to the location that you selected, click Existing worksheet.
To return the data to the upper-left corner of a new worksheet, click New worksheet.
Optionally, click Properties to set refresh, formatting, and layout options for the imported data.
Excel puts the external data range in the location that you specify.
If Excel does not convert a column of data to the format that you want, you can convert the data after you import it. For more information, see Convert numbers stored as text to numbers and Convert dates stored as text to dates.
Export data to a text file by saving it
You can convert an Excel worksheet to a text file by using the Save As command.
Go to File > Save As.
The Save As dialog box appears.
In the Save as type box, choose the text file format for the worksheet.
For example, click Text (Tab delimited) or CSV (Comma delimited).
Note: The different formats support different feature sets. For more information about the feature sets that are supported by the different text file formats, see File formats that are supported in Excel.
Browse to the location where you want to save the new text file, and then click Save.
A dialog box appears, reminding you that only the current worksheet will be saved to the new file. If you are certain that the current worksheet is the one that you want to save as a text file, click OK. You can save other worksheets as separate text files by repeating this procedure for each worksheet.
A second dialog box appears, reminding you that your worksheet may contain features that are not supported by text file formats. If you are interested only in saving the worksheet data into the new text file, click Yes. If you are unsure and would like to know more about which Excel features are not supported by text file formats, click Help for more information.
For more information about saving files in other formats, see Save a workbook in another file format.
The way you change the delimiter when importing is different depending on how you import the text.
If you use Get & Transform Data > From Text/CSV, after you choose the text file and click Import, choose a character to use from the list under Delimiter. You can see the effect of your new choice immediately in the data preview, so you can be sure you make the choice you want before you proceed.
If you use the Text Import Wizard to import a text file, you can change the delimiter that is used for the import operation in Step 2 of the Text Import Wizard. In this step, you can also change the way that consecutive delimiters, such as consecutive quotation marks, are handled.
See Text Import Wizard for more information about delimiters and advanced options.
If you want to use a semi-colon as the default list separator when you Save As .csv, but need to limit the change to Excel, consider changing the default decimal separator to a comma — this forces Excel to use a semi-colon for the list separator. Obviously, this will also change the way decimal numbers are displayed, so also consider changing the Thousands separator to limit any confusion.
Clear Excel Options > Advanced > Editing options > Use system separators.
Set Decimal separator to , (a comma).
Set Thousands separator to . (a period).
When you save a workbook as a .csv file, the default list separator (delimiter) is a comma. You can change this to another separator character using Windows Region settings.
Caution: Changing the Windows setting will cause a global change on your computer, affecting all applications. To only change the delimiter for Excel, see Change the default list separator for saving files as text (.csv) in Excel.
In Microsoft Windows 10, right-click the Start button, and then click Settings.
Click Time & Language, and then click Region in the left panel.
In the main panel, under Regional settings, click Additional date, time, and regional settings.
Under Region, click Change date, time, or number formats.
In the Region dialog, on the Format tab, click Additional settings.
In the Customize Format dialog, on the Numbers tab, type a character to use as the new separator in the List separator box.
In Microsoft Windows, click the Start button, and then click Control Panel.
Under Clock, Language, and Region, click Change date, time, or number formats.
In the Region dialog, on the Format tab, click Additional settings.
In the Customize Format dialog, on the Numbers tab, type a character to use as the new separator in the List separator box.
Note: After you change the list separator character for your computer, all programs use the new character as a list separator. You can change the character back to the default character by following the same procedure.
Need more help?
You can always ask an expert in the Excel Tech Community or get support in the Answers community.
Источник
After you’ve created a workbook, you need to save it if you want to use it again. Also, if you make changes to a workbook you’ll want to save it. You can even save a copy of an existing workbook with a new name, to a different location, or using a different file type.
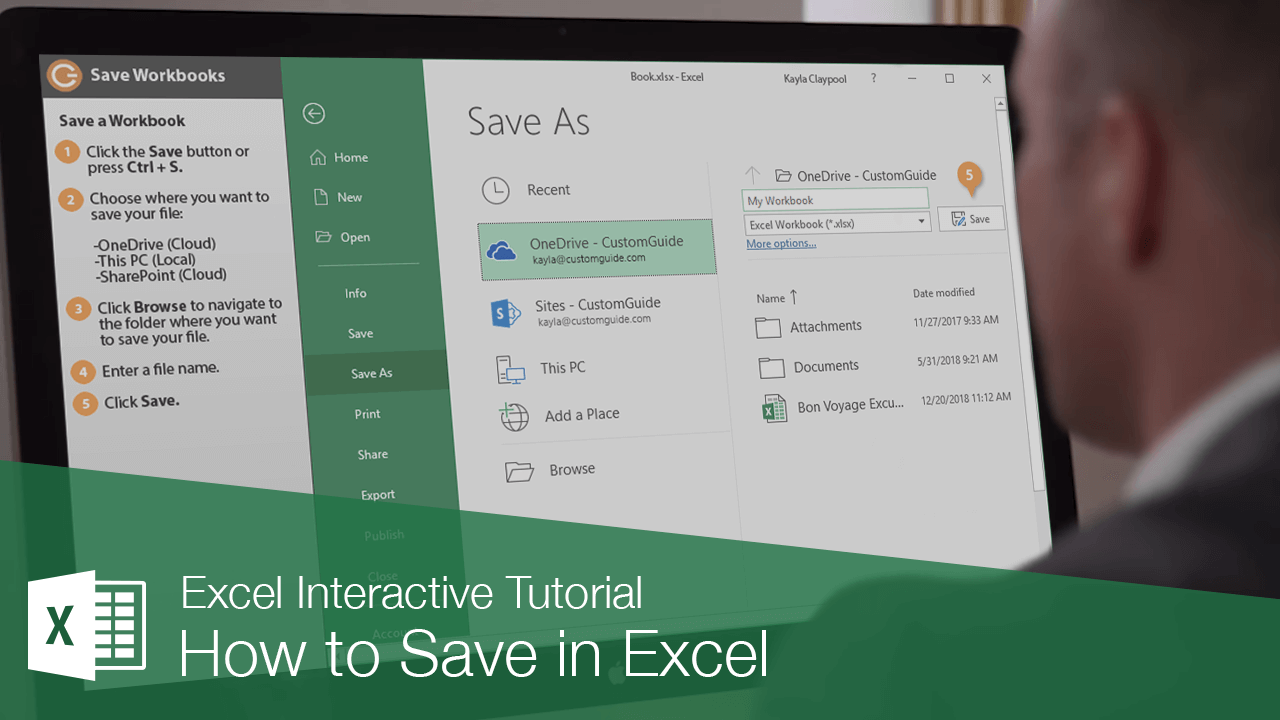
Save a Workbook
Once you’ve created a new workbook, you’ll need to save it if you want to use it again.
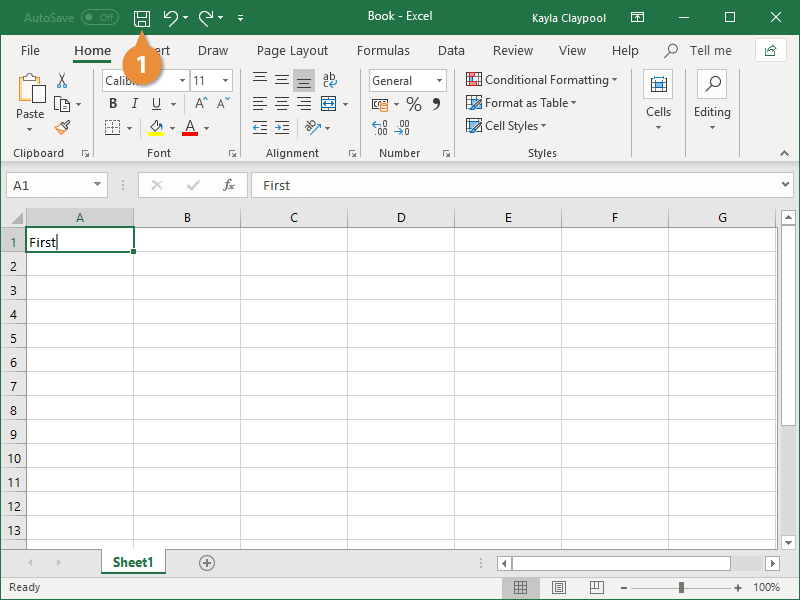
- Click the Save button.

Press Ctrl + S to quickly save a workbook.
If this is the first time you’ve saved the workbook, the Save As screen will appear.
- Choose where you want to save your file:
- OneDrive: Save to Microsoft’s cloud-based storage so you can open the worksheet on another computer.
- SharePoint: Save the workbook to a connected SharePoint server.
- This PC: Save to the local storage on your computer.
- Browse: Opens a dialog box, where you can browse through your computer’s folders, drives, and network shares.
- Enter a file name.
- Click Save.
AutoSave Workbooks
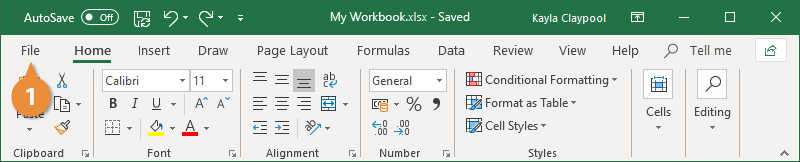
If an Excel file is saved online, the AutoSave feature in the top-left is automatically turned on. However, this can be changed as needed.
- Click the AutoSave toggle button to turn the feature on or off.
Save Progress
As you continue to work in Excel, you’ll want to save any changes you make from time to time.
- Click the Save button.
Press Ctrl + S to quickly save a workbook.
Try to save your progress every 10 minutes; that way you won’t lose any important changes if disaster strikes.
Save As a New File and/or Location
Sometimes you may want to make a copy of an existing workbook and save it with a new name. Using and modifying the content in an existing workbook can often save you a lot of time.
- Click the File tab.

- Click Save As.
- Click This PC to navigate to the folder you want to save your file.
- Enter a File name.
- Click Save.
Save to Different File Formats
Excel normally saves its files as Excel workbooks, but you can save information to other file formats as well. For example, sometimes you may want to save your data as a Comma Separated Values or CSV file, so you can import it into another program.
- Click the File tab.
- Click Save As.
- Click the Save as type list arrow.
The default file type is an XLSX Excel file, but you can choose from plenty of other file formats in this menu.
- Select the desired format.
- Click Save.
File Types Commonly Saved to From Excel
| File Type | Extension | Description |
|---|---|---|
| CSV | .csv | Comma delimited text file, often used to import/export data. |
| Excel Workbook | .xlsx | The default XLM-based file format for Excel, in use since Excel 2007. |
| Excel 97-2003 Workbook | .xls | Excel files from Excel 2003 and older. |
| Excel Macro-Enabled Template | .xlsm | Excel template that contains macros. |
| Excel Template | .xltx | Excel template files. |
| Portable Document Format, a format that preserves document formatting and allows file sharing. | ||
| Web Page | .html | A web page that is saved as a folder and contains an .htm file and supporting files, such as images. |
FREE Quick Reference
Click to Download
Free to distribute with our compliments; we hope you will consider our paid training.
Start a new search
To find content from modules and lessons
- Save as a copy: This option will create a copy of your file, and the original file will remain unchanged.
- Save as an Excel template: This option allows you to save the file with a new name and in a different format.
- Save as PDF or XPS: This will allow you to save the file in PDF or XPS format.
- Save as Image: If you are saving an image, this is the best option for you. It will allow you to save it in various formats such as JPEG, BMP, TIFF, PNG, etc.
The most common file type is .xlsx which is available to both Windows and Mac users. It has many advantages including being able to store larger datasets than its predecessor, the .xls file type. However, it also has some disadvantages such as not being able to use features like macros or conditional formatting on older versions of MS Excel or on Macs.
The default location for saved files in MS Excel is the user’s «My Documents» folder.
Learner’s Ratings
Reviews
Y
Yash kalra
I dont understood the quiz part the quiz is totally different from the video
S
Sunny kumar
This is a best learning app
K
Kajal Londhe
Best knowledge improve thank you so much
B
Brijesh Yadav
Really thankful to you to explain in such a lucent language
R
RESHMI KUMARI
its very useful for us
S
SHIVAM TIWARI
Formula wala pura uper ja rha
N
Navjeet Kaur
The theory is really good, but practice sheets must also be provided so that we can practice hand to hand. Excel is all about practice more than theory.
A
Aman kesarwani
Hi.
Please mujhe free mai certificate dedo please 😭😥🙏🙏
D
DABLOO Kumar
good and very suficient course
Show More
Use Excel Shortcut Keys to Quickly Save Your Work
Save early, save often!
Updated on December 2, 2020
You’ve put a lot of work into your Excel spreadsheet, don’t let it slip away because you forgot to save it. Use these tips to keep your work safe and saved for the next time you need that important file. When you want to share your work, save the workbook in PDF format.
Instructions in this article apply to Excel 2019, 2016, 2013, 2010; Excel for Microsoft 365, and Excel for Mac.
Use Excel Save Shortcut Keys
There are three ways to save a file in Excel:
- Select File > Save As. In Excel 2019, select File > Save a Copy.
- Select Save on the Quick Access Toolbar.
- Use the Ctrl+S shortcut key.
If you work on a Mac, use the Command key instead of the Control key.
If the file has been saved before, the pointer changes to an hourglass icon while the save takes place. If the workbook is being saved for the first time, the Save As dialog box opens.
First Time Save
When a file is saved for the first time, two pieces of information must be specified in the Save As dialog box. Enter a name for the file and choose the location where it will be saved.
File names can contain up to 255 characters including spaces.
Save Frequently
Using Ctrl+S is an easy way to save data. Use this shortcut frequently, at least every five minutes, to avoid losing data.
Pin Save Locations
If you open certain files or folders frequently in Excel, pin them to your list of recently opened files. This keeps the location readily accessible at the top of the Recent list.
There is no limit to the number of locations that can be pinned. To pin a save location:
-
To pin a folder, select File > Save As.
-
Select Recent and, on the right side of the window, hover over the workbook or folder you want to pin. A small horizontal image of a push pin appears for that location.
-
Select the pin for that location. The folder is moved to the Pinned list and the horizontal push pin changes to a vertical push pin.
-
To unpin a location, select the vertical push pin to change it back to a horizontal pin and remove it from the Pinned list.
Save Excel Worksheets as PDF Files
When you want a copy of a worksheet or an entire workbook that nobody can edit and everyone can view, convert or save your Excel files in PDF format. A PDF file (Portable Document Format) allows others to view documents without needing the original program, such as Excel, installed on their computer. Instead, users open the file with a free PDF reader program such as Adobe Acrobat Reader.
Saving the Active Worksheet in PDF Format
When saving a file in PDF format, by default only the current, or active worksheet (the worksheet on screen), is saved.
To save an Excel worksheet in PDF format:
-
Select File.
-
Select Save As to open the Save As window.
-
Choose the location where you want to save the file.
-
Enter a name for the file.
-
Select the Save as type down arrow.
-
Scroll through the list to find and select PDF (*.pdf).
-
Select Save to save the file in PDF format and close the window.
Save an Entire Workbook in PDF Format
The default Save As option only saves the current worksheet in PDF format. Follow these steps to save your entire workbook as a PDF file:
-
Select File > Save As.
-
Select Browse to open the Save As dialog box.
-
Select Save as type to open a drop-down list and choose PDF. The Options button appears in the Save As dialog box.
-
Select Options to open the Options dialog box.
-
Select Entire Workbook in the Publish what section.
-
Select OK to return to the Save As dialog box.
-
Select Save to save the workbook in PDF format and close the dialog box.
AutoSave to OneDrive
If you use Microsoft 365, Excel automatically saves your work when you choose to save files to your OneDrive cloud storage account. When your files are saved to OneDrive, documents are automatically saved every few seconds, eliminating the need for you to continuously select Save or use shortcut keys.
For the AutoSave function to work, save documents to a location in your OneDrive folder. The AutoSave function does not work with any location on your PC or Mac.
If you have Microsoft 365 and save your files to OneDrive, enable AutoSave by selecting the toggle switch in the top-left corner of the Excel screen. When enabled, the switch will say On. To turn the feature off and save your work manually, change it to Off.
Thanks for letting us know!
Get the Latest Tech News Delivered Every Day
Subscribe