
You can save a file to a folder on your hard disk drive, a network location, the cloud, a DVD, the desktop, or a flash drive. While you must identify the destination, if it is different than the default folder, the saving process is the same regardless of what destination you choose. By default, Microsoft 365 programs save files in the default working folder.
Additionally you can save a file in a different file format, such as RTF, CSV, or PDF.
Saving a file to OneDrive or SharePoint allows you to access it on any device and enables features such as AutoSave and Version History, which can help prevent data loss if your file closes unexpectedly.
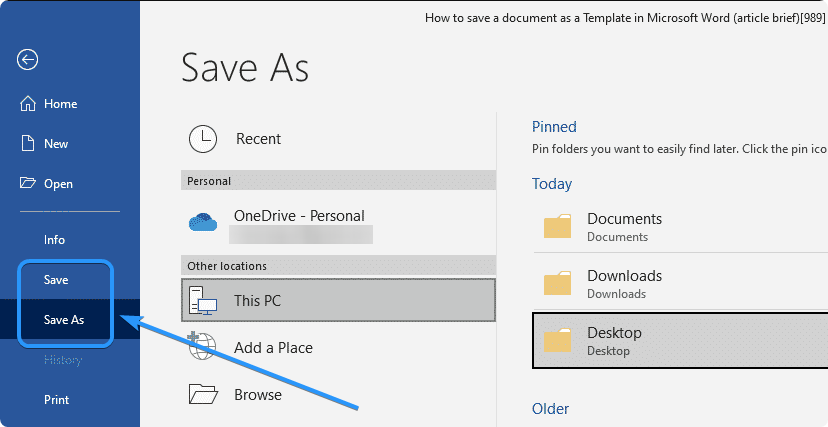
To save your file:
-
Press CTRL+S or select File > Save.
Tip: You can also select Save
 on the Quick Access Toolbar.
 -
You must enter a name for the file if you are saving it for the first time.
 on the Quick Access Toolbar.
Tip: Save your file to a cloud location, such as OneDrive or SharePoint, to be able to access it anywhere, collaborate with others in real-time, and access Version History.
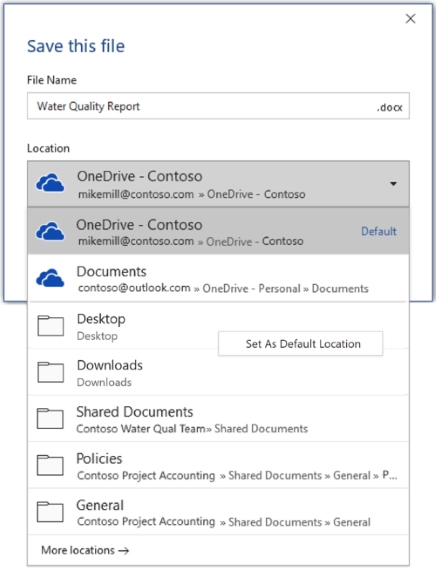
By default, if you’re signed in, files are saved to your OneDrive. If you want to save the current file somewhere else, click the Location drop-down to see additional recently-used locations. If the location you want isn’t there, you can open the full Save As window by selecting More save options.
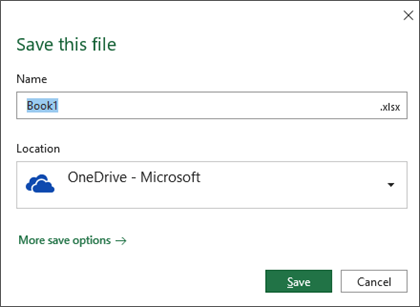
Tip: If you save your file to OneDrive or SharePoint, AutoSave will be enabled by default, so you don’t have to remember to save as you go.
If you’d like to change the default location for these saves to one of your other recently-used folders, select the Location drop-down, right-click the folder location you want to set as the default and select Set as Default Location.
If you want to save to a location other than your recently-used folders, select More locations. If you haven’t received this update yet, your Office applications will continue to use the File menu for saving.
Tips:
-
You can also press F12 or select File > Save As to open the File menu.
-
If you’re used to using keyboard shortcuts when closing your document, such as ALT+F4, you can quickly choose to «Don’t Save» the file by using the keyboard accelerator key for that button (ALT+N).
Save a copy as a new file (Save As)
Tip: If you’re going to create a new file based on an existing file, but only want your changes saved in the new file, it’s a good idea to Save a Copy before you’ve made any changes. That way your original file will remain unchanged and all your edits will be in the new copy. You can also right-click the original file and select Open a copy.
-
Press F12 or click File > Save a Copy
-
By default Office will save the copy in the same location as the original. If you’re happy with the existing location go on to step 3. If you want to save the new copy in a different location choose it at this point.
Location
Description
Sites –
[Your Company Name]
SharePoint or Office 365 Groups document libraries
OneDrive –
[Your Company Name]
OneDrive for Business
OneDrive – Personal
OneDrive for consumers via your Microsoft account
This PC
Your local device, including any connected hard drives or flash drives
Browse
Opens the File Explorer so you can navigate to any location on your computer.
-
Give your new copy a name and click Save.
Your original file will be closed and you’ll now be working in the new copy you just created.
Tip: If you find yourself creating new files based on existing files often, you may want to use templates to make the process easier and safer. See Create a template for more information.
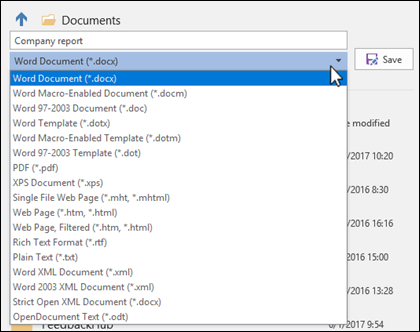
Save as a different format
You might want to save your file in another format so that you, or somebody else, can open the file in a different program or older version. For example, you might want to save your Word document as a Rich Text File (RTF) or your Excel workbook as a Comma-Separated Values (CSV) file.
Important: If you save an Office file in a format other than the Open XML format (such as .DOCX, .XLSX, or .PPTX) some connected experiences and modern features like AutoSave or Accessibility Checker won’t work on that file.
-
Click the File tab.
-
Click Save As.
-
Choose a file location, such as OneDrive or This PC to store your file.
-
In the File name box, enter a new name for the file.
-
In the Save as type list, click the file format that you want to save the file in. For example, click Rich Text Format (.rtf), Word 97-2003 (.doc), Web Page (.htm or .html), or Comma Delimited (.csv).
For more information about how to save files in PDF (.pdf) or XPS (.xps) formats, see Save or convert to PDF or XPS.
-
Click Save.
Back up and recover your files
How you back up and recover your files depends on where and when you saved it. To learn more about a feature, including which versions of Office support it, select the name of the feature in the table below.
Saved to OneDrive
Saved to your device
If AutoRecover is turned on and your file closes unexpectedly, Document Recovery opens the next time you open the Office app. You can also recover an earlier version of an Office file.
Important: Even if AutoRecover is turned on, you should save the file frequently while you’re working on it to avoid losing data because of an unexpected power failure or other problem.
You can save a copy as a new file, or in a different format, or to a different location in Office 2016.
Save a copy as a new file (Save As)
Tip: If you’re going to create a new file, based on an existing file, but only want your changes saved in the new file it’s a good idea to do the Save a Copy process first thing; before you’ve made any changes. That way your original file will remain unchanged and all your edits will be in the new copy.
-
Press F12 or click File > Save a Copy
-
By default Office will save the copy in the same location as the original. If you want to save the new copy in a different location choose it at this point. If you’re happy with the existing location go on to step 3.
-
Give your new copy a name and click Save.
Your original file will be closed and you’ll now be working in the new copy you just created.
Tip: If you find yourself creating new files based on existing files often, you may want to use templates to make the process easier and safer. See Create a template for more information.
Choose a different location to save your file
During the Save, or Save a Copy, process described above you can choose a different location to save your file.
-
Select the cloud, web site, or device location where you want to save the file.
Location
Description
Sites –
[Your Company Name]
SharePoint or Office 365 Groups document libraries
OneDrive –
[Your Company Name]
OneDrive for Business
OneDrive – Personal
OneDrive for consumers via your Microsoft account
This PC
Your local device, including any connected hard drives or flash drives
Browse
Opens the File Explorer so you can navigate to any location on your computer.
-
Select a folder from the Recent Folders list, or click Browse if you don’t see the location you want listed there.
-
Confirm the filename you want to use and click Save.
Save as a different, or older, format
You might want to save your file in another format so that you, or somebody else, can open the file in a different program or older version. For example, you might want to save your Word 2016 document as a Rich Text File (RTF) or your Excel workbook as a Comma-Separated Values (CSV) file.
-
Click the File tab.
-
Click Save As.
-
Choose a file location, such as OneDrive or This PC to store your file.
-
In the File name box, enter a new name for the file.
-
In the Save as type list, click the file format that you want to save the file in. For example, click Rich Text Format (.rtf), Word 97-2003 (.doc), Web Page (.htm or .html), or Comma Delimited (.csv).
Note: For more information about how to save files in PDF (.pdf) or XPS (.xps) formats, see Save or convert to PDF or XPS.
-
Click Save.
Save as a copy, or to a different location in Office 2013.
-
Select the cloud, web site, or device location where you want to save the file.
Location
Description
Sites –
[Your Company Name]
SharePoint Server 2013 or earlier document libraries
OneDrive –
[Your Company Name]
OneDrive for work or school
OneDrive – Personal
OneDrive for consumers via your Microsoft account
Other web locations
Any other websites you have file storage access to.
Computer
Your local device
-
Select a folder from the Recent Folders list, or click Browse if you don’t see the location you want listed there.
-
Confirm the filename you want to use and click Save.
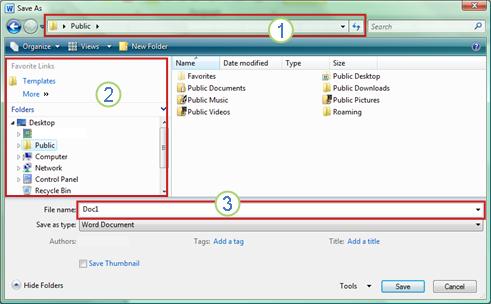
When you use the Save As dialog box, you can also save the file to a new location by using the Navigation pane.
-
To choose a folder or type the path to a folder, use the Address Bar.
-
To quickly see locations you use often, use the Navigation pane.
-
To see more file types, click the arrow.
You can also use the Save As dialog box to rename a file or change the location of where you save the file by clicking a different folder.
You might want to save your file in another format so that you, or somebody else, can open the file in a different program or older version. For example, you might want to save your Word document as a Rich Text File (RTF) or your Excel workbook as a Comma-Separated Values (CSV) file.
-
Click the File tab.
-
Click Save As.
-
Choose a file location, such as OneDrive or This PC to store your file.
-
In the File name box, enter a new name for the file.
-
In the Save as type list, click the file format that you want to save the file in. For example, click Rich Text Format (.rtf), Web Page (.htm or .html), or Comma Delimited (.csv).
Note: For more information about how to save files in PDF (.pdf) or XPS (.xps) formats, see Save or convert to PDF or XPS.
-
Click Save.
If you are using Office 2010, you can save files in an earlier version of Microsoft 365 by selecting the version in the Save as type list in the Save As dialog box. For example, you can save your Word 2010 document (.docx) as a 97-2003 document (.doc).
Notes:
-
Office 2010 continues the use of the XML-based file formats, such as .docx, .xlsx, and .pptx, introduced in the 2007 Office release. Therefore, files created in Microsoft Word 2010, Microsoft Excel 2010, and Microsoft PowerPoint 2010 can be opened in the 2007 Office release programs without special add-ins or loss of functionality. For more information, see Open XML Formats and file name extensions.
-
For more information about compatibility between files from different releases, see Use the Compatibility Checker.
For information about saving Microsoft Access 2010 .ACCDB files into the older .MDB format see Convert an .accdb database to an earlier file format.
-
Click the File tab.
-
Click Save As.
-
In the File name box, enter a new name for the file.
-
Click Save.
When you use the Save As dialog box, you can also save the file to a new location by using the Navigation pane.
-
To choose a folder or type the path to a folder, use the Address Bar.
-
To quickly see locations you use often, use the Navigation pane.
-
To see more file types, click the arrow.
You can also use the Save As dialog box to rename a file or change the location of where you save the file by clicking a different folder.
You might want to save your file in another format so that you, or somebody else, can open the file in a different program or older version. For example, you might want to save your Word document as a Rich Text File (RTF) or your Excel workbook as a Comma-Separated Values (CSV) file.
-
Click the File tab.
-
Click Save As.
-
Choose a file location, such as OneDrive or This PC to store your file.
-
In the File name box, enter a new name for the file.
-
In the Save as type list, click the file format that you want to save the file in. For example, click Rich Text Format (.rtf), Web Page (.htm or .html), or Comma Delimited (.csv).
Note: For more information about how to save files in PDF (.pdf) or XPS (.xps) formats, see Save or convert to PDF or XPS.
-
Click Save.
If you are using Office 2010, you can save files in an earlier version of Microsoft 365 by selecting the version in the Save as type list in the Save As dialog box. For example, you can save your Word 2010 document (.docx) as a 97-2003 document (.doc).
Notes:
-
Office 2010 continues the use of the XML-based file formats, such as .docx, .xlsx, and .pptx, introduced in the 2007 Office release. Therefore, files created in Microsoft Word 2010, Microsoft Excel 2010, and Microsoft PowerPoint 2010 can be opened in the 2007 Office release programs without special add-ins or loss of functionality. For more information, see Open XML Formats and file name extensions.
-
For more information about compatibility between files from different releases, see Use the Compatibility Checker.
For information about saving Microsoft Access 2010 .ACCDB files into the older .MDB format see Convert an .accdb database to an earlier file format.
We’re listening
This article was updated January 29, 2020 as a result of your comments. If you found it helpful, and especially if you didn’t, please use the feedback controls below to let us know how we can make it better.
See Also
-
What is AutoSave?
-
Rename a file
-
Save or convert to PDF
-
Store, share, and sync your files
-
What happens when you sign out of Office
![]()
Download Article
![]()
Download Article
Whether you’re creating a brand-new document in Microsoft Word or saving changes to an existing document, saving your files in Word is pretty simple. In this article, we’ll talk you through the basics of saving Word documents in Windows or Mac, including how to use keyboard shortcuts to save, how to turn on AutoSave, and how to save your docs in different file formats.
Things You Should Know
- Click the «File» menu and select «Save As» to save a new document.
- To quickly save changes to an existing document, click the disk icon on the toolbar, or press Control + S on a PC or Command + S on a Mac.
- If you’re using Office 365, enable AutoSave to automatically save your changes to the cloud every few seconds.
-
This function lets you name your file and choose its location. Once you’ve created a new Word document, open the File menu and select Save As. A window will pop up prompting you to name the file and choose a location on your computer or a linked cloud account where the file will be stored. Choose the file type (e.g., .docx, .pdf, or .xml) from the drop-down menu at the bottom of the window. Then, select Save.[1]
- You can also use the keyboard shortcut F12 (in Windows) or ↑+⌘ Command+s (on a Mac) to open the Save As window.
- If you’re saving a document for the first time, using the Save command will prompt the Save As window to open.
- If the document is saved locally, you can use Save As to save a copy of an existing document with a new name, format, or location. However, for documents that are saved to OneDrive or another cloud service, you may need to use Save a Copy instead, depending on your version of Word.

Advertisement
-
Use this method to save changes to an existing document. With your document open, click the File menu in the toolbar at the top of the screen. Then, click Save. Any recent changes to your file will be saved.[2]

-
This option lets you save your changes with a single click. The Quick Access Tool Bar is located at the very top of your document window on the right side. Locate the Save button, which looks like an old-fashioned square floppy disk, and click on it to save your document.[3]

Advertisement
-
These keyboard shortcuts instantly save recent changes. You can also use the keyboard Save command to launch the Save As window if you’re saving a new document for the first time. On a Windows PC, use Control+s. If you’re using a Mac, hit ⌘ Command+s.[4]

-
AutoSave is only available for documents saved to the cloud. The AutoSave feature in the Office 365 version of Word prevents you from having to save manually. However, in order to use it, you must save your files to a OneDrive, Box, or SharePoint account. To use AutoSave:[5]
- Click the toggle switch next to AutoSave in the Quick Access Toolbar at the top right corner of your document window.
- A window will pop up prompting you to upload your file to a cloud location. You can also rename it, if you like. Select your preferred location using the dropdown Place menu.
- Click Upload to use the default location or select Choose Location if you pick a different option in the Place menu.

Advertisement
-
Most Word documents save automatically as .docx files. However, you can choose to save your document as a different format, such as .pdf, .doc (for compatibility with older versions of Word), or .txt.[6]
To do this:- For documents that are saved locally on your computer, open the File menu and select Save As. In the File Format dropdown menu near the bottom of the Save As window, select your desired format.
- If your document has AutoSave enabled, you’ll need to use the Save a Copy command instead, which is also located in the File menu. Select the type of file you want to create in the drop-down File Format menu at the bottom of the window.
- Click Save to confirm your choice.
- With some formats, such as .pdf, you will be prompted to Export the file rather than Save it after you select the format.

-
This option creates a separate copy of your document. This is a good option if you want to make changes to your document while also preserving the original version. To make a copy of your Word doc, open the File menu and select Save a Copy…. If you’re saving the copy in the same location as the original, give it a new name. Click Save at the bottom of the Save a Copy window when you’re done.

Advertisement
-
If you don’t like Word’s default Save options, you can change them. On a Windows PC, open the File menu, then select Options, then Save.[7]
If you’re using a Mac, open the main Word menu, then click Preferences… and select Save. From there, you can customize options such as:- The default format for your saved Word files
- How frequently Word saves AutoRecover information
- Where AutoRecover files are stored
- The default location for saved documents (e.g., a local folder on your computer or a location in the cloud)

Add New Question
-
Question
What is the process of creating a file in a folder?

Once the folder is created, go into it and right-click on a blank area, then select New -> Microsoft Word Document.
-
Question
Do I save documents as a Word doc, or Word 97 — 2003?
This depends on what the reader(s) are using. Word 97 — 2003 format is more universal, but may strip some advanced features from your document. If you save it in Word format, those using earlier versions can still view/edit the document using the free MS Office Compatibility Pack from Microsoft. If you’re just creating the document for your own personal use, save as Word.
-
Question
How do I see a saved document?
On any modern version of Windows, you would a view a saved document by navigating to its save location. For example, if you saved it in the default «My Documents» folder, you would open a file explorer window and locate that folder, where you would then find your document. Alternatively, recent versions of Microsoft Word show a list of recent documents when you open the program. Finally, you can click File, then Open on most versions of Microsoft Word, then navigate to the correct file location.
Ask a Question
200 characters left
Include your email address to get a message when this question is answered.
Submit
Advertisement
Video
Thanks for submitting a tip for review!
-
Failing to save your document before you close Microsoft Word will potentially delete the document or any changes you made to an existing one.
Advertisement
About This Article
Thanks to all authors for creating a page that has been read 324,086 times.
Is this article up to date?
Microsoft Word is an indispensable tool for creating and saving documents. Whether you’re a student writing an essay or a business owner preparing a report, Word has got you covered. But for beginners, creating a new Word document can be daunting. That’s why we’re here to help you. In this article, we’ll guide you through the entire process of making a new Word document, including different options for starting your work.
This is a beginner-friendly guide that covers newer versions of Word, as well as older releases. From creating a blank document to using templates, we’ll show you how to make the most out of Word’s word-processing capabilities.
In addition to creating and saving documents, we’ll cover how to edit them. From simple text editing to more advanced features like editing text in pictures, we’ll show you how to get the most out of Word’s editing tools. Whether you’re a beginner or an advanced user, this article has everything you need to know about using Microsoft Word for your word processing needs.
Table of Contents
- What is a Word Document?
- How to Create a New Word Document
- How to Create a Word Document From a Template
- Writing and Formatting Your Document in Word
- How To Add Text to Your Document
- How To Add Shapes, SmartArt, Charts, and Pictures in Word
- How To Save Your Document in Word
- How To Save Your Document to OneDrive in Microsoft Word
- Frequently Asked Questions
What is a Word Document?
A Word document is a digital file created using Microsoft Word or other word processing software. It is a type of electronic document that is designed to be viewed and edited on a computer. A Word document can contain text, images, tables, charts, and other types of multimedia content. It is a versatile tool for creating a wide range of documents, from simple letters and memos to complex reports and academic papers.
Word documents are designed to be easily edited and formatted, which makes them a popular choice for document creation. The software lets you change fonts, colors, sizes, margins, and other formatting options to create visually appealing documents.
Additionally, Word provides several features that enhance document creation, such as spell check, grammar check, and thesaurus. Overall, word documents are a versatile and powerful tool for creating professional documents quickly and efficiently.
How to Create a New Word Document
Creating a new Word document is a straightforward process that can be done in just a few clicks. A blank document is the starting point for any document created in Word, whether it’s for personal or professional use. You can write anything from an article, report, or even a book with a new doc. Microsoft Word is a popular document creator that many people use for its user-friendly interface and features.
A blank Word document is a white space where you can write anything you want. It is the most basic form of document creation that you can customize to suit your needs. You can choose from different fonts, sizes, and colors to create a unique look for your document.
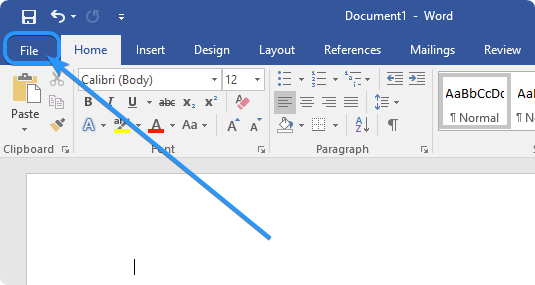
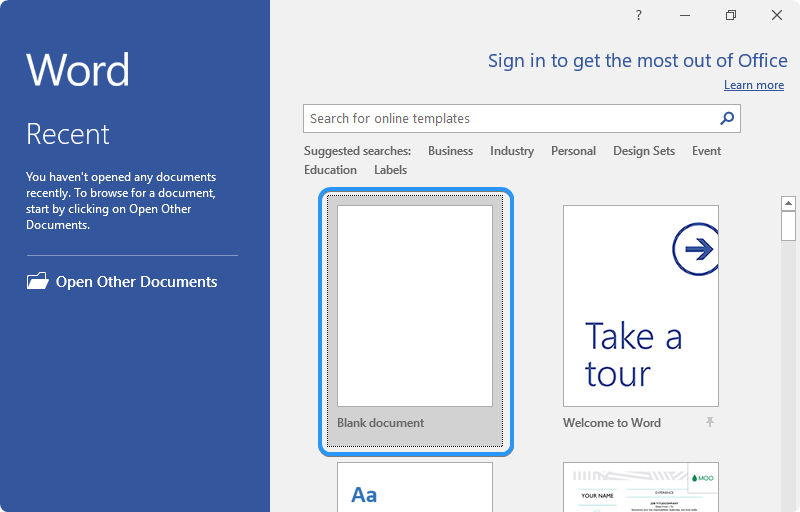
Creating a document in Microsoft Word is an essential skill that anyone who uses a computer should know. There are different ways to create a new document in Word. You can use the menu bar, a keyboard shortcut, or double-click the Word icon on your desktop. Here are the steps to create a new document from the menu bar:
On a Windows Computer
- Launch Microsoft Word by clicking the icon or searching for it in the Start menu.
- Click on the «File» menu at the top left corner of the screen.

- Click on «New» in the menu that appears.
- Select «Blank Document» to create a new document from scratch.

Windows Tip: You can use the keyboard shortcut «Ctrl + N» to create a new blank document.
On a Mac Computer
- To open Microsoft Word, click on the Word icon in the Dock or Applications folder.
- Click on «File» in the menu bar and select ”New” > «Blank Document.»

- Once you’ve created a new document, you can start typing.
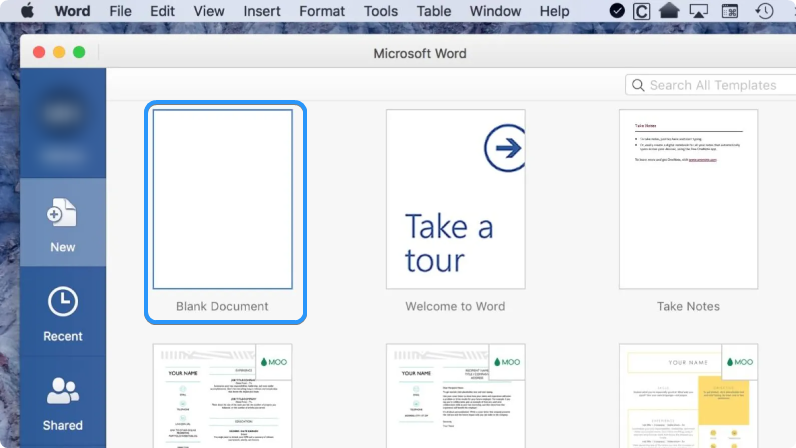
macOS Tip: You can use the «⌘ + N» keyboard shortcut to create a new blank document in Word for Mac.
How to Create a Word Document From a Template
You don’t have to create a blank Word document to get started. You can pick from various templates to quickly create documents for different purposes. This section will show you how to create a Word document from a template on Windows and Mac computers.
- Launch Microsoft Word by clicking the icon or searching for it in the Start menu.
- Click on the «File» menu at the top left corner of the screen.
- Click on «New» and select «From Template.»

- Choose a template to begin editing your document. Word has built-in templates for all purposes; you can also download new ones online. With millions of templates out there, you’ll surely find one that suits your needs.
- Once you’ve chosen a template, you can edit it as you like. You can change font styles, add images, and more.
Using these steps, you’ll kickstart your document in no time. Working with templates eliminates many of the early steps of creating a document. You can focus on creating impactful content instead of designing everything from scratch.
Writing and Formatting Your Document in Word
Once you have a new document open, you can start typing your content. You can change the font, size, and style using the «Home» tab formatting tools. Here are a few tips to help you write and format your document effectively:
- Use clear and concise language. Avoid using jargon or complicated words that may confuse your readers.
- Use headings and subheadings to organize your content. Reserve Heading 1 for your main title, and use Heading 2, 3, and 4 for subheadings.
- Use bullet points or numbered lists to break up large chunks of content. This makes your document easier to read
- Use bold or italic font to emphasize key points or important information.
- Enable spell check to catch any typos or errors before saving your document.
- Proofread your document before you save it. Even a small spelling mistake can greatly impact the quality of your work.
These tips will help you easily write and format your document in Word. With some practice, you’ll be creating professional-looking documents in no time.
How To Add Text to Your Document
Now that you’ve created a new Word document, it’s time to start adding text and formatting it. This section will cover the basics of adding and formatting text in Word.
- To add text to your Word document, simply start typing. You can also copy and paste text from other documents or sources.
- You can format your text using the formatting options in the Home tab on the ribbon. You can change the font, font size, color, and alignment.

You can copy and paste text from an external source by right-clicking anywhere in the document and selecting «Paste.» The keyboard shortcut for this is «Ctrl + V» on Windows and «⌘ + V» on a Mac.
How To Add Shapes, SmartArt, Charts, and Pictures in Word
In addition to text, you can also add various shapes, SmartArt, charts, and pictures to your Word document. This section will cover how to add these elements to your document.
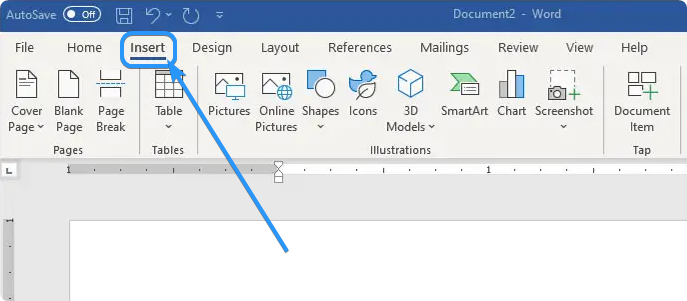
- To add a shape, click «Insert» in the menu bar and select «Shapes.» Choose the shape you want to add, then click and drag to draw it on your document.
- To add SmartArt, click «Insert» in the menu bar and select «SmartArt.» Choose the type of SmartArt you want to add, then click on the placeholder text to edit it.
- To add a chart, click «Insert» in the menu bar and select «Chart.» Choose the type of chart you want to add, then click and drag to draw it on your document.
- To add a picture, click «Insert» in the menu bar and select «Pictures.» Browse your computer to find the picture you want to add, then click «Insert.»
How To Save Your Document in Word
Since you’ve created and formatted your Word document, saving your work is important so you don’t lose it. Word supports various file formats, starting with its own proprietary file format, DOCX. However, you can also export your documents as PDF, HTML, and other popular formats. This makes it easy to store and share your documents.
When you save a document in Word, it’s important to give it a descriptive name so you can easily find it later. You can also assign tags or even password-protect the file so it’s not accessible to unauthorized users. With a vast selection of saving options, Word makes it easy to save, store, and share your documents.
To save your document in Word, follow these steps:
- Click on «File» in the menu bar and select «Save» or «Save As.» The «Save» option will replace an old document with a new one. The «Save As» option creates a copy of the document and gives it a different name in different formats like DOCX, PDF, HTML or other file types.

- Choose where you want to save your document, then enter a file name.
- Choose the file format you want to save your document as. The default file format for Word documents is .docx, but you can also choose to save your document as a .pdf, .txt, or another file format.
How To Save Your Document to OneDrive in Microsoft Word
If you want to save your Word document to OneDrive, Microsoft’s cloud storage service, you can do so directly from within the Word app. This section will cover how to save your document to OneDrive.
OneDrive makes accessing your documents from any device easy so you can work on them anywhere. It’s a popular choice for backing up and sharing documents since files stored in OneDrive are secure and encrypted. It’s worth noting that OneDrive is an online storage service, so you’ll need to be connected to the internet when working with it.
To save your document to OneDrive in Microsoft Word, follow these steps:
- Click «File» in the menu bar and select «Save As.»
- Choose «OneDrive» from the list of options.

- Choose the location where you want to save your document, such as «OneDrive — Personal» for personal files or «OneDrive — Business» for work or school files.
- Enter a file name.
- Click «Save» to save your document to OneDrive
Your document is now saved in OneDrive, and you can access it anytime from any device with an internet connection.
FAQ
How do I create a new document in Microsoft Word?
To create a new document in Microsoft Word, click «File» and «New» to choose a template or a blank document.
Can I save my Word document in different file formats?
Yes. You can save your document in different formats, such as DOCX, PDF, and RTF.
What is the difference between the «Save» and «Save As» options?
«Save» updates an existing document with the changes made, while «Save As» creates a new copy of the document with a new name or file format.
Can I save my Word document automatically?
Yes. Go to File > Options > Save in Word. Check the box that says AutoSave. You can also choose how often your document should be saved automatically.
Can I change the default file location in Word?
Yes. Navigate to File > Options > Save. The current location is in the «Default local file location» field. Click the «Browse» button to select a new default location.
Can I password-protect my Word document?
Yes. To make your document secure, go to the «File» menu. Choose «Info» and then click on «Protect Document.» Click «Encrypt with Password,» make up a password, and click OK.
Conclusion
Creating a new document in Word is a straightforward process that anyone can learn. With the right tools and techniques, you can write and format your document effectively and save it for future use. Remember to use clear and concise language, organize your content, and save your work often to avoid losing any progress.
Now that you know how to create and save documents in Microsoft Word, you’re well on your way to becoming a master of productivity! With these tips and techniques, you can write up professional documents quickly and securely without worrying about losing progress or compromising important information. So get typing — happy writing!
One More Thing
We’re glad you’ve read this article.  Thank you for reading.
If you have a second, please share this article on your socials; someone else may benefit too.
Subscribe to our newsletter and be the first to read our future articles, reviews, and blog post right from your inbox. We also offer deals, promotions, and updates on our products and share them via email. You won’t miss one.
Related Articles
» Microsoft Office Word Cheat Sheet
» The Complete Guide to Formatting Text in Microsoft Word
» Microsoft Word Hacks You Need to Know in 2023
Note: (This guide on how to save a word document is suitable for all Microsoft Word versions, including Office 365)
Saving your file/document is an important feature in almost every application. This feature is very helpful when you cannot complete a stipulated task in one go. Also, you would need to save your file when you share it with others. Saving your file prevents loss of data due to software crashes, power outages, or even, accidental closing of the application.
Saving a Word document is pretty simple and it can be done in a variety of ways. In this article, I will tell you how to save a Word document in 4 easy ways.
You’ll Learn:
- 4 Different Ways to Save a Word Document
- From the File Main Menu Ribbon
- Using the Keyboard Shortcut Keys
- Using the Quick Access Toolbar
- Save Your Word Document as a PDF
- AutoSave Feature in Word
Related Reads:
How to Merge Word Documents? – 3 Easy Methods
How to Change Orientation of One Page in Word? 3 Easy Ways
How to Wrap Text in Word? 6 Wrap Text Options Explained
4 Different to Save a Word Document
There are multiple ways to save a word document. Each method has its own steps, accessibilities, features, and functionalities.
Let us now see the different methods to save a word document in detail.
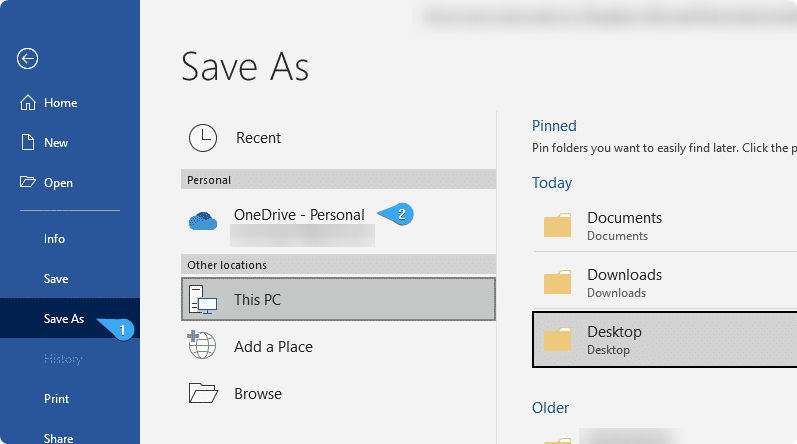
From the File Main Menu Ribbon
This is one of the most well-known methods to save a Word document ever since Word was launched.
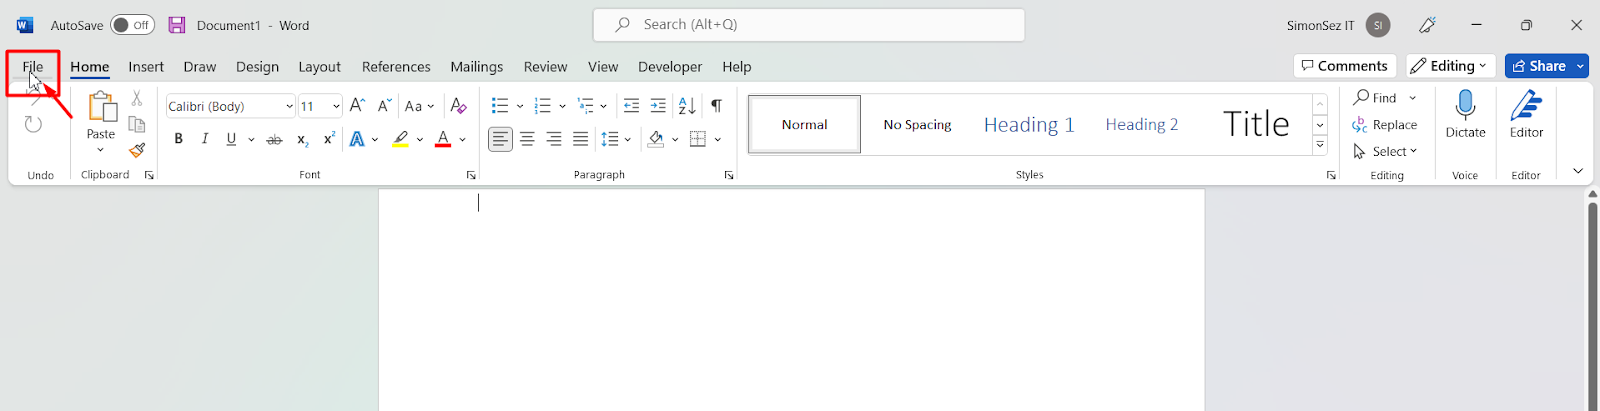
- Open the Word document which you want to save.
- Click on the File in the main menu ribbon. This opens the backstage view which contains all the additional options relating to the document.
- In the left pane of the File window, click on Save.
- This eventually takes you to the Save As pane.
Note: The functionalities of Save and Save As options are alike. Save is commonly used when saving a file for the first time or overwriting the existing file. The Save As option is used to create copies, and change the location or format of the file.
- In the Save As pane, choose the folder to which you want to save, name the file, and choose the file format.
- For additional saving options relating to the location and format, click on Browse or More Options.
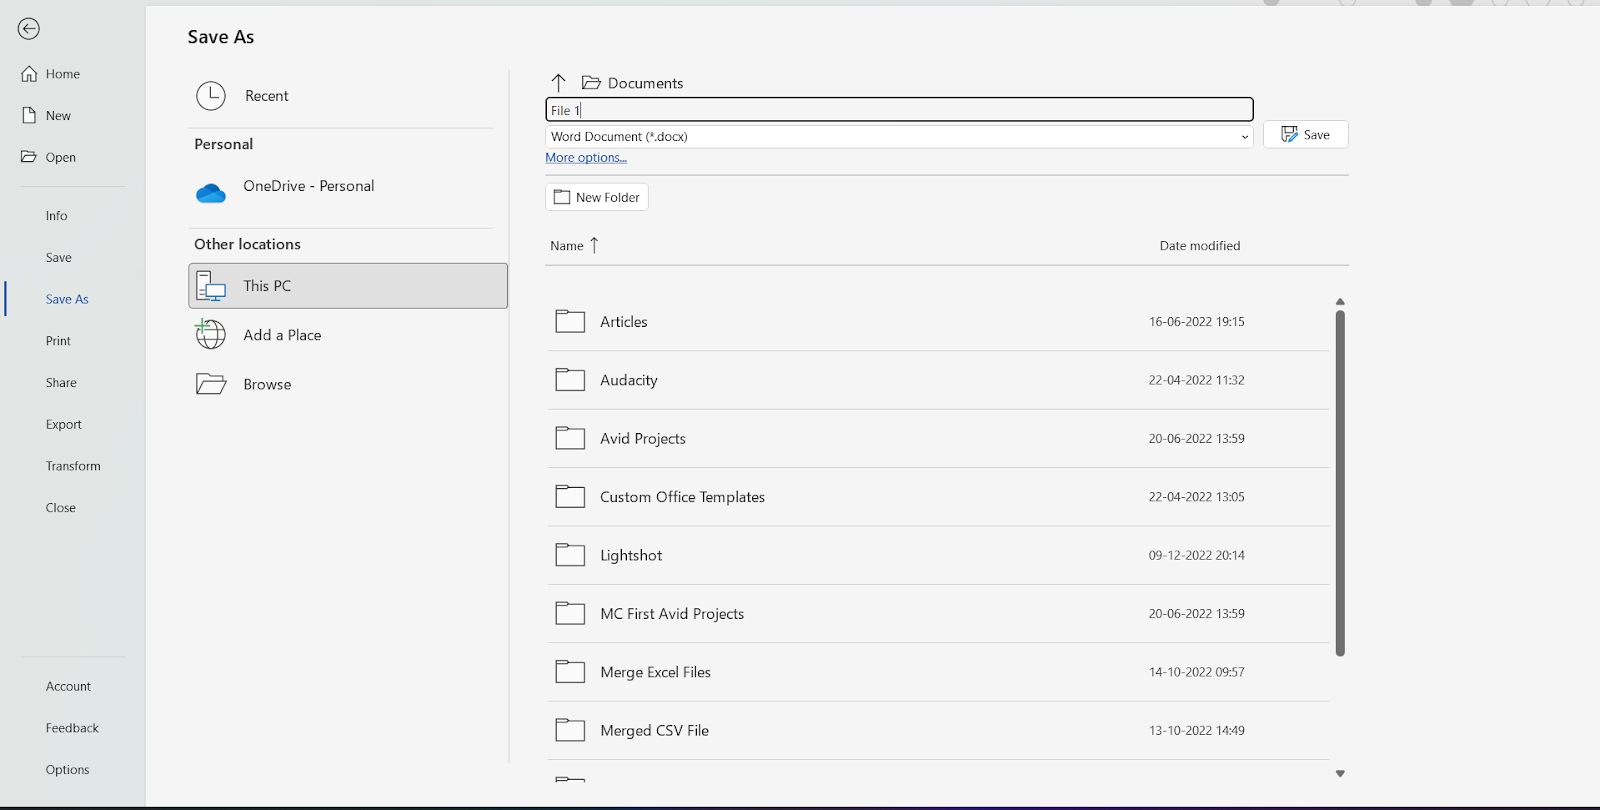
- Finally, click on Save.
This saves your Word document in the selected folder under the given file name.
By Using the Keyboard Shortcut
Shortcut keys are another easy way to help you save a Word document when clicking and navigating to Save options seems like a multi-step task.
- Once you have curated your Word document, just press the keys Ctrl+S.
- This opens the Save As dialog box. You can then rename the file and choose the location to save the document.
For additional options, click on More Options which takes you to the File menu backstage view. From there, you can access a variety of save options relating to the Word file.
Using the Quick Access Toolbar
The Quick Access Toolbar provides a single-click solution to a variety of options in Word. You can add a variety of buttons to the Quick Access Toolbar which you’ll be using often.
- Let us first enable the Quick Access Toolbar. Click on the Ribbon Display Options which can be seen as a small dropdown arrow. From the dropdown, click on Show Quick Access Toolbar.

- Once the Quick Access Toolbar is enabled, click on the dropdown from Customize Quick Access Toolbar, which can be seen as a small dropdown arrow in the left corner of the toolbar, and select More Commands.
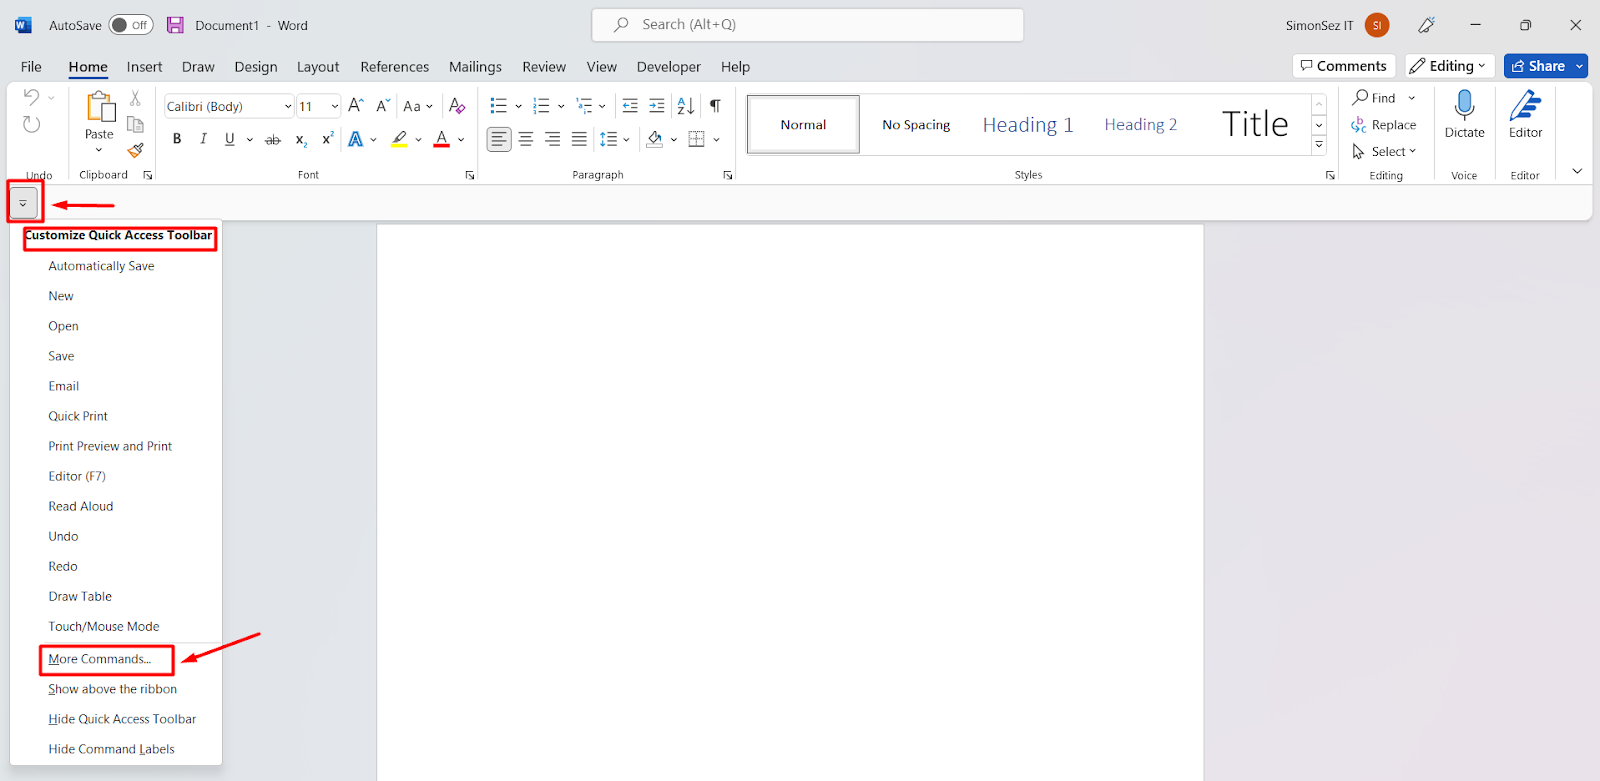
- This in turn opens the Excel options dialog box. Click on the dropdown from choose commands and select All Commands.
- Now, scroll down and choose the options you want to add to the Quick Access Toolbar. In this case, let us add the Save button.
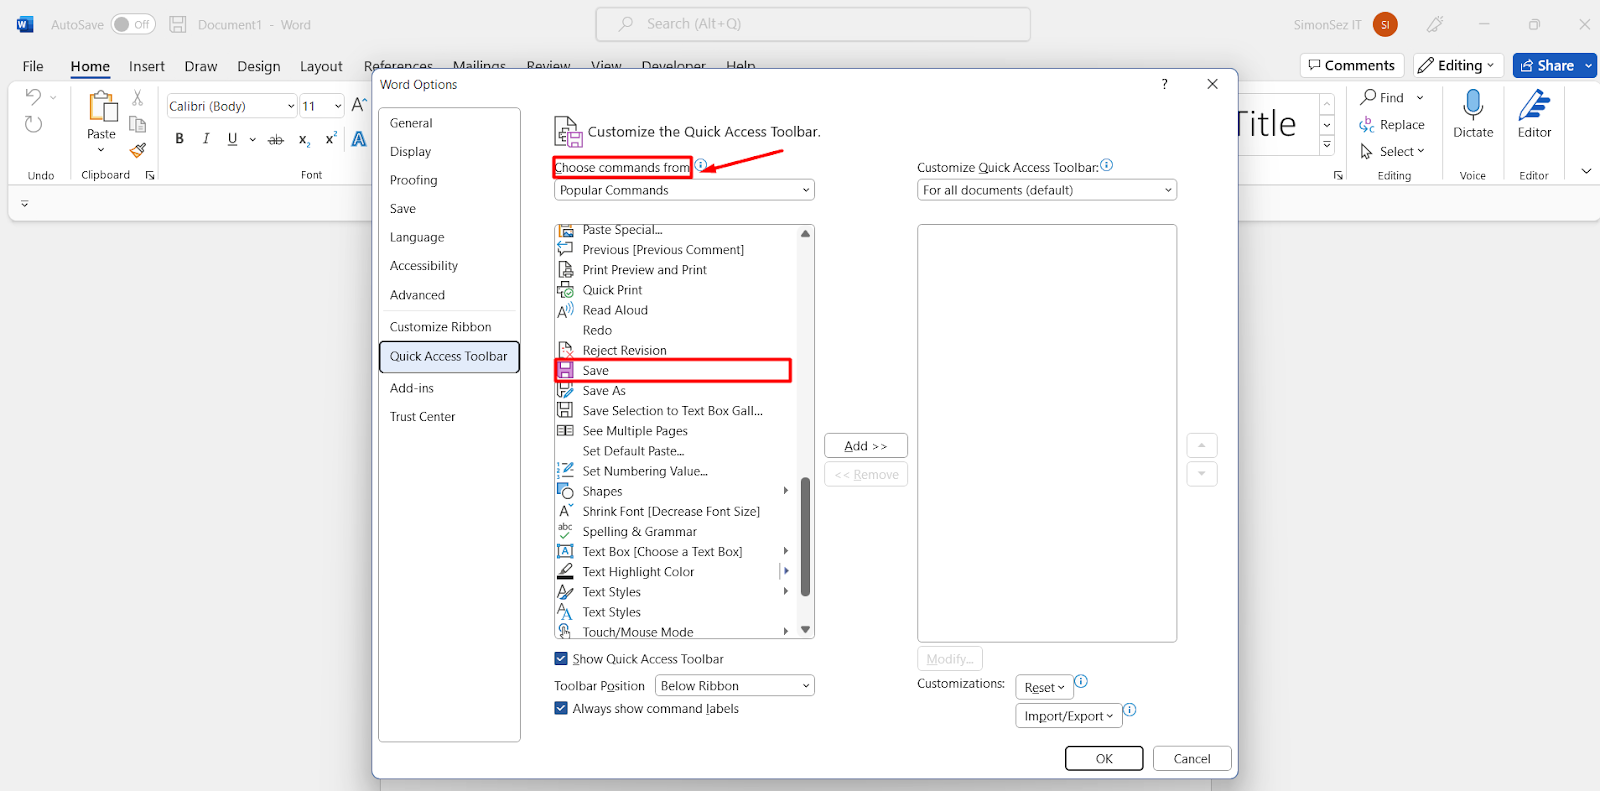
- Once you click on Add, you can see the chosen button move to the right side of the pane.
- Finally, click OK.
- Now, you can see the selected buttons in the Quick Access Toolbar.
When you want to save your Word document, you can just click on the Save button to open the Save As dialog box, without having to navigate through the File, Save, or Save As options.
Suggested Reads:
How to Insert Watermark in Word? 3 Easy Ways
How to Find and Replace in Word? 7 Simple Methods
How to Double Space in Word? 4 Easy Ways
Save Your Word Document as a PDF
Word documents can be converted into other file formats such as PDF using any additional third-party software or websites. However, you can just save the current word document you are working on into a PDF file without having to leave Word.
- To save the Word document as PDF, first, navigate to File.
- Click on Export in the left pane of the File window.
- This opens the Export pane towards the right of the file window.
- To export the Word document to a PDF file, click on Create PDF/XPS Document button. Now, click on Create PDF/XPS.
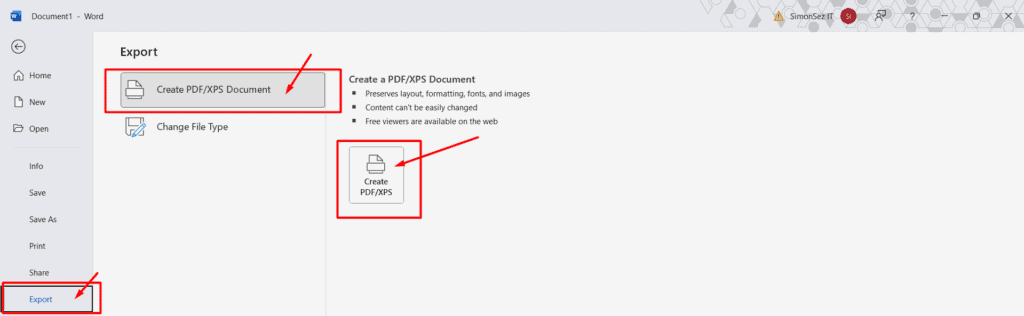
- This opens the Publish As PDF or XPS dialog box. In the dialog box, choose the file location, rename the file, and from the Save As type dropdown choose the file format and click on Save.
- This saves your current word document as a PDF file.
AutoSave Feature in Word
Even though there are a variety of ways to save a Word document, sometimes even they might not be enough to save your document at appropriate times. To overcome this, Word has a feature called AutoSave.
The AutoSave feature automatically saves your Word document at regular intervals of time so you don’t have to worry about losing your progress again.
The Autosave feature only works on the document uploaded to the cloud and not when the files are on your local storage.
By default, the feature will be automatically enabled when uploaded to the cloud. Else, you can use the toggle ON/OFF button in the title bar in the top left corner to enable or disable the AutoSave feature.
For additional customizations relating to the AutoSave feature, go to the File main menu and click on the Options button. Word opens the Word Options dialog box. Under the Save category, you can see the options relating to the AutoSave feature.
Also Read:
How to Recover a Word Document ? 4 Proven Ways
How to Curve Text in Word? 2 Easy Ways
How to Insert a Placeholder in Word? 2 Different Types
Frequently Asked Questions
What is the shortcut to saving a Word document?
Using the keyboard shortcut keys is the easiest way to save a Word document. When you want to save the word document, click on Ctrl+S. This opens the Save As dialog box, from where you can save the document. And, going forward you can just press Ctrl+S to overwrite the document.
How do I save the document as PDF from the Save As dialog box?
Navigate to File and click on Save. Again, click on Browse or More Options. This opens the Save As dialog box. Specify the name and the location of the Word document. Now, click on the dropdown from Save Ss type and select the format of your choice(PDF).
Closing Thoughts
Remembering to save your word document is integral when working on important documents. Though it might be a couple of additional steps, Saving is always better than losing the files along with all your hard-working efforts.
In this article, we saw how to save a word document in 4 easy ways. You can save them from the File main menu, using keyboard shortcuts, using the Quick Access Toolbar, exporting them as PDF, and even enabling AutoSave in Word to save the documents. Choose the one that suits your purpose the best.
For more high-quality guides on MS Word or Excel, please visit our free resources section.
Ready to dive deep into Excel? Click here for advanced Excel courses with in-depth training modules.
Simon Sez IT has been teaching Excel and other business software for over ten years. For a low monthly fee, you can get access to 150+ IT training courses.

Simon Calder

Chris “Simon” Calder was working as a Project Manager in IT for one of Los Angeles’ most prestigious cultural institutions, LACMA.He taught himself to use Microsoft Project from a giant textbook and hated every moment of it. Online learning was in its infancy then, but he spotted an opportunity and made an online MS Project course — the rest, as they say, is history!
Continuing this Word documents series for beginners, in this post you’ll discover everything you need to know about creating, storing and working with documents in Microsoft Word.
It’s not as hard as you might think and once you’ve done it a few times it will become like child’s play.
Clickable Table of Contents
1. Creating a new document from a Microsoft template
Don’t reinvent the wheel.
Rather than creating your own document from scratch there are thousands of templates that are freely available for you to use.
Some of these are available with your standard installation of Microsoft Word, but if you have an internet connection, there is an ever-changing library of templates that you can tap into.
There are ready-made templates for reports, resumes, flyers, birthday cards, thank you cards, brochures and the list goes on.
There is a template for you if you invest some time to look through the library and discover all that is on offer.
Microsoft have created an active online community where members can contribute and share template designs they have created, so that other people can benefit
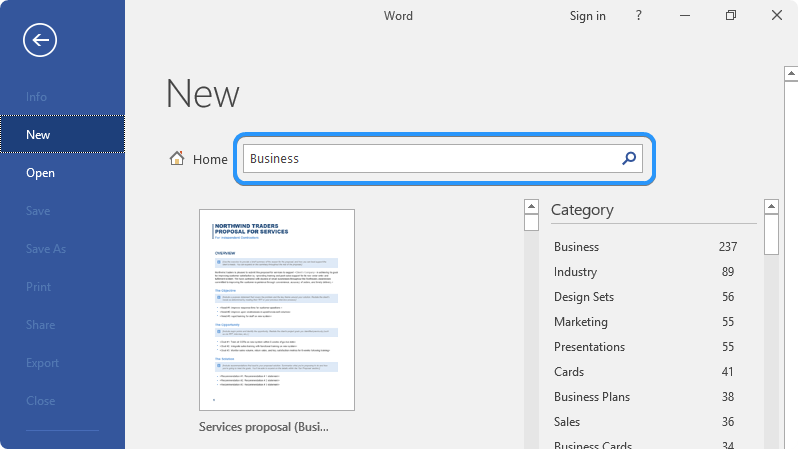
To create any type of new document:
1. Click the File tab in the top-left corner of the screen.
2. Choose New on the left side panel.

A gallery of document templates is displayed. Choosing one of these templates can give you a head start and save you a lot of time.
To drill down and display templates for something in particular:
1. Select one of the categories listed at the top (letters, resumes, fax, labels, cards, calendar), or
2. Type what you are looking for into the search box (e.g. Christmas party, meeting minutes).
3. Scroll through the targeted templates list options and click a template to select it.

2. Creating a brand new blank word document
A document is probably the simplest type of file to create as a beginner.
A document refers to any type of text on a page whether that’s a single page letter, resume, short report or a huge 200-page report
To create a new Word document:
1. Open Word from the apps list on the Start Menu (or use any other technique described in the previous chapter.
Depending on the settings, a new blank page may appear immediately.
However, if you see a gallery of templates:
2. Single-left-click on the first one called Blank Document.
3. Saving a document for the first time
Once you have created the document, you need to save it.
Choose any of these three methods
1. Hold the Ctrl key and press S.
2. Click the ancient floppy disk icon on the Quick Access Toolbar (top-left-of screen).
3. Single-left-click the FILE tab, then single-left-click SAVE or SAVE AS.
Then click BROWSE

The Save dialog is displayed and at first glance this might seem overwhelming, but there are just three things you need to do
4. On the left side of the dialog box, single-left-click either DESKTOP or DOCUMENTS.
These are the easiest locations to store files initially. In the next chapter you will discover some different locations where you can save files

5. In the File Name box, type a name for your file

6. Single-left-click the SAVE button
![]()
If you look at your document title bar (top of the screen) you will see the file name you just typed

4. Saving changes to an already saved document
If you then make changes to your document (either now or down the track):
- Press Ctrl S or
- Click the ancient floppy disk icon in the Quick Access Toolbar or
- Single-left-click the FILE tab then single-left-click SAVE.
Your updates are saved to the same file name.
If you wish to create a second copy of the file as a backup:
1. Single-left-click the FILE tab then single-left-click SAVE AS.
2. Choose a location and different file name (refer to previous section)
3. Click the SAVE button.
If you do this, take care to open the correct file in the future as you now have multiple copies.
5. Closing a document
Press Ctrl + W or single-left-click the FILE tab then single-left-click CLOSE. This will close the file but leave the Word app open.
Alternatively, click the X in the top-right-corner of the app window to close the file AND the app.

You will always be prompted to save unsaved changes.
6. Opening a document using browse
There are several ways to open a document in order to read it or make some changes
1. Press Ctrl + O or
2. Click the File tab in the top-left corner of the screen and choose Open on the left side bar
3. Click Computer in the middle panel.
4. Click Browse.
5. Choose the location where your document resides (probably the DESKTOP folder or the DOCUMENTS folder.
6. (Optional step) Choose the sub-folder (if you created one) where the document is saved.
7. Select your document and click Open.


7. Opening a recently-used document
1. Click the File tab in the top-left corner of the screen.
2. Click Open in the left panel.
3. Select Recent Documents (if necessary) in the middle column.
4. Select your document from the Recent Documents list on the right side of the screen.
8. Finding a lost file
If you cannot remember what you called the file or where you saved it, you can search for it.
1. Single-left-click the FILE tab then single-left-click OPEN.
2. In the top-right of the dialog is a search box. Single-left-click inside the search box.
![]()
3. Type the whole file nae or part of the file name then press ENTER. The app will search for your file and display a list of matching results.
4. If you see your file listed, double-left-click it to open it.
9. Switching from one open document to another
Often you need to work on two or more documents at the same time. In the Windows task bar (at the very bottom of the screen), the Word icon will show an overlap, which indicates that more than one document is open.

To switch to a different document:
- Hover over the stacked Word icon on the task bar to display the preview thumbnails for each open Word document.
- Left-click the thumbnail of the document you want to switch to.
When you switch to a different document, all the other open documents remain open in the background. You haven’t lost them. You don’t need to save them first. You can switch back to another document at any time.
10. Moving, resizing & positioning windows
At the top-right corner of the screen you’ll find the three standard Windows icons
![]()
![]()
Minimise. This will remove the document from the screen, but it remains open. Click the button on the Windows taskbar to re-display the document
![]()
Restore / Maximise. Clicking this button toggles between showing the document at the full screen size and displaying it as a resizable window.
![]()
Close. Closes the Word document. If there is only one document open, Word itself will also close.
You can also use these keyboard combinations to positioning windows on the screen

Display the window at full screen size.

Resize the window to half the screen width, then lock to the right side of the screen.

Resize the window to half the screen width, then lock to the left side of the screen.
11. All the key points again
- To create a new document from a Microsoft template, click the File tab, choose New from the left side panel then locate and select a template.
- To create a new blank document press Ctrl + N or click the File tab, choose New from the left side panel and choose Blank Document.
- To save a document, press Ctrl + S or click the File tab, choose Save or Save As from the left side panel, choose Computer, then Browse, select a location and a filename and click Save.
- To close a document, press Ctrl+W or click the File tab then choose Close from teh left sidebar.
- To open a document, press Ctrl+O or click the File tab then choose Open, then Browse, select the file location and double-left-click the file name. Recent files are listed on the right.
- To switch from one open document to another, hover over the stacked Word icon on the task bar then select the thumbnail from the gallery of open documents that you want to switch to.
I hope you found plenty of value in this post. I’d love to hear your biggest takeaway in the comments below together with any questions you may have.
Have a fantastic day.


About the author
Jason Morrell
Jason loves to simplify the hard stuff, cut the fluff and share what actually works. Things that make a difference. Things that slash hours from your daily work tasks. He runs a software training business in Queensland, Australia, lives on the Gold Coast with his wife and 4 kids and often talks about himself in the third person!
SHARE