
You can bring information from Publisher into a Word document. For example, if your publication contains a large amount of text that you want to re-use, you can save the text from your publication as a Word document. Or, if you designed a page in Publisher that you want to use as a book cover in your Word document, you can paste the page into the Word document and then print the document from Word.
Note: Although you can export part or all of your publication to Word, you cannot save your entire publication — all text, graphics, and layout — in a Word document in one step.
In this article
-
Ways to export your publication to Word
-
Save the text in your publication as a Word document
-
Copy and paste a page or objects on a page
-
Save a page, two facing pages, or objects on a page as a picture file
Ways to export your publication to Word
You can use any of the following methods to export part or all of your publication to Word:
-
Save the text in your publication as a Word document Use this method for a newsletter or a publication that contains a large amount of text that you want to use in Word. Save your publication in the file format for your current version of Word to open the saved file in Word. Save in the Word 97-2003 file format to open the saved file in earlier versions of Word.
-
Copy and paste a page or objects on a page Use this method for a brochure, letterhead page, or publication that you want to bring into Word and make changes to. Copy an object, a selection of objects, or a page in your publication and paste it into a Word document in Hypertext Markup Language (HTML) format.
-
Save a page, two facing pages, or objects on a page as a picture file Use this method to create a picture file that you can insert into a Word document. Possible uses include a calendar, a book cover, or a publication that includes a table or that you don’t need to make changes to in Word.
Top of Page
Save the text in your publication as a Word document
If you save your publication as a Word document, the built-in converter displays a message telling you that the selected file type supports only text. The text and font formatting (font, size, style, underline, color, and effects) are preserved. However, design elements such as graphics and columns are not preserved.
Tips for best results when you save the text in a publication as a Word document
-
Make sure that text box boundaries in your publication don’t overlap.
-
Headers and footers and page numbers are preserved when you save your publication, but the header and footer functionality is not. If you want to change the headers or footers, save the document, and then add headers and footers to the Word document.
-
Page breaks in the publication are ignored. You can insert page breaks in the Word document after you save it.
-
Graphics in the publication are not preserved. If you want to add graphics from the publication, you can copy the graphics and paste them into the Word document separately.
Save your publication as a Word document
-
Open the Publisher publication that you want to save as a Word document.
-
Click File > Save As, and browse to the location where you want to save the Word document.
-
In the File name box, type a name for the Word document.
-
In the Save as type list, select the version of Word you want save for. Older versions of Word will include the version number; for Word 2016, select Word Document for the current version of Word.
-
Click Save.
Top of Page
Copy and paste a page or objects on a page
You can copy a single object, a selection of objects, or all of the objects on a page in your publication and paste them into a Word document in HTML format. When you paste in HTML format, the formatting and text styles are preserved, and you can make changes to any objects or text that you paste into the Word document.
Tips for best results when you paste objects into a Word document in HTML format
-
If you copy a publication page that contains text that flows to a text box on another page, none of the text is pasted into the Word document. For best results, copy only pages with text that does not flow to another page.
-
If you copy an entire page from your publication, you may need to change the margins and page orientation in the Word document. You can do this either before or after you paste the page into the Word document.
-
If your publication contains a table, such as a calendar, save the objects in your publication as a picture file to preserve the layout of your table on the page.
Note: This method preserves the layout, but you will not be able to make changes to the table in the Word document.
-
If you want to copy several objects, you may find it easiest to group these objects first before you copy them.
-
Click and drag a selection box around the objects that you want in the group.
-
On the Drawing Tools Format or the Picture Tools Format tab, click Group.
-
-
If your publication has multiple pages, you can copy an entire page, but not the entire publication at one time. If you are viewing a two-page spread in a multiple-page publication (on the View menu, click Two-Page Spread), you can copy two facing pages at a time.
-
Text that is displayed vertically (top to bottom, or bottom to top) in your publication will be displayed with horizontal orientation in the Word document. You can change the text orientation in the Word document after you paste.
-
In Word, click the text box that contains the text that you want to change.
-
Under Text Box Tools, on the Format tab, in the Text group, click Text Direction repeatedly until you get the orientation that you want.
-
Copy a page or objects into Word
-
Select the Publisher objects that you want to copy.
Note: To select the entire page, click a blank area on the publication, or click the scratch area, and then click Ctrl+A.
-
Right-click, and then click Copy.
-
Open the Word document.
-
On the page where you want to paste the objects, right-click, and then click Paste.
-
Repeat steps 1 through 4 until you have pasted all of the objects or pages that you want.
Top of Page
Save a page, two facing pages, or objects on a page as a picture file
You can save a single object, a selection of objects, an entire page, or a two-page spread in your publication as a picture file and then insert that picture into a Word document.
Note: You can’t make changes to the publication text or objects that you insert in the Word document when you use this method.
Tips for best results when you paste objects or pages as picture files
-
If you save an entire page or a two-page spread from your publication, you may need to change the margins and page orientation in the Word document. You can do this either before or after you insert the picture file into the Word document.
-
If your publication has multiple pages, you can save an entire page, but not the entire publication at one time. If you are viewing a two-page spread in a multiple-page publication (on the View menu, click Two-Page Spread), you can save two facing pages at a time.
-
For the best results with viewing and printing objects or a page from your publication in Word, save the objects by selecting PNG Portable Network Graphics Format, JPEG File Interchange Format, or Enhanced Metafile format at the highest resolution, and selecting High quality printing or commercial press (300 dpi), and then paste the objects or the page into your Word document.
Notes:
-
Some PNG or JPEG pictures may already be compressed, so their resolution may be less than 600 dots per inch (dpi).
-
Enhanced metafiles can be saved only at 96 dpi.
Insert a page, two facing pages, or objects from your publication into Word as a picture
-
Select the items that you want to save by doing one of the following:
-
Click File > Save As to save the entire page or two facing pages as a picture.
-
Right-click the picture, WordArt, shape, or group of objects that you want to save, and then click Save as Picture on the shortcut menu.
-
-
In the Save as type list, select a picture format, such as PNG Portable Network Graphics Format or JPEG File Interchange Format.
-
If the picture format supports multiple resolutions (the Change button is available in the Save As dialog box), click Change, select the resolution option that you want, and then click OK.
Note: For best results, select High quality printing or commercial press (300 dpi).
-
Click Save.
-
Open the Word document, and then click where you want to insert the picture.
-
Click Insert > Picture.
-
In the Insert Picture dialog box, browse to where you saved the file, click the file, and then click Insert.
-
Repeat steps 1 through 7 until you have inserted all of the objects or pages that you want.
Top of Page
![]()
Download Article
![]()
Download Article
Whether you’re creating a brand-new document in Microsoft Word or saving changes to an existing document, saving your files in Word is pretty simple. In this article, we’ll talk you through the basics of saving Word documents in Windows or Mac, including how to use keyboard shortcuts to save, how to turn on AutoSave, and how to save your docs in different file formats.
Things You Should Know
- Click the «File» menu and select «Save As» to save a new document.
- To quickly save changes to an existing document, click the disk icon on the toolbar, or press Control + S on a PC or Command + S on a Mac.
- If you’re using Office 365, enable AutoSave to automatically save your changes to the cloud every few seconds.
-

This function lets you name your file and choose its location. Once you’ve created a new Word document, open the File menu and select Save As. A window will pop up prompting you to name the file and choose a location on your computer or a linked cloud account where the file will be stored. Choose the file type (e.g., .docx, .pdf, or .xml) from the drop-down menu at the bottom of the window. Then, select Save.[1]
- You can also use the keyboard shortcut F12 (in Windows) or ↑+⌘ Command+s (on a Mac) to open the Save As window.
- If you’re saving a document for the first time, using the Save command will prompt the Save As window to open.
- If the document is saved locally, you can use Save As to save a copy of an existing document with a new name, format, or location. However, for documents that are saved to OneDrive or another cloud service, you may need to use Save a Copy instead, depending on your version of Word.

Advertisement
-
Use this method to save changes to an existing document. With your document open, click the File menu in the toolbar at the top of the screen. Then, click Save. Any recent changes to your file will be saved.[2]

-
This option lets you save your changes with a single click. The Quick Access Tool Bar is located at the very top of your document window on the right side. Locate the Save button, which looks like an old-fashioned square floppy disk, and click on it to save your document.[3]

Advertisement
-
These keyboard shortcuts instantly save recent changes. You can also use the keyboard Save command to launch the Save As window if you’re saving a new document for the first time. On a Windows PC, use Control+s. If you’re using a Mac, hit ⌘ Command+s.[4]

-
AutoSave is only available for documents saved to the cloud. The AutoSave feature in the Office 365 version of Word prevents you from having to save manually. However, in order to use it, you must save your files to a OneDrive, Box, or SharePoint account. To use AutoSave:[5]
- Click the toggle switch next to AutoSave in the Quick Access Toolbar at the top right corner of your document window.
- A window will pop up prompting you to upload your file to a cloud location. You can also rename it, if you like. Select your preferred location using the dropdown Place menu.
- Click Upload to use the default location or select Choose Location if you pick a different option in the Place menu.

Advertisement
-
Most Word documents save automatically as .docx files. However, you can choose to save your document as a different format, such as .pdf, .doc (for compatibility with older versions of Word), or .txt.[6]
To do this:- For documents that are saved locally on your computer, open the File menu and select Save As. In the File Format dropdown menu near the bottom of the Save As window, select your desired format.
- If your document has AutoSave enabled, you’ll need to use the Save a Copy command instead, which is also located in the File menu. Select the type of file you want to create in the drop-down File Format menu at the bottom of the window.
- Click Save to confirm your choice.
- With some formats, such as .pdf, you will be prompted to Export the file rather than Save it after you select the format.

-
This option creates a separate copy of your document. This is a good option if you want to make changes to your document while also preserving the original version. To make a copy of your Word doc, open the File menu and select Save a Copy…. If you’re saving the copy in the same location as the original, give it a new name. Click Save at the bottom of the Save a Copy window when you’re done.

Advertisement
-
If you don’t like Word’s default Save options, you can change them. On a Windows PC, open the File menu, then select Options, then Save.[7]
If you’re using a Mac, open the main Word menu, then click Preferences… and select Save. From there, you can customize options such as:- The default format for your saved Word files
- How frequently Word saves AutoRecover information
- Where AutoRecover files are stored
- The default location for saved documents (e.g., a local folder on your computer or a location in the cloud)

Add New Question
-
Question
What is the process of creating a file in a folder?

Once the folder is created, go into it and right-click on a blank area, then select New -> Microsoft Word Document.
-
Question
Do I save documents as a Word doc, or Word 97 — 2003?
This depends on what the reader(s) are using. Word 97 — 2003 format is more universal, but may strip some advanced features from your document. If you save it in Word format, those using earlier versions can still view/edit the document using the free MS Office Compatibility Pack from Microsoft. If you’re just creating the document for your own personal use, save as Word.
-
Question
How do I see a saved document?
On any modern version of Windows, you would a view a saved document by navigating to its save location. For example, if you saved it in the default «My Documents» folder, you would open a file explorer window and locate that folder, where you would then find your document. Alternatively, recent versions of Microsoft Word show a list of recent documents when you open the program. Finally, you can click File, then Open on most versions of Microsoft Word, then navigate to the correct file location.
Ask a Question
200 characters left
Include your email address to get a message when this question is answered.
Submit
Advertisement
Video
Thanks for submitting a tip for review!
-
Failing to save your document before you close Microsoft Word will potentially delete the document or any changes you made to an existing one.
Advertisement
About This Article
Thanks to all authors for creating a page that has been read 324,086 times.
Is this article up to date?
Introduction:
According to the PDF Association, there are 2.6 trillion PDFs created each day. This figure convincingly demonstrates that PDFs are an essential file format. Even though, Microsoft Word documents still act as important digital files in daily communication simply because of their editability. Therefore, we may frequently need to convert from PDF to Word. Here comes the question: how to save a PDF as a Word document?
To streamline the PDF to Word conversion and thus improve working efficiency, this post will revolve around several free PDF to Word converters on Windows and Mac that readily save PDF as Word.
Windows: How to Save a PDF as a Word Document
Professional PDF software on the desktop is a good approach to converting a PDF to a Word doc for users who need to work on the Windows OS on a regular basis. Let’s dive into how to use SwifDoo PDF, Nitro PDF, and Microsoft Word to save a PDF as a Word document.
In this digital era, when most of us rely on PDFs to store information, an all-around PDF program is useful for addressing all PDF-related issues, for instance, PDF to Word conversion.
SwifDoo PDF
SwifDoo PDF is a PDF to Word converter that you can put into daily use on Windows 11, 10, 8, and 7. Its lightweight design makes access to the program faster and easier. With a clear user interface, users won’t find themselves at the bottom of a deep learning curve when using.
Apart from this, the functionality makes it grow to be a comprehensive Windows-based PDF software program. OK, no more description, here’s how to convert PDF to Word on Windows:
Step 1: Download and install SwifDoo PDF on your PC;
Free Download
Step 2: Run the software and click Convert > PDF to Word;
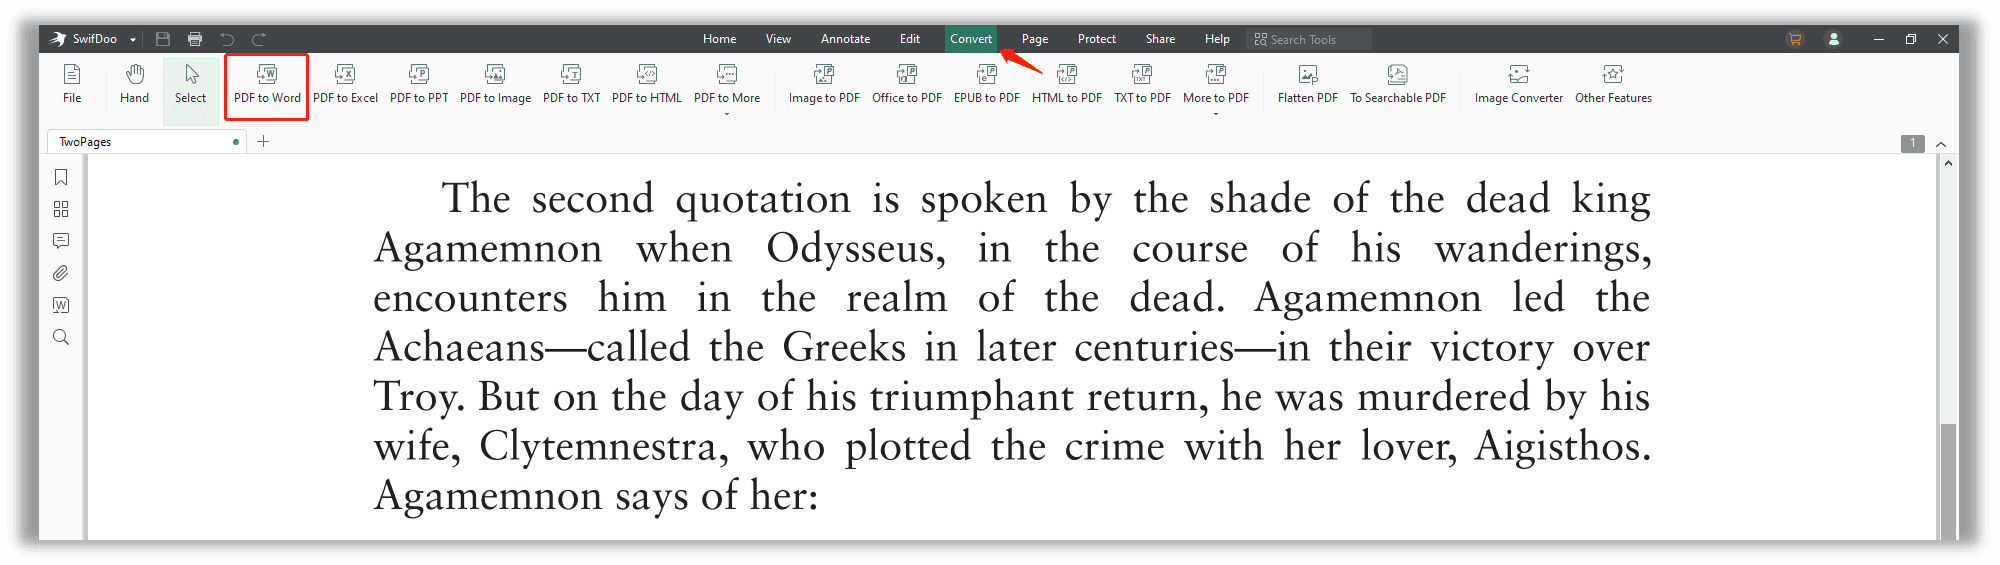
Step 3: Choose Add Files to upload your PDF files to the panel. SwifDoo PDF allows for batch conversion. Users can therefore import multiple PDF documents to the workstation;
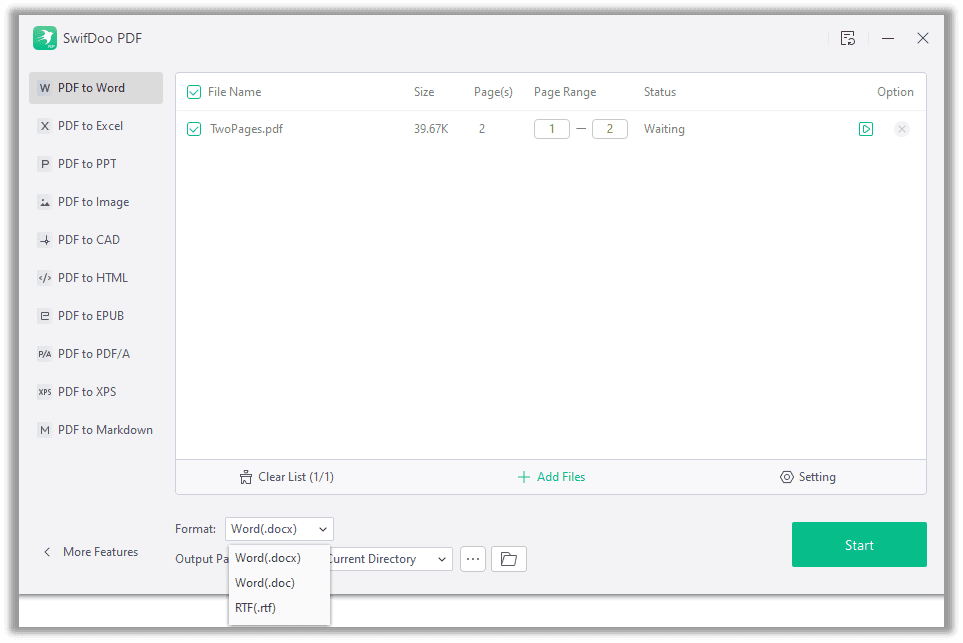
Step 4: Hit the Start button to convert your PDFs to Word files.
Tips: A.docx file is the default output type for a Word document. If you need to convert PDF to DOC or RTF, you’d better click on the Format menu to change the output setting.
If your PDF happens to be an image-only PDF and you need it to be an editable Word document, SwifDoo PDF’s OCR can identify the recognizable characters and make this PDF editable. In this way, the PDF to Word conversion results will become much more accurate.
Free Download
SwifDoo PDF provides a longer trial period, and every new user is eligible for a 15-day free trial. During that period, all the features are open to both non-registered and registered users.
Nitro PDF
Nitro PDF is another all-in-one PDF service provider for Windows and macOS. Unlike the previous SwifDoo PDF, Nitro PDF is more appropriate for businesses as it integrates features related to team collaboration.
Nitro PDF enables users to convert PDF to Word, other MS Office formats (PowerPoint and Excel), PDF/A, rich text, and plain text. Follow the guide to learn how to save a PDF as a Word document with Nitro PDF.
Step 1: Download and install Nitro PDF on your computers;
Step 2: Start the program and click Convert > To Word;

Step 3: Choose Add Files to load up your PDF documents to the workplace. When ready, select Convert to initiate the PDF to Word conversion process.
Generally, Nitro PDF is a comprehensive PDF to Word converter with a fast and smooth user experience. New users can get a 14-day free trial to see if it can meet the needs for a PDF converter. However, the installation process takes a long time, and it may crash occasionally, which is inconvenient during the review.
Microsoft Word
Microsoft Office may be the most used built-in office software. If you run MS Office 2007 or later versions on your PC, you are able to directly open a PDF in Word without using other PDF software. Even though it is not the ideal “Open with” method, it seems to be the most straightforward way to convert a PDF into a Word document. Check out how to save PDFs as Word files for free:
During the test, we used Microsoft Office 365 so the provided screenshots were from this version.
Step 1: Launch Microsoft Word. Click on the File tab in Word and choose Open > Browse to open a PDF in Word. Alternatively, users can press Ctrl + F12 to quickly launch the Open file dialogue;
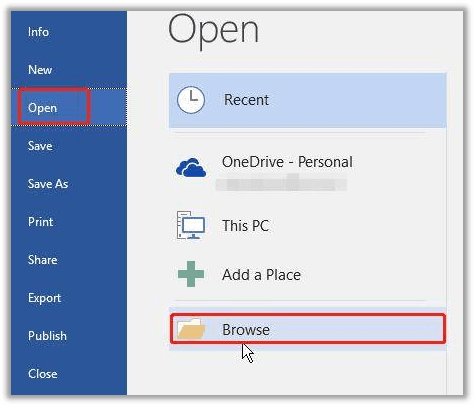
Step 2: Find the PDF document from your local folder and then choose Open;
Step 3: Save the Word document locally by pressing F12 to open the Save As dialog box.
Note: The moment you hit the button «Open», you will instantly see a window popping up to notify you that Word will convert your PDF document into an editable Word document. All you need to do is click on the «OK» button to proceed.
If you need to open a PDF in Word, make sure it doesn’t have any fillable forms, too many pictures, or more than two layers, and that it wasn’t created from PowerPoint.
How to Convert PDF to Word on Mac
Even if your MacBook includes an excellent inbuilt PDF viewer Preview, converting a PDF into a Word document seems tricky. The traditional way to copy text from a PDF proves to be out of date and riddled with errors, especially when the original PDF may contain more than a text-based layer. Therefore, how do we save a PDF as a Word document on Mac? Try Adobe Acrobat Pro DC for macOS.
Adobe Acrobat DC Reader
Step 1: Download and install Adobe Acrobat Reader from the App Store, and then open the PDF document that needs to be converted with Adobe. If you need to batch convert many PDFs at the same time, don’t forget to select Add Files to Export;
Step 2: Click File > Convert to Word, Excel, or PowerPoint;
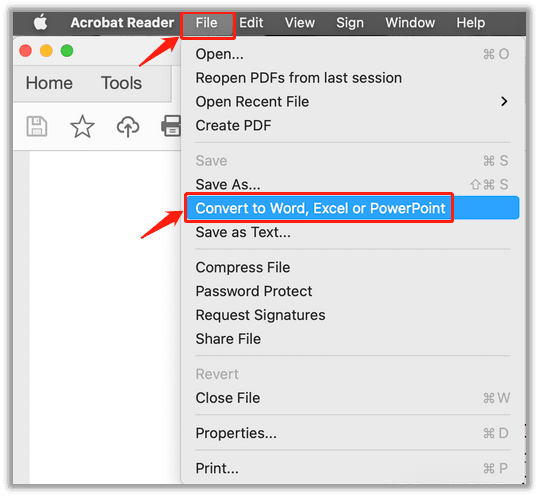
Step 3: Choose Microsoft Word Document (*.docx) or Microsoft Word 97-2003 Document (*.doc) in the Convert To drop-down menu. Users can click on the Document Language to enhance text recognition if necessary.
Step 4: When ready, hit the Export to Word button to start the conversion.
As we mentioned before, Adobe Acrobat is a comprehensive PDF to Word converter on Windows, macOS, and mobile. Users can expect this tool to address different PDF-related issues. Of course, the App Store has many amazing PDF converters that perform PDF to Word conversions, such as Microsoft Word, Foxit PDF, PDF Expert, and PDFelement.
How to Convert PDF to Word Online
For anyone who needs to convert PDF to Word online for free with no email required, online PDF to Word converters may be the best solution so far. Most web-based PDF converters provide limited free tasks (maybe two or three) and require your file size and page number to be kept within a certain range.
Google Drive
If you are searching for freeware to help with PDF to Word conversion, Google Drive may be worth a shot. First things first, let me be clear, Google Drive is a cloud service provider rather than a dedicated PDF converter. It primarily functions as a PDF to Word converter by integrating Google Docs. In a word, don’t be so picky when the conversion results may let you down; after all it is a free tool.
Let’s get to know how to save PDF as Word in Google Drive:
Step 1: Log in to Google Drive with your Google account;
Step 2: Open a PDF document directly and click on Open with Google Docs;
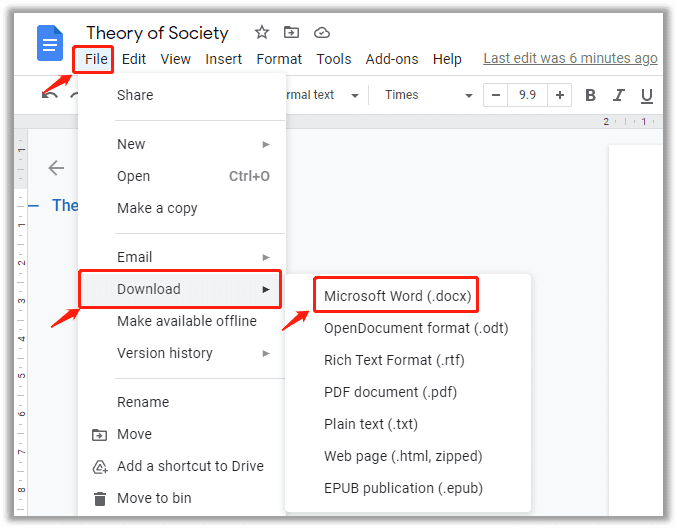
Step 3: When you are directed to a Google Docs page, your file has been successfully converted to PDF, but you still need to choose File > Download > Microsoft Word (.docx).
Even if Google Drive or Google Docs is not a professional PDF editor, the conversion result can meet our basic demands. Don’t celebrate too early, however, in some cases, the conversion results may fail when your PDF contains images and rich content.
If it does, the formatting of your converted Word document will be disorganized and unaligned. This is definitely not what you want, isn’t it? So, be sure to check what’s inside your document before you give Google Docs a try to save a PDF as a Word document.
![How to Edit a PDF in Google Drive [November 2022]](https://img.swifdoo.com/image/How%20to%20Edit%20a%20PDF%20in%20Google%20Drive.png)
How to Edit a PDF in Google Drive [November 2022]
How do you edit a PDF in Google Drive? Are you looking for the answer? The article demonstrates a freeway and advanced PDF editing option.
READ MORE >
Zamzar
This name might sound strange, but Zamzar should be credited as a mighty file converter. This is more than a free online PDF to Word converter, it can be used to convert video, audio, images, and eBook formats. With Zamzar, you can easily save PDF as Word (.doc or .docx).
Step 1: Click Add Files to upload your local PDFs to the workstation;
Step 2: In the drop-down menu of Convert To, select doc or docx as the output format;
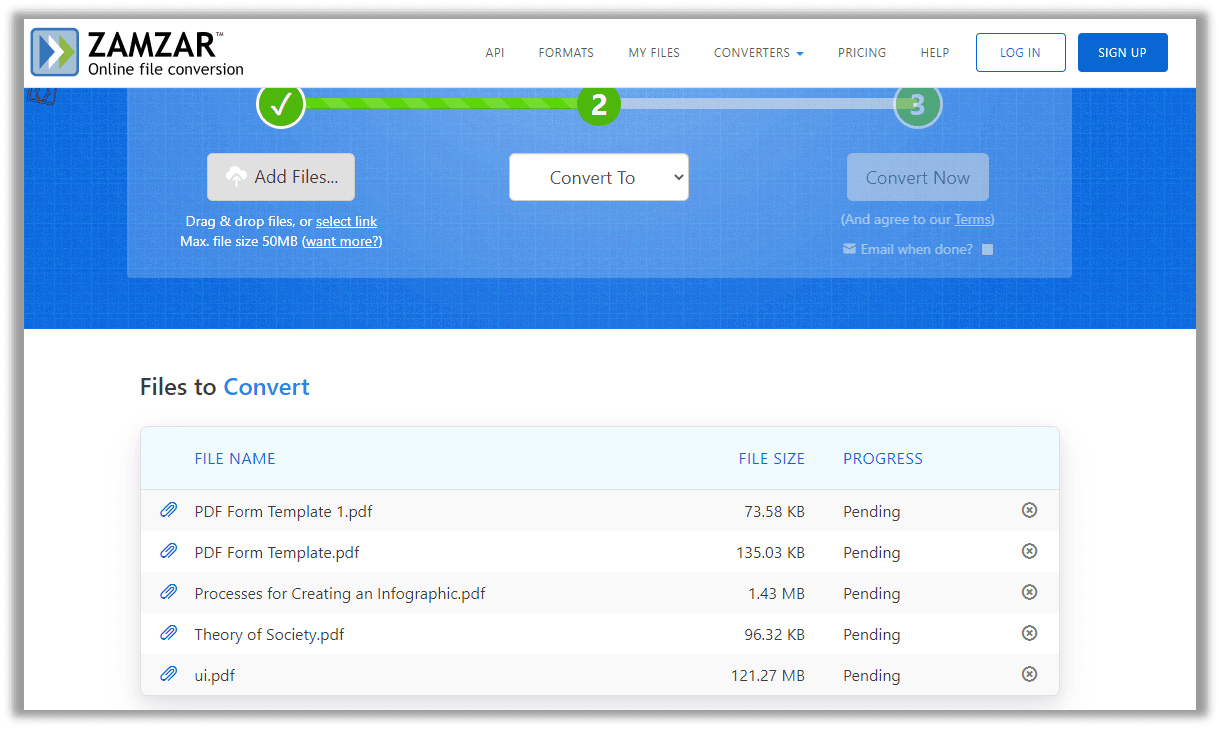
Step 3: Select Convert Now to finalize the conversion process.
As we said, Zamzar is a powerful file converter, which enables users to convert PDF to Microsoft Office formats, such as Word (.doc, .docx), Excel (.xls, .xlsx), PowerPoint (.pps, .ppsx, .ppt, .pptx). Furthermore, it can save PDF files as JPGs and other image formats (.png,.tiff,.bmp).
To handle documents in batches, Zamzar allows for a maximum of five concurrent conversions and two free conversion tasks every 24 hours. Once you exceed the limits, you need to upgrade your subscription to increase the limit. If you don’t regularly work with PDFs, two free tasks may be enough for you.
Given that it doesn’t cost you anything at all, Zamzar is a good Internet-based free PDF-to-Word converter.
In Closing
Although dedicated PDF programs are developed to help with PDF editing, some users may be inclined to save a PDF as a Word document for a smoother experience. We hope the mentioned PDF to Word converters are helpful to you. If you need a comprehensive PDF converter, SwifDoo PDF won’t let you down; just give it a try!
Free Download
Note: (This guide on how to save a word document is suitable for all Microsoft Word versions, including Office 365)
Saving your file/document is an important feature in almost every application. This feature is very helpful when you cannot complete a stipulated task in one go. Also, you would need to save your file when you share it with others. Saving your file prevents loss of data due to software crashes, power outages, or even, accidental closing of the application.
Saving a Word document is pretty simple and it can be done in a variety of ways. In this article, I will tell you how to save a Word document in 4 easy ways.
You’ll Learn:
- 4 Different Ways to Save a Word Document
- From the File Main Menu Ribbon
- Using the Keyboard Shortcut Keys
- Using the Quick Access Toolbar
- Save Your Word Document as a PDF
- AutoSave Feature in Word
Related Reads:
How to Merge Word Documents? – 3 Easy Methods
How to Change Orientation of One Page in Word? 3 Easy Ways
How to Wrap Text in Word? 6 Wrap Text Options Explained
4 Different to Save a Word Document
There are multiple ways to save a word document. Each method has its own steps, accessibilities, features, and functionalities.
Let us now see the different methods to save a word document in detail.
From the File Main Menu Ribbon
This is one of the most well-known methods to save a Word document ever since Word was launched.
- Open the Word document which you want to save.
- Click on the File in the main menu ribbon. This opens the backstage view which contains all the additional options relating to the document.
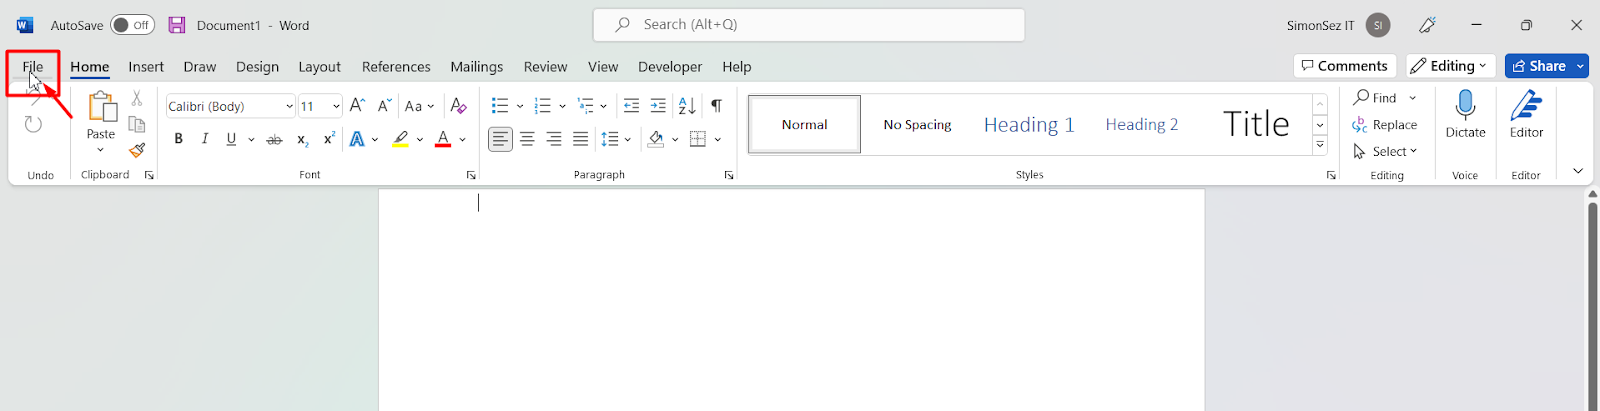
- In the left pane of the File window, click on Save.
- This eventually takes you to the Save As pane.
Note: The functionalities of Save and Save As options are alike. Save is commonly used when saving a file for the first time or overwriting the existing file. The Save As option is used to create copies, and change the location or format of the file.
- In the Save As pane, choose the folder to which you want to save, name the file, and choose the file format.
- For additional saving options relating to the location and format, click on Browse or More Options.
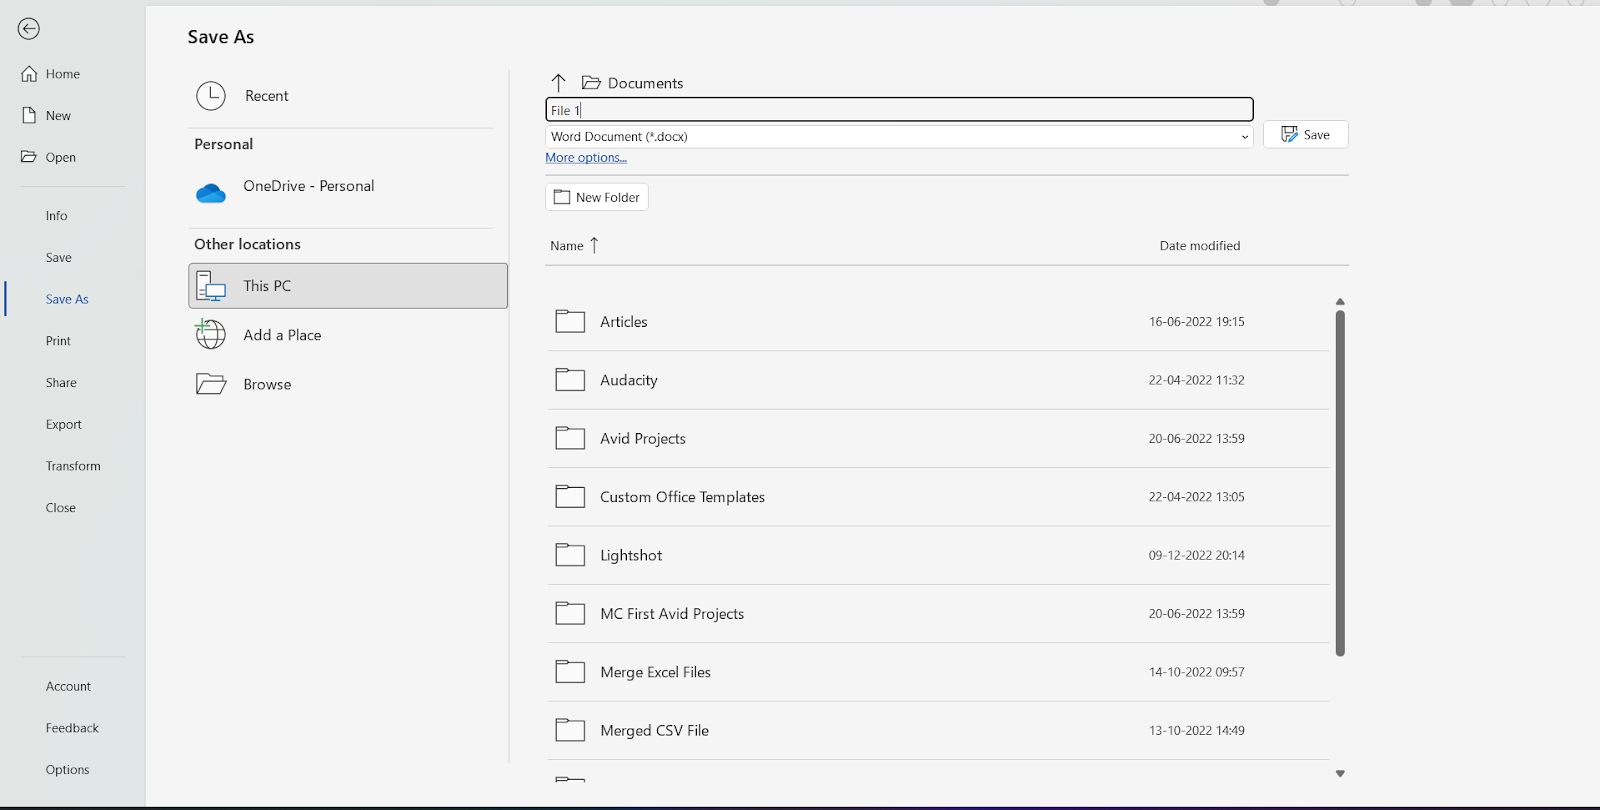
- Finally, click on Save.
This saves your Word document in the selected folder under the given file name.
By Using the Keyboard Shortcut
Shortcut keys are another easy way to help you save a Word document when clicking and navigating to Save options seems like a multi-step task.
- Once you have curated your Word document, just press the keys Ctrl+S.
- This opens the Save As dialog box. You can then rename the file and choose the location to save the document.
For additional options, click on More Options which takes you to the File menu backstage view. From there, you can access a variety of save options relating to the Word file.
Using the Quick Access Toolbar
The Quick Access Toolbar provides a single-click solution to a variety of options in Word. You can add a variety of buttons to the Quick Access Toolbar which you’ll be using often.
- Let us first enable the Quick Access Toolbar. Click on the Ribbon Display Options which can be seen as a small dropdown arrow. From the dropdown, click on Show Quick Access Toolbar.

- Once the Quick Access Toolbar is enabled, click on the dropdown from Customize Quick Access Toolbar, which can be seen as a small dropdown arrow in the left corner of the toolbar, and select More Commands.
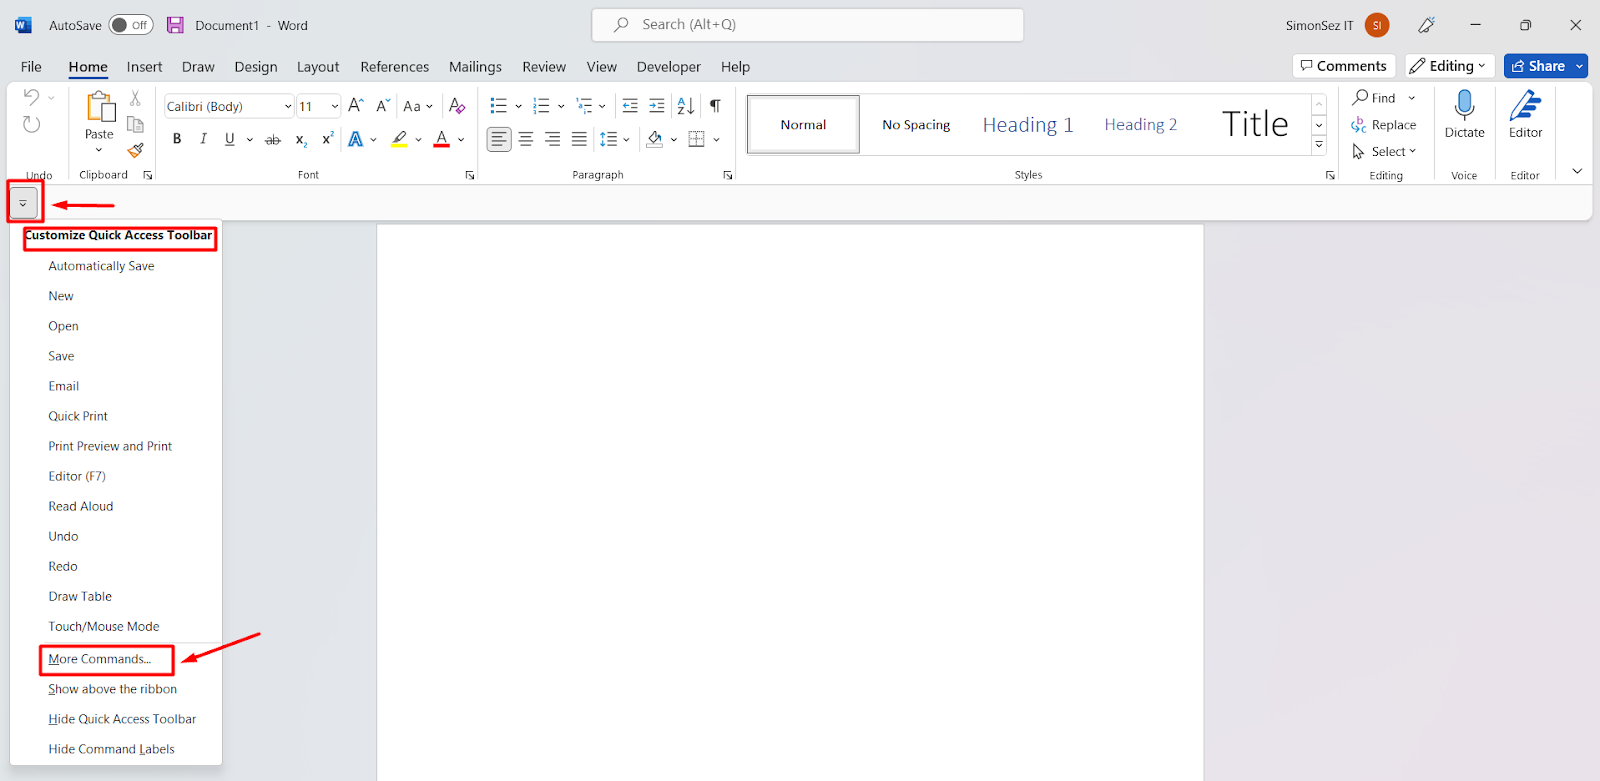
- This in turn opens the Excel options dialog box. Click on the dropdown from choose commands and select All Commands.
- Now, scroll down and choose the options you want to add to the Quick Access Toolbar. In this case, let us add the Save button.
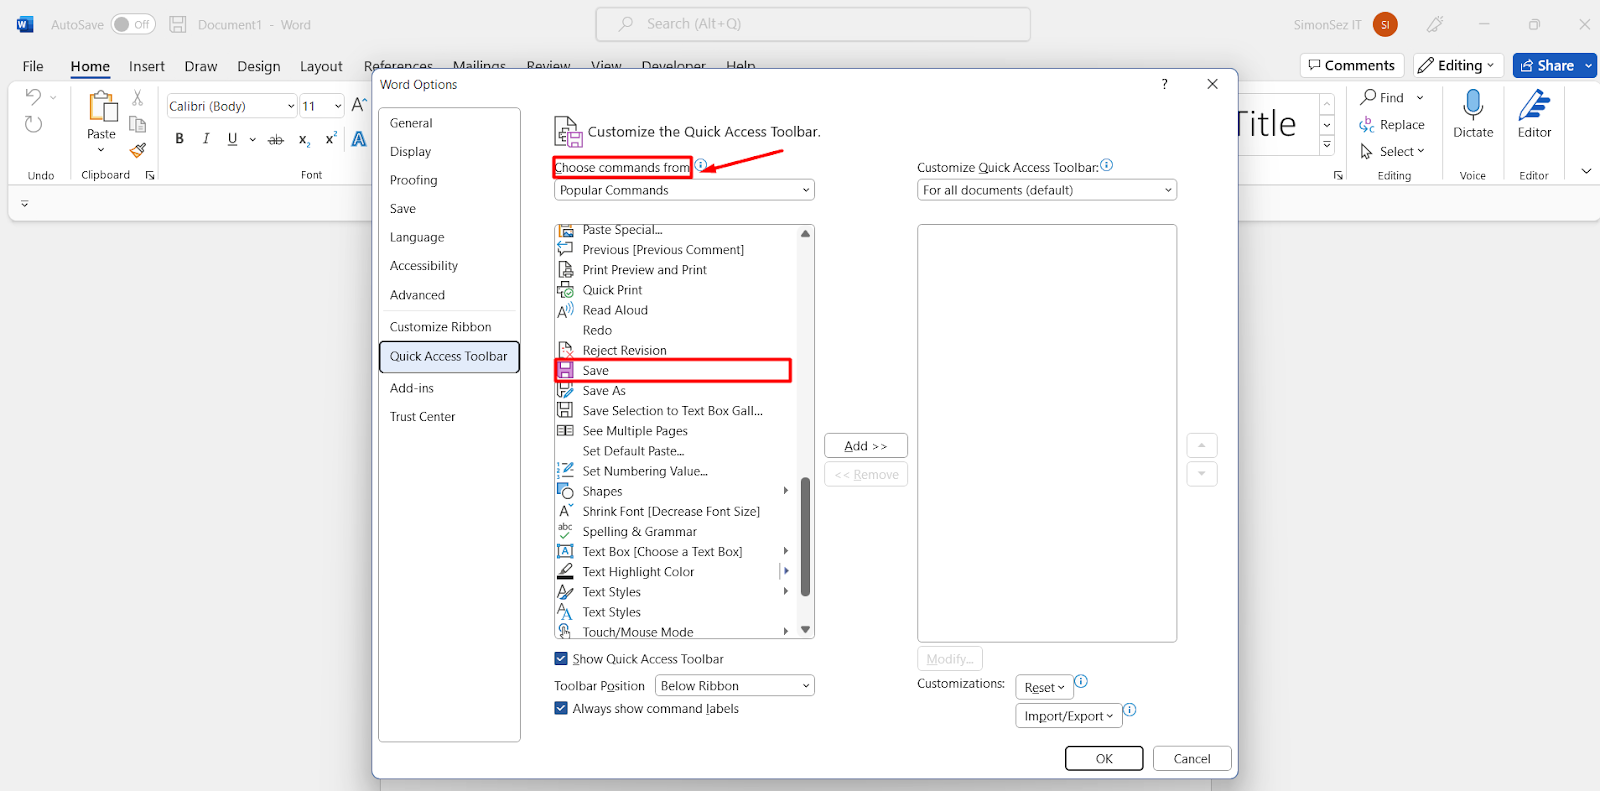
- Once you click on Add, you can see the chosen button move to the right side of the pane.
- Finally, click OK.
- Now, you can see the selected buttons in the Quick Access Toolbar.
When you want to save your Word document, you can just click on the Save button to open the Save As dialog box, without having to navigate through the File, Save, or Save As options.
Suggested Reads:
How to Insert Watermark in Word? 3 Easy Ways
How to Find and Replace in Word? 7 Simple Methods
How to Double Space in Word? 4 Easy Ways
Save Your Word Document as a PDF
Word documents can be converted into other file formats such as PDF using any additional third-party software or websites. However, you can just save the current word document you are working on into a PDF file without having to leave Word.
- To save the Word document as PDF, first, navigate to File.
- Click on Export in the left pane of the File window.
- This opens the Export pane towards the right of the file window.
- To export the Word document to a PDF file, click on Create PDF/XPS Document button. Now, click on Create PDF/XPS.
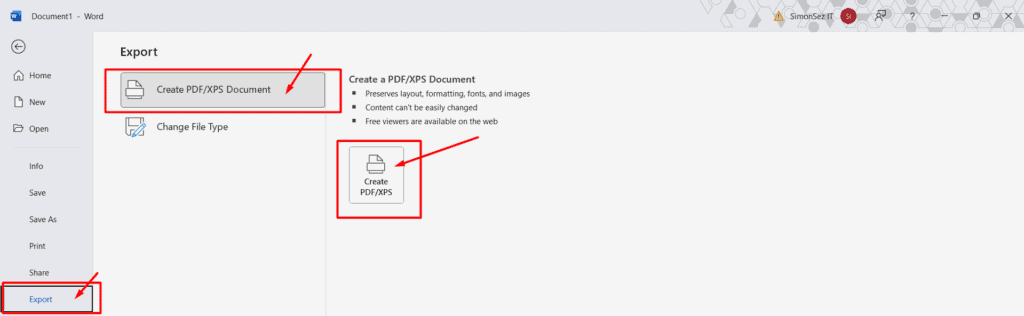
- This opens the Publish As PDF or XPS dialog box. In the dialog box, choose the file location, rename the file, and from the Save As type dropdown choose the file format and click on Save.
- This saves your current word document as a PDF file.
AutoSave Feature in Word
Even though there are a variety of ways to save a Word document, sometimes even they might not be enough to save your document at appropriate times. To overcome this, Word has a feature called AutoSave.
The AutoSave feature automatically saves your Word document at regular intervals of time so you don’t have to worry about losing your progress again.
The Autosave feature only works on the document uploaded to the cloud and not when the files are on your local storage.
By default, the feature will be automatically enabled when uploaded to the cloud. Else, you can use the toggle ON/OFF button in the title bar in the top left corner to enable or disable the AutoSave feature.
For additional customizations relating to the AutoSave feature, go to the File main menu and click on the Options button. Word opens the Word Options dialog box. Under the Save category, you can see the options relating to the AutoSave feature.
Also Read:
How to Recover a Word Document ? 4 Proven Ways
How to Curve Text in Word? 2 Easy Ways
How to Insert a Placeholder in Word? 2 Different Types
Frequently Asked Questions
What is the shortcut to saving a Word document?
Using the keyboard shortcut keys is the easiest way to save a Word document. When you want to save the word document, click on Ctrl+S. This opens the Save As dialog box, from where you can save the document. And, going forward you can just press Ctrl+S to overwrite the document.
How do I save the document as PDF from the Save As dialog box?
Navigate to File and click on Save. Again, click on Browse or More Options. This opens the Save As dialog box. Specify the name and the location of the Word document. Now, click on the dropdown from Save Ss type and select the format of your choice(PDF).
Closing Thoughts
Remembering to save your word document is integral when working on important documents. Though it might be a couple of additional steps, Saving is always better than losing the files along with all your hard-working efforts.
In this article, we saw how to save a word document in 4 easy ways. You can save them from the File main menu, using keyboard shortcuts, using the Quick Access Toolbar, exporting them as PDF, and even enabling AutoSave in Word to save the documents. Choose the one that suits your purpose the best.
For more high-quality guides on MS Word or Excel, please visit our free resources section.
Ready to dive deep into Excel? Click here for advanced Excel courses with in-depth training modules.
Simon Sez IT has been teaching Excel and other business software for over ten years. For a low monthly fee, you can get access to 150+ IT training courses.

Simon Calder

Chris “Simon” Calder was working as a Project Manager in IT for one of Los Angeles’ most prestigious cultural institutions, LACMA.He taught himself to use Microsoft Project from a giant textbook and hated every moment of it. Online learning was in its infancy then, but he spotted an opportunity and made an online MS Project course — the rest, as they say, is history!
By default, Word saves all documents in the newest format (*.docx), but you can change the default format to
.doc or anything else.
To do this, follow the next steps:
1. On the File tab, click the Options button:

2. In the Word Options dialog box, on the Save tab, choose
the format you prefer in the list Save files in this format:

3. Click OK.
See also this tip in French:
Comment enregistrer des documents au format .doc.
Please, disable AdBlock and reload the page to continue
Today, 30% of our visitors use Ad-Block to block ads.We understand your pain with ads, but without ads, we won’t be able to provide you with free content soon. If you need our content for work or study, please support our efforts and disable AdBlock for our site. As you will see, we have a lot of helpful information to share.