
Word for Microsoft 365 Outlook for Microsoft 365 Word for Microsoft 365 for Mac Outlook for Microsoft 365 for Mac Word for the web Outlook 2021 Outlook 2021 for Mac Word 2019 Outlook 2019 Word 2019 for Mac Outlook 2019 for Mac Word 2016 Outlook 2016 Word 2016 for Mac Outlook 2016 for Mac Word 2013 Outlook 2013 Word 2010 Outlook 2010 More…Less
Note: To rotate text in Word, you must first place the text in a text box, and then rotate the text box.
-
Select a text box. For more info on inserting a text box, see Add, copy, or remove a text box in Word.
-
Do one of the following steps:
-
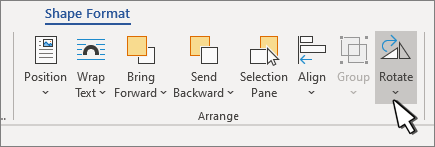
Select the text box, and then go to Shape Format or Drawing Tools Format > Rotate.

Use any of the rotate commands in the list.
-
Manually rotate the text box by selecting the text box rotation handle and dragging in the direction you want. To keep the rotation to 15 degree angles, press and hold Shift while you drag the rotation handle.
-
-
Select elsewhere on your document to view the rotated text box.
Note: A text box will appear horizontally when you select it to make editing the text easier.
Mirror text in a text box
This will reverse a line or paragraph of text in a text box.
-
Select the text box.
-
Select Shape Format or Drawing Tools Format.
-
Select Text Effects
> 3D Rotation > 3D Rotation Options. -
Under 3-D Rotation, set X Rotation to 180°.
 > 3D Rotation > 3D Rotation Options.
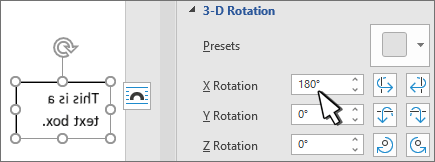
Remove the border
-
Select the text box.
-
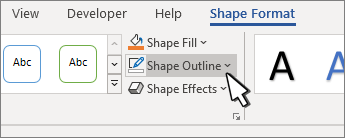
Go to Shape Format or Drawing Tools Format > Shape Outline, and then select No Outline.
The border around the text box disappears when you click or tap outside the text box.
Change the border
-
Select the text box border.
-
Go to Shape Format or Drawing Tools Format > Shape Outline to change the outline color, to change the line weight, or to change the line to dashes.
-
Select Shape Effects to add a shadow or a glow to the border.
Note: To rotate text in Word for Mac, you must first place the text in a text box, and then rotate the text box.
-
Select a text box to rotate. For more info on inserting a text box, see Add, copy, or remove a text box in Word
-
Select the rotation handle at the top of the text box, and then drag in the direction that you want.
-
To constrain the rotation to 15-degree angles, press and hold Shift while you drag the rotation handle.
-
When you rotate multiple shapes, they do not rotate as a group, but instead each shape rotates around its own center.
-
Alternatively you can select the object, hold down Option and press the left or right arrow keys to rotate.
-

Mirror text in a text box
-
Select the text box.
-
Select Shape Format.
-
Select Text Effects
> 3D Rotation > 3D Rotation Options. -
Under 3-D Rotation, set X Rotation to 180°.
Rotate to an exact angles
-
Select the text box you want to rotate.
-
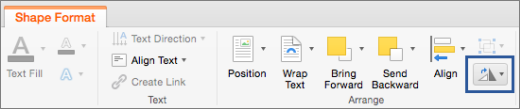
Go to Shape Format > Rotate.
-
If you don’t see the Shape Format, make sure that you selected a text box.
-
The Rotate button could be hidden if your screen size is reduced. If you don’t see the Rotate button, select Arrange to see hidden buttons in the Arrange group.
-
-
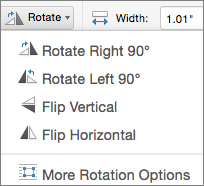
Select one of the following:
-
Select More Rotation Options.
Enter the amount that you want to rotate the object in the Rotation box. You can also use the arrows to rotate the object exactly where you want.
-
Select Rotate Right 90° to rotate the object 90 degrees to the right.
Select Rotate Left 90° to rotate the object 90 degrees to the left.
-

Group objects
When you group text boxes, you are combining them so that you can format, move, or copy them as a group.
-
Hold down Shift, select the text boxes that you want to group together, and then select Shape Format.
-
Go to Arrange > Group > Group.
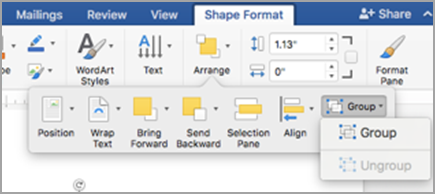
Tip: If Group appears dimmed or unavailable that’s usually because you haven’t already selected two, or more text boxes to be grouped together.
Rotate a text box
Note: To rotate text in Word for Mac, you must first place the text in a text box, and then rotate the text box.
-
Go to View > Print Layout.
-
Select the text box that you want to rotate or flip, and then select Format.
-
Under Arrange, select Rotate.
To rotate a text box to any degree, on the object, drag the rotation handle
. -
Select any of the following:
-
Rotate Right 90
-
Rotate Left 90
-
Flip Vertical
-
Flip Horizontal
-
 .
.Group text boxes
When you group text boxes, you are combining them together so that you can format, move, or copy them as a group.
-
Go to View > Print Layout.
-
Hold down Shift, select the text box that you want to group together, and then select Format > Format Picture.
-
Under Arrange, select Group, and then select Group.
Tip: If Group appears dimmed or unavailable that’s usually because you haven’t already selected two or more text boxes to be grouped together.
Word for the web will display documents that contain rotated text boxes, but you can’t insert or rotate text boxes. To insert or rotate a text box, open the document in Word for the desktop and make changes there.
Need more help?
Хотите повернуть текст в редакторе MS Word, но не знаете как? В этой статье мы объясним, как сделать текст вертикальным или изменить его угол наклона.
В программе MS Word имеется достаточно функций по изменению расположения текста в документе, Каждый пользователь, независимо от уровня владения компьютером сможет выбрать для себя наиболее удобный способ и грамотно оформить текст самостоятельно.
Поворота текста при помощи таблиц
MS Word текст можно разворачивать используя обычную таблицу. Для этого нам понадобится вставить в текстовый документ таблицу с ячейками.
- В открытом редакторе MS Word открываем вкладку “Вставка” и выбираем “Таблица”.
- В поле вставки таблицы выберите курсором нужное вам количество ячеек и подтвердите вставку нажатием левой кнопкой мыши.
- Напишите текст в любой из созданных ячеек.
- Выделите текст, который содержится в ячейке и нажмите правой кнопкой мыши.
- В контекстном меню выберите “Направление текста…”
- В открывшимся окне выбираете один из трех вариантов ориентации текста и нажимаете “ОК”.
Для того, чтобы скрыть таблицу и оставить текст повернутым, вы можете убрать видимую границу таблицы.
- Наведитесь на верхний левый угол таблицы и нажмите левую клавишу мыши. Либо выделите всю таблицу, чтобы появилось контекстное меню.
- В контекстном меню выберите иконку “Границы” и выберите “Нет границы”.
В результате вы получите текст с необходимой ориентацией в ячейке таблицы без границ.
Поворот текста при помощи надписи
Если вам нужно повернуть текст в любом месте вашего текстового документа под необходимым углом, то вы можете добавить Надпись.
- В открытом редакторе MS Word открываем вкладку “Вставка” и выбираем “Фигуры”.
- Выбираем основную фигуру – “Надпись”.
- Выделяем с зажатой левой клавишей мыши область, в которой будет находиться надпись и добавляем в нее нужный текст. В дальнейшем размер созданной надписи можно изменять потянув за края фигуры.
- Наводим курсор на круглую стрелку вверху фигуры и с зажатой левой клавишей мыши вращаем фигуру в нужном направлении.
- Чтобы скрыть контур фигуры вокруг текста нажмите на фигуру, а затем перейдите во вкладку “Формат фигуры”.
- Выбираем “Контур фигуры” и указываем внизу “Нет контура”.
Теперь у вас есть повернутый текст, который находится в фигуре без контура.
Поворот надписи при помощи формата фигуры
Данный способ не сильно отличается от предыдущего, но здесь вы сможете повернуть надпись при помощи встроенных настроек формата фигуры.
- Создаем надпись выбрав ее из вкладки “Вставка” > “Фигуры” > “Надпись”.
- Вставляем надпись в любом месте текстового документа и добавляем текст.
- Нажав или выделив надпись, откройте вкладку “Формат фигуры” и затем в категории “Текст” выберите “Направление текста”.
- Из предложенных вариантов вы можете выбрать поворот на 90° или 270°.
- После этого в той же вкладке “Формат фигуры” нажмите на “Контур фигуры” > “Нет контура”, чтобы скрыть контур нашей фигуры.
Поворот текста на 180° с помощью макета
В некоторых случаях вам может понадобиться перевернуть текст вверх ногами, Для таких целей можно воспользоваться встроенными возможностями MS Word.
- Создайте надпись в текстовом документе. Ее можно выбрать в пункте “Вставка” > “Фигуры” > “Надпись”.
- Добавляем текст внутри фигуры.
- Нажав на созданную фигуру, открываем вкладку “Макет” и выбираем “Повернуть”.
- В открытом меню можно выбрать поворот на 90° в разные стороны и отразить текст сверху вниз.
- Для того, чтобы задать свои параметры поворота текста, вы можете выбрать в том же меню пункт “Другие параметры поворота…”.
- В открывшимся окне макета находим поле “Поворот” и указываем нужный градус для поворота фигуры.
- Нажимаем “ОК” для принятия изменений.
- Для скрытия контура фигуры заходим во вкладку “Формат фигуры” и выбираем “Контур фигуры” > “Нет контура”, чтобы скрыть контур нашей фигуры.
Поворот текста при помощи SmartArt
Для поворота текста можно воспользоваться графическим функционалом текстового редактора SmartArt. Он позволяет добавлять визуальные элементы, которые могут принимать любое положение в текстовом документе.
- Открываем вкладку “Вставка” и выбираем “SmartArt”.
- Выбираем подходящий элемент, удаляем лишние части элемента и вставляем необходимый текст.
- Наведитесь курсором на круглую стрелку вверху элемента и поверните элемент в нужном направлении левой кнопкой мыши.
- Теперь по желанию остается спрятать контур фигуры. Для этого выбираем вкладку “Формат”, указываем в стилях фигуры “Черный контур”, а затем “Контур фигуры” > “Нет контура”.
В результате мы получим элемент с фигурами без контура, которые можно вращать курсором мыши.
Выводы
В текстовом редакторе Microsoft Word достаточно много способов для расположения текста внутри документа. В зависимости от требований к оформлению, текст можно поворачивать при помощи таблиц, фигур или надписей. Для создания более сложных текстовых фигур можно использовать элементы SmartArt, которые легко настраиваются под нужды пользователя.

Денис Быковский
Профессиональный лингвист-переводчик. Пишу информационные статьи о свежих событиях в видеоиграх, IT-технологиях, и программировании.
Steps
-
1
Open Microsoft Word. Double-click a Word document that you want to edit, or double-click the Word app icon and click Blank document to open a new document.
- On the Mac version of Microsoft Word, you may not need to click Blank document.
-
2
Click Insert. It’s a tab in the blue ribbon that’s at the top of the Word window. The Insert toolbar will appear.
Advertisement
-
3
Click Text Box. This option is in the «Text» section of the Insert toolbar. A drop-down menu will appear.
-
4
Click Simple Text Box. It’s at the top of the drop-down menu. The text box will appear in the Word document.
- On Mac, click Draw Text Box in the Text Box drop-down menu, then click and drag your mouse across the page to create a text box.
-
5
Resize your text box if necessary. Click and drag any one of the spheres around the text box’s outline to do so.
- For example, to elongate the text box to the right, you would click and drag the far-right sphere to the right.
-
6
Enter text. Click inside the text box, then type in whatever you want to rotate.[1]
- Skip this step if you drew a text box around existing text.
- If you want to add text that you’ve already written, select the text in question, press Ctrl+C (Windows) or ⌘ Command+C (Mac), click the text box, and press Ctrl+V (Windows) or ⌘ Command+V (Mac).
- You may have to resize your text box again to make all of your text fit.
-
7
Find the «Rotate» icon ⟳. It’s above the text box, but may be cut off by the toolbar at the top of the window. If so, you can prompt it to appear by clicking the upper-left corner of the document page and then pressing the ↵ Enter key a few times to move the text box down.
-
8
Click and drag the «Rotate» icon ⟳. Dragging the icon to the left will rotate the text box in a counterclockwise motion, while dragging it to the right will rotate the text box in a clockwise motion.
-
9
Remove the black text box. If you want to get ride of the black border around your text, you can do so by following these steps:
- Click your text box.
- Click the Format tab.
- Click Shape Outline
- Click the white box in the Shape Outline drop-down menu.
- Click a blank place on the Word document.
-
10
Save your document. Press Ctrl+S (Windows) or ⌘ Command+S (Mac), then enter a file name and click Save.
- If you were editing an existing document, pressing Ctrl+S (or ⌘ Command+S) will save your changes automatically.


Advertisement
Add New Question
-
Question
What should I do if I’ve followed these suggestions and still cannot rotate text?

Follow the directions above. When you get the picture format, copy it and then click on the «undo» arrow until you get where you want to place your text. Insert a new text box, and inside it do a right click «paste» and flip or position your text how ever you wish.
-
Question
I managed to rotate the text, but could not eliminate the box without eliminating the text inside it.
You can’t delete the box without also deleting its contents. All you can do it remove the outline so the box is not visible. Move the cursor inside the box, then right-click, click «Outline,» and select «No Outline.»
-
Question
How do I rotate text that is not in a text box?
In Microsoft Word, there is no direct way to do this, which is why you’ll have to use this workaround.
See more answers
Ask a Question
200 characters left
Include your email address to get a message when this question is answered.
Submit
Advertisement
-
The Format tab has several stylistic options that allow you to customize the appearance of your text box.
-
You can change the font, size, and color of the text that’s inside of the text box from the Home tab.
Thanks for submitting a tip for review!
Advertisement
-
The «Rotate» symbol will not be visible if your content is at the top of the Word page. You can change this by moving the content down several lines.
Advertisement
About This Article
Thanks to all authors for creating a page that has been read 1,475,923 times.
Is this article up to date?
How to Rotate Text in Word
Change the text direction in Word
Updated on November 29, 2022
What to Know
- Rotate a text box: Go to Insert > Text Box to create a text box. Select the box and drag the rotation handle to the right or left to rotate.
- Rotate text within a text box: Select Drawing Tools Format > Text Direction and choose either Rotate all text 90° or Rotate all text 270°.
- Change the direction of a table: Go to Insert > Table to create a table. Select a cell, then select Table Tools Layout > Text Direction.
You can use a text box or table in Microsoft Word to orient text in any direction you like. In this guide, we show you how to rotate a text box, how to rotate text within a text box, and how to change the direction of a table in the desktop versions of Microsoft Word for PC or Mac. (This task cannot be done in Word Online or the Word mobile apps.)
How to Rotate a Text Box in Word
Text boxes make it easy to change the direction of text in word. All you do is create the text box, add some text, and decide how to rotate the text box.
To create a text box, select Insert > Text Box and choose one of the built-in designs. To add text, select the text box and begin typing.
Drag the rotation handle on a text box to rotate the text.
To rotate the text with the rotation handle, select the text box and drag the rotation handle to the right or to the left. Release it when the text is in the direction you want.
To rotate the text box by 15-degree increments, hold Shift while dragging the rotation handle.
To rotate the text box 90 degrees:
- In Word for PC: Select the text box, select Layout > Rotate, and choose either Rotate Right 90° or Rotate Left 90°.
- In Word for Mac: Click the text box, click Shape Format > Arrange > Rotate > Rotate, and choose either Rotate Right 90° or Rotate Left 90°.
Choose a custom rotation angle.
To set a custom rotation angle:
- In Word for PC: Select the text box, select Layout > Rotate, and select More Rotation Options. From the Size tab, change the rotation angle to the angle you need.
- In Word for Mac: Click the text box, click Shape Format > Arrange > Rotate > Rotate, and click More Rotation Options. From the Size tab, change the rotation angle so the text points in the direction you need.
How to Rotate Text in a Text Box
Instead of rotating the text box, you can opt to rotate the text inside the box instead.
You can also rotate text inside a shape.
Choose how to rotate text inside a text box.
To rotate text in a text box, select Drawing Tools Format > Text Direction and choose either Rotate all text 90° or Rotate all text 270°. The text will appear vertically on the page.
To align the text inside a text box, select Drawing Tools Format > Align Text, and align the text with the right side of the text box, the left side, or the center.
How to Change Text Direction in a Table
You can also rotate text inside a table. Rotating text makes it possible to have narrow rows in a table.
To create a table, select Insert > Table and choose a table size.
Change text direction in a Word table.
To change text direction in a table:
-
Select the cell containing the text you want to change direction.
-
To change the text direction, select Table Tools Layout > Text Direction. The text will rotate to the right. Select Text Direction again to rotate the text another 90 degrees.
-
To change the text alignment, choose an Alignment option to change how the text appears in the cell. You can align the text to the center, to the left, to the right, to the bottom, or to the top.
FAQ
-
How do I rotate a picture in Word?
Select the picture you want to rotate, then select and hold the rotation handle that appears just above the picture. While still holding, drag the handle to the left or right to rotate. Note that if you have multiple pictures selected at once, they will all rotate individually.
-
How do I rotate a document in Word?
To rotate a document in Word, select Layout > Orientation, and then choose the page orientation you prefer: Landscape (horizontal) or Portrait (vertical).
-
How do I rotate a single page in Word?
Select the page you want to reorient, then select Page Layout > Page Setup and choose either Portrait or Landscape under Orientation. Then select Apply to > Selected text.
Thanks for letting us know!
Get the Latest Tech News Delivered Every Day
Subscribe

If you want to turn your text to a slight angle or 90 degrees, we’ll walk you through how to rotate text in Word exactly as you want it.
If you’re composing a document in Microsoft Word and want to get a little creative with the appearance, you might be thinking about rotating some text. You may want to turn the text to a slight angle or rotate it a full 90 or even 180 degrees.
While rotating text in Microsoft Word isn’t difficult, it’s not fully apparent how to do it either. Here, we’ll show you how to rotate text in Word and the various options you have for the angle.
Insert a Text Box in Word
To rotate text in a Word document, you must place the text in a text box.
On Windows, go to the Insert tab and use the drop-down arrow next to Text Box in the Text section of the ribbon. You can draw a text box or select the Simple Text Box option.

On Mac, go to the Insert tab and click the Text drop-down arrow. Then, click the Text Box arrow and choose to either Draw a Text Box or Draw a Vertical Text box.

After you insert the text box, type your text inside of it. Then, get ready to rotate it!
You have a few different ways to rotate the text box with the text in it.
Use the Rotation Handle
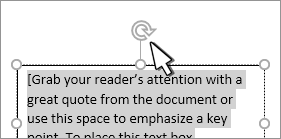
When you select the text box, you’ll see a rotation handle on the top. You can drag this handle left or right to rotate the text.

If you want to limit the flexibility in the rotation, hold your Shift key as you use the rotation handle. This will turn the text box 15 degrees at a time.

Use the Rotate Option in the Ribbon
If you want to make a simple turn of the text box 90 degrees, you can do this with a tool in the ribbon. Select the text box and go to the Shape Format tab that displays.
On Windows, click the Rotate Objects button in the Arrange section of the ribbon. Then, choose Rotate Right 90 Degrees or Rotate Left 90 degrees.

On Mac, click the Arrange drop-down arrow in the ribbon and then the Rotate arrow. Choose Rotate Right 90 Degrees or Rotate Left 90 degrees.

And if you want the text upside down, you can click one of those two options on Windows or Mac twice.
Set an Exact Rotation Angle
Maybe you have an exact angle that you want to use for your text rotation. You can add this in Word on both Windows and Mac.
Open the Rotate option in the ribbon on the Shape Format tab as described above. Then select More Rotation Options.

In the Rotate section of the Layout box that appears, enter a number or use the arrows to increase or decrease the degrees for the angle next to Rotation. Click OK.

Note: After you rotate the text box, it will appear horizontally whenever you select it. This helps to make edits to the text a bit easier.
Remove the Text Box Border
It has a border by default when you draw or insert a text box in Word. This may be fine for your situation, but if you prefer to remove that border to show only the text inside, here’s how.
Select the text box and go to the Shape Format tab. Click the Shape Outline drop-down arrow and pick No Outline.

Now, you’ll only see the text inside the box, which will appear in your document like your other text. If you select it, you’ll see a slight border to help you move, resize the box, or rotate it again.
Rotate Text to Any Angle in Word
Whatever your reason for wanting to turn your text to an angle, now you know just how easy it is to do in Microsoft Word. And if you’re working on a spreadsheet and want to spice it up, check out how to angle and rotate text in Excel.
And for more, take a look at how to curve text in your Word document or how to shrink text to fit on one page.
![]()