
Let me tell you the shortest horror story ever.
Excel Crashed!
Imagine working on that urgent report or that extremely important dashboard where you have done such a fantastic job. You are proud of yourself and all the hard work you have put into it.
But you forgot a key step.
You didn’t save the Excel file (gasp!!!)
Ok, let me cut down on the dramatics and come straight to the point.
Excel has a tendency to crash, especially when you need it not to. Somehow, it happens at the worst possible time (not that there is a good time for this ever).
In such a scenario, your only option is to try and recover unsaved Excel files.
In some cases, you will be smiled upon by the Excel Gods and you’ll get the file, and in some cases, you may not.
In this article, I will share all there is to know when it comes to recovering unsaved Excel files. I will also show you the precautions and pre-emptive steps you need to take.
And if you want to absolutely make sure nothing goes wrong, I will also share a VBA code that will save a copy of your Excel file with a timestamp whenever you save the existing file.
Let’s get started!
All Possible Ways to Recover Unsaved Excel Files / Data
Excel (and even Windows) is highly unpredictable. It can crash anytime and can your Excel files with it.
It’s a bad situation to be in…
…but there are ways to tackle this.
Excel has a few functionalities where it can help you recover unsaved Excel files or data in some cases.
Here are three scenarios where Excel’s in-built checks can help you recover files/data:
- You are working on a new file (which you haven’t saved yet) and your system/Excel crashes.
- You updated a file which has been saved earlier and Excel crashes before you could save it.
- You made a mistake and saved the changes, but now want to go back to the previous version.
Let’s see how to tackle each of these.
Recover a New Unsaved Excel File (that has never been saved)
If you are working on something and Excel crashes (or your system crashes), you can still recover that unsaved file.
Note: This method works as Excel has an inbuilt AutoSave and AutoRecover functionality. It’s enabled by default so you should be able to use these methods to recover the files. In case it’s not enabled, you will have to do it to be able to use these functionalities. How to enable AutoSave and AutoRecover is covered later in this article.
Below are the steps to recover an unsaved Excel file:
- Open a new Excel workbook.
- Click the ‘File’ tab

- Click on ‘Open’

- Click the Recent Workbook option (it’s at the top-left)

- Click the ‘Recover Unsaved Workbooks’ button which is at the bottom

- In the dialog box that opens, scroll through the list of unsaved Workbooks and open the one you want.

- Save the file (using the ‘Save As’ option) with a different name in the location of your choice.


By default, Excel saves a copy of all the unsaved files at the following location:
C:Users[YourSystemName]AppDataLocalMicrosoftOfficeUnsavedFiles
In the above address, you need to replace [YourSystemName] with the name of your system (which is ‘Sumit’ in my case).
You can also go directly to this folder (where unsaved copies of Excel files are saved) by opening any browser and copy-pasting the address in it (in the place of URL).
When you open any file from this folder, you will see a notification bar that will prompt you to save it.

Click on it and save it at a new location with a name of your choice.
Note: By default, all the recovered unsaved files are in the ‘XLSB’ format. When you save it, make sure you’re saving it in a format you want.
With this method, you can recover files which you created but never saved.
Recover Updated Excel Files (the previous version was saved)
This method can be used for files which you have saved earlier, and Excel crashed (or the system crashed or the power went off) when you were working on it.
So you still have the previously saved file, but you lost the changes you did.
Below are the steps to recover the updated Excel file:
- Open any of the existing Excel Workbook.
- As soon as it opens, you will see a document recovery pane that lists all the unsaved files. Click on any the file names to load the data.

- When you get the data you want, save the file with a different name.

Alternatively, you can also open the Excel application, and you will see the ‘Show Recovered Files’ option (as shown below).
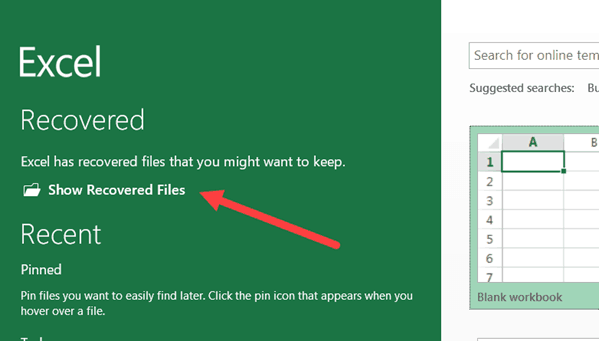
You can click on it and it will open the same Document Recovery pane.
Recover Overwritten Excel Files / Previously Saved Version (from within Excel)
While in the above two methods you can blame Excel or Windows for crashing or the power failure, this one is purely on you.
This is the case when you have a saved Excel file and you update the data and save it again.
But you end up making some changes you don’t want now (happens to me a lot).
What you really want is to get the previous version back.
While you can’t go back in life and correct your mistakes (unless you have a time machine of course), you can do that in the wonderful world of Excel spreadsheets.
In Excel 2010 and versions after that, Excel got an in-built feature to help you get the previous versions.
Below are the steps to revert to a previous version of Excel (even when you have updated and saved it):
- Click the File tab.
- In the Info page, click on Manage Workbook, you’ll find all the previous versions of that file.

- Click on the version you want to restore
- Save the file (preferably with a new name).

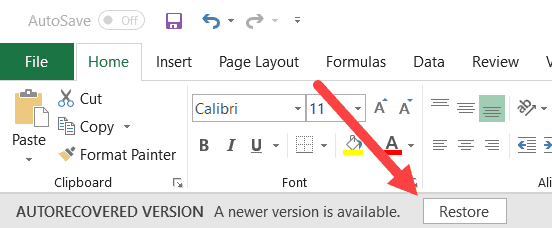
When you select a previously saved version and open it, Excel will show you a prompt as shown below. You can click on Restore to get the previous version that you have selected or can save it as a new file with a different name.
Note that for this to work, you need to make sure that AutoRecover option is enabled. While it usually is enabled by default, it’s something you can check and ensure. I cover how to enable ‘AutoRecover’ later in this tutorial.
When it comes to recovering unsaved Excel files or data, these are the three in-built options in Excel that can be used.
Another way (which I highly recommend) is to save your files on the cloud (OneDrive or DropBox). This takes away a lot of worries as the cloud services keep previous versions of your files.
Recover Overwritten Excel Files / Previously Saved Version (from the cloud – OneDrive/DropBox)
If you’re in the habit of saving your Excel files on the cloud – by using services such as OneDrive or DropBox, you don’t have to completely rely on Excel to help you recover unsaved files or lost data.
These cloud services also keep previous versions of your Excel files.
Let me show you how to get the previous versions from OneDrive and DropBox. I am sure there must be many more such services that have this functionality.
Getting the Previous Version of the Excel File from OneDrive
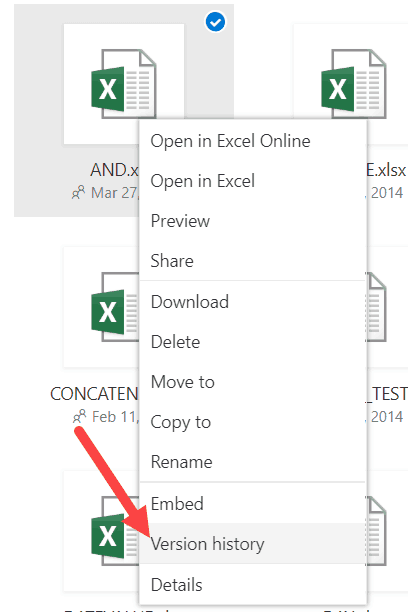
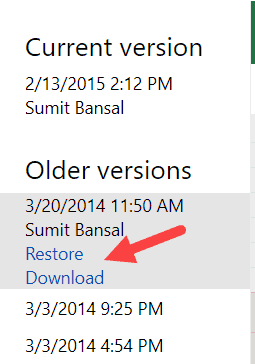
To get the previous version of an Excel file, right click on the current version in Onedrive and click on Version History.
This will open the file and you can see all the previous versions of the file in the pane on the left.
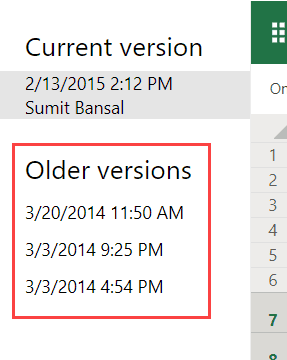
Click on the version that you want. It will show you the file content and also give you the option to download that file or restore it.
Getting the Previous Version of the Excel File from DropBox
Just like OneDrive, DropBox also keeps the past versions of the Excel files that you can revisit and download.
To get the previous versions, go to the file in Dropbox web-portal and click on the three dots for the file for which you want to see the previous versions.
Click on Version History option.
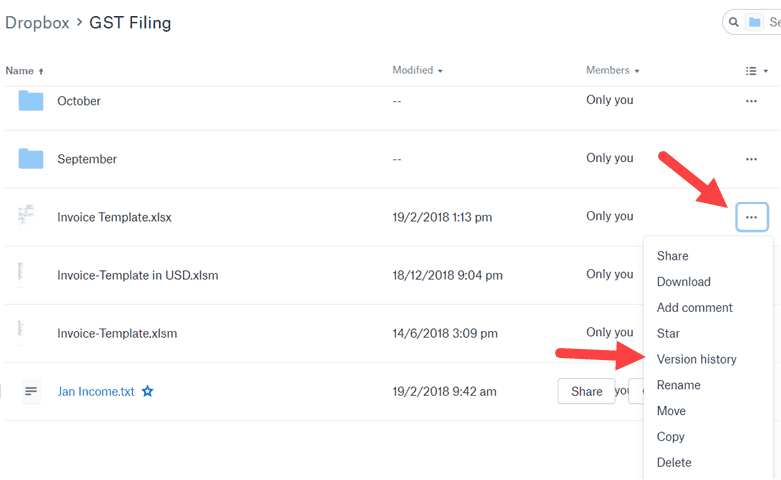
This will show you all the versions of that file. You can open and download this version from DropBox.
In case you have installed the DropBox folder on your system and keep your files there, you can simply right click on any of the files and click on Version History.
Doing this will take you to the web version of DropBox where you can see and download all the versions of the file.
Precautions to Enable Easy Recovery of Unsaved Files
While Excel has some default settings that make sure you have good chances of recovering Excel files, it’s still a good practice to make sure everything is enabled.
Enable AutoSave and AutoRecover
To make sure Excel automatically save your files and show recovery options, you need to have these enabled.
Although it should be enabled by default, in case it’s not, you can do that manually.
Below are the steps to enable AutoSave and AutoRecover functionality in Excel:
- Click the ‘File’ tab
- Click on ‘Options’
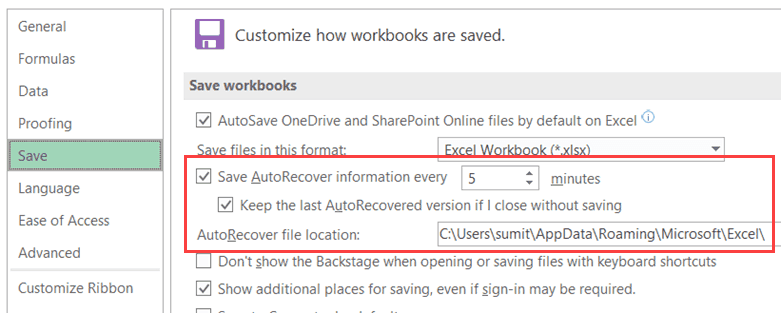
- In the Excel Options dialog box, click on Save (it’s in the left pane of the dialog box).
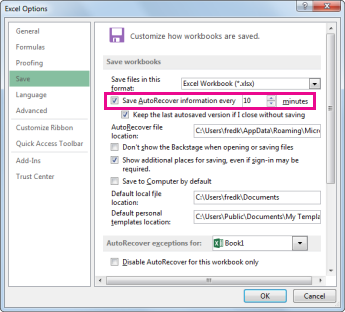
- Make sure the following settings are enabled (as shown below).
Let me quickly explain what these options mean:
- Save AutoRecover information every X minutes: This option will make sure that your files are saved every 5 minutes (or whatever time value you specify here). This is 10 minutes by default and I have changed this to 5 minutes. You can reduce this further if you want.
- Keep the last AutoRecovered version if I close without saving: This will ensure that in case your Excel/system crashes or you close a file without saving, a version is saved that can be auto-recovered.
- AutoRecover file location: This is the default location where auto-recovered files are saved. You can change this if you want.
Note: If you have a huge file with lots of formulas and charts, saving it every 5 minutes will lead to recalculation and some possible system freeze. If you don’t want that, you can choose a longer time duration (or can change calculation mode to manual).
Automatically Create a Backup Copy of the Saved Excel File
While Autosave and Autorecover options are useful when you forget to save the files and system crashes, auto-backup is something which creates a copy of the file whenever you save it.
For example, if I am working on a file with the name Test.xlsx and I save it in a folder, this would automatically create a copy with the name – ‘Backup of Test.xlk’
Now, whenever I save the Test file, all the changes are also saved in the backup copy.
This can be useful if you make some changes in a saved file and want to undo it. In that case, you can use the backup copy instead.
Or if your file crashes or gets corrupt, you will have the backup copy which will have the last saved content.
Below are the steps to enable the auto-backup feature for a workbook:
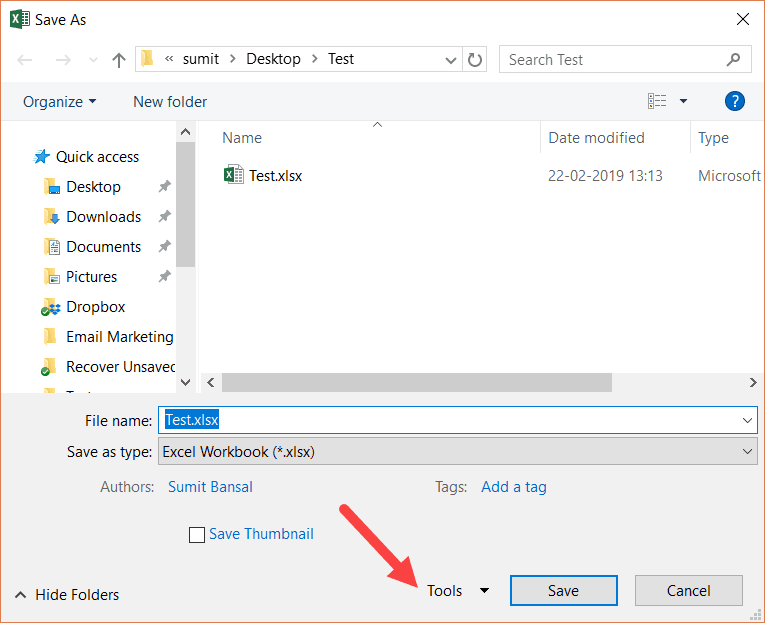
- Click the File tab.
- Click on ‘Save As’
- Click on Browse to open the ‘Save As’ dialog box.
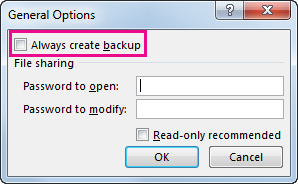
- In the Save As dialog box, click on the Tools option (it’s in the lower right part of the dialog box).

- Click on ‘General Options’.

- In the ‘General Options’ dialog box, check the ‘Always Create Backup’ option.

- Click OK.
- Save the file in the desired folder/location.


Now, whenever you save this file, an exact copy will be saved with the pre-fix ‘Backup of’.
Here are a few important things you need to know about using this auto-backup functionality in Excel:
- This is a workbook level setting. This means that if you enable it for one workbook, it will only work for that workbook. If you want it to work for others as well, you will have to manually enable it.
- This is different than Autorecover and Autosave options. These are independent settings and configuring one doesn’t impact the other. So you can have a workbook where AutoRecover, AutoSave, and AutoBackup all work.
- The backup file is saved with a .XLK extension. This is the extension for back-up files, and you may see a prompt when you open this file. Just click on Yes and it will open the backup file.
- The backup file is always one version behind your main file (except the time you save it for the first time). For example, if you create a new file and enable backup in it and do some changes and save it. This will save the new file as well as a backup copy of it. At this point, both the files (the main file and the backup) will be exactly the same. Now, if you make some changes in the main file and save it once, it will not be saved in the backup file. But if you save it again, it will be done in the backup file as well.
Auto-backup is a good feature as it gives you the file’s last saved version in case you make some unwanted changes and save the file. You can use the backup file to get the version before the last saved version.
Automatically Save a Time-Stamped Copy of the Excel Workbook
While all the methods covered so far rely on the Excel in-built features, you can also use a short VBA code to make sure you don’t lose your work ever.
With a VBA code, you save a timestamped copy of your Excel file as soon as you save it (or close it).
This ensures that you always have all the previous versions and you can go back and recover a file in case you mess up. Also, since these are time-stamped, you can easily find which version you want (or where you messed up).
Below is the code that will create a timestamped copy of the workbook as soon as you save it:
Private Sub Workbook_BeforeSave(ByVal SaveAsUI As Boolean, Cancel As Boolean)
Application.ScreenUpdating = False
Dim BackUpPath As String
BackUpPath = "C:UserssumitDesktopTest"
ThisWorkbook.SaveCopyAs BackUpPath & Format(Now, "dd-mm-yyyy hh:mm:ss") & " " & ActiveWorkbook.Name
Application.ScreenUpdating = True
End Sub
Note that you have to specify the location of the folder where you want to save the backup copies (change the path highlighted in bold in the above code).
This may mean that you end up with a lot of copies, but it can be a huge life-saver when you’re working on critical projects.
You can use a similar code to save a copy before you close the workbook (instead of saving a copy every time you save).
Private Sub Workbook_BeforeClose(Cancel As Boolean)
Dim BackUpPath As String
BackUpPath = "C:UserssumitDesktopTest"
ThisWorkbook.SaveCopyAs BackUpPath & Format(Now, "dd-mm-yyyy hh-mm-ss") & " " & ActiveWorkbook.Name
End Sub
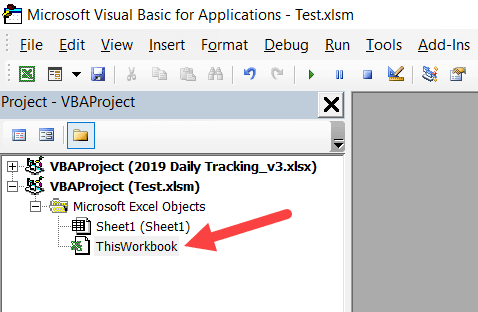
You need to put this code in the ThisWorkbook code window.
To do this, open the VB Editor (keyboard shortcut – ALT + F11) and double click on the This Workbook object in the project explorer.
Repairing Corrupt Excel Files
In case you find yourself with a corrupt Excel file, there are a few things you can do.
First and foremost, you can use the repair option that’s in-built in Excel.
Below are the steps to recover a corrupt file by repairing it:
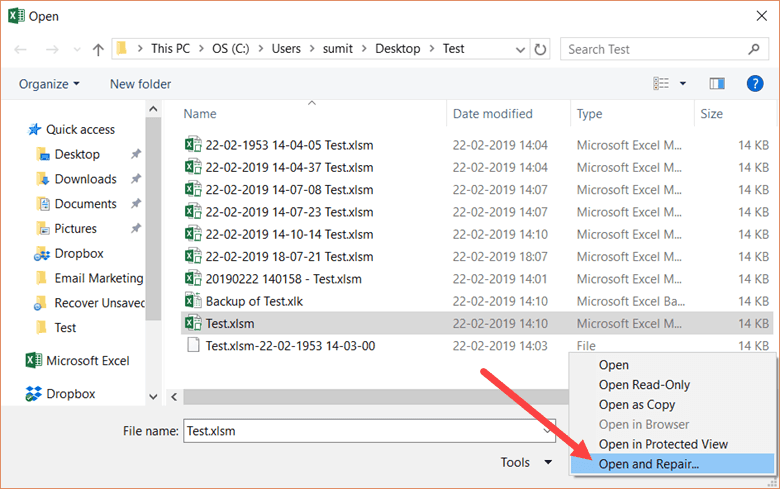
- Open the Excel application.
- Click on ‘File’ and then click on ‘Open’ (or use the keyboard shortcut Control + O).
- Click the Browse button.
- In the dialog box that opens, select the file that has been corrupted.
- Click on the small downward pointing triangle in the ‘Open’ button (as shown below).

- Click on Open and Repair.
- Excel will show you a prompt as shown below. Click on Repair.


If you’re lucky, everything would go smooth and you’ll be able to recover your data from the corrupt file.
In case repair option doesn’t work, follow the above steps till Step 5, and then instead of Repair, click on ‘Extract Data’. Excel will ask you whether you want to ‘Convert to values’ or ‘Recover Formulas’.

You can try using whatever option works for you. Excel will try and extract as much data as it can, and create a new workbook with the extracted data.
If this also doesn’t work. you may have to rely on third-party tools to recover corrupt Excel files.
You May Also Like the Following Excel Tutorials:
- Reduce Excel File Size
- How to Turn On AutoSave in Excel
- Clean Data in Excel.
- Excel Interview Questions.
- Excel Pivot Table
- Automatically Open Specific Excel Files on Startup
- How to Mark an Excel Workbook as Final?
Excel for Microsoft 365 Excel 2021 Excel 2019 Excel 2016 Excel 2013 More…Less
When Microsoft Excel detects a corrupted workbook upon opening, it automatically starts File Recovery mode and attempts to repair the workbook. If File Recovery mode doesn’t start, try using this manual process to recover your workbook:
-
Click File > Open.
-
Click the location and folder that contains the corrupted workbook.
-
In the Open dialog box, select the corrupted workbook.
-
Click the arrow next to the Open button, and then click Open and Repair.

-
To recover as much of the workbook data as possible, pick Repair.
If Repair isn’t able to recover your data, pick Extract Data to extract values and formulas from the workbook.
If neither automatic nor manual repair works, there are some recovery methods that might help salvage your data. You can also take some preventive measures to avoid losing your work by automatically saving a backup copy of your workbook or creating a recovery file from time to time.
-
Recover data from a corrupted workbook
-
Automatically save a backup copy of a workbook
-
Automatically create a recovery file at set intervals
Recover data from a corrupted workbook
Choose one of the following methods to help recover your data. If it’s not successful, try another method. You can also try third-party software solutions to try to recover workbook.
Important: If a disk error or network error prevents you from opening a workbook, move the workbook to a different hard disk drive or a local disk before trying any of the following recovery options.
Recover data when the workbook is open in Excel
-
Revert the workbook to the last saved version If a workbook becomes corrupted while you work but before you save your changes, you can revert your workbook to the last saved version:
-
Click File > Open.
-
Double-click the name of the workbook that you have open in Excel.
-
Click Yes to reopen the workbook.
The workbook opens without any changes you made that might have caused the workbook to become corrupted.
-
Recover data when you can’t open the workbook in Excel
-
Set the calculation option in Excel to manual Try changing the calculation setting from automatic to manual. Because the workbook won’t be recalculated, it may open.
-
Click File > New.
-
Under New, click Blank workbook.
-
Click File > Options.
-
In the Formulas category, under Calculation options, pick Manual, and then click OK.
-
Click File > Open.
-
Locate and then double-click the corrupted workbook to open it.
-
-
Use external references to link to the corrupted workbook To retrieve only data and not formulas or calculated values from the workbook, try using external references to link to the corrupted workbook.
-
Click File > Open.
-
Go to the folder that contains the corrupted workbook.
-
Right-click the file name of the corrupted workbook, click Copy, and then click Cancel.
-
Click File > New.
-
Under New, click Blank workbook.
-
In cell A1 of the new workbook, type =File Name!A1, where File Name is the name of the corrupted workbook that you copied in step 3, and then press Enter.
Note: You have to enter only the name of the workbook—you don’t have to type the file name extension.
-
If the Update Values dialog box appears, select the corrupted workbook, and then click OK.
-
If the Select Sheet dialog box appears, select the appropriate sheet, and then click OK.
-
Select cell A1.
-
Click Home > Copy, or press Ctrl+C.
-
Select an area, starting in cell A1 that is approximately the same size as the range of cells that contain data in the corrupted workbook.
-
Click Home > Paste, or press Ctrl+V.
-
With the range of cells still selected, click Home > Copy again, or press Ctrl+C.
-
Click Home > the arrow below Paste, and then under Paste Values, click Values.
Pasting values removes the links to the corrupted workbook and leaves only the data.
-
-
Use a macro to extract data from a corrupted workbook If a chart is linked to the corrupted workbook, try using a macro to extract the source data of the chart.
-
Copy the following macro code and paste it in a module sheet:
Sub GetChartValues()
Dim NumberOfRows As Integer
Dim X As Object
Counter = 2
‘ Calculate the number of rows of data.
NumberOfRows = UBound(ActiveChart.SeriesCollection(1).Values)
Worksheets(«ChartData»).Cells(1, 1) = «X Values»
‘ Write x-axis values to worksheet.
With Worksheets(«ChartData»)
.Range(.Cells(2, 1), _
.Cells(NumberOfRows + 1, 1)) = _
Application.Transpose(ActiveChart.SeriesCollection(1).XValues)
End With
‘ Loop through all series in the chart and write their values to
‘ the worksheet.
For Each X In ActiveChart.SeriesCollection
Worksheets(«ChartData»).Cells(1, Counter) = X.Name
With Worksheets(«ChartData»)
.Range(.Cells(2, Counter), _
.Cells(NumberOfRows + 1, Counter)) = _
Application.Transpose(X.Values)
End With
Counter = Counter + 1
Next
End Sub
-
Insert or delete a worksheet into your workbook right-click its sheet tab, and then rename it ChartData.
-
Select the chart from which you want to extract the underlying data values.
Note: The chart can be embedded on a worksheet or on a separate chart sheet.
-
Run the macro.
-
The data from the chart is put on the ChartData worksheet.
-
Top of Page
Automatically save a backup copy of a workbook
With a backup copy of your workbook, you’ll always have access to your data if your workbook is deleted accidentally or if it becomes corrupted.
-
Click File > Save As.
-
Click Computer, and then click the Browse button.
-
In the Save As dialog box, click the arrow next to Tools, and then click General Options.
-
In the General Options dialog box, check the Always create backup box.


Top of Page
Automatically create a recovery file at set intervals
A recovery file of your workbook also helps ensure you’ll have access to your data if your workbook is deleted accidentally or if it becomes corrupted.
-
Click File > Options.
-
In the Save category, under Save workbooks, check the Save AutoRecover information every box, and then enter a number of minutes. (The default is 10.)
-
In the AutoRecover file location box, enter the location where you want to save the recovery file.
-
Make sure that the Disable AutoRecover for this workbook only box is unchecked.
Top of Page
Need more help?
Want more options?
Explore subscription benefits, browse training courses, learn how to secure your device, and more.
Communities help you ask and answer questions, give feedback, and hear from experts with rich knowledge.
Обновлено 17.07.2019
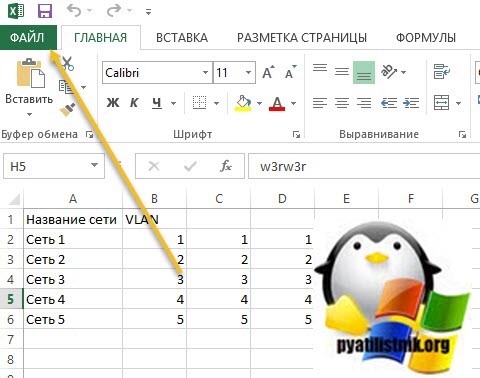
![]() Добрый день! Уважаемые читатели и гости одного из крупнейших IT блогов рунета Pyatilistnik.org. В прошлый раз мы с вами разбирали назначение технологии VLAN, смотрели, как ее применить в вашей локальной сети. Сегодня мы разберем весьма отрешенную от административных задач тему, но не менее жизненную, речь пойдет про создание точки восстановления файлов Excel, и последующее восстановление файла после сохранения.
Добрый день! Уважаемые читатели и гости одного из крупнейших IT блогов рунета Pyatilistnik.org. В прошлый раз мы с вами разбирали назначение технологии VLAN, смотрели, как ее применить в вашей локальной сети. Сегодня мы разберем весьма отрешенную от административных задач тему, но не менее жизненную, речь пойдет про создание точки восстановления файлов Excel, и последующее восстановление файла после сохранения.
Описание задачи
Вот согласитесь, что очень часто офисные работники обращаются к вам по вопросам восстановления файлов на нужное время. Логично, что у вас должна быть система резервного копирования, но и она не может делать бэкапы каждые 10 минут, особенно если большие объемы. Пользователь может делать сотни правок в файле, и в какой-то момент осознать, что ему нужно откатиться. Штатными средствами вы не всегда это можете сделать, и из бэкапа не всегда восстановить, если файл еще не успел туда попасть.
Методы восстановления excel файла после сохранения
Существует ряд возможностей, которые смогут вам помочь вернуть потерянную информацию в вашем файле Excel:
- Восстановление из снапшота
- Восстановление из предыдущей версии
- Возвращаем файл средствами самого Excel
- Использование истории файлов
- Восстановление в облаке
Использование снапшотов в Excel
Те кто из вас сталкивался в своей практике с виртуальной машиной, то наверняка знает, что там есть технология моментальных снимков (снапшотов), я про это рассказывал, но в двух словах это быстрое сохранение состояния работы с удобным откатом при необходимости, очень часто используется в тестовых средах. Как оказалось в MS Excel, так же можно реализовать данный функционал, чем я постоянно пользуюсь. Для включения снимков для файлов Excel. вам необходимо установить бесплатный компонент Kutools for Excel Setup.
Скачать Kutools for Excel Setup с моего сайта или с официального https://www.extendoffice.com/download/kutools-for-excel.html
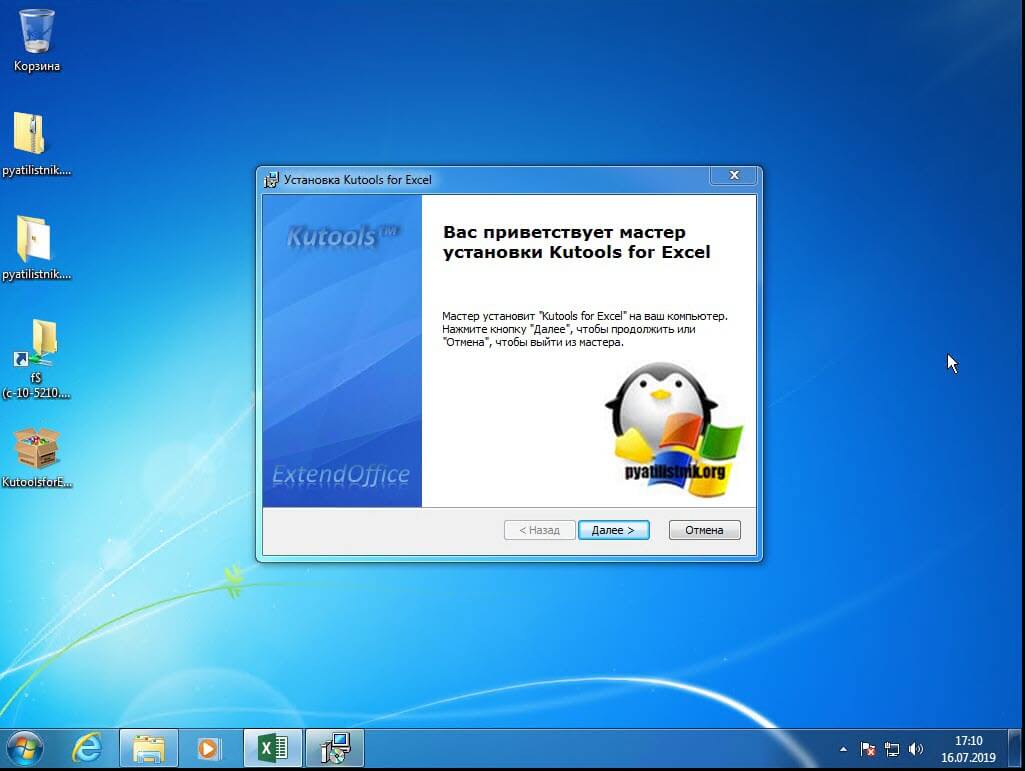
Установка Kutools for Excel
Хотя установка Kutools for Excel очень простая и тривиальная, я покажу ее для целостности статьи. Запускаем установочный файл. На первом экране мастера инсталляции нажимаем «Далее».
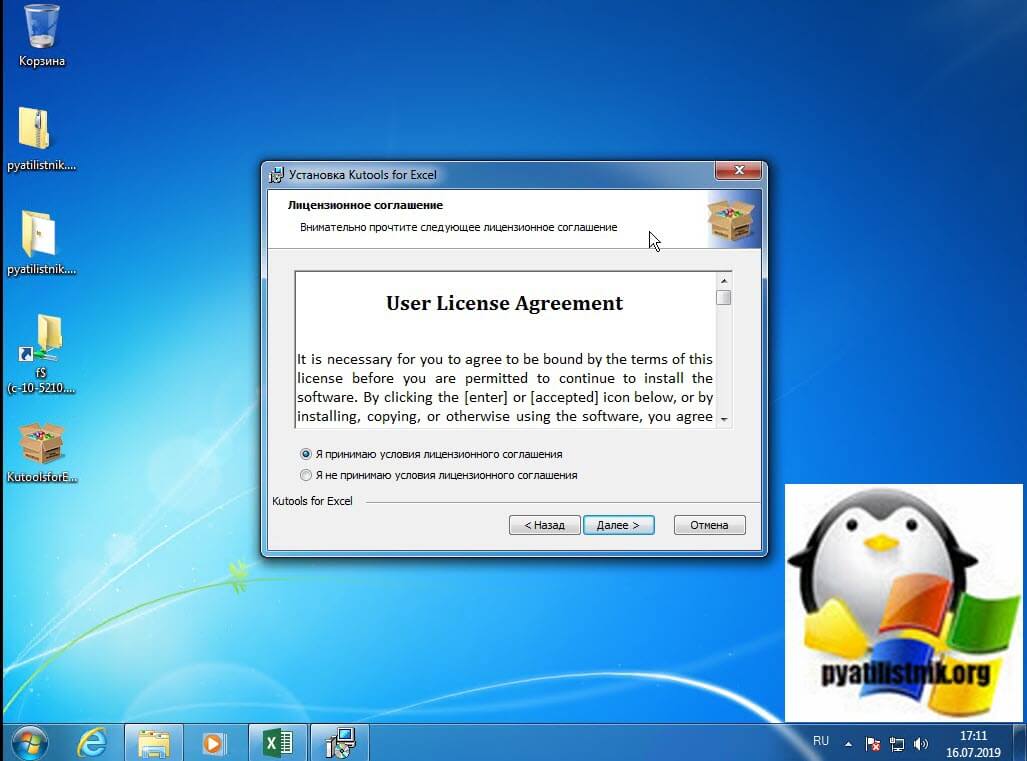
Принимаем лицензионное соглашение.
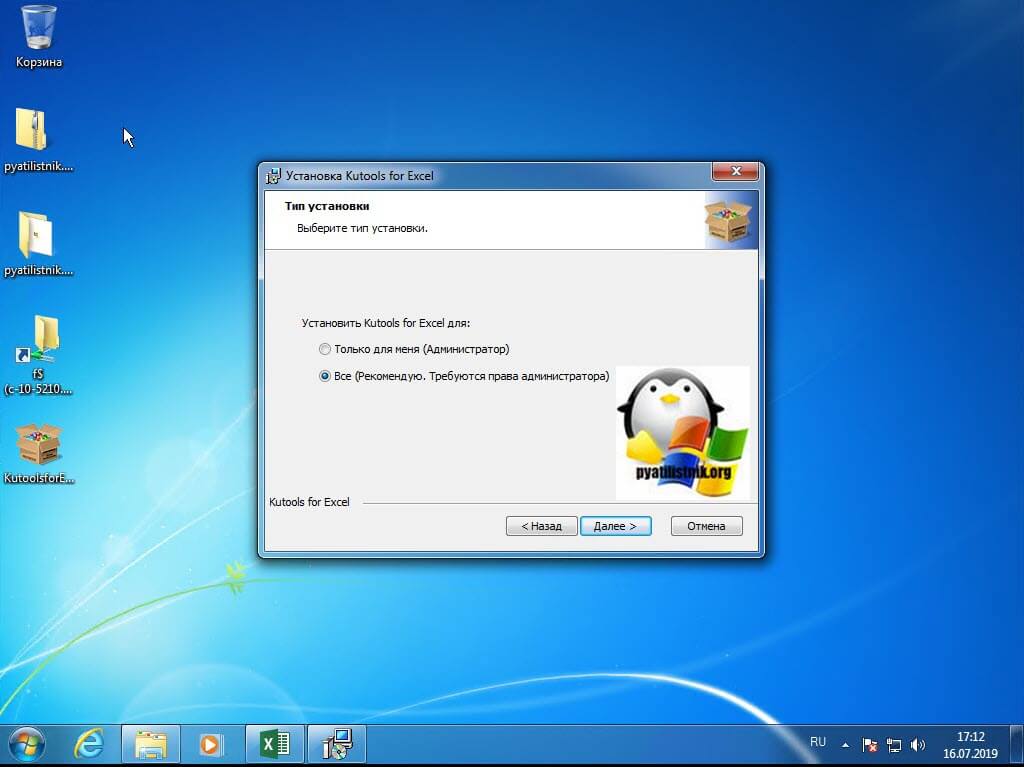
Указываем, для всех будет доступна утилита или нет.
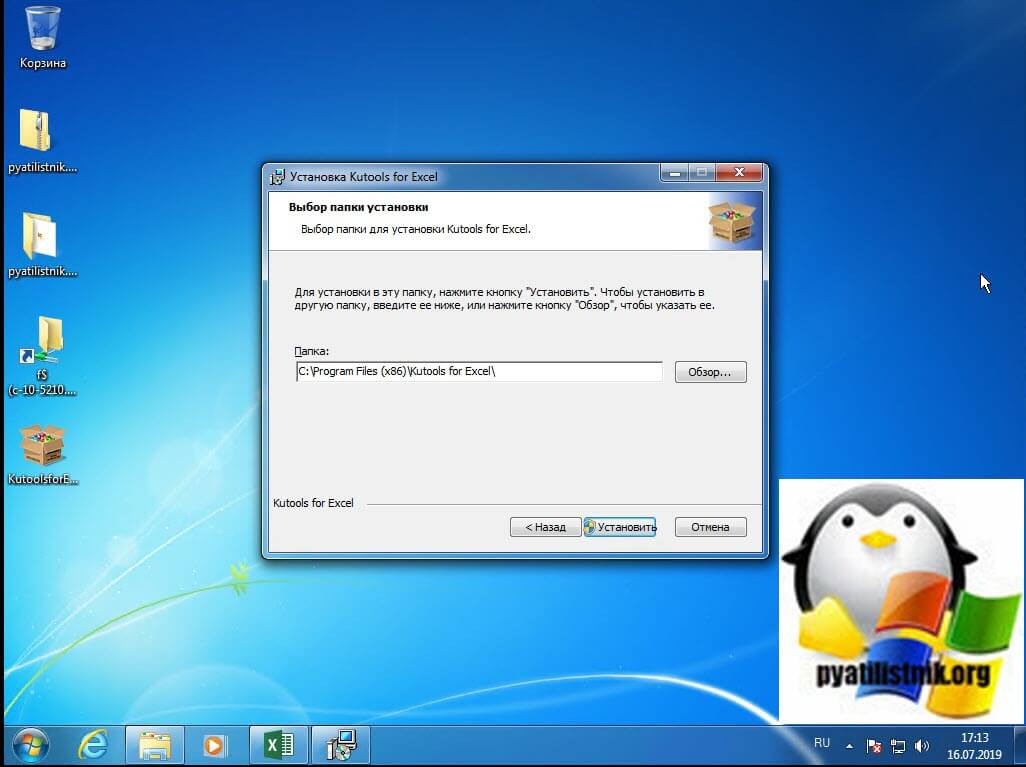
Задаем каталог установки и нажимаем заветную кнопку.
После завершения инсталляции, выставите галку «Запустить Kutools for Excel».
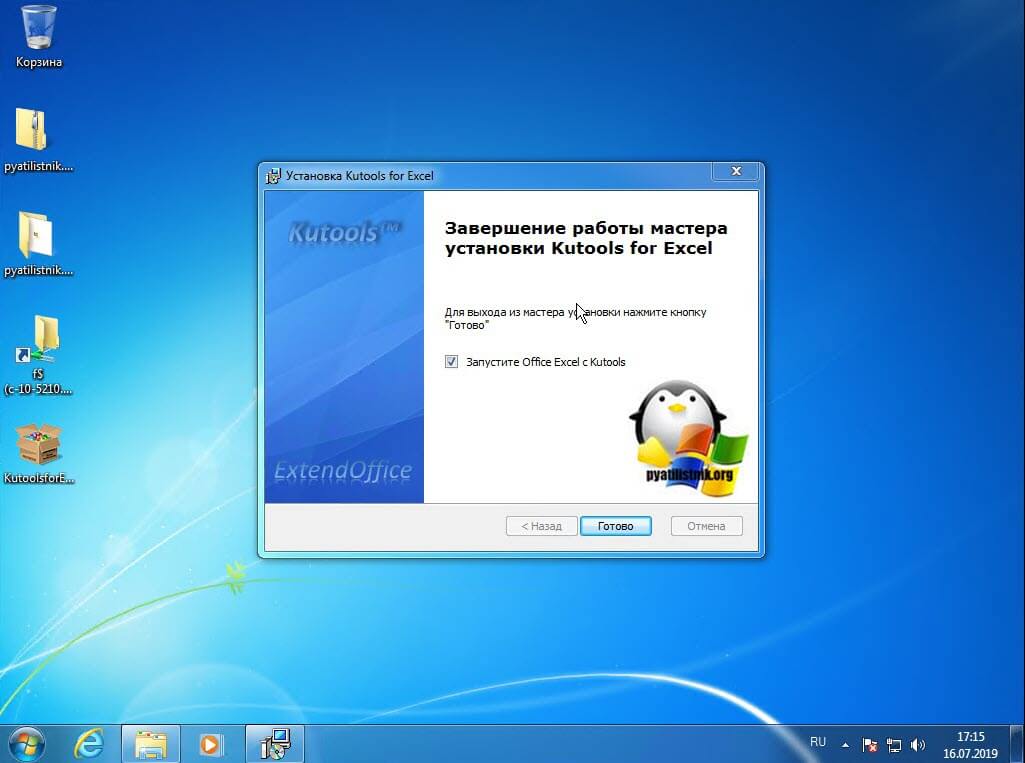
В результате чего у вас будет запущен Excel, слева вы увидите рабочую область Kutools for Excel и две дополнительные вкладки.
Как создать снапшот в Excel
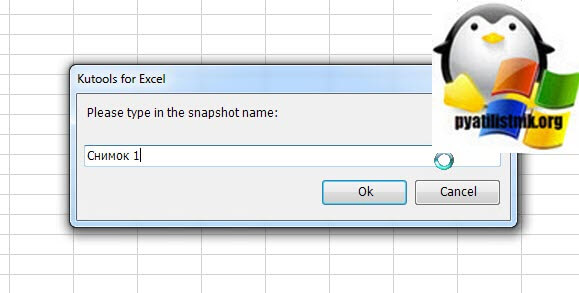
Теперь, для того чтобы создать моментальный снимок документа, 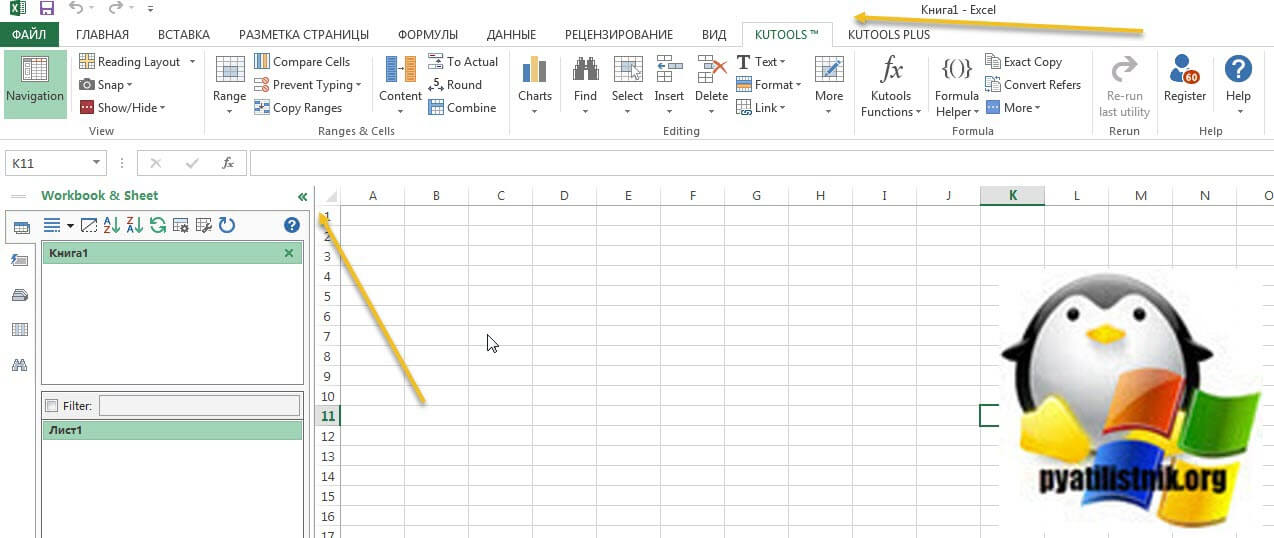
вам нужно открыть вкладку «KUTOOLS» и выбрать пункт «Snap — Track Snap».
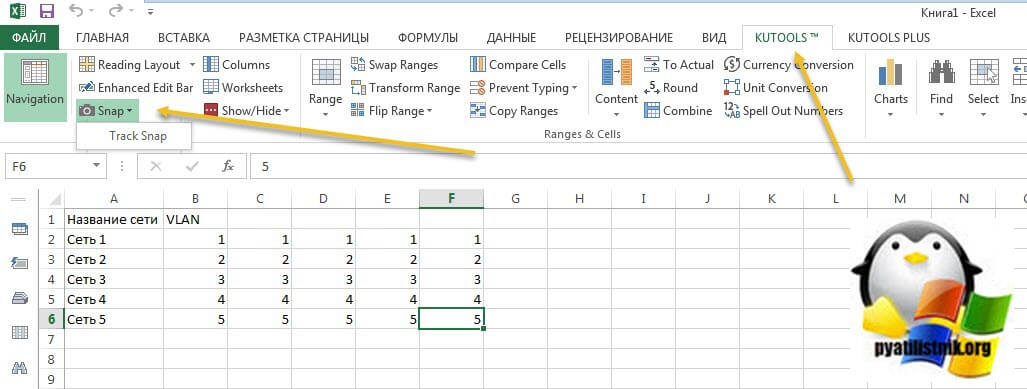
Задаем имя снимка, лучше задавать понятное для вас имя, чтобы потом легко можно было выбрать время на которое нужно восстановить файл Excel.
Теперь, чтобы произвести восстановление файла после сохранения, вы опять открываете «Snap», где видите все ваши снапшоты. Выбираем нужный.
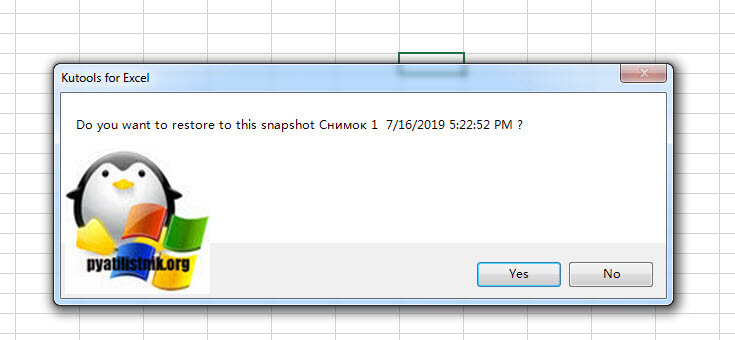
Вас уведомят, что будет восстановлена версия на такое состояние, вы увидите дату. Если все устраивает, то соглашаемся, через 10 секунд у вас будет возвращена нужная вам версия. Согласитесь, что это очень удобный метод по откату вашего документа в нужное состояние.
Второй метод восстановить перезаписанный файл excel
Если вы ранее не делали снапшотов вашего файла, да и в принципе не знали, о такой возможности, то можете попробовать восстановить excel файл средствами операционной системы в Windows. В Windows данная функция называется «Предыдущие версии» в десятке есть еще «История файлов«.
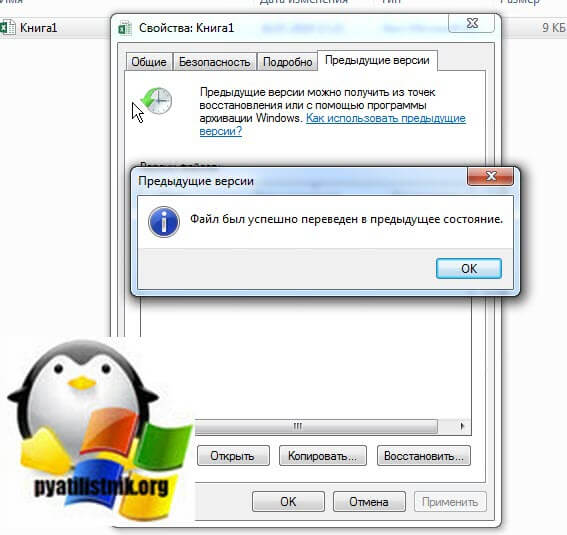
Для того, чтобы ей воспользоваться, откройте свойства нужного вам файла и перейдите на вкладку «Предыдущие версии» или же из контекстного меню файла выбрать пункт «Восстановить прежнюю версию».

В списке версий файлов вам необходимо найти нужный вам и нажать восстановить.
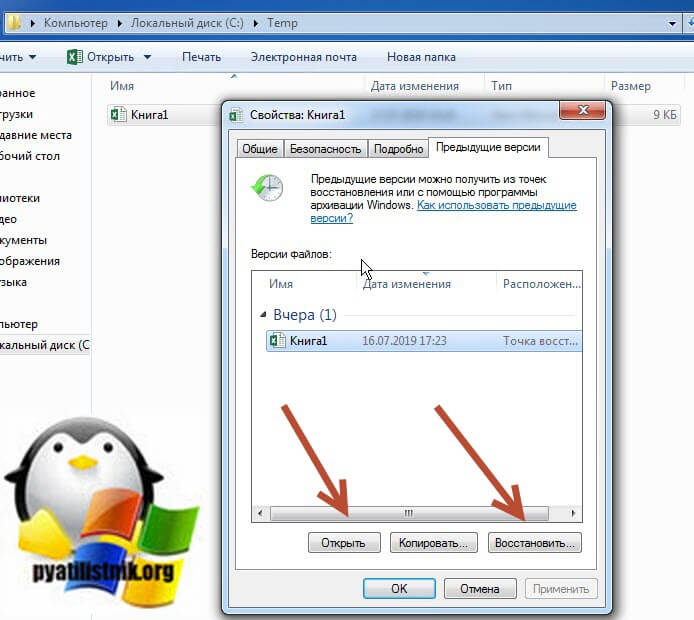
Обратите внимание, что у вас есть возможность перед восстановлением открыть файл в другом окне и оценить его содержимое
Вас попросят подтвердить восстановление вашего Excel файла.
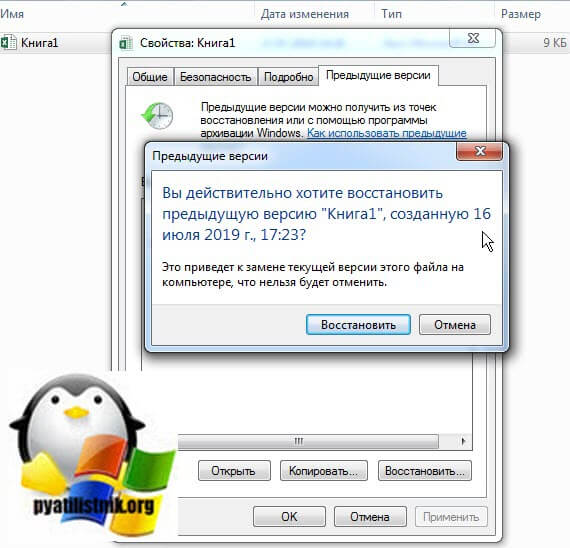
В итоге файл восстановился на прежнее состояние, проверяем его содержимое.
Если у вас в списке версий отсутствуют точки отката, то это говорит о двух моментах: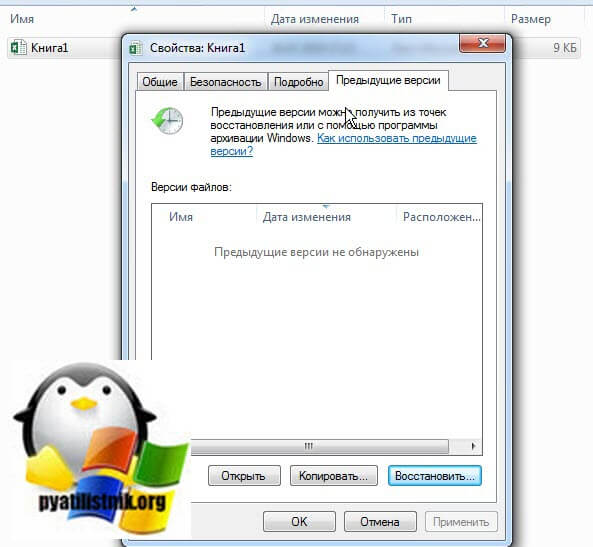
- У вас просто их нет и вы используете самую последнюю версию
- У вас не включены точки восстановления системы Windows, если их нет, то и нет возможности восстановить файлы Excel таким методом.
- В Windows 10 не включена функция «История файлов«, если вы используете ее

Восстановление файлов Excel при аппаратном сбое оборудования
Ни одно оборудование не застраховано от того, что оно не сбоит, вы можете как-то минимизировать данный процесс, но не более. К примеру у вас мог случиться синий экран смерти dpc watchdog violation, что привело к нештатному завершению всех приложений, среди которых были документы Excel. Начиная с версии 2010, они автоматически сохраняются каждые 10 минут, что дает возможность пользователю ощущать какую-то защиту. В таких ситуациях, когда было некорректное закрытие документа, вам при следующем его открытии покажут, что есть автосохраненные точки, вам покажут время их создания. За это отвечает левый блок «Восстановление документа». Указываем нужную версию.
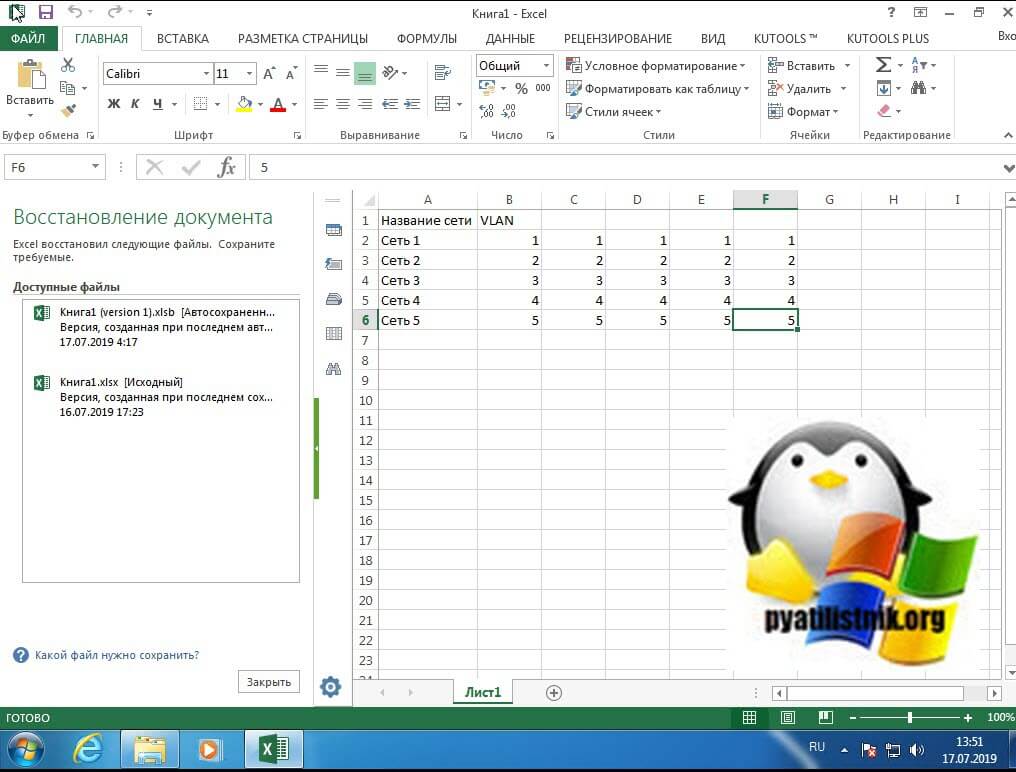
В мгновение ока у вас откроется второй документ, где вы можете сравнить его содержимое и при желании его пересохранить в нужное место.
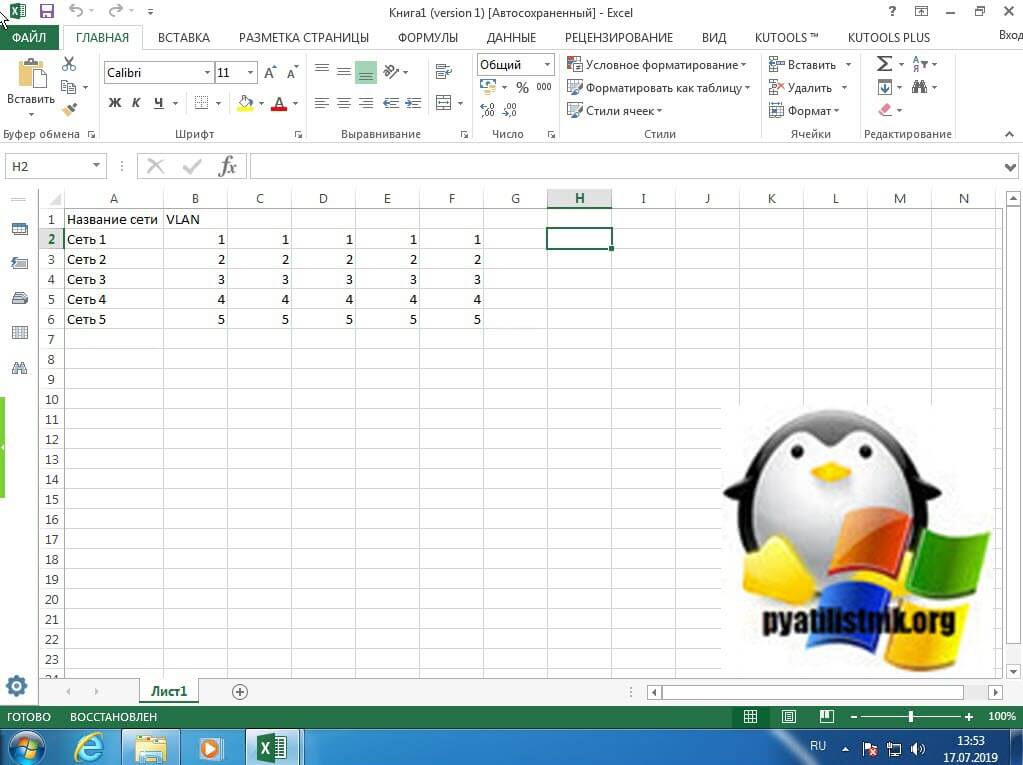
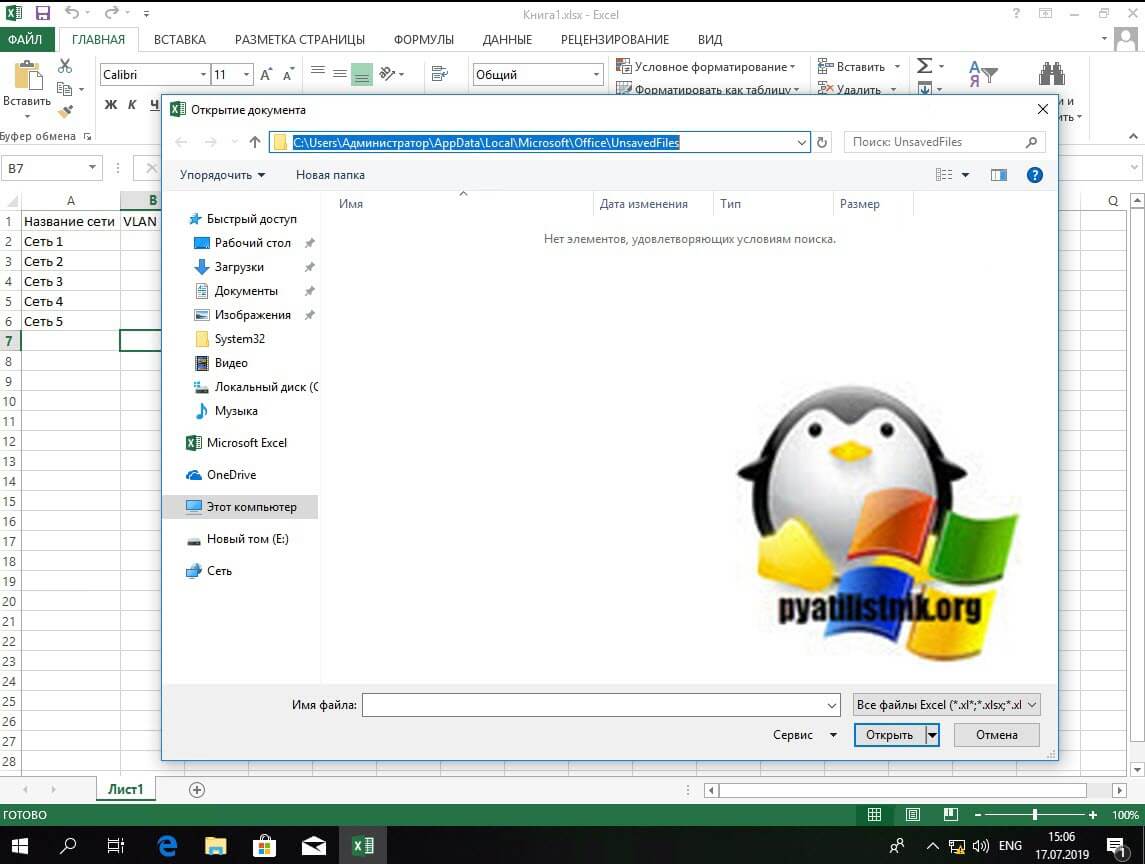
Метод восстановления несохраненной книги Excel
При некорректном закрытии файла Excel, он может у вас не быть сохранен. В таких случаях можно попытаться восстановить его, для этого перейдите в меню «Файл».
Перейдите в раздел «Открыть — Последние книги», в самом низу будет кнопка «Восстановить несохраненные книги».
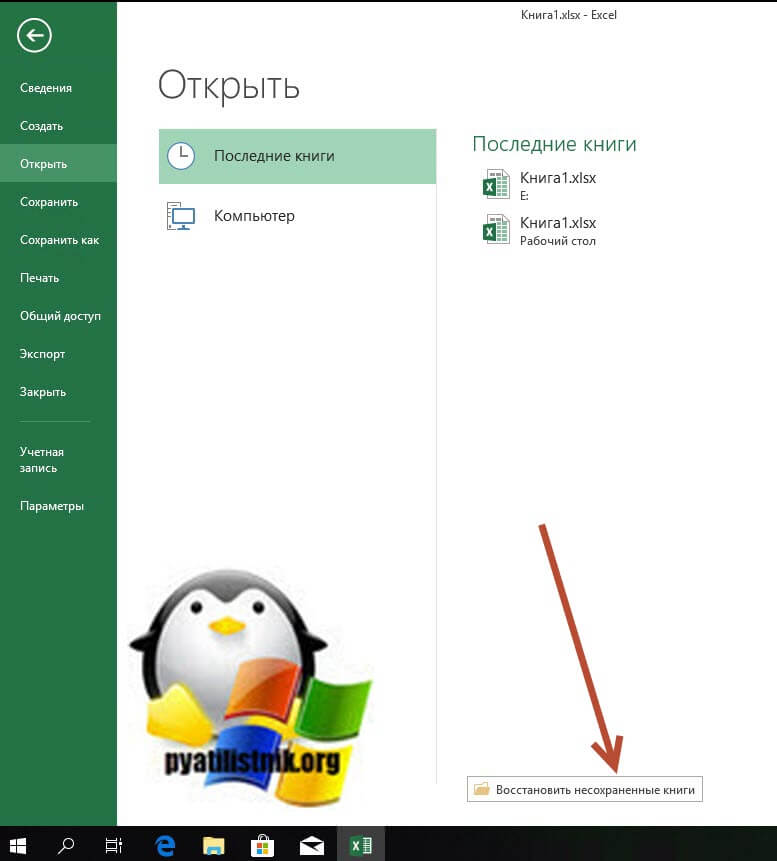
В итоге у вас откроется путь C:UsersАдминистраторAppDataLocalMicrosoftOfficeUnsavedFiles. В данной папке могут находится снимки файла.
Восстановление в облаке
Одним из больших плюсов использования облачных сервисов, таких как OneDrive, Google Drive является доступность документов везде и возможность быстрого восстановления предыдущих сохранений. Вот вам пример отката в Google Excel. Открываем нужный вам документ, после меню справка вам покажут последнее время изменения, кликаем по нему.

Находим в списке версий нужную нам дату, открываем ее.
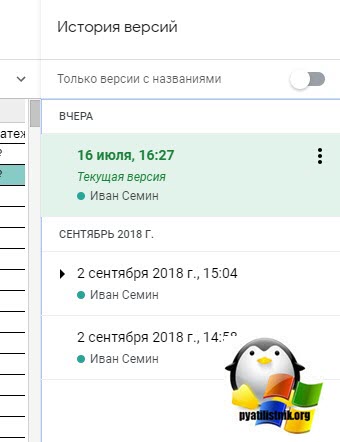
Если она нас устраивает, то восстанавливаем наш файл. Еще раз большой плюс в онлайн сервисах.

На этом у меня все. мы разобрали варианты, как восстановить перезаписанный файл excel. С вами был Иван Семин, автор и создатель IT блога Pyatilistnik.org.
![]()
Download Article
Easy ways to recover a corrupt Excel file
![]()
Download Article
This wikiHow teaches you how to recover and repair a corrupted Microsoft Excel file on your Windows or Mac computer.
-
1
Make sure that you’re using a Windows computer. You can only repair an Excel file in the Windows version of Excel.
- If you’re using a Mac, try one of the other methods in this article.
-
2
Open Excel. Its app icon resembles a green box with a white «X» on it.
Advertisement
-
3
Click Open Other Workbooks. This option is next to a folder-shaped icon in the lower-left corner of the window.
-
4
Click Browse. It’s a folder-shaped icon in the middle of the page. Doing so opens a File Explorer window.
-
5
Select your Excel file. Go to the folder in which your corrupted Excel file is stored, then click the Excel file to select it.[1]
-
6
Click the «Menu» icon
. It’s the downward-facing arrow to the right of the Open button. A drop-down menu will appear.[2]
-
7
Click Open and Repair…. This option is at the bottom of the drop-down menu.
- If Open and Repair… is greyed out, make sure that your Excel file is selected and try again. If it’s still greyed out, you can’t repair this file.
-
8
Click Repair when prompted. It’s in a pop-up window. Windows will begin attempting to repair your file.[3]
- If you don’t have this option, click Extract Data instead, then click either Convert to Values or Recover Formulas. This will recover any salvageable data.
-
9
Wait for the file to open. This may take a few minutes if your Excel file is large.
- If the file still won’t open, go back through this process and click Extract Data instead of Repair when prompted.
-
10
Save your file. Once the repaired file opens, press Ctrl+S, double-click This PC, select a save location, enter a file name, and click Save.
- Be sure to select a different file name than the one which you used for the corrupted Excel file.


Advertisement
-
1
Understand why the file type matters. Sometimes, Excel documents created on older computers or versions of Excel become unstable on newer versions; similarly, Excel documents can be saved in many different file formats. By changing the Excel file format to «xlsx» (or «xls» for older programs), you can fix this problem.
-
2
Open Start
. Click the Windows logo in the bottom-left corner of the screen.
-
3
Open File Explorer
. Click the folder-shaped icon in the lower-left side of the Start window.
-
4
Click the View tab. It’s at the top of the File Explorer window. A toolbar will appear below this tab.
-
5
Check the «File name extensions» box. This option is in the «Show/hide» section of the toolbar. Doing so will allow you to see the file type extensions at the end of files, including your Excel document.
-
6
Select your Excel file. Go to the location of the Excel document that you want to recover, then click the document to select it.
-
7
Click Home. It’s a tab in the upper-left side of the File Explorer window. This will prompt a toolbar to appear.
-
8
Click Rename. This option is in the «Organize» section of the toolbar. Clicking Rename will cause the Excel file’s name to become highlighted.
-
9
Change the file type. Replace whatever comes after the period at the end of the file name with xlsx and then press ↵ Enter.
- For example, if the document was named «Spreadsheet1.docx», you would change it to «Spreadsheet1.xlsx».
- If the file extension already is «xlsx», try using «xls» or «html».
-
10
Click Yes when prompted. This will confirm your changes and change the file extension.
-
11
Try opening the file. Double-click the file to open it. If the file opens in Excel (or, if you selected «html» as the extension, a web browser), your file has successfully been recovered.
- If you chose the «html» extension, you can convert the webpage into an Excel document by dragging the html file onto the Excel icon and then saving the file that opens as a new «xlsx» file.
- If the file still won’t open, proceed to the next Windows method.


Advertisement
-
1
Understand why the file type matters. Sometimes, Excel documents created on older computers or versions of Excel become unstable on newer versions; similarly, Excel documents can be saved in many different file formats. By changing the Excel file format to «xlsx» (or «xls» for older programs), you can fix this problem.
-
2
Open Finder. Click the blue, face-shaped app icon in your Mac’s Dock.
-
3
Select the Excel file. Go to the folder in which your Excel file is located, then click the Excel file that you want to recover.
-
4
Click File. This menu item is in the top-left corner of your Mac’s screen. Clicking it prompts a drop-down menu.
-
5
Click Get Info. It’s in the File drop-down menu. This will open a pop-up window.
-
6
Expand the «Name & Extension» section if necessary. If you don’t see any file name or extension below this category, click the triangle to the left of the «Name & Extension» heading to view the file’s name and extension.
-
7
Change the file type. Replace whatever comes after the period at the end of the file name with xlsx and then press ⏎ Return.
- For example, if the document was named «Spreadsheet1.txt», you would change it to «Spreadsheet1.xlsx».
- If the file extension already is «xlsx», try using «xls» or «html».
-
8
Click Use .xlsx when prompted. This will confirm your decision and change the file type.
-
9
Try opening the file. Double-click the file to open it. If the file opens in Excel (or, if you selected «html» as the extension, a web browser), your file has successfully been recovered.
- If you chose the «html» extension, you can convert the webpage into an Excel document by dragging the html file onto the Excel icon and then saving the file that opens as a new «xlsx» file.
- If the file still won’t open, proceed to the next Mac method.


Advertisement
-
1
Understand the limitations of this method. Like most Microsoft Office products, Excel will automatically save recovery versions of files, meaning that you may be able to restore a partial version of your corrupted Excel document. However, Excel doesn’t always save these files in time, and you most likely won’t be able to recover the whole document in this way.
-
2
Open Start
. Click the Windows logo in the bottom-left corner of the screen.
-
3
Type in this pc. This will search your computer for the «This PC» program.
-
4
Click This PC. It’s the computer monitor-shaped icon at the top of the Start window. Doing so opens the This PC window.
-
5
Double-click your computer’s hard drive. This is usually the «OS (C:)» option below the «Devices and drives» heading in the middle of the page.
-
6
Double-click the «Users» folder. You’ll find this in the middle of the hard drive’s folder.[4]
-
7
Double-click your user folder. This folder is labeled with part or all of your username on your computer.
-
8
Double-click the «AppData» folder. It’s in the «A» section, so you’ll most likely find this folder near the top of the window.[5]
- If you can’t find this folder, click the View tab, then check the «Hidden items» box in the «Show/hide» section to prompt the «AppData» folder to appear.
-
9
Double-click the «Local» folder. This option is near the top of the folder.
-
10
Scroll down and double-click the «Microsoft» folder. You’ll find it in the «M» section.
-
11
Double-click the «Office» folder. It’s in the «O» section of the Microsoft folder.
-
12
Double-click the «UnsavedFiles» folder. This folder should be near the top of the window.[6]
-
13
Select an Excel file. Look for an Excel file icon that has a name matching your corrupted Excel file, then click it to select it.
- If you don’t see any files here, a recovery version of your Excel document was not saved.
-
14
Change the Excel file’s extension. To do so:[7]
- Click View
- Check the «File name extensions» box.
- Click Home
- Click Rename
- Replace the .tmp section with .xlsx
- Press ↵ Enter.
- Click Yes when prompted.
-
15
Open the Excel file. Double-click the file that you just renamed to open it.
-
16
Save your file. Once the restored file opens, press Ctrl+S, double-click This PC, select a save location, enter a file name, and click Save.
- Be sure to select a different file name than the one which you used for the corrupted Excel file.


Advertisement
-
1
Understand the limitations of this method. Like most Microsoft Office products, Excel will automatically save recovery versions of files, meaning that you may be able to restore a partial version of your corrupted Excel document. However, Excel doesn’t always save these files in time, and you most likely won’t be able to recover the whole document in this way.
-
2
Click Go. This menu item is at the top of the screen. Clicking it prompts a drop-down menu.
- If you don’t see the Go menu item, first open Finder or click the desktop to make it appear.
-
3
Hold down the ⌥ Option key. After doing this, you should see the Library folder appear in the Go drop-down menu.
-
4
Click Library. It’s in the Go drop-down menu. This will open the Library hidden folder.
-
5
Open the «Containers» folder. Double-click the «Containers» folder, which is in the «C» section of the Library folder.[8]
-
6
Click the search bar. It’s in the upper-right side of the window.
-
7
Search for the Microsoft Excel folder. Type in com.microsoft.Excel and press ⏎ Return.
-
8
Click the Containers tab. You’ll find this to the right of the «Search:» heading near the top of the Finder window.
-
9
Open the «com.microsoft.Excel» folder. Double-click this folder to open it.
-
10
Open the «Data» folder.
-
11
Open the «Library» folder.
-
12
Open the «Preferences» folder. If you don’t see this folder, scroll down to find it.
-
13
Open the «AutoRecovery» folder. This will bring up a list of automatically saved versions of your Excel files.[9]
-
14
Find a temporary version of your Excel file. The temporary version of your Excel file should have some or all of the file’s name in its title.
- If you can’t find the temporary version of your Excel file, it wasn’t backed up.
-
15
Select the Excel file. Click the Excel file to do so.
-
16
Click File. It’s a menu item in the upper-left corner of your Mac’s screen. A drop-down menu will appear.
-
17
Select Open With. This option is near the top of the File drop-down menu. You should see a pop-out menu open.
-
18
Click Excel. It’s in the pop-out menu. Doing so will prompt the temporary version of the Excel document to open in Excel.
- The temporary version will probably not include some of your most recent changes to the original Excel document.
-
19
Save the document. Press ⌘ Command+S, then enter a file name, select a save location in the «Where» menu, and click Save.


Advertisement
Add New Question
-
Question
I cannot open the file with my Excel file, but I can open it in another computer. Why?

It’s likely that the other computer has either an older or newer version of Excel, and your document is not compatible with the version you have on your computer.
-
Question
What do I do if my Excel files are save with the extension xls?
Nakamura Rei
Community Answer
You can repair .xls files using methods from this article as well as xlsx.
-
Question
How do I recover a deleted excel file in Windows 7?
yYou can use the same method. However, to change the file extension you will need to use CMD and run a command like this (make sure you are in the right directory): rename (corrupted excel file, add its file extension at the end) (corrupted excel filename, do NOT add the file extension at the end).(xls, xlsx).
Ask a Question
200 characters left
Include your email address to get a message when this question is answered.
Submit
Advertisement
Video
-
Windows computers will often attempt to repair automatically the corrupted Excel workbook when you open it.[10]
-
You may be able to open an otherwise corrupted Excel file by placing your computer in safe mode. If so, a file error or a virus is most likely the reason for your document failing to open.
-
There are a few paid data recovery software options that you can use to recover corrupted Excel files. Stellar Phoenix Excel Repair, which is available for both Windows and Mac computers, is a good example of such a program.
Thanks for submitting a tip for review!
Advertisement
-
Unfortunately, some Excel files may be entirely unrecoverable.
Advertisement
About This Article
Article SummaryX
1. Open Excel.
2. Select Open Other Workbooks.
3. Select the corrupted file.
4. Click the down-arrow menu next to «Open.»
5. Select Open and Repair.
6. Click Repair.
7. Click Close when complete.
Did this summary help you?
Thanks to all authors for creating a page that has been read 1,357,471 times.
Is this article up to date?
Quick navigation for solutions to recover previous version of Excel whether the Excel file is saved or not:
| Workable Solutions | Step-by-step Troubleshooting |
|---|---|
| Fix 1. Restore from Previous Version | To recover saved over Excel file, right-click on the saved Excel > «Properties» > «Previous Versions»…Full steps |
| Fix 2. Recover previous saved Excel | To recover overwritten Excel file, open Excel > «File» > «Info» > «Manage Documents» > «When I closed»…Full steps |
| Fix 3. Recover from AutoRecover | Recover unsaved Excel file, open Excel > «File» > «Info» > «Manage Workbook» > «Recover Unsaved…»…Full steps |
| Fix 4. Recover from .TMP File | Restore Excel previous version, Find Excel temp file with .TMP extension > Copy and change extension…Full steps |
Q: How to recover a previous version of an Excel spreadsheet after saving it?
«Is it possible to recover a saved-over Excel to a previous version? I got a very important two-sheet Excel file, but it was saved by mistake, and there was only one spreadsheet left with much useful data loss. I don’t know how it happened without me knowing it. I need the lost data back. So, I’m hoping someone will be able to help and tell me if I can recover a previous version of this spreadsheet before the deletion occurred? If so, how do I do this?»
Recovering an Excel file that was saved over is a long-standing hot issue for many users. How you can restore earlier Excel depends on whether you’ve saved it or not. If the Excel file is still open, you can directly use Ctrl + Z or the Undo option to revert the Excel file to an earlier state.
However, if the edited Excel is saved and closed, recovery is not so easy. In the following content, we will discuss how to recover previous version of Excel file 2016, 2013, 2010, and 2007 in two cases. One is restoring older Excel version if you’ve saved the file, the other is recovering the previous version of Excel if you haven’t saved it. Besides, in the end, we highly recommend you try EaseUS Data Recovery Wizard to recover lost saved Excel file without effort.
How to Recover Previous Version of Excel File After Saving
Two ways are available to help you restore previous version of Excel file by using Windows backup feature and Excel’s Manage Wordbook feature.
1. Recover Earlier Version of Excel File from Previous Versions
Windows can automatically save old versions of your data files when you have enabled the File History and system backup and restore.
Step 1. Open File Explorer and locate the Excel/Word file.
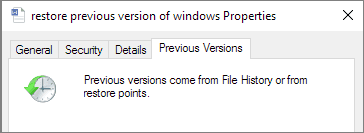
Step 2. Right-click on the Excel file and select «Properties».
Step 3. Click the «Previous Versions» tab and select the version you would like to get back and then hit «Restore’.
2. Restore Excel File to Previous Version with Excel’s Built-in Tool
Step 1. Open the file you are working on;
Step 2. Go to «File» and click «Info». Under «Manage Documents», click the file labeled «When I closed without saving».
Step 3. Click «Restore» in the bar at the top of the file to overwrite any previously saved versions.

How to Restore Previous Version of Excel File Not Saved
If you haven’t saved the file, try below two approaches to get an Excel file earlier version back.
1. Recover Unsaved Excel File from AutoRecover
If the AutoRecover option is turned on, Windows can automatically save versions of your file while you’re working on it. You can recover previous version of Excel that is not saved by following steps below.
Step 1. Click «File» > «Info» > «Manage Workbook» > «Recover Unsaved Workbooks» .
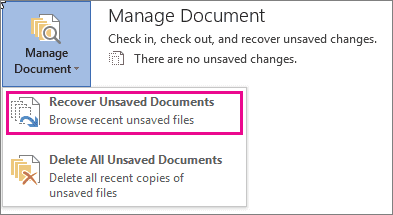
Step 2. Select the file and click «Open».
Step 3. In the bar at the top of the file, click «Save As» to save the file.

2. Recover Old Version of Excel File from .TMP file
Microsoft Office has this feature that it would automatically save temp files for the file that you are editing. So you can try to find the .TMP file to get an earlier version of Excel or Word file back:
Step 1. Follow the temp file folder location on your PC and find the Excel/Word temp files with .TMP extension.
- For Windows 7 users: C:UsersUserNameAppDataRoamingMicrosoftExcel
- For Windows 8/10 users: C:UsersUserNameAppDataLocalMicrosoftOfficeUnsavedFiles
Step 2. Locate and find the temporary excel or word files begin with «$» or «~» and end with “.TMP”, select the right version of Excel/Word temp file by date, then copy and save to another safe spot by changing the extension from .TMP to .XLS/.XLSX or .DOC/.DOCX.
Conclusion: If your Excel file got overwritten accidentally with data loss, you could use the four methods in total to recover previous version of the Excel file. In addition to Excel getting saved over, users also have trouble with Excel loss caused by mistaken deletion, storage device formatting, OS crash, virus attack, recycle bin emptying, and so on. Under these circumstances, the above approaches are not useful any longer. Then, how to recover deleted Excel documents? Calm down and use the EaseUS Data Recovery Wizard demonstrated below to get back lost Excel easily.
How to Retrieve Deleted/Lost Excel File with Data Recovery Software
If you’ve already deleted the earlier version of Excel file, or if the saved Excel gets lost due to careless deletion, hard drive formatting, and other reasons, you can use EaseUS Data Recovery Wizard to help you restore the deleted Excel from your PC or other storage devices within three steps.
EaseUS Data Recovery Wizard
- Recover lost or deleted photos, documents, videos, audio files, emails, and other 1000+ file types effectively
- Recover files from emptied Recycle Bin, HDD, SSD, memory card, USB flash drive, digital camera, and camcorders
- Repair corrupted files after the data recovery, support repairing corrupted Excel, Word, PPT, and PDF Documents
Now, install this program and follow to see how to get your lost Excel/Word file back effortlessly.
Step 1. Run EaseUS Data Recovery Wizard. Choose the drive where you lost files and start scanning. This software allows you to recover lost data from all devices, including HDD, SSD, USB drive, SD card, pen drive, camera, etc.

Step 2. Browse the full scan results. You can choose the file type you need by clicking on the file type filter. EaseUS data recovery software supports 1000+ file types like photos, videos, documents, emails, audio files, and many more.

Step 3. Select the files you want to preview. Click «Recover» and set a storage location to save the recovered data.
