
Содержание
- Убираем нарисованную линию
- Убираем вставленную линию
- Убираем линию, созданную с помощью инструмента “Границы”
- Убираем линию, добавленную в качестве рамки
- Убираем линию, созданную форматом или автозаменой символов
- Убираем линию в таблице
- Вопросы и ответы
Убрать линию в документе MS Word задача несложная. Правда, прежде, чем приступить к ее решению, следует понять, что это за линия и откуда она взялась, точнее, каким образом она была добавлена. В любом случае, все их можно убрать, и ниже мы расскажем, что для этого нужно сделать.
Урок: Как в Ворде нарисовать линию
Убираем нарисованную линию
Если линия в документе, с которым вы работаете, нарисована с помощью инструмента “Фигуры” (вкладка “Вставка”), имеющегося в MS Word, удалить ее очень просто.
1. Кликните по линии, чтобы выделить ее.

2. Откроется вкладка “Формат”, в которой вы можете эту линию изменить. А вот для ее удаления просто нажмите кнопку “DELETE” на клавиатуре.
3. Линия исчезнет.
Примечание: Линия, добавленная с помощью инструмента “Фигуры” может иметь различный внешний вид. Вышеописанная инструкция поможет убрать двойную, пунктирную линию в Ворде, а также любую другую линию, представленную в одном из встроенных стилей программы.
Если же линия в вашем документе не выделяется после клика на нее, значит, добавлена она была другим способом, а для ее удаления необходимо воспользоваться иным методом.
Убираем вставленную линию
Возможно, линия в документ была добавлена иным образом, то есть, скопирована от куда-то, а затем вставлена. В таком случае необходимо выполнить следующие действия:
1. Выделите с помощью мышки строки до и после линии, чтобы линия тоже была выделена.
2. Нажмите кнопку “DELETE”.
3. Линия будет удалена.

Если этот метод вам тоже не помог, попробуйте в строках до и после линии написать несколько символов, а затем выделить их вместе с линией. Нажмите “DELETE”. Если линия не удалится, воспользуйтесь одним из следующих методов.
Убираем линию, созданную с помощью инструмента “Границы”
Бывает и так, что линия в документе представлена с помощью одного из инструментов в разделе “Границы”. В таком случае убрать горизонтальную линию в Word можно одним из следующих методов:
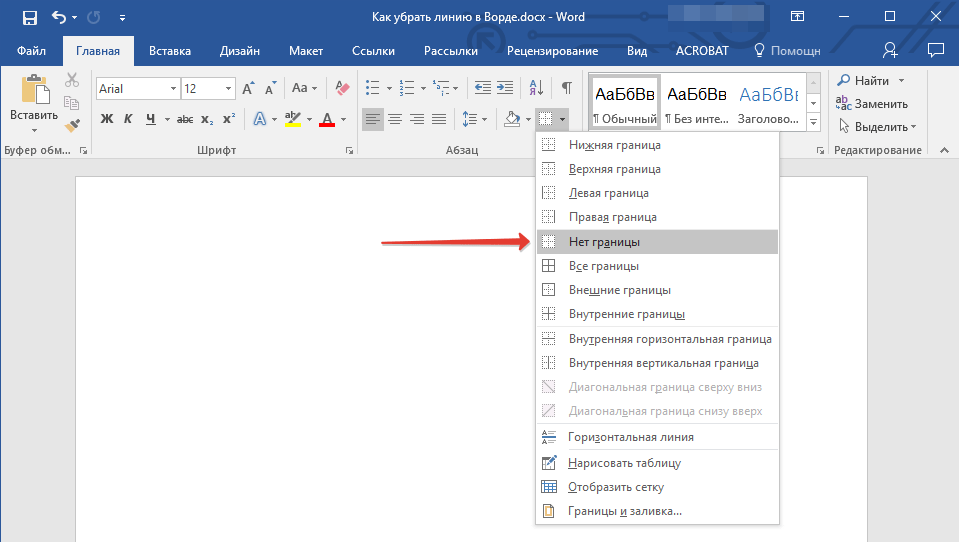
1. Откройте меню кнопки “Граница”, расположенной во вкладке “Главная”, в группе “Абзац”.
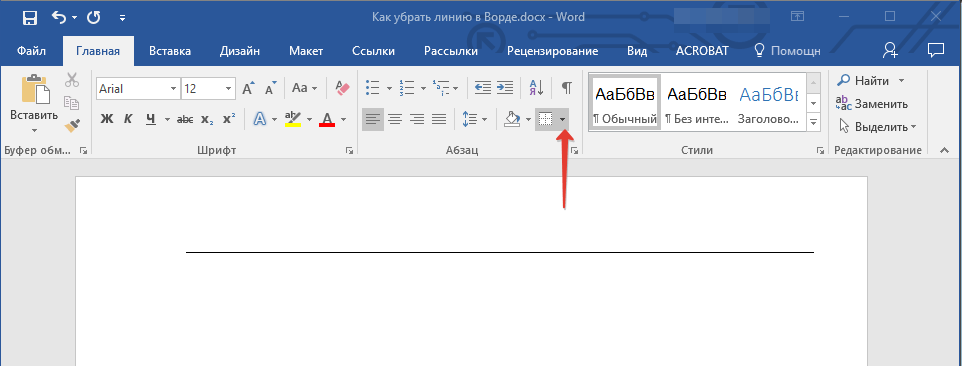
2. Выберите пункт “Нет границы”.
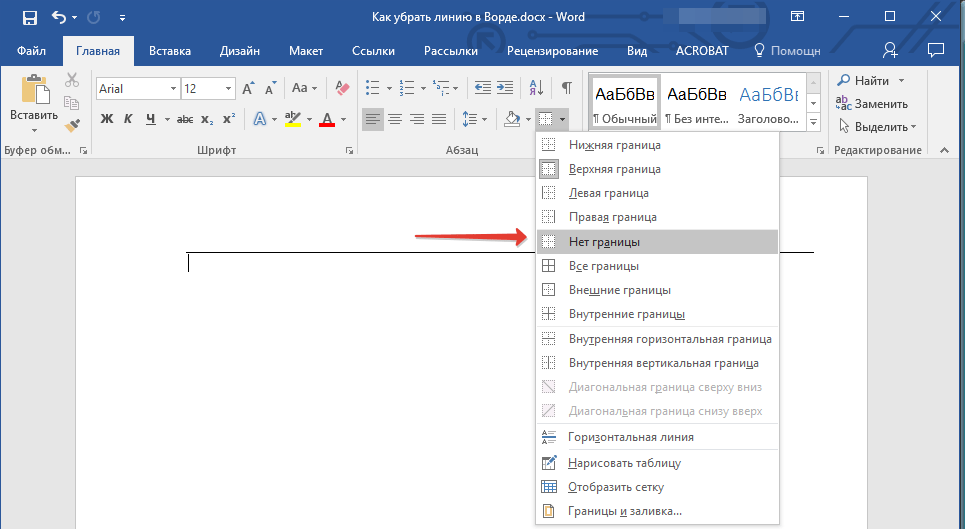
3. Линия исчезнет.
Если и это не помогло, скорее всего линия была добавлена в документ с помощью того же инструмента “Границы” только не в качестве одной из горизонтальных (вертикальных) границ, а с помощью пункта “Горизонтальная линия”.
Примечание: Линия, добавленная в качестве одной из границы, визуально выглядит немного жирнее линии, добавленной с помощью инструмента “Горизонтальная линия”.
1. Выделите горизонтальную линию, кликнув по ней левой кнопкой мышки.
2. Нажмите кнопку “DELETE”.
3. Линия будет удалена.
Убираем линию, добавленную в качестве рамки
Добавить линию в документ можно и с помощью встроенных рамок, доступных в программе. Да, рамка в Word может быть не только в виде прямоугольника, обрамляющего лист или фрагмент текста, но и в виде горизонтальной линии, расположенной в одном из краев листа/текста.
Уроки:
Как в Ворде сделать рамку
Как удалить рамку
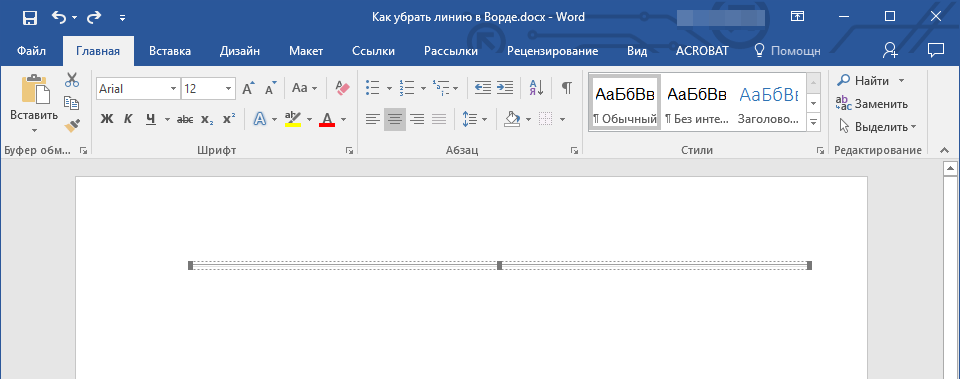
1. Выделите линию с помощью мышки (визуально выделится только область над ней или под ней, в зависимости от того, в какой части страницы эта линия расположена).
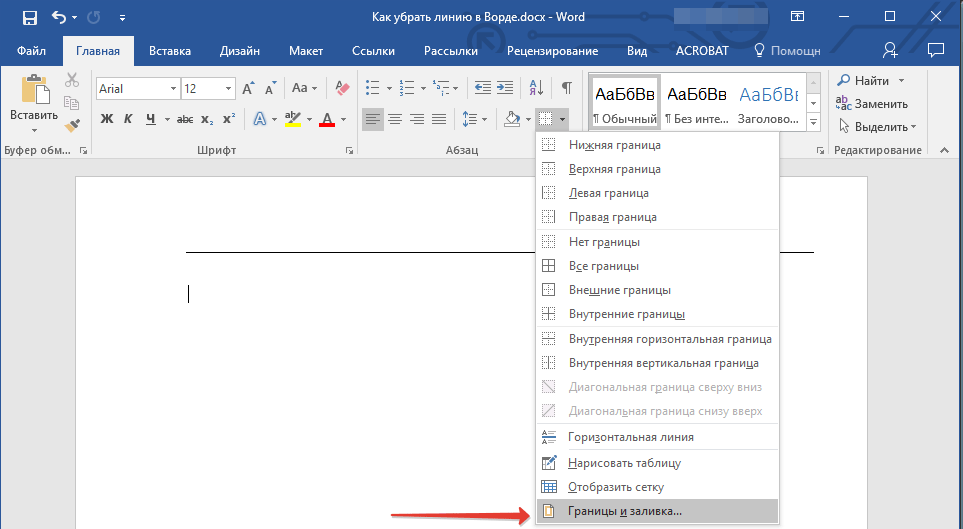
2. Разверните меню кнопки “Граница” (группа “Абзац”, вкладка “Главная”) и выберите пункт “Границы и заливка”.
3. Во вкладке “Граница” открывшегося диалогового окна в разделе “Тип” выберите “Нет” и нажмите “ОК”.
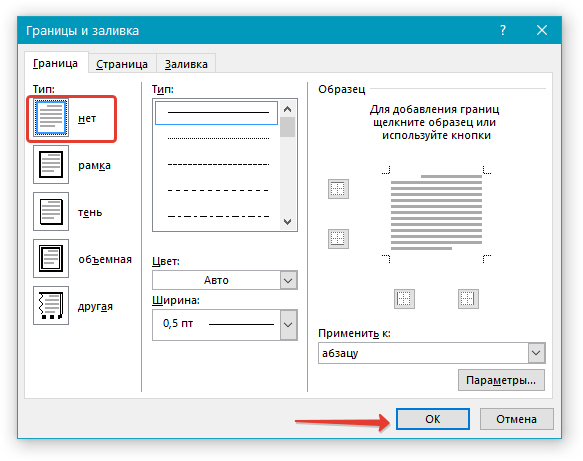
4. Линия будет удалена.
Убираем линию, созданную форматом или автозаменой символов
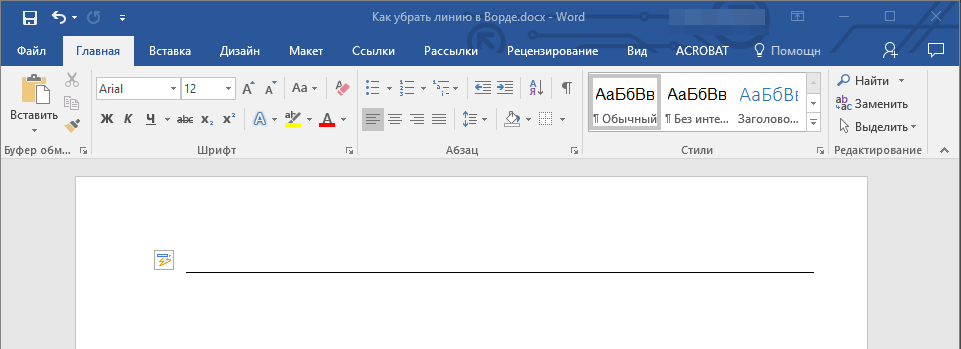
Горизонтальную линию, добавленную в Word из-за неправильного форматирования или автозамены после трех нажатий символов “-”, “_” или “=” и последующего нажатия клавиши “ENTER” выделить невозможно. Чтобы удалить ее выполните следующие действия:
Урок: Автозамена в Ворде
1. Наведите указатель курсора на эту линию, чтобы в самом ее начале (слева) появился символ “Параметры автозамены”.
2. Разверните меню кнопки “Границы”, которая находится в группе “Абзац”, вкладка “Главная”.
3. Выберите пункт “Нет границы”.
4. Горизонтальная линия будет удалена.
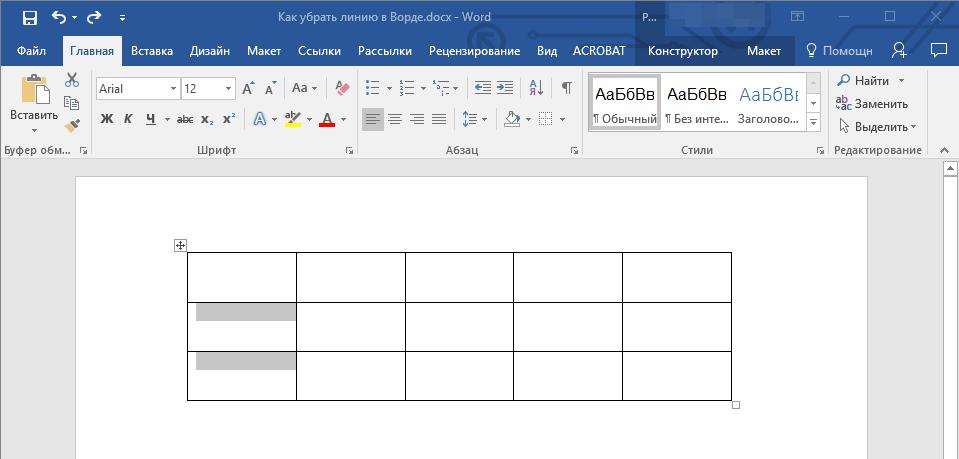
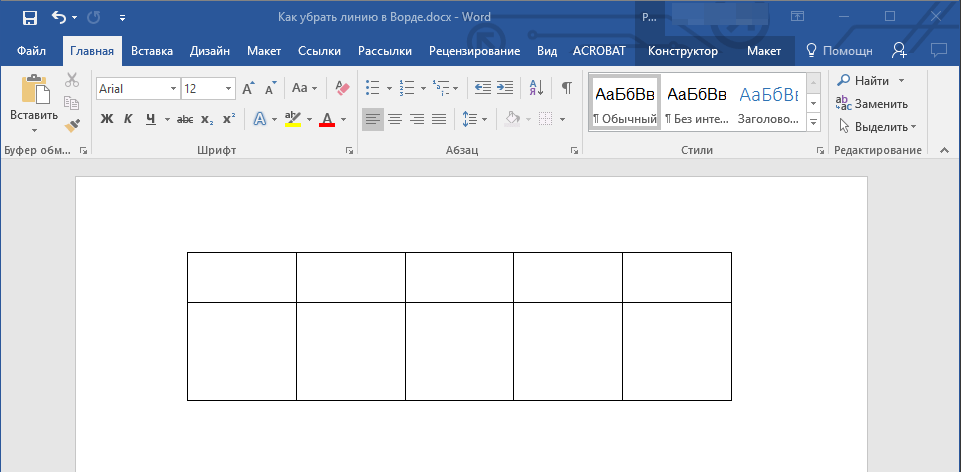
Убираем линию в таблице
Если ваша задача — убрать линию в таблице в Ворде, необходимо просто объединить строки, столбцы или ячейки. О последнем мы уже писали, объединить столбцы или строки можно походим способом, более подробно о котором мы и расскажем ниже.
Уроки:
Как в Word сделать таблицу
Как объединить ячейки в таблице
Как добавить строку в таблицу
1. Выделите с помощью мышки две соседних ячейки (в строке или столбце) в ряду, линию в котором вы хотите удалить.
2. Кликните правой кнопкой мышки и выберите пункт “Объединить ячейки”.
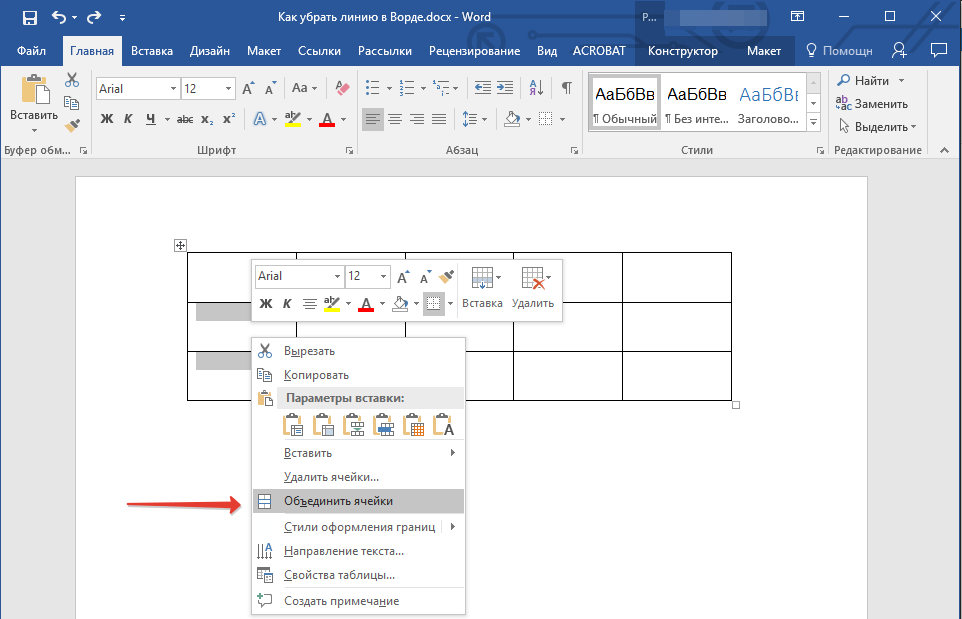
3. Повторите действие для всех последующих соседних ячеек строки или столбца, линию в которых вы хотите удалить.
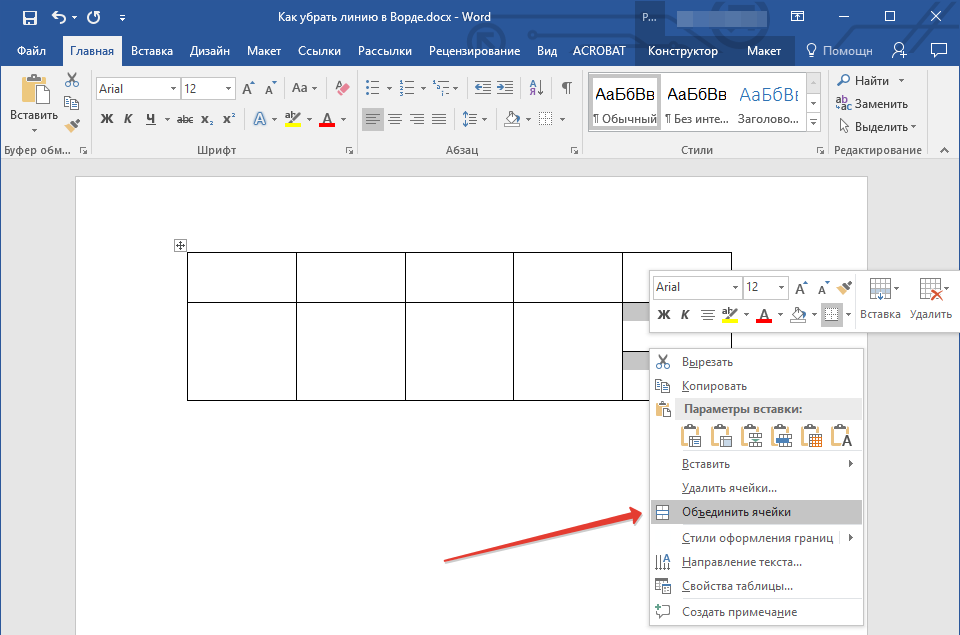
Примечание: Если ваша задача — удалить горизонтальную линию, необходимо выделять по паре соседствующих ячеек в столбце, если же вы хотите избавиться от вертикальной линии, выделять нужно по паре ячеек в строке. Сама же линия, которую вы планируете удалить, будет находится между выделенных ячеек.
4. Линия в таблице будет удалена.
Вот и все, теперь вы знаете обо всех существующих методах, с помощью которых можно удалить линию в Ворде, вне зависимости от того, как она появилась в документе. Желаем вам успехов и только положительных результатов в дальнейшем изучении возможностей и функций этой продвинутой и полезной программы.
![]()
Download Article
Troubleshooting methods to remove a horizontal line in Word
![]()
Download Article
This wikiHow teaches you how to remove a border line in Microsoft Word that you may have inadvertently created by typing three hyphens (-), underscores (_), equal signs (=), or asterisks (*), and pressing «return.»
-

1
Click in the row immediately above the unwanted line. If there is any text immediately above the line, select the entire row above the line.
-
2
Drag the cursor to the row immediately below the unwanted line. The left end of the line will be highlighted.
Advertisement
-
3
Press delete. In many versions of Word, doing so will remove the line.


Advertisement
-
1
Click in the row immediately above the unwanted line. If there is any text immediately above the line, select the entire row above the line.
-
2
Drag the cursor to the row immediately below the unwanted line. The left end of the line will be highlighted.
-
3
Click the Home tab at the top of the screen.
-
4
Click the «Borders and Shading» icon. It’s a square divided into four panes in the «Paragraph» section of the ribbon.
-
5
Click No Borders. The border line will disappear.


Advertisement
-
1
Click in the row immediately above the unwanted line. If there is any text immediately above the line, select the entire row above the line.
-
2
Drag the cursor to the row immediately below the unwanted line. The left end of the line will be highlighted.
-
3
Click the Design tab at the top of the window.
-
4
Click Page Borders in the upper-right corner of the window.
-
5
Click the Borders tab at the top of the dialog box.
-
6
Click None in the left pane.
-
7
Click OK. The border line will disappear.


Advertisement
Add New Question
-
Question
I typed a couple of underscores and then pressed enter and it won’t go away. How do I get rid of them?

First, select part of your text which contains «Border Lines,» then go to the «Home» tab and select the «Paragraph» ribbon, click on «Borders» command and finally choose «No Border.»
-
Question
How do I identify an unwanted line on a page?
Press the backspace key. It is the one with an arrow going left on most keyboards. You can tell which way left is by making your hands into letters — the L is the left hand.
-
Question
What do I do if the print of a section I was trying to cut and paste became small, and I need it to be big again?
Press Control + Z (which is undo) and right-click on the passage to find Undo.
See more answers
Ask a Question
200 characters left
Include your email address to get a message when this question is answered.
Submit
Advertisement
Thanks for submitting a tip for review!
About This Article
Article SummaryX
1. Click the row above the line.
2. Drag the cursor below the line.
3. Press the Delete key.
Did this summary help you?
Thanks to all authors for creating a page that has been read 970,844 times.
Is this article up to date?
Delete lines or connectors Click the line, connector, or shape that you want to delete, and then press Delete. Tip: If you want to delete multiple lines or connectors, select the first line, press and hold Ctrl while you select the other lines, and then press Delete.
Contents
- 1 How do I delete a line in word that won’t delete?
- 2 How do I get rid of automatic horizontal lines in Word?
- 3 Where is eraser in MS Word?
- 4 How do I remove a vertical line between columns in Word?
- 5 How do I remove space between lines in Word?
- 6 How do I decrease line spacing in Word?
- 7 Why is there an extra space between lines in Word?
- 8 Where is eraser in MS Word 2010?
- 9 How do I delete part of a shape in Word?
- 10 How do you delete column lines?
- 11 How do I get rid of the vertical line on the left side of a Word document?
- 12 What are the 4 alignment options?
- 13 How do I get rid of paragraph marks in Word?
- 14 What is a eraser tool?
- 15 What is eraser tool in MS Paint?
- 16 What is computer eraser?
How do I delete a line in word that won’t delete?
The easiest way to get rid of it is to use the Ctrl+Q combination on your keyboard. Simply move your cursor anywhere in the paragraph above the line that you want to delete, and then use Ctrl+Q.
How do I get rid of automatic horizontal lines in Word?
The first method is to press “Ctrl + Z” right after typing the characters and pressing “Enter” to undo the automatic creation of the horizontal line. The line is removed and your characters remain.
Where is eraser in MS Word?
If you are referring to the Eraser command that you can use in a table, note that you’ll find it on the Table Tools Layout tab (when the insertion point is inside a table).
How do I remove a vertical line between columns in Word?
Select the table, Design contextual tab, Table styles group, Border button, click Inside Vertical border that should leave the table border and the horizontal lines. Note that the lines will not be deleted but just won’t print. Select it and press the delete button.
How do I remove space between lines in Word?
Click or tap anywhere in the paragraph you want to change, or press Ctrl+A to select all text. Click Home > Line Spacing. Select the line spacing you want. If you want more exact spacing, select Line Spacing Options.
How do I decrease line spacing in Word?
- Select the “Paragraph” group on Word’s Home tab to open your paragraph settings.
- Choose the “Indents and Spacing” tab, then select the drop-down box below the Line Spacing header to reduce your line spacing or to choose a custom line spacing, as per your preference.
According to the Microsoft’s “Word Blog,” spacing changed because “Back in 2007, the product designers changed the default line spacing to improve document readability.” The noticeable differences in the new settings are a larger space between lines and a whole skipped line between paragraphs.
Where is eraser in MS Word 2010?
Click on the Eraser tool, in the Draw Borders group (Word 2007 and Word 2010) or the Draw group (Word 2013 and Word 2016). Click and drag to select the table lines you want to erase. Click on the Eraser tool again or press the Esc key.
How do I delete part of a shape in Word?
If I draw a rectangle object in Word, is it possible to delete one of the edges?
- Right-click the edge of the rectangle.
- Select Edit Points.
- Right-click the side you want to remove.
- Select Delete Segment.
How do you delete column lines?
To do this, select the row or column and then press the Delete key.
- Right-click in a table cell, row, or column you want to delete.
- On the menu, click Delete Cells.
- To delete one cell, choose Shift cells left or Shift cells up. To delete the row, click Delete entire row. To delete the column, click Delete entire column.
How do I get rid of the vertical line on the left side of a Word document?
Click the arrow under Accept on the ribbon and select “Accept All Changes” to remove the vertical lines.
What are the 4 alignment options?
There are four main alignments: left, right, center, and justified. Left-aligned text is text that is aligned with a left edge. Right-aligned text is text that is aligned with a right edge.
How do I get rid of paragraph marks in Word?
Click on Word Options. In the left pane of the Word Options dialog, click on Display. Locate the Paragraph marks option under the Always show these formatting marks on the screen section and uncheck the checkbox beside it to have Word hide the symbols.
What is a eraser tool?
The Eraser tool changes pixels to either the background color or to transparent. If you’re working on a background or in a layer with transparency locked, the pixels change to the background color; otherwise, the pixels are erased to transparency.
What is eraser tool in MS Paint?
E. This tool is used to remove parts of the active layer or selection. It can be useful when working with multi-layered images as portions of an upper layer erased will allow lower layers to show through.
What is computer eraser?
Eraser is an open source secure file erasure tool available for the Windows operating system. It supports both file and volume wiping. Eraser securely erases data by overwriting it such that the data is irrecoverable.
Contents
- 1 How to Remove an Automatic Horizontal Line in Word
- 2 Extra: How to Clear Formatting in Word
- 3 Extra: How to Delete Extra Pages in Word
Microsoft Word has several features to speed up your word processing experience, from hotkeys to autocorrect. One feature that’s particularly contentious, though, is the automatic insertion of a horizontal line when you type —, ===, or ___. Today we’re going to show you how to remove these lines in Word and how to stop it from happening again.
The first thing you should know is that when you accidentally insert a line in Word, you can always undo it with Ctrl + Z. If you press Enter immediately after that, Word shouldn’t create the line again.
If you use the symbols above a lot, though, you’re going to waste a lot of time undoing and not a lot of time actually writing. Before we can stop this from happening, though, you need to understand how the line is inserted in the first place.
Below, you’ll be showing you this, and in the process another method to delete a horizontal line in Word. We’ll then move on to how you can adjust your preferences to disable the feature:
When Word inserts a horizontal line, it doesn’t use the shape tool as you might expect. Instead, it inserts a border line at the location you pressed Enter. We can remove this border line in Word to get rid of the horizontal line. In settings, we can then disable automatic border lines to stop this behavior. Here’s how:
- Place your cursor above the horizontal line in Word and press the border line icon
You’ll find the border line icon in the “Home” tab of your ribbon, in the bottom middle row of the “Paragraph” section.

- Select “No Border” from the list
Pressing the No Border button will delete the horizontal line in Word immediately. You can now move on to disabling the automation insertion feature.

- Click “File” in the top-left corner

- Press “More… > Options” in the File menu

- Click “Proofing” in the sidebar, then “AutoCorrect Options…” in the main pane

- Open the “AutoFormat As You Type” tab and untick “Border lines” and press “OK”

- Press “OK” at the bottom of the main options window

- Type ‘—‘ and check whether the line is inserted


A blank page may be useful if you’re planning to continue your document, but it can look very unprofessional when you’re sending off a finished document and you might want to delete it. We show you a few different ways to delete a page in Word.

If you pasted text into your document from the internet or another document, you may find it necessary to learn how to clear formatting in Word. You can do this for an entire document or just a certain section that’s causing you trouble.
![]()
Skip to content
Line that appears after typing —, ===, etc. and pressing enter is not a line, it’s page border. Hence, it cannot be selected for removal or editing. To remove line in Word, follow these steps.
Steps to remove line in Word
Step 1: Move cursor to immediately before line that needs to be removed
Step 2: In the Home tab, click on the down arrow next to borders in paragraph group, as shown below
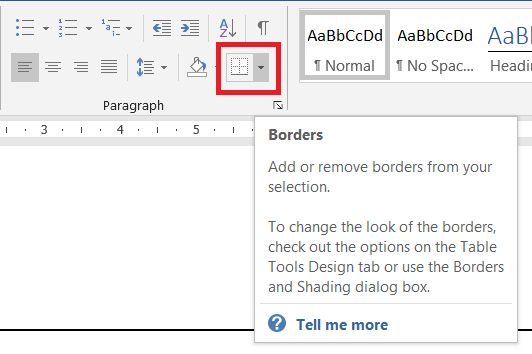
Step 3: Select no borders to remove line in Word
Related Posts

If you want to remove a horizontal line in Word that appears and stop it from automatically popping up, this tutorial is for you.
A long horizontal line appears when you type three or more hyphens in a row in Microsoft Word. It may be your intent to insert this line, or maybe it’s a mistake.
Whatever the case, whatever your intent, we’ll show you how to remove a horizontal line that automatically appears in Word. And so that you’re covered, we’ll explain how to do it once, stop it from happening in the future, and then insert a horizontal line manually.
Follow these steps if you want to do a one-time removal of that horizontal line that automatically appears.
- Place your cursor on the line directly above the horizontal line.
- Head to the Home tab.
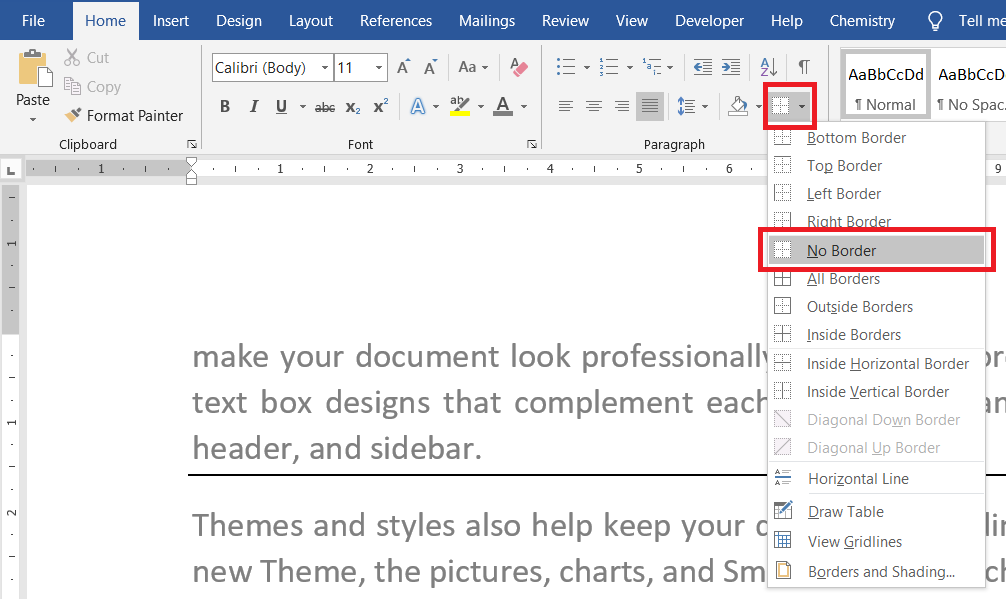
- Click the Borders drop-down arrow in the Paragraph section of the ribbon and pick No Border.

And that’s all there is to it! That horizontal line should vanish as fast as it appeared.
How to Disable the Automatic Horizontal Line in Word
Maybe you never want a horizontal line to appear when you type three or more hyphens. This is a simple setting you can disable in Word.
- On Windows, go to File > Options > Proofing. On Mac, go to Word > Preferences in the menu bar.
- Select AutoCorrect Options (AutoCorrect on Mac).
- Pick AutoFormat As You Type at the top.
- Under Apply as you type, uncheck the box for Border lines.
- Click OK on Windows and close the window on Mac, and your change will be applied.

Now you’ll have no more worries about automatic horizontal lines appearing. And if you’re interested in more ways to customize autocorrect in Word on Windows and Mac, take a look at our how-to.
How to Manually Insert a Horizontal Line in Word
If you decide to disable the automatic horizontal line and want to insert one, you can do so manually.
- Place your cursor where you want the horizontal line to fall below.
- Go to the Home tab.
- Click the Borders drop-down arrow in the ribbon and pick Horizontal Line.

The horizontal line will pop into your document on the line beneath your cursor. If you’d like to format the line, select it and use the tools in the ribbon on the Home tab.

Control the Automatic Horizontal Line in Word
While it can be convenient to have that horizontal line appear if you’re looking for a way to separate sections in your document, it can also be inconvenient to have that line appear if that’s not your intent. But now you know how to get rid of it once and for all.
For more, check out how to find and replace formatting in both Word and Excel or how to work with page and section breaks in Microsoft Word.
Keep up with our new how-tos by following us on Twitter or liking us on Facebook!
![]()