
This wikiHow teaches you how to remove a header and/or footer from the top or bottom of each page in your Microsoft Word document. A header is special text that appears in or near the margin at the top of a document, while a footer appears at the bottom. If you don’t want to remove all headers and/or footers, you can just remove the one(s) that appear on the first page.
-

1
Open your document in Microsoft Word. You can do this by double-clicking the document on your computer.
- If you’re using Word Online, sign in to https://www.office.com, click the Word icon in the left panel (the sheet of paper with a «W»), and select your document. If it needs to be uploaded from your computer, click Upload and open on the right side of the page and select it.
-
2
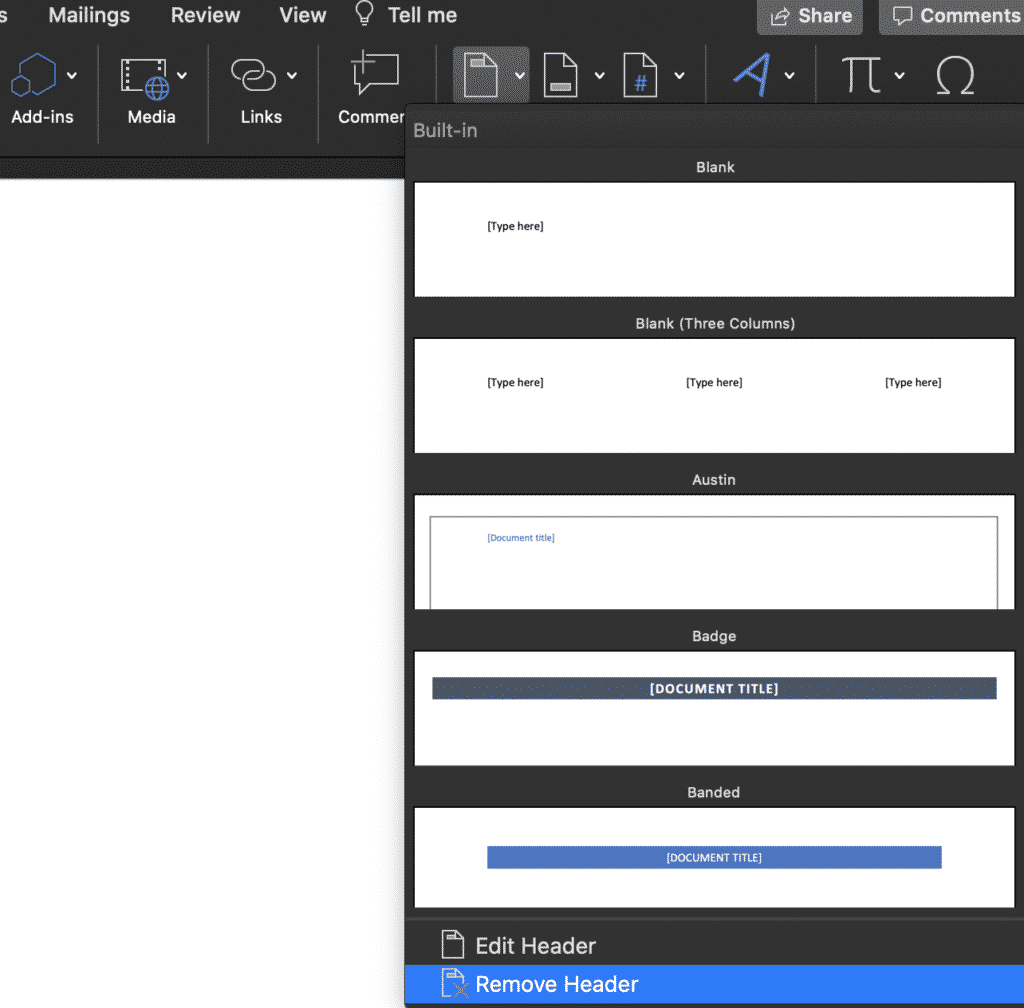
Click the Insert menu. It’s at the top of Word.
-
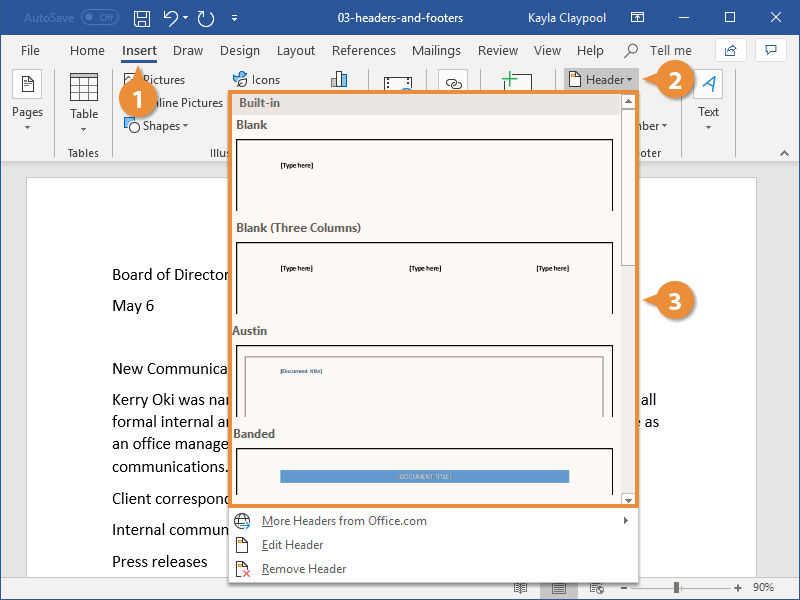
3
Select Header or Footer. A menu will expand.
- In most versions of Word, if your document contains both a header and a footer, you’ll need to remove them separately—just select Header now, and then return to the menu and select Footer later.
- If you’re using the web-based version of Office, select Header & Footer instead.[1]
You can then remove the header and footer at the same time by selecting Remove Headers & Footers.
-
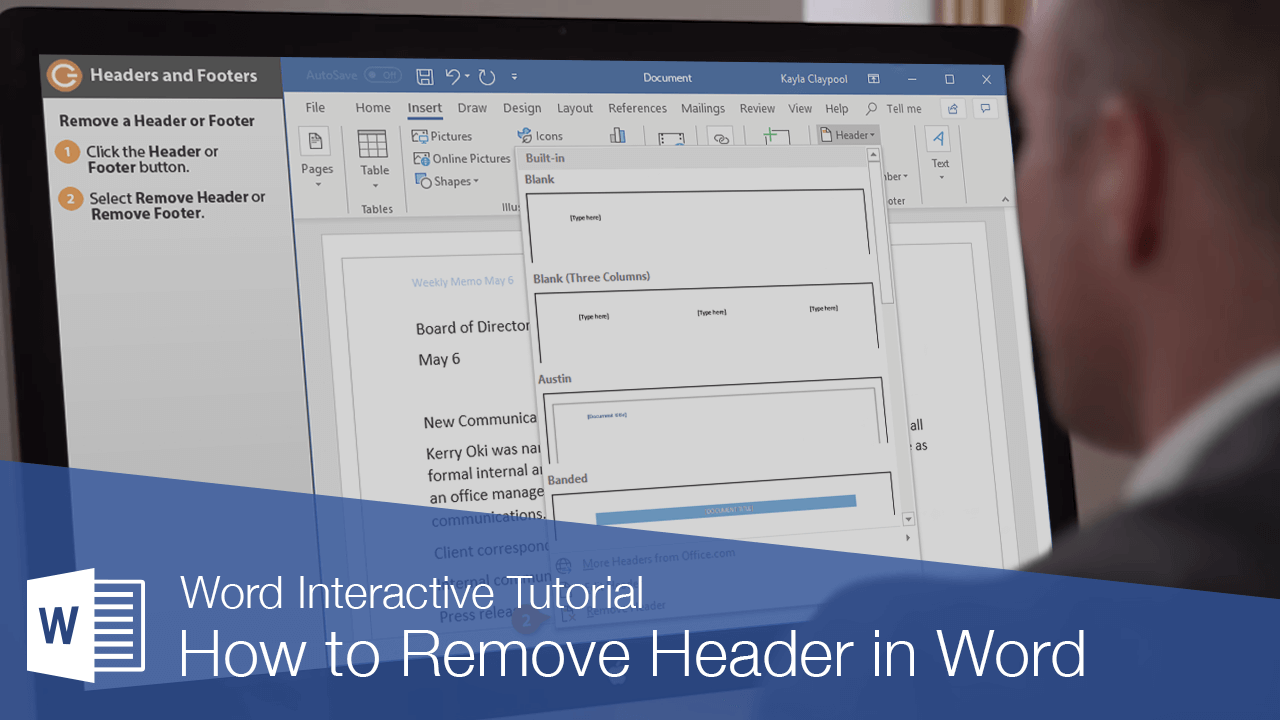
4
Select Remove Header or Remove Footer. This removes the header or footer from the document.
- If you removed the header and still need to remove a footer, return to the Insert menu and select Footer > Remove Footer now.


-
1
Open your document in Microsoft Word. You can do this by double-clicking the document on your computer.
- If you’re using Word Online, sign in to https://www.office.com, click the Word icon in the left panel (the sheet of paper with a «W»), and select your document. If it needs to be uploaded from your computer, click Upload and open on the right side of the page and select it.
-
2
Double-click the header or footer on the first page. You’ll see the header at the top, and/or the footer at the bottom.
- If you’re using the web version of Word, click the Insert tab and select Header & Footer instead.[2]
- If you’re using Word for Windows or macOS and want to remove both a header and a footer from the first page, start by selecting the header. After you remove it from the first page, you’ll be able to repeat these steps for the footer.
- If you’re using the web version of Word, click the Insert tab and select Header & Footer instead.[2]
-
3
Check the box next to «Different First Page.» You’ll see this is in the toolbar at the top of Word. This removes the header or footer from the first page of your document.
- If you’re using the web version of Word, click the Options tab at the top-right and select Different First Page instead.
-
4
Add a different header or footer for the first page (optional). If you want to have a different header or footer on the first page than you have in the rest of the document, you can now add a new header/footer to the first page only. As long as you’ve selected the «Different First Page» option, the new header/footer you add to the first page will not affect the remaining pages.


Ask a Question
200 characters left
Include your email address to get a message when this question is answered.
Submit
References
About this article
Article SummaryX
1. Click Insert.
2. Click Header or Footer.
3. Click Remove Header or Remove Footer.
Did this summary help you?
Thanks to all authors for creating a page that has been read 6,382 times.
Is this article up to date?
In this article today, I want to show you how to remove Headers and heading styles in Microsoft Word.
I want to kill two birds with one stone since headers and heading styles are two different things altogether. So in the first part of this tutorial, I’ll explain how to remove or delete a header in Word before looking at heading styles.
A header is the top margin of a page in Microsoft Word. Headers are normally used for titles, page numbers, dates, logos and other essential bits of information.
There are two ways to remove or delete a header in Microsoft Word. Without further ado, let’s get started.
Option 1: Using the Remove header command
To delete or remove headers in Word:
- Go to the Insert tab.

- In the Header & Footer group, click on the Header button.

- A drop-down box will appear, click on Remove Header at the bottom of the drop-down to remove the header from your Word document.

This is how you may exit headers in Microsoft Word.
Option 2: Clear all the header content to remove the header in Word
Another way to delete header in Word is to double-click on the header area to make it editable. Then select all the content in the header and hit the delete key. After deleting the header content, the header itself will disappear from all your pages.
How to remove heading styles in Word
Microsoft Word comes with a library of heading styles you can use in your document.
These styles are very handy as it allows you to apply
changes to all your headings at once. It also allows you to do other fancy
things like collapse and expand content under each heading.
Heading styles also helps if you want to insert an automatic table of Content into your document.
Despite all these awesome things heading styles can do, you may want to remove it in your Word document for some reason.
Without further ado, below are the various ways you can
remove headings in Word.
First Option: Apply Normal Paragraph style
All the heading styles, Heading 1 through Heading 9, have their own formatting, which you can modify anyway.
There’s also a style called Normal style. It is designed to have the same formatting as the body text. And applying this style means you are switching from one of the headings to a body text, removing all the heading properties from the text.
The steps are bulleted below:
- Highlight the heading or headings you want to remove the styles from. If you want to remove heading styles from the entire document, use Ctrl+A to select all content in the document. Just know that selecting all will clear every other formatting like Bold, Italic, bullets (●), and so on.

- Go to the Home tab, in the Styles
group, and select Normal.

Clicking the Normal style option will remove the
heading properties from the text.
Option two: Remove Heading Styles Using the styles dialog
There’s a dialog box that contains most of the styles. Through
this dialog of styles, you can change any heading into a body text or normal
text by clearing all the styles or formatting applied to the text.
Just follow the steps below to see what I am talking about:
- Highlight the heading or headings you wish to change
into a normal text.
- Press Alt+Ctrl+Shift+S to display the Styles dialog box

- Click on Clear All to remove the heading
style properties from the text.
All the formats that were making the heading to look different from the body text will disappear. The body text and the headings will have the same appearance now.
Option 3: Using the “Clear All Formatting” Command
There’s yet, another command that performs the same task as
in the previous methods.
This is a command that clears all formatting that has been
applied to text in Word.
To use this command, the steps are outlined below:
- Highlight the Heading you want to change
- Go to the Home tab, in the Font group,
click on the “Clear all formatting” icon.
See screenshot:

Now Word will remove all the Heading style properties (AKA
formatting) from the selection, leaving only the normal, unformatted text.
- Bonus Tip: Another place to get access to the Clear Formatting command is in the Styles library section. Go to the Home tab, in the Styles group, click the small triangular icon at the right side to expand for more styles.
See screenshot:

- Near the bottom of the expanded box, click on “Clear
Formatting”

This is how you may remove heading styles in word.
For any further questions, don’t hesitate to add it in the
comments section below.
A page header is text that is separate to the body text and will appear at the top of your Microsoft Word document. Often used to display information such as the document name, date or pages number on multi-page documents.
Headers can be very helpful when you are working on long reports, but they do take up space on your page and sometimes they are just not necessary.
In this post, we will show you how to remove the header from your Word Document at the click of a button.
Once the header is removed, the information sitting in this header will also be deleted. If you would like to keep the document title we suggest you copy this down into the body of text before following these steps to remove the header.
Removing the Header from your Word Document
- Open Microsoft Word
- Click the Insert Tab
- Find and Press Header

- Select Remove Header
You have now successful removed the header from your document.
If you have a footer to remove, follow the steps above clicking Footer in step 3.
Searching for a way to collaborate with ease?
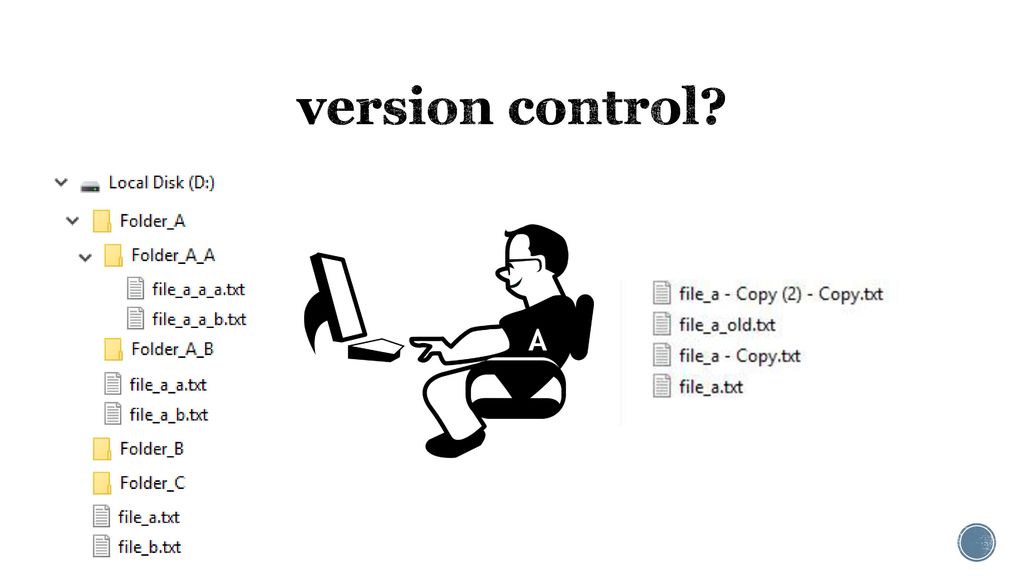
You’ve been tasked with updating and styling the header on a Word Document that your team has been collaborating on before it is sent off for final review. You spend hours making it look perfect, aligning the logo and making sure the text is perfect. When you are happy with the final result, you press save, give the document a new version number, let’s say presentation_v18_Headerupdated and cross your fingers the rest of your team are able to find the document in the cluttered, unorganised shared drive.
John in marketing misses your updated document and starts editing an old version, leaving your team with two ‘new’ versions of the same document and no way to merge them together. Its no-ones fault, the team just work quickly and all have slightly different methods of naming and storing files.
With so many different methods, this is where collaboration becomes harder than it should be and you can enlist the help a tool built to manage version control.
A tool such as Simul Docs.
Simul Docs was built with you in mind, with the understanding that you don’t want to continue living with a messy shared drive and you’d love to be able to access files at the click of a button.
By importing the first version of your Word Document into Simul, Simul will automatically save this file as version 0.0.1, with your name next to the document as its author.
You can then share the document with whoever you’d like to collaborate with. Send it to the marketing team, to your manager and to your client.

By sharing the document, your colleagues will receive an email letting them know you have a document waiting for their review. When they click the Simul link in the email, the Word file will automatically open for them in Simul’s easy to use dashboard. Each user can then decide if they’d like to edit the document directly in Simul, or export it out and edit in Microsoft Word.
No matter which editing option they choose, all of the handy Simul collaboration functions will work.
As they start to make some minor (or major) edits, Simul will track every change, without them even turning on comments or tracked changes. Because a change that isn’t tracked can cause confusion for everyone.

Now they are done editing, they press ok and close Simul (or Word). You will be sent an email letting you know there is now a new version (in this case version 0.0.2) with some changes for your revisions.
Jump into Simul, accept or decline the changes or just thank the author for their amazing efforts and you’re done.

This process can be repeated with as many versions, authors, collaborates and edits as you please. There is no limit to how long your collaboration can take, Simul will work in the background for you for as long as you need.
Once you’ve reached the final version of your document, you can save, export or share the file using any cloud sharing system you already have in place, such as GoogleDocs, Dropbox and OneDrive. Or, share via email or a direct link.
If you’d prefer to just export the final version and drop it into your shared drive, that’s simple too. Export the file as a Word doc. or PDF and save it wherever you like.

It’s a great way to collaborate, knowing in the back of your mind that Simul is keeping an eye on all of the changes made so you won’t miss a thing.
Changing headings or headers is easy. But if you are a beginner, Word must be difficult for you. And when it comes to removing the headings one by one or all together, it gets more mind-numbing!
And for beginners in Word, we have some easy methods for you. If you want to know how to remove headings in Word, these easy steps can help you out!
There are five different methods we will talk about today. There are also other methods of deleting headings but these are the easiest ones on the list! Check them out!
- Methods of Removing Heading in Word
- Apply Normal Style
- Different Headers On Different Pages-Microsoft Word
- Removing Heading with Dialog
- Removing Heading from Navigation Pane
- Clear All Formatting Command
- Remove Header Command
- Remove All Headers
- Wrap Up
Methods of Removing Heading in Word

Apply Normal Style
When you check the headings of MS Word, you will get several heading types.
From Heading 1 to Heading 9, you will get to use and change the headings as per your requirement.
Step 1: Normal Text Idea
The first option of all the headings is the NORMAL TEXT style. This option will help you to write the texts in the normal style.
You can apply this style and switch from the other heading styles to the normal text. With the help of using this style, you can remove the other heading properties too.
Step 2: Select the Heading
Here, you need to select the text or the portion that you want to change from heading to normal. You can also select several headings if you want to change them altogether.

Step 3: Go to Styles
After selecting them with your cursor, you have to check the tab STYLES on the HOME which is situated on the upper portion of Word.
There, you will see different options and among them, the first one from the left will be NORMAL.

Step 4: Removing Headings
When you have selected NORMAL, the Word will automatically remove the headings you have selected and it will replace them with normal texts just like the other part of the paragraph.
Step 5: Change the Entire Text
In this case, you might want to remove the headings from your entire word file.
If you want to do this, you can follow a shortcut method without selecting each of them manually.
Press CTRL+A. The whole text of the content will get selected in this way. And then, you have to go through Steps 3 to Step 4.
As a result, the whole text will change into a normal style.
Note: But in this situation, you must keep in mind that this process will change all the other formats like BULLETS, ITALIC, BOLD, UNDERLINE, NUMBERED LIST, etc into normal text.
<span data-mce-type=”bookmark” style=”display: inline-block; width: 0px; overflow: hidden; line-height: 0;” class=”mce_SELRES_start”></span>
Removing Heading with Dialog
If you want to change the heading to a normal text word, you can also check this out. This is the Styles Dialog box method for deleting the headings. You might be interested in Microsoft Word Won’t Open Windows 10 & Mac.
Step 1: Finding the Dialog Box
When you go through the Word file, you will see that there is a dialog box for headings in the top section.
In this dialog box, you will get different styles of headings. With the help of this dialog box, it is easy to change the heading.
You can change one heading to another style heading. Also, you can change it to normal text. If you want to clear the formatting for all the texts, you can do that too.
Step 2: Open Styles Dialog Box
First of all, you have to mark the text or heading that you want to turn back to normal text. Highlight the part or select it.
Now, you have to press Alt+CTRL+SHIFT+S. With the help of this short form, you will see the Styles dialog box.

Step 3: Clear All Headings
Now that you have seen the several styles of heading, you can easily change them to normal text.
The best part is you will see an option named CLEAR ALL here. With this option, you can remove all the headings from your content.
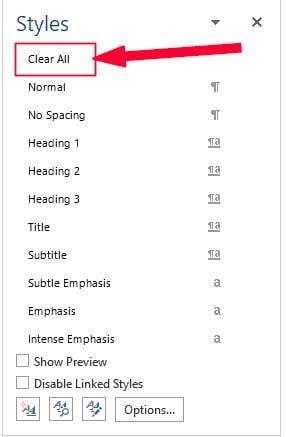
After clicking it, all the headings will be removed and you will only see the normal texts.
Removing Heading from Navigation Pane
You can also let the Word remove heading from the navigation pane. Make sure the Navigation pane is visible in your Word.
Step 1: Getting Navigation Pane
If you don’t see the Navigation pane, you need to go to the VIEW option situated on the top of the Word.
When you get several options, put a tick mark on the NAVIGATION PANE to see this option.

Step 2: Go through Headings Option
In the Navigation Pane, you will see the HEADINGS option along with the PAGES and RESULTS. It will show all the headings there.
Check the article How to Fix Page Numbers in Word.

Step 3: Delete Heading
On the headings that are shown in the Navigation Pane, you can right-click and do whatever you want.
By right-clicking, you will see various options. There is a DELETE option to delete the heading. Press if and will no longer see the heading there!

Clear All Formatting Command
You can also settle for the Clear All Formatting command if you want to. This will help in clearing all the headings.
- In the first place, you have to select or mark the heading or headings you want to change.
- Now you have to go to the HOME tab first. There, you will see a group named FONT.
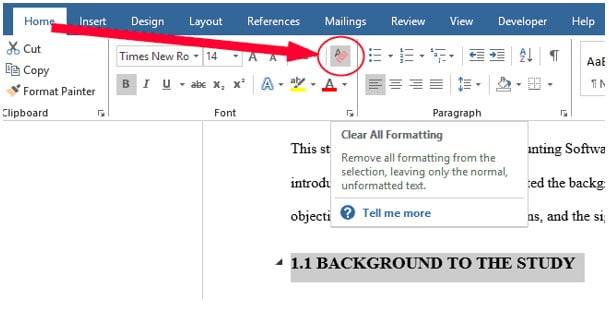
- Get into FONT and search CLEAR ALL FORMATTING icons. After you get it, press it.
- This will clear all the headings from the selected area and provide you normal texts.
Note: Just like the previous method, this will also remove other formattings like BOLD, LISTS, UNDERLINED, etc. So, before selecting, check, and double-check it.
Remove Header Command
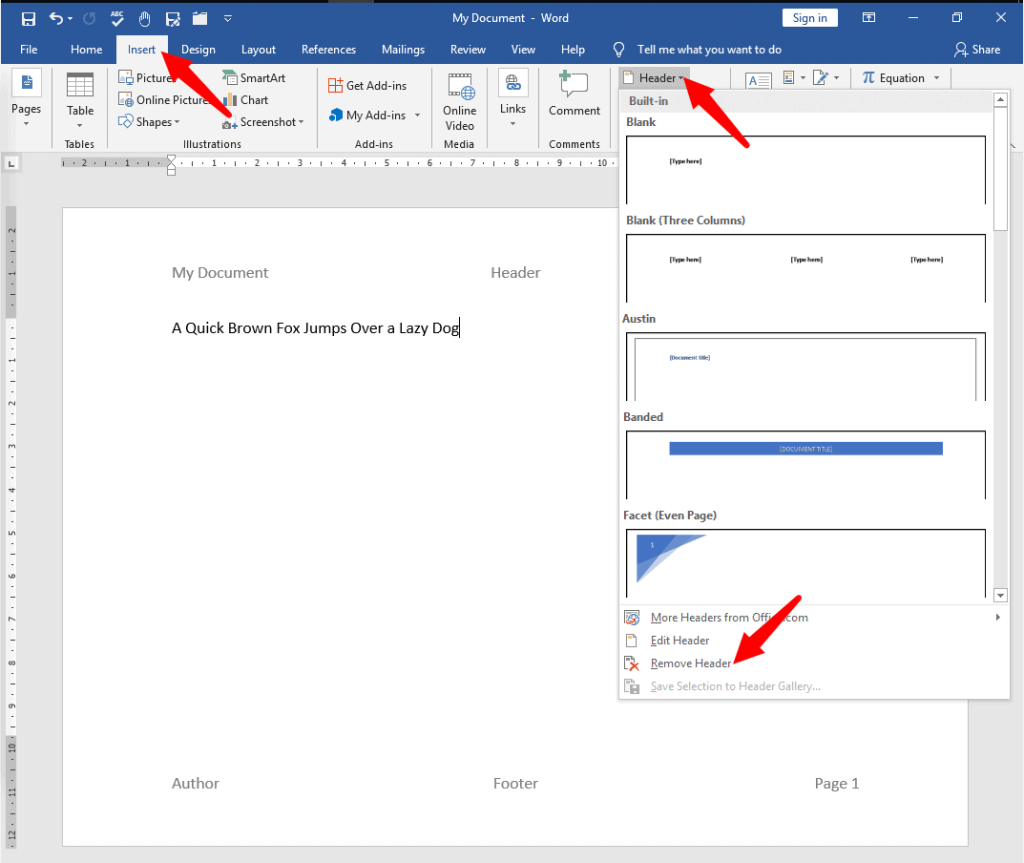
Step 1: Click INSERT
If you want to delete the headers, you can go for this easy method. First of all, get inside the Word file and there you have to look at the top tab.
In the top tab, you will find an option named INSERT. Click the INSERT option.
Now that you have clicked it, you will see the HEADER & FOOTER section there. All you have to do is go through the HEADER button and press it.
As a result, you will get a new box of options. Check the bottom part of the box. There, you will see an option called REMOVE HEADER. This is all you are searching for. By clicking it, you can remove the header in your MS Word!
There are times when you don’t want to remove the headers one by one. This might be time-consuming. As a substitute, you can rely on removing all the headers with some clicks!
- First of all, you have to go to the header area and double-click it. As a result, that will be editable for you.
- Now, you have to select the part of the header in your content. After selecting, press the delete on your keyboard.
- You will see that the header is gone. And along with this, all the headers will disappear too from your content. This method is faster than the previous method.
Wrap Up
We are sure that if you are a PRO working in Word, these are the known facts to you. However, beginners in Word might be very helpful with these easy steps for removing the heading styles.
So, which method do you use for removing headings in Word? Share with us in the comment box!
Enjoytechlife
For some reason, if you want to remove the header and/or the footer from your Word document, follow the steps below.
Please note, for this method to work, your document must contain a header and/or a footer.
Step #1: Open the Document
Open Word. Click on Open on the left side and locate your document using any of the methods Word offers—Recent, OneDrive, This PC, or Browse.

Step 2 : Check for Header and Footer
The opened document must show the header and the footer. There may or may not be text in the body of the document.

Step #3: Go to the Toolbar
From the toolbar on the top, click on Insert. The ribbon will change to show the Insert Menu.
Step #4: Delete the Header.
This will drop a menu with many selections. Go to the bottom of the menu and click on Remove Header. Word will remove the header and return you to the body of the document.
Final Document
This is how the final document will look with the header removed. Take note that the footer is still visible as we have not removed it.

How to Delete a Footer in Word
Deleting the footer is same as removing the header. Here are the steps for the same.
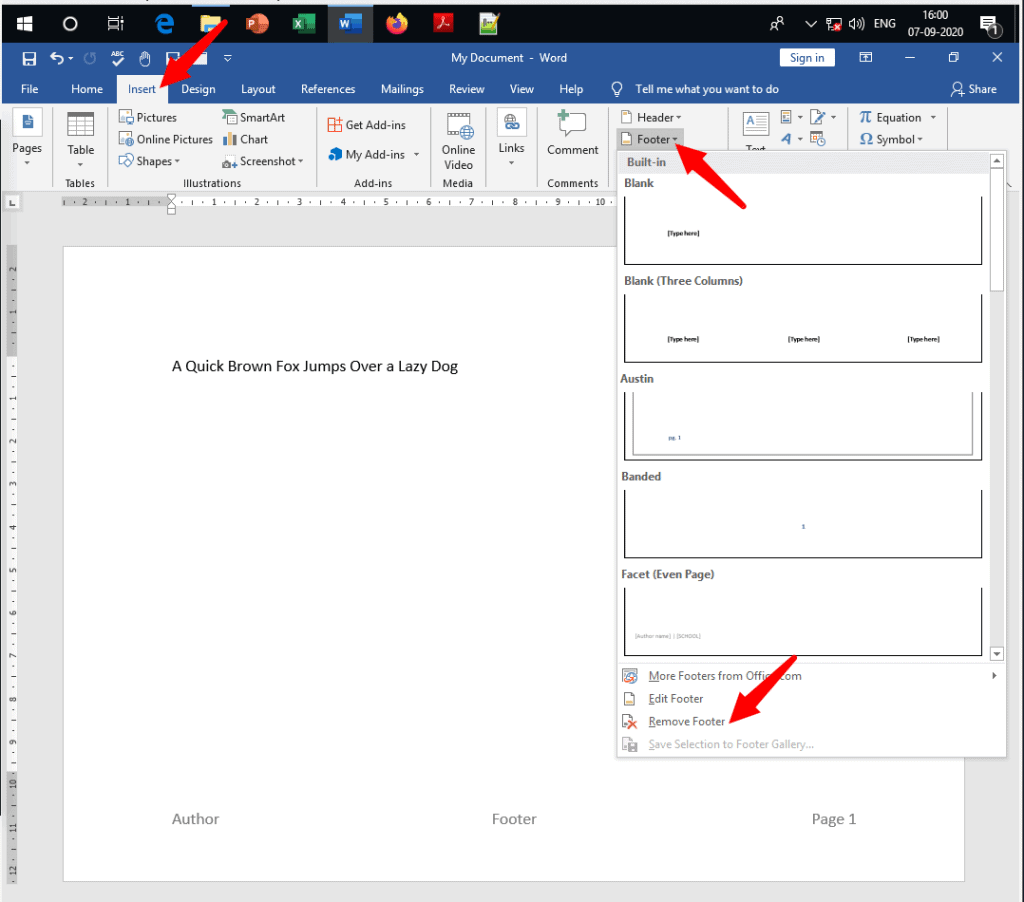
Step #1 : Go to the Toolbar
From the toolbar on the top, click on Insert. The ribbon will change to show the Insert Menu.
Step #2: Delete the Footer.
Go to the bottom of the menu and click on Remove Footer. Word will remove the footer and return you to the body of the document.
Final Document without the footer.
This is how the final document will look with Both Footer and Header removed.

Conclusion
Deleting a header and a footer from a document takes only five easy steps. It is possible to remove the header and footer independently and in any order.
Check out this tutorial for How to add header and footer in word
Go to Insert > Header & Footer. On the top right side of the document, select Options > Remove Headers & Footers.
Contents
- 1 Why can’t I remove header and footer in Word?
- 2 How do I remove header and footer from second page?
- 3 How do you unlock headers and footers in Word?
- 4 How do I remove a Header section 2 in Word?
- 5 How do I remove the Header format in Word?
- 6 How do I remove headers and footers in Word 2016?
- 7 How do I remove a Header in Word 2010?
- 8 How do I remove header from except first page?
- 9 How do you use the header and Footer write down the steps to insert and remove header and Footer from the documents?
- 10 How do I remove the header from the second page of a Word document?
- 11 How do I fix a header and footer in Word?
- 12 Why can’t I edit header in Word?
- 13 How do I remove section 2?
- 14 How do I change the header section in Word?
- 15 How do I remove headers and footers in Word 2007?
- 16 How do I remove Heading but keep formatting?
- 17 How do I remove layout options in Word?
- 18 How do I get rid of embedded formatting in Word?
- 19 How do I delete a header in Word 2013?
- 20 How do I make the header only appear on the first page?
Why can’t I remove header and footer in Word?
1. Click File > Info > Check for Issues > Inspect Document, see screenshot: 2. In the popped-out Document Inspector dialog box, only check the Header, Footers, and Watermarks option in the dialog box, make sure other options unchecked.
How do I remove header and footer from second page?
Put the cursor in the header. The contextual “Header & Footer > Design tab will display. In the Option group, turn on (put a checkmark) in “Different first page”. The scroll down to the second page and change the header, ie delete it.
How do you unlock headers and footers in Word?
Double-click anywhere on the header or footer to unlock it.
Double-click the header or footer area (near the top or bottom of the page) to open the Header & Footer tab. Select Link to Previous to turn off the link between the sections. Select Header or Footer and do one of the following: Choose Remove Header or Remove Footer near the bottom of the menu.
The first way to remove style formatting is to select the text from which you want to remove the formatting. Then, click the “More” button in the “Styles” button group on the “Home” tab of the Ribbon. Then choose the “Clear Formatting” command from the drop-down list.
How do I remove headers and footers in Word 2016?
How to Remove a Header or Footer from a Document in Word 2016
- Edit the document’s header or footer.
- Click the Header & Footer Tools Design tab.
- In the Header & Footer group, click the Header button.
- Choose Remove Header. The header is gone.
- Click the Footer button and choose Remove Footer. The footer is gone.
Answer:Select the Insert tab in the toolbar at the top of the screen. Then click on the Header button in the Header & Footer group. Select Remove Header from the popup menu.
Double click the header or footer area to make it active. This also activates the Header & Footer Tools section on Word’s Ribbon. On the Design tab of that section, select the “Different First Page” check box. This action removes the header and footer from the first page.
How do you use the header and Footer write down the steps to insert and remove header and Footer from the documents?
In the Header & Footer Tools, select Design and then Different First Page.
Try it!
- Select Insert > Header or Footer.
- Select one of the built in designs.
- Type the text you want in the header or footer.
- Select Close Header and Footer when you’re done.
Remove a header or footer
- On your computer, open a document in Google Docs.
- Double-click the header or footer you want to remove.
- On the right, click Options. Remove header or Remove footer.
How do I fix a header and footer in Word?
How to lock and protect Header and Footer in Word
- Launch Microsoft Word.
- Create a Header or Footer or use existing Header or Footer.
- Click the Layout tab > Continuous.
- Click the Show and Hide button to see the section break.
- Highlight the section break shown in the document.
- Click the font button and enter 1.
Check the “Allow only this type of editing in the document” box and select “Filling in forms” option. Next click “Select sections” to invoke the “Section Protection” dialog box. In that box, check only “Section 1” box and click “OK”.
How do I remove section 2?
If you added section breaks to your document, the easiest way to see where they begin and end is to show formatting marks.
- Go to Home, and select Show all nonprinting characters.
- The section breaks look similar to this:
- Select the section break and then press Delete.
- To change a header, scroll to the top of a page and double-click the header.
- Under the Header & Footer Tools Design tab, select where and how you want your header to appear in the document:
- If you’d like to link to a previous section of the document, select Link to Previous.
- Type your text into the header.
How do I remove headers and footers in Word 2007?
Answer:Select the Insert tab in the toolbar at the top of the screen. Then click on the Header button in the Header & Footer group. Select Remove Header from the popup menu.
How do I remove Heading but keep formatting?
If you have a lot of headings and want to remove the formatting for all of it, simply to a Select All from the tool pane and from Paragraph menu change outline level to “body text” as suggested by the previous posters.
How do I remove layout options in Word?
Use Ctrl + A to select all text in a document and then click the Clear All Formatting button to remove the formatting from the text (aka character level formatting.) You can also select just a few paragraphs and use the same method to remove formatting from part of a document.
How do I get rid of embedded formatting in Word?
Clear formatting from text
- Select the text that you want to return to its default formatting.
- In Word: On the Edit menu, click Clear and then select Clear Formatting. In PowerPoint: On the Home tab, in the Font group, click Clear All Formatting .
Summary – How to delete a header in Word 2013
- Open your document.
- Double-click inside the header section of the document.
- Delete the unwanted header text using the Backspace key on your keyboard.
- Double-click in the document body, or click the Close Header and Footer button to exit the header section.
- Go to Insert on the Ribbon, click on the Header icon and then select Edit Header.
- Locate the “Design” located under the title “Header & Footer Tools” Check the box “Different First Page”
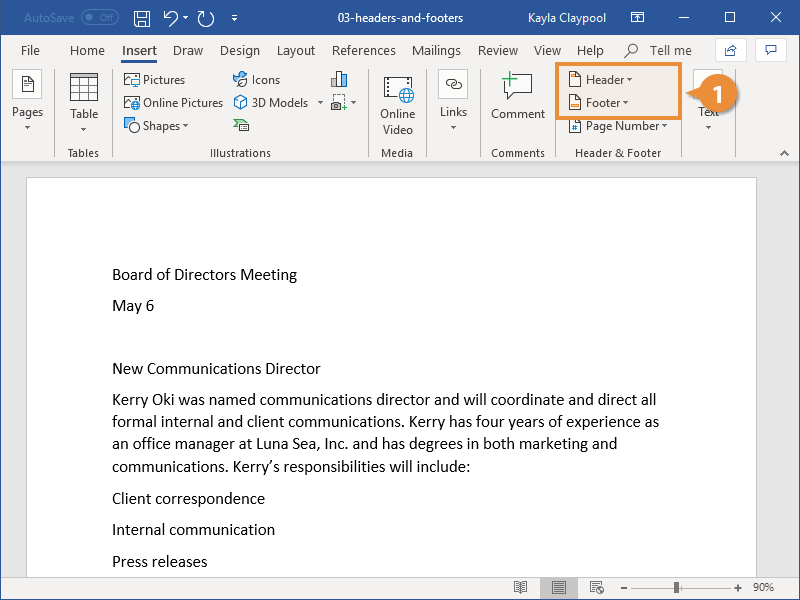
Documents with several pages often have information—such as the page number, the document’s title, or the date—located at the top or bottom of every page. Text that appears at the top of every page in a document is called a header, while text appearing at the bottom of every page is called a footer.
Use a Header or Footer
- Click the Insert tab.
- Click the Header or Footer button.
- Select a built-in header or footer design.

- Click the Close Header and Footer button when you’re done.
A list of built-in header or footer designs appears. Each option will include one or more placeholders for information such as document title, date, or page number.
Hover over a built-in header or footer option to view its attributes and a description of how it might be used best.
A new header or footer is inserted, and the Header and Footer Design tab also appears on the ribbon.
The Header and Footer Design tab closes, and the header and footer are set.
Remove a Header or Footer
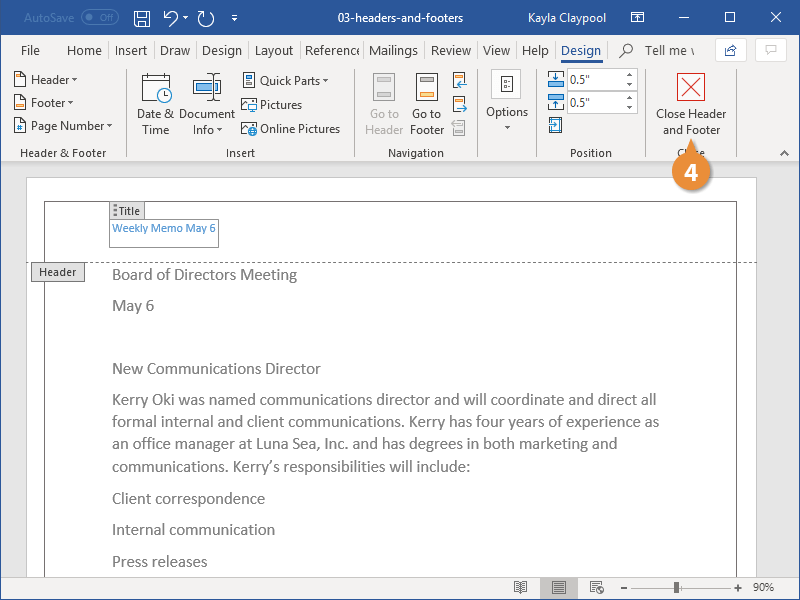
Once you’ve added a header or footer, you can easily remove it if you find that it isn’t what you want.
- Click the Header or Footer button on the Insert tab.
- Select Remove Header or Remove Footer.
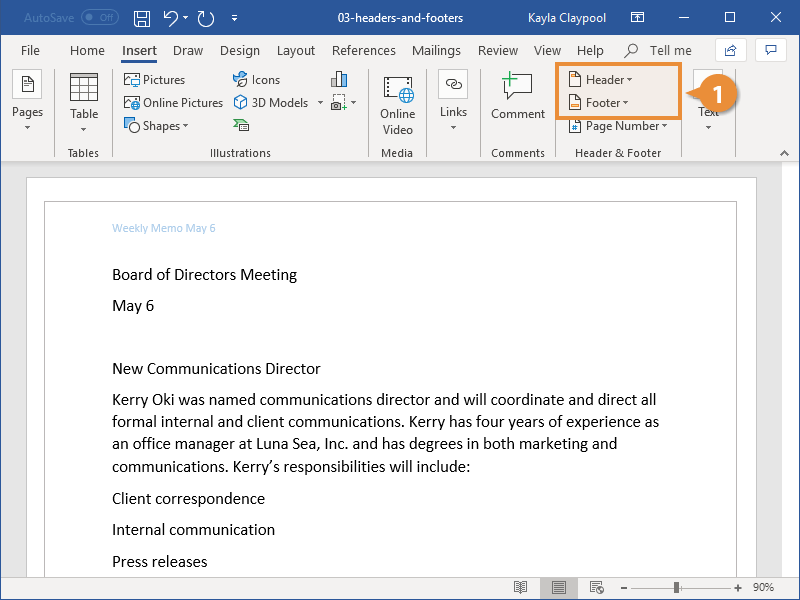
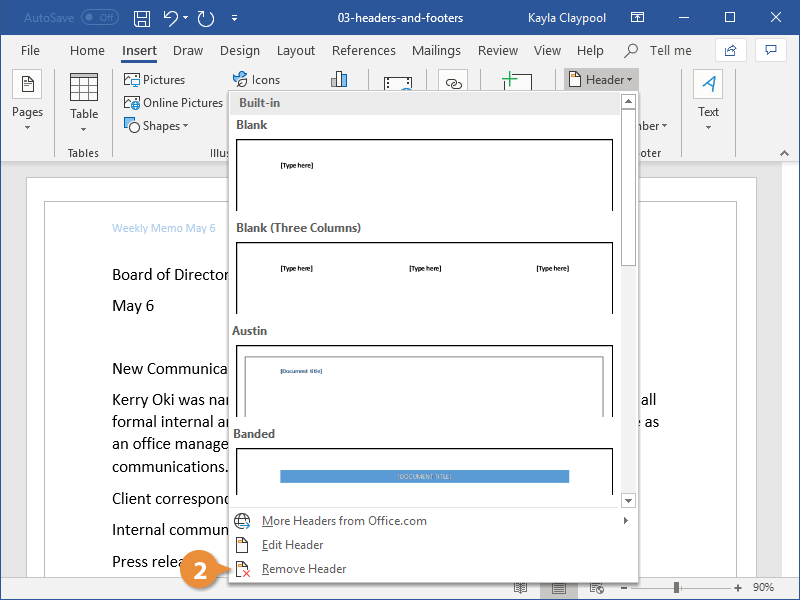
The header or footer is removed.
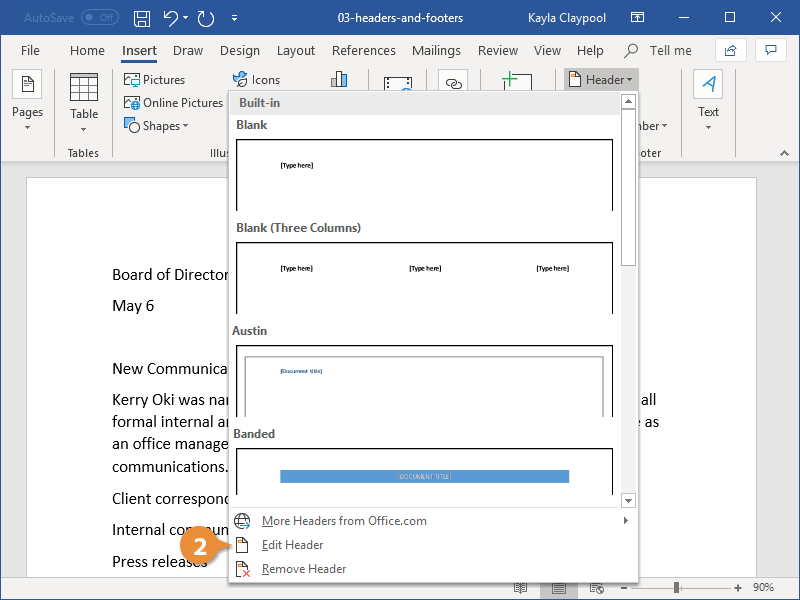
Create a Custom Header or Footer
Once you’ve added a header or footer, you can use the Header and Footer Design tab to customize its appearance. Or, if you’d prefer to start from scratch, you can customize the header or footer without using one of the built-in presets.
- Click the Header or Footer button on the Insert tab.
- Select Edit Header or Edit Footer.
- Make selections using the Header and Footer Design tab tools on the ribbon.
- Click Close Header and Footer when you’re done.
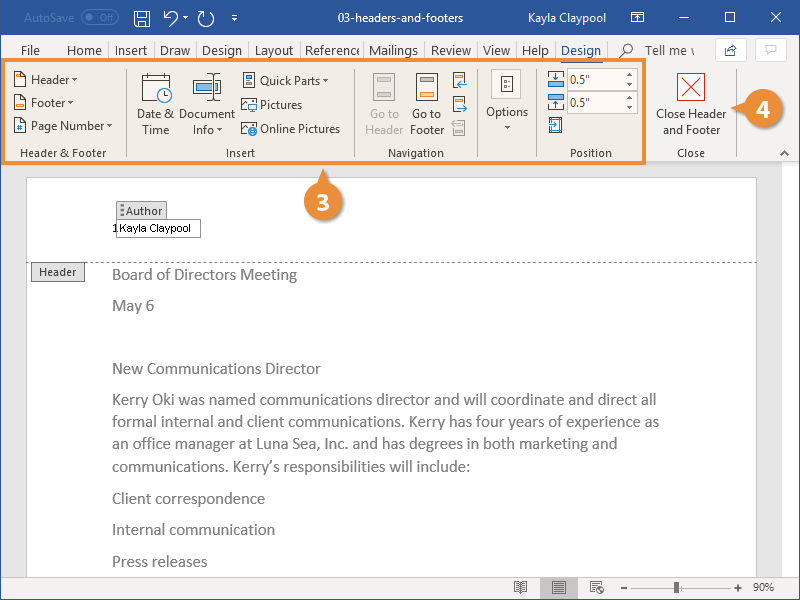
The Header and Footer Design tab appears, and you can now add text, graphics, and placeholders to the header or footer.
You can also display the Header and Footer Design tab and edit the header or footer by double-clicking in the top or bottom margins of the document, or by right-clicking in the top or bottom margins and selecting Edit Header or Edit Footer.
The Insert group contains options for inserting document info placeholders, which are fields that automatically fill in information, such as page number, the current date, the file name and path, or the author’s name.
In the Options group, you can also choose to use a different header or footer on the first page of a document, or to use different headers or footers on odd and even pages.
The custom header or footer is applied.

FREE Quick Reference
Click to Download
Free to distribute with our compliments; we hope you will consider our paid training.