
Let me tell you the shortest horror story ever.
Excel Crashed!
Imagine working on that urgent report or that extremely important dashboard where you have done such a fantastic job. You are proud of yourself and all the hard work you have put into it.
But you forgot a key step.
You didn’t save the Excel file (gasp!!!)
Ok, let me cut down on the dramatics and come straight to the point.
Excel has a tendency to crash, especially when you need it not to. Somehow, it happens at the worst possible time (not that there is a good time for this ever).
In such a scenario, your only option is to try and recover unsaved Excel files.
In some cases, you will be smiled upon by the Excel Gods and you’ll get the file, and in some cases, you may not.
In this article, I will share all there is to know when it comes to recovering unsaved Excel files. I will also show you the precautions and pre-emptive steps you need to take.
And if you want to absolutely make sure nothing goes wrong, I will also share a VBA code that will save a copy of your Excel file with a timestamp whenever you save the existing file.
Let’s get started!
All Possible Ways to Recover Unsaved Excel Files / Data
Excel (and even Windows) is highly unpredictable. It can crash anytime and can your Excel files with it.
It’s a bad situation to be in…
…but there are ways to tackle this.
Excel has a few functionalities where it can help you recover unsaved Excel files or data in some cases.
Here are three scenarios where Excel’s in-built checks can help you recover files/data:
- You are working on a new file (which you haven’t saved yet) and your system/Excel crashes.
- You updated a file which has been saved earlier and Excel crashes before you could save it.
- You made a mistake and saved the changes, but now want to go back to the previous version.
Let’s see how to tackle each of these.
Recover a New Unsaved Excel File (that has never been saved)
If you are working on something and Excel crashes (or your system crashes), you can still recover that unsaved file.
Note: This method works as Excel has an inbuilt AutoSave and AutoRecover functionality. It’s enabled by default so you should be able to use these methods to recover the files. In case it’s not enabled, you will have to do it to be able to use these functionalities. How to enable AutoSave and AutoRecover is covered later in this article.
Below are the steps to recover an unsaved Excel file:
- Open a new Excel workbook.
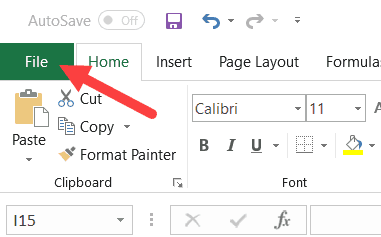
- Click the ‘File’ tab

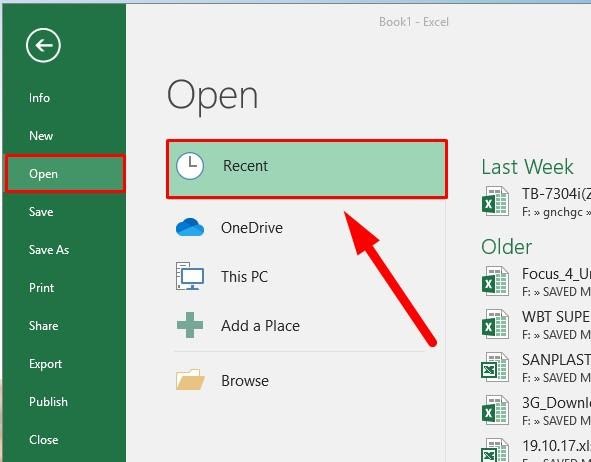
- Click on ‘Open’

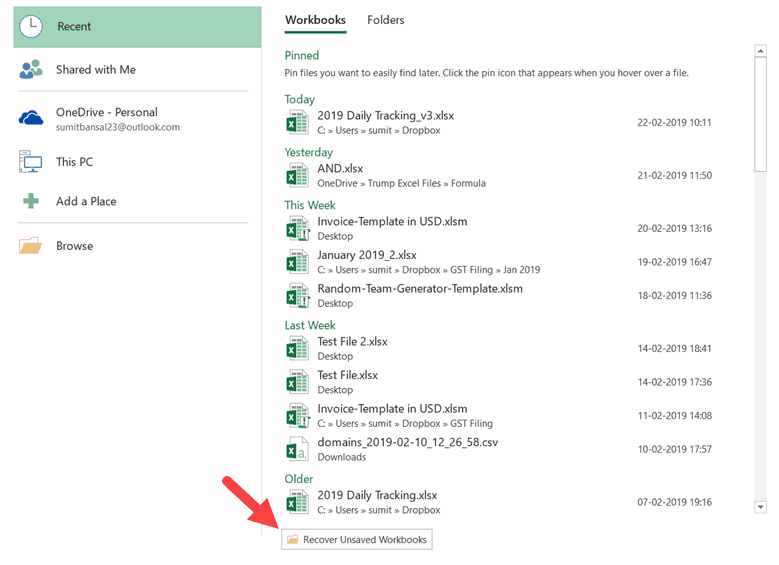
- Click the Recent Workbook option (it’s at the top-left)

- Click the ‘Recover Unsaved Workbooks’ button which is at the bottom

- In the dialog box that opens, scroll through the list of unsaved Workbooks and open the one you want.

- Save the file (using the ‘Save As’ option) with a different name in the location of your choice.


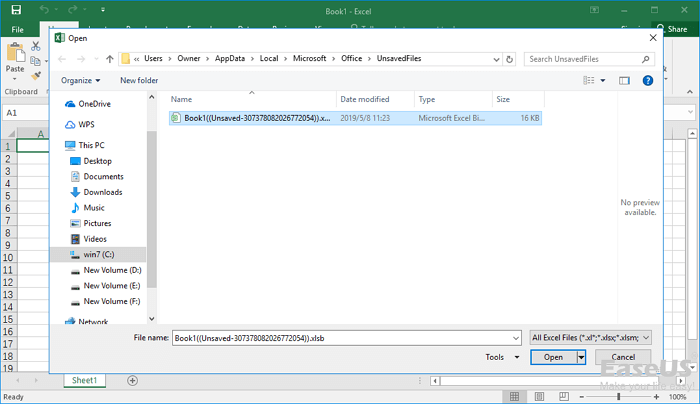
By default, Excel saves a copy of all the unsaved files at the following location:
C:Users[YourSystemName]AppDataLocalMicrosoftOfficeUnsavedFiles
In the above address, you need to replace [YourSystemName] with the name of your system (which is ‘Sumit’ in my case).
You can also go directly to this folder (where unsaved copies of Excel files are saved) by opening any browser and copy-pasting the address in it (in the place of URL).
When you open any file from this folder, you will see a notification bar that will prompt you to save it.

Click on it and save it at a new location with a name of your choice.
Note: By default, all the recovered unsaved files are in the ‘XLSB’ format. When you save it, make sure you’re saving it in a format you want.
With this method, you can recover files which you created but never saved.
Recover Updated Excel Files (the previous version was saved)
This method can be used for files which you have saved earlier, and Excel crashed (or the system crashed or the power went off) when you were working on it.
So you still have the previously saved file, but you lost the changes you did.
Below are the steps to recover the updated Excel file:
- Open any of the existing Excel Workbook.
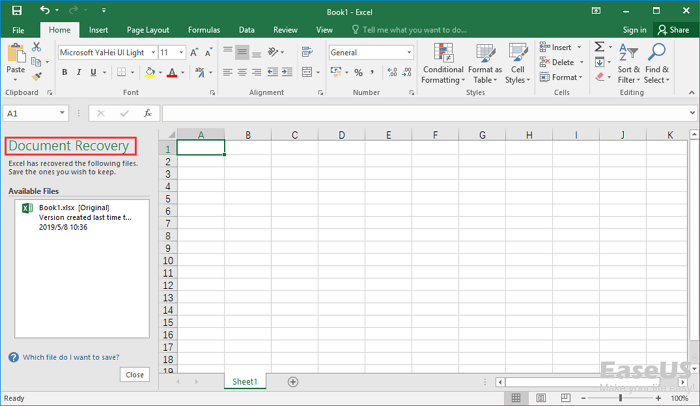
- As soon as it opens, you will see a document recovery pane that lists all the unsaved files. Click on any the file names to load the data.

- When you get the data you want, save the file with a different name.

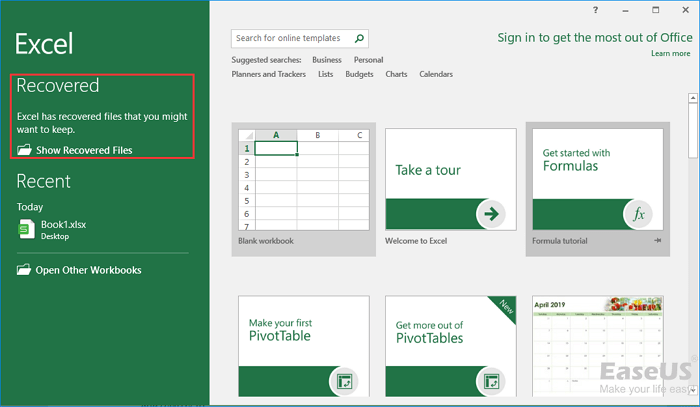
Alternatively, you can also open the Excel application, and you will see the ‘Show Recovered Files’ option (as shown below).
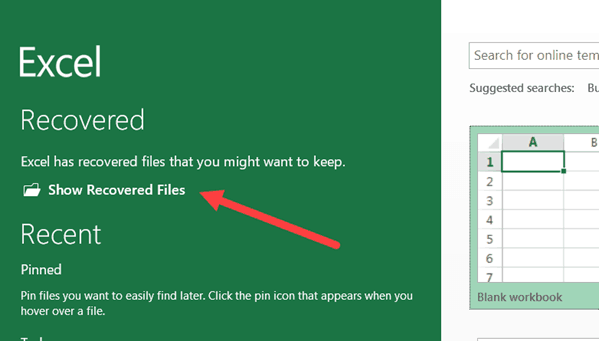
You can click on it and it will open the same Document Recovery pane.
Recover Overwritten Excel Files / Previously Saved Version (from within Excel)
While in the above two methods you can blame Excel or Windows for crashing or the power failure, this one is purely on you.
This is the case when you have a saved Excel file and you update the data and save it again.
But you end up making some changes you don’t want now (happens to me a lot).
What you really want is to get the previous version back.
While you can’t go back in life and correct your mistakes (unless you have a time machine of course), you can do that in the wonderful world of Excel spreadsheets.
In Excel 2010 and versions after that, Excel got an in-built feature to help you get the previous versions.
Below are the steps to revert to a previous version of Excel (even when you have updated and saved it):
- Click the File tab.
- In the Info page, click on Manage Workbook, you’ll find all the previous versions of that file.

- Click on the version you want to restore
- Save the file (preferably with a new name).

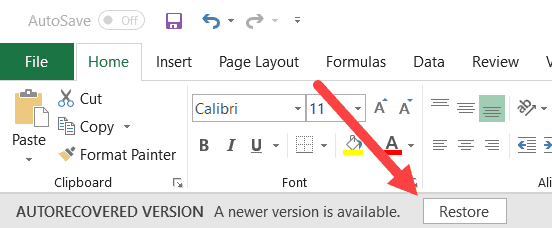
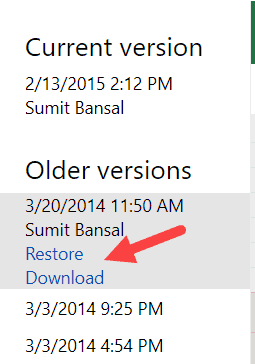
When you select a previously saved version and open it, Excel will show you a prompt as shown below. You can click on Restore to get the previous version that you have selected or can save it as a new file with a different name.
Note that for this to work, you need to make sure that AutoRecover option is enabled. While it usually is enabled by default, it’s something you can check and ensure. I cover how to enable ‘AutoRecover’ later in this tutorial.
When it comes to recovering unsaved Excel files or data, these are the three in-built options in Excel that can be used.
Another way (which I highly recommend) is to save your files on the cloud (OneDrive or DropBox). This takes away a lot of worries as the cloud services keep previous versions of your files.
Recover Overwritten Excel Files / Previously Saved Version (from the cloud – OneDrive/DropBox)
If you’re in the habit of saving your Excel files on the cloud – by using services such as OneDrive or DropBox, you don’t have to completely rely on Excel to help you recover unsaved files or lost data.
These cloud services also keep previous versions of your Excel files.
Let me show you how to get the previous versions from OneDrive and DropBox. I am sure there must be many more such services that have this functionality.
Getting the Previous Version of the Excel File from OneDrive
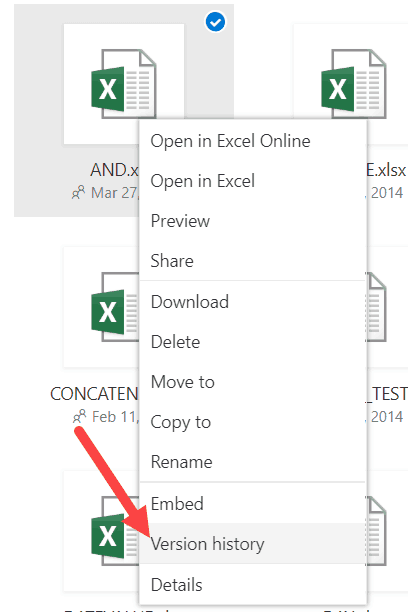
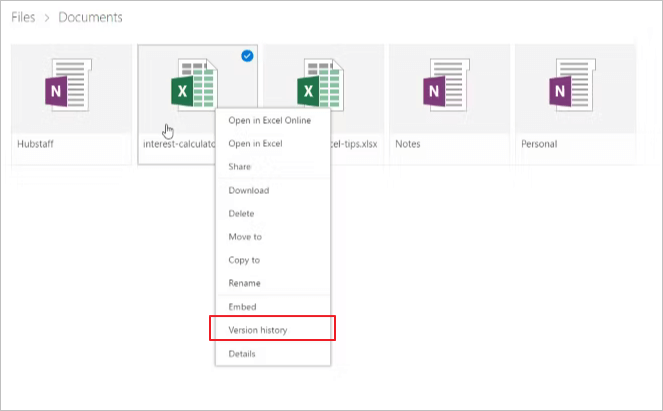
To get the previous version of an Excel file, right click on the current version in Onedrive and click on Version History.
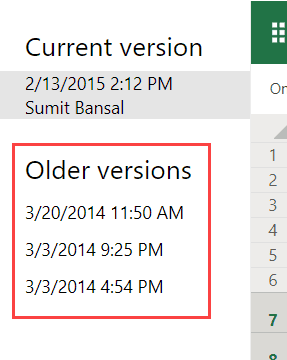
This will open the file and you can see all the previous versions of the file in the pane on the left.
Click on the version that you want. It will show you the file content and also give you the option to download that file or restore it.
Getting the Previous Version of the Excel File from DropBox
Just like OneDrive, DropBox also keeps the past versions of the Excel files that you can revisit and download.
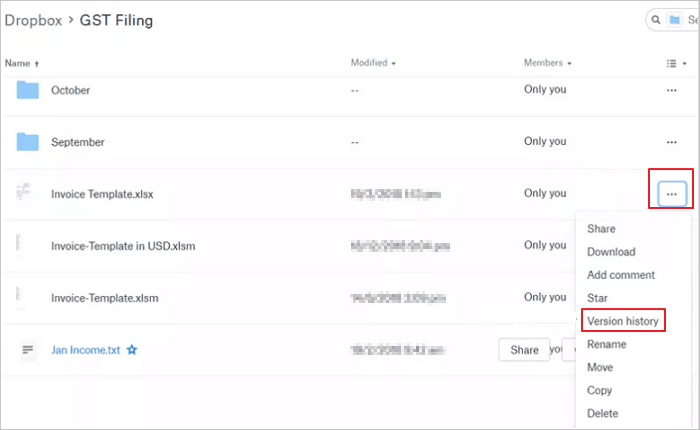
To get the previous versions, go to the file in Dropbox web-portal and click on the three dots for the file for which you want to see the previous versions.
Click on Version History option.
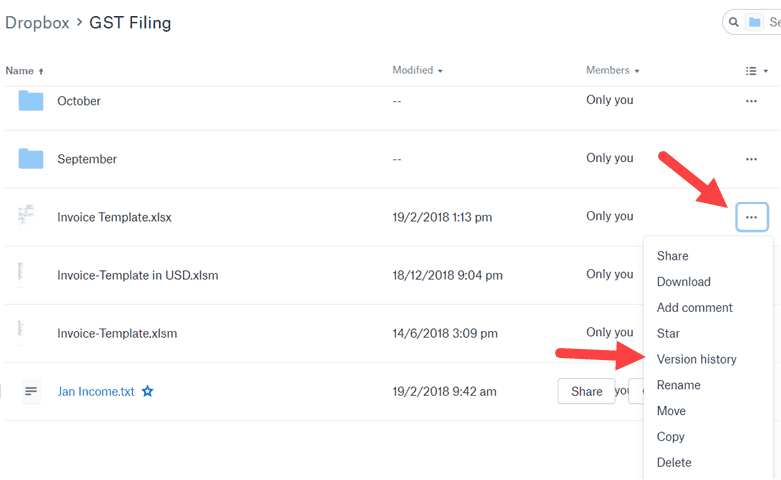
This will show you all the versions of that file. You can open and download this version from DropBox.
In case you have installed the DropBox folder on your system and keep your files there, you can simply right click on any of the files and click on Version History.
Doing this will take you to the web version of DropBox where you can see and download all the versions of the file.
Precautions to Enable Easy Recovery of Unsaved Files
While Excel has some default settings that make sure you have good chances of recovering Excel files, it’s still a good practice to make sure everything is enabled.
Enable AutoSave and AutoRecover
To make sure Excel automatically save your files and show recovery options, you need to have these enabled.
Although it should be enabled by default, in case it’s not, you can do that manually.
Below are the steps to enable AutoSave and AutoRecover functionality in Excel:
- Click the ‘File’ tab
- Click on ‘Options’
- In the Excel Options dialog box, click on Save (it’s in the left pane of the dialog box).
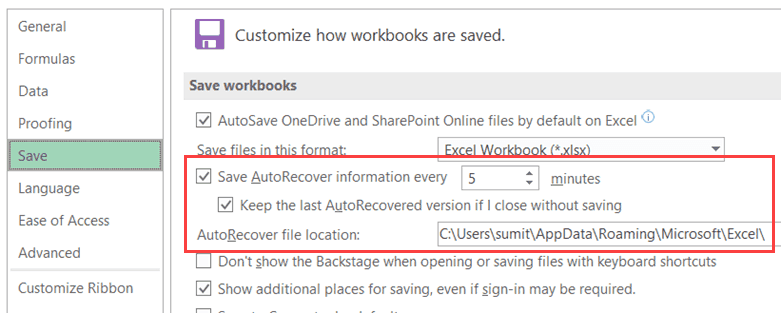
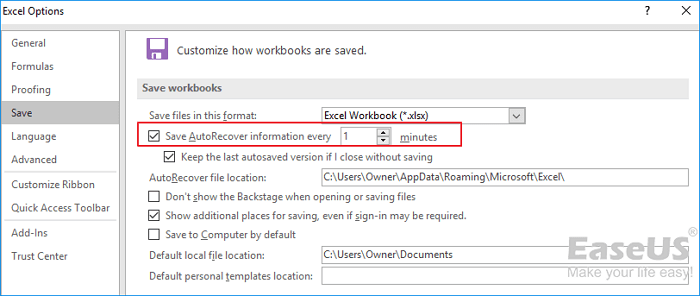
- Make sure the following settings are enabled (as shown below).
Let me quickly explain what these options mean:
- Save AutoRecover information every X minutes: This option will make sure that your files are saved every 5 minutes (or whatever time value you specify here). This is 10 minutes by default and I have changed this to 5 minutes. You can reduce this further if you want.
- Keep the last AutoRecovered version if I close without saving: This will ensure that in case your Excel/system crashes or you close a file without saving, a version is saved that can be auto-recovered.
- AutoRecover file location: This is the default location where auto-recovered files are saved. You can change this if you want.
Note: If you have a huge file with lots of formulas and charts, saving it every 5 minutes will lead to recalculation and some possible system freeze. If you don’t want that, you can choose a longer time duration (or can change calculation mode to manual).
Automatically Create a Backup Copy of the Saved Excel File
While Autosave and Autorecover options are useful when you forget to save the files and system crashes, auto-backup is something which creates a copy of the file whenever you save it.
For example, if I am working on a file with the name Test.xlsx and I save it in a folder, this would automatically create a copy with the name – ‘Backup of Test.xlk’
Now, whenever I save the Test file, all the changes are also saved in the backup copy.
This can be useful if you make some changes in a saved file and want to undo it. In that case, you can use the backup copy instead.
Or if your file crashes or gets corrupt, you will have the backup copy which will have the last saved content.
Below are the steps to enable the auto-backup feature for a workbook:
- Click the File tab.
- Click on ‘Save As’
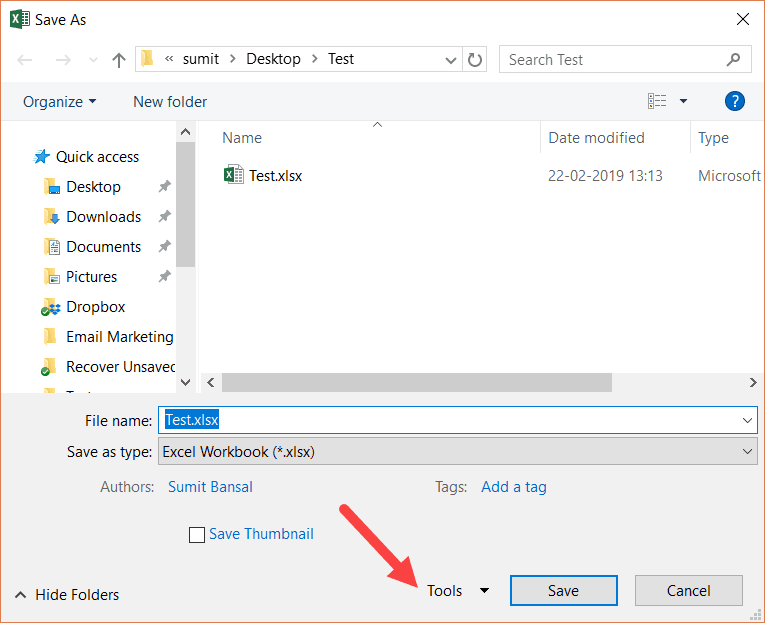
- Click on Browse to open the ‘Save As’ dialog box.
- In the Save As dialog box, click on the Tools option (it’s in the lower right part of the dialog box).

- Click on ‘General Options’.

- In the ‘General Options’ dialog box, check the ‘Always Create Backup’ option.

- Click OK.
- Save the file in the desired folder/location.


Now, whenever you save this file, an exact copy will be saved with the pre-fix ‘Backup of’.
Here are a few important things you need to know about using this auto-backup functionality in Excel:
- This is a workbook level setting. This means that if you enable it for one workbook, it will only work for that workbook. If you want it to work for others as well, you will have to manually enable it.
- This is different than Autorecover and Autosave options. These are independent settings and configuring one doesn’t impact the other. So you can have a workbook where AutoRecover, AutoSave, and AutoBackup all work.
- The backup file is saved with a .XLK extension. This is the extension for back-up files, and you may see a prompt when you open this file. Just click on Yes and it will open the backup file.
- The backup file is always one version behind your main file (except the time you save it for the first time). For example, if you create a new file and enable backup in it and do some changes and save it. This will save the new file as well as a backup copy of it. At this point, both the files (the main file and the backup) will be exactly the same. Now, if you make some changes in the main file and save it once, it will not be saved in the backup file. But if you save it again, it will be done in the backup file as well.
Auto-backup is a good feature as it gives you the file’s last saved version in case you make some unwanted changes and save the file. You can use the backup file to get the version before the last saved version.
Automatically Save a Time-Stamped Copy of the Excel Workbook
While all the methods covered so far rely on the Excel in-built features, you can also use a short VBA code to make sure you don’t lose your work ever.
With a VBA code, you save a timestamped copy of your Excel file as soon as you save it (or close it).
This ensures that you always have all the previous versions and you can go back and recover a file in case you mess up. Also, since these are time-stamped, you can easily find which version you want (or where you messed up).
Below is the code that will create a timestamped copy of the workbook as soon as you save it:
Private Sub Workbook_BeforeSave(ByVal SaveAsUI As Boolean, Cancel As Boolean)
Application.ScreenUpdating = False
Dim BackUpPath As String
BackUpPath = "C:UserssumitDesktopTest"
ThisWorkbook.SaveCopyAs BackUpPath & Format(Now, "dd-mm-yyyy hh:mm:ss") & " " & ActiveWorkbook.Name
Application.ScreenUpdating = True
End Sub
Note that you have to specify the location of the folder where you want to save the backup copies (change the path highlighted in bold in the above code).
This may mean that you end up with a lot of copies, but it can be a huge life-saver when you’re working on critical projects.
You can use a similar code to save a copy before you close the workbook (instead of saving a copy every time you save).
Private Sub Workbook_BeforeClose(Cancel As Boolean)
Dim BackUpPath As String
BackUpPath = "C:UserssumitDesktopTest"
ThisWorkbook.SaveCopyAs BackUpPath & Format(Now, "dd-mm-yyyy hh-mm-ss") & " " & ActiveWorkbook.Name
End Sub
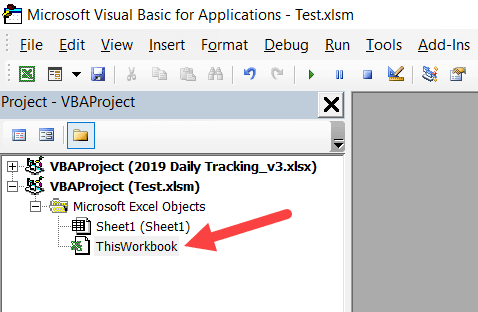
You need to put this code in the ThisWorkbook code window.
To do this, open the VB Editor (keyboard shortcut – ALT + F11) and double click on the This Workbook object in the project explorer.
Repairing Corrupt Excel Files
In case you find yourself with a corrupt Excel file, there are a few things you can do.
First and foremost, you can use the repair option that’s in-built in Excel.
Below are the steps to recover a corrupt file by repairing it:
- Open the Excel application.
- Click on ‘File’ and then click on ‘Open’ (or use the keyboard shortcut Control + O).
- Click the Browse button.
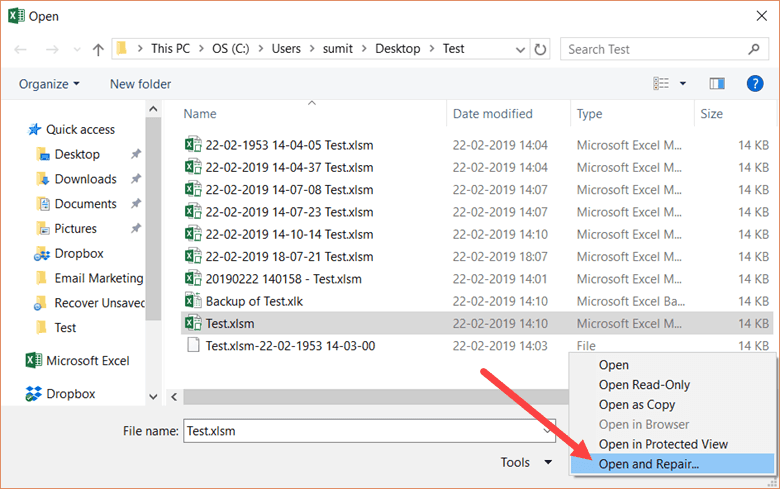
- In the dialog box that opens, select the file that has been corrupted.
- Click on the small downward pointing triangle in the ‘Open’ button (as shown below).

- Click on Open and Repair.
- Excel will show you a prompt as shown below. Click on Repair.


If you’re lucky, everything would go smooth and you’ll be able to recover your data from the corrupt file.
In case repair option doesn’t work, follow the above steps till Step 5, and then instead of Repair, click on ‘Extract Data’. Excel will ask you whether you want to ‘Convert to values’ or ‘Recover Formulas’.

You can try using whatever option works for you. Excel will try and extract as much data as it can, and create a new workbook with the extracted data.
If this also doesn’t work. you may have to rely on third-party tools to recover corrupt Excel files.
You May Also Like the Following Excel Tutorials:
- Reduce Excel File Size
- How to Turn On AutoSave in Excel
- Clean Data in Excel.
- Excel Interview Questions.
- Excel Pivot Table
- Automatically Open Specific Excel Files on Startup
- How to Mark an Excel Workbook as Final?
Reading time
3 min
Views 2.2K
Read this article to learn how to restore any unsaved or overwritten MS Excel files. Three simple methods for an ordinary user.

Microsoft Office
There are several ways to restore unsaved files. You may not be so lucky to get the latest version of your document with all of the recent changes, but still it is much better than starting all the hard work from the scratch. In this article, we will review possible ways of restoring documents created in Microsoft Excel, And you will see that they are pretty easy and convenient.
Method one: Restore unsaved Microsoft Excel workbooks
If you forget to save a document and close the application, you can recover it with the help of the feature: Recover unsaved workbooks.
To find out what unsaved workbooks are available for recovery, do the following. Start Microsoft Excel. In the top left corner, click on the tab File. In the left panel, choose Open and click Recent on the right.
Go to the bottom of the screen to find Recover Unsaved Workbooks.
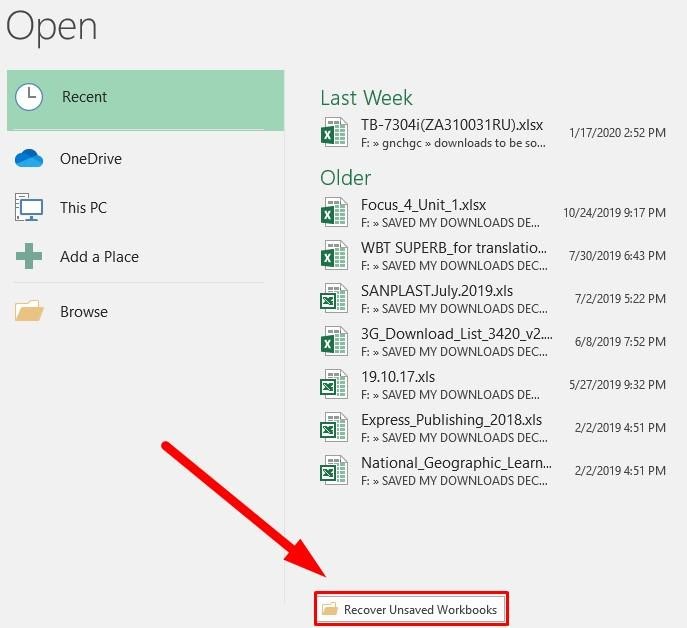
Click on this button, and you will see a list of unsaved files available for recovery in the window that opens.
If you’re lucky, you will see the file you are looking for on this list. Now the last step is to load it and save for further use.
Method two: Restore overwritten Microsoft Excel files from OneDrive;
If you don’t save your Microsoft Excel files to such cloud service as OneDrive, the description of this method will certainly convince you to consider that option. The OneDrive storage saves the history of versions for your files, so you can view this history and restore any files – anytime. You can choose to save your files to any directory, but choosing the folder Documents seems to be the most logical solution.
The easiest way to to finish the recovery process is to use the interface of the OneDrive service.
Open any browser you prefer and go to the address onedrive.live.com.

Click on the folder where you have saved the file (in my case, this is the folder Documents).

Find the document you need, right-click on it and open a pop-up menu. Choose the option Version history from the list.

Using the browser functionality, OneDrive will open a new page to display the list of previously saved versions for your document. You can view each version of the saved document.
Find the version that meets your needs. Click on the link Restore, to overwrite the current version of the document, or the link Download, to download a copy of this version.
Method three: Restore previous versions from File History
Even if you don’t use OneDrive, the storage service offered by Microsoft, you still have a chance to recover your overwritten Microsoft Excel documents. If you enabled File History for your Windows operating system, you can use this feature to search for older versions of any file.
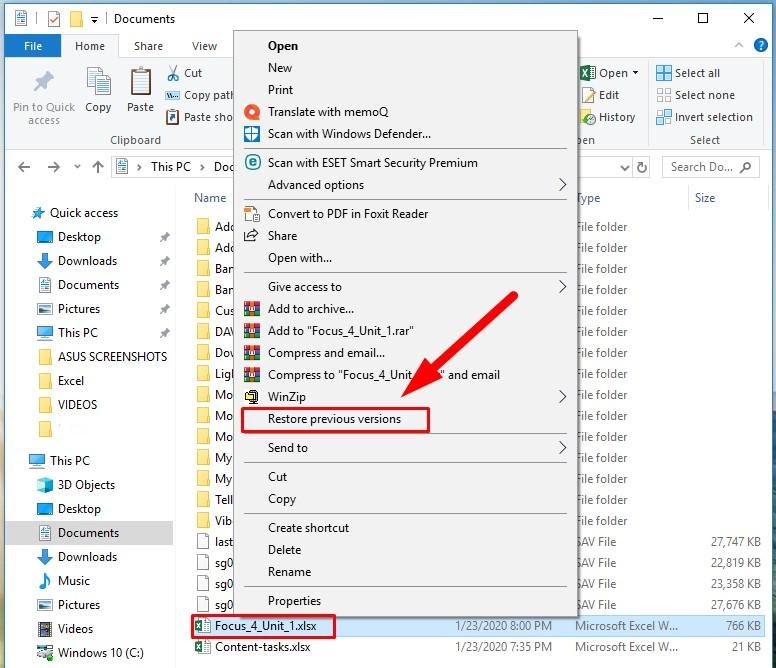
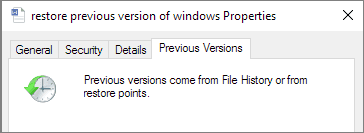
Open the Windows file explorer in any way you like (for example, by double-clicking on This PC desktop icon), go to the directory where File History saves files and find the one you need. Right-click on it and open a context menu. From the list of available actions, select the section Restore previous versions.
A new window will open for you to see all previous versions available for recovery. However, if the File History feature was not enabled before, and you haven’t created any Restore points, there will be nothing to show (it’s the case in our example).
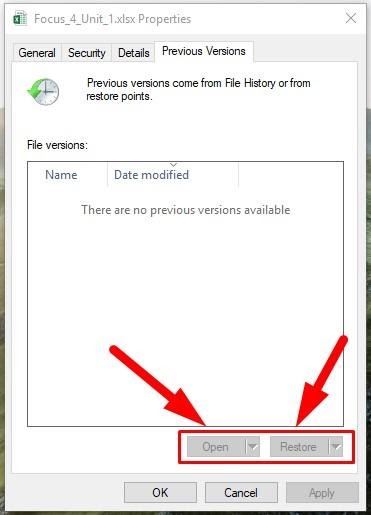
On the other hand, if you took care to back up your data, it will be easy to restore a Microsoft Excel document. Select the saved file you need and click Open. This action starts Microsoft Excel and the selected version of the document will open. Otherwise, click Restore and save the existing version of the document to the folder Documents which is the default directory.
The final conclusion: save your files as often as possible
Although the methods for restoring deleted and overwritten Microsoft Excel files will work and can help you if necessary, we wouldn’t recommend you to rely on them exclusively. They do not always restore the exact version of the spreadsheet which you hoped for. The best thing you can do is to save your work documents more often (enable the autosave feature: click Options, find the tab Save and check the box for Save Autorecover information every ** minutes), and use backup options that support management of file versions.
If necessary, use Hetman Office Recovery to restore any deleted documents. To learn more about it, read the notes on the program’s webpage or follow the link below for a video tutorial.
What methods do you prefer to restore unsaved and overwritten Microsoft Excel files? Leave a comment to share your advice or experience.
See the full article with all additional video tutorials. If you still have any questions, please ask in a comments. Also visit our Youtube channel, there are over 400 video tutorials.
Excel for Microsoft 365 PowerPoint for Microsoft 365 Excel 2021 PowerPoint 2021 Excel 2019 PowerPoint 2019 Excel 2016 PowerPoint 2016 More…Less
If the AutoRecover option is turned on, you can automatically save versions of your file while you’re working on it. How you recover something depends on when you saved it.
If you’ve saved the file
-
Open the file you were working on.
-
Go to File > Info.
-
Under Manage Workbook or Manage Presentation, select the file labeled (when I closed without saving).
-
In the bar at the top of the file, select Restore to overwrite any previously saved versions.

Tip: In Word, you can also compare versions by clicking Compare instead of Restore.

If you haven’t saved the file
-
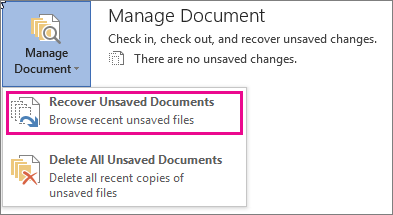
Go to File > Info > Manage Document > Recover Unsaved Workbooks in Excel, or Recover Unsaved Presentations in PowerPoint.
-
Select the file, and then select Open.
-
In the bar at the top of the file, select Save As to save the file.


See Also
View historical versions of Office files
What is AutoSave?
View the version history of an item or file in a SharePoint list or library
How does versioning work in a SharePoint list or library
Need more help?
Imagine you had been working on a really important Workbook for hours and the system crashes. The file is not saved, and you just lost hours of work because you forget to hit the save button.
But what about when you realize that you made a mistake while working on the workbook an hour ago? How do you go back to an older version of the Excel file?
Well, don’t panic because we have compiled together some of the most efficient tips to recover unsaved Excel files and their older versions.
By default, Microsoft provides an AutoRecovery option which can recover files that were saved, but their latest version cannot be accessed because the system or Excel crashed.
Configure the AutoRecover Settings in Excel
- Go to the File tab and click on Options
- Click on the Save tab
- Make sure both ‘Save AutoRecover information every Z minutes’ and Keep the last autosaved version if I close without saving’ are checked. You can also keep the autorecover duration to the smallest to make sure every file is saved
- Click on OK
After this, whenever you open Excel after a crash, you will be able to see the files that can be autorecovered. But, this only applies to files that have been saved at least once. For files that haven’t been saved at all, follow the steps in the next section.
Recover unsaved Excel file
In order to recover an Excel file that you forget to save, follow the steps below
- Go to the file tab and click on ‘Open’
- Now click on the Recent Workbooks option on the top left
- Now scroll to the bottom and click on ‘Recover Unsaved Workbooks’ button
- Scroll through the list and search for the file you lost.
- Double-click on it to open it
- The document will open in Excel, now all you have to do is hit the Save As button
Recover overwritten Excel files
If you are using Excel 2010 or 2013, then you can easily recover an older version of the document. It is extremely helpful if you made a mistake on the Workbook and realized it late or you just want to see what the workbook looked like before.
To do this, here are the steps you need to follow
- Click on the File tab and select Info
- Now click on the manage versions tab. There you will be able to see all the versions that were autosaved by Excel
But you can also see these autosaved versions until you have saved the file. Once the current version of the file has been saved, all the previous autosaved files will disappear. To save them, you need to take the backup of the file.
Saving a backup of Excel file
Taking a backup of Excel files makes it possible to revisit older versions in case you made a mistake. This can be useful when you hit the save button when you didn’t mean it or when you delete the main original final.
Here is how you can take a backup in Excel 2010 and 2013
- Go to the File tab and click on ‘Save as’
- Now click on the Browse tab at the bottom
- A Save as window will open up. At the bottom of it, there is an option called Tools
- Click on Tools and select ‘General options’
- In the new Window, check on ‘Always create backup
Now every new Excel file that you create will have a backup file associated with it. But remember that backup Excel files have a different extension – .xlk
Overall, it’s very easy to recover Excel files even when you forgot to save them. All you have to do is not panic and follow the steps we mentioned.
It is quite painful of losing an important Excel Workbook due to power failure or software crash while working on it for hours without hitting a Save button. But don’t worry, as this optimized post contains ample information on how to recover unsaved Excel files in no time.
So, without any further ado, let’s get started…
To repair/recover corrupted Excel file data, we recommend this tool:
This software will prevent Excel workbook data such as BI data, financial reports & other analytical information from corruption and data loss. With this software you can rebuild corrupt Excel files and restore every single visual representation & dataset to its original, intact state in 3 easy steps:
- Download Excel File Repair Tool rated Excellent by Softpedia, Softonic & CNET.
- Select the corrupt Excel file (XLS, XLSX) & click Repair to initiate the repair process.
- Preview the repaired files and click Save File to save the files at desired location.
Can I Recover an Excel File I Didn’t Save?
Yes, of course, you can recover an Excel file you didn’t save.
But how???
Many of you are unaware of a few functionalities of MS Excel where it can assist you in bringing back your unsaved Excel data in various circumstances.
Here’re the two scenarios where Microsoft Excel’s in-built checks for the unsaved file and try to recover it:
Scenario 1- You’re working on a new Excel file for hours (haven’t saved it yet) & suddenly system or Excel crashes.
Scenario 2- You updated an Excel file which is previously saved & Excel crashes before you could save the changes.
Now, let’s scroll down this page to find out Excel recover unsaved file solutions according to circumstances…
Please Note: Excel deletes the entire earlier Autosaved versions at the time you close the document. If you want to look at the previous version, then it is better to create a backup of your data.
How to Recover Unsaved Excel Files Automatically?
If you don’t have a backup of your unsaved Excel file then simply try the recommended MS Excel Repair & Recovery Tool. This advanced program has the ability to repair all sorts of errors, corruption, or issues in Excel workbooks.
Apart from this, it allows to restore all the corrupt Excel data such as charts, properties cell comments, worksheet, and other important stuff.
It is a unique tool to repair multiple excel files in one repair cycle and recovers the entire data in a preferred location.
The best thing about this utility is- it is easy to use and compatible with both Windows as well as Mac operating systems.
* Free version of the product only previews recoverable data.
Even it supports the entire Excel version. All you need to do is to just download & install this tool on your PC and follow the below step-by-step guide to know how it works:
Also Read: Recover Excel Data After Accidentally Clicked Don’t Save Excel File
How To Recover an Unsaved Excel File Under Different Situations?
Recover a New Unsaved Excel File (That Wasn’t Saved)
In case, if you are working on a new Excel file and suddenly the program or system crashes. And after a few seconds, you realize that you haven’t saved the workbook.
In such a case, you can still recover deleted unsaved Excel files. Here’s how you can do so:
- Launch a new Excel file.
- Go to FILE >> click ‘Open’

- Select Recent Workbook.

- Now scroll down > click on Recover Unsaved Workbooks button.
- And when the Open dialogue box pops up, select the necessary file > click Open.

The document opens in Excel and will prompt you to save it. Click on the Save As button, in the yellow bar above your worksheet and save the file to the desired location.
Retrieve Unsaved Excel File (The File Was Earlier Saved)
Excel Autosave and AutoRecover are the two best features that help the user to recover unsaved Excel file data if they are enabled.
Excel AutoSave is a tool that automatically saves a new document that was created just now but hasn’t been saved yet. This helps the user to recover important data that have been lost due to power failure or crash.
Excel AutoRecover allows the user to restore the unsaved files lost after an accidental closure and other unexpected reasons. With this, you can recover the last saved version displayed in the Document Recovery Pane, when the Excel file is started next time.

This feature only works on Excel workbooks that have been saved at least once, otherwise, the Document Recovery pane won’t show up in Excel. Besides, these two features are amazing to recover unsaved Excel workbooks or restore overwritten Excel files. And this option by default comes ON in an Excel file.
Steps to Organize The AutoSave (AutoRecover) Settings In Excel:
- First, go to FILE tab > select Options.

- Then click Save on the left-hand side of the Excel Options dialog box
- Assure both “Save AutoRecover information every X minutes and Keep the last autosaved version if I close without saving” are checked.
- Click OK.
The AutoRecover feature is by default set to automatically save changes to your workbook every 10 minutes. You can increase or decrease the time period as per your recommendation.
You can also change the Excel AutoRecover file location and specify AutoRecover exceptions.
Also Read: Recover Corrupted Excel File Data
There are two ways to recover overwritten unsaved Excel files one is via OneDrive and another is via Windows File History.
Here we have discussed briefly:
Way 1- From OneDrive
OneDrive is used to keeps a version history which you can easily browse & recover from whenever you would like. Thus, if you are also using a OneDrive, then you can recover overwritten Excel files from OneDrive.
Here is how you can do so:
- First, visit https://onedrive.live.com/
- After this, click on a folder where you’ve saved your file.
- In this instance, find a document you are looking for >> right-tap on it.
- Choose the Version history. Here, you’ll get the list of all versions which OneDrive has saved. Luckily, you can even preview each version.

- Choose the needed document version & select Restore or Download in order to overwrite a current version.

Way 2- Restore from the File History
In case, you are not using OneDrive, then you can recover your overwritten Excel files using File History. Though, you can only use this feature if you have previously it in your Windows OS.
Thereby, if you have enabled it, follow the below steps carefully:
- First, right-click on the file >> click ‘File history’
- Find the version that you need to restore.
- Click on ‘Open’ option or ‘Restore Previous Versions’ button to select what you need to do with a file.

Bonus Tip To Avoid Excel Data Loss
#1: Save a Backup Copy of Your Workbook
The Auto Backup feature in Excel is very useful it allows the users to recover a previously saved version of the workbook. Making a backup of the important file is a very important and good habit to overcome the data loss situation.
This also protects the work if you accidental loss or in the situation you save changes that you do not want to keep or delete the original file. So, in this case, backup proved to be the best, as you have the current saved information in the original workbook and all previously saved information in the backup copy.
Well, this is a very helpful feature; but this is hard enough to find in Excel 2010 / 2013. So here follow the steps:
- First, go to File> Save As.
- And choose Computer> click on the Browse

- As the Save As dialogue window pops up > click on the small arrow next to the Tools button
- Now choose General Options from the drop-down list.

- And check Always create a backup box in the General Options dialog > click OK.

- Then rename your file > select the desired location to save it. Excel creates the backup copy of the document in the same folder.
Please Note: The backed copy is saved with different .xlk file extension, as you open it, Excel pop-up a message to verify that you really want to open this workbook. Click YES and you can restore a previous version of your spreadsheet.

Related FAQs:
Where Do Unsaved Excel Files Go?
All the unsaved Excel files should be shown in the Document Recovery pane that pops up when Excel was shutdown erroneously.
How to Recover Excel Data After Accidentally Clicked Don T Save Excel File?
To recover Excel data after accidentally clicked don’t save Excel file, try the below methods:
- Try to recover via Auto Recovery
- Through Recycle Bin
- Search for the Autorecover files
- Look for the Temporary Files.
Also Read: Recover Lost/Disappeared Data In Excel
Bottom Line:
I hope the given methods will help you to recover unsaved Excel file Mac/Windows or overwritten Excel files.
However, all the solutions mentioned above are very effective but the MS Excel Repair & Recovery Tool is the best among them. Furthermore, don’t forget to create a backup of your important files regularly to avoid such Excel data loss situations.
Thanks for reading…!


Priyanka is an entrepreneur & content marketing expert. She writes tech blogs and has expertise in MS Office, Excel, and other tech subjects. Her distinctive art of presenting tech information in the easy-to-understand language is very impressive. When not writing, she loves unplanned travels.
How to Recover an Unsaved Excel File (4 Free Methods)
Losing an unsaved Excel file is a real pain🤕
Whether you lose an entire spreadsheet or just the latest round of edits, it can take a lot of time to fix the problem.
But don’t worry!
In this guide, I’ve compiled the 5 methods with the highest probability to recover unsaved Excel files.
Recover an unsaved Excel file with AutoRecover
So, you didn’t save the deleted file at all?
There’s still a good chance you’ll be able to recover your unsaved Excel file.
By default, Excel saves a temporary version of your Excel file (even if it’s unsaved) every 10 minutes.
You can access these temporary versions by following these steps.
1. In Excel, click on ‘Files’ in the ribbon and then go to ‘Open’.
2. Somewhere on the ‘Open’ screen, you will see an option called ‘Recover Unsaved Workbooks’ or something similar. Click it.
The exact words and placement of this button depend on your version of Excel. In Excel 2021 it looks like this:

3. Your unsaved Excel file may be in the folder that appears. If it is, just double-click to open it.
And do remember to save it this time💾

4. If the folder doesn’t contain your lost Excel file, close the dialog box and click on ‘Options’ (still from the ‘File’ tab in Excel).
5. Click on the ‘Save’ pane and see the AutoRecover file location.

Your lost Excel files may be there!
6. Navigate to that location and look for your unsaved Excel file.

If the file is not there, don’t panic yet✋
There are still plenty of methods to restore your lost data.
Read on!
If you’re running Windows, copy the AutoRecover file path from step 5, then press Windows Key + R to bring up the ‘Run’ command window.
Paste the file path and you are taken to the folder immediately.
Recover overwritten Excel files with OneDrive
If you’re not using OneDrive, skip to the next section.
Losing hours of work because you pressed save when you shouldn’t is a bummer👎
But if your file was overwritten, there are a few things you can do to restore a previous version of your Excel file.
1. Go to onedrive.live.com and locate the Excel file that was overwritten.
2. Right-click it and click ‘Version history’.

3. Identify the version of your Excel file you want to recover and choose whether to restore it (replacing the current version) or download it.

If you use the OneDrive application on your computer, you can just right-click the Excel file on your computer.
Then click ‘Version History’ to look for the version you want to recover.
Recover overwritten Excel files using File History
If you don’t use OneDrive (or didn’t keep the file in a OneDrive folder), you might still be able to recover a previous version of an overwritten Excel file.
1. Right-click on your file and click on ‘File history’.
2. Locate the version you want to restore in the dialog box.

3. Click the ‘Open’ or ‘Restore’ buttons to choose what you want to do with the file.
Did you find it? 🔍
Recover deleted Excel files
So, you deleted the file and want it back?
Here are a few things you can try, to recover your deleted Excel file.
Restore from Recycle Bin
1. Locate the Recycle Bin on your computer.
Read this guide if you have trouble finding it.
2. Find your Excel file (if it’s there) and right-click it.
3. Click on ‘Restore’ and your file is automatically put back to where it came from.

Unfortunately, this only works if you didn’t permanently delete your Excel file.
If you did, then there’s no way of getting it back without using 3rd party recovery software (and there’s still no guarantee).
But, if the deleted file was placed in a OneDrive folder, there’s a big chance you can get it back😊
Restore deleted Excel files from OneDrive Recycle Bin
Even if you permanently deleted your file, OneDrive still saves a version in its own Recycle Bin.
1. Go to onedrive.live.com and click on the ‘Recycle Bin’ in the left-side menu.
2. Find your lost Excel file and right-click it.
3. Click ‘Restore’ and your file is automatically restored to its previous location.

Prevent data loss with AutoRecover and AutoSave
Losing data is almost inevitable.
But you can make the process of recovering the data from an unsaved file a lot less painful if you’re prepared.
We recommend changing just a few settings to help prevent data loss in the future.
AutoRecover
AutoRecover saves a temporary version of what you’re doing in Excel every 10 minutes.
If Excel crashes, you can access this temporary version using the methods I explained earlier.
AutoRecover is active by default. If it somehow isn’t active on your computer, follow these steps:
1. Go to ‘File’ and ‘Options’.
2. In the ‘Save’ pane, make sure there’s a checkmark in ‘Save AutoRecover information every’ and ‘Keep the last AutoRecovered versions if I close without saving’.

3. Here you can also change when Excel should save this temporary version of your Excel file.
The default is every 10 minutes, but you can easily change that. Try 5 instead.
It might not seem like a big difference from 10 minutes, but it can save you a lot of work.
AutoSave
Of course, we recommend saving your changes often. Just hit Ctrl + S to overwrite the previous version of your document.
If you’re the type of person who forgets to do this (like me), you can toggle on ‘AutoSave’ on the top left side of the Excel interface.

AutoSave saves every single change you make in your Excel file – automatically.
And if you overwrite something, read here how you can recover overwritten versions of your Excel files.
That’s it – Now what?
I truly hope this guide helped you recover your unsaved files and restore your lost data.
Trust me, I’ve been through my fair share of rebuilding Excel files the hard way until AutoRecover and AutoSave/OneDrive came along.
But sometimes, other people are the cause of your data loss. If you share your Excel files with other people, I strongly suggest you learn a bit about file protection.
Read my guide here and learn to protect your Excel file from unintentional (and intentional) changes.
So, you might avoid being in a situation where you need to recover unsaved workbooks in the future.
See you around👋
![]() Written by Kasper Langmann, co-founder and Microsoft Office Specialist.
Written by Kasper Langmann, co-founder and Microsoft Office Specialist.
Updated May 27th, 2022.
Kasper Langmann2022-08-21T20:14:07+00:00
Page load link
Did you forget to save Excel files on a Windows PC? Follow the steps below to recover unsaved Excel files with simple clicks.
| Workable Solutions | Step-by-step Troubleshooting |
|---|---|
| Recover Unsaved Excel Workbooks | Open a new or an Excel workbook. Go to «File > Open»…Full steps |
| Recover Updated Excel Files | Open the Excel application, find «Recovered» and click «Show Recovered Files»…Full steps |
| Recover from Previous Versions | Open Excel, and click «File» > «Info» > «Manage Workbook»…Full steps |
| Recover Overwritten Excel Files | Enter the OneDrive official page and sign in to your account…Full steps |
| Other Effective Solutions | Restore from File History > Run Data Recovery Software…Full steps |
Common Reasons that Can Lead to the Loss of Your Excel File
Any business owner or manager knows that data is essential to the success of their enterprise. Without accurate, up-to-date information, it would be difficult to make informed decisions about where to allocate resources or how to set prices. Excel files are often used to store this vital data, as they offer a convenient way to organize and manipulate large amounts of information. However, excel data loss can occur for a variety of reasons.
01
Accidental Deletion:
One common cause is accidental deletion. This can happen if a user accidentally clicks the wrong button or deletes an Excel file without meaning to. But you can recover deleted Excel sheets if you have the right methods.
02
Unintentional Formatting:
Instead of manually deleting all files stored on a storage device, this error often happens all of a sudden and you can’t open the Excel file. Formatted files can almost always be recovered, but you must begin the recovery process promptly.
03
Excel Corruption:
Another common cause is corruption. This can happen if a file is damaged or corrupted during storage or transfer. You can repair corrupted Excel files if they are not heavily damaged. When it comes to a heavily corrupted file, the backup is a better choice.
04
Excel Overwritten:
Finally, Excel data loss can also occur if a file is simply overwritten or lost. Unlike the previous causes of Excel data loss, it is often impossible to recover overwritten Excel files. Especially if you’re not willing to spend some money on data recovery services.
Whatever the cause, Excel data loss can have serious consequences. Not only can it lead to lost productivity, but it can also result in lost revenue and customers. That’s why it’s so important to take steps to prevent Excel data loss from happening and recover unsaved Excel files if necessary.
How to Recover Unsaved Excel Files on Windows 11/10/8/7
We’ve all been there — we’re working on an important Excel file, and we accidentally close it without saving it. Or, worse yet, our computer crashes and we lose unsaved changes. Suddenly, all of our work seems like it’s gone for good. But there is hope! In many cases, it is possible to recover unsaved Excel files on Windows 10. Luckily, there are a few different methods you can try to recover your Excel documents.
Let’s take a look at those Excel recovery methods to see how they’re done.
Method 1. How to Recover Unsaved Excel Workbooks
You are working on a new Excel file and have never saved the file at all. If Excel crashes or your system crashes, you can still recover the unsaved Excel file.
- Notice:
- The method works only if Excel has enabled AutoSave and AutoRecover functionality. It’s enabled by default so you should be able to use the method to recover the files.
Follow the steps below to recover any Excel file that hasn’t been saved yet.
Step 1. Open a new or an Excel workbook.
Step 2. Go to «File > Open».
Step 3. Click the «Recent» option on the top left.
Step 4. Click the «Recover Unsaved Workbooks» button at the bottom.

Step 5. Scroll through the list of unsaved Workbooks and open the one you want.
Step 6. Hit the «Save As» button to recover the.
By default, Excel saves Excel temporary files — a copy of all the unsaved files at the following location:
C:Users[YourSystemName]AppDataLocalMicrosoftOfficeUnsavedFiles
In the above address, you need to replace [YourSystemName] with the name of your system. This folder saves copies of Excel files. You can also access this folder directly to perform unsaved Excel document recovery.
Method 2. How to Recover Updated Excel Files
This method would work if you have previously saved the file before Excel or the system crashed. You can have the previously saved file, but you lose the changes you made. Now, follow the steps below to recover the updated Excel file.
Step 1. Open the Excel application, find «Recovered» and click «Show Recovered Files».
Step 2. The «Document Recovery» pane will display the unsaved files. Open and save the Excel file you need.
Method 3. How to Recover Unsaved Excel from Previous Versions
This method applies to this situation — you have a saved Excel file and you update the data. But what you really want is the old version of the Excel file. If you are using Excel 2010 and versions after that, you can get the previous versions of Excel with the steps below.
Step 1. Open Excel, and click «File» > «Info» > «Manage Workbook».

Step 2. Click «Recover Unsaved Workbooks» from the drop-down menu.
Step 3. Click on the version you want to restore and click «Open».
Step 4. In the bar at the top of the file, click «Save As» to save the file.

You need to make sure that the AutoRecover option is enabled to make this method work.
Method 4. How to Recover Overwritten Excel Files
Storing important files in the cloud can help to prevent data loss in the event of a hardware failure or other catastrophe. OneDrive and DropBox are two popular cloud storage services that offer a convenient way to back up files and access them from anywhere.
How to Recover Overwritten Excel Files from OneDrive
When it comes to storing Excel files, OneDrive is a great option. It offers 2 GB of storage for free, and users can purchase additional storage if needed. It keeps track of prior versions of files, so users can restore an older version if necessary. To recover your unsaved Excel file from OneDrive, follow these steps:
Step 1. Enter the OneDrive official page and sign in to your account.

Step 2. Click on the folder you saved your file in (in our case, that’s Documents).
Step 3. Find the Excel document you’re looking for, and right-click it.
Step 4. Select «Version History». You can see all the previous versions of the file in the pane on the left.
Step 5. Find the one you’re looking for, and select «Restore» to overwrite the current version, or click «Download» to download a copy of that version.

How to Recover Overwritten Excel Files from DropBox
DropBox also offers 2 GB of storage for free, but it caps file sizes at 100 MB. As a result, users with large Excel files may need to upgrade to a paid plan. For users who need to recover overwritten Excel files, DropBox also offers a convenient and reliable solution. To get the previous version of the Excel file from DropBox, follow the steps below.
Step 1. Log into DropBox.

Step 2. Click on the three dots for the file for which you want to see the previous versions.
Step 3. Click the» Version History» option.
Step 4. Open and download the Excel data from DropBox.
No doubt, Microsoft OneDrive, and DropBox are great tools for storing and sharing files. You don’t have to worry if you regularly back up your office files to these powerful cloud services.
Method 5. Restoring Previous Versions of the Excel from File History
If you accidentally delete or make changes to an Excel file that you later regret, you can use File History to restore a previous version of the file. Make that you’ve enabled File History, and then restore Excel data with the steps.
Step 1. Navigate to your file in Windows Explorer.
Step 2. Right-click the file and select «Previous Versions».
Another window will appear, and you’ll see any previous versions that you can restore. If you haven’t turned on File History and haven’t created a restore point, you can’t retrieve any data.
Method 6. How to Retrieve Unsaved Excel Files with Data Recovery Software
Losing an unsaved Excel file can be frustrating, especially if you’ve spent a lot of time working on it. However, there is still hope — you may be able to recover XLSX/XLS files using data recovery software. Data recovery software can scan your hard drive for lost or deleted Office files and recover them if possible. EaseUS Data Recovery Wizard is one of the most popular data recovery programs available.
- It offers a variety of features that make it a valuable tool for anyone who needs to recover lost data.
- It supports a wide range of file types, making it possible to recover photos, videos, documents, and more.
- With it, you can perform Excel corrupted file recovery, undelete Excel files, and run Excel password recovery.
- The software also includes a preview feature that allows you to view recovered files before saving them.
Overall, EaseUS data recovery software is an excellent choice for anyone who needs to recover lost or deleted Excel files. Read on to carry out Excel recovery with EaseUS file recovery software.
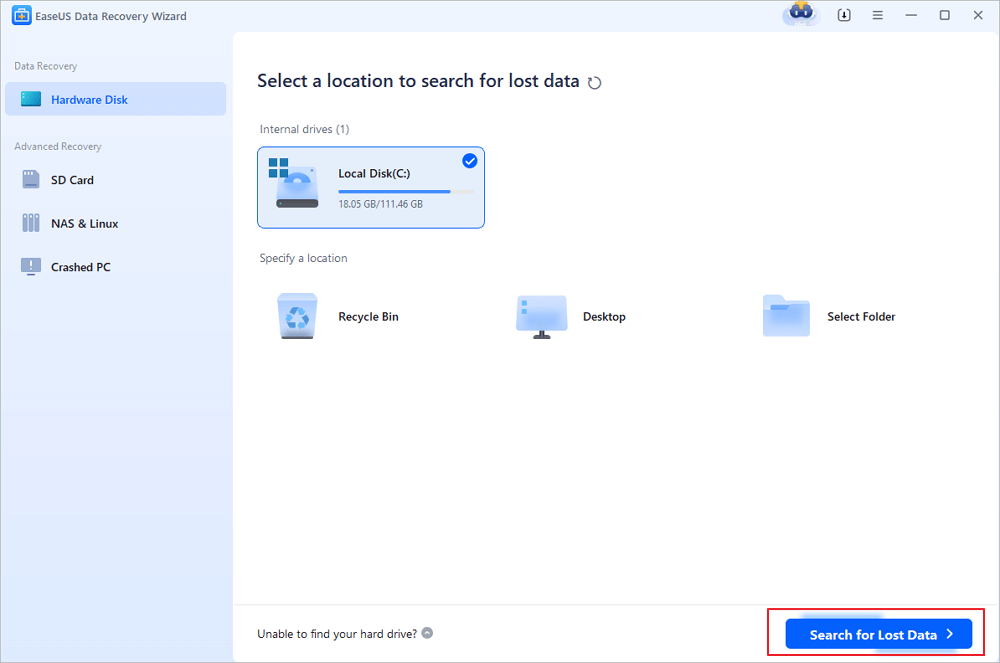
Step 1. Select location and click «Scan»
Choose the drive or a specific folder on Desktop or somewhere else where you lost the excel files, and click the «Scan» button.
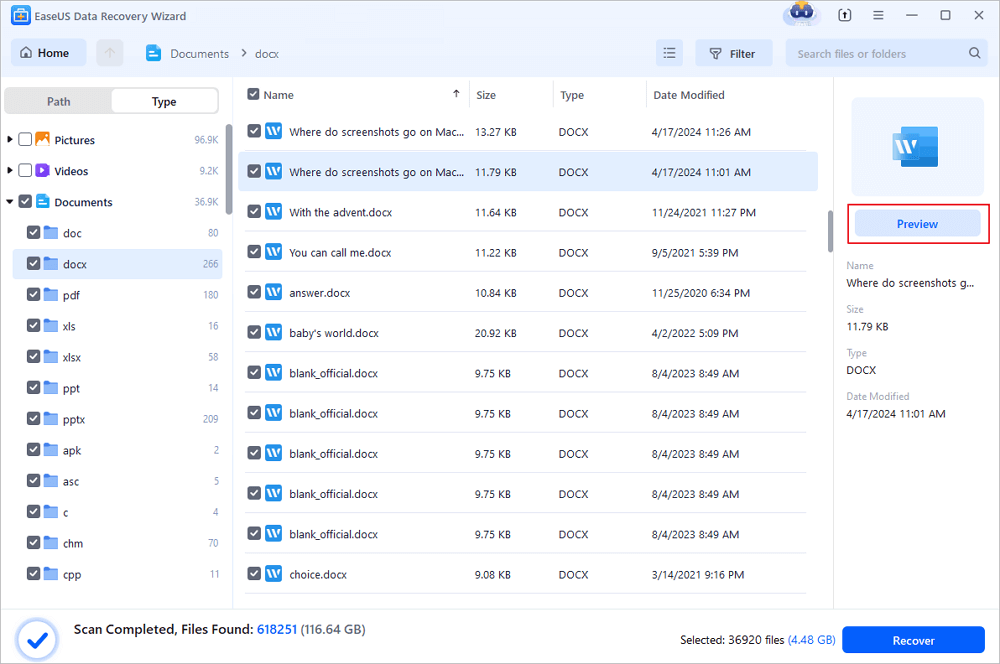
Step 2. Locate your excel files
To quickly find the Excel files from the scan results, click the «Documents» option in the left panel. Choose «Excel», and click «Preview» to check if the Excel files are the wanted ones.
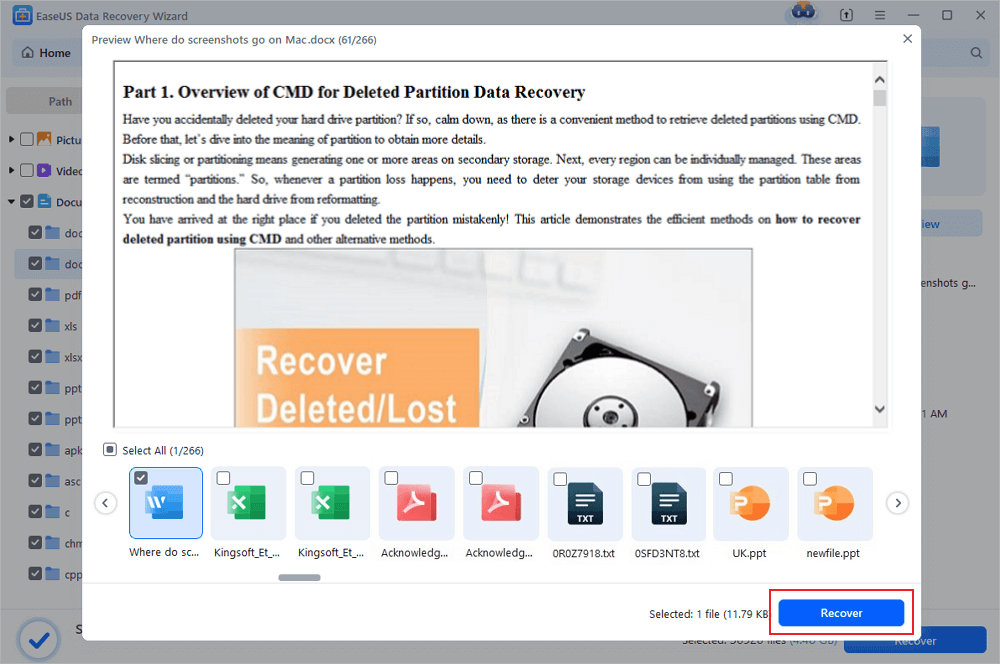
Step 3. Recover Excel files
Finally, select the desired Excel files and click the «Recover» button. Then, select a folder to save the Excel files to another location.
When it comes to a Mac user, things could be a little different. There are a few different ways that you can go about recovering an unsaved Excel file on Mac.
Method 1. Restore Unsaved Excel File from the Temporary Folder
The first thing to do is simply look for the file in the temporary folder. This folder should contain a list of all of the recently saved Office files.
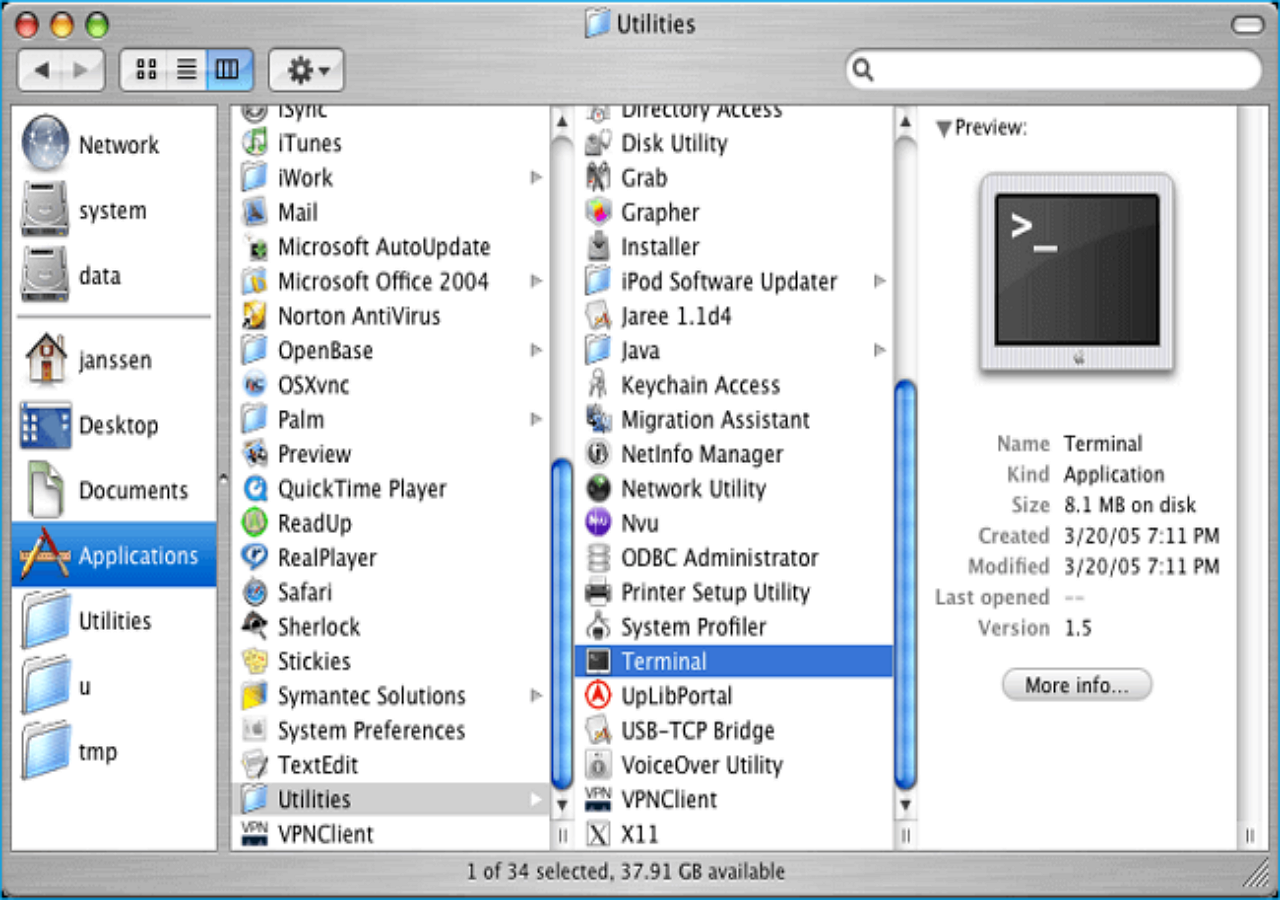
- Go to «Applications» > «Utilities» > «Terminal».
- Type open $TMPDIR and press «Return» to open the Temporary files folder. Select the folder named «TemporaryItems».
- Find the unsaved Excel file under «TemporaryItems» and restore.
Method 2. Recover Lost or Unsaved Excel Files from AutoSave
If the file you’re looking for isn’t in the Temporary folder, then your next best bet is to try opening up the Microsoft Office AutoSave folder. From here, you should be able to locate the unsaved file and open it up.
- Go to «Applications» >» Utilities» > «Terminal».
- Type defaults write com.apple.Finder AppleShowAllFiles true.
- Click «Finder» > press «Return» on your Mac.
- Type /Users/username/Library/Containers/com.microsoft.Excel/Data/Library/Preferences/AutoRecovery and click «Go» to open Excel’s AutoRecovery folder.
- Find the unsaved spreadsheet files and recover them to another safe location on Mac.
If neither of these methods works, then your last resort would be to use Mac data recovery software to scan your hard drive for any lost or deleted Excel files.
Full Guide
Still have problems? Click here to learn how to recover unsaved excel files on Mac.
Precautions to Avoid Excel Data Loss — AutoSave
As anyone who has ever lost an important Excel spreadsheet can attest, data loss is a serious issue. Whether due to a power outage, system crash, or simply user error, the consequences of losing valuable data can be severe. This is why it is so important to enable Excel AutoSave.
Excel AutoSave automatically saves a copy of your workbook at regular intervals, ensuring that you will always have a backup in case of an unexpected event. To enable AutoSave, simply click the «File» tab and select «Options». In the Save category, check the box next to Save AutoRecover information every _ minutes.
You can also choose how often you would like Excel to save your workbook by changing the number of minutes in the text box. In addition to enabling AutoSave, there are several other steps you can take to avoid Excel data loss.
1. Save your workbook regularly.
Even though Excel will save your workbook automatically, it’s always a good idea to save manually as well. This way, you can be sure that your latest changes are always saved.
2. Back up your workbook.
In addition to saving the workbook regularly, it’s also a good idea to back up your workbook periodically. This way, you’ll have an extra copy of your data in case something happens to your original file.
3. Avoid working files without first creating a backup.
This way, if something does happen to the file, you will still have a copy to fall back on.
4. Save Excel files in multiple formats
Finally, it’s always a good idea to save your files in multiple formats. If one Excel becomes corrupted or unreadable, you’ll still have access to your data in another format.
Conclusion
Excel is a powerful tool for organizing and analyzing data, but it’s also susceptible to data loss. If you accidentally close an unsaved Excel file, or if your computer crashes while you’re working on a file, you may be able to recover your work using Excel’s AutoRecover feature. To maximize your chances of recovering unsaved Excel work, make sure that AutoRecover is turned on and you know where the recovery files are stored. With a little luck, you should be able to get your work back.
Файл Microsoft Excel не сохранился или был перезаписан пустым документом? Не беда, ведь его можно быстро восстановить встроенными средствами или при помощи специализированных программ.

Содержание
- Восстановление несохраненных файлов встроенными средствами
- Восстановление перезаписанных файлов
- Как настроить облачное хранилище «OneDrive» в Microsoft Excel
- Что делать если Excel файл был случайно удален?
Microsoft Excel является одним из компонентов комплекса офисных программ Microsoft Office. Данный пакет пользуется большой популярностью среди пользователей, поскольку его функционал позволяет выполнять множество действий вроде создания электронных документов, таблиц, презентаций, баз данных и т.д. Нередко Microsoft Office используется для работы или создания важных файлов, хранящих ценную информацию.
К сожалению, Microsoft Office, как и сама операционная система, может давать сбои и ошибки. При возникновении таких обстоятельств текущие файлы, над которыми велась работа, бесследно исчезают, принуждая пользователя выполнять всю работу снова. Ниже мы рассмотрим основные способы восстановления утерянных файлов, а также приведем пример правильной настройки программы, которая сможет обеспечить безопасность данных в случае возникновения непредвиденных ошибок.
Восстановление несохраненных файлов встроенными средствами
Разработчики Microsoft Excel предвидели возможную утерю данных из-за проблем с питанием и системных ошибок, поэтому в функционал пакета были встроены функции AutoSave (автоматическое сохранение) и AutoRecover (автоматическое восстановление). Принцип работы данных функций заключается в автоматическом сохранении текущей версии документа каждые пять, десять или больше минут. Автоматически сохранённые файлы всегда могут быть восстановлены при открытии программы.
Чтобы настроить функцию автоматического сохранения необходимо:
Шаг 1. Запустить Microsoft Excel и перейти на вкладку «Файл».

Шаг 2. В открывшемся меню опускаемся в нижнюю часть левого меню и выбираем пункт «Параметры».

Шаг 3. Выбрать пункт «Сохранение» и в открывшемся меню поставить галочки возле пунктов «Автосохранение каждые» и «Сохранять последнюю автосохраненную версию». Помимо этого, здесь можно выбрать интервал сохранения, а также место, где будут храниться данные для восстановления файлов.

После настройки автосохранения файлы можно будет восстановить при запуске Microsoft Excel, перейдя во вкладку «Открыть», выбрав пункт «Последние» и «Восстановить несохраненные книги».

Восстановление перезаписанных файлов
Помимо восстановления автосохраненных данных в Microsoft Excel существует функция восстановления предыдущих версий документа. Это очень удобно, ведь используя данную возможность, можно обратить случайное удаление части таблицы или сохранение пустой страницы.
Чтобы воспользоваться функцией восстановления перезаписанных данных необходимо:
Открыть графу «Файл», перейти в пункт «Сведенья» и выбрать «Управление книгой». В открывшемся окне следует выбрать требуемую версию файла.

Как настроить облачное хранилище «OneDrive» в Microsoft Excel
Облачное хранилище «OneDrive» тесно связано с пакетом Microsoft Office, что позволяет хранить резервные копии данных на сервере в сети. Такой способ исключает возможность утери несохраненной информации, а также файлов, которые могут быть удалены вирусами, программными сбоями или случайным форматированием. Помимо этого, функционал хранилища «OneDrive» позволяет редактировать и сохранять копии при работе сразу нескольких пользователей.
Чтобы настроить облачное хранилище у себя, необходимо:
Шаг 1. Перейти на официальный сайт OneDrive и пройти регистрацию. Зайти в облачное хранилище через MS Excel. Для этого достаточно ввести данные аккаунта хранилища, нажав по кнопке «Вход» в правом верхнем углу MS Excel.

Шаг 2. Сохранить текущий документ в облачное хранилище. Для этого выбираем «Файл», «Сохранить как», «One Drive».

Шаг 3. Переходим на «OneDrive» при помощи любого браузера и находим место, куда был сохранен файл через MS Excel. Чтобы найти предыдущие версии файла, кликаем по нему правой кнопкой мыши и выбираем пункт «Журнал версий».

В открывшемся окне пользователь сможет восстановить или скачать предыдущие версии файла.
Что делать если Excel файл был случайно удален?
Предыдущие методы позволяют восстановить Excel файлы если вы не успели их сохранить или случайно сохранили не те изменения. Но что делать, если вы случайно удалили файл, думая, что он вам больше не нужен и вдруг оказалось, что в нем была важная информация или вы случайно отформатировали накопитель, на котором хранился нужный Excel файл?
В такой ситуации стандартные возможности не помогут, но выход из ситуации есть.
Скачайте и установите программу RS Office Recovery.
RS Office Recovery позволит вам восстановить утерянный Excel файл за несколько минут. Для этого вам придется сделать всего несколько кликов мышки благодаря встроенному мастеру восстановления файлов.
Стоит отметить, что RS Office Recovery восстанавливать не только файлы Excel, но и всего пакета Microsoft Office.

Часто задаваемые вопросы
Да. Чтобы восстановить нужный Excel файл можно использовать функцию автосохранения. Более детально как это сделать читайте на нашем сайте.
Сначала пройдите процесс регистрации на сайте One Drive, а затем войдите в ваш One Drive аккаунт в программе Microsoft Excel. Более детально читайте на нашем сайте.
Воспользуйтесь программой RS Office Recovery. Программа обладает интуитивно понятным интерфейсом, благодаря чему вы сможете восстановить ваш файл независимо от уровня владения компьютером.
Microsoft Excel сохраняет все версии файла, соответственно вы можете вернуть исходный файл. Откройте меню Файл – Сведения – Управление книгой и выберите нужную версию файла.