
Protect an Excel file
To prevent others from accessing data in your Excel files, protect your Excel file with a password.

Note: This topic covers file-level protection only, and not workbook or worksheet protection. To learn the difference between protecting your Excel file, workbook, or a worksheet, see Protection and security in Excel.
-
Select File > Info.
-
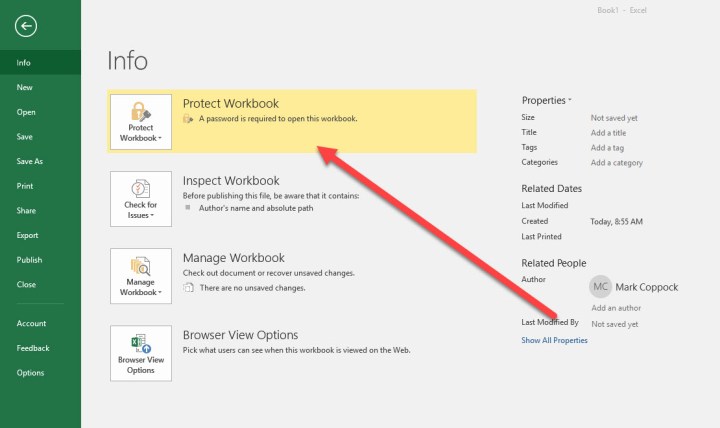
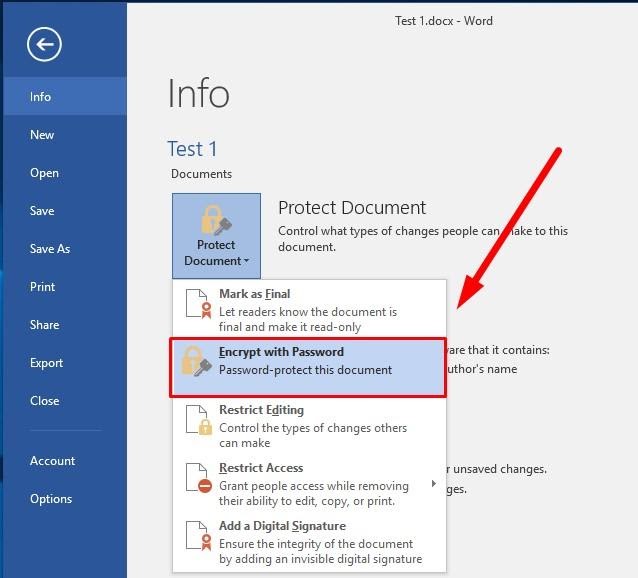
Select the Protect Workbook box and choose Encrypt with Password.
-
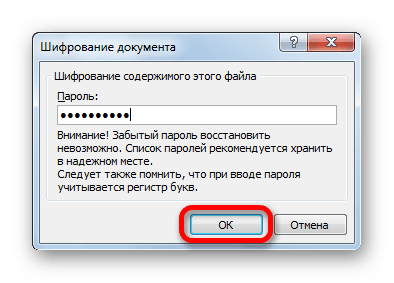
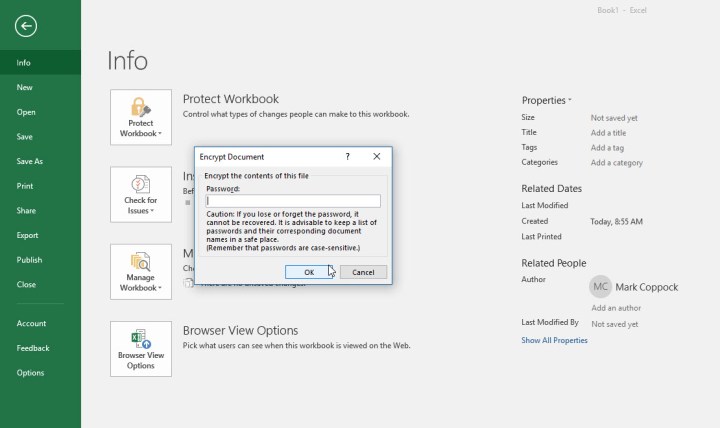
Enter a password in the Password box, and then select OK.
-
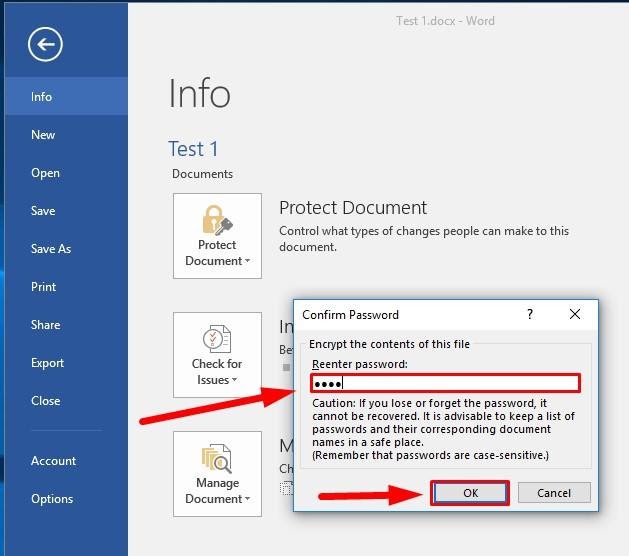
Confirm the password in the Reenter Password box, and then select OK.
Warning:
-
Microsoft cannot retrieve forgotten passwords, so be sure that your password is especially memorable.
-
There are no restrictions on the passwords you use with regards to length, characters or numbers, but passwords are case-sensitive.
-
It’s not always secure to distribute password-protected files that contain sensitive information such as credit card numbers.
-
Be cautious when sharing files or passwords with other users. You still run the risk of passwords them falling into the hands of unintended users. Remember that locking a file with a password does not necessarily protect your file from malicious intent.
Need more help?
You can always ask an expert in the Excel Tech Community or get support in the Answers community.
See Also
Protect a workbook
Protect a worksheet
Protection and security in Excel
Need more help?
Since its foundation, MS Excel has been used by many organizations to manage their data and records. These data and records also include confidential information that everyone within an organization should not access. So, what to do with those files that should be used precautiously and must have restricted access? The answer is that you can put password on Excel file to protect it from unauthorized access.
When you password-protect an Excel file, no one can see the file’s contents without entering the correct password. This makes your data secure and more confidential. However, in this article, you will find the best ways to password protect an Excel file. If you want to set a password on any of your Excel files, give a read to this article and try out the methods!
Part 1: How to Put Password on Excel File?
Putting a password on an Excel file is not a big deal, but if you are a beginner and do not have enough experience, the following methods will definitely help you!
Method 1: Encrypt an Excel Document:
The most common way to protect an Excel file with a password is to encrypt it. Encrypting means that whenever someone opens the file, they will have to enter a password. Perform the following steps to encrypt an Excel file:
- Open the Excel file and go to the File menu.
-
Click on Info.

-
Click on Protect Workbook button.
-
Search for the «Encrypt with password» option and click on it.
-
Enter the password you want to set on the file. Click OK.
-
Re-enter the password and click OK again.

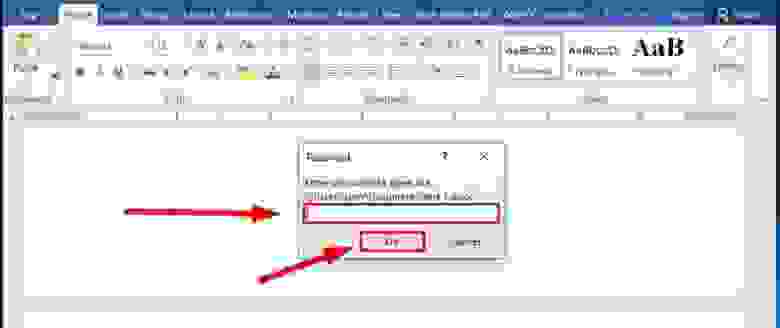
Next time, when you open the encrypted file, you will need to enter the correct password. You have successfully protected your data from unauthorized access.
Method 2: Add a Password using VBA:
VBA is short for Visual Basic for Applications. It is used to automate the Office applications such as MS Word, MS PowerPoint, MS Excel, etc. it is a programming language that you can use to personalize your Office Applications. If you want to put password on Excel file using VBA, the following are the steps:
- Open the Excel file you want to protect and go to the View menu.
-
Click on the Macros option to create a new Macro.
-
Now enter the Macro name and click on Create button.
Tips:
Note that we have used protection as a placeholder. You can name a Macro as anything you want.
-
When you click on Create, you will land on a new Window as follows:
-
Copy the following code and paste it into the new window as follows:
Range(«A1»).Value = «Protection Protected»
Tips:
Do not forget to replace the Macro name.
-
Now, go to the Tools menu and click on VBAProject Properties.
- Open the Protection tab when the Project Properties dialog box appears.
-
Now, check the box in front of the «Lock project for viewing» if you want to lock it; else, set the password and click OK to save settings.
Bingo! You have protected your Excel file with VBA successfully. No one can intrude on your private data now.
Method 3: Allow Read-only Access:
If you do not want to make all the data and settings inaccessible to other users, you can avail the option of restricted access in MS Excel. Restricted access means limiting the actions that could be performed on a sheet. Simply put, using read-only access, you can determine which users can access, update and edit the file’s contents. Read-only access is the best option if you do not want to make the file fully confidential. Instead, you can just limit the actions that could be performed. Here is how to allow read-only access:
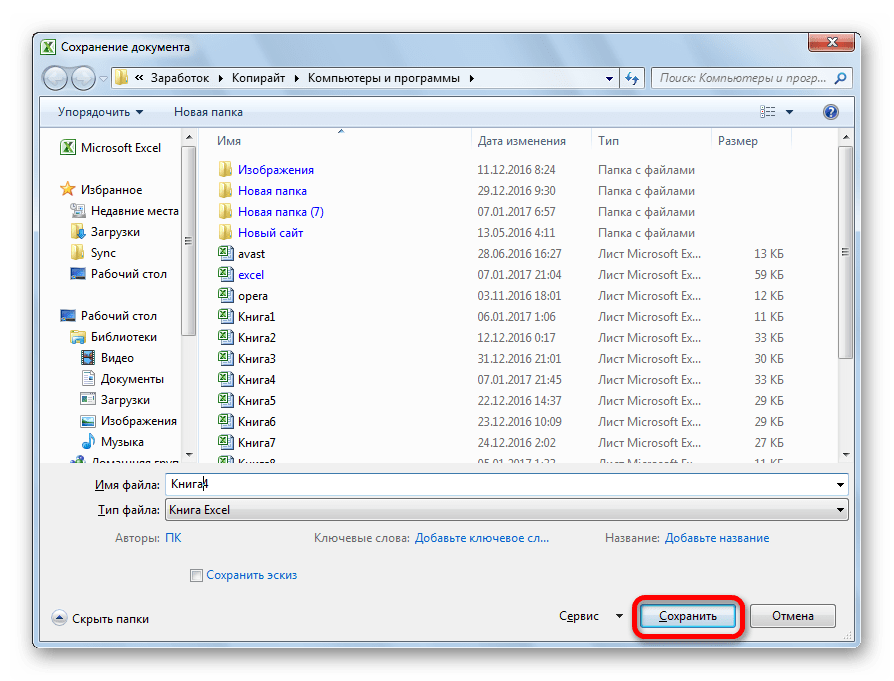
- Open the Excel file, go to File menu and click on Save As.
-
When the Save As dialog box appears, click on the Tools link beside the Save button.
- Select General Options from the list.
-
A new dialog will appear to ask you to enter a password. After entering, click OK.
Next time when you open the Excel file, you will need to enter the correct password to make any changes. You have put password on Excel file.
Now that you know how to password protect an Excel file, you must also know how to unprotect it if you ever lose the password. The next section of the article will address the problem of opening a password-protected Excel file without a password.
Part 2: How to Unprotect the Excel Sheet if Forgot the Password?
Forgetting the password of an Excel sheet can lead to the loss of essential data. Many people end up deleting their important files after forgetting the password, as it seems impossible to recover the file. However, to rescue you from such a situation, here is the best yet a perfect solution, i.e., PassFab for Excel.
PassFab for Excel:
PassFab for Excel is a brilliant tool specifically designed and programmed to help you recover your password-protected Excel files without any data loss or privacy intrusion. This tool recovers your password quickly and enables you to access your files in no time. To use PassFab for Excel, follow the following guide:
- Download and install PassFab for Excel from the official site.
-
Launch the application and click the Recover Excel Open Password button.
- Click on the +(Please import Excel file) to upload the password-protected file.
-
Choose the recovery mode and click the Recover button.
-
After some time, the recovered password will be displayed. Copy the password and paste it into the password field of the Excel file.
After completing the processing, you will have found the lost password, and you will be able to access the file contents without losing any data or privacy. Remember that when you put password on Excel file, you need to remember it as there are not many options to avail after losing the password.
Final Words:
MS Excel is an important application that we all use in our day-to-day life. Sometimes we save not so crucial data other times; we have confidential information. Setting a password on Excel sheets and files is the best way to protect them from unauthorized access.
This article covers different ways to put password on Excel sheet and the best way to recover a lost password. We hope that this article will be helpful for you. Thank you for reading it!
COMMENT
Содержание
- Установка пароля
- Способ 1: установка пароля при сохранении файла
- Способ 2: установка пароля в разделе «Сведения»
- Способ 3: Установка пароля и его снятие во вкладке «Рецензирование»
- Вопросы и ответы
Безопасность и защита данных являются одним из главных направлений развития современных информационных технологий. Актуальность этой проблемы не уменьшается, а только растет. Особенно важна защита данных для табличных файлов, в которых зачастую хранится важная информация коммерческого характера. Давайте узнаем, как защитить файлы Excel при помощи пароля.
Установка пароля
Разработчики программы прекрасно понимали важность возможности установки пароля именно на файлы Excel, поэтому внедрили сразу несколько вариантов выполнения данной процедуры. При этом, существует возможность установить ключ, как на открытие книги, так и на её изменение.
Способ 1: установка пароля при сохранении файла
Один из способов предполагает установить пароль непосредственно при сохранении книги Excel.
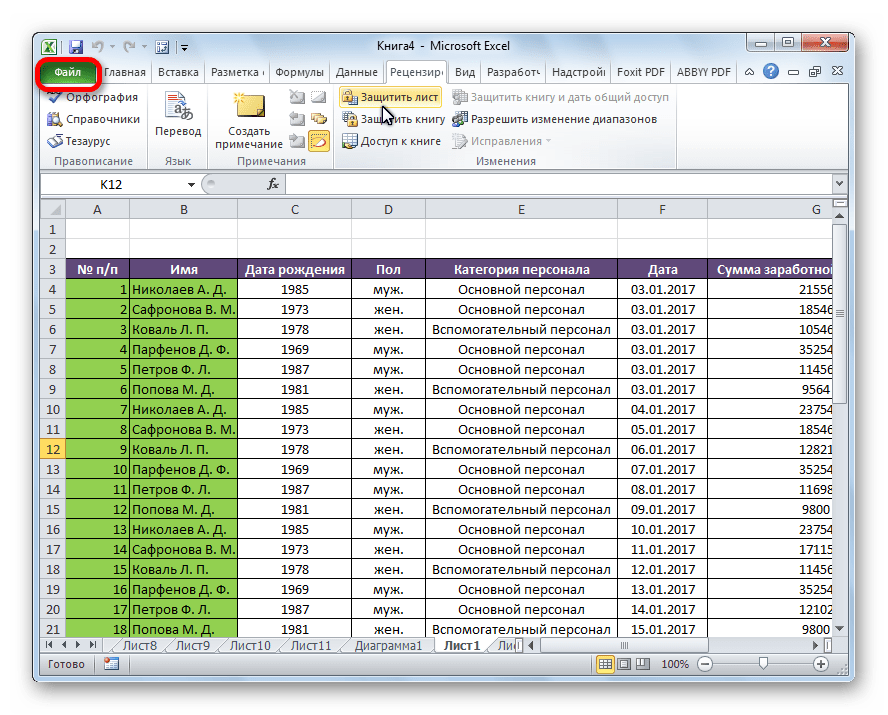
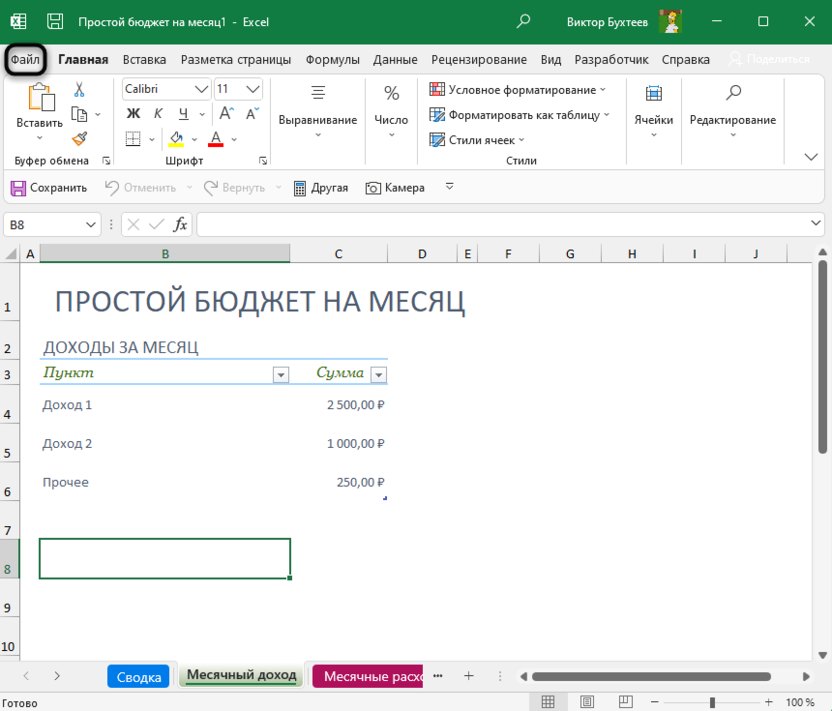
- Переходим во вкладку «Файл» программы Excel.
- Кликаем по пункту «Сохранить как».
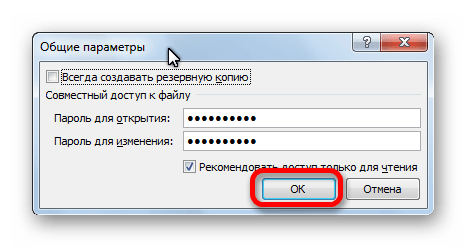
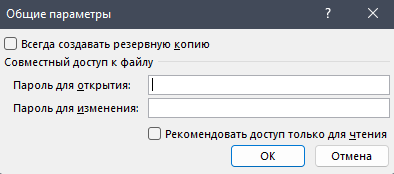
- В открывшемся окне сохранения книги жмем на кнопку «Сервис», расположенную в самом низу. В появившемся меню выбираем пункт «Общие параметры…».
- Открывается ещё одно небольшое окно. Как раз в нём можно указать пароль на файл. В поле «Пароль для открытия» вводим ключевое слово, которое нужно будет указать при открытии книги. В поле «Пароль для изменения» вводим ключ, который нужно будет ввести, если понадобится отредактировать данный файл.
Если вы хотите, чтобы ваш файл не могли редактировать посторонние лица, но доступ к просмотру желаете оставить свободным, то, в таком случае, вводите только первый пароль. Если задано два ключа, то при открытии файла будет предложено ввести оба. Если пользователь знает только первый из них, то ему доступно будет исключительно чтение, без возможности редактирования данных. Вернее, редактировать он сможет всё что угодно, но вот сохранить эти изменения не получится. Можно будет только сохранить в виде копии без изменения первоначального документа.
Кроме того, тут же можно поставить галочку около пункта «Рекомендовать доступ только для чтения».
При этом, даже для пользователя, знающего оба пароля, файл по умолчанию откроется без панели инструментов. Но, при желании он всегда сможет открыть эту панель, нажав соответствующую кнопку.
После того, как все настройки в окне общих параметров выполнены, жмем на кнопку «OK».
- Открывается окно, где нужно ввести ключ ещё раз. Это сделано для того, чтобы пользователь ошибочно при первом вводе не совершил опечатку. Жмем на кнопку «OK». В случае несовпадения ключевых слов программа предложит ввести пароль ещё раз.
- После этого мы опять возвращаемся в окно сохранения файла. Тут можно при желании изменить его название и определить директорию, где он будет находиться. Когда все это сделано, жмем на кнопку «Сохранить».


Таким образом мы защитили файл Excel. Теперь для его открытия и редактирования потребуется вводить соответствующие пароли.
Способ 2: установка пароля в разделе «Сведения»
Второй способ подразумевает установку пароля в разделе Excel «Сведения».

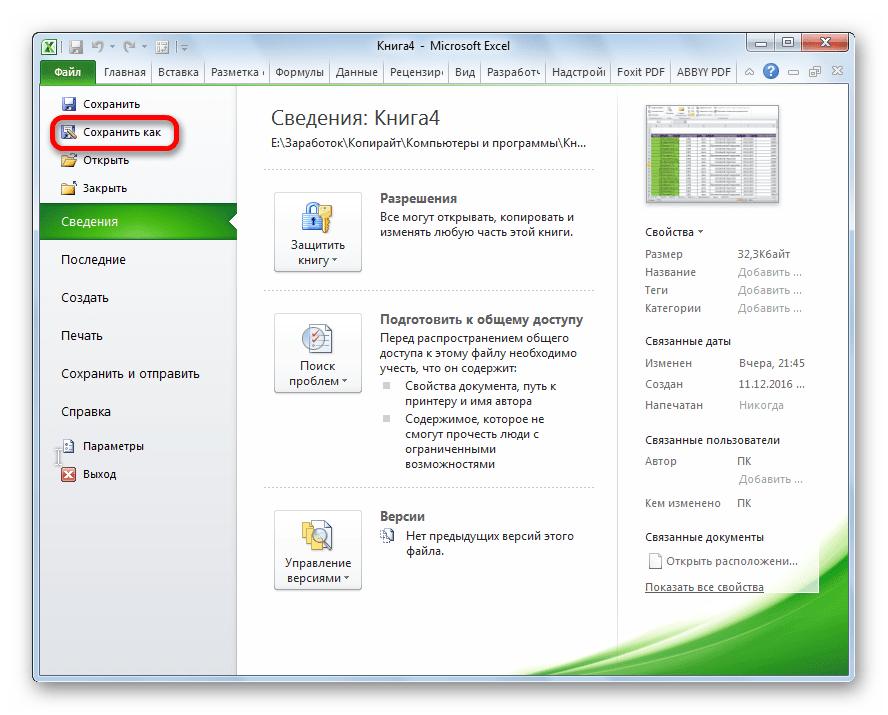
- Как и в прошлый раз, переходим во вкладку «Файл».
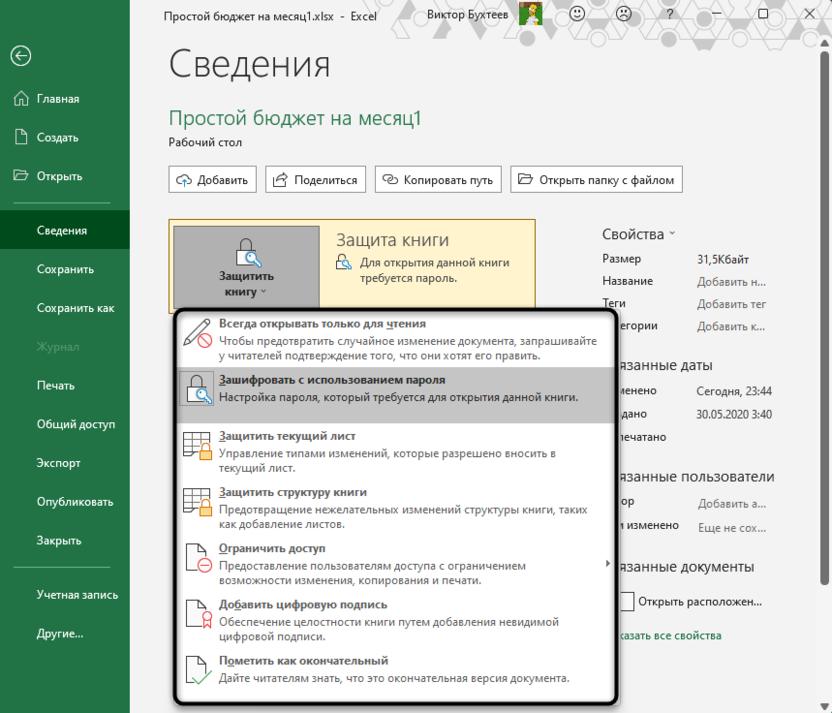
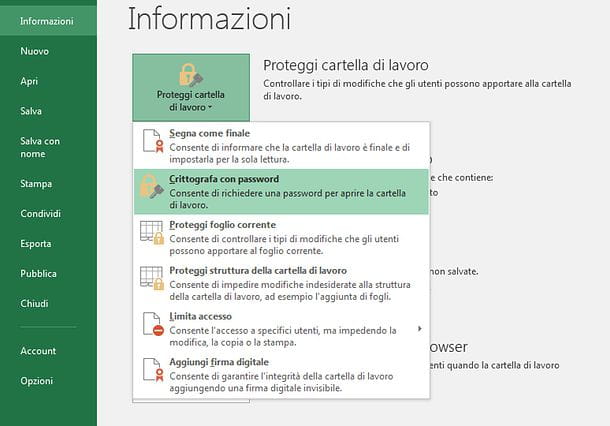
- В разделе «Сведения» кликаем на кнопку «Защитить файл». Открывается список возможных вариантов защиты ключом файла. Как видим, тут можно защитить паролем не только файл в целом, но и отдельный лист, а также установить защиту на изменения структуры книги.
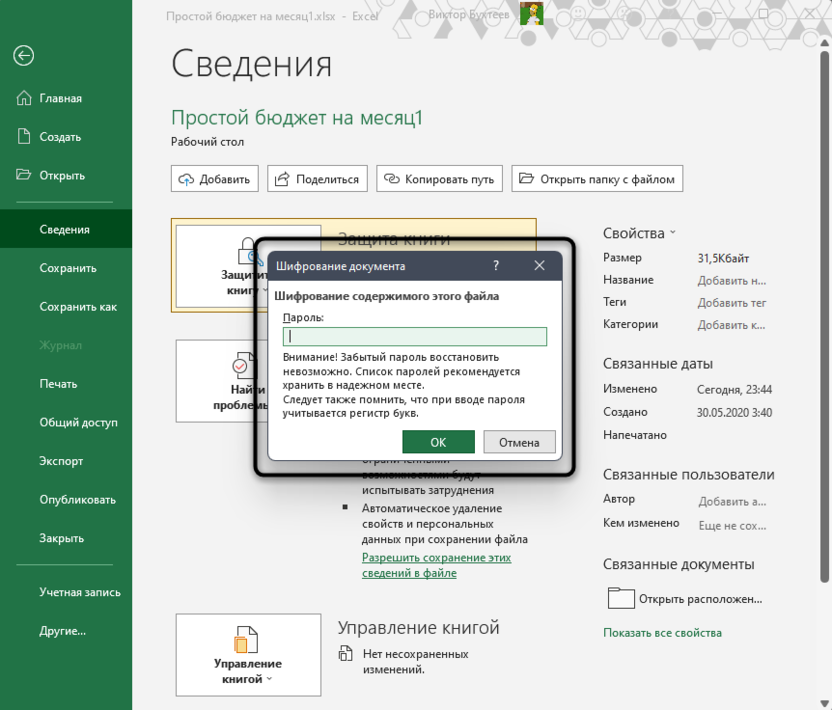
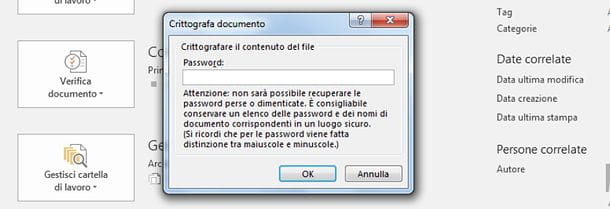
- Если мы остановим выбор на пункте «Зашифровать паролем», то откроется окно, в которое следует ввести ключевое слово. Этот пароль соответствует ключу для открытия книги, который мы применяли в предыдущем способе при сохранении файла. После ввода данных жмем на кнопку «OK». Теперь без знания ключа файл никто не сможет открыть.
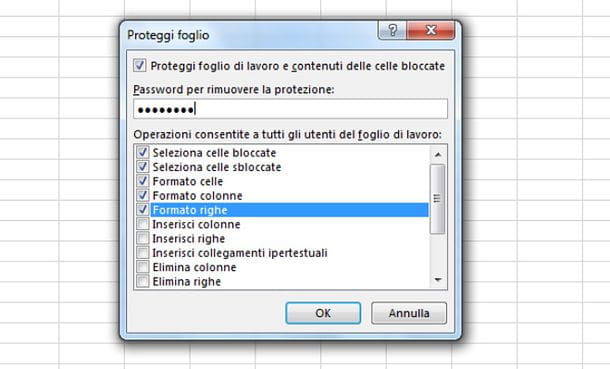
- При выборе пункта «Защитить текущий лист» откроется окно с большим количеством настроек. Тут также есть окно для ввода пароля. Данный инструмент позволяет защитить конкретный лист от редактирования. При этом, в отличие от защиты от изменения через сохранение, данный способ не предусматривает возможности даже создавать измененную копию листа. Все действия на нём блокируются, хотя в целом книгу сохранить можно.
Настройки степени защиты пользователь может установить сам, выставляя галочки в соответствующих пунктах. По умолчанию из всех действий для пользователя, который не владеет паролем, доступным на листе является только выделение ячеек. Но, автор документа может разрешить форматирование, вставку и удаление строк и столбцов, сортировку, применение автофильтра, изменение объектов и сценариев, и т.д. Можно снять защиту практически с любого действия. После установки настроек жмем на кнопку «OK».
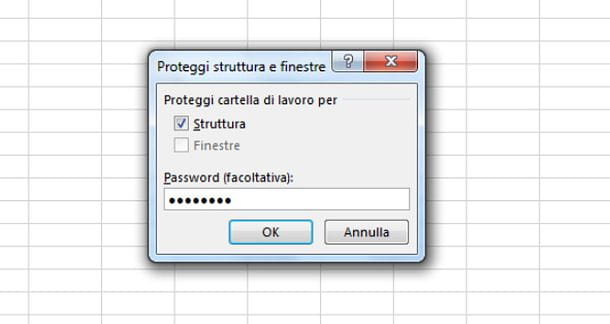
- При нажатии на пункт «Защитить структуру книги» можно установить защиту структуры документа. В настройках предусмотрена блокировка изменения структуры, как с паролем, так и без него. В первом случае, это, так называемая «защита от дурака», то есть от непреднамеренных действий. Во втором случае, это уже защита от целенаправленного изменения документа другими пользователями.


Способ 3: Установка пароля и его снятие во вкладке «Рецензирование»
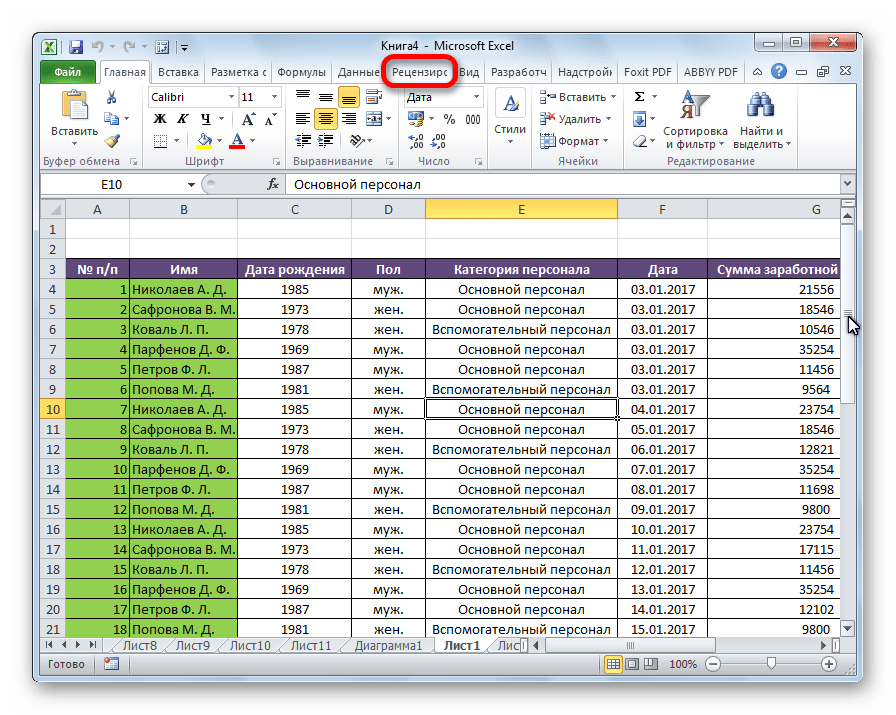
Возможность установки пароля существует также во вкладке «Рецензирование».
- Переходим в вышеуказанную вкладку.
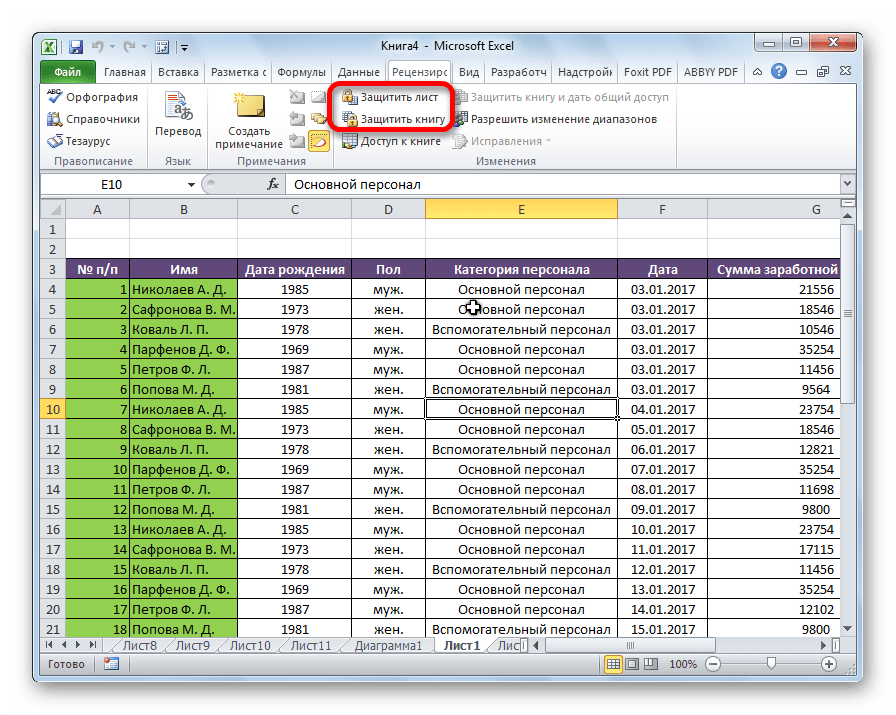
- Ищем блок инструментов «Изменение» на ленте. Кликаем на кнопку «Защитить лист», или «Защитить книгу». Эти кнопки полностью соответствуют пунктам «Защитить текущий лист» и «Защитить структуру книги» в разделе «Сведения», о которых мы уже говорили выше. Дальнейшие действия тоже полностью аналогичные.
- Для того, чтобы удалить пароль, нужно нажать на кнопку «Снять защиту с листа» на ленте и ввести соответствующее ключевое слово.

Как видим, программа Microsoft Excel предлагает сразу несколько способов защитить файл паролем, как от преднамеренного взлома, так и от неумышленных действий. Запаролить можно, как открытие книги, так и редактирование или изменение её отдельных структурных элементов. При этом, автор может сам определять, от каких именно изменений он хочет защитить документ.
Еще статьи по данной теме:
Помогла ли Вам статья?
В электронных таблицах, создаваемых при помощи Microsoft Excel, часто хранится важная информация, которая должна быть скрыта от лишних глаз или случайного редактирования. Специально для таких случаев разработчики программного обеспечения предлагают защиту в виде установки пароля. Всего доступно три разных варианта добавления защитного ключа, которые и будут разобраны далее.
Способ 1: Установка пароля при сохранении файла
Самый быстрый метод, который подойдет большинству пользователей, – установка пароля на Excel-файл при его сохранении. В этом случае не нужно переходить в дополнительные меню и искать специальные параметры, достаточно будет открыть всего одну панель, куда и вписывается ключ доступа.
-
Допустим, вы уже завершили редактирование электронной таблицы и готовы перейти к ее сохранению с добавлением пароля. Тогда на верхней панели выберите меню «Файл».
-
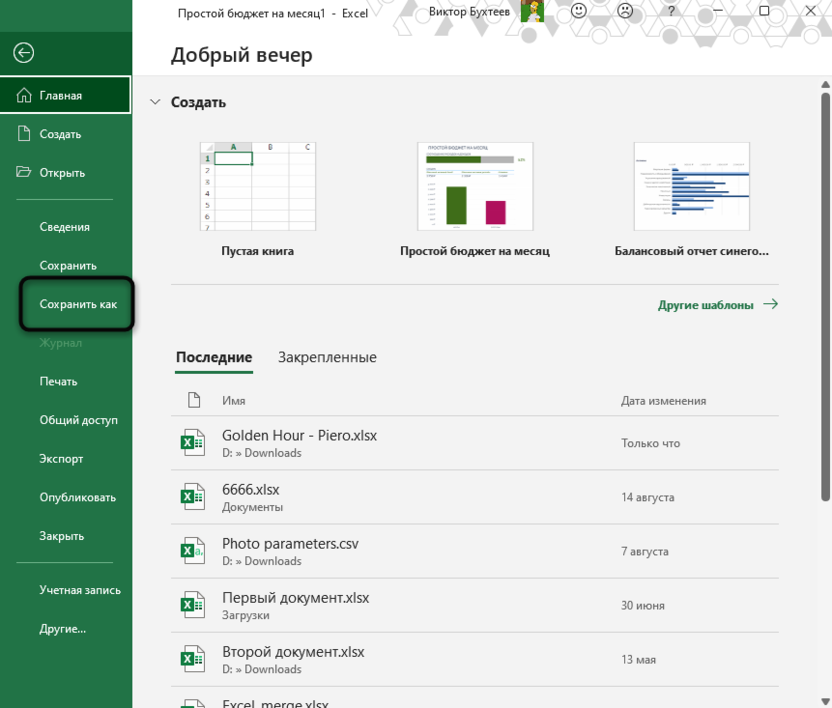
В появившемся окне на левой панели выберите пункт «Сохранить как».
-
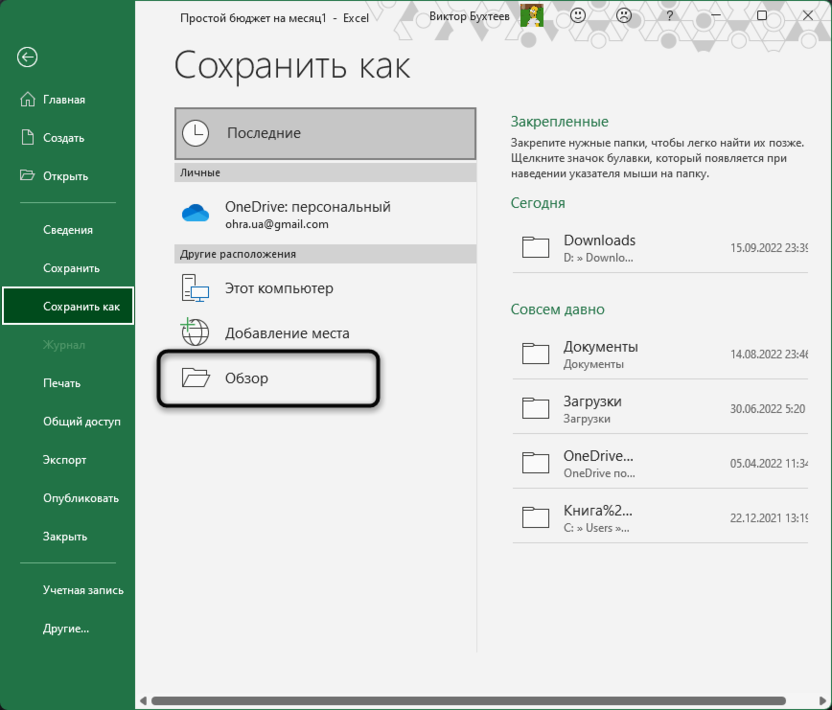
Далее щелкните по «Обзор», чтобы перейти к «Проводнику» и не только выбрать место сохранения таблицы, но и указать сам пароль.
-
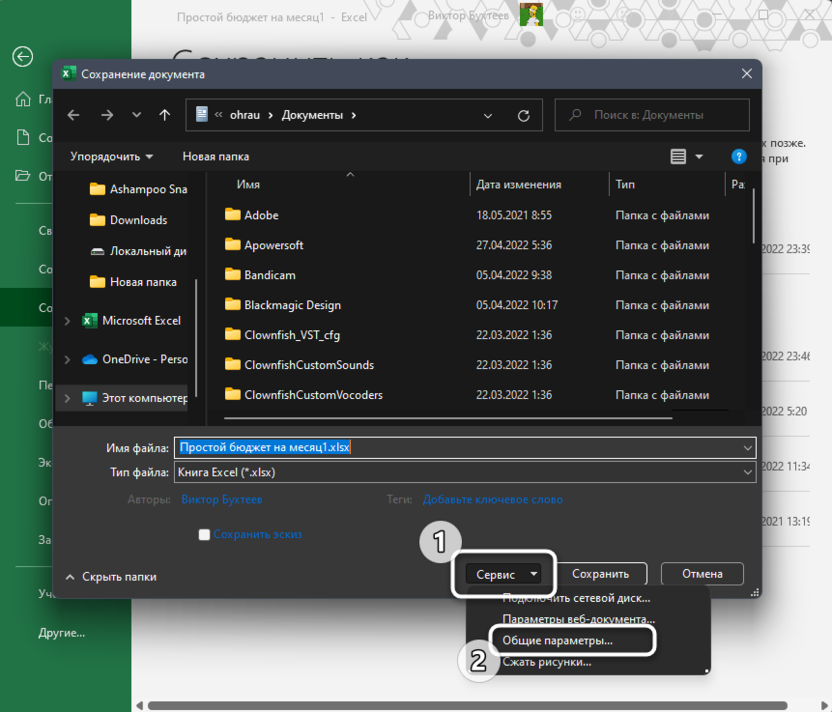
В небольшом окошке сохранения разверните меню «Сервис» и выберите из него пункт «Общие параметры».
-
Вы можете задать два пароля: для открытия и изменения файла. Здесь уже сами решайте, нужно ли добавить два ключа или достаточно будет только какого-то одного. В конце обязательно подтвердите свой пароль и завершите экспорт XLSX-файла.
-
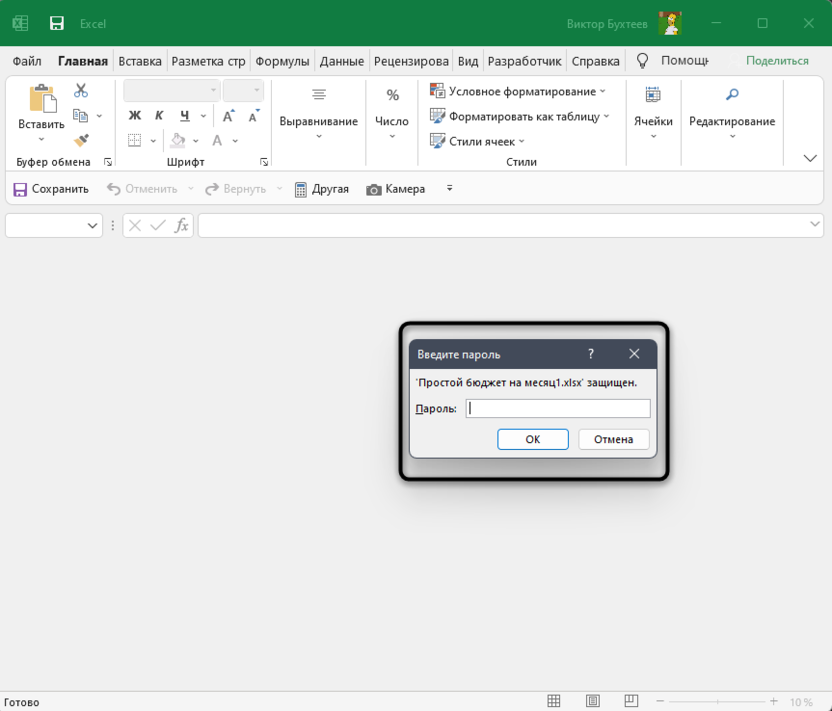
Теперь при следующем запуске данного защищенного файла появится окно со строкой для ввода пароля. Доступ к содержимому и редактирование будет доступно только после ввода этого ключа.
Снять установленный пароль можно через специальное меню «Сведения», о котором как раз пойдет речь в следующем методе.
Комьюнити теперь в Телеграм
Подпишитесь и будьте в курсе последних IT-новостей
Подписаться
Способ 2: Установка пароля через меню «Сведения»
Microsoft Excel предлагает пользователям доступ к отдельному меню, где есть разные параметры для взаимодействия с книгой. В нем вы можете настроить резервное копирование, проверить форматирование, узнать метаданные и установить защиту. Как раз последнюю настройку я и предлагаю рассмотреть более детально.
-
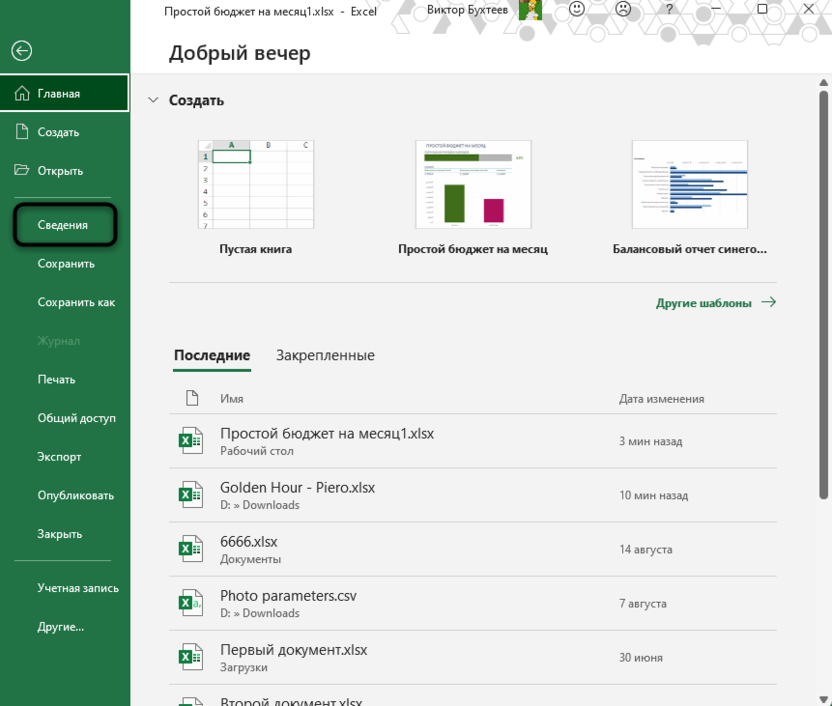
В том же окне «Файл», о переходе в которое говорилось в предыдущей инструкции, на левой панели выберите раздел «Сведения».
-
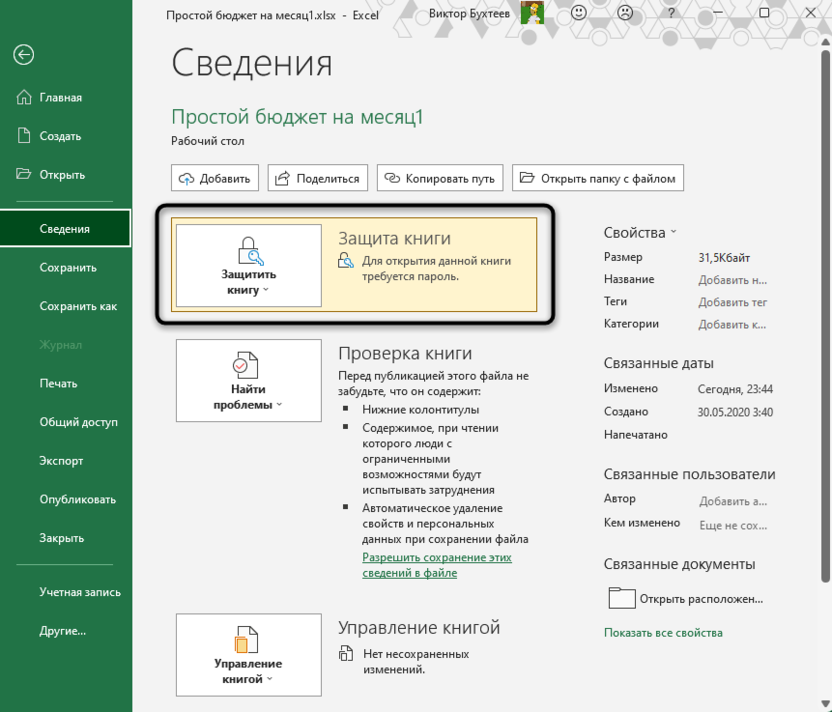
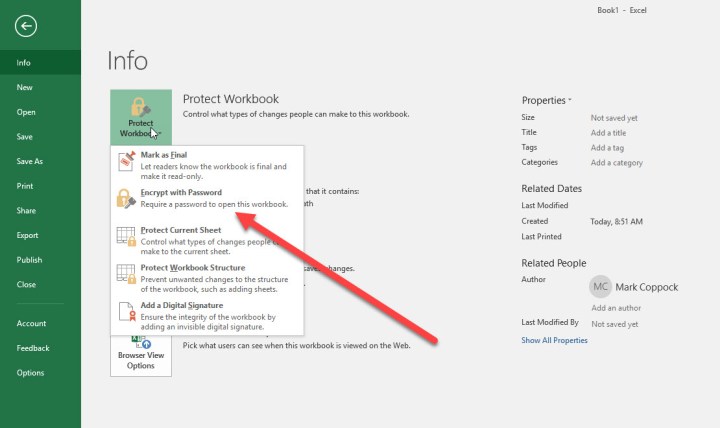
Нажмите по кнопке «Защитить книгу», чтобы открыть доступные настройки защиты.
-
Среди всех пунктов отыщите «Зашифровать с использованием пароля». Можете использовать и другие настройки, если посчитаете, что они лучше подойдут конкретно в вашей ситуации.
-
Создайте новый пароль и подтвердите внесение изменений. Учитывайте тот факт, что забытый пароль восстановить невозможно, поэтому сохраните его в надежном месте или где-то запишите.
Способ 3: Использование онлайн-сервисов
В конце статьи я хотел бы показать метод, который придет на помощь тем юзерам, кто не имеет доступа к Microsoft Excel, но на руках есть файл, для которого нужно установить пароль. В таких ситуациях изменения можно вносить прямо в код документа, в чем помогут разные онлайн-сервисы.
-
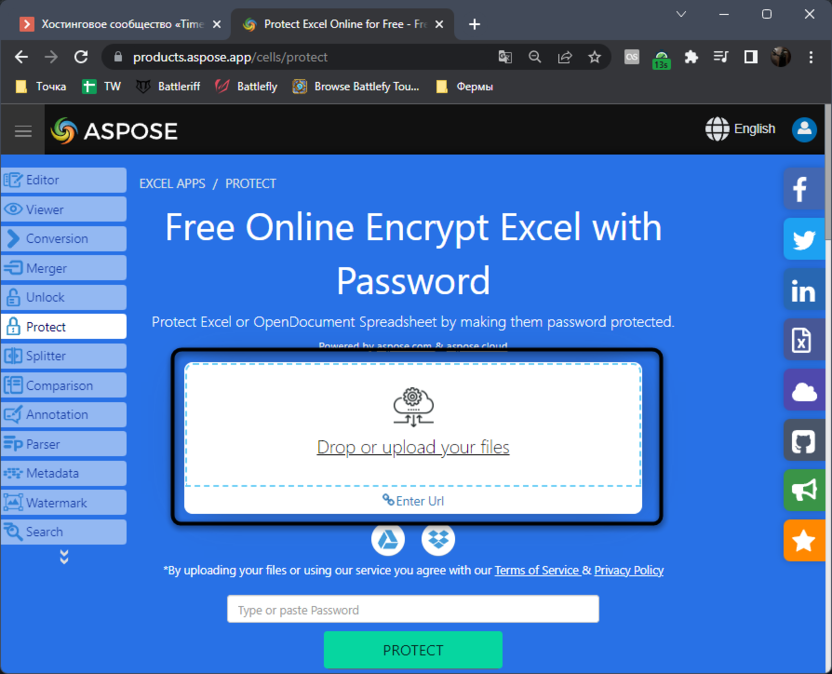
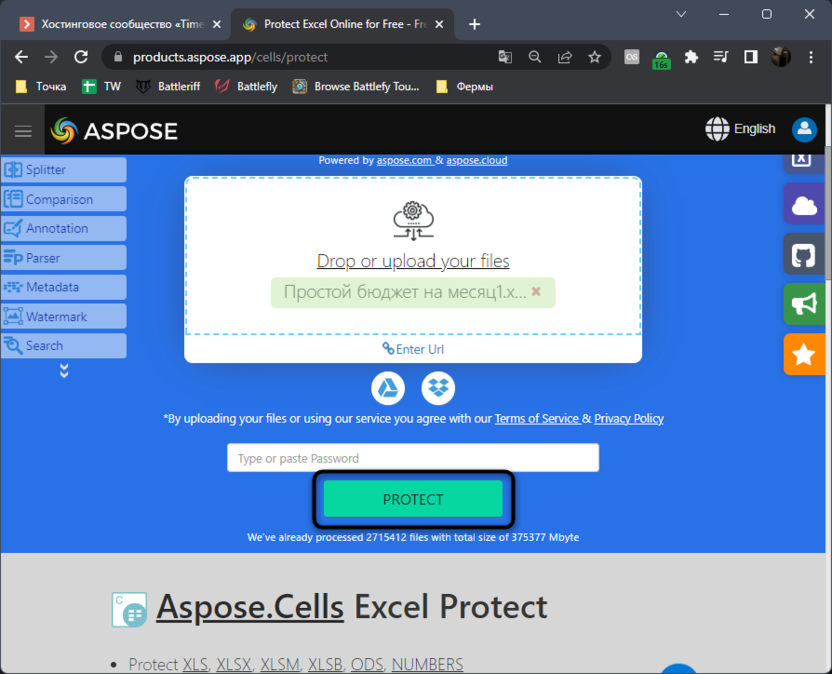
Для реализации поставленной задачи я выбрал инструмент на онлайн-сервисе ASPOSE, но вы можете через поисковик отыскать любые другие тематические веб-ресурсы, если этот по каким-то причинам не подойдет. Начните с загрузки исходного файла на сайт.
-
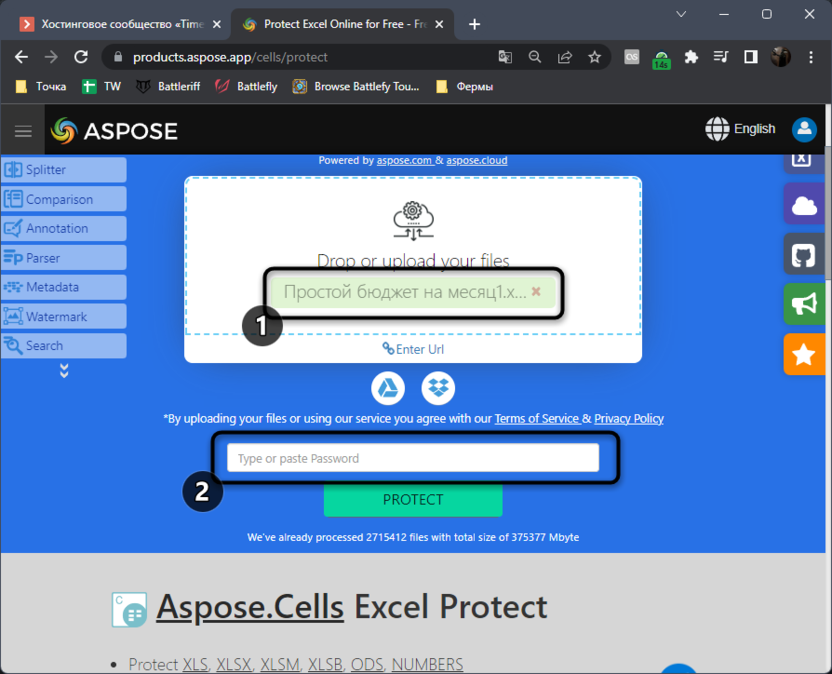
Убедитесь в том, что файл выбран, затем в специально отведенном поле введите пароль.
-
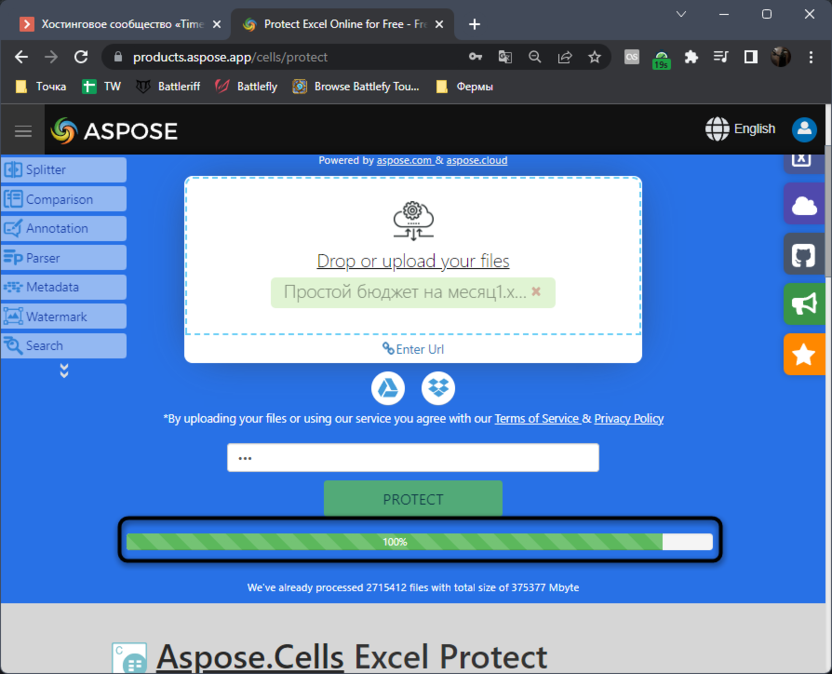
Подтвердите его добавление, кликнув по «Protect».
-
Ожидайте окончания операции, не закрывая текущую вкладку, иначе весь прогресс будет сброшен.
-
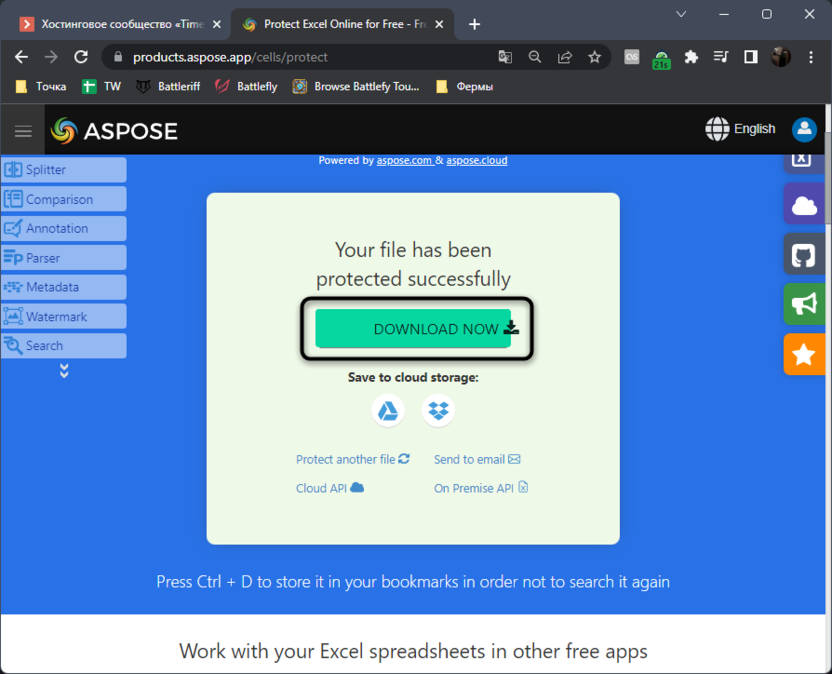
Страница обновится, появится кнопка для скачивания электронной таблицы. Эта версия файла теперь будет открываться только после ввода установленного через онлайн-сервис пароля.
Я уже писал об этом выше, но повторюсь еще раз: при вводе пароля обязательно запомните его, учитывайте текущую раскладку и регистр символов, поскольку все это влияет на ключ безопасности. Восстановить его можно будет, но для этого понадобится обращаться к стороннему софту или платным сайтам, что не есть хорошо.
Learning how to put a password to an Excel is extremely useful, especially when you are doing some work and you do not want it to be plagiarized. It is also very useful in cases where you need to share the file, but you don’t want some data to be modified by mistake.
In this article we show you the methods how you can lock an Excel workbook or just some sheets of a file.
Table of Contents
- 1 Steps for you to learn how to put a password on an Excel workbook
- 2 Method for you to learn how to put a password in spreadsheets
- 3 Other protection and security methods in an Excel file
- 4 Warnings when learning how to put a password in Excel
Steps for you to learn how to put a password on an Excel workbook
Managing to protect an Excel workbook is not so complicated, as long as you know what steps you must follow to achieve it. Next, we give you the steps so that you can achieve it:
- The first thing you should do is open excel file that you want to protect
- Once you have already opened it, you must go to the menu “Archive” and then look for the section “Information«.
- Then in the information section you must select the option «Protect book” and then you must select “Encrypt with password«.
- When you select «encrypt password» a box is displayed asking you enter password and then repeat it to verify it.
- Once you have verified the password, the book will be protected and when you open it again you will need to enter it.
By following these 5 steps you will be able to learn how to put a password on an Excel workbook and thus keep the information you work on safe.
You have to keep in mind that you must have the password written down in a safe place, since if you do not do so, you can lose the information that you have created in the Excel workbook. The encryption is so strong that even the people at Microsoft couldn’t access the information without the password.
It is also recommended that select a password that is not so easily guessed by third parties. If you don’t take this into account, others could guess the password and therefore have access to the data you don’t want disclosed.
Method for you to learn how to put a password in spreadsheets
A very good option is to learn how to put a password in spreadsheets, since this can help you protect data that you do not want to be modified by accident or intentionally.
What you should keep in mind is that this is a method that does not lock the file completely, nor does it limit the users who can see the information in the book. To be able to apply this blocking of sheets of an Excel workbook you must follow the following steps:
- First you must identify if there are some columns you want, if they can be modified before blocking the others.
- Once you’ve determined the columns you don’t want to be locked, you must select them and right click with the mouse.
- In the new menu you must look for the section “Cell format” and in the next menu you should look for the option “Protect«.
- Once in the protect option you must deactivate the option “Blocked up” which is already checked.
- Now you just have to go to the menu “Check” located at the top of the book.
- When entering the review section, you need to select the option «Protect sheet«.
- When you have selected protect sheet, a window is displayed in which you are asked to enter the lock password. But you can also select what activities users can do once you have locked the sheet.
- By entering the key and selecting the activities allowed for users, you just have to press accept to set the lock.
By following these 8 steps, you have not only learned how to put a password on an Excel sheet, but you also protect the data that you do not want to be modified in the workbook.
Other protection and security methods in an Excel file
Microsoft has created different methods to be able to protect the security of an Excel file, in addition to those that we have already talked about. Next, we will talk about some of these alternative methods.
- Mark file as final. This is an option that Excel provides when you want to mark a file as the final version and do not want it to receive modifications from a third party.
- Information rights management (IRM). This is one of the options that you can use to block the file, with the information management rights you can protect it from being modified or used by other people.
- Digital signature. Making use of digital signatures can be a good option so that your data is not used or stolen by third parties. For this method you must have a valid certificate from a certification authority.
- book level. This is a lock option for the workbook structure, that is, with it you can prevent other users from being able to move, add, delete, hide and even rename your worksheets.
- Spreadsheet level. This is a protection that allows you to protect other elements such as cells, ranges, formulas, ActiveX controls, forms. That is, it limits a user’s modification options in an Excel sheet.
These alternative methods can also be very useful depending on the type of information you are working with in your Excel workbook.
Warnings when learning how to put a password in Excel
There are a number of caveats when it comes to learning how to put an Excel password. So it is important that you know them before using any of these methods.
- It is important that keep your password safe, since if you forget it, Microsoft cannot enter the file to recover your information.
- The fact that the file has a password does not mean that it is completely safe or protected. Hence you should be careful when distributing files with important information to third parties or strangers.
- It is not recommended that you keep personal information such as credit card numbers, social security or employee identification in an Excel workbook. Remember that the fact that it is blocked does not mean that it is completely safe.
- The protection related to the sheet level is not a considered security method, since it only limits the cells that you have blocked from being modified.
It is very important that you take these warnings into account, especially if you handle classified information in your organization or the company you work for.
The content of the article adheres to our principles of editorial ethics. To report an error click here!.
-
1
Open your Excel document.
-
2
Click File. This is in the top left corner of the screen.
Advertisement
-
3
Click Protect Workbook.[1]
-
4
Click «Encrypt with Password».
-
5
Type in a password. Take care not to forget this password; if you lose it, you won’t be able to open your file.
-
6
Click OK.
-
7
Re-enter your password.
-
8
Click OK.
-
9
Close your document. If prompted, click Save Changes first.
-
10
Re-open your document. You should see a field that reads «(YourFile).xlsx is protected».
-
11
Type in your password.
-
12
Click OK. If you typed in your password correctly, you should now have access to your document!


Advertisement
-
1
Open your Excel document.
-
2
Click the «Review» tab.[2]
-
3
Click Protect Workbook. This is in the «Changes» section.
-
4
Check the «Structure» box. If you have also set up specific windows within the file, check the pertinent box as well.
-
5
Type in your password. You may need to do this twice.
-
6
Click OK. Your excel file is now password-protected! When you open it, you’ll be asked to input your password.


Advertisement
Add New Question
-
Question
I have made a sheet in Excel which contains 2000 names and addresses, so now I want to make this sequenced. First a, then after that b, c, etc. How do I do this?

Sylvia Saltaformajo
Community Answer
Right-click on the column you want to sort your sheet by. A menu will open. Hover over the «Sort» option in it. You will see another menu, click «Sort A to Z» in it.
-
Question
What do I do if I forgot the password?
Sylvia Saltaformajo
Community Answer
Unfortunately you can’t recover forgotten passwords for MS Excel spreadsheets. You’ll have to recreate a document or recover password using special software. You can find it online, there are many options: Password-Find, Password Lastic, Rixler password recovery, etc.

Ask a Question
200 characters left
Include your email address to get a message when this question is answered.
Submit
Advertisement
-
Password protecting your Excel sheet will keep the average user from messing around in your files, but a determined user can purchase password-cracking software to view your sheets.
Thanks for submitting a tip for review!
Advertisement
-
Write down your password somewhere so you don’t forget it.
Advertisement
References
About This Article
Article SummaryX
1. Open the file.
2. Click File.
3. Click Protect Workbook.
4. Click Encrypt with Password.
5. Enter a password.
6. Click OK.
7. Close the document.
8. Reopen and enter the password.
Did this summary help you?
Thanks to all authors for creating a page that has been read 193,091 times.
Reader Success Stories
-

Ningappa Totigara
Mar 31, 2018
«How to protect a workbook or worksheet.»
Is this article up to date?
-
Home
- Computing
- Guides

If you use a computer, you probably have some Microsoft Excel documents on your Mac or PC that you wouldn’t want other people to find and read.
After all, Excel serves not only the average person, but also businesses, government institutions, and millions of other folks worldwide. Whether you’re creating graphs, converting PDFs, or just inputting rows and rows of data, the best way to keep that information safe is to learn how to password-protect an Excel file.
Adding a password

Step 1: In Excel, open the document you want to secure with a password.
Step 2: Click File, followed by Info.
Step 3: Next, click the Protect Workbook button. From the drop-down menu, select Encrypt with Password.
Step 4: Excel will then prompt you to type in a password. Pick one that’s complicated and unique and note it down in your password manager.
It is paramount that you remember it, or have access to a copy of it in a secure location because if you forget it, you will lose access to the Excel file and recovering it will be complicated. There’s no way to access a forgotten password, so keep it in a password manager or similar method in case it is forgotten.
From now on, any time you try to open that file, Excel will prompt you to input your newly chosen password. Note that this password only protects that individual document, not every Excel document on your PC. If you want all Excel files to have similar protection, you’ll need to password-protect each file individually or look at more advanced protections.
If you want to see whether an Excel file has password protection or not, check out the Info tab for the document and look at the Protect Workbook section. It will tell you whether a password is required to open it or not.
Now that you’ve password-protected your most essential files, it might be worth considering adding extra layers of security to your system. The easiest way to protect a large number of records is to encrypt them. Luckily, encryption programs are not hard to find. Windows 10 Professional users have a built-in encryption utility called Bitlocker. Still, if you want to download a free version with lots of customization options for many types of data, you can try Crypto Expert 8 or VeraCrypt open source downloads.
Additional security options

Excel also allows you to apply more customized security options to your file if necessary. It’s important to know what these other options do so you can create the right security for your project. Under Protect Document, you’ll find several additional features that may prove useful:
Mark as Final: This will mark the file as completed, which lets other people know that they shouldn’t make any changes. Using this option will not secure the data behind a password, however, so it doesn’t offer any security.
Protect Current Sheet: This will guard the currently selected worksheet with a password so that people can’t make any changes. It’s a handy option if there’s only one sheet in the workbook that you want to protect, and you don’t mind if people can see the info — you just don’t want them messing with anything. You will notice that there’s also an option to do this with Workbook Structure, which protects data throughout the workbook from changes unless people have the password.
Restrict Access: Businesses in particular benefit from restricting access to Excel files. Businesses know that all employees have access to the company’s system, and yet some aren’t authorized to open certain documents. Just as IT has made security templates that keep Excel files safe from particular users, the Restrict Access feature backs up these settings. It’s helpful in big groups where some people need to get to data, but not everyone needs to move in and out of the document.
Add a Digital Signature: You can guarantee that only you have access to and control over your Excel files by establishing a unique and inimitable digital signature.
Safeguarding Excel files is a crucial task that many people overlook. There are plenty of safety measures available to ensure that your information remains private and secure, starting with password protection. If you want to improve your information security, look at our crash course on encryption and our article on hiding files in Windows 10.
Editors’ Recommendations
-
Wi-Fi not working? How to fix the most common problems
-
Here’s how to rewatch the first public demo of ChatGPT-4
-
Best Microsoft Office deals for January 2023
-
The best all-in-one computers for 2023
-
How to fix audio issues in macOS
-
Computing
Microsoft Teams Premium uses AI to automatically recap your meetings

Microsoft has just made Teams Premium available for a short time. The preview will allow Microsoft’s customers to test out some of the new features that won’t be widely available for a while yet.
A few interesting features are making an appearance during this short trial run, including the ability to add custom branding to meetings, live translated captions, and meeting recaps prepared by artificial intelligence (AI).
Read more
-
Computing
How to use the new communities feature in Microsoft Teams

Microsoft has announced a new communities feature for its free Microsoft Teams communication platform that is intended for personal use rather than exclusively for large businesses.
The communities feature is available for Microsoft 365 Personal and Family and Teams Essentials accounts and allows users to easily organize, share, communicate, and collaborate in a hybrid manner. The feature allows you to not only connect online directly, but also to prepare for in-person meetings.
Read more
-
Computing
Hacker ranks explode — here’s how you can protect yourself

The number of people that have hacking skills has exploded recently but it’s still possible to protect yourself against almost all attacks, according to Microsoft’s latest Digital Defense Report.
Microsoft has among the most complete collections of cybersecurity data compiled from Windows computers around the world and has analyzed that information to uncover some interesting insights for 2022. Something immediately obvious from the report is the threat from phishing attacks and ransomware is growing rapidly and at the same time becoming more sophisticated but you can still protect yourself.
Read more
Reading time
4 min
Views 682
Read this article to find out how to set a password for any Microsoft Office document created or remove it. How to restrict access to such applications as Microsoft Word, Excel or PowerPoint, and to files created with other tools included into the Office package.
Intro
Together with Windows 10, another highly popular software product by Microsoft is the Microsoft Office package that allows users to create, edit, share and otherwise manage various document types (such as texts, spreadsheets, databases etc) for any personal or business needs.
Although people already use a system password in the Windows 10 operating system to protect their account and files from unauthorized access, there can be a number of reasons why you need extra protection for your Microsoft Word, Microsoft Excel or Microsoft PowerPoint files. For instance, you may wish to share a document containing confidential information and you want to be sure that only trusted users can access it. Another example is that you choose to keep your documents in OneDrive or another cloud storage service, and you want to add an extra protection feature just in case your account gets hacked. Other scenarios may include cases when the computer where a specific document is stored can be accessed by many other users, and you would like to use the password to know for sure nobody else can view your files.
Regardless of why you need it, Microsoft Office 365, Microsoft Office 2019, and Microsoft Office 2016 (as well as their earlier versions) all contain the options to quickly protect their files with a password.
In this article, we are going to show you how to password protect a Microsoft Office document, and how to remove a password, if necessary.
How to set a password to any document created with the Microsoft Office package
To encrypt a document, restrict the circle of people who can access it, and add a secret password for such applications as Microsoft Word, Microsoft Excel or Microsoft PowerPoint, that are all included into the Microsoft Office package, there are a few steps to take.
Start the application Microsoft Word (Excel or PowerPoint) and open the document which you would like to protect with a password.
Above, find the menu and select the File tab.

The new page appears, with the settings that let you control save, print and access options; look to the left and click on the line Info.
Find the large button entitled Protect Document to open the nested menu in charge of the security settings.
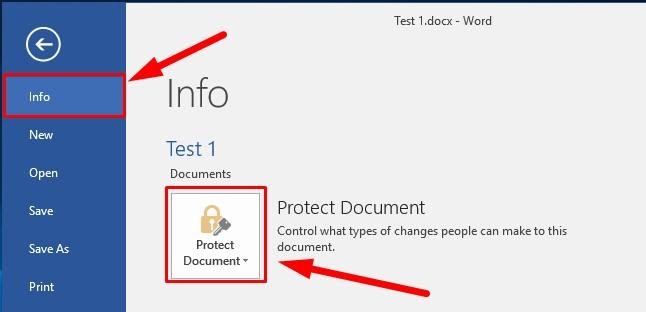
An important note. In Microsoft Excel this option is displayed as Protect Workbook, and in Microsoft PowerPoint – as Protect Presentation.
In the menu that opens, select the line Encrypt with Password.
The office package security system will show you the Encrypt Document window containing the Password field, where you need to type the word or phrase that will lock and unlock the document.

When you are ready with the password, click ОК to continue.
An important note. If you forget the password you have set for the file, there is no way to restore it, so you won’t be able to access the document contents. That is why passwords should be stored in a safe location where you can always find them in case you forget or lose a password.
Retype the password in the window Confirm password containing the line Reenter password.
Click ОК again and apply the password to the document.
Now users trying to open this document will be suggested to enter the password in order to get access to the file. Be sure to keep the password in a safe place so that it can’t be available to anyone.
How to remove a password set for a Microsoft Office document
If you no longer need to protect a file with a password, and you want the Microsoft Office (Word, Excel or PowerPoint) file to be accessible by anyone, here is how to unlock the file.
Use the corresponding application to open your Word file (Excel spreadsheet or PowerPoint presentation).
The security system will ask you to confirm your right to access the file by entering the password. Type the current password into the field Enter password to open file to unlock the document.
Click ОК to open the document.
Above, in the left corner of the screen, find the menu and select the File tab.

In the new page that opens, choose Info on the left.
You will see several options to manage the document settings; find Protect Document and click on it to bring up the security settings.
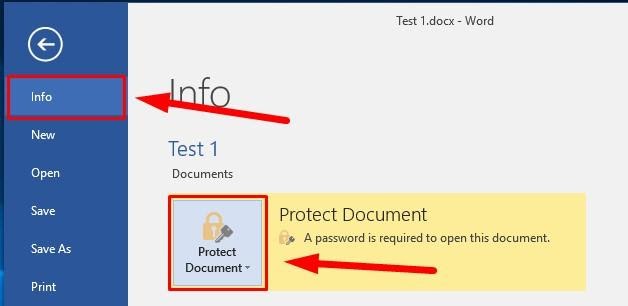
An important note. If a document is password protected, the protection button will be yellow.
In the menu that opens, go for Encrypt with Password.

The security system will open the Encrypt Document window, where the Password field contains the previously set password hidden behind special symbols so that no one can see the actual password. Clear the field and remove the current password.

Then click ОК to save the changes you have made.
Now any user will be able to open and edit this Microsoft Office document without having to enter the password.
Conclusion
For a number of reasons, people may need to add extra protection for their files, especially if these documents contain confidential information or are transmitted over the network.
Fortunately, the Microsoft Office package allowing you to create and edit a wide range of office documents also features a special tool that gives your files a decent level of protection. Using the advice given in this tutorial, you can always protect your text files, spreadsheets or presentations with a password which makes it almost impossible for anyone else to access the contents of the encrypted file. When you don’t need the password anymore, you can easily remove it and unlock the file so that it becomes available to anyone.
See the full article with all additional video tutorials. Also visit our Youtube channel, there are over 400 video tutorials.
Microsoft Excel makes our life super easy with its useful data processing features. Business people and students can create their desired data chart with the help of this Excel application.
When our Excel sheets contain some sensitive information, we must protect it with a password for security purposes. Adding a password in Excel is easy, but removing the password from Excel can be challenging.
Often after adding a password to our Excel sheet, we forget about them. Don’t worry. In this article, I displayed how to add or remove a password and the way of recovering an Excel password if you have lost it.
So don’t skip any part of this article if you want to learn Excel’s password adding and removal process.
Let’s start!
Read more on how to Sort by Date in Excel
How Secure is Microsoft Excel Password Protection?
Microsoft Excel password protection is very secure and trustworthy because it uses the AES-256 security patch. This patch makes your password close to unbreakable. You must ensure that your password is long enough and stuffed with strong characters.
The more solid characters are on your password, the more secure the password becomes. So include the (!@#$%^&*) unique characters in your password to make it unbreachable. If possible, you must try to make your password longer than the expected size.
Most importantly, make a strong password and note it down for further use. Your unbreakable password will not come of any help if you can’t remember it. Therefore write down the password to a secure place and protect it for the future.
Read through this article to learn how to add or remove an Excel password and find out what to do when you forget the password.
Check out our separate post on how to MS Excel Lock a Cell
How to Add a Password in Microsoft Excel on Windows & Mac
You can add a password to your specific Excel sheet with the help of two methods. The first is to use the Info section, and the other is to utilize the Review menu. Both of the processes are demonstrated below for your assistance.
Here are the steps to add a password in MS Excel:
1. Use the Info Section to Add an Excel Password
With the help of the Info section, users can quickly add a password to their Excel sheet. To learn how you can do that, follow the steps carefully.
Here are the steps to use the info section to add an Excel password:
On Windows OS:
Here’s a complete guide on how to Lock and Unlock Cells in Excel
On Mac OS:
- Open the MS Excel spreadsheet.
- Navigate to the File section.
- Choose the Passwords option.
- Enter the Password you want to set and Re-Enter it to Confirm.
- Hit the OK button and Save the file.
Password protection is set up on your desired MS Excel Spreadsheet.
Using the Review section, you can set up a new password for your Excel sheet. Let’s find out how to add a password on Excel with the Review menu.
Here are the steps to utilize the review menu to add a password on MS Excel:
Your desired MS Excel sheet is password protected now, and you can open this sheet anytime with the newly set password.
Follow our guide on how to Mail Merge in Outlook with Excel & Word
How to Remove Password from MS Excel Sheet in Windows & Mac
Removing the password from an encrypted Excel sheet can be complicated. But in this article, I will show you 3 quick yet functioning methods by which you can easily remove a password from your MS Excel Sheet.
1. Use the Info Section
As you know from the previous heading, you can add a password with the info section. To remove this password, you just need to reverse the previous process. Let’s sort out how to do that.
Here are the steps to use the Info section to remove the password:
On Windows:
Now at the bottom right side of the Protect Workbook section, you can see the Unprotected hyperlink.
On Mac:
- Launch the Excel sheet.
- Navigate to the File menu.
- Select the Passwords section.
- Clear the Password Box.
- Hit the OK Butt0n.
- Save the File.
Password protection no longer remains on your desired Excel Sheet.
Check out our separate post on Highlight Duplicate Values in Excel
You can remove the existing password from the Review section of an Excel Sheet. To complete the removal process, you must check out the instructions below.
Here are the steps to remove a password with the Review menu:
Alternatively, you can follow the below steps.
This operation will remove your current password from your specific Excel sheet.
You may also like to read: how to Install Macro in Excel
3. Apply the Save As Option
In order to remove the password from your MS Excel sheet, you can use the Save As option. A detailed description of this method is stated below.
Here are the steps to remove the password from MS Excel with the Save As menu:
You successfully removed the password from your particular MS Excel sheet.
For all the above-displayed methods, you must remember your password. But if you forget your password, follow the next heading, where I will show you the technique with which you can easily remove your Excel password without knowing the existing password.
Also related to this guide on how to Copy Values Without Formulas on Excel
How to Remove Password from MS Excel Without Knowing the Password
We all know the proverb TO ERR IS HUMAN, which means mistakes are in our nature. Suppose you made a mistake because you forgot your Excel password.
Don’t worry; it happens every now and then with all of us. So let’s find out how you can remove your password from MS Excel when you can’t remember your actual password.
Here are the steps to remove the password from Excel without knowing the password:
1. Make a Zip File and Create an Alternative File
You can make a zip file from the protected Excel sheet and modify this zip to remove the password. By creating an alternative file, you can access your desired Excel document without any password.
Here are the steps to make a zip file to remove the Excel password:
You can see that password protection from the Excel sheet is gone, and now you can modify the sheet.
Check out our separate post on Fix Microsoft Excel Freezing or Slow
2. Use Third-Party Apps
Using a third-party app, you can easily remove the password from an MS Excel sheet. A third-party app can solve your problem and save you a lot of time. There are several apps on the market with which you can remove your Excel password.
Here is the list of some third-party apps that can remove your Excel password:
- Password Find.
- LostMyPass.
- Password-Online.
- Straxx Excel Password Remover.
All the stated apps can help you but keep in mind that third-party apps are malicious and risky. Also, they contain several bugs and glitches and can harm your device.
So my recommendation is not to use any third-party apps because they are unsafe. Instead, you can follow the methods I mentioned earlier to solve your password removal issue.
Also read, how to Copy & Paste Objects in Excel
FAQs
How do you make a read-only file editable in MS Excel?
You need to remove the read-only function if you want to make a read-only file editable in MS Excel. Right-click on the File, select the Properties option, Uncheck the Read-only checkbox, and hit the OK button.
What would happen if you tried to remove a read-only file in MS Excel?
Nothing will happen when you try to remove a read-only file from MS Excel.
What does chmod 666 code mean in MS Excel?
The chmod 666 code in MS Excel means that everyone can Read and Write the program, but no one can Run the program.
Bottom Line
MS Excel is a program that is immensely used worldwide for its compact build and handy features.
However, an inbuilt password protection option is available on the Excel app. With the help of this function, you can easily add or remove an Excel password. You can use the Info section or the Review menu to remove or add a password.
Also, applying the Save As option can come in handy to remove a specific password from the Excel program. I guess you already know that because, in this article, I exhibited all the available methods in detail.
Let me know your afterthought in the comment section; until then, Bye!
You are tired of finding your valuables Excel documents upset by unauthorized interventions of friends and relatives? Don’t think twice: protect them with a nice password. This way, your spreadsheets can only be opened after entering the right keyword.
How do you say? You don’t know yet how to password protect excel files? Don’t worry, there is no need to install any additional programs on your computer. Just «fumble» in the right menus of Excel and your documents will become inaccessible or, if you prefer, protected from changes. Here’s how, in detail.
Final report: I will use for the tutorial Office 2022 for Windows and macOS which, at the time of writing, is the most recent version of the Microsoft suite. However, the indications contained in the guide should be valid for all editions of Excel starting from 2007, i.e. all those equipped with a Ribbon tabbed interface. In addition, I’ll also give you some pointers on older versions of Office, such as 2003. That said, there is nothing left for me to do but wish you a good read and a good job!
Index
- Putting the password to an Excel file on Windows
- Put the password to an Excel file on Mac
- Put the password to an Excel file online
- Put the password to an Excel file on smartphones and tablets
Putting the password to an Excel file on Windows
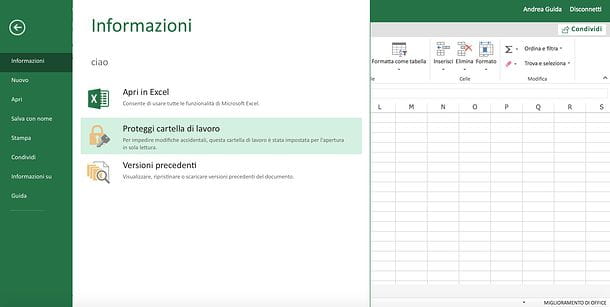
If you are using a Windows PC, you can put the password to an Excel file very simply. All you have to do is open the spreadsheet you want to protect, click on the button Fillet located at the top left, expand the menu Protect Workbook on the next screen and select the item Encrypt with password from the menu that appears. If you don’t see the «Protect Workbook» menu, select the item Information from the side bar of the sinistra.
In the window that opens, type the password you want to use to protect your Excel file and click on the button OK. Repeat the same operation to confirm the settings and that’s it. From this moment on, your document will be viewable only after entering the right keyword.
If you change your mind, you can remove the password request from your Excel document by opening it and repeating the steps outlined above. Then click on the button Fillet located at the top left, expand the menu Protect Workbook on the next screen and select the item Encrypt with password give the menu to compare.
In the window that appears on the screen, delete the password currently set for file protection, press on OK And that’s it.
How do you say? Would you like to protect your Excel document from changes without preventing it from being viewed by anyone who does not know the unlock password? This can also be done.
To begin with, open the workbook you want to protect, click on the button Fillet located at the top left, select the item Information from the left sidebar and choose the option Protect Current Sheet from the menu Protect Workbook.
In the next window, put the check mark next to the operations you want to lock with a password, for example Select locked cells, Formato that, Insert columns, Insert lines o Delete columns; type the Password to unlock the changes to the worksheet in the appropriate text field (top), click on the button OK and repeat entering the Password per salvare I modified it.
It should be noted that the above protection only applies to the current worksheet. If your workbook consists of multiple sheets, you will need to repeat the operation for all the sheets you want to password protect.
Alternatively, you can select the option Protect workbook structure from the menu File> Protect Workbook, which allows you to block the modification of the structure of the workbook (for example the addition of new sheets) with a password to be entered in the window that appears immediately after on the desktop.
In case of second thoughts, you can revoke the blocks to changes in the Excel document by opening it, returning to the menu File> Protect Workbookby selecting the option Protect Current Sheet or the option Protect workbook structure, by typing the current password in the window that is shown on the screen and pressing OK.
Old versions of Excel
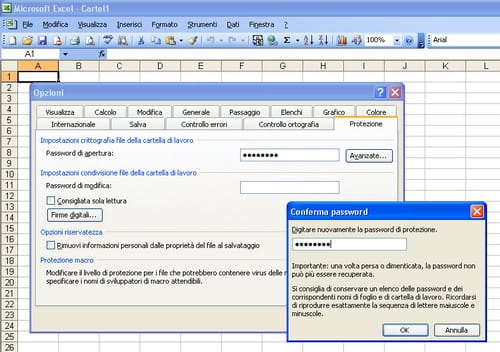
It was used Office 2003 or an even older version of the Microsoft suite and you want to find out how to protect an Excel file with a password, all you have to do is open the spreadsheet to which you want to deny access by unauthorized persons and select the item options from the menu Instruments of the program, above.
In the window that opens, click on the tab Protection , type in the text field Password to open the password you want to use to protect your Excel document, click on OK and type your keyword again to save your settings. You can also allow the document to be opened but prevent it from being changed by typing a password in the field Change password.
Put the password to an Excel file on Mac

I use a Mac? No problem: Excel is also available for the Apple operating system and also on the latter it allows you to protect your workbooks with a password in an extremely simple way: let me explain how.
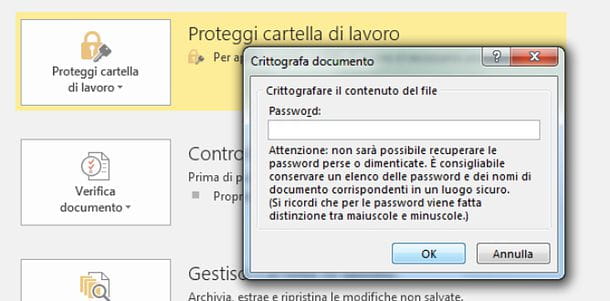
First, open the workbook you want to password protect, then select the item Password from the menu Fillet which is at the top left. In the window that opens, type the password to open you want to set for the document or, alternatively, the change password (to block changes to the file only) and click on the button OK.
If you want, also put the check mark next to the item Read only recommended, to make the file open in read-only mode, and that’s it. Then type for the second time the password with which to protect the workbook and press the button OK to save the settings.
In case of second thoughts, you can remove the password for opening and / or editing your Excel file by opening it, returning to the menu File > Password located at the top left and deleting the password you no longer intend to use from the window that opens. Once this is done, click on the button OK per salvare i Cambiomenti.
Put the password to an Excel file online
There is also a web version of Excel, which works directly from the browser without installing additional programs on your computer. Is called Excel Online and it’s completely free, you just need a Microsoft account to use it.
Although it allows you to protect your documents by setting them to read-only mode, Excel Online does not allow you to set passwords as it does in Excel for Windows or macOS. Likewise, it does not allow you to open password-protected Excel documents via the desktop version of the program.
If these limits aren’t a big deal to you, log into Excel Online, log into your Microsoft account, and choose whether to create one blank workbook (to create a new Excel file) or whether to open an existing document. In the latter case, however, you must first upload the file to OneDrive, the Microsoft cloud storage service (which I told you about in depth in my dedicated tutorial).
Once you have opened the document you want to set in read-only mode in Excel Online, click on the button Fillet located at the top left, select the item information from the menu that appears on the side and click on the icon Protect Workbook. The game is done!
Put the password to an Excel file on smartphones and tablets
Excel is also available as an app for Android, iPhone and iPad and Windows 10 Mobile and is free for all devices that are 10.1 inches or smaller. If you have a larger device, you need to subscribe to the service Office 365, which has prices starting from 7 euros / month.
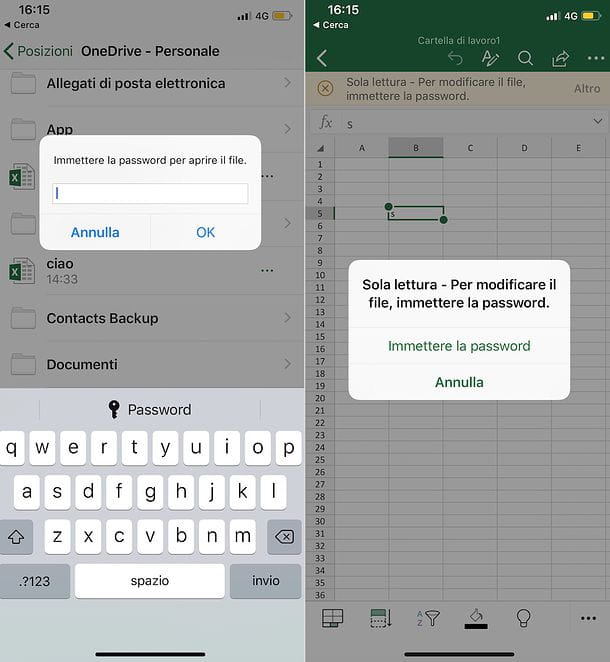
Excel for mobile devices offers many of the features available in the desktop version of the program. However, password protection of documents is not one of them. The only thing you can do is to import, view and edit the documents previously protected from opening and / or editing via the standard version of Excel.
To do this, you must first upload the documents to open on OneDrive, Dropbox or another of the services supported by the Excel app, select them via the tab apri and enter their unlock password when prompted. The steps to take are practically the same on both Android and iOS and Windows 10 Mobile.