
Word for Microsoft 365 Word 2021 Word 2019 Word 2016 Word 2013 Word 2010 Word 2007 More…Less
Underline words and the spaces between them
The quickest way to underline text is to press Ctrl+U and start typing. When you want to stop underlining, press Ctrl+U again.
You can also underline text and spaces in several other ways.
|
What do you want to do? |
Example |
|---|---|
|
Underline words and the spaces between them |
|
|
Underline words, but not the spaces between them |
|
|
Change the underline style and color |
|
|
Use a double underline |
|
|
Underline blank spaces |
|
|
Remove underlining |
text without underline |


-
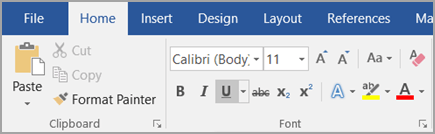
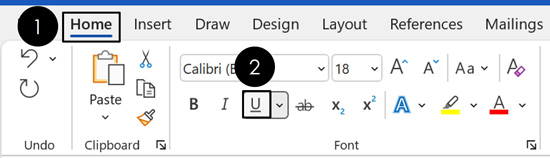
Select the text that you want to underline.
-
Go to Home > Underline. Or press Ctrl+U.

Underline words, but not the spaces between them
-
Select the text that you want to underline.
-
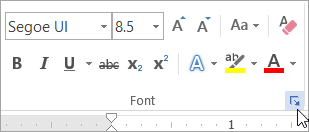
Go to Home and select Font dialog box launcher
.
-
Go to Font and select Words only in the Underline style drop-down list.
 .
.
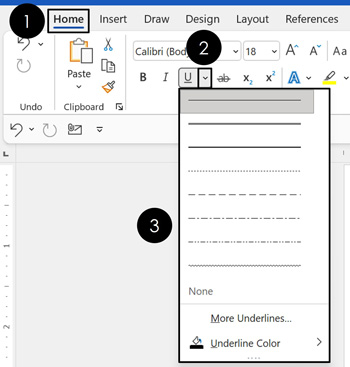
Change the underline style and color
-
Select the text that you want to underline.
-
Go to Home and select Font dialog box launcher
.Tip: You can also use the keyboard shortcut Ctrl+D.
-
Use the Underline style drop-down list to select an underline style.
Use the Underline color drop-down list to change the color of the line.
Use a double underline
-
Select the text that you want to underline.
-
Go to Home and select Font dialog box launcher
.
-
Select double underline in the Underline style drop-down list.
Underline blank spaces
You can underline blank spaces by pressing Shift+Hyphen (-), but it is difficult to line up the underlines — if you are creating a fill-in form, for example. Also, if the AutoFormat option for changing underscore characters into border lines is turned on, pressing Shift+Hyphen (-) three or more times in a row will result in a line that extends the width of the paragraph, which may not be what you want.
A better way to underline blank spaces for a printed document is to use the Tab key and apply the underline formatting to the tab characters.
When you want to create an underline in an online form, insert table cells with the bottom border turned on.
Underline blank spaces for a printed document
To underline blank spaces for a printed document, use the Tab key and apply the underline formatting to the tab characters.
-
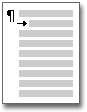
Go to Home > Show/Hide ¶ so that you can see the marks that indicate spaces and tab stops.
-
Press the Tab key.
-
Select the tab characters that you want to underline. A tab character looks like a small arrow.
-
Do one of the following:
-
Press Ctrl+U to apply a simple underline.
-
To apply a different style of underline, go to Home and select Font dialog box launcher
.Select Underline style to choose a different underline style.
-
Underline blank spaces for an online document
To create an underline in an online document or form, insert a table cell with the bottom border turned on. This method ensures that when someone types on the line, the line stays in place.
-
Click or tap where you want to insert a blank underline.
-
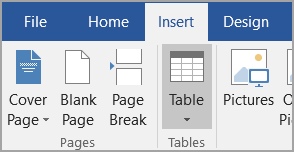
Go to Insert > Table.
-
Select the upper-left box to insert a 1×1 Table.
If you want to add introductory text, such as a name or Social Security Number, before the underline, insert a 2×1 Table.
To change the length of the line, move the pointer over the end of the table until it becomes a resize pointer
, and then move the arrow right or left to lengthen or shorten the line. -
Click or tap in the table (or in the second table cell if you created a 2×1 table).
-
The Table Tools appear. On the Design tab, select Borders > Borders and Shading.
-
Under Setting, select None.
-
Under Style, select the line type, color, and width that you want.
-
In the diagram under Preview, click or tap between the lower margin markers to add the bottom border. Make sure only the bottom line is displayed.
Note: If you prefer to view the table without the light gray gridlines that do not print, select the table, go to Layout next to the Table Design tab and select View Gridlines.
If you used a 2×1 table to make room for introductory text, you can type the text before the line.
 , and then move the arrow right or left to lengthen or shorten the line.
Remove underlining
To remove single underlining from words and spaces, select the underlined text and press Ctrl+U.
To remove other styles of underlining, press Ctrl+U twice.
Need more help?
Creating underline to certain sentence in Word 2016 can highlight the information you want to emphasize. Here I gathered 4 simple and pratical ways that can underline specific text in Word , let’s have a quick look.
1. Use Shortcut key to Underline Text
It may be the best known way of adding underline in Word. Select the content you want to emphasize, press Ctrl+U to underline it.

2. Underline Text with Font
Select the text, click the U symbal in Home tab. Or you can click the small black triangle next to it and choose the style of underline.

3. Underline Text with Table Border
1. Select the text, click the small black triangle next to Borders in Home.

2. But the underline created in this way will take up an entire line. For better result, you can click Insert tab and create a new table in the first place.

3. Input the content in the table, and resize it to adapt the text.

4. Right click the table and select Table Properties.

5. Click Borders and Shading.

6. Choose the style you like and disable the other three borders in Preview, then click OK.

6. Now you can see the result. Underline created in this way will be farther to the character than created by Ctrl+U.

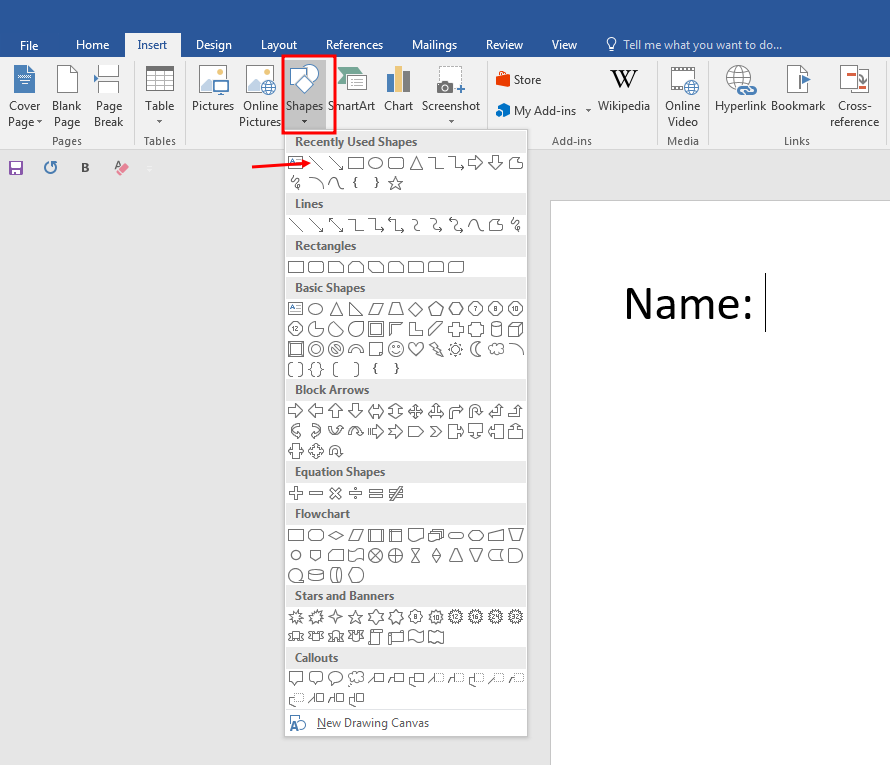
4. Underline Text with Shapes
1. Click Insert – Shapes. Choose the straight line icon in Lines.

2. Underline the text directly. You can also choose the color of underline in Drawing Tools. If you feel difficult to draw a straight line, then press Shift key at the same time.

Copyright Statement: Regarding all of the posts by this website, any copy or use shall get the written permission or authorization from Myofficetricks.
To create an underline without any text in Microsoft Word, press Ctrl + U to start the underline, then, press Ctrl + Shift + spacebar to create non-breaking spaces. Press and hold this keyboard shortcut combination to add multiple underlines next to each other, creating an underline.
Contents
- 1 How do you insert an underline in Word?
- 2 How do you underline text manually?
- 3 How do you underline without text?
- 4 What is the shortcut key for underline?
- 5 How do I insert a picture into a Word document without moving the text?
- 6 What is underline in MS Word?
- 7 How do you highlight in Word without text?
- 8 How do I get rid of the red underline in Word?
- 9 How do I get rid of the red underline in Word 2016?
- 10 Why is underscore not showing in Word?
- 11 How do you underline a word in Windows 10?
- 12 How do I insert a picture in Word without resizing?
- 13 How do you put a picture behind text on Microsoft Word?
- 14 What kind of type is underline?
- 15 How do you highlight specific words in Word?
- 16 How do I shade a whole line in Word?
- 17 What does red underline in word mean?
- 18 Why are all my words underlined in red on word?
How do you insert an underline in Word?
Do one of the following:
- Press Ctrl+U to apply a simple underline.
- To apply a different style of underline, go to Home and select Font dialog box launcher . Select Underline style to choose a different underline style.
How do you underline text manually?
Underlining Shortcuts and Troubleshooting. Highlight text and press CTRL+U. The quick key-combo for underlining text in Microsoft Word is holding Control and pressing the “U” key.
To create an underline without any text in Microsoft Word, press Ctrl + U to start the underline, then, press Ctrl + Shift + spacebar to create non-breaking spaces. Press and hold this keyboard shortcut combination to add multiple underlines next to each other, creating an underline.
What is the shortcut key for underline?
Format characters
| To do this | Press |
|---|---|
| Hide the selected text. | Ctrl+Shift+H |
| Apply bold formatting. | Ctrl+B |
| Apply underline formatting. | Ctrl+U |
| Apply underline formatting to the words, but not the spaces. | Ctrl+Shift+W |
How do I insert a picture into a Word document without moving the text?
To insert an image into Word without moving any text is to set the image’s default wrapping to no wrapping before entering it into the document.
- Click the location in your document where you want to insert a picture.
- On the Insert tab, click Pictures.
- Select the option you want to use for inserting pictures.
What is underline in MS Word?
An underline is a section of text in a document where the words have a line running beneath them. For example, this text should be underlined. Underlined text is commonly used to help draw attention to text.Create underline text in HTML. Create underline text in a word processor, such as Microsoft Word.
How do you highlight in Word without text?
Method 1: Using the CTRL Key and Your Mouse
- Step 1: Open up your Word document. First off, you’ll need to open up a Word document with some sentences ready.
- Step 2: Select the blank spaces. Now that your document is ready, select a blank space in your document.
- Step 3: Highlight the blank spaces.
How do I get rid of the red underline in Word?
Click on the name of the language in the status bar at the bottom of the screen. 2. Add a check mark in the Do not check spelling or grammar option and click OK. All the red and green squiggly underlines should be gone.
How do I get rid of the red underline in Word 2016?
When that situation comes, just follow this easy guide to remove spelling and red lines in MS Word:
- Click on the File menu and then on Options.
- In the Options pop-up window, open Proofing.
- Untick the Check spelling as you type and Check grammar with spelling.
Why is underscore not showing in Word?
Sometimes underscores don’t appear if the line spacing is too tight, or at the bottom of a page (especially if white space is hidden). If you change the Zoom ratio, do they appear?
How do you underline a word in Windows 10?
On the Ease of Access page, choose the “Keyboard” tab on the left. On the right, scroll down a bit and turn on the “Underline Access Keys When Available” toggle under the “Change How Keyboard Shortcuts Work” section. Once enabled, you’ll start seeing underlined letters in various menus, dialog boxes, and windows.
How do I insert a picture in Word without resizing?
CTRL+Arrow key(s). and have the ability to move it around. text-area from the drawing options and then insert a picture into it. EXACTLY its original size.
How do you put a picture behind text on Microsoft Word?
Moving Images Behind Text
- Select the image.
- Choose the Order option from the Draw menu on the Drawing toolbar. Word displays a submenu.
- Choose Send Behind Text from the submenu. The image should move behind the text.
What kind of type is underline?
Understanding Underlines
| Underline Type | Meaning |
|---|---|
| Single | Adds a single underline, the entire length of the selected text |
| Words Only | Underlines only the words (not spaces or tabs) in the selected text |
| Double | Adds a double-line underline, the entire length of the selected text |
| Dots | Same as Single, but uses a line of dots instead |
How do you highlight specific words in Word?
Highlighting Found Text
- Press Ctrl+H.
- Click the More button, if it is available.
- In the Find What box, enter the text you want to find and highlight.
- In the Replace With box, enter ^&.
- With the insertion point still in the Replace With box, click the Format button.
- Click the Highlight option.
How do I shade a whole line in Word?
Apply shading to words or paragraphs
- Select the word or paragraph that you want to apply shading to.
- On the Home tab, in the Paragraph group, click the arrow next to Shading.
- Under Theme Colors, click the color that you want to use to shade your selection.
What does red underline in word mean?
Microsoft Word comes with a powerful spelling and grammar checking module.If there is a spelling mistake, the word gets underlined with a red color wavy / squiggly / zig-zag line indicating the error. For grammatical errors a wavy green line appears under the word or phrases.
Why are all my words underlined in red on word?
You have the Track Changes feature turned on – red underlining is the default markup used to identify Insertions. Go to the Review tab, turn Track Changes OFF, then Accept all changes in the document & save the file.

Underlining seems like a simple enough task in Microsoft Word, but many times there’s more involved. You can underline words, spaces, words with spaces, and words without spaces. We’ll show you several ways to use underline in Word.
Many people reserve underlining for web links while others find it a good way to emphasize text in a document. Along with the options for underlining words and spaces, you can format it as a double, bold, or dotted line and remove an underline you’ve added. Let’s walk through it all!
Underline Words With Spaces
The most uncomplicated way to underline in Word is words with spaces. You may have a phrase, sentence, or paragraph you want to underline.
Select the text and then apply the underline one of these ways:
- Click the Underline button in the Font section of the Home tab.
- Press Ctrl+U on Windows or Control+U on Mac.

Underline Words Without Spaces
Underlining words without spaces takes a little more work, especially for sentences and paragraphs. You can select each word, one at a time, and then apply the underline as described above using the Underline button or keyboard shortcut. But there’s a faster way!
Select the text you want to underline, including the spaces. Right-click and pick “Font.”
In the Underline Style drop-down box, choose “Words Only.” You can see a preview at the bottom of the dialog box confirming that only the words are underlined and not the spaces. Then, click “OK.”
You should have your phrase, sentence, or paragraph with underlines only below the words.
Underline Only Spaces
Maybe you’re creating a document such as a printable form where you want to underline spaces to make a blank line. You’d think that inserting several spaces and applying the underline to them would be the way to go. Unfortunately, it doesn’t work. Here are two ways to underline spaces.
RELATED: How to Overline Text in Word
Method One: Use Tab Stops
You can use the default tab stops in Word which are 0.5 inches with each press of the Tab key. If you prefer, you can set up your own tab stops.
Press the Tab key the number of times necessary to cover the length you need. Then, select all of the tab stops you just inserted by dragging your cursor through them.
Click the Underline button in the ribbon or use a keyboard shortcut. You’ll then see your line, or underlined spaces.
Method Two: Use a Table
Another way to create underlined spaces is by inserting a table and adjusting the borders. Go to the Insert tab and select the Table drop-down arrow. Choose the first square which is the one-by-one table.
When the table appears, it should stretch the width of your document. If not, drag the right side so that it does. Right-click and choose “Table Properties.”
Click “Borders and Shading” at the bottom of the Table tab.
On the right side of the dialog box, click to remove the top and side borders, leaving only the bottom border. Click “OK” to apply the change.
You’ll then have a single line as your “underlined spaces.”
Change the Underline Format
You have a few different ways to change the format for your underline. You can pick a double underline, a bolder line, or a dotted line in a variety of styles. And you can change the line before or after you apply the underline to your text or spaces.
RELATED: How to Add a Dotted Line in a Microsoft Word Document
To change the line style at the time you apply the underline, select the text you want to underline. If you’ve already applied the underline, select all of the underlined text. Then, do one of the following.
Click the arrow next to the Underline button in the Font section of the Home tab. Select the line style you want to use.
Right-click the selected text and pick “Font.”Choose the line in the Underline Style drop-down box and click “OK.”
If you used the table method above to underline spaces, select the table and head back to Table Properties > Borders and Shading. Then, use the options in the Style drop-down box.
How to Remove an Underline
Removing an underline is as easy. Select the underlined text and click the Underline button in the Font section on the Home tab. This deselects the Underline button and removes the underline from your text.
Alternatively, you can use the shortcut Ctrl+U on Windows or Control+U on Mac.
Another way to remove an underline is to select the underlined text, right-click, and choose “Font.” Choose “None” in the Underline Style drop-down box and click “OK.”
If you inserted a table for underlined spaces, you can remove the table by right-clicking it and choosing “Delete Table.”
Knowing how to apply, format, and remove underlines in your Word documents is important if that’s your preferred method of emphasizing text. But you can also highlight text or apply a format like bold or italics.
READ NEXT
- › How to Adjust and Change Discord Fonts
- › BLUETTI Slashed Hundreds off Its Best Power Stations for Easter Sale
- › Google Chrome Is Getting Faster
- › Mozilla Wants Your Feature Suggestions for Thunderbird
- › Expand Your Tech Career Skills With Courses From Udemy
- › The New NVIDIA GeForce RTX 4070 Is Like an RTX 3080 for $599
Updated: 10/11/2021 by

To create an underline without any text in Microsoft Word, press Ctrl+U to start the underline, then, press Ctrl+Shift+spacebar to create non-breaking spaces. Press and hold this keyboard shortcut combination to add multiple underlines next to each other, creating an underline. For example, holding down Ctrl+Shift and pressing Spacebar five times would create an underline five characters long.
An example of how this could be used is for printable forms, for example: Name: .
Содержание
- Стандартное подчеркивание текста
- Подчеркивание только слов, без пробелов между ними
- Подчеркивание двойной чертой
- Подчеркивание пробелов между словами
- Подчеркиваем пробелы в документе для печати
- Подчеркиваем пробелы в веб-документе
- Добавление фигурного подчеркивания
- Удаление подчеркивания
- Вопросы и ответы
MS Word, как и любой текстовый редактор, имеет в своем арсенале большой набор шрифтов. Кроме того, стандартный набор, при необходимости, всегда можно расширить с помощью сторонних шрифтов. Все они отличаются визуально, но ведь и в самом Ворде есть средства для изменения внешнего вида текста.
Урок: Как добавить шрифты в Word
Помимо стандартного вида, шрифт может быть полужирным, курсивом и подчеркнутым. Как раз о последнем, а именно, о том, как в Ворде подчеркнуть слово, слова или фрагмент текста мы и расскажем в этой статье.
Урок: Как изменить шрифт в Word
Стандартное подчеркивание текста
Если вы внимательно посмотрите на инструменты, расположенные в группе “Шрифт” (вкладка “Главная”), наверняка заметите там три буквы, каждая из которых отвечает за конкретный тип написания текста.
Ж — жирный (полужирный);
К — курсив;
Ч — подчеркнутый.
Все эти буквы на панели управления представлены в том виде, в котором будет написан текст, если вы их используете.
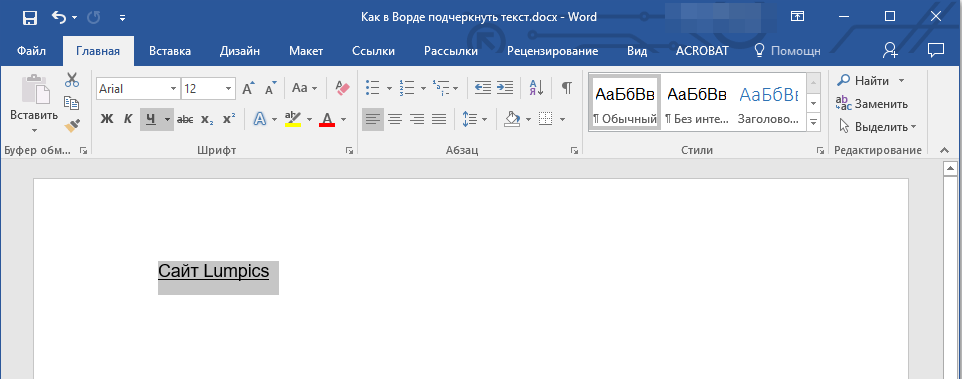
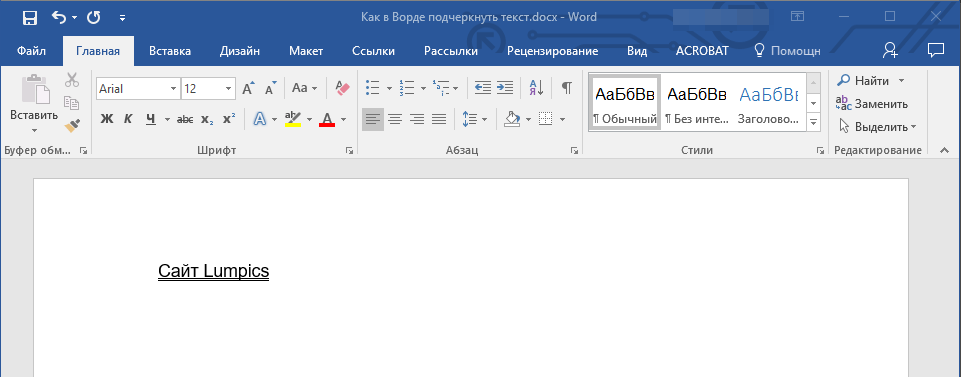
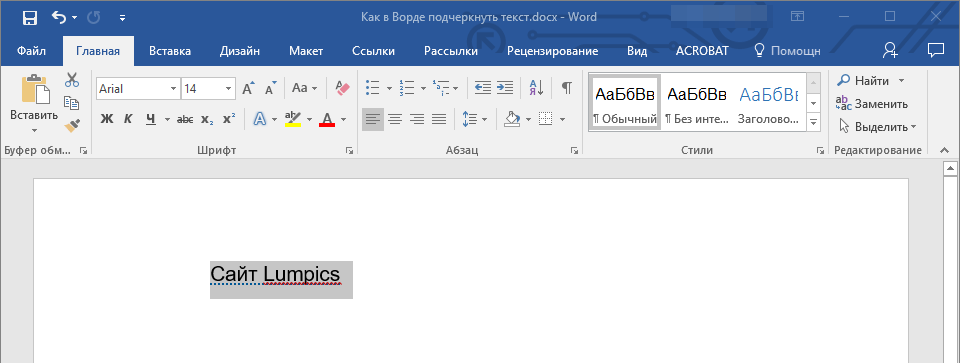
Чтобы подчеркнуть уже написанный текст, выделите его, а затем нажмите букву Ч в группе “Шрифт”. Если текст еще не написан, нажмите эту кнопку, введите текст, а затем отключите режим подчеркивания.
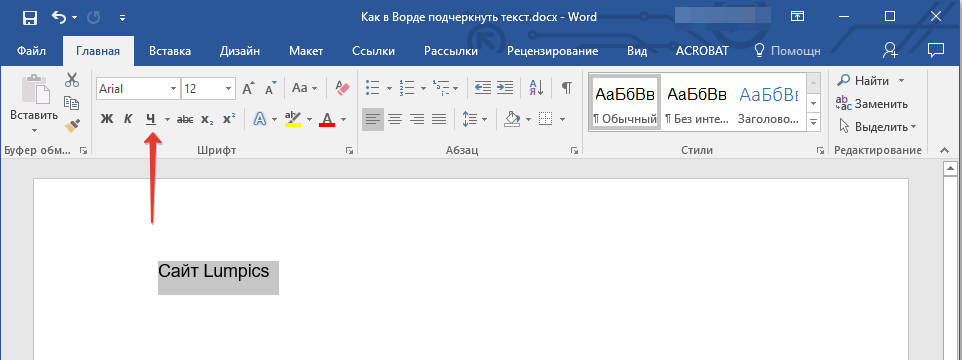
- Совет: Для подчеркивая слова или текста в документе также можно использовать горячую комбинацию клавиш — “Ctrl+U”.
Примечание: Подчеркивание текста таким образом добавляет нижнюю линию не только под словами/буквами, но и в пробелах между ними. В Ворде также можно отдельно подчеркнуть слова без пробелов или сами пробелы. О том, как это сделать, читайте ниже.

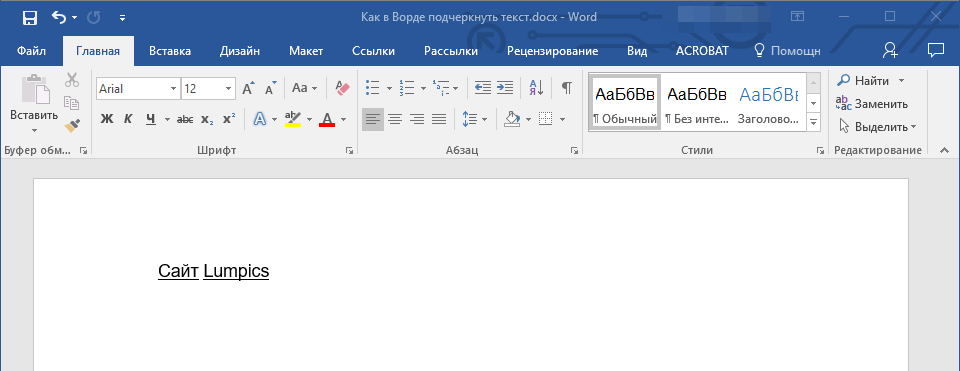
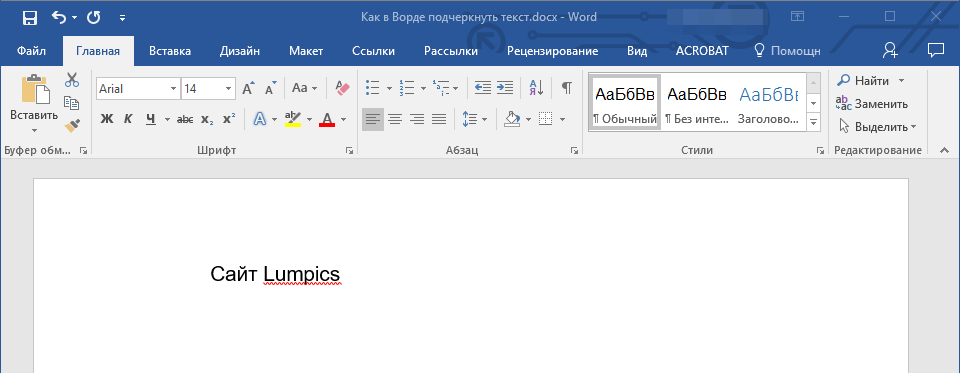
Подчеркивание только слов, без пробелов между ними
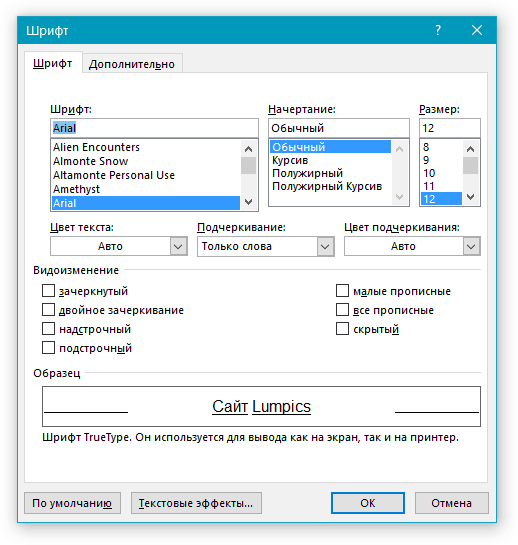
Если вам необходимо подчеркнуть в текстовом документе только слова, оставив пустыми пробелы между ними, выполните следующие действия:
1. Выделите фрагмент текста, в котором необходимо убрать подчеркивание в пробелах.

2. Разверните диалоговое окно группы “Шрифт” (вкладка “Главная”), нажав на стрелочку в его правом нижнем углу.

3. В разделе “Подчеркивание” задайте параметр “Только слова” и нажмите “ОК”.

4. Подчеркивание в пробелах исчезнет, слова при этом останутся подчеркнутыми.
Подчеркивание двойной чертой
1. Выделите текст, который необходимо подчеркнуть двойной чертой.

2. Откройте диалоговое окно группы “Шрифт” (то, как это сделать, написано выше).
3. В разделе подчеркивание выберите двойную черту и нажмите “ОК”.
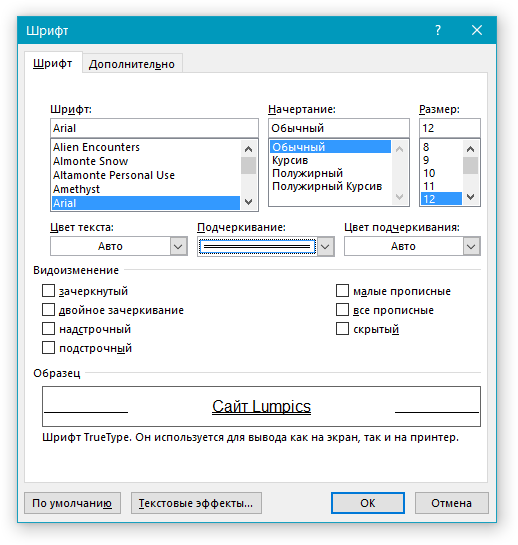
4. Тип подчеркивания текста изменится.
- Совет: Аналогичные действия можно проделать и с помощью меню кнопки “Подчеркивание” (Ч). Для этого нажмите на стрелочку возле этой буквы и выберите там двойную черту.
Подчеркивание пробелов между словами
Самый простой способ, с помощью которого можно сделать подчеркивание только в пробелах — это нажатие клавиши “нижнее подчеркивание” (предпоследняя клавиша в верхнем цифровом ряду, на ней также находится дефис) с предварительно зажатой кнопкой “Shift”.
Примечание: В данном случае нижнее подчеркивание ставится вместо пробела и будет находится на одном уровне с нижним краем букв, а не под ними, как стандартное подчеркивание.
Однако, стоит отметить, что у данного метода есть один важный недостаток — сложность выравнивания подчеркивающих линий в некоторых случаях. Один из явных тому примеров — создание форм для заполнения. Кроме того, если у вас в MS Word активирован параметр автоформата для автозамены знаков подчеркивания на линию границы, нажав три и/или более раза “Shift+-(дефис)”, в результате вы получите линию, равную ширине абзаца, что крайне нежелательно в большинстве случаем.
Урок: Автозамена в Ворде
Верное решение в случаях, когда необходимо подчеркнуть пробел — это использование табуляции. Необходимо просто нажать клавишу “Tab”, а затем подчеркнуть пробел. Если же вы хотите подчеркнуть пробел в веб-форме, рекомендовано использовать пустую ячейку таблицы с тремя прозрачными границами и непрозрачной нижней. Более подробно о каждом из этих методов читайте ниже.
Урок: Как сделать таблицу в Word
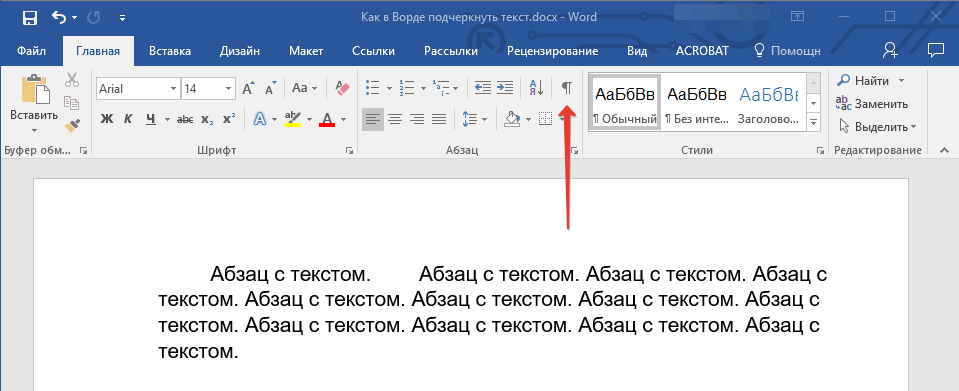
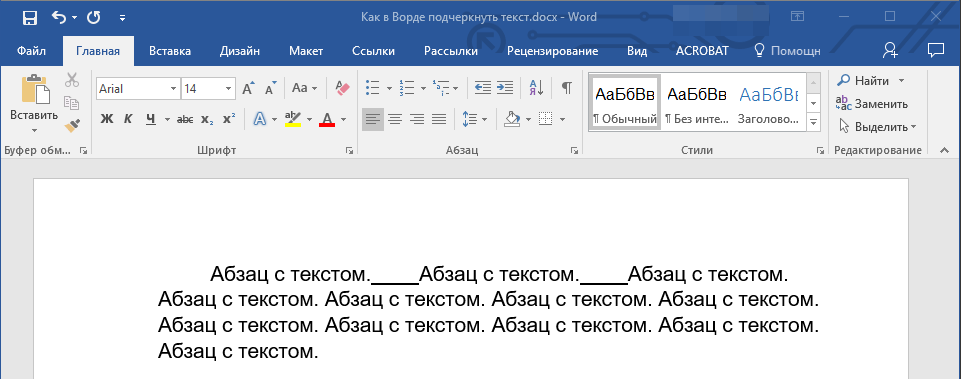
Подчеркиваем пробелы в документе для печати
1. Установите указатель курсора в том месте, где необходимо подчеркнуть пробел и нажмите клавишу “Tab”.

Примечание: Табуляция в данном случае используется вместо пробела.
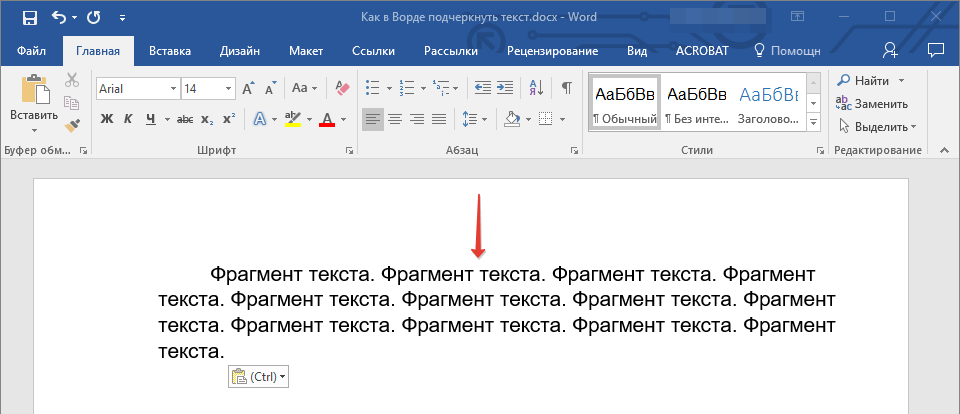
2. Включите режим отображения скрытых символов, нажав на кнопку, расположенную в группе “Абзац”.
3. Выделите установленный знак табуляции (он будет отображен в виде небольшой стрелки).
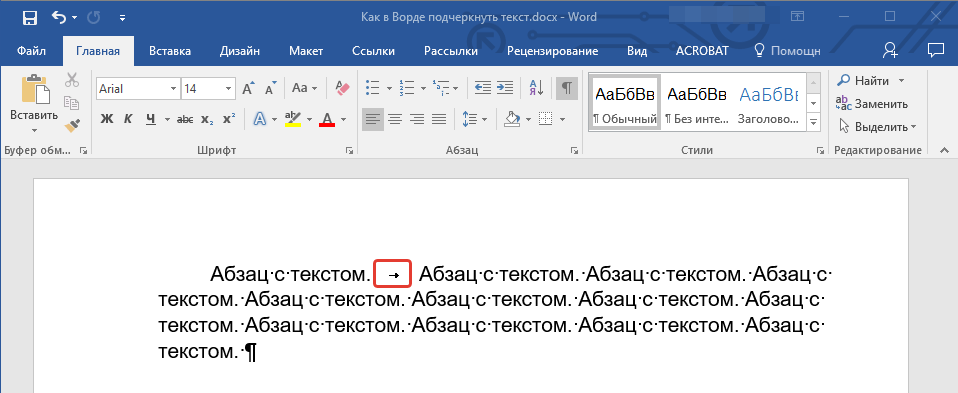
4. Нажмите кнопку “Подчеркивание” (Ч), расположенную в группе “Шрифт”, или используйте клавиши “Ctrl+U”.
- Совет: Если вы хотите изменить стиль подчеркивания, разверните меню этой клавиши (Ч), нажав на стрелочку возле нее, и выберите подходящий стиль.
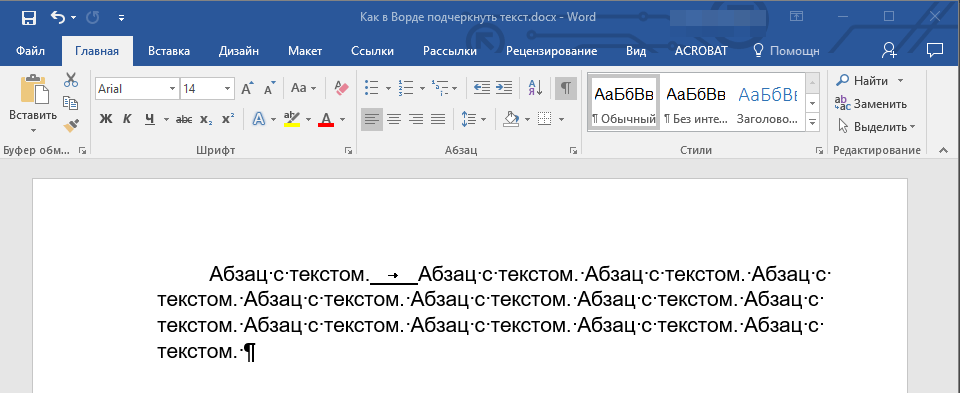
5. Подчеркивание пробела будет установлено. Если это необходимо, проделайте аналогичное действие и в других местах текста.
6. Отключите режим отображения скрытых знаков.
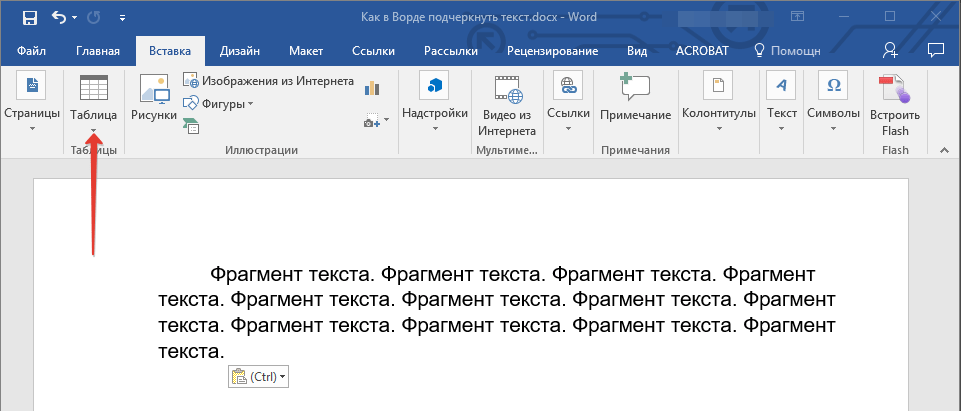
Подчеркиваем пробелы в веб-документе
1. Кликните левой кнопкой мышки в том месте, где необходимо подчеркнуть пробел.
2. Перейдите во вкладку “Вставка” и нажмите кнопку “Таблица”.
3. Выберите таблицу размером в одну ячейку, то есть, просто нажмите на первый левый квадрат.
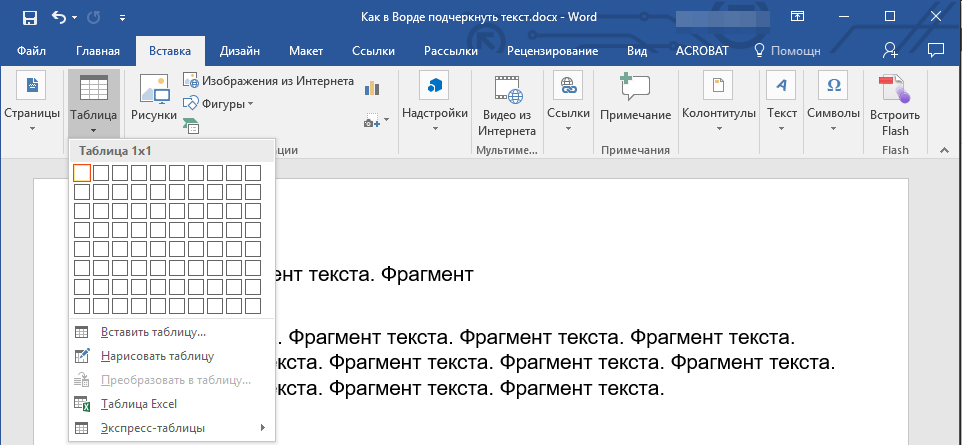
- Совет: Если это необходимо, изменить размер таблицы, просто потянув за ее край.
4. Кликните левой кнопкой мышки внутри добавленной ячейки, чтобы отобразился режим работы с таблицами.

5. Кликните в этом месте правой кнопкой мышки и нажмите на кнопку “Границы”, где выберите в списке “Границы и заливка”.
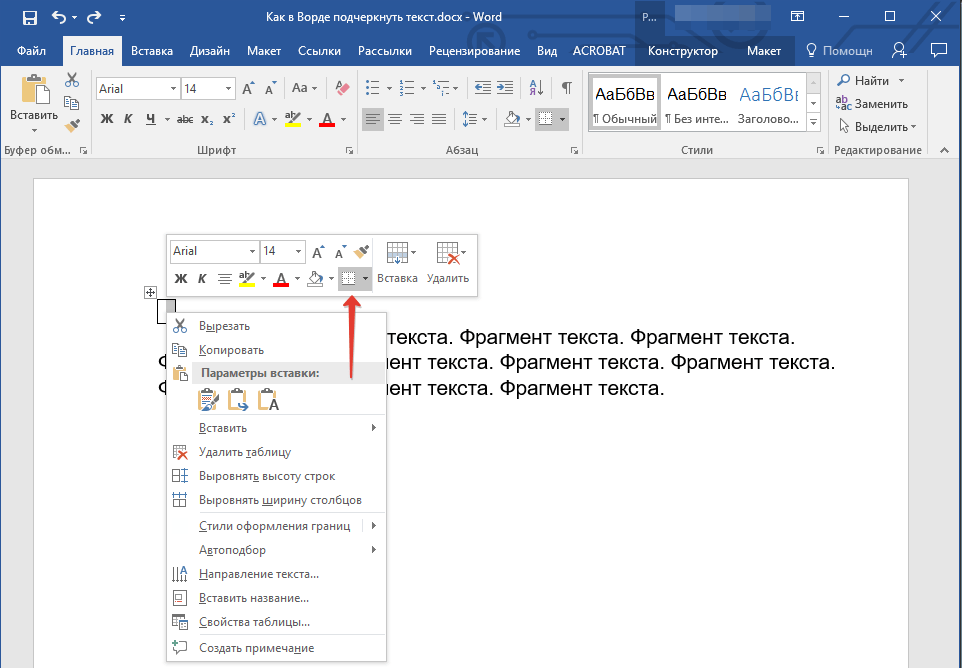
Примечание: В версиях MS Word до 2012 года в контекстном меню есть отдельный пункт “Границы и заливка”.

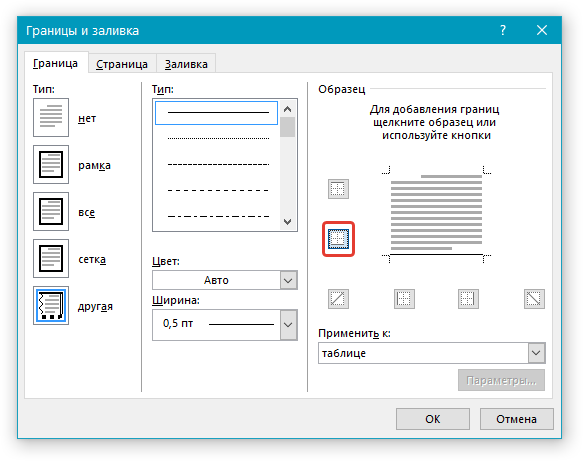
6. Перейдите во вкладку “Граница” где в разделе “Тип” выберите “нет”, а затем в разделе “Образец” выберите макет таблицы с нижней границей, но без трех остальных. В разделе “Тип” будет показано, что вы выбрали параметр “Другая”. Нажмите “ОК”.
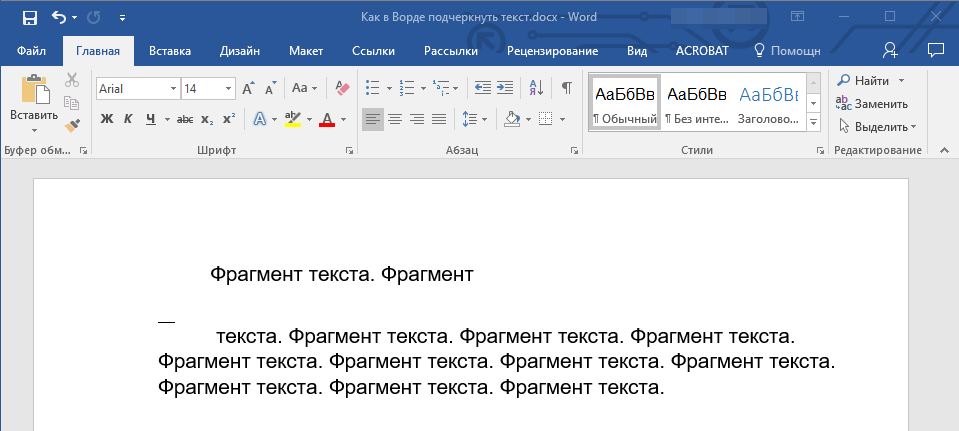
Примечание: В нашем примере после выполнения вышеописанных действий подчеркивание пробела между словами находится, мягко говоря, не на своем месте. Возможно, вы тоже столкнетесь с аналогичной проблемой. Для этого придется изменить параметры форматирования текста.
Уроки:
Как изменить шрифт в Ворде
Как выровнять текст в документе
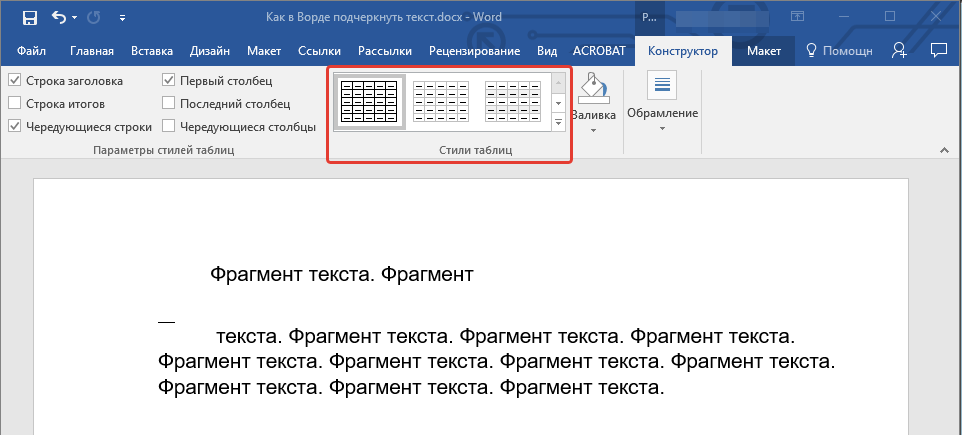
7. В разделе “Стиль” (вкладка “Конструктор”) выберите желаемый тип, цвет и толщину линии, которая будет добавлена в качестве подчеркивания.
8. Для отображения нижней границы кликните в группе “Просмотр” между маркерами нижнего поля на рисунке.
- Совет: Для отображения таблицы без серых границ (на печать не выводятся) перейдите во вкладку “Макет”, где в группе “Таблица” выберите пункт “Отображать сетку”.
Примечание: Если вам необходимо ввести перед подчеркнутым пробелом пояснительный текст, используйте таблицу размером в две ячейки (горизонтальных), сделав прозрачными все границы первой. Введите в эту ячейку необходимый текст.
9. Подчеркнутый пробел будет добавлен между словами в выбранном вами месте.
Огромным плюсом данного метода добавления подчеркнутого пробела является возможность изменения длины линии подчеркивания. Достаточно просто выделить таблицу и потянуть ее за правый край в правую сторону.
Добавление фигурного подчеркивания
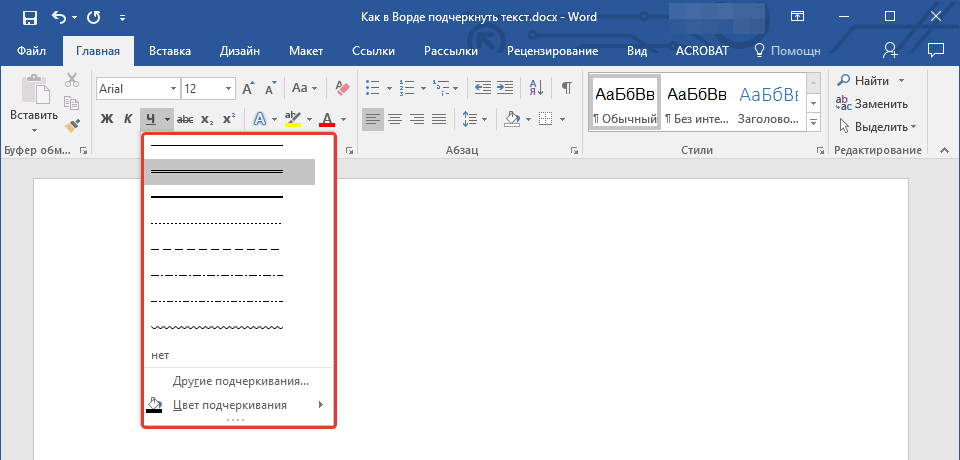
Помимо стандартной одной или двух линий нижнего подчеркивания, вы также можете выбрать другой стиль и цвет линии.
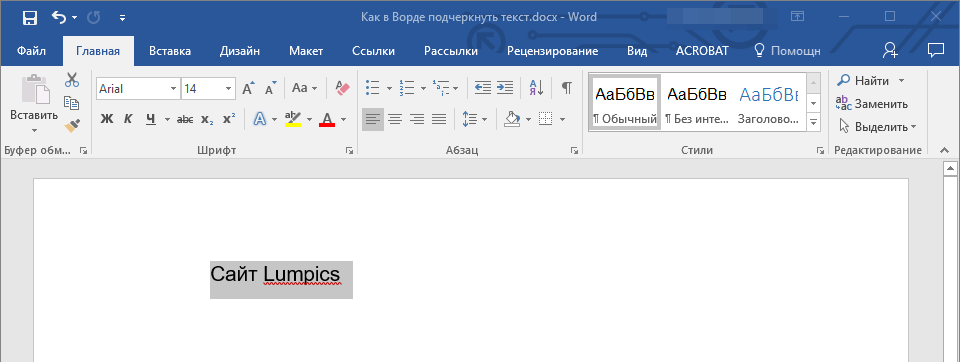
1. Выделите текст, который нужно подчеркнуть в особом стиле.
2. Разверните меню кнопки “Подчеркивание” (группа “Шрифт”), нажав на треугольник возле нее.
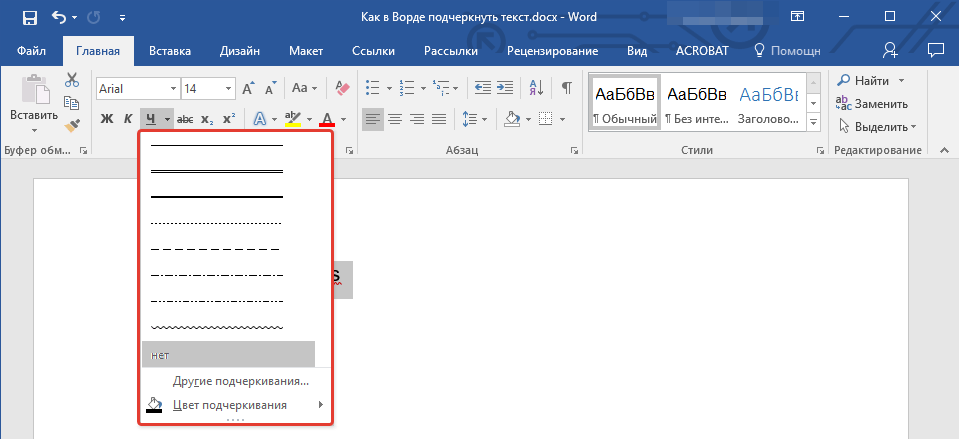
3. Выберите необходимый стиль подчеркивания. Если это необходимо, выберите также цвет линии.
- Совет: Если шаблонных линий, представленных в окне вам недостаточно, выберите пункт “Другие подчеркивания” и попробуйте найти там подходящий стиль в разделе “Подчеркивание”.

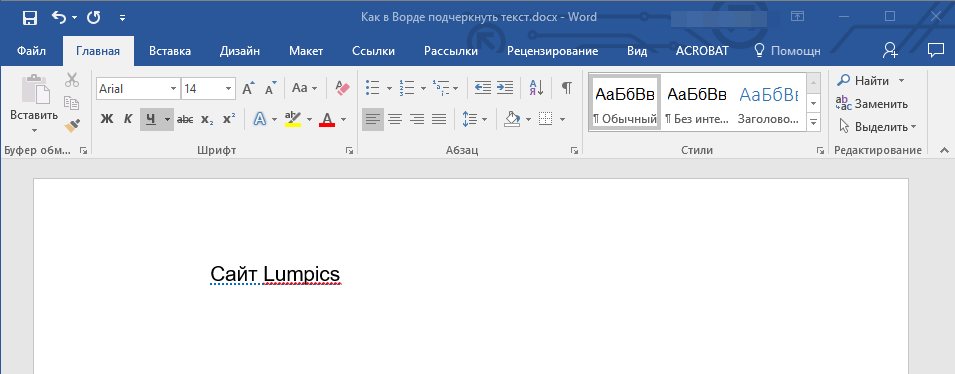
4. Фигурное подчеркивание будет добавлено в соответствие с выбранным вами стилем и цветом.
Удаление подчеркивания
Если вам необходимо убрать подчеркивание слова, фразы, текста или пробелов, выполните то же самое действие, что и для его добавления.
1. Выделите подчеркнутый текст.
2. Нажмите кнопку “Подчеркивание” в группе “Шрифт” или клавиши “Ctrl+U”.
- Совет: Чтобы убрать подчеркивание, выполненное в особом стиле, кнопку “Подчеркивание” или клавиши “Ctrl+U” необходимо нажать дважды.
3. Линия подчеркивания будет удалена.
На этом все, теперь вы знаете, как подчеркнуть слово, текст или пробел между словами в Ворде. Желаем вам успехов в дальнейшем освоении этой программы для работы с текстовыми документами.
Asked by: Ottis Luettgen
Score: 4.8/5
(23 votes)
Underline words and the spaces between them
What do you want to do? Select the text that you want to underline. Go to Home > Underline. Or press Ctrl+U.
Why can’t I see my underline in Word?
The problem is you have NONE selection on your underline button. Fix: Push the small drop down arrow on the right hand side of the underline button…and pick a line type other than «none».
How do you make an underline in Word?
Type the text you want to overline into your Word document and make sure the “Home” tab is active on the ribbon bar. Click the down arrow on the “Borders” button in the “Paragraph” section of the “Home” tab. Select “Top Border” from the drop-down menu.
How do you underline in Word without text?
Create underlines in Word without any text
Create an underlined space by pressing Ctrl + U to start the underline, press the Spacebar for each underlined space you want to create and end the line with an underscore ( _ ).
Where is the underscore key?
You can easily type underscore on mac and Windows computers, press the “Shift” and “hyphen” key simultaneously to type an underscore. The underscore symbol shares a key with the hyphen symbol, and you can find it to the right of the “0” key on the row above the letters.
31 related questions found
How do you type an overline?
Start opening the document in Word where you want to add the overline. Position the cursor at the point where you want to put the text you’re going to overbar. Press “Ctrl + F9” on your keyboard and the field code brackets will appear.
How do you insert over in Word?
Type over text in Word for Windows
- In Word, choose File > Options.
- In the Word Options dialog box, choose Advanced.
- Under Editing options, do one of the following: To use Insert key to control Overtype mode, select the Use Insert key to control overtype check box.
How do you uppercase in Word?
To use a keyboard shortcut to change between lowercase, UPPERCASE, and Capitalize Each Word, select the text and press SHIFT + F3 until the case you want is applied.
What is the double underline in Word?
In Microsoft Word, double underlining helps draw extra attention to specific words or numbers, such as denoting a grand total.
What does the double underline mean in Word?
Most commonly the double blue underline appears where there are two spaces between words instead of one. There are some other grammar «errors» that may also be underlined that way. Right-click the underlined words to see what Word objects to.
What is the shortcut key of double underline?
CTRL + SHIFT + D will immediately add a double underline in Word.
How do I convert lowercase to uppercase in word?
Step 1: Open the word document. Step 2: Highlight or select the text that you want to covert from uppercase to lowercase. Step 3: Press and hold Shift + F3 keys from the keyboard. Step 4: Once you release the keys, you can see that Uppercase is converted into the Lowercase, as shown in the screenshot below.
How do you capitalize without retyping in word?
Select the text you want to change the case of, using your mouse or keyboard. On the Home tab of the Ribbon, go to the Fonts command group and click the arrow next to the Change Case button.
What is title case in Microsoft Word?
Title case means that the first letter of each word is capitalized, except for certain small words, such as articles and short prepositions.
Why can’t I type in a word document?
If text is not appearing on your screen, there is a good chance that Number Lick has been turned on by mistake. To check this, locate your «Num Lock» key, which often is the same button as «F11» on your keyboard. Press the key and then try typing. Text should appear on your screen.
What is advanced mode in Microsoft Word?
Use advanced Word options to customize editing tasks, document display, printing preferences, and more. Newer versionsOffice 2010 Office 2007. To choose your advanced Word options, select File > Options, and on the left pane, select Advanced.
What is typeover mode in Microsoft Word?
Overtype mode is an editing mode in which everything you type replaces something else in your document. When overtype mode is active and you type a letter, it replaces the letter to the right of the insertion point. When overtype mode is not active, your text is inserted where the insertion point is located.
What is Dropcap in Word?
A drop cap (dropped capital) is a large capital letter used as a decorative element at the beginning of a paragraph or section. The size of a drop cap is usually two or more lines. The following illustration shows your options for positioning a drop cap. WindowsmacOS.
What is the line above a letter called?
What Is a Diacritic, Anyway? Diacritics are marks placed above or below (or sometimes next to) a letter in a word to indicate a particular pronunciation—in regard to accent, tone, or stress—as well as meaning, especially when a homograph exists without the marked letter or letters.
What is L Ctrl?
Alternatively referred to as Control+L and C-l, Ctrl+L is a keyboard shortcut whose function differs depending on the program being. For example, in Microsoft Word, Ctrl+L is used to align text with the left edge of a document (margin). … Ctrl+L in Excel and other spreadsheet programs.
What is Ctrl F for?
CTRL-F or F3: to find a word or words on a page. CTRL-C: to copy text. CTRL-V: to paste text. CTRL-Z: to undo a command. SHIFT-CTRL-Z: to redo the command above.
What is the keyboard shortcut for word count?
Checking word count using a keyboard shortcut
You can also display the Word Count dialog box by pressing Ctrl + Shift + G.
What does a blue underline mean in Word?
Wavy blue lines that appear under text in a Word document indicate that the Format Consistency Checker is turned on and is functioning in the background as you type. The lines indicate that the Format Consistency Checker has detected an inconsistency that you may want to look at and to correct.
In this guide, you will learn how to underline text in Word, Excel, and PowerPoint.
There are three different ways to underline text:
- The underline shortcut (recommended)
- The underline command
- The Font dialog box
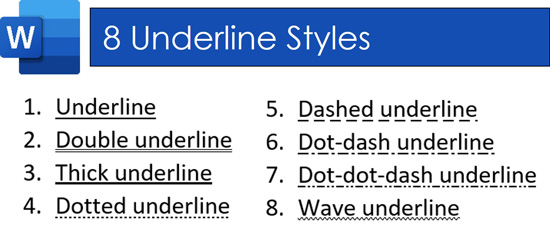
While these all accomplish the same task, the Font dialog box gives you the most underlining options in Word, Excel, and PowerPoint. As you can see in the picture below, there are 8 underline styles in Word, 16 styles in PowerPoint, and 4 styles in Excel.

It’s worth noting that in Microsoft Word you can underline words only. And in Word and PowerPoint, you can change the color of your underline (compared to your text)t, as pictured below.
As you can see, there are a lot of options for underlining text in the Microsoft Office Suite depending on which program you are working in. Below, I’ve broken out each one into its own section so you can navigate directly to the underline style you are trying to create.
As most of the time you will probably just want to add a single underline to your text, the shortcut is the fastest way to do this.
1. The Underline Text Shortcut
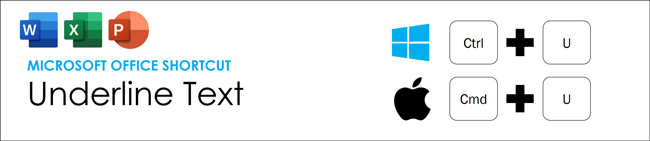
The fastest way to underline text in the Microsoft Office Suite (or any word processing program), is Ctrl+U on a PC and Cmd+U on a Mac.
Using the shortcut once applies the underline effect. Using the shortcut a second time removes the underline effect.
Note: Ctrl+U only allows you to add a single, solid underline to your text. If you want to double underline your text, or create a dashed underline effect, you need to use the underline style options discussed below.
2. The Underline Command
The underline command gives you more options than the Ctrl+U shortcut discussed above as it includes a ‘more options’ area.
To expand your knowledge and learn how to double underline text in Word using keyboard shortcuts, read our guide here.
A. Using the Underline command
Another fast way to underline text in Word, Excel, and PowerPoint is to simply click the Underline command on the Home tab in the Ribbon.
Simply select the text you want to underline and click the command to add your underline. Clicking the command a second time removes the underline effect.
B. Using the Underline command style options in Word
The Underline command in Word is a two-part button. While clicking the button on the left underlines your text (discussed above), clicking the downward facing arrow on the right gives you additional line style options to choose from.
To choose a different underline style in Word, simply select your text and then follow these steps:
- Navigate to the Home tab
- Click the Underline style arrow
- Choose an underline style
There are a total of eight underline styles in Word you can choose from, as pictured below. To see the additional options in Excel and PowerPoint, you will need to use the Font dialog box discussed next.
Note: If you do not select your text first, the underline style you choose will be applied to whatever text you type next. To stop underling your text, simply click the command a second time or hit Ctrl+U on your keyboard.
3. Underlining text using the Font dialog box
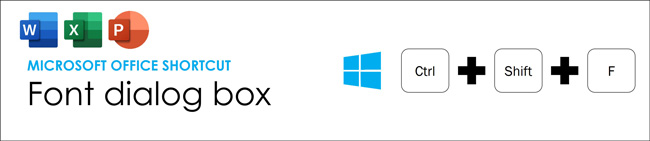
There are multiple ways to open the Font dialog box. The simplest (and fastest way) is to use the Font dialog box shortcut. This shortcut works in Word, Excel, and PowerPoint, so it’s a triple dipper shortcut.
Another way to open the Font dialog box is to click the diagonal facing arrow in the corner of the Font group. Clicking this arrow accomplishes the same task.
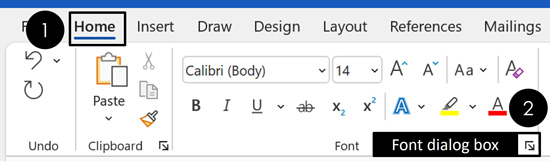
As a speed training tip – although there is no difference between using the shortcut and clicking the diagonal facing arrow, as the shortcut is significantly faster, I recommend learning the Ctrl+Shift+F shortcut.
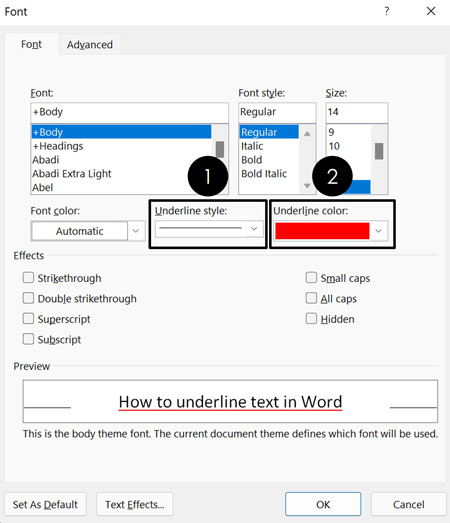
As you can see in the picture above, inside the Font dialog box, you can:
- Choose your underline style
- Choose your underline color
The Font dialog box is also where you can access a number of other text effects like strikethrough, double strikethrough, etc. As you will see in the next section, the Font dialog box is also the trick to underlining words only in Microsoft Word.
To expand your knowledge and learn the strikethrough shortcut to quickly cross out text in Word, Excel, and PowerPoint, read our guide here.
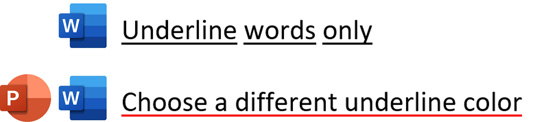
How to Underline Words Only in Word
Microsoft Word includes the ability to underline words only. This means that you do not need to select the words individually and apply the underline to create the desired effect.
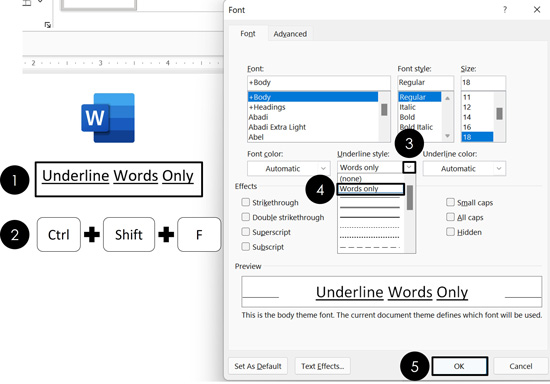
To underline your words only in Word, simply:
- Select your text
- Open the Font dialog box (Ctrl+Shift+F)
- Open the Underline style options
- Select Words Only
- Click OK
Doing so creates the ‘underline words only’ effect, without you having to manually do it yourself. You can also change the color of your underlines as you will see in the next section.
Note: This Words Only underline option does not exist in PowerPoint or Excel. If you want to create the same effect in these programs, you will need to underline your words individually, or take a screenshot of your text in Word and use it in the other programs.
How to Change the Color of Your Underlined Text
In Word and PowerPoint, you can also choose an underline color that is different from your text. This does not work in Microsoft Excel.
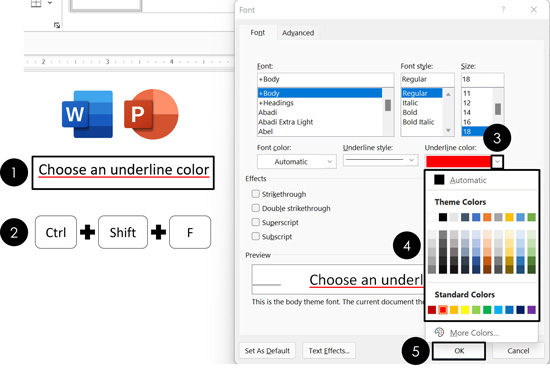
To change the color of your underlined text, simply:
- Select your text
- Open the Font dialog box (Ctrl+Shift+F)
- Open the Underline color options
- Choose an underline color (I picked red)
- Click OK
When picking an underline color that is different than your font color, it is best not to pick colors that are hard to read. See some examples below.
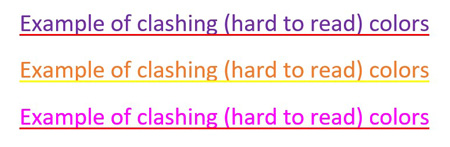
If your font is black, you can use almost any color for your underline. To make your document look more professional, I recommend picking an underline color that complements your logo or other design elements within your document.
Conclusion
Those are the different ways to underline text in the Microsoft Office Suite.
For most of your underlining text needs, I recommend learning and using the Ctrl+U keyboard shortcut. It’s faster than the other methods discussed above but does not provide the extra options like changing the underline color or underlining words only.
If you enjoyed the depth of this guide and want to learn more about our speed training courses and resources, visit us here.
Underlining text in Microsoft Word is simple. You can even tailor the line style! To find out how, check out our guide to underlining in Microsoft Word.
Underlining in Microsoft Word
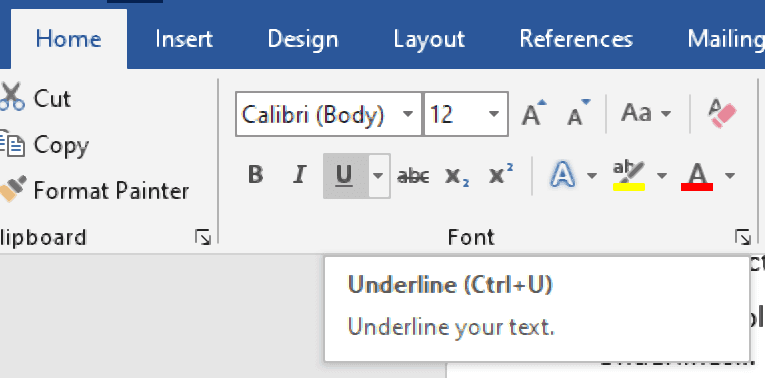
The basics of underlining text in Microsoft Word are simple. All you do is select the text you want to format, or place the cursor where you want to start typing, then do one of the following:
- Click the U symbol on the Home tab.
- Use the keyboard shortcut Ctrl + U (or Cmd + U on Mac computers).
This will add the default underlining in the place selected.
Custom Underlining in Microsoft Word
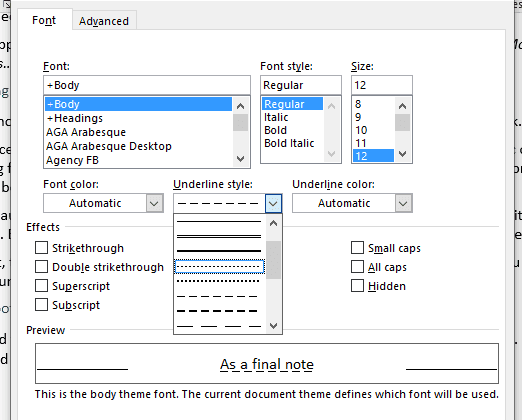
If the default underlining doesn’t suit your needs, you can customize it by:
- Selecting the text you want to underline (or placing the cursor where you want to start typing the underlined text).
- Clicking the little arrow next to the U symbol on the Home tab.
- Selecting a line style or color from the dropdown menu.
This will apply the selected line style and color as required. Alternatively, you can click More Underlines… in this same dropdown menu to open the font dialog box, where you’ll see further underlining options.
Find this useful?
Subscribe to our newsletter and get writing tips from our editors straight to your inbox.
Underlining or Italics?
As a final note, you might want to check whether to use underlining or italics in your work, since italics are more common in modern writing.
For instance, while underlining was once widely used for emphasis, most people use italic or bold formatting for this now. And while people used to underline titles in writing (e.g., if mentioning a published book in an essay), these are now italicized or placed in quote marks.
This is because underlining is a hangover from the days of typewriters, which didn’t have italic or bold fonts. But this isn’t an issue in the age of word processors, so underlining has become rare.
Expert Proofreading and Formatting
If you need to be sure your documents are clear and professional, our services could help. Submit a 500-word sample document for free proofreading today to find out more.
Sometimes we need underlines or just simple lines without any text. Imagine you are creating fillable forms or printable forms and you want to add an empty underline in the front of the name of the person?
A real example will look like this:
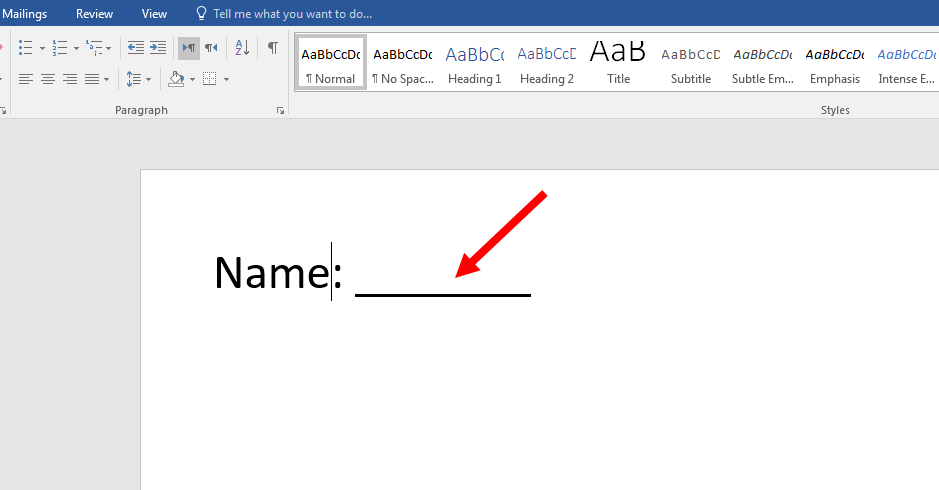
Create underlines in Word without any text
Let’s see How can we create underlines in Microsoft Word without any text by using two simple methods.
To create an underline without any text in Microsoft Word, press Ctrl + U and then press Ctrl + Shift + spacebar to create non-breaking spaces. You can create multiple underlines next to each other, by pressing and holding this keyboard shortcut combination.
Create underlines in Word by inserting Shape lines
We can also create an underline by inserting shape elements in MS Word.
- Go to Microsoft Word Ribbon Area and then go to Insert Tab.
- Click on the Shapes and Select line option.
- Draw the line by holding the mouse where you want to add underlines. You can also format it by clicking on the line.
Some Useful Articles

I’ve been in the business of writing, marketing, and web development for a while now. I have experience in SEO and content generation. If you need someone who can bring life to your words and web pages, I’m your guy.