
Print a worksheet or workbook
You can print entire or partial worksheets and workbooks, one at a time, or several at once. And if the data that you want to print is in a Microsoft Excel table, you can print just the Excel table.
You can also print a workbook to a file instead of a printer. This is useful when you need to print the workbook on a different type of printer from the one that you originally used to print it.
Before you print
Before you print anything in Excel, remember that there are many options available for an optimal print experience. For more information, see Printing in Excel.
Important: Some formatting, such as colored text or cell shading, may look good on the screen but not look how you expect when it prints on a black-and-white printer. You may also want to print a worksheet with gridlines displayed so that the data, rows, and columns stand out better.
Print one or several worksheets
-
Select the worksheets that you want to print.
-
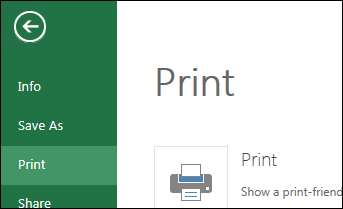
Select File > Print, or press CTRL+P.
-
Select the Print button or adjust Settings before you select the Print button.
Print one or several workbooks
All workbook files that you want to print must be in the same folder.
-
Select File > Open.
-
Hold down CTRL click the name of each workbook to print, and then select Print.
Print all or part of a worksheet
-
Click the worksheet, and then select the range of data that you want to print.
-
Select File, and then click Print.
-
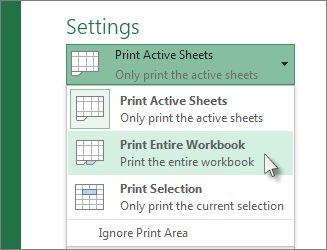
Under Settings, select the arrow next to Print Active Sheets and select the appropriate option.

-
Select Print.
Note: If a worksheet has defined print areas, Excel will print only those print areas. If you don’t want to print only the defined print area, select the Ignore print area check box. Learn more on setting or clearing a print area.
Print an Excel table
-
Select a cell within the table to enable the table.
-
Select File, and then select Print.
-
Under Settings, select the arrow next to Print Active Sheets and select Print Selected Table.
-
Select Print.
Print a workbook to a file
-
Select File, and then select Print, or press Ctrl+P.
-
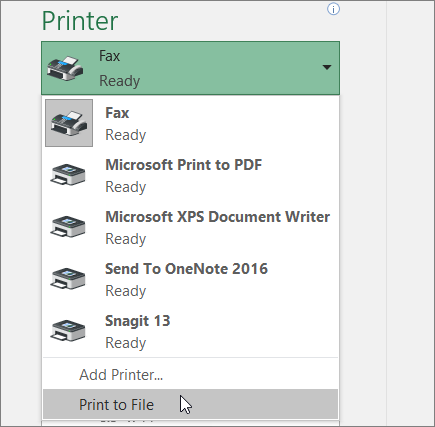
Under Printer, select Print to File.
-
Select Print.
-
In the Save Print Output As dialog box, enter a file name and then select OK. The file will be saved in your Documents folder
Important: If you print the saved file on a different printer, the page breaks and font spacing may change.
Print a worksheet
For best results with printing your worksheet, use the Print command in Excel for the web, not your browser’s Print command. You can print the entire worksheet or just the cells you want.
If you want to print a range of cells, select them. To print the entire worksheet, don’t select anything.
-
Select File > Print > Print.
-
If you selected a range of cells, but decide to print the entire worksheet, switch to Entire Workbook before you hit Print.
Change a selected print area
In Excel for the web, you can either specify an area you want to print or print an entire worksheet. If you select a print area, but decide to change the specified area, here’s how you can preview your changes:
-
On the worksheet, click and drag to select the cells you want to print.
-
Select File > Print > Print.
-
To print only the selected area, in Print Options, select Current Selection.
-
If the print preview shows what you want printed, select Print.
To change the print selection, close print preview by clicking on the X, and repeat the previous steps.
To print the entire worksheet, select File > Print > Print. Make sure Entire Workbook is selected.
If you have the Excel desktop application, you can set more print options. Select Open in Excel and select multiple print areas on a worksheet.
Print a worksheet that has hidden rows and columns
In Excel for the web, when you print a worksheet with hidden rows or columns those hidden rows and columns won’t be printed. If you want to include the hidden rows and columns, you’ll need to unhide them before you print the worksheet.
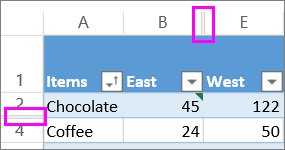
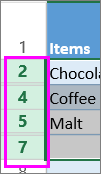
You can tell if rows or columns are hidden either by the missing header labels or by the double lines as shown in this picture.
Here’s how you can unhide rows or columns:
-
Select the range of headers surrounding the hidden rows or columns. In this example, select all row headers between 2 and 7 to unhide rows 3 and 6.
-
Right-click the selection and pick Unhide Rows (for columns, pick Unhide Columns).
-
Select File > Print.
-
Select Print for a print preview.
-
In the Print Options box, make sure Entire Sheet is selected, and select Print.
Note: The row and column labels don’t show in print preview and the printout.
Print a workbook
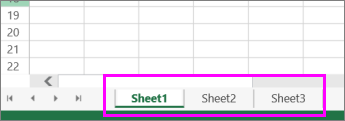
If your Excel for the web workbook has only one worksheet, you can just print the worksheet. But if the workbook has multiple worksheets you’ll need to go to each worksheet by selecting its sheet tab, and then print that worksheet.
Not sure if the workbook has any hidden worksheets? Here’s how you can verify:
-
Right-click any sheet tab.
-
If the Unhide option is available, the workbook has one or more hidden worksheets. Select Unhide to show and unhide the worksheets.
-
When you unhide a worksheet, the sheet tab in the worksheet becomes available. Select the sheet tab and print the worksheet.
Print a table
Sometimes you want to print only part of a worksheet, like a table. You can do this in Excel for the web as long as the table has less than 10,000 cells. For worksheets more than 10,000 cells you have to use the Excel desktop app.
To print a table:
-
To select all the cells in the table, select the first cell and scroll to the last cell.
If your table has a lot of columns, instead of scrolling, select the first cell, press and hold the Shift key and select the last cell.
-
Select File > Print > Print.
-
Select Current Selection if it isn’t already selected, and then select Print.
-
If you like the print preview, select Print. If not, close the view and make any required changes.
Learn how you can print a table with gridlines.
Print page numbers on a worksheet
You can’t insert, view or print page numbers in Excel for the web. However, if you have the Excel desktop application, you can add page numbers either at the top (headers) or at the bottom (footers) of the worksheet and print it.
Use the Open in Excel button to open the workbook and, add page numbers in the Page Layout view, and then print the worksheet from Excel. Here’s how:
-
Select Open in Excel and insert page numbers on worksheets.
-
Print the worksheet.
See also
-
Preview worksheet pages before you print.
-
Print gridlines in a worksheet
-
Print rows with column headers on top of every page.
Need more help?
You can always ask an expert in the Excel Tech Community or get support in the Answers community.
Need more help?
Want more options?
Explore subscription benefits, browse training courses, learn how to secure your device, and more.
Communities help you ask and answer questions, give feedback, and hear from experts with rich knowledge.
Print a partial sheet, an entire sheet, or an entire workbook
-
Do one of the following:
-
To print a partial sheet, click the sheet, and then select the range of data that you want to print.
-
To print the entire sheet, click the sheet or the sheet tab.
-
To print a workbook, click any of its sheets.
-
-
On the File menu, click Print.
-
On the Printer menu, select the printer that you want.
-
The default is to print all active sheets. To change what is printed, select Show Details.
-
In the Print drop-down menu, select the option that corresponds to what you want to print (Selection, Active Sheets, or Entire Workbook) and then select Print.
Print several sheets at once
-
Select the sheets that you want to print.
To select
Do this
Two or more adjacent sheets
Click the tab for the first sheet. Then, hold down SHIFT and click the tab for the last sheet that you want to select.
Two or more nonadjacent sheets
Click the tab for the first sheet. Then, hold down COMMAND and click the tabs of the other sheets that you want to select.
All sheets in a workbook
Hold down CONTROL and click a sheet tab, and then click Select All Sheets on the shortcut menu.
Note: When multiple sheets are selected, [Group] appears in the title bar at the top of the sheet. To cancel a selection of multiple sheets in a workbook, click any unselected sheet. If no unselected sheet is visible, hold down CONTROL and click the tab of a selected sheet, and then click Ungroup Sheets on the shortcut menu.
-
On the File menu, click Print.
-
On the Printer menu, select the printer that you want.
-
Select Show Details.
-
In the Print drop-down menu, select Active Sheets, and then select Print.
Print selections from several sheets at once
-
On each sheet, select the range of data that you want to print.
-
On the File menu, click Print.
-
Select Show Details.
-
In the Print drop-down menu, select Selection, and then select Print.
Print several workbooks at once
Note: All of the workbook files that you want to print must be in the same folder.
-
On the File menu, click Open.
-
For adjacent files, hold down SHIFT and select the name of each workbook that you want to print. Or, for nonadjacent files, hold down COMMAND and select the name of each workbook that you want to print.
-
On the File menu, click Print.
Print an Excel table
-
Click a cell within the table to activate the table.
-
On the File menu, click Print.
-
Select Show Details.
-
In the Print drop-down menu, select Selection, and then select Print.
Other print options
-
Select Show Details in the Print dialog box to print to a PDF file, or to set which pages to print, paper handling options, margins, and scaling.
-
The Page Layout tab in the ribbon includes more options for page setup and printing, including page orientation, paper size and whether to print gridlines and headings.
See also
Print headings or titles on every page
Print a sheet on just one page
Scale the sheet size for printing
Print a partial sheet, an entire sheet, or an entire workbook
-
Do one of the following:
-
To print a partial sheet, click the sheet, and then select the range of data that you want to print.
-
To print the entire sheet, click the sheet or the sheet tab.
-
To print a workbook, click any of its sheets.
-
-
On the File menu, click Print.
-
On the Printer pop-up menu, select the printer that you want.
-
Next to Print What, click the option that corresponds to what you want to print (Selection, Active Sheets, or Entire Workbook) and then click Print.
Print several sheets at once
-
Select the sheets that you want to print.
To select
Do this
Two or more adjacent sheets
Click the tab for the first sheet. Then, hold down SHIFT and click the tab for the last sheet that you want to select.
Two or more nonadjacent sheets
Click the tab for the first sheet. Then, hold down CONTROL and click the tabs of the other sheets that you want to select.
All sheets in a workbook
Hold down CONTROL and click a sheet tab, and then click Select All Sheets on the shortcut menu.
Note: When multiple sheets are selected, [Group] appears in the title bar at the top of the sheet. To cancel a selection of multiple sheets in a workbook, click any unselected sheet. If no unselected sheet is visible, hold down CONTROL and click the tab of a selected sheet, and then click Ungroup Sheets on the shortcut menu.
-
On the File menu, click Print.
-
On the Printer pop-up menu, select the printer that you want.
-
Next to Print What, click Active Sheets, and then click Print.
Print selections from several sheets at once
-
On each sheet, select the range of data that you want to print.
-
On the File menu, click Print.
-
Next to Print What, click Selection, and then click Print.
Print several workbooks at once
Note: All of the workbook files that you want to print must be in the same folder.
-
On the File menu, click Open.
-
Hold down CONTROL and click the name of each workbook that you want to print.
-
On the File menu, click Print.
Print an Excel table
-
Click a cell within the table to activate the table.
-
On the File menu, click Print.
-
Next to Print What, click Selection, and then click Print.
Tip: The Layout tab in the ribbon includes more options for page setup and printing, including page orientation and headers and footers.
See also
Print headings or titles on every page
Preview pages before you print
Print with landscape orientation
Содержание
- Print a sheet or workbook
- Print a partial sheet, an entire sheet, or an entire workbook
- Print several sheets at once
- Print selections from several sheets at once
- Print several workbooks at once
- Print an Excel table
- Other print options
- See also
- Print a partial sheet, an entire sheet, or an entire workbook
- Print several sheets at once
- Print selections from several sheets at once
- Print several workbooks at once
- Print an Excel table
- Print a worksheet or workbook
- Before you print
- Print one or several worksheets
- Print one or several workbooks
- Print all or part of a worksheet
- Print an Excel table
- Print a workbook to a file
- Print a worksheet
- Change a selected print area
- Print a worksheet that has hidden rows and columns
- Print a workbook
- Print a table
- Print page numbers on a worksheet
- How to Print Excel Sheet on One Page (Fit to One Page)
- Check How Many Pages Would be Printed (Preview)
- Ways to Fit and Print Excel Sheet in One Page
- Adjust the Column Width (or Row height)
- Change the Scaling (Fit All Rows/Columns in One Page)
- Hide or Delete Rows/Columns
- Change the Page Orientation
- Change the Page Margins
- Reduce the Font Size
- Print Selected Data only (or Set the Print Area)
- [Bonus] Add Page Breaks
Print a sheet or workbook
You can print entire or partial sheets and entire workbooks, one at a time or several at once. You can also print selections of several sheets at the same time. If the data that you want to print is in an Excel table, you can print just the Excel table.
Print a partial sheet, an entire sheet, or an entire workbook
Do one of the following:
To print a partial sheet, click the sheet, and then select the range of data that you want to print.
To print the entire sheet, click the sheet or the sheet tab.
To print a workbook, click any of its sheets.
On the File menu, click Print.
On the Printer menu, select the printer that you want.
The default is to print all active sheets. To change what is printed, select Show Details.
In the Print drop-down menu, select the option that corresponds to what you want to print ( Selection, Active Sheets, or Entire Workbook) and then select Print.
Print several sheets at once
Select the sheets that you want to print.
Two or more adjacent sheets
Click the tab for the first sheet. Then, hold down SHIFT and click the tab for the last sheet that you want to select.
Two or more nonadjacent sheets
Click the tab for the first sheet. Then, hold down COMMAND and click the tabs of the other sheets that you want to select.
All sheets in a workbook
Hold down CONTROL and click a sheet tab, and then click Select All Sheets on the shortcut menu.
Note: When multiple sheets are selected, [Group] appears in the title bar at the top of the sheet. To cancel a selection of multiple sheets in a workbook, click any unselected sheet. If no unselected sheet is visible, hold down CONTROL and click the tab of a selected sheet, and then click Ungroup Sheets on the shortcut menu.
On the File menu, click Print.
On the Printer menu, select the printer that you want.
Select Show Details.
In the Print drop-down menu, select Active Sheets, and then select Print.
Print selections from several sheets at once
On each sheet, select the range of data that you want to print.
On the File menu, click Print.
Select Show Details.
In the Print drop-down menu, select Selection, and then select Print.
Print several workbooks at once
Note: All of the workbook files that you want to print must be in the same folder.
On the File menu, click Open.
For adjacent files, hold down SHIFT and select the name of each workbook that you want to print. Or, for nonadjacent files, hold down COMMAND and select the name of each workbook that you want to print.
On the File menu, click Print.
Print an Excel table
Click a cell within the table to activate the table.
On the File menu, click Print.
Select Show Details.
In the Print drop-down menu, select Selection, and then select Print.
Other print options
Select Show Details in the Print dialog box to print to a PDF file, or to set which pages to print, paper handling options, margins, and scaling.
The Page Layout tab in the ribbon includes more options for page setup and printing, including page orientation, paper size and whether to print gridlines and headings.
See also
Print a partial sheet, an entire sheet, or an entire workbook
Do one of the following:
To print a partial sheet, click the sheet, and then select the range of data that you want to print.
To print the entire sheet, click the sheet or the sheet tab.
To print a workbook, click any of its sheets.
On the File menu, click Print.
On the Printer pop-up menu, select the printer that you want.
Next to Print What, click the option that corresponds to what you want to print ( Selection, Active Sheets, or Entire Workbook) and then click Print.
Print several sheets at once
Select the sheets that you want to print.
Two or more adjacent sheets
Click the tab for the first sheet. Then, hold down SHIFT and click the tab for the last sheet that you want to select.
Two or more nonadjacent sheets
Click the tab for the first sheet. Then, hold down CONTROL and click the tabs of the other sheets that you want to select.
All sheets in a workbook
Hold down CONTROL and click a sheet tab, and then click Select All Sheets on the shortcut menu.
Note: When multiple sheets are selected, [Group] appears in the title bar at the top of the sheet. To cancel a selection of multiple sheets in a workbook, click any unselected sheet. If no unselected sheet is visible, hold down CONTROL and click the tab of a selected sheet, and then click Ungroup Sheets on the shortcut menu.
On the File menu, click Print.
On the Printer pop-up menu, select the printer that you want.
Next to Print What, click Active Sheets, and then click Print.
Print selections from several sheets at once
On each sheet, select the range of data that you want to print.
On the File menu, click Print.
Next to Print What, click Selection, and then click Print.
Print several workbooks at once
Note: All of the workbook files that you want to print must be in the same folder.
On the File menu, click Open.
Hold down CONTROL and click the name of each workbook that you want to print.
On the File menu, click Print.
Print an Excel table
Click a cell within the table to activate the table.
On the File menu, click Print.
Next to Print What, click Selection, and then click Print.
Tip: The Layout tab in the ribbon includes more options for page setup and printing, including page orientation and headers and footers.
Источник
Print a worksheet or workbook
You can print entire or partial worksheets and workbooks, one at a time, or several at once. And if the data that you want to print is in a Microsoft Excel table, you can print just the Excel table.
You can also print a workbook to a file instead of a printer. This is useful when you need to print the workbook on a different type of printer from the one that you originally used to print it.
Before you print
Before you print anything in Excel, remember that there are many options available for an optimal print experience. For more information, see Printing in Excel.
Important: Some formatting, such as colored text or cell shading, may look good on the screen but not look how you expect when it prints on a black-and-white printer. You may also want to print a worksheet with gridlines displayed so that the data, rows, and columns stand out better.
Print one or several worksheets
Select File > Print, or press CTRL+P.
Select the Print button or adjust Settings before you select the Print button.
Print one or several workbooks
All workbook files that you want to print must be in the same folder.
Select File > Open.
Hold down CTRL click the name of each workbook to print, and then select Print.
Print all or part of a worksheet
Click the worksheet, and then select the range of data that you want to print.
Select File, and then click Print.
Under Settings, select the arrow next to Print Active Sheets and select the appropriate option.
Note: If a worksheet has defined print areas, Excel will print only those print areas. If you don’t want to print only the defined print area, select the Ignore print area check box. Learn more on setting or clearing a print area.
Print an Excel table
Select a cell within the table to enable the table.
Select File, and then select Print.
Under Settings, select the arrow next to Print Active Sheets and select Print Selected Table.

Print a workbook to a file
Select File, and then select Print, or press Ctrl+P.
Under Printer, select Print to File.
In the Save Print Output As dialog box, enter a file name and then select OK. The file will be saved in your Documents folder
Important: If you print the saved file on a different printer, the page breaks and font spacing may change.
Print a worksheet
For best results with printing your worksheet, use the Print command in Excel for the web, not your browser’s Print command. You can print the entire worksheet or just the cells you want.
If you want to print a range of cells, select them. To print the entire worksheet, don’t select anything.
Select File > Print > Print.
If you selected a range of cells, but decide to print the entire worksheet, switch to Entire Workbook before you hit Print.
Change a selected print area
In Excel for the web, you can either specify an area you want to print or print an entire worksheet. If you select a print area, but decide to change the specified area, here’s how you can preview your changes:
On the worksheet, click and drag to select the cells you want to print.
Select File > Print > Print.
To print only the selected area, in Print Options, select Current Selection.
If the print preview shows what you want printed, select Print.
To change the print selection, close print preview by clicking on the X, and repeat the previous steps.
To print the entire worksheet, select File > Print > Print. Make sure Entire Workbook is selected.
If you have the Excel desktop application, you can set more print options. Select Open in Excel and select multiple print areas on a worksheet.
Print a worksheet that has hidden rows and columns
In Excel for the web, when you print a worksheet with hidden rows or columns those hidden rows and columns won’t be printed. If you want to include the hidden rows and columns, you’ll need to unhide them before you print the worksheet.
You can tell if rows or columns are hidden either by the missing header labels or by the double lines as shown in this picture.
Here’s how you can unhide rows or columns:
Select the range of headers surrounding the hidden rows or columns. In this example, select all row headers between 2 and 7 to unhide rows 3 and 6.
Right-click the selection and pick Unhide Rows (for columns, pick Unhide Columns).
Select File > Print.
Select Print for a print preview.
In the Print Options box, make sure Entire Sheet is selected, and select Print.
Note: The row and column labels don’t show in print preview and the printout.
Print a workbook
If your Excel for the web workbook has only one worksheet, you can just print the worksheet. But if the workbook has multiple worksheets you’ll need to go to each worksheet by selecting its sheet tab, and then print that worksheet.
Not sure if the workbook has any hidden worksheets? Here’s how you can verify:
Right-click any sheet tab.

If the Unhide option is available, the workbook has one or more hidden worksheets. Select Unhide to show and unhide the worksheets.
When you unhide a worksheet, the sheet tab in the worksheet becomes available. Select the sheet tab and print the worksheet.
Print a table
Sometimes you want to print only part of a worksheet, like a table. You can do this in Excel for the web as long as the table has less than 10,000 cells. For worksheets more than 10,000 cells you have to use the Excel desktop app.
To print a table:
To select all the cells in the table, select the first cell and scroll to the last cell.
If your table has a lot of columns, instead of scrolling, select the first cell, press and hold the Shift key and select the last cell.
Select File > Print > Print.
Select Current Selection if it isn’t already selected, and then select Print.

If you like the print preview, select Print. If not, close the view and make any required changes.
Print page numbers on a worksheet
You can’t insert, view or print page numbers in Excel for the web. However, if you have the Excel desktop application, you can add page numbers either at the top (headers) or at the bottom (footers) of the worksheet and print it.
Use the Open in Excel button to open the workbook and, add page numbers in the Page Layout view, and then print the worksheet from Excel. Here’s how:
Источник
How to Print Excel Sheet on One Page (Fit to One Page)
If you often print your data/work in Excel, I am sure you have faced the issue where it prints multiple pages instead of one single page.
Sometimes, it’s so frustrating that a new page is printed just to accommodate a few extra lines of data (which also leads to wastage of paper).
There are some simple techniques you can use to make sure you Excel data in printed on one page (or in less number of pages in case you’re printing a big report).
In this Excel tutorial, I will share some methods you can use to print the Excel sheet on one page. You can use a combination of these methods to get the best result.
So let’s get started!
This Tutorial Covers:
Check How Many Pages Would be Printed (Preview)
Before you set out to optimize the settings to print the Excel work in one sheet, it’s best to check the current state using the Print Preview.
Don’t worry! You don’t have to print anything for this. You can simply check how the printed work would look and how many sheets will be printed.
This allows you to understand the things you can change to make sure you’re using the minimal number of paper while still keeping your printed report beautiful and legible.
Below are the steps to use Print Preview to see how the final print job would look like:
- Click the File tab
- Click the Print Option

Or you can use the keyboard shortcut Control + P (Command + P if using a Mac)
This would open the Print preview page where you would be able to see how many pages would be printed and what would be printed on each page.

You can use the arrow keys to go to the next/previous page when in the Print preview mode.
Ways to Fit and Print Excel Sheet in One Page
Now, let’s see some methods you can use to fit all the data in a sheet on one page and then print your report on one page (or fewer number of pages)
Adjust the Column Width (or Row height)
In many cases, you don’t need your columns to be too wide.
And since this is a direct determinant of how much data is printed on one page, you can save a lot of paper by simply reducing the column width.
But then, how do you know whether you have done enough or not? How do you know how much column width you should reduce to make everything fit on one page?
To make this easy, you can use the Page Layout View in Excel – which shows you in real-time how much data would be printed on each page of your report.
Below are the steps to get into the Page Layout mode and then reduce the column width:
- Click the View tab in the ribbon
- In the Workbook Views group, click on the ‘Page Layout’ option. This will change the way data is displayed (and you will see scales at the top and on the left of the worksheet)
- Reduce the column width to fit the data on one page. To do this, place the cursor at the edge of the cursor on the column header that you want to reduce in size. Then click and drag.


Once you have all the data on one page, you can go ahead and print it.
In some cases, you may find that the data in a cell is being cut off and is not being displayed completely. This often happens when you change the column width. You can correct this by enabling the Wrap text option in Excel.
To return to the normal view (and get out of the Page Layout view), click on the View tab and then click on ‘Normal’.
Change the Scaling (Fit All Rows/Columns in One Page)
Excel has an in-built option that allows you to rescale the worksheet in a way that fits more rows/columns on one page.
When you do this, it simply scales down everything to fit all the columns or rows in one page.
Suppose you have a sheet where the columns are spilling over to the next sheet when printed.
Below are the steps to scale down the sheet while printing:
- Click the File tab
- Click on Print (or use the keyboard shortcut – Control + P)
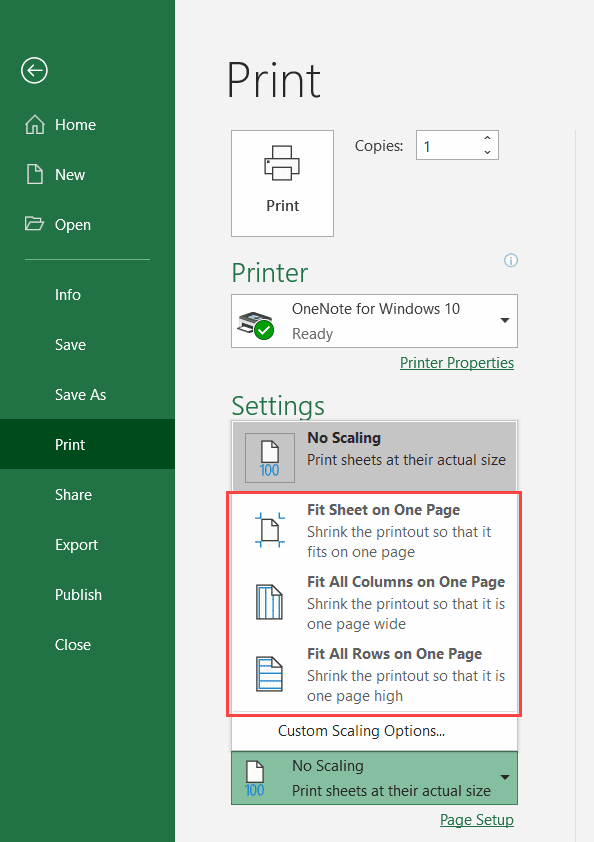
- In the Print window, click on the Scaling option (it’s the last option on the left)
- Click on any one of the options:
- Fit Sheet on One Page
- Fir All Columns on One Page
- Fit All Rows on One Page
The above steps would scale the sheet to fit the page (based on what options you have selected). You will also be able to see how the data would look in the sheet preview which is on the right.
This doesn’t impact the worksheet data. It only scales the data for print purposes.
Hide or Delete Rows/Columns
Another smart way to get everything on one page when printing is to hide any columns or rows that you don’t need.
You always have the option to make these visible again in case you need it later, but hiding these while printing will make sure you’re optimizing the space and using fewer pages to print.
To hide a row/column, simply select them, right-click and then select Hide.

Again, it’s best to first get into the Page Layout mode and then do this. This makes sure you can see how many rows/columns you need to hide to fit all the data on one page in Excel.
Change the Page Orientation
If you have more columns and rows, it makes sense to change the orientation of the page while printing.
There are two Orientations in Excel;
- Portrait (default in Excel) – More rows are printed than columns
- Landscape – More columns are printed than rows
In case you have more columns than rows (as shown below), you can change the page orientation to Landscape to ensure your data fit and is printed on one page.

Below are the steps to change the page orientation in Excel:
- Click the Page Layout tab
- In the Page Setup group, click on the dialog box launcher. This will open the ‘Page Setup’ dialog box.
- Click on the Page tab in the dialog box (if not selected already)
- In the Orientation option, select Landscape
- Click OK


Now you can go to Print Preview and see how your printed report would look like.
The keyboard shortcut to open the Page Setup dialog box ALT + P + S + P (press these keys in succession)
Alternatively, you can also change the orientation in the Print Preview window, by selecting Landscape Orientation from the drop-down in the settings.
Change the Page Margins
Sometimes you just have one or two extra columns that are getting printed on a new page (or a few extra rows that are spilling to the next page).
A little adjustment in the Page margins may help you fit everything on a single page.
If you’re wondering what page margins are – when you print an Excel worksheet, every printed page would have some whitespace at the edges. This is by design to make sure the data looks good when printed.
You have the option to reduce this white space (the page margin) and fit more data on a single page.
Below are the steps to reduce the page margin in Excel:
- Click the Page Layout tab
- In the Page Setup group, click on ‘Margins’
- Click on Narrow

The above steps would reduce the page margin and you may see some extra rows/columns being squeezed on the same page.
In case you want to further reduce the page margin, click on the ‘Margins’ option in the ribbon, and then click on ‘Custom Margins’. This will open the Page Setup Dialog box where you can further adjust the margins.

Reduce the Font Size
Another simple way to quickly make some extra rows/columns (that are spilling to additional sheets when printed as of now) fit the same page can be by reducing the font size.
This can allow you to resize a few columns so that it fits one page when printed.
This can be useful when you have printed data that usually goes in the appendix – something you need to have but nobody reads or cares about it.
Print Selected Data only (or Set the Print Area)
Sometimes, you may have a large dataset, but you may not want to print all of it. Maybe you only want to print selected data.
If this is a one-off thing where you want to quickly print the selected data in the worksheet, you can do that using the below step:
- Select the data that you want to print
- Click the File tab
- Click on Print (or use the keyboard shortcut – Control + P)
- In the Print screen that shows up, click on the first option in Settings
- Click on the Print Selection option. You would notice that the preview also changes to show you only the part that would be printed.
- Click on Print.


The above steps would only print the selected dataset.
Note that in case you selected a dataset that can’t be fit into a single plage when printed, it will be printed on multiple sheets. You can, however, change the scaling to ‘Fit Sheet on One Page’ to print selection on a single page.
The above method is good when you have to print the selected data once in a while.
But you need to print the same selection from multiple worksheets, it’s a better idea to set the print area. Once set, Excel would consider this Print Area as the part that is meant to print and would ignore the other data on the sheet.
- Select the data that you want to set as the print area
- Click the Page Layout tab
- In the Page Setup group, click on the Print Area option
- Click on Set Print Area
Now when you try and print a worksheet, only the print area would be printed (and only this will be shown in the Print Preview).
[Bonus] Add Page Breaks
In case you have a large dataset. it’s obvious that it can not be fit into one page and printing this entire data would take up multiple pages.
You can add page breaks in Excel to let Excel know where to stop printing on the current page and spill the rest to the next page.
Below are the steps to add page breaks in Excel:
- Select the cell where you want to insert the page break. From this cell onwards, everything would be printed on the next page
- Click the Page Layout tab
- In the Page Setup group, click on Breaks option
- Click on Insert Page Breaks

The above steps would add a page break and everything before the page break would be printed in one sheet and the remaining data in other sheets.
Note that in case you have set the print area, it will take precedence over page breaks.
So these are various methods you can use to fit data into one page and print an Excel spreadsheet on one page. In cases where you have a lot of data, it may not make sense to print it on one page, but you can still use the above methods to minimize paper usage and fit the same data into fewer pages.
I hope you found this tutorial useful.
You may also like the following Excel tutorials:
Источник
If you often print your data/work in Excel, I am sure you have faced the issue where it prints multiple pages instead of one single page.
Sometimes, it’s so frustrating that a new page is printed just to accommodate a few extra lines of data (which also leads to wastage of paper).
There are some simple techniques you can use to make sure you Excel data in printed on one page (or in less number of pages in case you’re printing a big report).
In this Excel tutorial, I will share some methods you can use to print the Excel sheet on one page. You can use a combination of these methods to get the best result.
So let’s get started!
Check How Many Pages Would be Printed (Preview)
Before you set out to optimize the settings to print the Excel work in one sheet, it’s best to check the current state using the Print Preview.
Don’t worry! You don’t have to print anything for this. You can simply check how the printed work would look and how many sheets will be printed.
This allows you to understand the things you can change to make sure you’re using the minimal number of paper while still keeping your printed report beautiful and legible.
Below are the steps to use Print Preview to see how the final print job would look like:
- Click the File tab
- Click the Print Option
Or you can use the keyboard shortcut Control + P (Command + P if using a Mac)
This would open the Print preview page where you would be able to see how many pages would be printed and what would be printed on each page.
You can use the arrow keys to go to the next/previous page when in the Print preview mode.
Ways to Fit and Print Excel Sheet in One Page
Now, let’s see some methods you can use to fit all the data in a sheet on one page and then print your report on one page (or fewer number of pages)
Adjust the Column Width (or Row height)
In many cases, you don’t need your columns to be too wide.
And since this is a direct determinant of how much data is printed on one page, you can save a lot of paper by simply reducing the column width.
But then, how do you know whether you have done enough or not? How do you know how much column width you should reduce to make everything fit on one page?
To make this easy, you can use the Page Layout View in Excel – which shows you in real-time how much data would be printed on each page of your report.
Below are the steps to get into the Page Layout mode and then reduce the column width:
- Click the View tab in the ribbon
- In the Workbook Views group, click on the ‘Page Layout’ option. This will change the way data is displayed (and you will see scales at the top and on the left of the worksheet)

- Reduce the column width to fit the data on one page. To do this, place the cursor at the edge of the cursor on the column header that you want to reduce in size. Then click and drag.

Once you have all the data on one page, you can go ahead and print it.
In some cases, you may find that the data in a cell is being cut off and is not being displayed completely. This often happens when you change the column width. You can correct this by enabling the Wrap text option in Excel.
To return to the normal view (and get out of the Page Layout view), click on the View tab and then click on ‘Normal’.
Change the Scaling (Fit All Rows/Columns in One Page)
Excel has an in-built option that allows you to rescale the worksheet in a way that fits more rows/columns on one page.
When you do this, it simply scales down everything to fit all the columns or rows in one page.
Suppose you have a sheet where the columns are spilling over to the next sheet when printed.
Below are the steps to scale down the sheet while printing:
- Click the File tab
- Click on Print (or use the keyboard shortcut – Control + P)
- In the Print window, click on the Scaling option (it’s the last option on the left)
- Click on any one of the options:
- Fit Sheet on One Page
- Fir All Columns on One Page
- Fit All Rows on One Page
The above steps would scale the sheet to fit the page (based on what options you have selected). You will also be able to see how the data would look in the sheet preview which is on the right.
The ‘Fit Sheet on One Page’ option is suited when you only have a few rows/columns that are spilling over. In case there are many, using this option may make the printed data too small to read.
This doesn’t impact the worksheet data. It only scales the data for print purposes.
Hide or Delete Rows/Columns
Another smart way to get everything on one page when printing is to hide any columns or rows that you don’t need.
You always have the option to make these visible again in case you need it later, but hiding these while printing will make sure you’re optimizing the space and using fewer pages to print.
To hide a row/column, simply select them, right-click and then select Hide.
Again, it’s best to first get into the Page Layout mode and then do this. This makes sure you can see how many rows/columns you need to hide to fit all the data on one page in Excel.
And here are steps to unhide the rows/columns in Excel.
Change the Page Orientation
If you have more columns and rows, it makes sense to change the orientation of the page while printing.
There are two Orientations in Excel;
- Portrait (default in Excel) – More rows are printed than columns
- Landscape – More columns are printed than rows
In case you have more columns than rows (as shown below), you can change the page orientation to Landscape to ensure your data fit and is printed on one page.
Below are the steps to change the page orientation in Excel:
- Click the Page Layout tab
- In the Page Setup group, click on the dialog box launcher. This will open the ‘Page Setup’ dialog box.

- Click on the Page tab in the dialog box (if not selected already)
- In the Orientation option, select Landscape

- Click OK
Now you can go to Print Preview and see how your printed report would look like.
The keyboard shortcut to open the Page Setup dialog box ALT + P + S + P (press these keys in succession)
Alternatively, you can also change the orientation in the Print Preview window, by selecting Landscape Orientation from the drop-down in the settings.
Change the Page Margins
Sometimes you just have one or two extra columns that are getting printed on a new page (or a few extra rows that are spilling to the next page).
A little adjustment in the Page margins may help you fit everything on a single page.
If you’re wondering what page margins are – when you print an Excel worksheet, every printed page would have some whitespace at the edges. This is by design to make sure the data looks good when printed.
You have the option to reduce this white space (the page margin) and fit more data on a single page.
Below are the steps to reduce the page margin in Excel:
- Click the Page Layout tab
- In the Page Setup group, click on ‘Margins’
- Click on Narrow
The above steps would reduce the page margin and you may see some extra rows/columns being squeezed on the same page.
In case you want to further reduce the page margin, click on the ‘Margins’ option in the ribbon, and then click on ‘Custom Margins’. This will open the Page Setup Dialog box where you can further adjust the margins.
Reduce the Font Size
Another simple way to quickly make some extra rows/columns (that are spilling to additional sheets when printed as of now) fit the same page can be by reducing the font size.
This can allow you to resize a few columns so that it fits one page when printed.
This can be useful when you have printed data that usually goes in the appendix – something you need to have but nobody reads or cares about it.
Print Selected Data only (or Set the Print Area)
Sometimes, you may have a large dataset, but you may not want to print all of it. Maybe you only want to print selected data.
If this is a one-off thing where you want to quickly print the selected data in the worksheet, you can do that using the below step:
- Select the data that you want to print
- Click the File tab
- Click on Print (or use the keyboard shortcut – Control + P)
- In the Print screen that shows up, click on the first option in Settings

- Click on the Print Selection option. You would notice that the preview also changes to show you only the part that would be printed.

- Click on Print.
The above steps would only print the selected dataset.
Note that in case you selected a dataset that can’t be fit into a single plage when printed, it will be printed on multiple sheets. You can, however, change the scaling to ‘Fit Sheet on One Page’ to print selection on a single page.
The above method is good when you have to print the selected data once in a while.
But you need to print the same selection from multiple worksheets, it’s a better idea to set the print area. Once set, Excel would consider this Print Area as the part that is meant to print and would ignore the other data on the sheet.
Below are the steps to set the print area in Excel:
- Select the data that you want to set as the print area
- Click the Page Layout tab
- In the Page Setup group, click on the Print Area option
- Click on Set Print Area
That’s it!
Now when you try and print a worksheet, only the print area would be printed (and only this will be shown in the Print Preview).
[Bonus] Add Page Breaks
In case you have a large dataset. it’s obvious that it can not be fit into one page and printing this entire data would take up multiple pages.
You can add page breaks in Excel to let Excel know where to stop printing on the current page and spill the rest to the next page.
Below are the steps to add page breaks in Excel:
- Select the cell where you want to insert the page break. From this cell onwards, everything would be printed on the next page
- Click the Page Layout tab
- In the Page Setup group, click on Breaks option
- Click on Insert Page Breaks
The above steps would add a page break and everything before the page break would be printed in one sheet and the remaining data in other sheets.
Note that in case you have set the print area, it will take precedence over page breaks.
So these are various methods you can use to fit data into one page and print an Excel spreadsheet on one page. In cases where you have a lot of data, it may not make sense to print it on one page, but you can still use the above methods to minimize paper usage and fit the same data into fewer pages.
I hope you found this tutorial useful.
You may also like the following Excel tutorials:
- How to Print Comments in Excel
- How to Print the Top Row on Every Page in Excel
- How to Print Multiple Sheets (or All Sheets) in Excel in One Go
- How to Unhide COLUMNS in Excel
- How to Group Worksheets in Excel
- How to Compare Two Excel Sheets (for differences)
Your data looks great in Excel; you’ve used the perfect font styles, the right borders, and all that is Excel nifty. But the printer didn’t even think twice before severing your carefully drafted spreadsheet in the weirdest ways and now none of the pages make sense. Well, your printer is going to do what it’s set out to do so run a good check on what the final prints are going to look like.
For a decent-sized dataset, it’s not too much to ask for it to all be on the same page especially since details like headers are most likely to come out right on the first page, not to mention the waste of paper.
This tutorial will give you all the pointers on fitting an Excel sheet on one page. Portrait or landscape, scaling, adjusting rows and columns, reducing margins and font size, deleting/hiding rows or columns; these are the keywords of what we’ll be looking into today.
But before you try to print or find other ways to squeeze the sheet in, check the Print Preview of the worksheet to see how many pages the data is splayed on. You might find that the sheet is taking up a single page in the first place or that it cannot be crammed into one page.

Check Number of Pages in Print Preview
The number of pages a worksheet takes up can be seen in Print Preview, Page Break Preview, and Page Layout View. You can choose whichever preview you are comfortable with, and for now, we will talk about the first one.
Print Preview is easily accessed by pressing the Ctrl + P keys or by selecting the File tab and then selecting Print from the left pane in the window.

You can view what will be printed on each page. At the bottom of the window, you can see the page number total for each worksheet and can navigate to the pages by clicking on the left and right arrows.

Ways to Fit and Print a Worksheet on One Page
Now that we’ve viewed what the sheet will look like in prints, we can move to fit the data into one page. There are several ways of doing this and you may need a combination. The detailed steps for each method are explained below:
Let’s get fitting!
Change the Page Orientation
The default page orientation for printing will be Portrait Orientation. For our data which has more width than length, it’s a far better utilization of a page to change the page orientation to Landscape. You might not have to make any other adjustments to the data or the settings if the data fits in Landscape mode.
There are a couple of ways of changing the page orientation and we have them enlisted below with their steps:
Change Page Orientation in Print Preview
The page orientation can be changed in Print Preview while immediately previewing the effect of the change in orientation. Here’s what to do:
- Press the Ctrl + P keys to enter Print Preview.
In the Settings, you can see that the page is in Portrait Orientation.

- Click on Portrait Orientation in Settings and select Landscape Orientation.

As with our data, Landscape Orientation has fit more columns on the first page but we still have a second page and will have to resort to other methods of fitting the data on one page.

Change Page Orientation in Page Setup
The page orientation can also be changed from Page Setup with the following steps:
- Go to the Page Layout tab and click on the dialog launcher of the Page Setup. This opens the Page Setup settings.

- In Portrait Orientation, we have 4 columns in excess of the first page.
- In the Page Setup dialog box’s Page tab, select Landscape from the Orientation

- Click on the OK
As seen from the Print Area line, the Landscape Orientation has included 3 more columns on the first page.

Note: The Print Area line will only show up on the sheet after entering Print Preview, Page Layout View, or Page Break View.
Fit Data on One Page in Page Break Preview
This solution may, many a time be the answer for you as you simply adjust the Page Breaks to include all the data on the same page. Now let’s see how to fit data on one page in Page Break Preview.
Carrying forward the example from above, here’s what to do next after switching to Landscape Orientation:
- From the status bar at the bottom of the file, click on the third icon to enter Page Break Preview.

- The following window is what you’ll see in Page Break Preview. The blue lines are Page Breaks and can be clicked and dragged for adjustment.
- Adjust the Page Breaks by clicking and dragging to fit the data on a single page.

Now all the data will fit on one page:

You may be tempted to directly jump into Page Break Preview and make everything settle on one page but sometimes you may find that you’ll have to adjust the scaling for the data to sit right.
Change the Scaling (Fit All Rows/Columns in One Page)
Alternatively, the data can be scaled to fit the page. All the rows or columns containing the data can be scaled to fit on one page. This takes no manual adjusting like that of Page Breaks and the settings are easily accessible through Print settings. Let’s see the steps to change the scaling to fit all rows/columns on one page:
Our example data is more column-dense than row-dense so we have first switched to Landscape Orientation to fit the data more suitably on the page.
- To go to the Print settings, press the Ctrl + P

- The last option in the Settings shows that there is no scaling applied.
- Click on the last button in the Settings which says No Scaling and select one of the options.
We have selected Fit Sheet on One Page.

The selected scaling shows up in the Print Preview and has fitted the sheet on one page.

Similarly, you can scale the data to fit 1 page in width and 1 page in height from Page Layout tab > Scale to Fit group:

And from Page Layout tab > Page Setup dialog launcher > Scaling settings:

Both the above options are scaling options and have the same result of scaling down the sheet to fit a single page. Print Preview has the advantage of showing the changes in preview.
Reduce the Page Margins
The last option before we meddle with the actual sheet and the data is to reduce the Page Margins. By default, the margins are 0.75 inches at the top and bottom and 0.7 inches left and right from the edges in Excel. Narrowing or removing some margins will allow more data to fit on the same page. The steps to reduce Page Margins are:
- To go to Print Preview, press Ctrl + P. As shown in the Settings, the margins currently are Normal Margins.

- Click on the Margins button reading Normal Margins and select Narrow to narrow down the margins or select Custom Margins… to further reduce or eliminate margins.

- Clicking on Custom Margins… leads to the Margin tab in the Page Setup dialog window.
- Reduce the relevant margins. We have eliminated the left and right margins to fit the columns in Landscape Orientation.

- Click on the OK button when done.
Check the effects in the preview. For our example, the reduced margins have fit the sheet on one page:

It’s easier to adjust the margins in the Print settings and view the changes in the Print Preview. Other ways to access the Margin settings are from the Page Layout tab’s Page Setup group.
You can use the Margin button (highlighted below in red) or the Page Setup dialog launcher’s (highlighted below in green) Margin tab:

Adjust Column Width or Row Height
Now we get to the more invasive methods where we tweak the sheet and its contents. You might have squeezed everything in on one page but would that always be a good idea? If the data comes out being congested and hard-to-read you probably gave the page too much to deal with. Row height is rarely a problem but columns, especially the ones carrying numeric data, are needlessly wide and we can work on those to make the data more compact.
Now we will try adjusting column width (or you can adjust row height, whichever is necessary) for fitting the sheet on one page and this is how we do it:
- To go to Page Layout View, click on the Page Layout icon in the status bar.

- This is the Page Layout View:

- Select the columns and reduce the widths by clicking and dragging a column header border until the columns all fit on one page.

- Now the worksheet fits on one page:

Note: The columns can be selected and their widths can be reduced in Normal View but with Page Layout View it is easier to determine how much column width you need to reduce to make all the data fit.
You can however also check if the data will fit on the page in Normal View if you have the Print Area set so that the dotted line will display on the worksheet. You can see the dotted line by entering and exiting Print Preview, Page Layout View, or Page Break View, or by setting the Print Area.
Hide or Delete Rows/Columns
If all else has failed and compacting the data on a sheet makes it indecipherable, you may have some columns or rows that are not important enough to not be deleted. Or if they are a bit more important than that, maybe they can be hidden at least for a print. Hidden columns/rows can be unhidden at any time.
This one’s easy and with our example, we’re dealing with columns. All you need to do is select the columns, right-click any column in selection and choose Hide or Delete from the context menu:

The data now fits the Print Area of the first page:

Reduce the Font Size
If you are trying to fit larger data on one page, the font will reduce anyway so might as well give this a try. Reducing the font size will then leave more space in columns and rows, which can then be reduced further to compress the data. You can reduce the font size of lesser important parts in the data.
If you are reducing the font size of the whole sheet, your data may contain different font sizes. To reduce all the font sizes by one unit, select all the cells by pressing Ctrl + A, then select the Decrease Font Size button in the Font group of the Home tab:

Tip: Using Page Breaks to Divide Worksheet Print Areas
There’s only so much you can fit on one page before it doesn’t look right. If your data still can’t be stuffed on one page while maintaining readability, you can consider reverting the data and sheet to its original form and splitting the columns/rows between two pages using Page Breaks. This is also applicable for large datasets where inevitably multiple pages will be required for printing and by setting the Print Area with Page Breaks, you can control the amount of data on each page.
Tip: After adding Page Breaks, see if you need to add headers or extra information to the other pages to make the data look cohesive.
Follow these steps to add Page Breaks to your sheet:
- Select the Page Break Preview icon in the status bar.

- Select the column where you want to add a Page Break. The Page Break will be added to the left of the selection.
- Right-click anywhere on the selection and select Insert Page Break from the list.
- For horizontal Page Breaks, the Page Break will be added on top of the selected row.

The Page Break will set the Print Areas for the pages.

Those were all our tips and tricks on how to print an Excel sheet on one page. Don’t forget to be mindful of the readability of the data on the page as all the fitting and resizing skills are of no use if one can’t make head or tail of the final print. We hope you’ll be able to fit your worksheet contents on one page with our hacks. Be ready with more problems because we’ll be ready with more solutions!
INTRODUCTION
After we have created a report in Excel by using the different formats, borders, functions, formulas etc. , the next step is to present the report.
Most of the time, the report is presented as a print of the report on a paper or sometimes as a pdf.
But taking a print in Excel is a bit tricky in comparison with other applications like Word , powerpoint etc.
The reason is the presence of a big continuous sheet which has no visible borders in Excel. In word, a page is properly defined just as a slide is clearly defined in powerpoint.
So, it is very important to be able to play with the spreadsheet in a way that we get the print of data as we want. This article specially deals with the options of printing a sheet on one page in few seconds.There are a few methods of doing this. We’ll discuss them in details.
DIFFERENT METHODS OF PRINTING A SHEET ON ONE PAGE
DIFFERENT METHODS TO FIT A DATA ON ONE PAGE FOR PRINTING
- USING THE SPECIFIC PRINT OPTION
- BY HIDING THE ROWS OR COLUMNS
- BY CUSTOM SCALING
USING THE PRINT OPTION AVAILABLE
The easiest way to print a sheet on a page is available in Excel now.
Follow the steps to print the sheet on one page.
- Select the data if you want to print only the selected part. If you want to print all the data, no need to select.
- Click FILE MENU.
- Go to PRINT option.
- Select the PRINTER, from which you want to have a print.
- Choose the orientation and paper size.

- Finally , the most important setting.
- Open the SCALING MENU as shown in the picture below and click on FIT SHEET ON ONE PAGE.
- Check the preview. Complete sheet will be accommodated on the same page.

- Check the preview. Complete sheet will be accommodated on the same page.

WHEN TO FIT SHEET ON ONE PAGE
Did you notice one thing??Look at the previous picture and check out the print preview. We opted for the option, FIT SHEET ON ONE PAGE and it did so, but the text has become so small that if we take out its print, the report is useless as nobody can read it. We never want so.Therefore, it becomes very important to understand when should we use this option.
ALWAYS USE THIS OPTION WHEN WE HAVE A SMALL REPORT WHICH WILL BE READABLE ON A PAGE IF PRINTED. IT’LL SAVE US A LOT OF TIME.
NEVER USE THIS OPTION IF WE HAVE A BIG SHEET.
There are better options for settling this issue.
PRINTING SHEET ON A PAGE BY HIDING ROWS OR COLUMNS
The next method, by the use of which we can print sheet on a page isBY HIDING THE “NOT USEFUL” ROWS AND COLUMNS.This is a manual process. Follow the steps to fit the sheet in one page
STEPS:
- Go to FILE MENU>PRINT.
- Check out if the complete data is able to get printed on a single page or not.
- Go back. Excel for our help will put a dotted line to show the printable area now.
- Check out the picture below.
- The data , on the left of the dotted line and above of the dotted line [ shown by a slim rectangle].

- Find out the rows and columns which are not necessary to be printed.
- We can hide the rows and columns which we don’t want to print.
PROCEDURE TO HIDE THE ROWS OR COLUMNS
- Select the row or column which we want to hide.
- Right Click and choose the option HIDE.
- The concerned rows or columns will be hidden.
- Now check if all the visible data is inside these dotted lines or not.
- Once, the data comes inside the dotted lines we can go to FILE>PRINT and click on PRINT BUTTON to print the sheet in one page.
PRINTING FULL SHEET ON ONE PAGE USING CUSTOM SCALING
DIFFERENT METHODS TO FIT A DATA ON ONE PAGE FOR PRINTING
- USING THE SPECIFIC PRINT OPTION
- BY HIDING THE ROWS OR COLUMNS
- USING CUSTOM SCALING AND SETTING THE MARGINS
We have already discussed two methods. Now let us discuss the option of CUSTOM SCALING to fit our sheet on one page.
FOLLOW THE STEPS
Even if we are unsuccessful in fitting the page and keeping it readable, we can go for our next step which is
CUSTOM SCALING AND SETTING THE MARGINS.
Custom Scaling lets us scale our sheet for the printing purpose, as we want.STEPS:
- Go to FILE MENU >PRINT
- Choose the other options such as orientation, printer, collation etc. as already discussed above.

- Now go to the SCALING OPTION and choose CUSTOM SCALING as shown in the picture below.

- Click the CUSTOM SCALING OPTIONS and following dialog box will open.
- Set the scaling value [ as the percentage] and click ok.
- Check the preview if it is as per requirement otherwise repeat the process again.
- After this process , we can set the page as per our requirement.
- Now, we can further increase a bit space for the printing by narrowing the margins.
- For that, click the MARGINS TAB as seen in the picture below. [Second Tab]

The MARGINS tab will open containing the options for declaring or setting the margins of top , bottom, left or right as per the requirement.
We can increase the printing size a bit and consequently the size of the font would increase so that the report is easy to read.
THESE WERE THE OPTIONS TO PRINT THE SHEET IN ONE PAGE BUT ALWAYS REMEMBER THAT AS WE COMPRESS THE DATA , THE FONT SIZE WILL GET SMALLER. ALWAYS TAKE CARE THAT AT LEAST THE REPORT IS READABLE EASILY. OTHERWISE INCREASE THE PAGES.
How to Print an Excel Spreadsheet on One Page (+ More)
Trying to fit your big spreadsheet into 1 tiny page?
As easy as it seems, printing Excel spreadsheets can be difficult if you don’t know the pro tricks. And even more so if you’re new to this software.
Luckily, this guide has everything you need to know about printing Excel spreadsheets. We’ve jotted down some of the most important Excel techniques to help you get started 😃
So without further ado, let’s get right into it.
Also, if you want to practice along the guide, download our sample workbook here.
How to print an Excel sheet on one page
Sometimes we just want to squeeze all our data on one page to avoid extra mess. But by default, Excel prints multiple pages for data that can easily show up on a single page.
Not only does this lead to wastage of paper, but managing so many hard copies can be a true hassle.
This is why people prefer accommodating most of their data on a single page. And if you don’t have extensive data or readability issues, this is the ideal approach.
Let’s suppose we have some data set, and we want to print it on one page 📄

So to print the Excel sheet on one page:
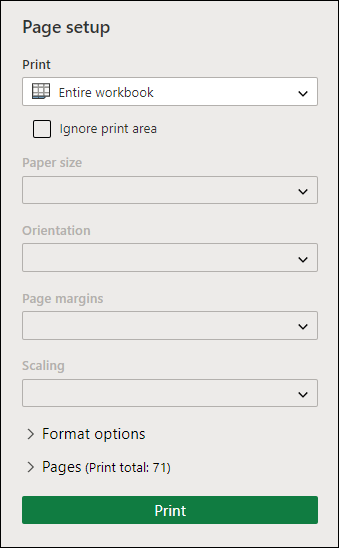
- Click Print from the File Tab.

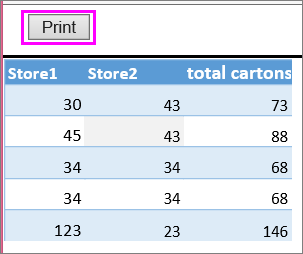
- The Print Preview screen shows up.

The Print Preview screen gives you an idea of how your data will look on a printed page. Our printed page is in Portrait orientation and spread over two pages.
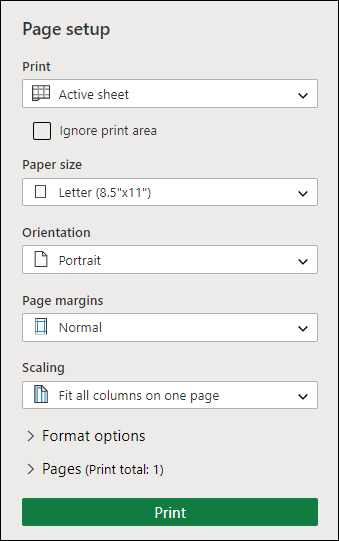
If you prefer, you can change the page orientation from the print settings shown above. Or the Page Layout Tab from the ribbon.
If you have columns to print, choose Landscape. And if the data consists of more rows (like in our case), choose Portrait.

To fit all the rows on one page, we will scale it accordingly.
- Click the ‘No Scaling’ option at the bottom.

- Select ‘Fit All Rows on One Page.’

- Excel shows the preview as:

All your data will now be printed on a single piece of paper 📝
Note that scaling an Excel sheet on one page can make the printout hard to read.
How to print the entire workbook
We just saw how to print the Excel spreadsheet on a single page. Now, let’s see how to print the entire workbook in one go.
It’s quite straightforward. All you need to do is:
- Go to ‘Print” from the File Tab.
- `Click ‘Print Active Sheets’ in the Print Preview area.

- Select ‘Print Entire Workbook.’

Excel will now print the entire workbook when you click Print.
Pro Tip!
You can select other options too. For instance, if you only want to print a specific selection in the sheet, click ‘Print Selection.’ And if you want to print the Excel worksheet, select the ‘Print Active Sheets‘ option.
How to change the print area
As evident from the name, the Print Area lets you choose a specific portion of the spreadsheet that you want to print.
This is because often, we don’t want to print the entire sheet but only some part of it. The Print Area feature can help you do just that. And its working is similar to that of Print Selection under the Print Settings.
To enable the Print Area:
- Select the data you want to print.
We want to print the first ten rows of our data set:

- Go to the Page Layout Tab.
- Select Print Area under the Page Setup group.
- Click ‘Set Print Area.’

And it’s done! 🥳
Excel will now only print the selected data. You can view the Print Area in the Print Preview window as well 🗔

Pro Tip!
You can also choose whether you want to show the gridlines for printing or not. For that, select the ‘Print’ option under Gridlines from the Sheet Options group.
Excel will now print the gridlines as well. You can view them from the Preview window.
You can also add a new print area to your previous selection. All you need to do is select the new range and press Print Area.
Then select the ‘Add to Print Area’ option.

The selected portion is now added to the Print Area 📃
Similarly, if you want to remove it, click Clear Print Area. Excel will remove the entire Print Area.
How to print comments
If your comments are just as important as your worksheet data, know that you can print them too. The process takes a few seconds only and is easy to understand 😃
To print Excel comments:
- Go to the Page Layout Tab.
- Open the Page Setup dialog box (from the small arrow at the right corner)

- Click the Sheet tab.

- Click the drop-down arrow next to Comments and select an option.

- Press Ok.

You can now see how the comments will appear on paper in the Print preview window 📄
Just scroll down or move to the next page to view them.
That’s it – Now what
Printing spreadsheets in Excel can be tricky, especially when you have large data to print. But using these new techniques, you will be able to wind that hours-long task in minutes.
Summing up, we learned how to print an Excel sheet on one page in this article. We also saw how to print comments, the entire workbook, and even change the Print Area.
Knowing how to print Excel spreadsheets is pretty important when working in a professional environment. But so are the other things in this giant spreadsheet software that you need to learn!
If you are just starting out, we recommend you practice the Excel VLOOKUP, IF, and SUMIF functions. Enroll in my 30-minute free email course that teaches these functions and much more for FREE! 😵
Other resources
These printing tips and tricks are sure to give a boost to your Excel skills. All you need is constant practice and more knowledge.
If you enjoyed this article, we’re sure you’d love to know more. Try reading How to Print Gridlines, Mailing Labels, and more.
Frequently asked questions
To fit an Excel sheet on one page, go to File Tab > Print. Click the No Scaling option at the bottom. Select ‘Fit Sheet on one Page‘ from the drop-down. Excel will shrink the printout to fit one page. You can also set custom scaling options to keep the data legible.
To print a selected area in Excel, open the Print option from the File Tab. Under Settings, click Print Active Sheets. Select ‘Print Selection‘ from the drop-down menu. Excel will now only print the range you have selected in the worksheet.
Clearing the Print Area in Excel is easy. Select Print Area under the Page Setup group from the Page Layout Tab and click Clear Print Area. Excel will remove the entire Print Area.
Kasper Langmann2023-01-07T20:40:09+00:00
Page load link
Printing a spreadsheet in Microsoft Excel can be challenging if you have a lot of data. To cut down on the paper and keep your data together, you can print your sheet on one page instead of multiple pages.
While the setup is the same, getting to the settings differs slightly between Excel on Windows versus Mac.
RELATED: What’s the Difference Between Microsoft Office for Windows and macOS?
On Windows, go to the Page Layout tab and click the arrow on the bottom right of the Page Setup section of the ribbon.

On Mac, go to the Page Layout tab and click “Page Setup.”
When the Page Setup window opens, make sure you’re on the Page tab. Go down to the Scaling section, mark the option for Fit To, and enter the number 1 in both boxes. Click “OK” to save your change.
Tip: If your sheet is wider than it is long, consider changing the Orientation in the Page Setup window to Landscape to accommodate the width.
If you have a ton of rows in your sheet, printing on a single page like this may make the data difficult to read. So, if you want the columns on one page but are fine with the rows extending to more pages, this is doable.
RELATED: How to Repeat Specific Rows or Columns on Every Printed Page in Excel
In the Fit To boxes, enter the number 1 in the first box and 9999 in the second box. Click “OK” to save your change.
View a Print Preview
You can see a preview of how your sheet will look on a single page before you print it. On both Windows and Mac, click File > Print from the menu or menu bar.
This gives you a nice view of whether or not printing your sheet on one page works for you. If it does, continue to print as you normally would.
If you’re not happy with the preview of your sheet on a single page, remember that you can always print a specific selection of cells in Excel instead. Or, you can set up and save a print area in Excel if you plan to print the same section often.
RELATED: How to Set the Print Area in Microsoft Excel
READ NEXT
- › How to Print a Spreadsheet or Workbook in Google Sheets
- › Don’t Have a Wearable? Track Your Health in Excel
- › Mozilla Wants Your Feature Suggestions for Thunderbird
- › BLUETTI Slashed Hundreds off Its Best Power Stations for Easter Sale
- › Microsoft Is Testing Windows 11 Changes for the Steam Deck
- › Google Chrome Is Getting Faster
- › Expand Your Tech Career Skills With Courses From Udemy
- › The New NVIDIA GeForce RTX 4070 Is Like an RTX 3080 for $599
How-To Geek is where you turn when you want experts to explain technology. Since we launched in 2006, our articles have been read billions of times. Want to know more?
Print a sheet on one page On the Page Layout tab, select Page Setup. Under Scaling, select Fit to, and type 1 in both the page(s) wide box and page(s) tall box. Select OK. On the File menu, select Print.
Contents
- 1 How do I get my Excel spreadsheet to print on one page?
- 2 How do I print an Excel sheet without cutting it off?
- 3 How do I get Excel to only show one page?
- 4 How do I print two Excel spreadsheets side by side?
- 5 How do I print a large Excel spreadsheet on multiple pages?
- 6 How do I print without cutting off?
- 7 Why is Excel not printing the entire page?
- 8 How do I print an Excel sheet with lines?
- 9 How do I make an Excel spreadsheet fit on one page Mac?
- 10 How do I set print margins in Excel?
- 11 How do you print more than one workbook at a time?
- 12 How do you print selected columns on one page in Excel?
- 13 How do I convert multiple Excel sheets into one PDF?
- 14 How do I Print two Excel sheets on one page front and back?
- 15 How do I Print multiple pages on one page?
- 16 How do I print full page in excel without margins?
- 17 How do I print without cutting off margins?
- 18 Why is my printer printing only half the page?
- 19 How do you print Excel with all columns?
- 20 How do I show the grid in Excel?
How do I get my Excel spreadsheet to print on one page?
Shrink a worksheet to fit on one page
Select the Page tab in the Page Setup dialog box. Select Fit to under Scaling. To fit your document to print on one page, choose 1 page(s) wide by 1 tall in the Fit to boxes. Note: Excel will shrink your data to fit on the number of pages specified.
How do I print an Excel sheet without cutting it off?
How to Fix Excel Cutting Off Text When Printing
- Open your spreadsheet.
- Click Page Layout.
- Select Print Area.
- Choose Clear Print Area.
How do I get Excel to only show one page?
Select the range you want to view on a single screen. Select the View tab on Excel’s ribbon.
As shown in Figure 5, you can choose from these additional options:
- Fit All Rows on One Page. Select this option if your data spans many rows.
- Fit All Columns on One Page.
- Fit Sheet on One Page.
How do I print two Excel spreadsheets side by side?
Printing Multiple Pages On a Piece of Paper
- Display the Page Layout tab of the ribbon.
- Click the small icon at the lower-right corner of the Page Setup group.
- Click on the Options button.
- Using the Pages Per Sheet control, specify how many pages you want printed on each sheet of paper.
How do I print a large Excel spreadsheet on multiple pages?
To print a worksheet on a specific number of pages, in Page Setup, click the small window launcher button. Then, under Scaling, in both of the Fit to boxes, enter the number of pages (wide and tall) on which you want to print the worksheet data.
How do I print without cutting off?
Printing without Margins to Match Paper Size
- In the printer driver, open the settings screen.
- Select the paper source. From the Paper Source list on the Page Setup tab, select Roll Paper.
- Select paper roll width.
- Select borderless printing.
- Select a method for printing borderless.
- Complete the setting process.
Why is Excel not printing the entire page?
If your Excel spreadsheet isn’t printing properly, clearing or setting a print area can often help.To do this from the Page Layout Ribbon, click the Print Area icon and select Clear Print Area. If you now want to redefine the print area, select the cells that you want to print.
How do I print an Excel sheet with lines?
Print gridlines in a worksheet
- Select the worksheet or worksheets that you want to print. For more information, see Select one or multiple worksheets.
- On the Page Layout tab, in the Sheet Options group, select the Print check box under Gridlines.
- Click the File tab, and then click Print.
- Click the Print button.
How do I make an Excel spreadsheet fit on one page Mac?
Print a sheet on just one page in Excel for Mac
- On the Page Layout tab, select Page Setup.
- Under Scaling, select Fit to, and type 1 in both the page(s) wide box and page(s) tall box. Select OK. .
- On the File menu, select Print.
How do I set print margins in Excel?
Use the File menu:
- From the File menu, select Print.
- Under “Settings”, select the Normal Margins drop-down menu.
- Choose a different pre-set option, or select Custom Margins…, adjust the values for each margin that you want to change, and click OK.
How do you print more than one workbook at a time?
The easiest approach is to right-click a worksheet tab, choose Select All Sheets, and then print normally to have the worksheets printed as a single print job. As an alternative you could also select File, Print, Settings, Print Entire Workbook to achieve the same result.
How do you print selected columns on one page in Excel?
Set one or more print areas
- On the worksheet, select the cells that you want to define as the print area. Tip: To set multiple print areas, hold down the Ctrl key and click the areas you want to print.
- On the Page Layout tab, in the Page Setup group, click Print Area, and then click Set Print Area.
How do I convert multiple Excel sheets into one PDF?
Solutions:
- Click Excel Options. Click Entire Workbook or Sheets From a Range. With Sheets From a Range you will need to specify the range you want.
- Click OK. Click Convert to PDF.
- Choose The file location and name to save to then click Save.
How do I Print two Excel sheets on one page front and back?
Click the Microsoft Office Button/File, point to Print, click Print, and then click Properties. On the Layout tab, select the one of the duplex options, and then click OK. Click OK in the Print dialog box. Repeat these steps for every sheet in the workbook.
How do I Print multiple pages on one page?
Choose File > Print. From the Page Scaling pop-up menu, select Multiple Pages Per Sheet. From the Pages Per Sheet pop-up menu, select a value. Click OK or Print.
How do I print full page in excel without margins?
Navigate to the tab called General, and look at your Printing Preferences. From the Printing Shortcuts section, choose the option for photo printing – borderless to ensure that whatever document you print, the default will be for your printer not to add any additional borders.
How do I print without cutting off margins?
How to print a Word document without margins?
- In the document you will print without margins, click Layout > Page Setup in the Page Setup group.
- In the Page Setup window, change the Top, Bottom, Left and right to 0 under Margins tab, and then click the OK button.
Why is my printer printing only half the page?
Partial prints are a common issue with printers and there are several main reasons it can occur: Problem with the print spooler (on Windows PCs) Overload of the GPU on later model Macs. Dodgy USB cord.
How do you print Excel with all columns?
On the Ribbon, click the Page Layout tab. In the Sheet Options group, under Headings, select the Print check box. , and then under Print, select the Row and column headings check box . To print the worksheet, press CTRL+P to open the Print dialog box, and then click OK.
How do I show the grid in Excel?
You can either show or hide gridlines on a worksheet in Excel for the web. On the View tab, in the Show group, select the Gridlines check box to show gridlines, or clear the check box to hide them.