
What is the best way to read Excel (XLS) files with Python (not CSV files).
Is there a built-in package which is supported by default in Python to do this task?
![]()
asked May 31, 2010 at 10:28
![]()
1
I highly recommend xlrd for reading .xls files. But there are some limitations(refer to xlrd github page):
Warning
This library will no longer read anything other than .xls files. For
alternatives that read newer file formats, please see
http://www.python-excel.org/.The following are also not supported but will safely and reliably be
ignored:- Charts, Macros, Pictures, any other embedded object, including embedded worksheets. - VBA modules - Formulas, but results of formula calculations are extracted. - Comments - Hyperlinks - Autofilters, advanced filters, pivot tables, conditional formatting, data validationPassword-protected files are not supported and cannot be read by this
library.
voyager mentioned the use of COM automation. Having done this myself a few years ago, be warned that doing this is a real PITA. The number of caveats is huge and the documentation is lacking and annoying. I ran into many weird bugs and gotchas, some of which took many hours to figure out.
UPDATE:
For newer .xlsx files, the recommended library for reading and writing appears to be openpyxl (thanks, Ikar Pohorský).
![]()
Saikat
13.4k20 gold badges104 silver badges121 bronze badges
answered May 31, 2010 at 12:24
![]()
taleinattaleinat
8,3811 gold badge30 silver badges44 bronze badges
2
You can use pandas to do this, first install the required libraries:
$ pip install pandas openpyxl
See code below:
import pandas as pd

xls = pd.ExcelFile(r"yourfilename.xls") # use r before absolute file path

sheetX = xls.parse(2) #2 is the sheet number+1 thus if the file has only 1 sheet write 0 in paranthesis

var1 = sheetX['ColumnName']

print(var1[1]) #1 is the row number...
![]()
Skully
2,2723 gold badges22 silver badges31 bronze badges
answered May 23, 2017 at 4:04
![]()
3
You can choose any one of them http://www.python-excel.org/
I would recommended python xlrd library.
install it using
pip install xlrd
import using
import xlrd
to open a workbook
workbook = xlrd.open_workbook('your_file_name.xlsx')
open sheet by name
worksheet = workbook.sheet_by_name('Name of the Sheet')
open sheet by index
worksheet = workbook.sheet_by_index(0)
read cell value
worksheet.cell(0, 0).value
answered Apr 6, 2017 at 14:15
![]()
SomilSomil
1,9031 gold badge20 silver badges35 bronze badges
1
I think Pandas is the best way to go. There is already one answer here with Pandas using ExcelFile function, but it did not work properly for me. From here I found the read_excel function which works just fine:
import pandas as pd
dfs = pd.read_excel("your_file_name.xlsx", sheet_name="your_sheet_name")
print(dfs.head(10))
P.S. You need to have the xlrd installed for read_excel function to work
Update 21-03-2020: As you may see here, there are issues with the xlrd engine and it is going to be deprecated. The openpyxl is the best replacement. So as described here, the canonical syntax should be:
dfs = pd.read_excel("your_file_name.xlsx", sheet_name="your_sheet_name", engine="openpyxl")
Update 03-03-2023: There are now several other options available. For example the Polars library that is written in Rust:
import polars as pl
dfs = pl.read_excel("your_file_name.xlsx", sheet_name="your_sheet_name")
Feel free to also check the PyArrow and pyodbc libraries.
answered Jun 12, 2018 at 10:35
![]()
Foad S. FarimaniFoad S. Farimani
12k15 gold badges72 silver badges181 bronze badges
3
For xlsx I like the solution posted earlier as https://web.archive.org/web/20180216070531/https://stackoverflow.com/questions/4371163/reading-xlsx-files-using-python. I uses modules from the standard library only.
def xlsx(fname):
    import zipfile
    from xml.etree.ElementTree import iterparse
    z = zipfile.ZipFile(fname)
    strings = [el.text for e, el in iterparse(z.open('xl/sharedStrings.xml')) if el.tag.endswith('}t')]
    rows = []
    row = {}
    value = ''
    for e, el in iterparse(z.open('xl/worksheets/sheet1.xml')):
        if el.tag.endswith('}v'):  # Example: <v>84</v>
            value = el.text
        if el.tag.endswith('}c'):  # Example: <c r="A3" t="s"><v>84</v></c>
            if el.attrib.get('t') == 's':
                value = strings[int(value)]
            letter = el.attrib['r']  # Example: AZ22
            while letter[-1].isdigit():
                letter = letter[:-1]
            row[letter] = value
            value = ''
        if el.tag.endswith('}row'):
            rows.append(row)
            row = {}
    return rows
Improvements added are fetching content by sheet name, using re to get the column and checking if sharedstrings are used.
def xlsx(fname,sheet):
    import zipfile
    from xml.etree.ElementTree import iterparse
    import re
    z = zipfile.ZipFile(fname)
    if 'xl/sharedStrings.xml' in z.namelist():
        # Get shared strings
        strings = [element.text for event, element
                   in iterparse(z.open('xl/sharedStrings.xml'))
                   if element.tag.endswith('}t')]
    sheetdict = { element.attrib['name']:element.attrib['sheetId'] for event,element in iterparse(z.open('xl/workbook.xml'))
                                      if element.tag.endswith('}sheet') }
    rows = []
    row = {}
    value = ''

    if sheet in sheets:
    sheetfile = 'xl/worksheets/sheet'+sheets[sheet]+'.xml'
    #print(sheet,sheetfile)
    for event, element in iterparse(z.open(sheetfile)):
        # get value or index to shared strings
        if element.tag.endswith('}v') or element.tag.endswith('}t'):
            value = element.text
        # If value is a shared string, use value as an index
        if element.tag.endswith('}c'):
            if element.attrib.get('t') == 's':
                value = strings[int(value)]
            # split the row/col information so that the row leter(s) can be separate
            letter = re.sub('d','',element.attrib['r'])
            row[letter] = value
            value = ''
        if element.tag.endswith('}row'):
            rows.append(row)
            row = {}

    return rows
![]()
answered Oct 28, 2018 at 11:53
![]()
2
If you need old XLS format. Below code for ansii ‘cp1251’.
import xlrd

file=u'C:/Landau/task/6200.xlsx'

try:
    book = xlrd.open_workbook(file,encoding_override="cp1251")
except:
    book = xlrd.open_workbook(file)
print("The number of worksheets is {0}".format(book.nsheets))
print("Worksheet name(s): {0}".format(book.sheet_names()))
sh = book.sheet_by_index(0)
print("{0} {1} {2}".format(sh.name, sh.nrows, sh.ncols))
print("Cell D30 is {0}".format(sh.cell_value(rowx=29, colx=3)))
for rx in range(sh.nrows):
   print(sh.row(rx))
answered Nov 17, 2019 at 5:15
![]()
1
For older .xls files, you can use xlrd
either you can use xlrd directly by importing it. Like below
import xlrd
wb = xlrd.open_workbook(file_name)
Or you can also use pandas pd.read_excel() method, but do not forget to specify the engine, though the default is xlrd, it has to be specified.
pd.read_excel(file_name, engine = xlrd)
Both of them work for older .xls file formats.
Infact I came across this when I used OpenPyXL, i got the below error
InvalidFileException: openpyxl does not support the old .xls file format, please use xlrd to read this file, or convert it to the more recent .xlsx file format.
answered Aug 12, 2020 at 6:06
![]()
2
You can use any of the libraries listed here (like Pyxlreader that is based on JExcelApi, or xlwt), plus COM automation to use Excel itself for the reading of the files, but for that you are introducing Office as a dependency of your software, which might not be always an option.
![]()
answered May 31, 2010 at 10:46
![]()
Esteban KüberEsteban Küber
36.1k15 gold badges83 silver badges97 bronze badges
1
You might also consider running the (non-python) program xls2csv. Feed it an xls file, and you should get back a csv.
answered Nov 25, 2012 at 21:43
![]()
2
    with open(csv_filename) as file:
        data = file.read()

    with open(xl_file_name, 'w') as file:
        file.write(data)
You can turn CSV to excel like above with inbuilt packages. CSV can be handled with an inbuilt package of dictreader and dictwriter which will work the same way as python dictionary works. which makes it a ton easy
I am currently unaware of any inbuilt packages for excel but I had come across openpyxl. It was also pretty straight forward and simple You can see the code snippet below hope this helps
    import openpyxl
    book = openpyxl.load_workbook(filename)
    sheet = book.active
    result =sheet['AP2']
    print(result.value)
answered Jun 19, 2020 at 12:26
![]()
For older Excel files there is the OleFileIO_PL module that can read the OLE structured storage format used.
answered Sep 18, 2013 at 20:35
![]()
Gavin SmithGavin Smith
3,0661 gold badge18 silver badges24 bronze badges
If the file is really an old .xls, this works for me on python3 just using base open() and pandas:
df = pandas.read_csv(open(f, encoding = 'UTF-8'), sep='t')
Note that the file I’m using is tab delimited. less or a text editor should be able to read .xls so that you can sniff out the delimiter.
I did not have a lot of luck with xlrd because of – I think – UTF-8 issues.
answered Dec 14, 2020 at 21:16
![]()
1
Why parse Excel data?
Microsoft Excel has helped business owners make data collection easy. Business plans, employee data, or customer data can be easily organized on Excel spreadsheets.
But sometimes business workflows require Excel data to be transformed or modified and sent to ERPs, CRMs or even Google Sheets.
Cleaning up or parsing such data manually from Excel is often time-consuming and error-prone. And unfortunately, Excel doesn’t integrate with ERPs or CRMs out of the box.
That’s where an Excel parser or Excel data parsing can help.
This guide will walk you through a few methods on how to parse data from Excel spreadsheets. You will also learn how to parse Excel data with Nanonets and automate data workflows from Excel to other business software.
How To Parse Data In Excel
Ever cleaned up data on Excel? Data imported into Excel or maintained on spreadsheets can often get cluttered and messy. And not all data is required for every business process.
This is why employees spend a lot of time parsing specific data on Excel to extract relevant data for their business workflows. Common Excel data parsing examples include:
- removing spaces in or between values
- converting text values or numbers
- splitting column values into separate columns
- adding currencies
- reformatting dates, addresses, names etc.
Let’s look at a few intelligent methods of parsing data from Excel that don’t rely on manual copying and pasting:
Excel data parsing by splitting a column into multiple columns
Follow these steps to split the data in one column into one or more columns.
- Open the Excel spreadsheet.
- Highlight the column that you wish to modify.
- Click the “Data” tab in the ribbon >> then click «Data Tools» >> and click «Text to Columns» to open the «Convert Text to Columns Wizard».
- Select “Delimited” and click “Next”.
- Select the ‘Delimiter’ of your choice and click “Next”.
💡
A delimiter is a symbol, character or space that separates the data you wish to split. For example, if you wanted to split just the zip code from an address (2 Court Square New York, NY 12210) you could select “Comma” or “Space” as your delimiters.
Check the box next to «Treat consecutive delimiters as one» and click “Next”.
- Select “General” in the «Column data format».
- Click the red spreadsheet icon in the «Destination» text box.
- Select the column(s) you wish to populate with the split data.
- Click the red arrow/spreadsheet icon to return to the wizard >> and Click “Finish”.
💡
To split data with using delimiters, select «Fixed width» in the «Convert Text to Column» Wizard. You can now manually create divisions within your data using break lines.
Excel data parsing with Microsoft Excel string functions
Traditionally most parsing activities on Excel have been handled using string functions such as RIGHT(), LEFT(), MID(), FIND() and LEN().
These functions are used to determine and specify a position for each character in a string. This is then used to delimit data within larger strings.
Although pretty complex to work with, these functions are handy when trying to clean up or split data. Here’s a detailed guide from Microsoft on how to use these functions to manipulate strings of text or numbers.
Flash fill to parse data in Excel
Excel’s flash fill feature allows it to evaluate a parsing pattern based on certain examples, and then parsing the entire data accordingly.
Let’s use Flash Fill to parse the zip codes from addresses listed in a single column A.
- Enter just the zip codes for the first 2 cells in column B.
- Press Ctrl + Enter
- OR select the entire column B >> click Data >> and click Flash-fill
Excel should now pick up the dat parsing pattern you wish to implement, and accordingly auto-fill cells in column B.
This is a huge improvement from string functions and is pretty straightforward to use. Note that this might not help in cases of complicated data transformation.
Supercharge your Excel data parsing workflows with Nanonets. Automatically modify your Excel data in any way you prefer.
Automated Excel data parsing with Nanonets
While all the methods discussed previously work pretty well on individual documents. There’s no way to completely automate these methods across thousands of Excel spreadsheets.
You would still need to manually key in the steps for splitting columns, or using string function or even flash fill.
With Nanonets, you can build a completely touchless automated Excel data parsing workflow.
You can collect Excel files coming from multiple sources (email, cloud storage, desktop etc.), parse the data you need, and finally send it to any business software of your choice.
Here are a few data parsing or data enhancement options that Nanonets provides out of the box:
Takeaway
Data parsing is crucial for business workflows that need to transform Excel data and ingest them into CRMs or ERPs.
The techniques we’ve covered in this article can help you save a lot of time that would otherwise be spent in manual tiresome copy pasting. And Nanonets’ automated data parser can help completely automate Excel data transformation workflows.
The Nanonets email parser can be used to extract info from all kinds of emails — e.g. exporting Outlook emails to Excel or extracting data from email attachments.
This will allow employees to focus on higher value tasks.

If you work with imported or foreign data in Microsoft Excel, chances are you have to clean the data a bit before you can use it. You might have to remove spaces at the beginning or end of values or reformat a column of values from text to numbers or vice versa. It’s also common to parse values when a column stores more than one value.
A good example of this is names. You’ll often find the entire name in a single column and that makes those values difficult to work with. In this tutorial, I’ll show you two quick ways to parse data using Excel’s Flash Fill and Power Query features.
I’m using Microsoft 365 on a Windows 10 64-bit system. You can use string functions in older versions including the .xls menu format. Flash Fill is available in Excel 2013 and later, and Power Query is available in Excel 2010 and later. In addition, Excel for the web supports Flash Fill. You can also open existing Power Query queries in Excel for the web, but you can’t create them in the browser edition. Download the demo files.
SEE: Windows, Linux, and Mac commands everyone needs to know (free PDF) (TechRepublic)
How to parse using Microsoft Excel string functions
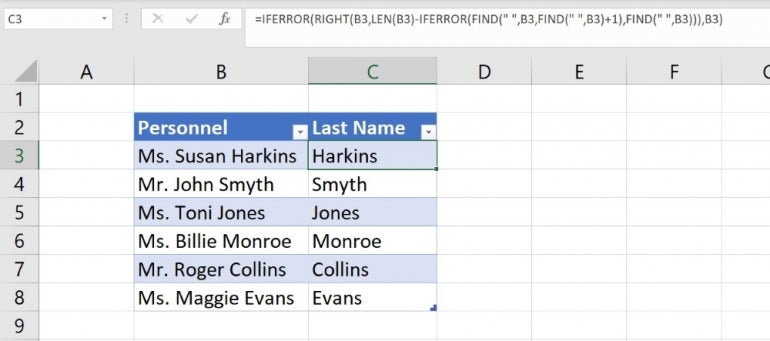
Before Flash Fill, most parsing required combining string functions such as RIGHT(), LEFT(), MID(), FIND() and LEN(). For example, the expression in column D of Figure A.
=IFERROR(RIGHT(B3,LEN(B3)-IFERROR(FIND(” “,B3,FIND(” “,B3)+1),FIND(” “,B3))),B3)
The above expression returns the last name from the values in column B. IFERROR() handles the error when there’s no second space. Fortunately, our name values are consistent in format, but that won’t always be the case. Even if IFERROR() is removed, it’s still a complex and tedious expression to work through.
Flash Fill can complete many parsing tasks in more recent versions of Microsoft Excel.
How to use Flash Fill to parse data in Microsoft Excel
Excel’s Flash Fill feature has been around since Excel 2013, so you may be familiar with it. When using it to parse, enter the first value in the target column, so Excel can evaluate the pattern. Sometimes, Flash Fill requires only one value. Because our data is consistent, this parsing task will be easy.
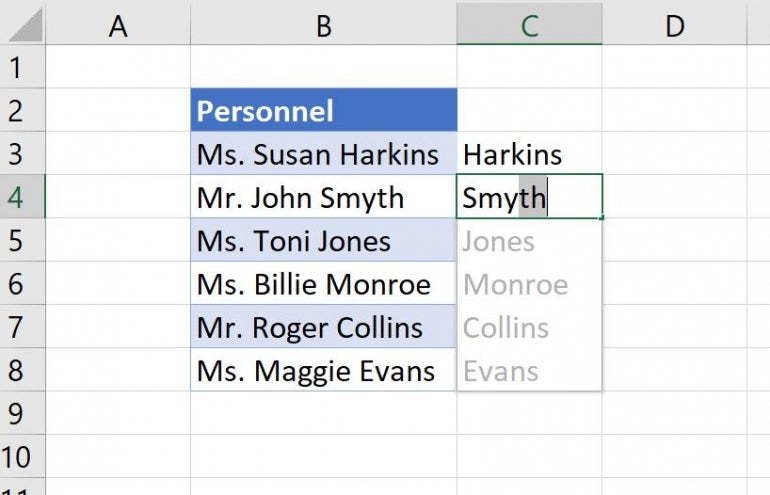
Let’s use Flash Fill to parse the last names from the name values in column B.
First, enter Harkins in C3 and press Ctrl + Enter. Most likely, Flash Fill won’t fill the column.
Then, enter the first few characters in Smyth, as shown in Figure B. As you can see, Flash Fill now has the pattern and offers to fill the entire column.
Press Enter to fill the remaining cells, as shown in Figure C.
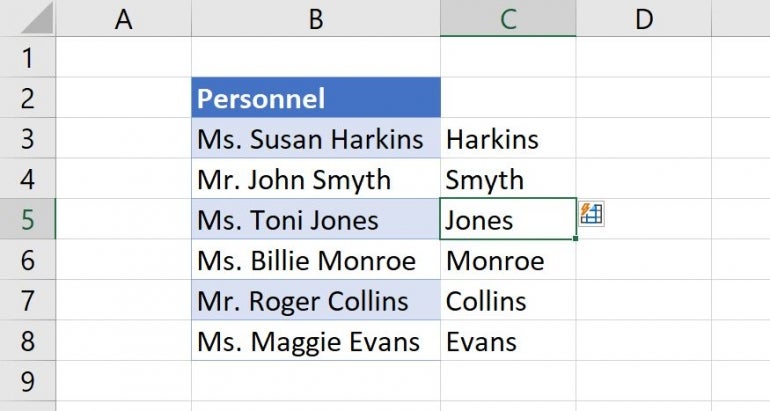
Excel’s Flash Fill is a lot faster and easier than combining string functions. Even when the data isn’t consistent, this feature does a good job of finding the pattern.
Excel for the web supports Flash Fill. Look for it on the Data tab. Instead of pressing Ctrl + Enter, click Flash Fill in the Data Tools group.
SEE: 6 ways to save time using Flash Fill in Microsoft Excel (TechRepublic)
How to use Power Query to parse data in Microsoft Excel
Power Query is available to Microsoft Excel 2010 users and later. Its purpose is to retrieve and clean data, but it’s full of features that can do much more. Using Power Query, we’ll add a column and parse the last names into that column.
First, we need to load the data into Power Query as follows:
- Click anywhere inside the table that you want to load into Power Query.
- Click the Data tab.
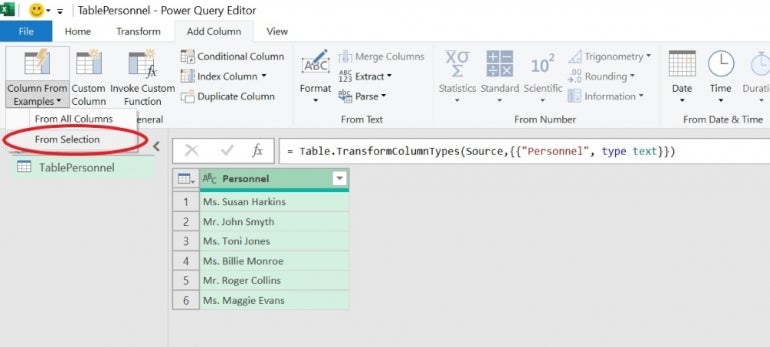
- In the Get & Transform Data group, click From Table/Range.
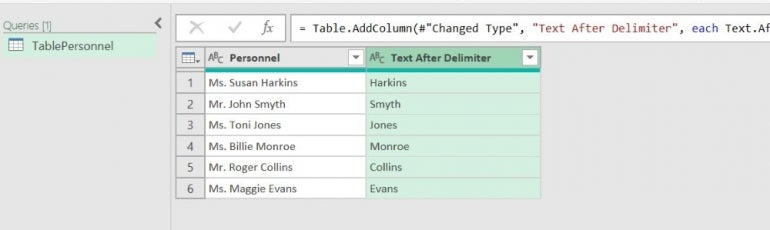
- If you haven’t formatted the data as a Table, Power Query will prompt you to do so. The demonstration Table is TablePersonnel. You don’t need to name the Table, but a named Table is a bit easier to work with.
Figure D shows TablePersonnel in Power Query.

Once the data is in Power Query, add a column based on the Personnel column.
First, click the Personnel header to select the column, and click the Add Column tab.
In the General Group, choose From Selection from the Column From Examples dropdown (Figure E). Power Query adds a new blank column. To enter the new last name values for this column, we’ll use Power Query’s own version of Flash Fill.
Into the first cell of the new column, Column 1, enter Harkins (Figure F). Power Query responds by offering a set of last name values for the entire column. Look them over a bit. If they’re not correct, enter another last name. However, Power Query returns the correct list with just one name to set the pattern for our data.

Click OK to create and populate the new column with last names, as shown in Figure G.
All that’s left to do is to save the modified data to Microsoft Excel, as follows:
- Click the Home tab.
- In the Close group, click Close and Load from the Close & Load dropdown.
Figure H shows the parsed last names in an Excel sheet. Power Query uses the name TablePersonnel to name the new sheet. At this point, you can rename the new column. You can also do so in Power Query before saving the data.

Flash Fill was definitely quicker but knowing the Power Query method will help when you’re already working with data in Power Query.
Click the “Data” tab in the ribbon, then look in the “Data Tools” group and click “Text to Columns.” The “Convert Text to Columns Wizard” will appear. In step 1 of the wizard, choose “Delimited” > Click [Next]. A delimiter is the symbol or space which separates the data you wish to split.
Contents
- 1 How do I parse text in Excel?
- 2 How do I separate data in a cell in Excel?
- 3 How do you import and parse data?
- 4 How do I extract data from an Excel table based on criteria?
- 5 How do I use concatenate in Excel?
- 6 Is there a parse function in Excel?
- 7 What is parsing in VBA?
- 8 How do I split a string in Excel?
- 9 What is a text qualifier in Excel?
- 10 How do you concatenate 3 columns in Excel?
- 11 How do you combine cells in Excel without losing data?
- 12 How do you parse Data in sheets?
- 13 What is TRIM function in Excel?
- 14 How do I convert a string to an integer in VBA?
- 15 How do I find the length of an array in VBA?
- 16 How do you separate words separately in Excel?
- 17 How do I separate text rows in Excel?
How do I parse text in Excel?
Steps to convert content from a TXT or CSV file into Excel
- Open the Excel spreadsheet where you want to save the data and click the Data tab.
- In the Get External Data group, click From Text.
- Select the TXT or CSV file you want to convert and click Import.
- Select “Delimited”.
- Click Next.
How do I separate data in a cell in Excel?
Split the content from one cell into two or more cells
- Select the cell or cells whose contents you want to split.
- On the Data tab, in the Data Tools group, click Text to Columns.
- Choose Delimited if it is not already selected, and then click Next.
How do you import and parse data?
Import data
Note that parsing the data used in the reference article was a breeze because each field contained similar records. 2. For our example, we’ll just enter a dozen records, which you could edit manually in a few minutes. But the technique I’ll show you will work for editing thousands of records.
Filter Unique Records
- Select a cell in the database.
- On the Excel Ribbon’s Data tab, click Advanced.
- In the Advanced Filter dialog box, choose ‘Copy to another location’.
- For the List range, select the column(s) from which you want to extract the unique values.
- Leave the Criteria Range blank.
How do I use concatenate in Excel?
Here are the detailed steps:
- Select a cell where you want to enter the formula.
- Type =CONCATENATE( in that cell or in the formula bar.
- Press and hold Ctrl and click on each cell you want to concatenate.
- Release the Ctrl button, type the closing parenthesis in the formula bar and press Enter.
Is there a parse function in Excel?
In Excel (2016, 2013, 2010) it’s possible to parse data from one column into two or more columns.A delimiter is the symbol or space which separates the data you wish to split. For example, if your column reads “Smith, John” you would select “Comma” as your delimiter. Select the delimiter within your data.
What is parsing in VBA?
Your task is to break the names into first name, last name — a process known as parsing.You can try using a formula and/or function to help, or you can use Visual Basic for Applications (VBA) code. A common approach is to find the space between the first name and last name, and voila!
How do I split a string in Excel?
Try it!
- Select the cell or column that contains the text you want to split.
- Select Data > Text to Columns.
- In the Convert Text to Columns Wizard, select Delimited > Next.
- Select the Delimiters for your data.
- Select Next.
- Select the Destination in your worksheet which is where you want the split data to appear.
What is a text qualifier in Excel?
A text qualifier is a symbol that let’s Excel know where text begins and ends. It is used specifically when importing data. Say you need to import a text file that is comma delimited (commas separate the different fields that will be placed in adjacent cells).
How do you concatenate 3 columns in Excel?
Use the CONCATENATE function:
- Use the CONCATENATE function in column D: =CONCATENATE(A1,B1,C1).
- In the menu bar, select Insert, Function. Click Text functions and select CONCATENATE.
- Enter A1 in the text1 field, B1 in the text2 field, and C1 in the text3 field.
- Click OK.
- Copy and paste for as many records as needed.
How do you combine cells in Excel without losing data?
How to merge cells in Excel without losing data
- Select all the cells you want to combine.
- Make the column wide enough to fit the contents of all cells.
- On the Home tab, in the Editing group, click Fill > Justify.
- Click Merge and Center or Merge Cells, depending on whether you want the merged text to be centered or not.
How do you parse Data in sheets?
Select the text or column, then click the Data menu and select Split text to columns…. Google Sheets will open a small menu beside your text where you can select to split by comma, space, semicolon, period, or custom character. Select the delimiter your text uses, and Google Sheets will automatically split your text.
What is TRIM function in Excel?
TRIM will remove extra spaces from text. Thus, it will leave only single spaces between words and no space characters at the start or end of the text. It is very useful when cleaning up text from other applications or environments. TRIM only removes the ASCII space character (32) from the text.
How do I convert a string to an integer in VBA?
In order to convert a string to integer in VBA, first, we need to check whether the string can be converted. If not it will return a different string. In order to check whether the string is a numerical value, we will use the ISNUMERIC Function. Then we will use Cint to convert the string to an integer.
How do I find the length of an array in VBA?
To get the size of an array in Excel VBA, you can use the UBound and LBound functions.
Size of an Array
- First, we need to declare the array.
- Next, we get the size of the array.
- We use a MsgBox to display the number of elements of the array.
How do you separate words separately in Excel?
- Place text you want to split in cell A1 (image)
- Then paste this function into any cell you want (image) =MID($A1;COLUMN(A1)-COLUMN($A1)+1;1)
- Move the mouse cursor over the little block in the lower right corner of the cell in which you pasted the above-mentioned function (image)
How do I separate text rows in Excel?
The easiest method is to follow these steps:
- Select one cell in your data and press Ctrl+T to convert the data to a table.
- In the Power Query tools, choose From Table.
- Select the column with your products.
- In the Split Column dialog, click on Advanced Options.
- In the Split Into section, choose Rows.
Содержание
- Parse and read a large spreadsheet document (Open XML SDK)
- Getting a SpreadsheetDocument Object
- Approaches to Parsing Open XML Files
- Sample Code
- Read Excel file using Javascript (XLSX or XLS)
- Read XLSX using Javascript
- Read XLS file using Javascript
- Convert Excel to JSON using Javascript
- Reading/parsing Excel (xls) files with Python [closed]
- 13 Answers 13
- UPDATE:
- How to Parse Data from Excel with Mailparser
- How to Parse Data from Excel
- Method 1: How to Parse Data from Excel Manually
- Method 2: How to Parse Data from Excel with Mailparser
- Step 1: Create a Mailparser account
- Step 2: Create an inbox
- Step 3: Send an Excel spreadsheet to your inbox
- Step 4: Add parsing rules
- Step 5: Send your parsed data to your application of choice
- A Few Companies that Rely On Mailparser
- What is email parsing?
- How do I use Mailparser?
- How do I save an email as a spreadsheet?
- How do I extract specific data from Excel?
Parse and read a large spreadsheet document (Open XML SDK)
This topic shows how to use the classes in the Open XML SDK 2.5 for Office to programmatically read a large Excel file. For more information about the basic structure of a SpreadsheetML document, see Structure of a SpreadsheetML document (Open XML SDK).
Interested in developing solutions that extend the Office experience across multiple platforms? Check out the new Office Add-ins model. Office Add-ins have a small footprint compared to VSTO Add-ins and solutions, and you can build them by using almost any web programming technology, such as HTML5, JavaScript, CSS3, and XML.
You must use the following using directives or Imports statements to compile the code in this topic.
Getting a SpreadsheetDocument Object
In the Open XML SDK, the SpreadsheetDocument class represents an Excel document package. To open and work with an Excel document, you create an instance of the SpreadsheetDocument class from the document. After you create this instance, you can use it to obtain access to the main workbook part that contains the worksheets. The content in the document is represented in the package as XML using SpreadsheetML markup.
To create the class instance, you call one of the overloads of the Open() method. The following code sample shows how to use the Open(String, Boolean) overload. The first parameter takes a string that represents the full path to the document to open. The second parameter takes a value of true or false and represents whether or not you want the file to be opened for editing. In this example, the parameter is false because the document is opened as read-only.
Approaches to Parsing Open XML Files
The Open XML SDK provides two approaches to parsing Open XML files. You can use the SDK Document Object Model (DOM), or the Simple API for XML (SAX) reading and writing features. The SDK DOM is designed to make it easy to query and parse Open XML files by using strongly-typed classes. However, the DOM approach requires loading entire Open XML parts into memory, which can cause an Out of Memory exception when you are working with really large files. Using the SAX approach, you can employ an OpenXMLReader to read the XML in the file one element at a time, without having to load the entire file into memory. Consider using SAX when you need to handle very large files.
The following code segment is used to read a very large Excel file using the DOM approach.
The following code segment performs an identical task to the preceding sample (reading a very large Excel file), but uses the SAX approach. This is the recommended approach for reading very large files.
Sample Code
You can imagine a scenario where you work for a financial company that handles very large Excel spreadsheets. Those spreadsheets are updated daily by analysts and can easily grow to sizes exceeding hundreds of megabytes. You need a solution to read and extract relevant data from every spreadsheet. The following code example contains two methods that correspond to the two approaches, DOM and SAX. The latter technique will avoid memory exceptions when using very large files. To try them, you can call them in your code one after the other or you can call each method separately by commenting the call to the one you would like to exclude.
The following is the complete code sample in both C# and Visual Basic.
Источник
Read Excel file using Javascript (XLSX or XLS)
In the previous post, I have explained how we can read csv file using javascript and HTML 5 filereader, now in this post, I have explained how we can use external library like xlsx to parse or read excel file using javascript and show it’s contents in HTML table. When file is uploaded using Javascript, it is read as Binary string initially, and then binary data is read using xlsx plugin.
Read XLSX using Javascript
Let’s beging by adding simple HTML file input and button to upload file
I have also included empty HTML div to create table inside it from our Excel file.
Now, we will create the function to upload the file and process the Excel file to get data from it and convert it into HTML table.
In the above Javascript code, we are first adding references of XLSX plugin files and then adding two functions
- UploadProcess: Uploads the file on button click and convert it into Binary data, it also check if Browser is IE then process accordingly to convert file into binary.
- ProcessExcel: this function takes the binary data, reads the Sheet name, create Table element and append each row in it.
I have explained lines of code using Comment.
Suppose our sample Excel file looks like this
So, if use the above code in HTML/Javascript, output will be as below

Read XLS file using Javascript
In a Similar way, we can read .xls (excel) file also and show it in HTML table, I will repeat the same code, just few lines of code is different, also we will be using different plugin in it which is for .xls
The XLS file upload code is the same as .XLSX one was, here are the changes
- We included difference JS plugin file :
- Changed a few lines of code for the function «GetTableFromExcel»
The rest of the code remains the same.
Note: You need to pass .xls file in this code to make it work.
Convert Excel to JSON using Javascript
You can also upload excel and then convert it to JSON data and proceed with it further.
Here is the fiddle: https://jsfiddle.net/aszchkr0/ using which you can test the above code, just to search excel file and once value is changed you will find JSON result in textarea.
In the above code, we are reading excel using XLSX plugin, then we loop through each sheet and get XL row object and further convert it to JSON.
Источник
Reading/parsing Excel (xls) files with Python [closed]
Want to improve this question? Update the question so it can be answered with facts and citations by editing this post.
Closed 1 year ago .
The community reviewed whether to reopen this question 1 year ago and left it closed:
Original close reason(s) were not resolved
What is the best way to read Excel (XLS) files with Python (not CSV files).
Is there a built-in package which is supported by default in Python to do this task?

13 Answers 13
I highly recommend xlrd for reading .xls files. But there are some limitations(refer to xlrd github page):
This library will no longer read anything other than .xls files. For alternatives that read newer file formats, please see http://www.python-excel.org/.
The following are also not supported but will safely and reliably be ignored:
Password-protected files are not supported and cannot be read by this library.
voyager mentioned the use of COM automation. Having done this myself a few years ago, be warned that doing this is a real PITA. The number of caveats is huge and the documentation is lacking and annoying. I ran into many weird bugs and gotchas, some of which took many hours to figure out.
UPDATE:
For newer .xlsx files, the recommended library for reading and writing appears to be openpyxl (thanks, Ikar Pohorský).
Источник
How to Parse Data from Excel with Mailparser
Excel is a wonderful tool, but sometimes you need business data to be accessible in other applications like a CRM or Google Sheets.
When a large amount of data is trapped in Excel documents, parsing it manually becomes a serious challenge. It’s a time-consuming task that can cost you opportunities, and its repetitive nature can lead to mistakes.
Luckily, it is possible to automate this process to save a massive amount of time and money. This article will teach you how to parse data from Excel using Mailparser and send it to any application you want. Let’s get started.
Try it free. No credit card required.
How to Parse Data from Excel
Parsing data means you break it down into separate components. For example, you split a column of full names into one column for first names and one for surnames.
There is more than one way to extract data from Excel and send it elsewhere. Let’s take a look at two different methods.
Method 1: How to Parse Data from Excel Manually
First, open your Excel spreadsheet and highlight the column that has the combined data you want to parse.
Next, go to the ‘Data’ tab and click on the ‘Text to Columns’ icon. A pop-up window titled ‘Convert Text to Columns Wizard’ will appear. You have now three quick steps to follow to parse data in Excel:
Step 1: Select ‘Delimited’ and click on ‘Next’.
Step 2: Select the delimiter that separates the data you want to parse. This can be a comma, a semicolon, a blank space, a tab, or some other character which you can type in the field next to ‘Other’. Once you have selected the delimiter, click on ‘Next’.
Step 3: Select ‘General’ under ‘Column data format’ and click on ‘Finish’.
The parsed data will now appear in several columns.
You can now copy and paste the columns containing the parsed data into the application that you use (Google Sheets, Salesforce, etc.).
However, this method is only viable if you have a single document to parse. If your team receives tens or even hundreds of spreadsheets regularly, parsing data manually is going to be too time-consuming to be worthwhile. In this case, you need a tool that automates the data entry process.
Method 2: How to Parse Data from Excel with Mailparser
If your business has large volumes of data trapped in Excel and you want to automate the data entry workflow, then Mailparser is a much more effective alternative. Here’s a high-level overview of how it works.
- Step 1:Create a Mailparser account (free for 30 days)
- Step 2: Create an inbox
- Step 3: Send an Excel spreadsheet to your inbox
- Step 4: Add parsing rules
- Step 5: Send your parsed data to your application of choice
Now, let’s take a deeper look at each step.
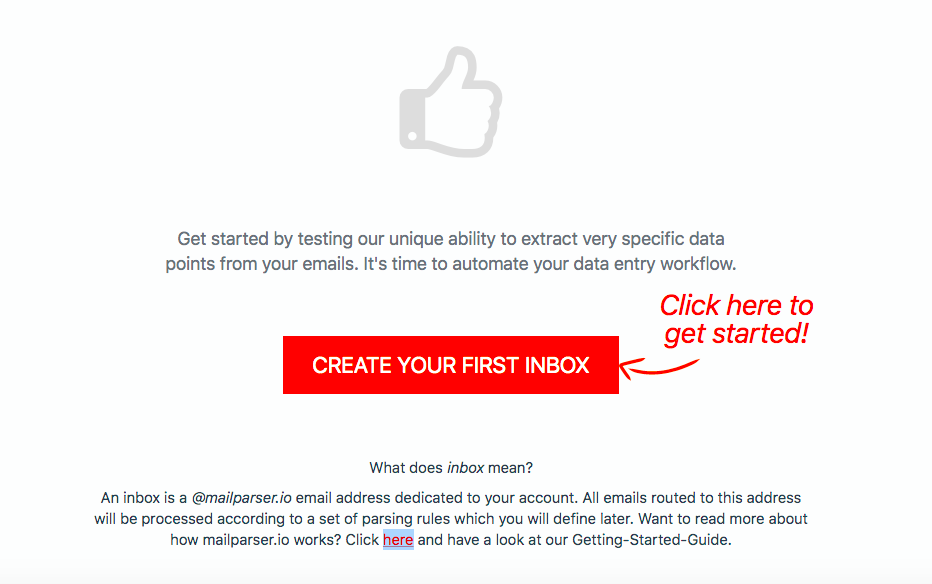
Step 1: Create a Mailparser account
The first thing you need to do is to sign up for a Mailparser account. It’s free and you don’t have to enter credit card information.
30 Day Trial. No credit card required.
Step 2: Create an inbox
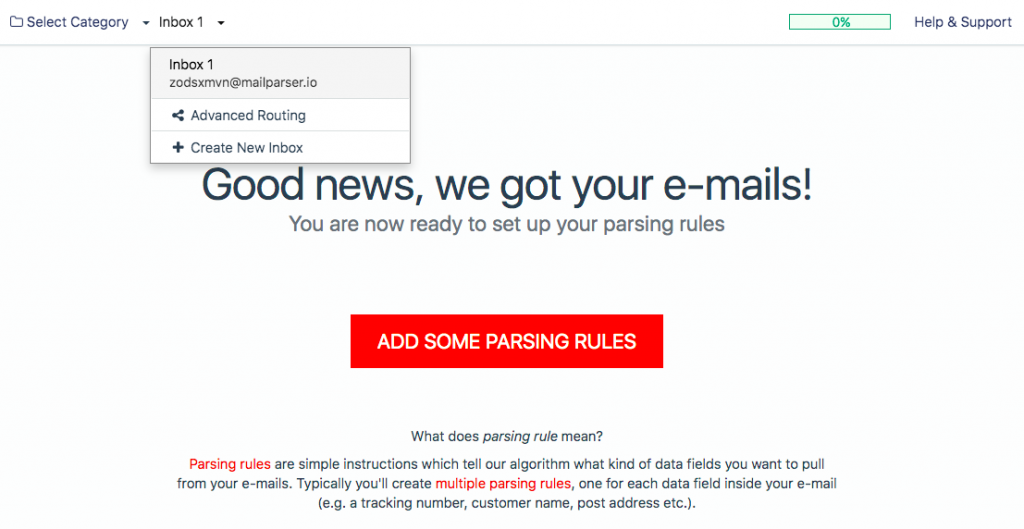
Once your account is created, you have to create an inbox where your Excel documents will go. Click on ‘Create Your First Inbox’.
A pop-up window will then appear. Type a name for your inbox in, add notes if you want, and click on ‘Save’. For this example, I simply named my inbox “Inbox 1”.
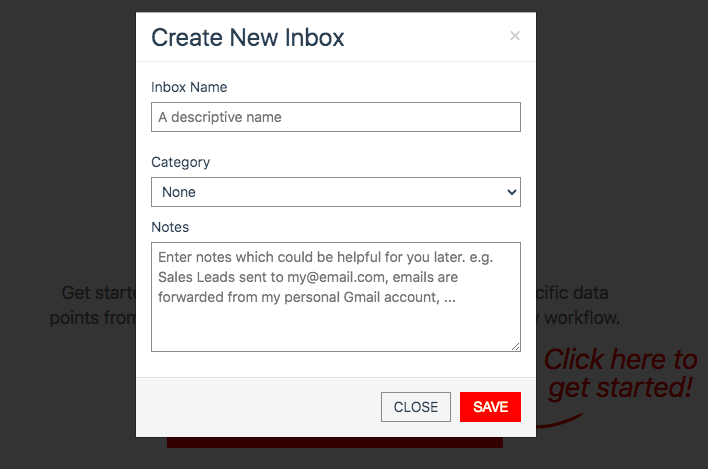
Mailparser will instantly generate a unique email address for your new inbox. This is because Mailparser uses emails as its data source. It can extract data from emails as well as the documents attached to them, such as PDF, Word, or – in our case – Excel.
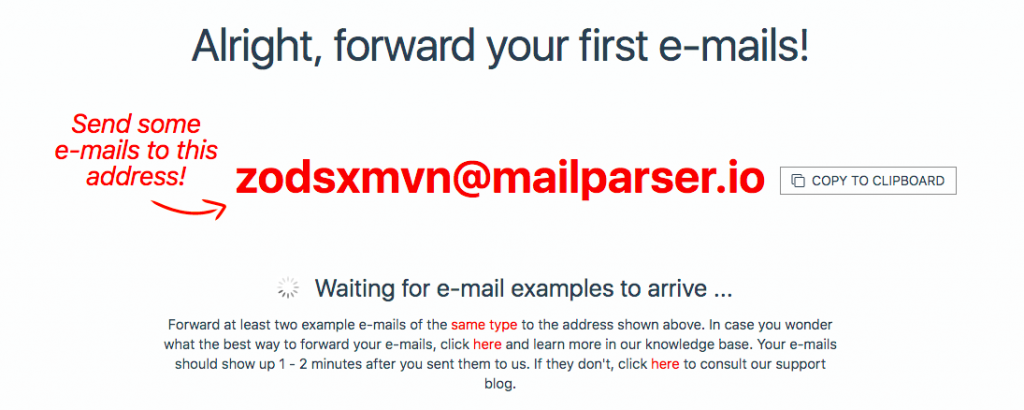
Step 3: Send an Excel spreadsheet to your inbox
Send an email with your Excel spreadsheet attached – whether in XLS, XLSX, or CSV format – to your Mailparser email address.
Note: you can set up emails with Excel attachments to be automatically forwarded to your Mailparser inbox. That way, you won’t have to manually send them to Mailparser every time you receive them.
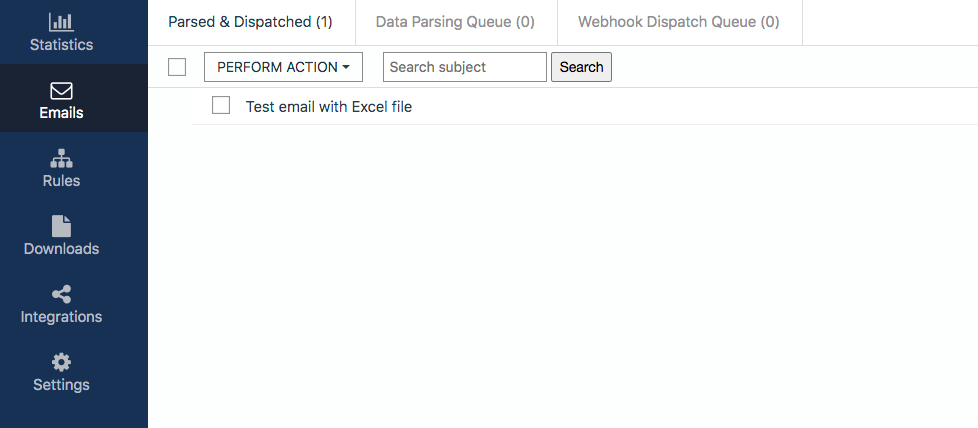
Go to your Mailparser account, click on ‘Inbox 1’ at the top left of your screen and select your inbox.
You will find your email with the Excel file attached to it; click on it. Time to parse the data!
Step 4: Add parsing rules
A parsing rule is a set of instructions you give to the Mailparser algorithm so that it can recognize, reorganize, and extract the data you want.
Each inbox has a specific set of parsing rules that tell Mailparser how to parse data from Excel. So when you want to parse data from documents that are used for different purposes, or documents in other formats like Word, create new inboxes with different parsing rules. Note that you can create up to 10 inboxes with your free plan.
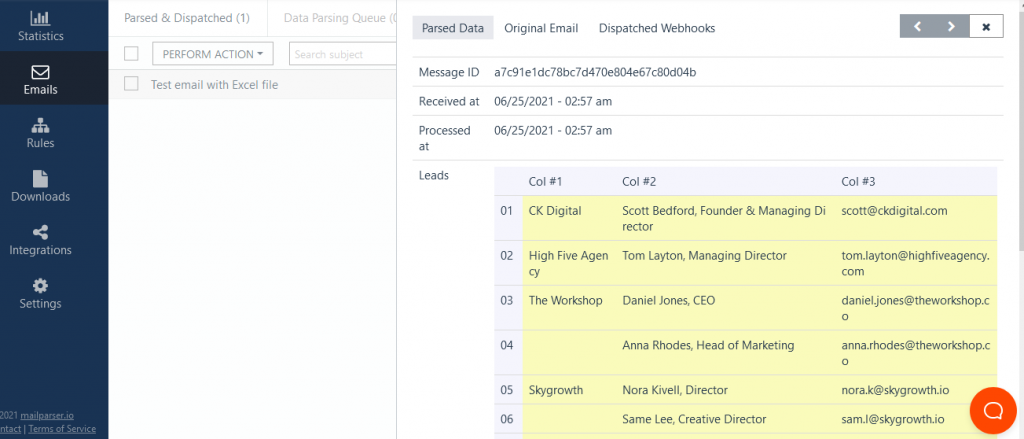
Now, click on the email you received and you will notice that Mailparser has already parsed the data since the layout of the Excel file I used is quite simple. At this point, you can already send the data to a third-party application. But before that, we want to go a step further – let’s add a few parsing rules.
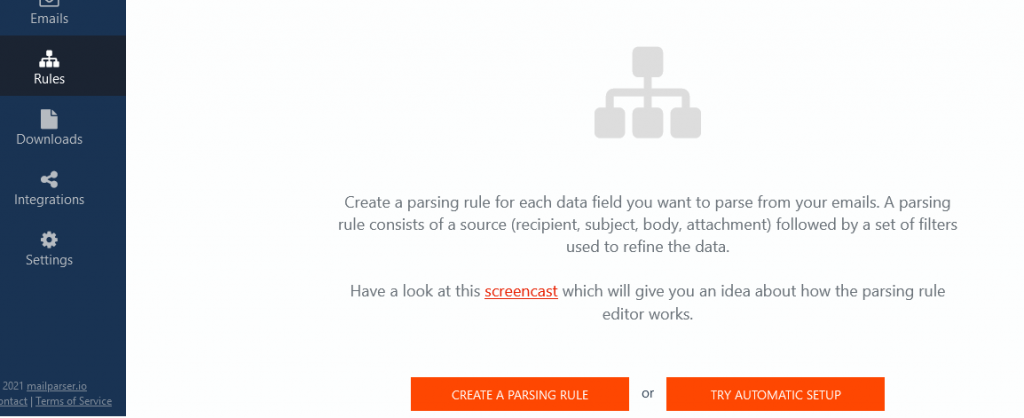
Click on ‘Rules’ on the left-hand side panel then click on the ‘Create a Parsing Rule’ orange button.
Click on ‘Attachment’ to set your Excel file as the data source to parse from.

Scroll down and choose ‘File content (Table Cells)’ from the drop-down menu next to ‘Parse attachments’. The rule editor will now display the columns and rows from your Excel spreadsheet.
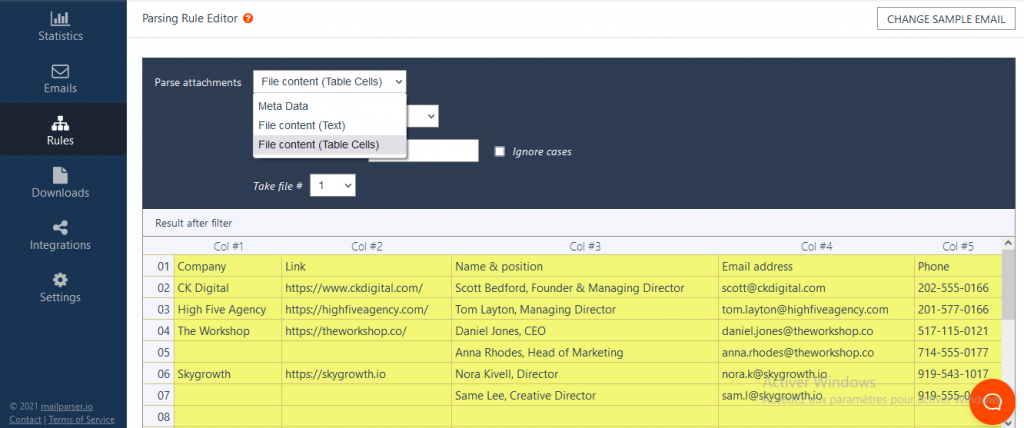
Now, here’s what I want to do with my data:
- Remove the first row, since the spreadsheet where I will send the data will already have a header row with the same information.
- Remove Column #2
- Split Column #3 into two columns, one for the person’s name and one for their position.
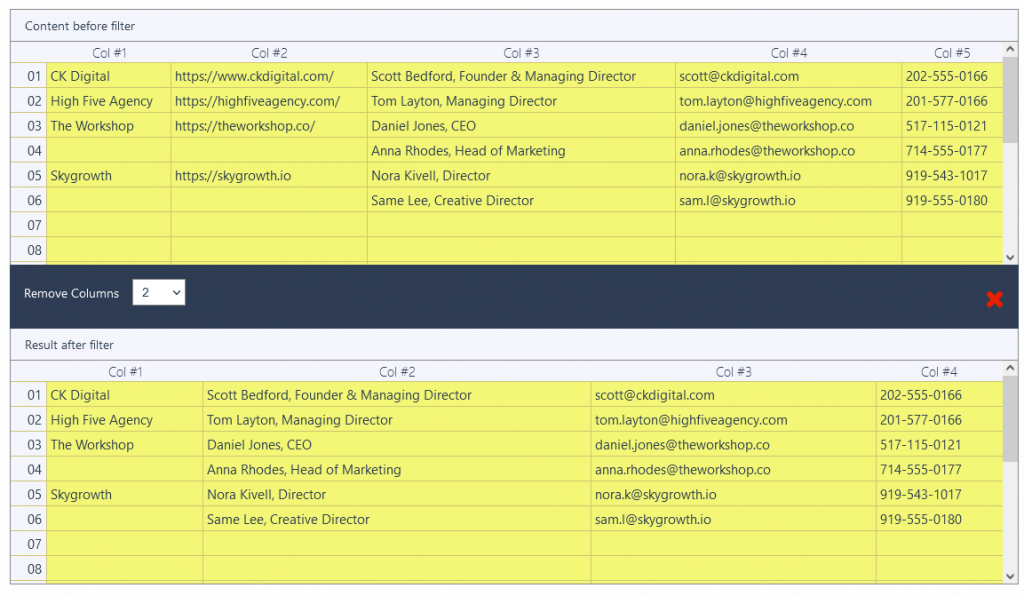
To do that, scroll down further and click on the button that says ‘Add Cell Filter’ on the right. A drop-down list will appear. Move the cursor to ‘Remove & Select’ and click on ‘Remove Rows’.
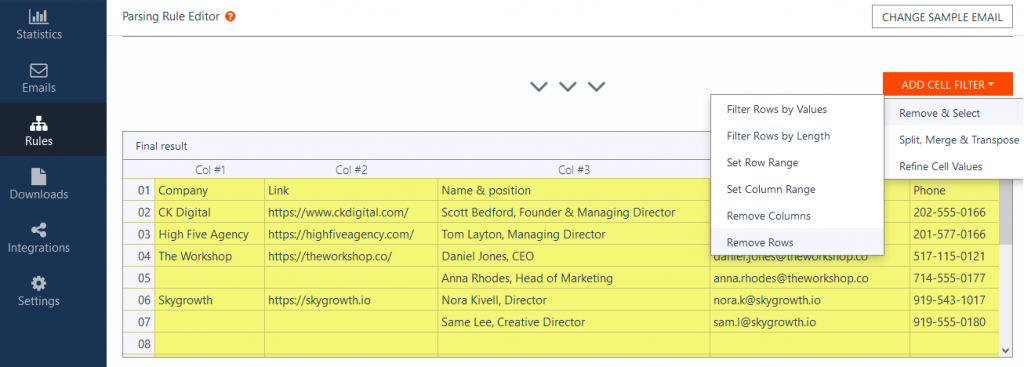
Mailparser selects the first row by default, but you can remove any row you want just by selecting its number. You can also remove several rows at the same time if you want.
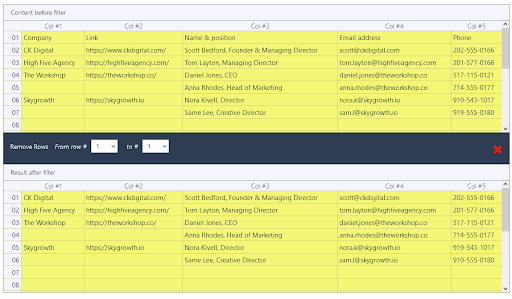
See how Mailparser shows you what your spreadsheet looks like both before and after adding the filter. The first parsing rule is now set, so let’s move to the next.
For every additional parsing rule you want to add, just scroll down below the last one and you will find a new ‘Add Cell Filter’ button. Go to ‘Remove & Select’ and click on ‘Remove Columns’.
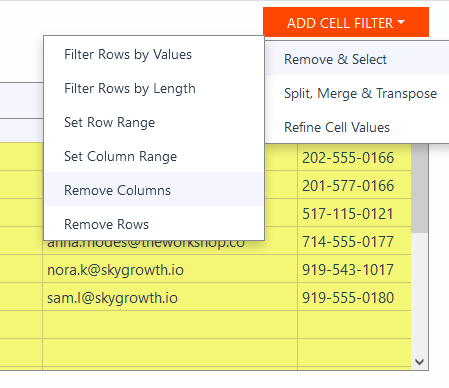
Choose ‘2’ in the drop-down list next to ‘Remove Columns’ and the second column will be gone.
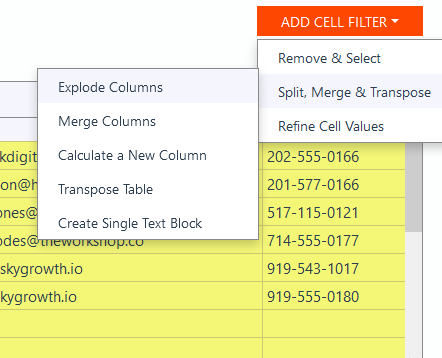
Moving on to step 3, we want to display the names and positions on separate columns. To do that, scroll down and click on the ‘Add Cell Filter’ button. Move your cursor to ‘Split, Merge & Transpose’ and click on ‘Explode Columns’.
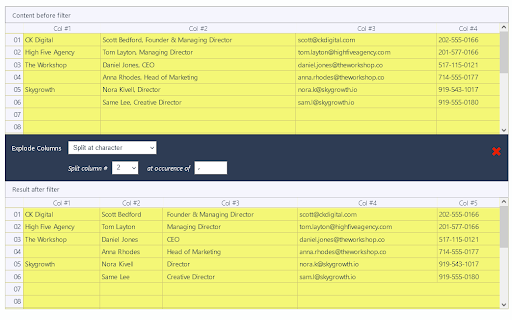
Go to the drop-down menu on the right, next to ‘Explode Columns’, and select ‘Split at a character’.
We are going to set a specific character to determine where to split the data within the column (like in method 1). This character is the comma which you can see written after the names on Column #2.
So choose ‘2’ from the drop-down list next to ‘Split column’ and type a comma in the field next to ‘at occurrence of’. The Rule Editor will apply this new filter and show you the result below. Now the names are in Column #2 and the positions in Column #3.
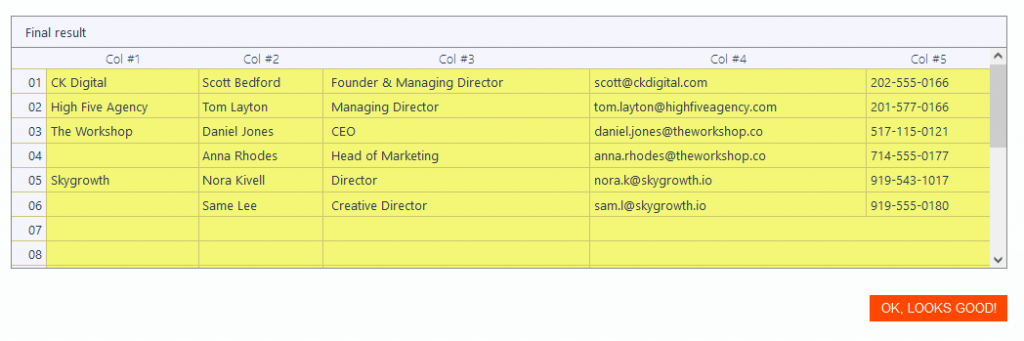
That’s it! The data is now parsed as intended. Don’t forget to scroll to the bottom of the page and click on ‘OK, Looks Good!’ on the right.
Type name for your parsing rules and click on ‘Validate & Save’ to save it.
Now, every time an email with an Excel spreadsheet is sent to Inbox 1, Mailparser will apply the parsing rules to rearrange and extract the data just like in this example.
Step 5: Send your parsed data to your application of choice
Your data is ready to be sent where it needs to go – you’re almost done!
Mailparser uses webhooks, an automatic method of transferring data from one location to another, to send the data parsed from Excel to the third-party APIs or web applications that you already use. For this example, we want to send the data to Google Sheets.
But first, be sure to have a spreadsheet in your Google Drive that will serve as the destination for the data. The header row should correspond to the parsed data:
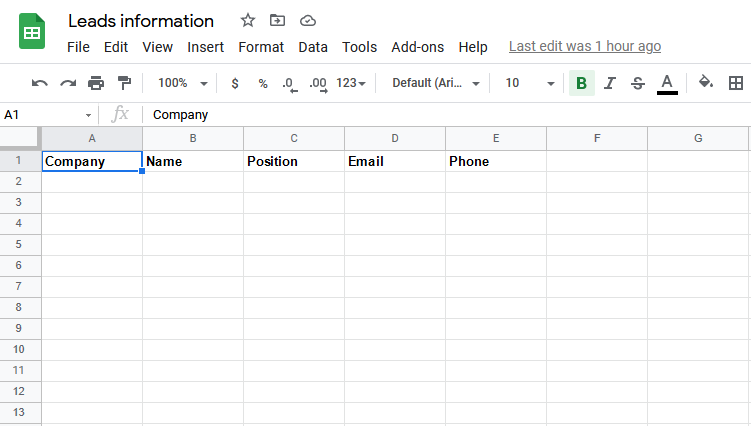
Make sure that the cells in the header row don’t have special characters; otherwise the corresponding column won’t be able to populate.
In Mailparser, go to ‘Integrations’ and click on the button ‘Add New Integration’ on the right.
Select the integration you want to send the data to, which in this case is Google Sheets.
Next, what you need to do in this screen is to add your Google account, the spreadsheet where you want the data to be sent, and the worksheet where you want the data to show up.
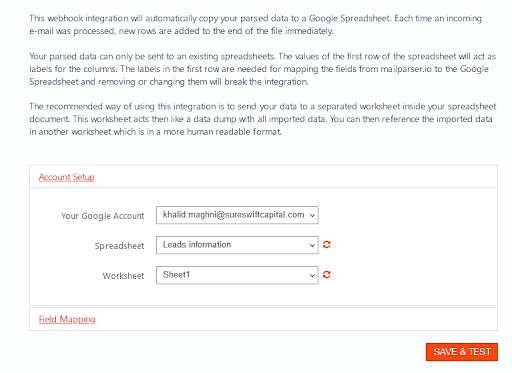
But don’t click on the orange button yet. Instead, click on ‘Field Mapping’.
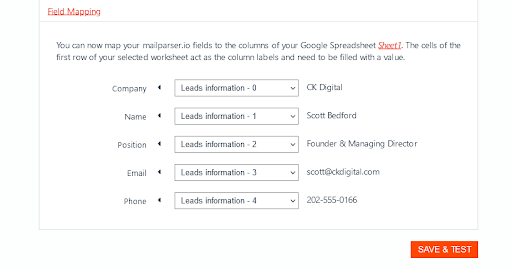
You can see the contents of the header row listed on the left. All you have to do is to set each column of the parsed spreadsheet to the one that fits it in the Google spreadsheet. Pick a column from each drop-down list and you will see a preview of the corresponding data on the right. Once you make sure everything is in order, click on ‘Save & Test’.
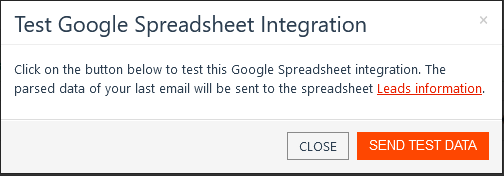
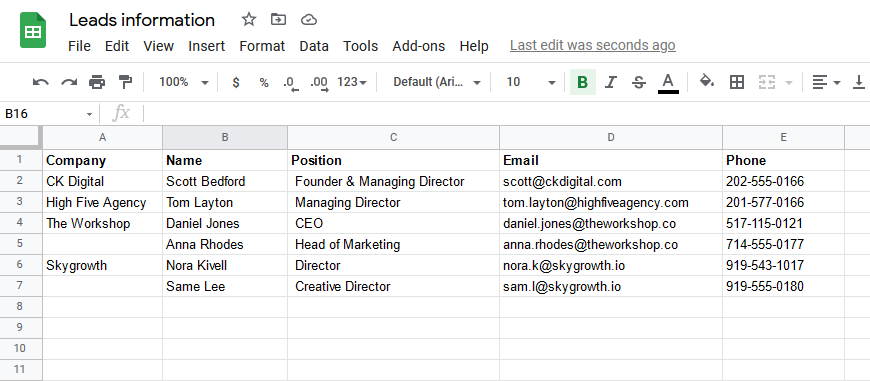
A pop-up window will ask for confirmation. Click on ‘Send Test Data’ and go to your Google spreadsheet to see the result:
And that’s it! Your data is now parsed and displayed exactly how you want it.
As you can see, parsing data from Excel using Mailparser is simple and requires no technical skills. It’s simple a matter of knowing where to click, which this guide has just walked you through step by step.
Remember that you can set up your inbox to automatically process all incoming emails by following the parsing rules you set. So what would take hours upon hours to do manually can now be achieved in minutes!
Imagine how many man-hours and money your business can save by automating this data entry workflow. Parsing data from Excel with Mailparser makes the process seamless and accurate – once your parsing rules are set and tested, you won’t have to worry about human errors that cause delays and cost money.
Try it free. No credit card required.
You can export your parsed data to any API or web-based application that you already use. This could be:
You can see the full list of integrations here.
A Few Companies that Rely On Mailparser
Many companies are relying on Mailparser to quickly and accurately parse data not only from Excel, but other sources as well. Let’s take a look a few of them:
- Atlanta Green Maids struggled for years with manual data entry, losing countless hours to feed customers orders to their CRM software. After discovering Mailparser, the company became able to effectively automate the process. Now, orders placed on their website are sent to an inbox where Mailparser processes the data and sends it to the CRM software via Zapier.
- Movinga, a startup operating in the moving industry in Europe, receives large amounts of leads regularly. Using Mailparser has allowed Movinga to quickly extract lead information from emails and use it to convert leads faster than the competition.
- United Worx is a web development company that relies on Mailparser to grab emails, clean the html, extract lead information, and send it to a CRM solution used by their clients. Being able to send hundreds of leads per month to clients has become a key selling point for United Worx.
What is email parsing?
Email parsing is an automated process that extracts data from an email’s body and/or attachments. You can structure data however you want and then send it to any application you use. Email parsing saves your business a lot of time and money, and allows your team to focus on higher-value tasks.
How do I use Mailparser?
Simply put, you create an inbox where you will send your emails. You then create parsing rules to structure the data as needed. Lastly, you set up your business email to forward emails and attachments to Mailparser.
Using Mailparser is quite simple and requires no technical skills. The UI is user-friendly and instructions are provided along the way.
How do I save an email as a spreadsheet?
Follow the instructions provided in this article to convert your email to a spreadsheet.
Send your Excel spreadsheet to your Mailparser inbox and set parsing rules that isolate the data you want. Visit our support center for more details on how to use Mailparser. If you need help, contact our support team and they will be in touch shortly.
Источник