
Word for Microsoft 365 Word 2021 Word 2019 Word 2016 Word 2013 More…Less
To put a blank page into your Word document, place the cursor where you want the new page to begin and then click Insert > Blank Page. The blank page opens, ready for whatever you want to add.
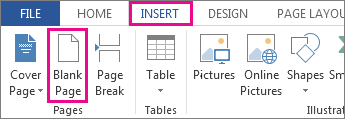
Another option when you need a little space is to insert a page break. The difference is that Insert > Blank Page puts an entire blank page into your document, and Insert > Page Break doesn’t. Instead, it pushes whatever comes after the break to the top of the next page. See Add a page break for more about page breaks.
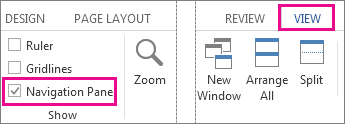
Tip: If you’re formatting a complex document and you quickly want to add or look for blank pages, page breaks, or other elements, click View > Navigation Pane > Pages to see what’s where.
To remove a blank page from your document, see Delete a blank page.
Need more help?
Содержание
- Вставка страницы в Ворде
- Вариант 1: Пустая страница
- Вариант 2: Разрыв страницы
- Заключение
- Вопросы и ответы
Необходимость добавить новую страницу в текстовом документе Microsoft Word возникает не так уж часто, так как по мере набора текста или вставки элементов они появляются автоматически. При этом столкнувшись с задачей непосредственной вставки «чистого листа», не все знают, как это сделать. Сегодня мы расскажем о ее решении.
Вставка страницы в Ворде
Наиболее очевидный и, казалось бы, простой способ добавления новой страницы в текстовый документ Word заключается в установке курсора в начале или конце текста, в зависимости от того, с какой стороны нужно добавить «чистый холст», и последующем нажатии клавиши «Enter» вплоть до того момента, пока не будет получен желаемый результат. Решение элементарное, но точно не самое верное и удобное в своей реализации, особенно для тех случаев, когда требуется добавить хотя бы несколько пустых страниц. Читайте далее, чтобы узнать, как это сделать правильно.
Вариант 1: Пустая страница
Добавить пустую страницу в Ворде можно с помощью средств вставки, а благодаря недвусмысленному названию необходимого инструмента вы точно не упустите его из виду.
- Кликните левой кнопкой мышки в начале или конце текста, в зависимости от того, где вам нужно добавить новую страницу — перед имеющимися записями или после них.
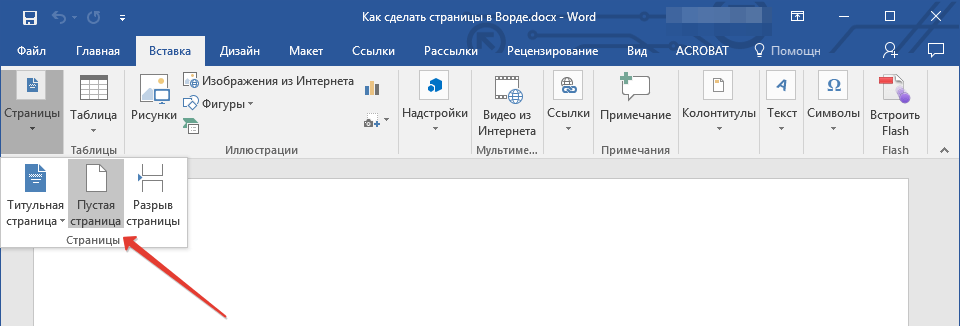
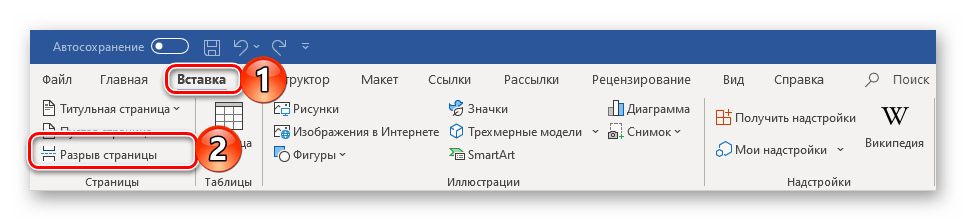
- Перейдите во вкладку «Вставка» и в группе инструментов «Страницы» найдите и нажмите кнопку «Пустая страница».
- Новая страница будет добавлена в начале или конце документа, в зависимости от того, в каком месте вы изначально помещали курсор.
Вот так просто можно решить задачу, озвученную в заголовке данной статьи. Если же вы установите курсор в произвольном месте текста, пустая страница будет добавлена прямо между теми символами, которые будут находиться слева и справа от каретки.
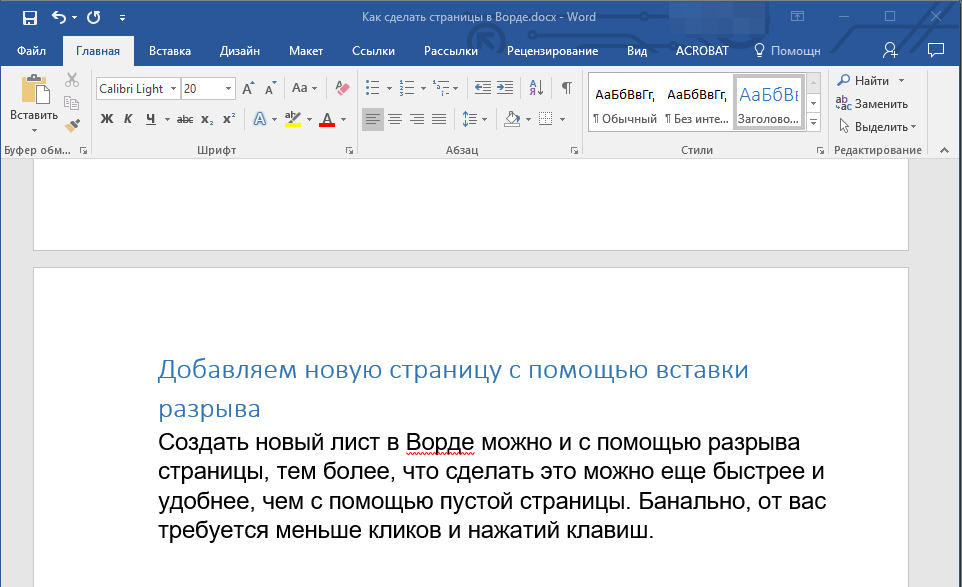
Вариант 2: Разрыв страницы
Добавить новый лист в Word можно и с помощью разрыва страницы. Делается это еще быстрее и удобнее, чем с помощью элемента «Пустая страница», но не без оговорок (о них в конце). Аналогичное рассмотренному выше решение тоже имеется.
- Установите курсор мышки в начале или конце текста, до или после которого требуется добавить новую страницу и нажмите «Ctrl+Enter» на клавиатуре.

Читайте также: Горячие клавиши в Ворде
- До или после текста будет добавлен разрыв, а значит, будет вставлена новая, пустая страница.

Узнать более детально о том, что представляют собой разрывы страниц, когда и зачем они применяются, а также о том, как в случае необходимости от них избавиться, помогут представленные по ссылкам ниже статьи.
Подробнее: Как вставить / убрать разрыв страницы в Word
Как мы уже обозначили выше, добавить разрыв можно и ровно таким же образом, как пустую страницу — просто перейдите во вкладку «Вставка» и нажмите по соответствующий кнопке на панели инструментов.
Особенно актуально применение разрывов документах с так называемым сложным форматированием, подразумевающим наличие титульных листов, нумерации и разделов (как всего вместе, так и любого из перечисленных элементов отдельно). Ранее обо всем этом мы тоже писали, а потому, если данная тема вас интересует, рекомендуем ознакомиться с представленными по ссылкам ниже статьями.
Читайте также:
Как в Ворде сделать титульный лист
Как пронумеровать страницы документа Microsoft Word
Как создать разделы в Ворде
Заключение
На этом закончим, ведь теперь вы знаете, как добавить новую страницу в Microsoft Word, а также о том, как в случае необходимости сделать разрыв страницы.

Еще статьи по данной теме:
Помогла ли Вам статья?
The word always lets you insert a new page as often as you want. You can create a section of content, add a new section to the document, or create a new page to continue writing on a different page.
To create a new page in Word, follow the 3 steps below:
Table of Contents
- 3 Methods: Keyboard Shortcut to Insert a New Page in Word:
- Method 1: to Insert a New Page:
- Method 2: to Create a New Blank Page:
- Method-3: to Add a New Page in Word:
- Conclusion:
3 Methods: Keyboard Shortcut to Insert a New Page in Word:
Method 1: to Insert a New Page:
Firstly, navigate to the page where you want to create a new page.
To do this, simply click the page you want to create the new page from.
Once you’ve arrived at the page, press Ctrl + Enter on your keyboard to insert the new page.
Method 2: to Create a New Blank Page:

To create a new page in another way, navigate to the page where you want to create a new page.
Then simply click the page you want to create the new page from.
Method-3: to Add a New Page in Word:
Adding a new page is different from creating a new document.

Click on the File menu in the Word toolbar to navigate to its options
Then click New in the File menu options
On the right side, click blank document under new to create a new document.
Conclusion:
Some users may think that the only reason to create a new page in Word is to create a new file. But that is not the only reason. You can create this for creating a table of contents, headers and footers, footnotes and end notes, new sections, table citations for the new page, etc.
What is the shortcut to adding another page in Word?
By pressing the Ctrl + Enter Key you a new page in Microsoft Word.
Things You Should Know
- To create a basic document, choose a template from the list provided or start with a blank document.
- Use the File tab to open, save, and start documents, and the Insert tab to add any images, symbols, or other media to your document.
- Highlight your text and play around with formatting options in the «Home» tab. You can change the font, italicize/bold/underline your words, and play around with font size.
-

1
Open the Microsoft Word application. Do this by double-clicking the Microsoft Word icon.
-
2
Review the available templates. On the right side of the screen, you’ll see several templates of interest:
- Blank document — A blank document with default formatting.
- Creative Resume/Cover Letter — A clean, pre-formatted resume (and accompanying cover letter) document.
- Student Report with Cover Photo — A document format geared toward an academic demographic.
- Fax Cover Sheet — A document to preface fax reports.
- You can also search for specific templates online from within Word by using the search bar at the top of this screen.
Advertisement
-
3
Choose a template. Doing so will open the template in Word with whatever pre-determined formatting applies to it. Now that your document is open, you’re ready to review your Toolbar options.
- When in doubt, open a blank document.


Advertisement
-
1
Click the File tab. It’s in the top left side of the screen (or in the menu bar for Mac users). From here, you have several useful options on the far left side of your screen:
- Info (PC only) — Click this to review the documents statistics, such as when it was last modified, as well as any potential issues with the document.
- New — Click this to bring up the «New Document» page that lists all of the pre-formatted templates. Opening a new document will prompt you to save your old one.
- Open — Click this to review a list of recently-opened documents. You can also select a directory (e.g., «This PC») in which to search.
- Save — Click this to save your document. If this is your first time saving this particular document, you’ll be prompted to enter a name, save location, and preferred file format as well.
- Save As — Click this to save your document «as» something (e.g., a different name or file format).
- Print — Click this to bring up your printer settings.
- Share — Click this to view sharing options for this document, including email and cloud options.
- Export — Click this to quickly create a PDF or change the file type.
-
2
Click ← in the top left corner of your screen. If you’re using a Mac, you won’t have this option—simply click your document to exit the «File» menu.
-
3
Review the Home tab to see your formatting options. At the top of your screen—from left to right—are five sub-sections of this tab:
- Clipboard — Whenever you copy text, it is saved on your clipboard. You can view copied text by clicking the Clipboard option here.
- Font — From this section, you can change your font style, size, color, formatting (e.g., bold or italic), and highlighting.
- Paragraph — You can change aspects of your paragraph formatting—such as line spacing, indentation, and bullet formatting—from this section.
- Styles — This section covers different types of text for various situations (e.g., headings, titles, and subtitles). You’ll also see the popular «No Spacing» option here, which removes excess spaces between lines of text.
- Editing — A couple of commonly-used tools—such as «Find and Replace», which allows you to quickly replace all appearances of one word with another—live here.
-
4
Click the Insert tab to review the types of media you can place in your document. Insert is to the right of the Home tab. The Insert tab allows you to add things like graphics and page numbers to your document. From left to right, a couple of notable options include the following:
- Table — Clicking this option will allow you to create an Excel-style table right in your document.
- Pictures — Use this feature to insert a picture into your document.
- Header, Footer, and Page Number — These options are all essential for writing in MLA- or APA-style formatting. The Header places a space at the top of the document for comment, while the Footer goes at the bottom—page numbers are customizable.
- Equation/Symbol — These options use special formatting to accurately display simple equations. You can select these equations or symbols from the pertinent drop-down menu.
-
5
Click the Design tab to create your own template. It’s to the right of the Insert tab.
- The Design tab contains pre-designed themes and formats listed across the top of the page.
-
6
Click the Layout tab to customize your page’s formatting. This tab contains options for changing the following aspects of your document:
- Margins
- Page orientation (vertical or horizontal)
- Page size
- Number of columns (defaults to one)
- Location of page breaks
- Indentation
-
7
Click the References to manage your citations. If you have a bibliography page, you can also manage it from here.
- For quick bibliography formatting, click the Bibliography drop-down menu and select a template.
- In the «Citations & Bibliography» group of options, you can change your bibliography formatting from APA to MLA (or other citation styles).
- The «Captions» group has an option to insert a table of figures. This is useful for scientific review papers or similar documents in which statistical data is prioritized over quotations.
-
8
Click the Mailings tab to review your document sharing options. You can review your email settings and share your documents from within this section.
- You can also print an envelope or label template by clicking the pertinent option in the top left corner of your screen.
- The Select Recipients drop-down menu allows you to choose Outlook contacts as well as an existing contact list within Word.
-
9
Click the Review tab. The Review section is geared towards editing, so it includes options for marking up documents and proofreading. A couple of important options include:
- Spelling & Grammar — Click this option (far left corner) to underline any spelling or grammatical errors.
- The «Changes» section — This is to the far right of the toolbar. From here, you can enable the «Track Changes» feature which automatically formats any additions or deletions you make in a document to appear in red print.
-
10
Decide on the set of options that best apply to your work. If you’re a student, for example, you’ll likely use the Insert and References tab often. Now that you’re familiar with the toolbar options, you can format your first Word document.


Advertisement
-
1
Open a new Blank Document in Word. If you have an existing document, you can open that instead.
-
2
Enter text. Do this by clicking on the blank section of the document and typing away.
- If you opened an existing document, be sure to save your work before re-formatting.
-
3
Highlight a section of text. To do this, click and drag your cursor across your writing, then let go when you’ve highlighted the section you wish to edit.
-
4
Consider what you want to do to the writing. Some potential options include:
- Quickly format your writing. Do this by right-clicking (or two-finger clicking) your highlighted text and then selecting an option from the right-click menu.
- Change the font of your selection. You can do this by clicking the drop-down bar at the top of the «Font» section (Home tab) and then selecting a new font.
- Bold, italicize, or underline your highlighted section. To do this, click the B, I, or U in the «Font» section of the Home tab.
- Change your document’s spacing. This is easiest to accomplish by right-clicking your selected text, clicking Paragraph, and modifying the «Line Spacing» value in the bottom right corner of this window.
-
5
Continue working with Word. Your preferred options for your documents will differ based on the intention behind creating them, so the more you work within your own particular format, the more proficient you’ll become.


Advertisement
Add New Question
-
Question
How do I copy and paste?

To copy a certain piece of text, highlight it and press Ctrl + C. Then click the spot you want to place the copied text and press Ctrl + V to paste.
-
Question
How do I place a logo in MS Word?
Press the Insert tab and then press the Pictures button. You will then be allowed to select the image.
-
Question
How can I save a document to a specific location?
Click File —> Save As… and you’ll be allowed to select the destination location (and filename and format) of the file.
Ask a Question
200 characters left
Include your email address to get a message when this question is answered.
Submit
Advertisement
-
A red line under a word means the word is misspelled, a green underline suggests a grammatical error, and a blue underline pertains to formatting.
-
If you right-click (or two-finger click) an underlined word, you’ll see a replacement suggestion at the top of the right-click menu.
-
You can quick-save your document by holding down Control (or Command on Mac) and tapping S.
Thanks for submitting a tip for review!
Advertisement
-
Don’t forget to save your work before closing Word.
Advertisement
About This Article
Article SummaryX
1. Create blank documents or from templates.
2. Format text colors, fonts, and sizes.
3. Insert media like photos and animations.
4. Insert data like tables, page numbers, headers, and equations.
5. Customize the on-screen and print layouts.
6. Add references and citations.
Did this summary help you?
Thanks to all authors for creating a page that has been read 213,472 times.
Is this article up to date?

This tutorial shows how to insert a blank page in Microsoft Word (without repeatedly pressing the Enter or Return key on your keyboard). We will also look at how to delete a blank page.
Quick Links:
- How to Insert a Blank Page
- How to Delete a Blank Page
This tutorial is also available as a YouTube video showing all the steps in real time.
Watch more than 100 other videos about Microsoft Word and Adobe Acrobat on my YouTube channel.
The images below are from Word for Microsoft 365. These steps will also work for Word 2019, Word 2016, Word 2013, and Word for Mac.
- Place your cursor where you would like to insert the blank page.
- Select the Insert tab in the ribbon.

- Select Blank Page in the Pages group.

Your blank page should be inserted into your document.
How to Delete a Blank Page in Microsoft Word
These steps show how to delete a blank page inserted using the steps above. If this method doesn’t work for you, please see the bonus section below for two additional deletion methods.
- Select the Home tab in the ribbon.

- Select the Show/Hide button in the Paragraph group to show the hidden formatting marks in your document.

- Place your cursor at the start of the page break automatically created when you inserted your blank page.
Important Note: Mac users may have to place their cursor at the end of the page break rather than the start in order to delete the break.

- Press the Delete key on your keyboard to delete the page break.
- (Optional) If your blank page was inserted between existing content rather than at the end of your document, also delete the page break automatically created after the existing content.
Your blank page should be deleted.
Two More Ways to Delete Blank Pages
Blank pages can be created by several other issues, including leftover section breaks and unnecessary paragraph marks.
Delete Blank Pages Created by Section Breaks
If your unwanted blank page was created by a section break, you must delete the section break to delete the blank page.
- Select the Show/Hide button in the Home tab (see figure 4) to locate the section break.
- Place your cursor at the start of the break and press the Delete key on your keyboard. (Mac users may have to place their cursor at the end of the break in order to delete it.)
Delete Blank Pages Created by Paragraph Marks
Blank pages can be created by unnecessary paragraph marks.
- Select the Show/Hide button in the Home tab (see figure 4) to locate the paragraph marks.
- Select the paragraph mark or place your cursor directly in front of it, and then press the Delete key on your keyboard until the blank page is removed.
Related Resources
How to Create a Cover Page in Microsoft Word (Built-In and Custom)
How to Create Newspaper-Style Columns in Microsoft Word
How to Insert Headers and Footers in Microsoft Word