
The following shows an intro with lower case Roman numerals. You can use any other format instead.
-
Select between the intro and the body of the document and go to Layout > Breaks > Next Page.
Tip: To see section breaks and other formatting marks, go to Home and select Show/Hide (¶) to turn on the display of formatting marks.
-
In the header for the body section, deselect Link to Previous. If Link to Previous is dimmed, check to make sure a section break was created.
-
In the intro section select Page Number and choose a location and style. If your change only affects the first page of your section, make sure Different First Page is not selected.
-
To choose a format or to control the starting number, select Page Number > Format Page Numbers.
-
Do either or both of the following:
-
Select Number format to select the format for the numbering, such as a, b, c or i, ii, iii for the intro.
-
Under Page numbering, choose Start at and type a number that you want to start the section with. For example, restart numbering at the beginning of the body section.
-
-
Select Close Header and Footer, or double-click anywhere outside the header or footer area to exit.
The following shows an intro with lower case Roman numerals. You can use any other format instead.
-
Select between the intro and the body of the document and go to Layout > Breaks > Next Page.
-
In the header for the body section, deselect Link to Previous. If Link to Previous is dimmed, check to make sure a section break was created.
Note: Headers and footers are linked separately, so if your page number is in the header, turn off linking for headers. If your page number is in the footer, turn off linking for footers.
-
Go to Header & Footer > Page Number, and then click Page Number.
-
Choose the position and alignment of page numbers. If you don’t want a page number to appear on the first page, clear Show number on first page.
-
To choose a format or to control the starting number, go to Header & Footer > Page Number > Format Page Numbers.
-
To change the numbering style, select a different style in Number format.
-
To change the starting page number of the newly created section, select Start at, and then enter a number.
-
Select OK.
-
Select Close Header and Footer, or double-click outside of the header or footer to exit.

on
September 23, 2010, 2:41 AM PDT
10 steps to setting up page numbering in Word sections
If you’ve ever been outfoxed by Word’s page numbering options in a multiple-section document, here’s good news: Controlling how the pages in each section are numbered is actually pretty easy. Susan Harkins demystifies this Word feature.
We may be compensated by vendors who appear on this page through methods such as affiliate links or sponsored partnerships. This may influence how and where their products appear on our site, but vendors cannot pay to influence the content of our reviews. For more info, visit our Terms of Use page.
According to Microsoft, a section is “a portion of a document in which you set certain page formatting options.” It might help to think of sections as rooms in a house. They’re all part of the same dwelling, but each room has its own purpose and décor. This autonomy lends flexibility, but it can lead to questions about numbering pages — where do you start numbering, does each section start over with page 1, and so on.
SEE: Download: Build your Excel skills with these 10 power tips (TechRepublic)
Fortunately, adding sections actually makes complex page numbering schemes easier, not more difficult.
1: Determine page numbering needs for each section
Before you can number anything, you have to discern what each section comprises. The results will be specific to each document. For instance, a book can have several elements, or sections: a title page, a table of contents, numerous chapters, and so on. Sections allow you to treat each of these elements as a single unit.
Once you identify the sections, you must decide how you want to number each one: Where is page 1, will each section begin with page 1, and so on.
2: Create the sections
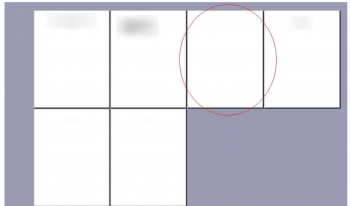
Figure A
- Position the insertion point between the two elements. If there’s a page break between them, it’s often easier to insert the section break at the end of the preceding page. Click Show/Hide to display formatting marks, if necessary (in the Paragraph group on the Home tab in Word 2007 and 2010).
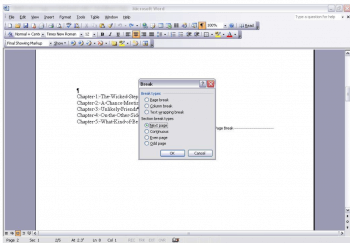
- From the Insert menu, choose Break and choose Next Page in the Section Break Types section, as shown in Figure B. In Word 2007 and 2010, click the Page Layout tab | Breaks in the Page Setup group | Next Page.
- Click OK.
Figure A
You can treat each of these elements as a section.
Figure B
Enter a section break.
3: Check for extra pages
beforeFigure C
Figure C
Print Preview shows a new blank and unnecessary page between the table of contents and the first page of chapter 1.
This is one time when planning comes in handy. If you know you’re going to divide the document into sections, insert section breaks instead of page breaks. On the other hand, it’s easy to delete the extra pages.
4: Add a header or footer — maybe
Most page numbers appear in a document’s header or footer section (although that’s not strictly necessary). To add a header, choose Header And Footer from the View menu. In Word 2007 and 2010, double-click above the top margin or click the Insert tab | Header (in the Header & Footer group) | Blank.
5: Enable page numbering
As mentioned, page numbering doesn’t always begin with the first page. For instance, in the example book document, you might want to avoid page numbering until the first page of chapter 1. In this case, you’d select the first page of chapter 1 — that’s also the first page of section 2. Then, to enable page numbering for chapter 1 and beyond, you’d open the header (or footer, depending on where you want the page number to appear). On the Header And Footer toolbar (that Word launches when you open a header or footer), click Insert Page Number. In Word 2007 and 2010, click the Design context tab | Page Number (in the Header & Footer group) | Top of Page | Plain Number 1. (The last two options are preferential.)
Figure D
Figure D
By default, page number continuous from section to section.
6: Break the connection
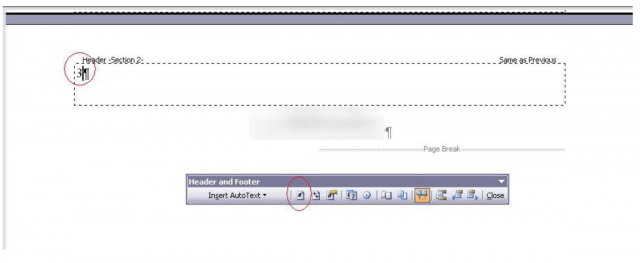
As you just learned in the previous step, page numbering isn’t autonomous in sections by default. You must break the connection between the two sections. To break the connection between the first and second sections, click Link To Previous on the Header And Footer toolbar. (If you closed the header in the last step, reopen it and Word will display the Header And Footer toolbar.) In Word 2007 and 2010, click the Design context tab | Link To Previous (in the Navigation group).
The page number is still 3, but don’t worry.
7: Reset page numbering
Breaking the connection isn’t enough; you must also reset the page numbering option, as follows:
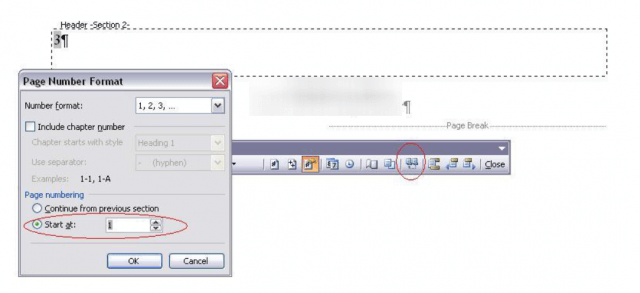
- On the Header And Footer toolbar, click Format Page Number. In Word 2007 and 2010, click the Design context tab | Page Number (in the Header & Footer group) | Format Page Number.
- n the resulting dialog box, select the Start At option in the Page Number section. Enter 1, as shown in Figure E.
- Click OK. As you can see in Figure F, the page number is now 1, even though this page is actually the third page in the document.
Figure E
Reset page number for the current section.
Figure F
After resetting the section’s page number, the first page of the section is 1.
8: Disable page numbering for the title page
Chapter 1 begins with the page number 1 — that’s good. But the first two pages of the document, the title page and table of contents page, still display page numbers 1 and 2, respectively. Fortunately, you can easily inhibit this legacy numbering as follows:
- Go to the first page and open the header (if necessary).
- Highlight the page number.
- Press Delete.
Notice that deleting the page number field on page 1 also deletes the page number field on page 2. That’s because these two pages are both part of the same section.
9: Number the appendix
If you check the appendix page (page 4 in the document), you’ll see that it displays the page number 2. Similarly, the last page, the index, displays the number 3. As far as Word is concerned, the appendix and index pages are part of the second section, which begins with chapter 1. Right now, there’s only one section break in the document.
There’s an easy fix for this situation. Simply add a section break after the chapter 1 section. Position the insertion point at the end of the chapter and repeat the steps in #2. Unlike before, you don’t have to break the connection and reset the page number, because you changed those default settings earlier.
10: Number the index
You’ll probably want the index page to have its own page numbering, similar to the chapter and appendix section. The easy answer is to make a section for the index by repeating the process in #9. Position the insertion point at the end of the appendix and insert a section break.
Also See
- How to highlight rows in Excel with conditional formatting (TechRepublic)
- 10 time-saving tips to speed your work in Excel (TechRepublic)
-
Microsoft
-
Software
It can, at times, be very difficult to get your head around Word’s page numbering options, particularly in a multiple-section document. Fortunately, controlling how your pages in each section are numbered is actually pretty easy.
To quote Microsoft, a section is ”a portion of a document in which you set certain page formatting options.” It may help you to think of sections as rooms in a house. They are all part of the whole house, but each room has its own purpose and style. This autonomy will lend flexibility, but it can also lead to questions about numbering pages (i.e., where do you start numbering, does each section start over with page 1, etc).
Fortunately, adding sections actually makes complex page numbering less, not more, difficult!
Determine Page Numbering Needs For Each Section
Before you can begin numbering, you must discern what each section comprises. The results will be specific to each document (i.e., a book may have several elements or sections: title page, table of contents, numerous chapters, etc.). Sections will allow you to treat each of these elements as a single unit.
Once you identify the sections, you must decide how you want to number each one: Where is page 1, will each section begin with page 1, and so on.
Follow the steps below to learn how to create your sections:
- Position your cursor between the two elements. If there is a page break between them, it is often easier to insert the section break at the end of your preceding page. Click Show/Hide to display formatting marks, if necessary.
- From the Insert menu, select Break and choose Next Page in the Section Break Types section, as shown below.
- Click OK.
You can treat each of these as different sections.
Check for extra pages:
This is one instance when planning will be very handy. If you know you are going to divide your document into sections, insert section breaks instead of page breaks, although it is easy to delete extra pages.
Add a header or footer — perhaps
Most page numbers appear in a document’s header or footer section, although that is not always necessary. To add a header, select Header And Footer from your View menu. In versions 2007 and 2010, double-click above the top margin or click the Insert tab | Header in the Header & Footer group | Blank.
Enable Page Numbering
As mentioned above, page numbering does not always begin with your first page. For instance, you might want to avoid page numbering until the first page of Chapter 1. In this case, you would select the first page of Chapter 1 — that is also the first page of Section 2. Then, to enable page numbering for Chapter 1 and beyond, you would open the header (or footer, depending on where you want the page number to appear). On the Header And Footer toolbar that Word launches when you open a header or footer, click Insert Page Number. In Word 2007 and 2010, click Design | Page Number | Top of Page | Plain Number 1. The last two options are preferential.
Break the connection
As you learned above, page numbering is not by default, autonomous in sections. You must break the connection between the two sections.
Follow the steps below to learn how:
To break the connection between the first and second sections, click Link To Previous on the Header And Footer toolbar. If you closed the header in the last step, simply reopen it and Word will display the Header And Footer toolbar again. In Word 2007 and 2010, click Design | Link To Previous in the Navigation group.
The page number is still 3, but do not fret.
Reset page numbering
Breaking the connection is not enough; you must also reset the page numbering option.
Follow the steps below to learn how:
- On your Header And Footer toolbar, click Format Page Number. In versions 2007 and 2010, click the Design | Page Number | Format Page Number.
- In the dialog box, select the Start At option in the Page Number section. Enter 1, as shown below.
- Click OK. As you can see, the page number is now 1, even though this page is actually the third page in the document.
Reset page number for the current section.
After resetting the section’s page number, the first page of the section is 1.
Disable page numbering for the title page
Chapter 1 begins with page number 1 — that is good. But the first two pages of the document, the title page, and table of contents page, still display page numbers 1 and 2, respectively.
Follow the steps below to learn how to fix this:
- Go to the first page and open the header if necessary.
- Select the page number.
- Click Delete.
Note that deleting the page number field on Page 1 also deleted the page number field on Page 2. That is because these two pages are both parts of the same section.
Number the appendix
If you check your appendix page (page 4 in your document), you will see that it displays the page number 2. Also, the last page, the index, displays the number 3. As far as Word is concerned, the appendix and index pages are part of the second section, which begins with chapter 1. Right now, there is only one section break in your document.
There is an easy fix for this. Simply add a section break after the Chapter 1 section. Position the cursor at the end of the chapter and repeat the steps above. Unlike before, you do not have to break the connection and reset the page number because you changed those default settings earlier.
You will most likely want your index page to have its own page numbering, similar to the Chapter and Appendix section. So just make a section for your index by repeating the process above. Place your cursor at the end of your appendix and insert a section break!
Yes, it can bend your brain, but only if you let it. With these steps, you should be an expert in page numbering very soon!
—
Multilevel numbering in Word is the #1 headache for many people working with large documents.
Believe it or not, it’s not complicated. It just takes somebody to lead the way and point out the pitfalls you need to avoid.
Today that pleasure falls to me!
Before I start, grab your free multilevel numbering troubleshooting guide that shows you the steps to get multilevel numbering working properly first time, every time, together with answers to over 20 FAQs and plenty of real client examples constructed step by step to help you fix what isn’t working with your numbering.

1. What Multi-level Numbering Looks Like
Often used in the legal profession or in large corporate documents, multilevel numbering creates a logical hierarchy and easy navigation within the document. The headings can also be summarised later on in a table of contents. Here is a simple example:

2. How to Set Up Multilevel Numbering
Here is the correct process:
1. Select the text that you want to number (this can be a section of text or the whole document).

2. Select the Home tab.
3. Click the multilevel numbering icon in the Paragraph group.
![]()
4. You can either select an existing layout from the list to use as a starting point, or you can create a new numbering system from scratch. As you hover over each thumbnail image, Word provides a larger image of the numbering system.
5. Choose Define New Multilevel List to display the control dialog.

The dialog box can be broken down as follows:
Step #1 Click level to modify
In the top left is a list of levels. As you select each level, the settings in the rest of the dialog box changes.
Level 1 is the highest level, i.e. the main headings such as chapter or section titles.
Level 2 is subordinate to level 1.
Level 3 is subordinate to level 2.

Step #2 Enter formatting for number
This is where the level number is constructed. If you include a previous level number, it will be displayed with a grey background, as will the number for the current level.
Type anything you wish to put in between the numbers such as dots, dashes, brackets etc.
Clear any text in the ‘Enter formatting for this number’ box.
Step #3 Include level number from
When creating a subordinate level (or child level), you can first specify the level number of the parent.
For example, for section 3.2
- ‘3’ is the parent level (level 1) and
- ‘2’ is the child level (level 2)

Step #4 Number style for this level
Each level can have its own number style. It may be a standalone style, e.g. 1, 2, 3 or a, b, c or continue on from a higher level, e.g. 1.1.1 or 1.a.i.
- When creating 1.1 numbering, this option is 1, 2, 3.
- When creating 1.a numbering, this option is a, b, c

Step #5 Font
Set the font formatting for the selected level, if you want.

Step #6 Position
What position from the left margin do you want items for each level of numbering. For example, level 1 items may be 0cm from the left margin, level 2, 1cm from the left margin and level 3, 2cm from the left margin.
Here’s what they mean:
- The Aligned At determines how far from the left margin the number appears.
- The Text indent at figure determines how far from the left margin the text following the number is.

6. Click OK to save all the settings and close the dialog box.
The text you selected in step 1 now looks like this.

The next part is where the magic happens …
3. How to Apply Multilevel Numbering
Once you have created your numbering system:
1. Position the cursor at the beginning of a line.

2. Press the TAB key to move the text down a level (demote).

3. Press the SHIFT and TAB keys together to move the text up a level (promote).

If you prefer, you can also click the indent icon to demote and the outdent icon to promote between levels.
![]()
4. How to Change Multilevel Settings
Once you have created your numbering system:
1. Reselect all text that is using the multilevel numbering.
2. Click the multilevel numbering icon and select Define New Multilevel List (yes, you choose this option even if you are modifying an existing multilevel list).

The original settings that you defined are redisplayed.
3. In the top-left box select the level that you wish to change, then change your settings.
4. Repeat for the other settings.
5. Click OK to save the settings. Your numbered list should now reflect your new settings.
5. Linking Multilevel Numbering to Styles
Each level of a multilevel numbering system can be linked to a style. This means that as you apply styles throughout the document, the numbering is applied appropriately and automatically. You can either use the built-in Heading 1, Heading 2, Heading 3 styles or use your own custom styles.
1. In the Numbering dialog box, click the MORE button in the bottom-left corner to expand the dialog box.
2. Select level to modify in the top-left box.
3. Open the Link level to style drop-down list and choose the style you wish to connect to the numbering level.

4. Click OK.
5. In the document, apply the Heading 1, Heading 2, Heading 3 styles where needed.
It’s a good idea to create a body text style and apply that where appropriate, so that the body text does not inadvertently get caught up in the multi-level numbering.
6. Select the whole document (or the portion of the document where you want to apply your numbered sections).
7. Click the icon in the Paragraph group (Home tab).
8. Select your custom numbering style from the gallery. The thumbnail image should show the linked styles.

6. How to Use Styles to Set Number Levels
1. Select all the text that you wish to apply the same number level to. Alternatively, if you wish to go line by line, you can place the cursor anywhere in a line of text.
2. In the Styles gallery, click the style that corresponds to the number level you wish to apply. For example, to apply the top level numbering click Heading 1 and for the third level numbering click Heading 3 (assuming those are the styles you assigned).
The numbering and all the numbering settings will be applied to the selected text or the paragraph in which the cursor was positioned.

And that, my friend, is how you do multilevel numbering in Word with no loose ends.
How to set up a dual-multilevel numbering system in Word
7. Two resources to help you
1. Grab your free multilevel numbering troubleshooting guide.

2. Watch over my shoulder as I set up multilevel numbering from scratch.

8. What next?
I hope you found plenty of value in this post. I’d love to hear your biggest takeaway in the comments below together with any questions you may have.
Have a fantastic day.


About the author
Jason Morrell
Jason loves to simplify the hard stuff, cut the fluff and share what actually works. Things that make a difference. Things that slash hours from your daily work tasks. He runs a software training business in Queensland, Australia, lives on the Gold Coast with his wife and 4 kids and often talks about himself in the third person!
SHARE

Contents
- 1 How to Add Line Numbers to an Entire Document in Word
- 2 How to Number Lines in Word for Individual Sections
- 3 How to Remove Word Line Numbers
- 4 How to Change Word Line Number Formatting
While some text editors come with line numbers, the same can’t be said about Microsoft Word. To reduce visual clutter, they aren’t present by default, despite being a useful visual aid.
As a result, this guide will show you how to add line numbers in Word with just a few clicks. We’ll also teach you how to change the formatting of your line numbers, so they aren’t so intrusive.
However, while Word has several different options when it comes to numbering, all of them treat tables and text boxes as a single line.
It’s also worth noting that the instructions will only work with Word 2010 and onwards. If you have an older version, we recommend an upgrade – you’ll be missing out on vital security updates at this point. Let’s get started:
How to Add Line Numbers to an Entire Document in Word
Most commonly, users want Word line numbers across their entire document so they can easily reference parts to colleagues or clients. This can be achieved easily through the ribbon.
- Insert continuous line numbers in Word
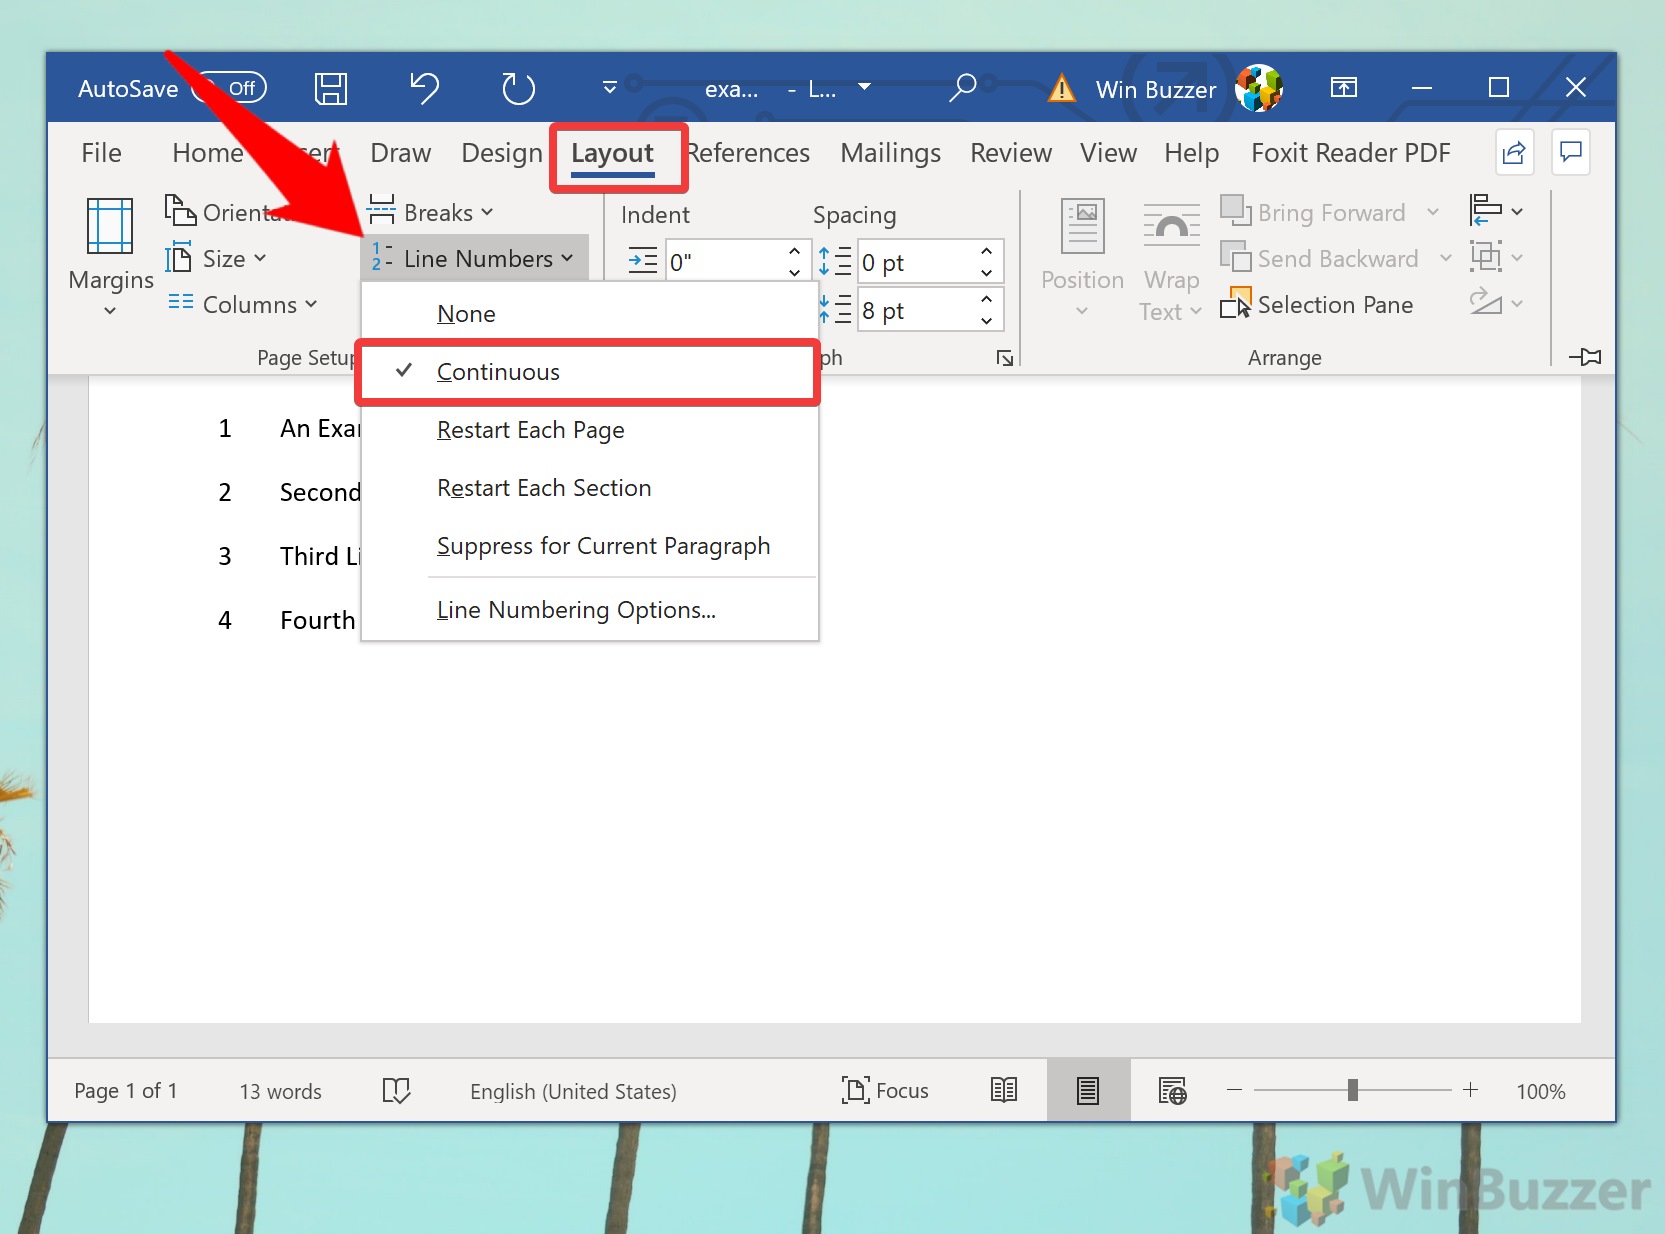
With your Word document open, click the “Layout” tab in the ribbon. On the right-hand side, you’ll see a “Line Numbers” button. Click it, then select “Continuous”.
Continuous lines will add numbers sequentially across your entire document. If a page has 44 lines, for example, the next page will start on 46. This is the most common use case.

- How to insert line numbers in Word and have them restart each page
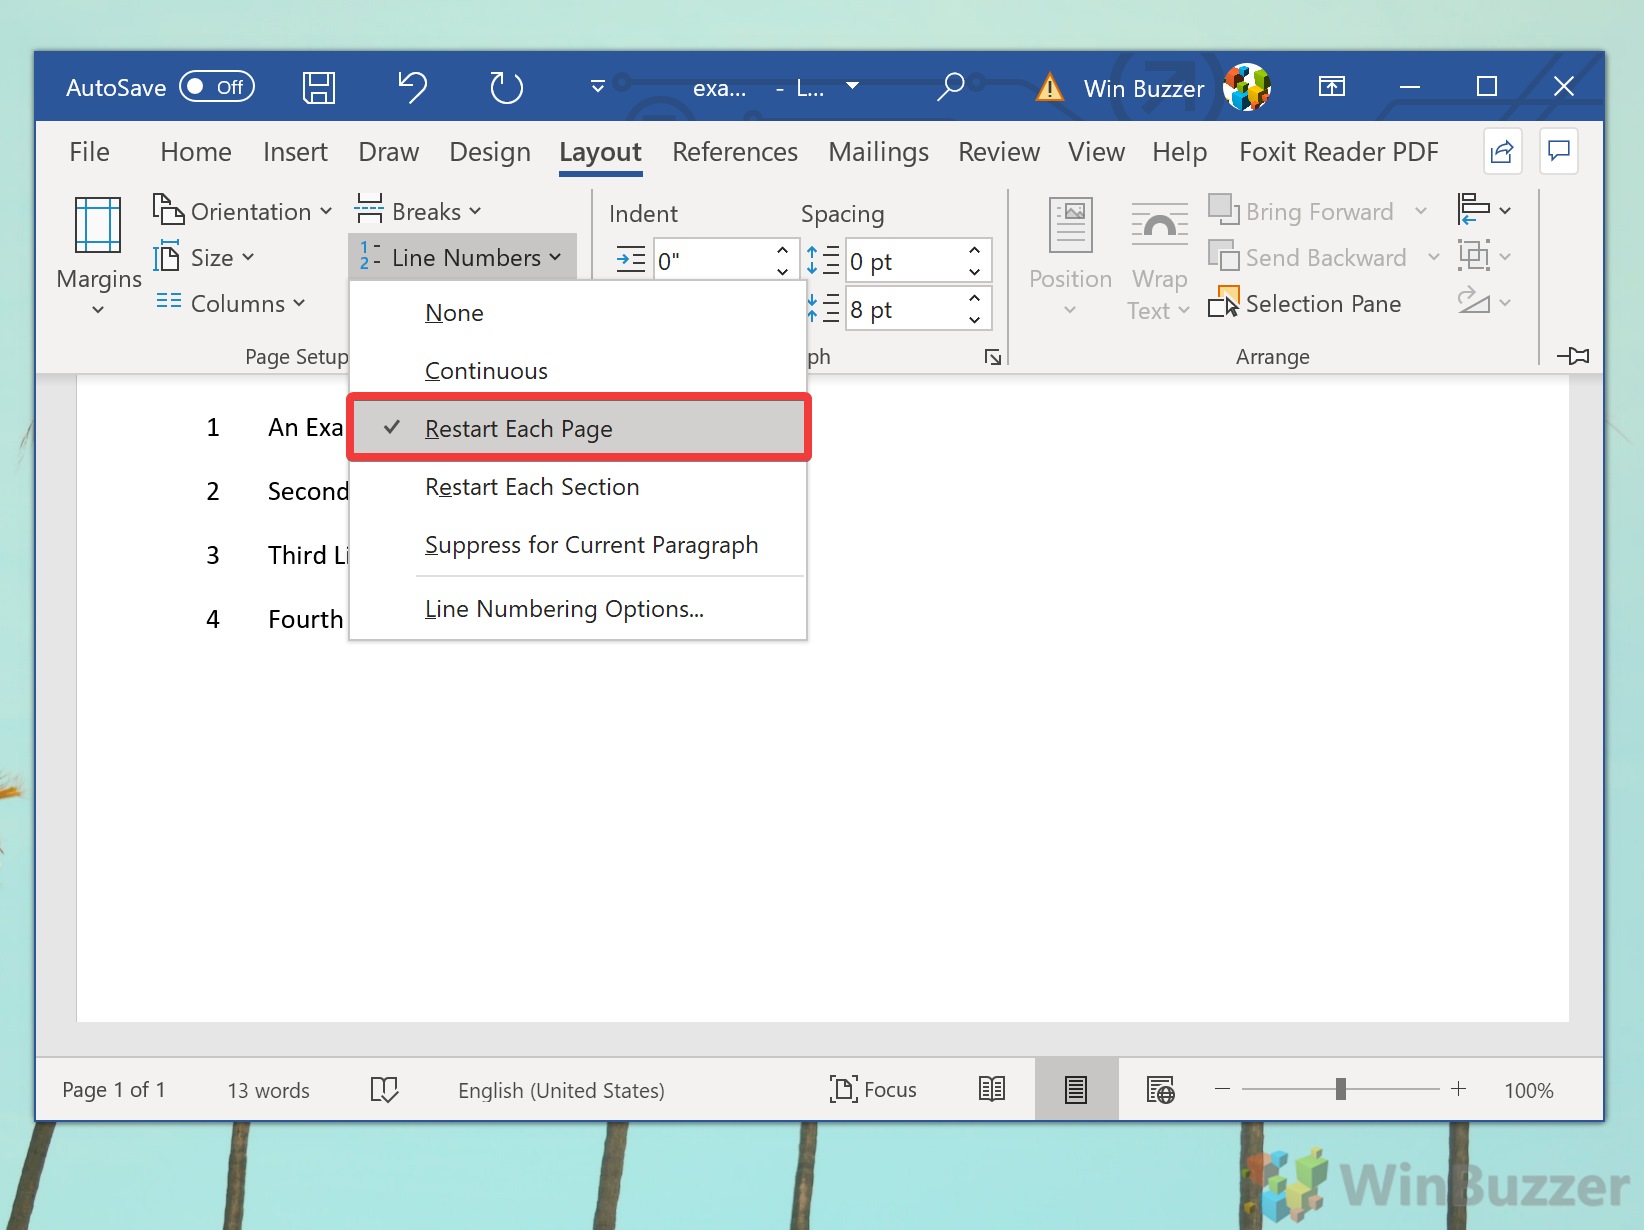
Click the “Line Numbers” button, then select “Restart Each Page”. This will cause the first line on each page to start from 1.

- Make sure you’re on the ‘Print’ view
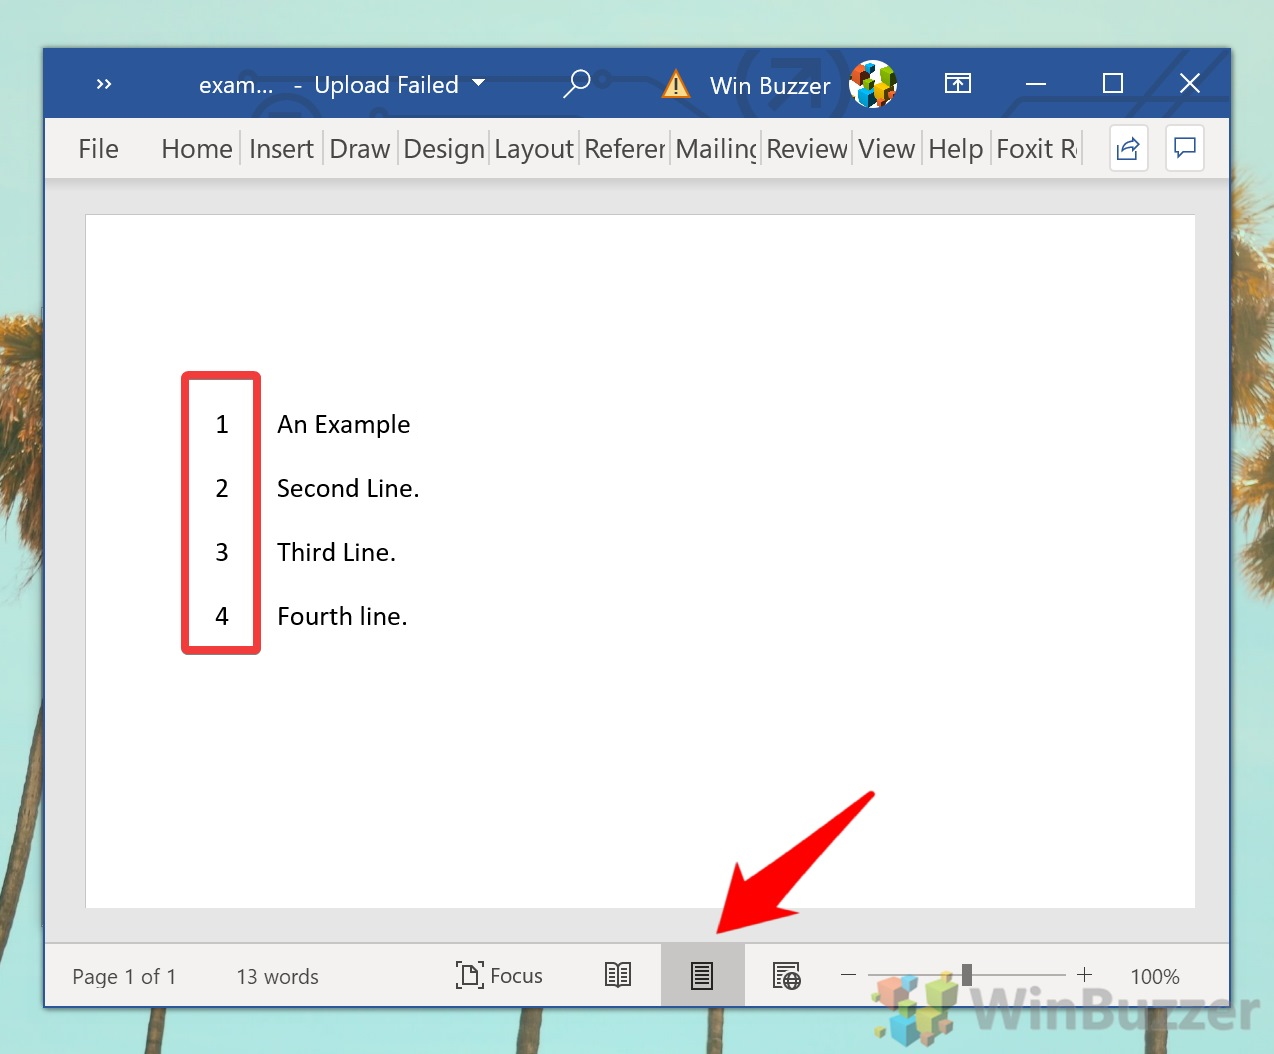
If you still don’t seer line numbers, it may be because you’re on the reading or browser layout view for word. Line numbers only show up on Print view. At the bottom of your document, press the page icon in the middle to switch the view.

How to Number Lines in Word for Individual Sections
So what if you want your numbers to restart in the middle of the page? You can just do it manually of course, but that takes time and may conflict with existing formatting. Instead, we can use the “Each Section” option under Line Numbers.
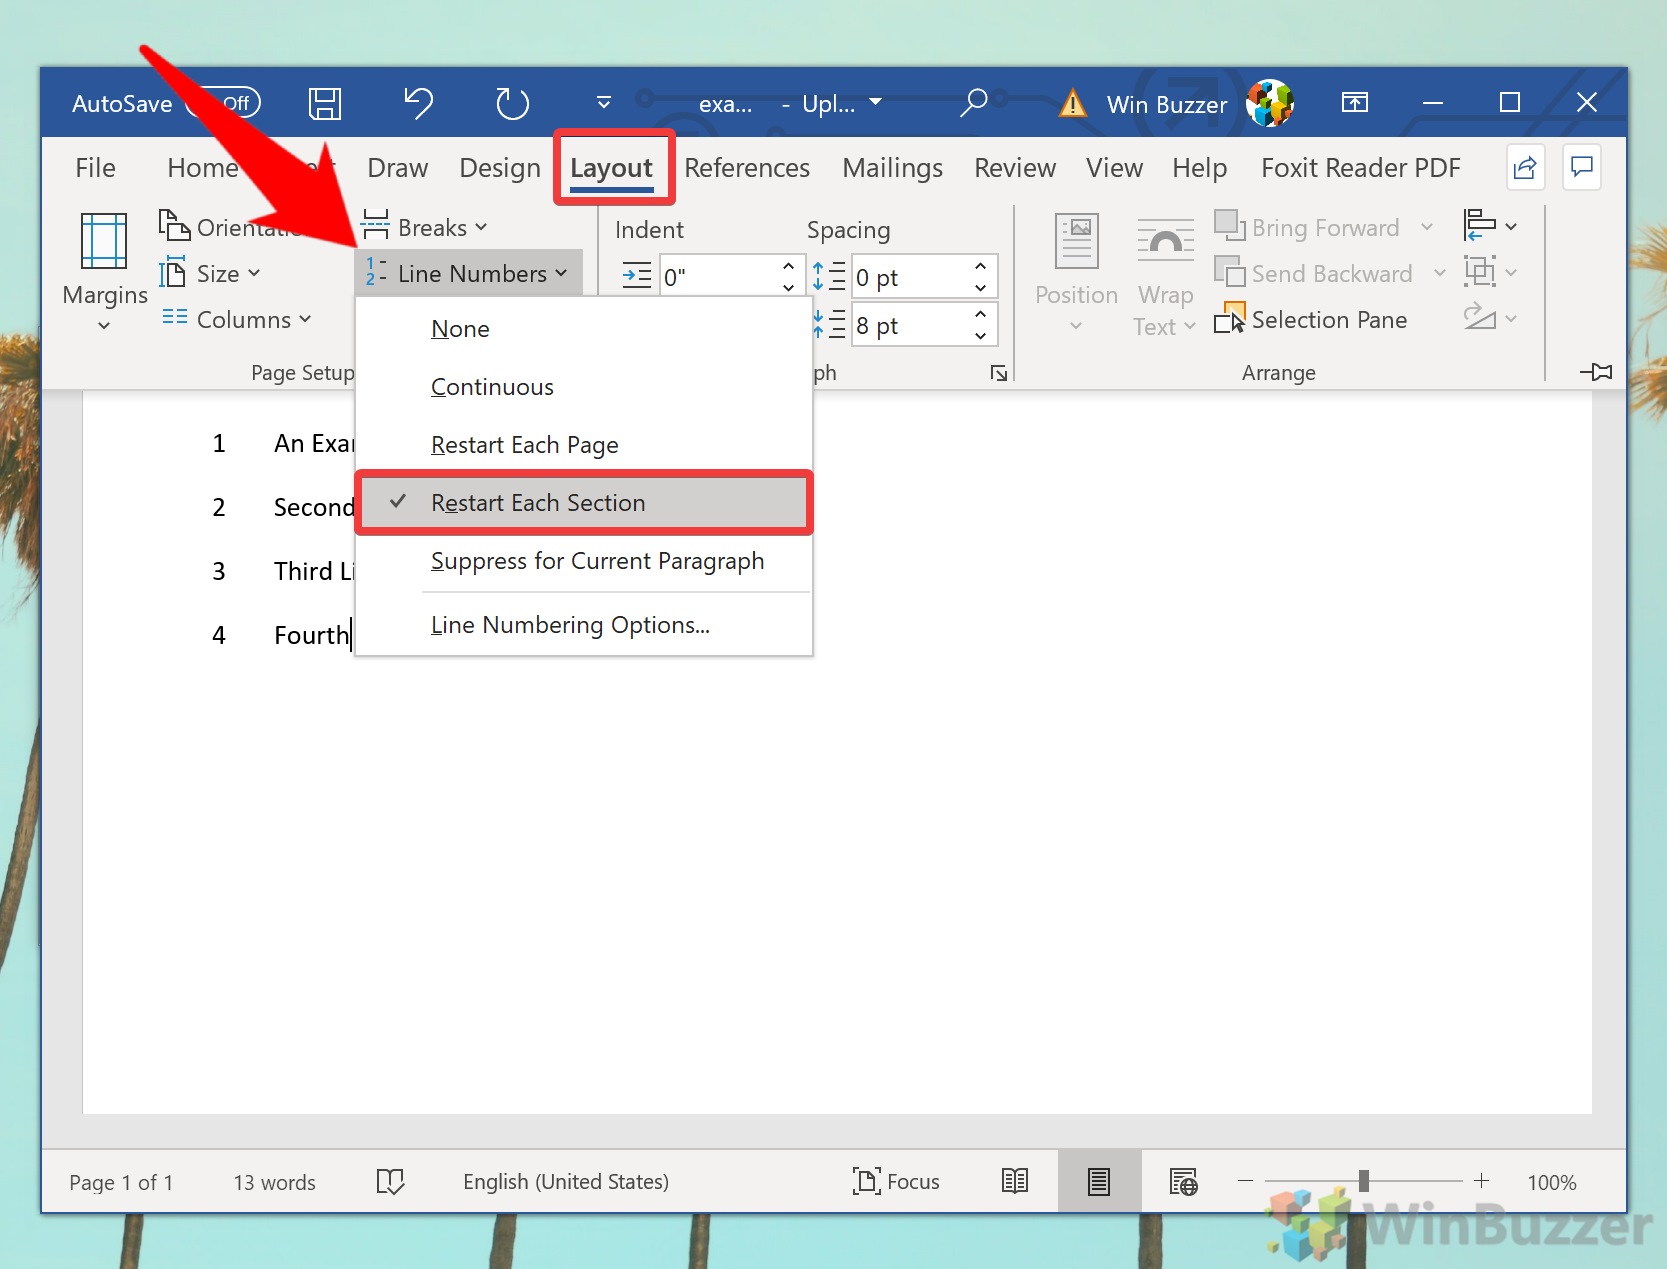
- Select the ‘Restart Each Section’ optionClick the “Layout” tab in your word Ribbon and then “Line Numbers” on the right-hand side. Click “Restart Each Section”.

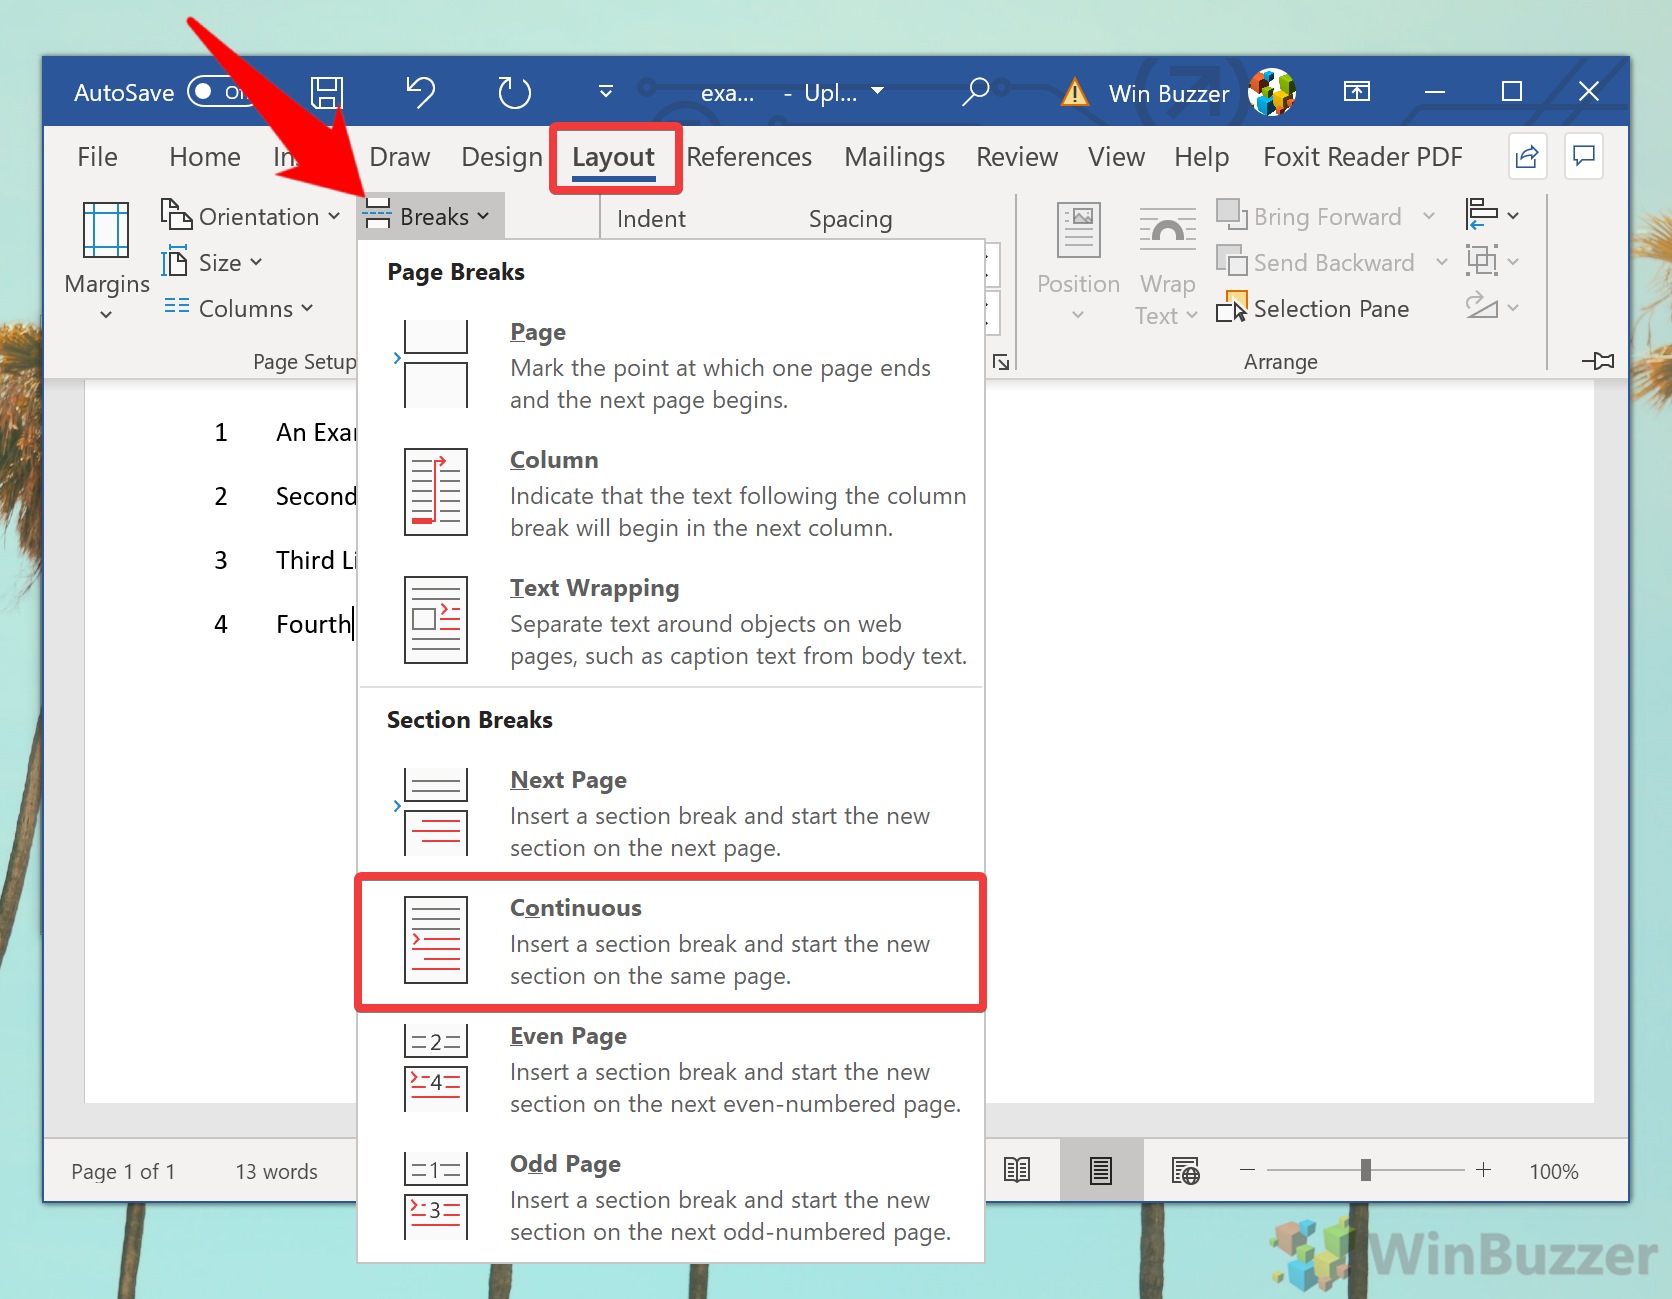
- Add a section break
To restart your numbers anywhere on a page, select where you want the break to be. Then, click the “Layout” tab in your Ribbon, followed by “Breaks”, and “Continuous”.

- Make sure your numbers have changed
You should notice that your line numbers switch back to “1” wherever you put your section break.


If you’ve received a document that already has line numbers on, you can perform similar steps to remove them. Handily, you can also remove them for an individual paragraph.
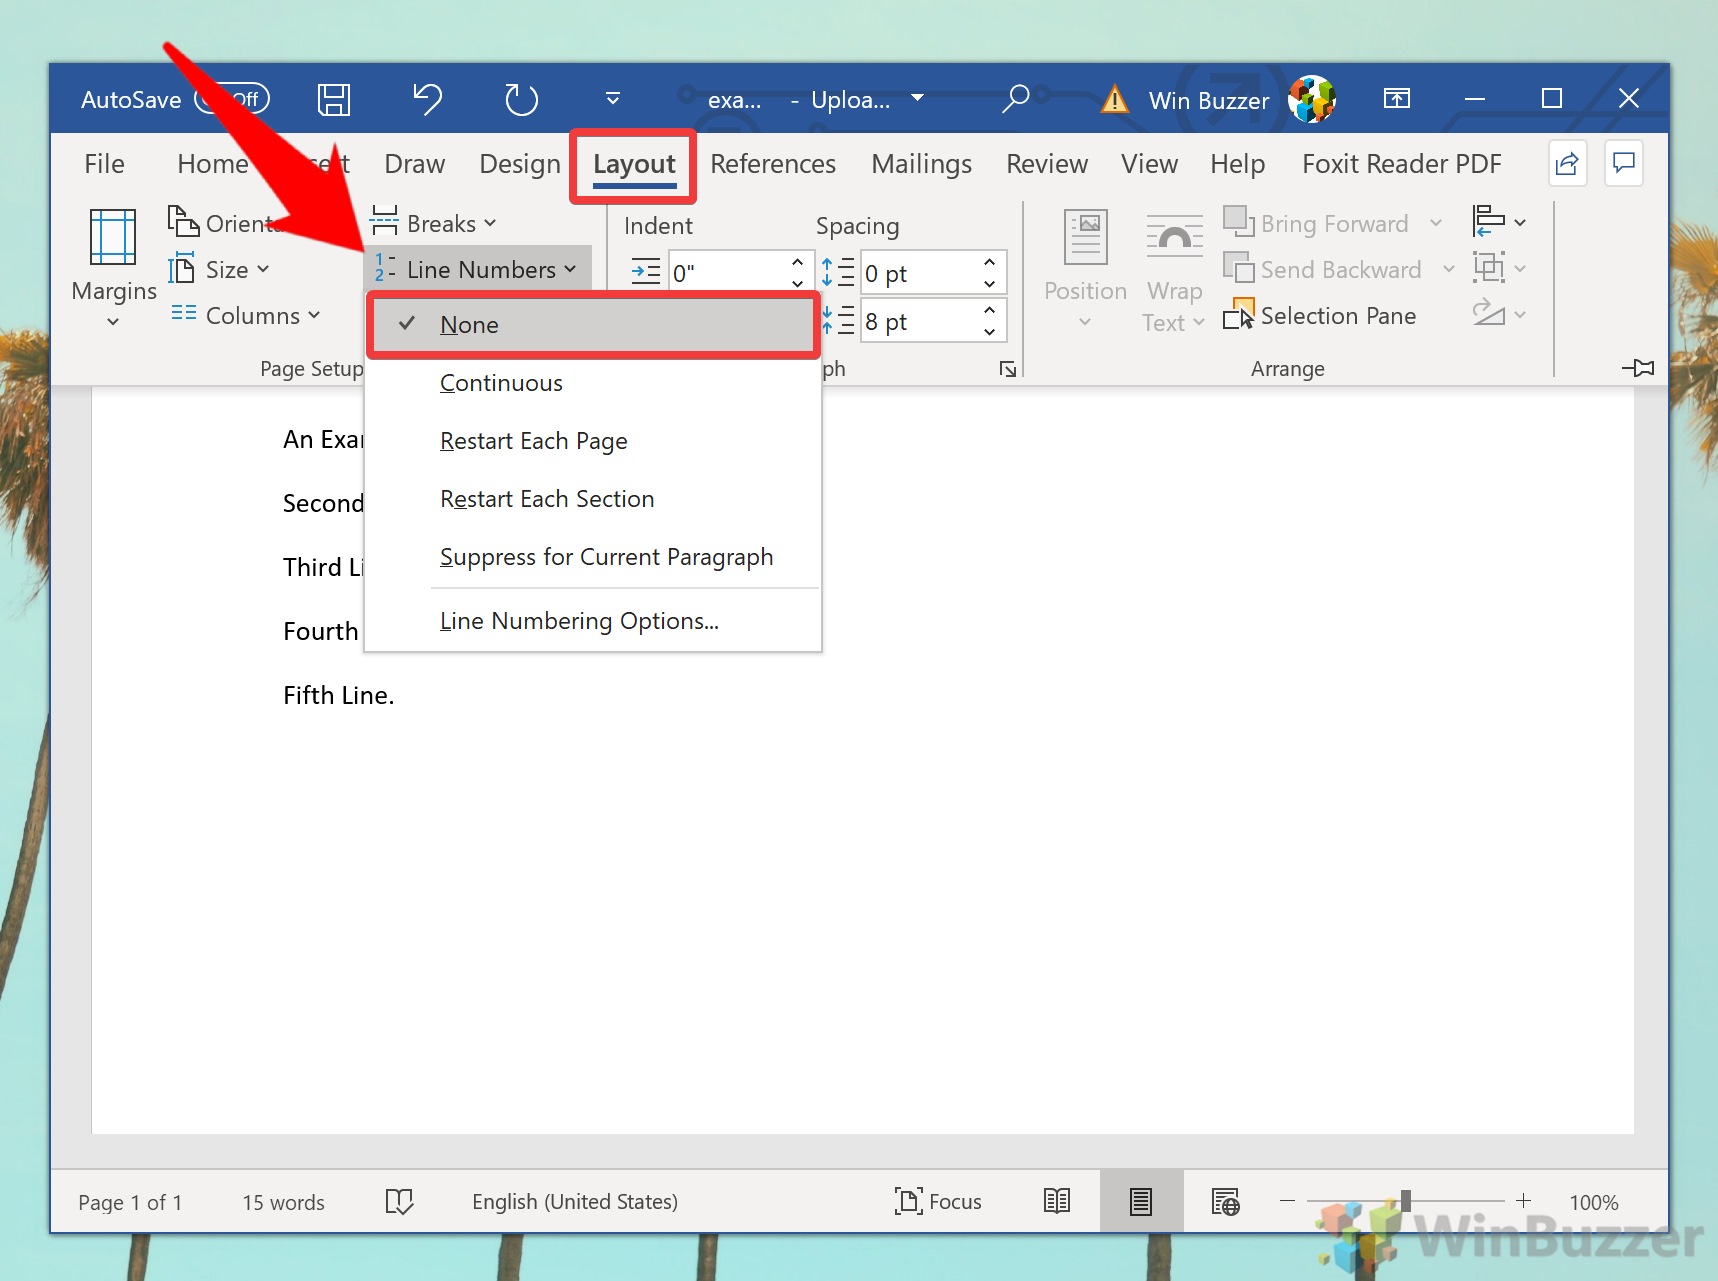
- How to remove all line numbers in WordTo get rid of all line numbers from a document, click the “Layout” tab, then “Line Numbers” and select “None”.

- How to remove Word line numbers from a single paragraph
Select the line you want to remove the line number from. Click the “Layout” tab, then “Line Numbers”, and tick “Suppress for Current Paragraph”. The lines underneath should continue the count as if that line doesn’t exist.


How to Change Word Line Number Formatting
You may have noticed that the line numbers in Word stand out quite a bit by default. If you don’t want them to distract from your text, you can change their style to suit your preferences. Alternatively, you can make them stand out more if you wish.
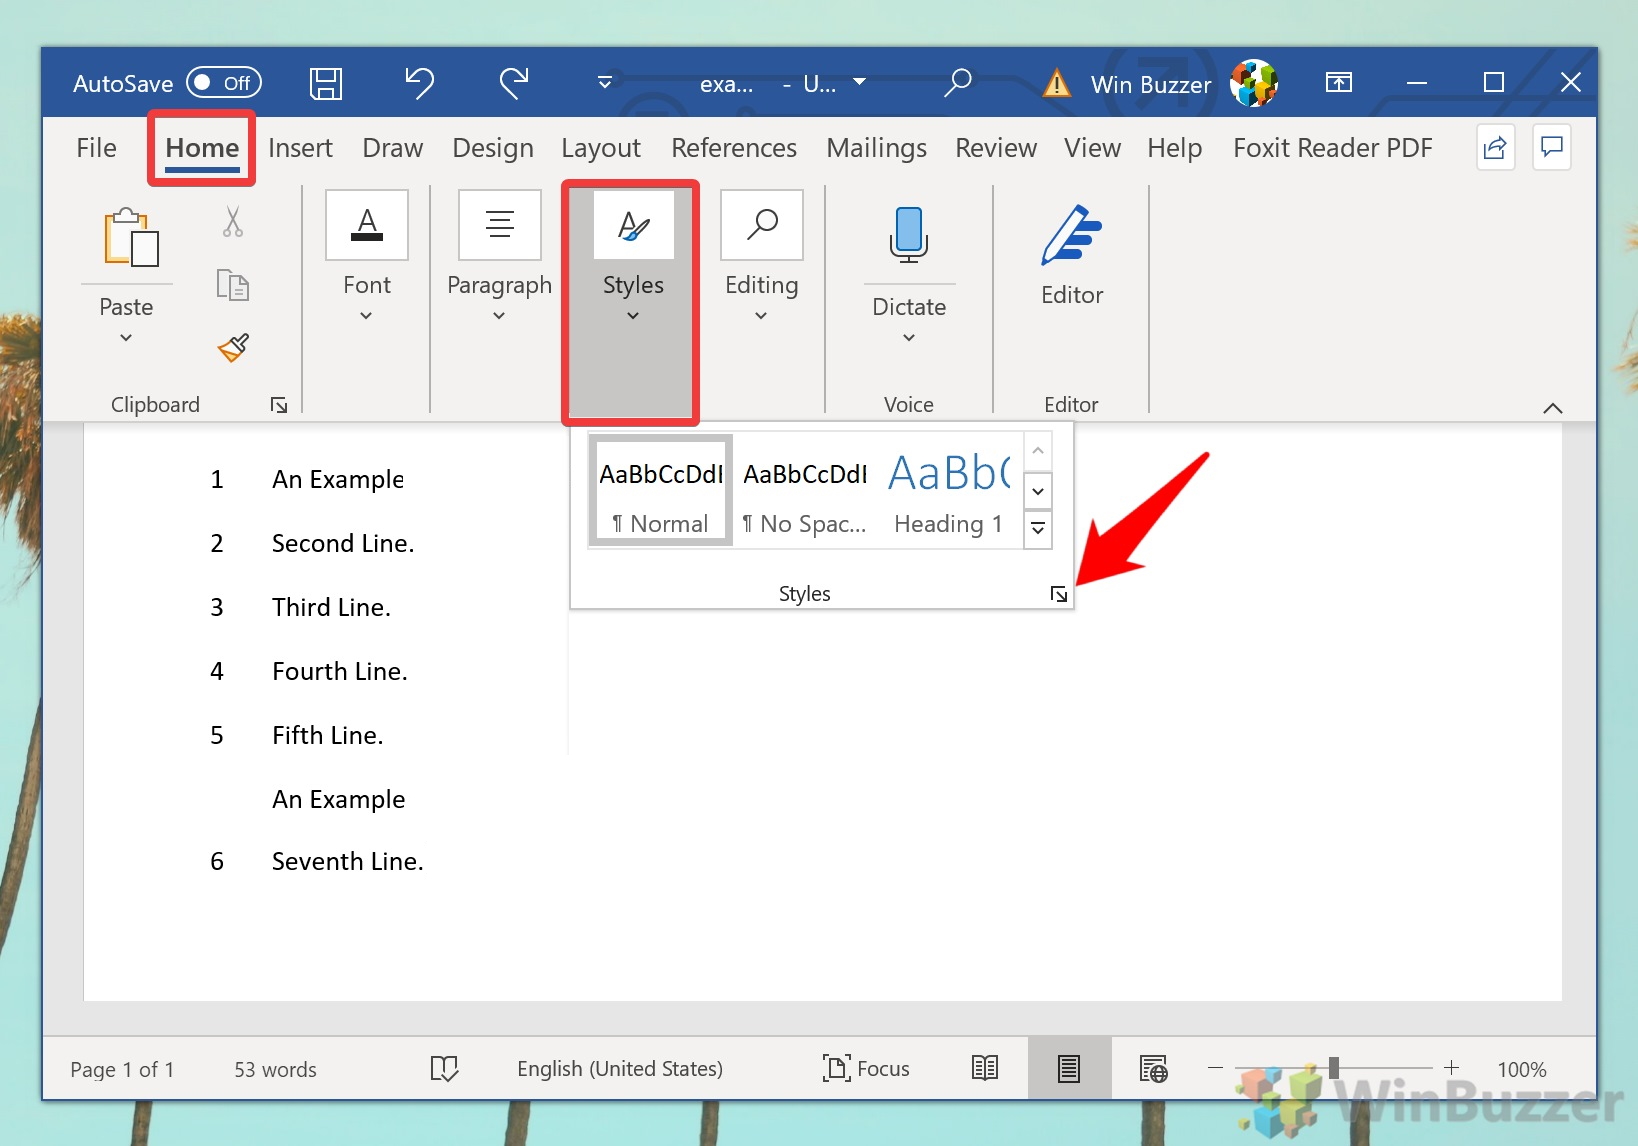
- Open the Styles panelIn the Word ribbon, select the “Home” tab, click the “Styles” button, then press the maximize icon in the bottom right corner of the pop-out.

- Open Styles options
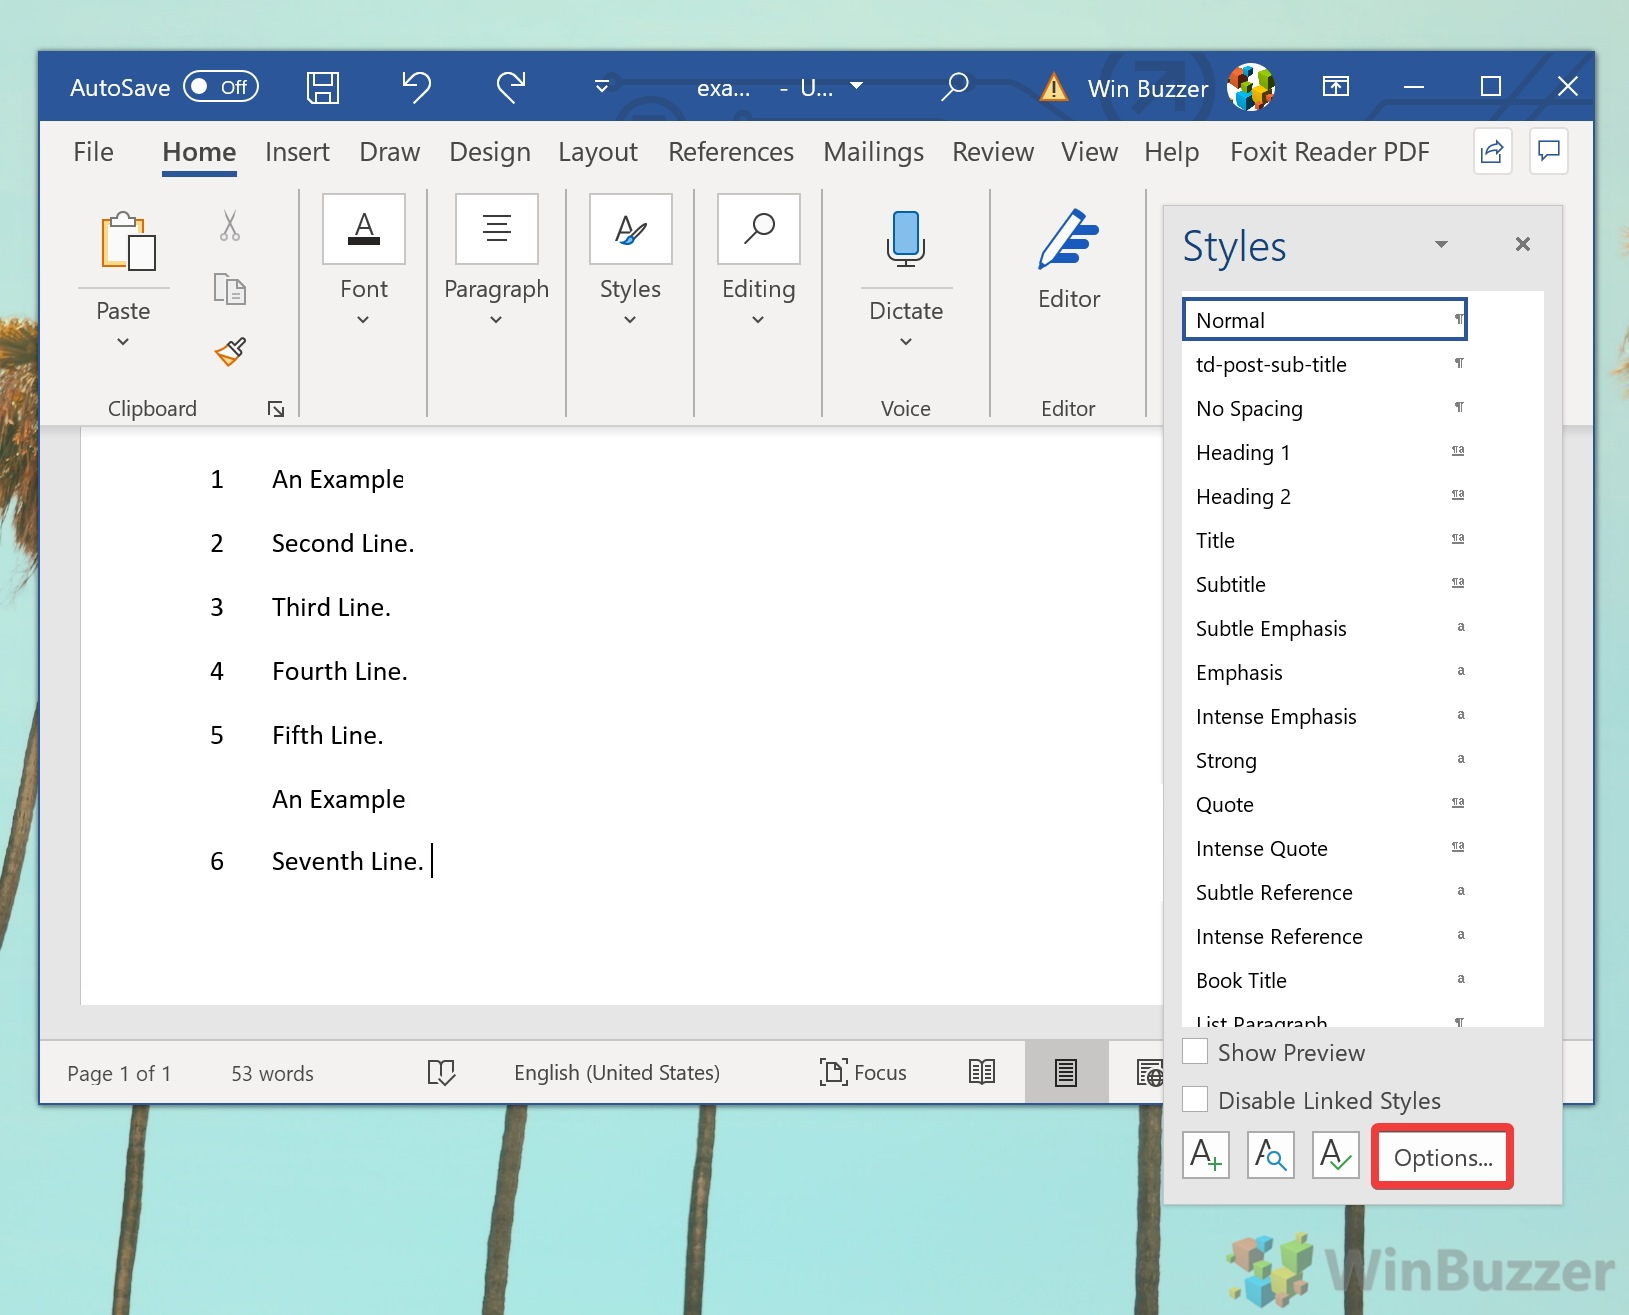
In the Styles panel, press the “Options…” button at the bottom of the screen.

- Select the option to show ‘All styles’
Under the “Select styles to show:” header, click the drop-down and click “All styles”. Click “OK”.

- Modify the Word’s Line Number style
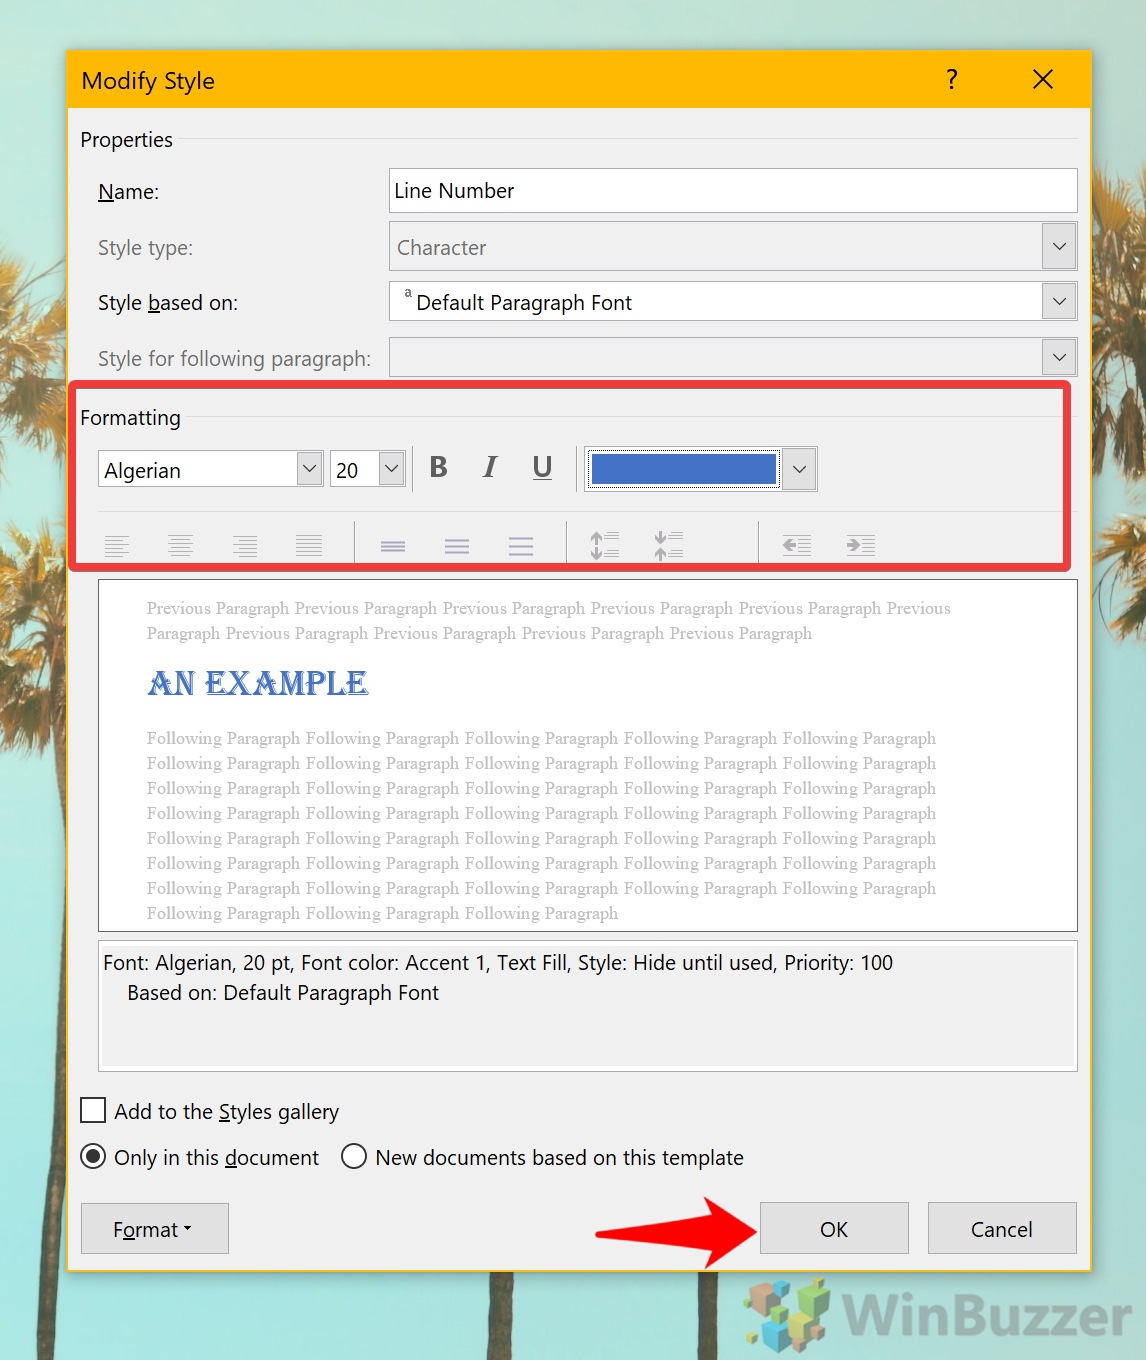
Your styles list should now have an entry called “Line Number”. Find it, right-click it, and press “Modify…”.

- Change font, color, and text size to your liking
Under the “Formatting” section, you’ll find several options for changing your text. If you’re looking for a more subdued look, try changing the color to light grey. For the sake of this tutorial, we’re going to change ours to a funky blue font so it stands out.
Once you’re done, press “OK”.

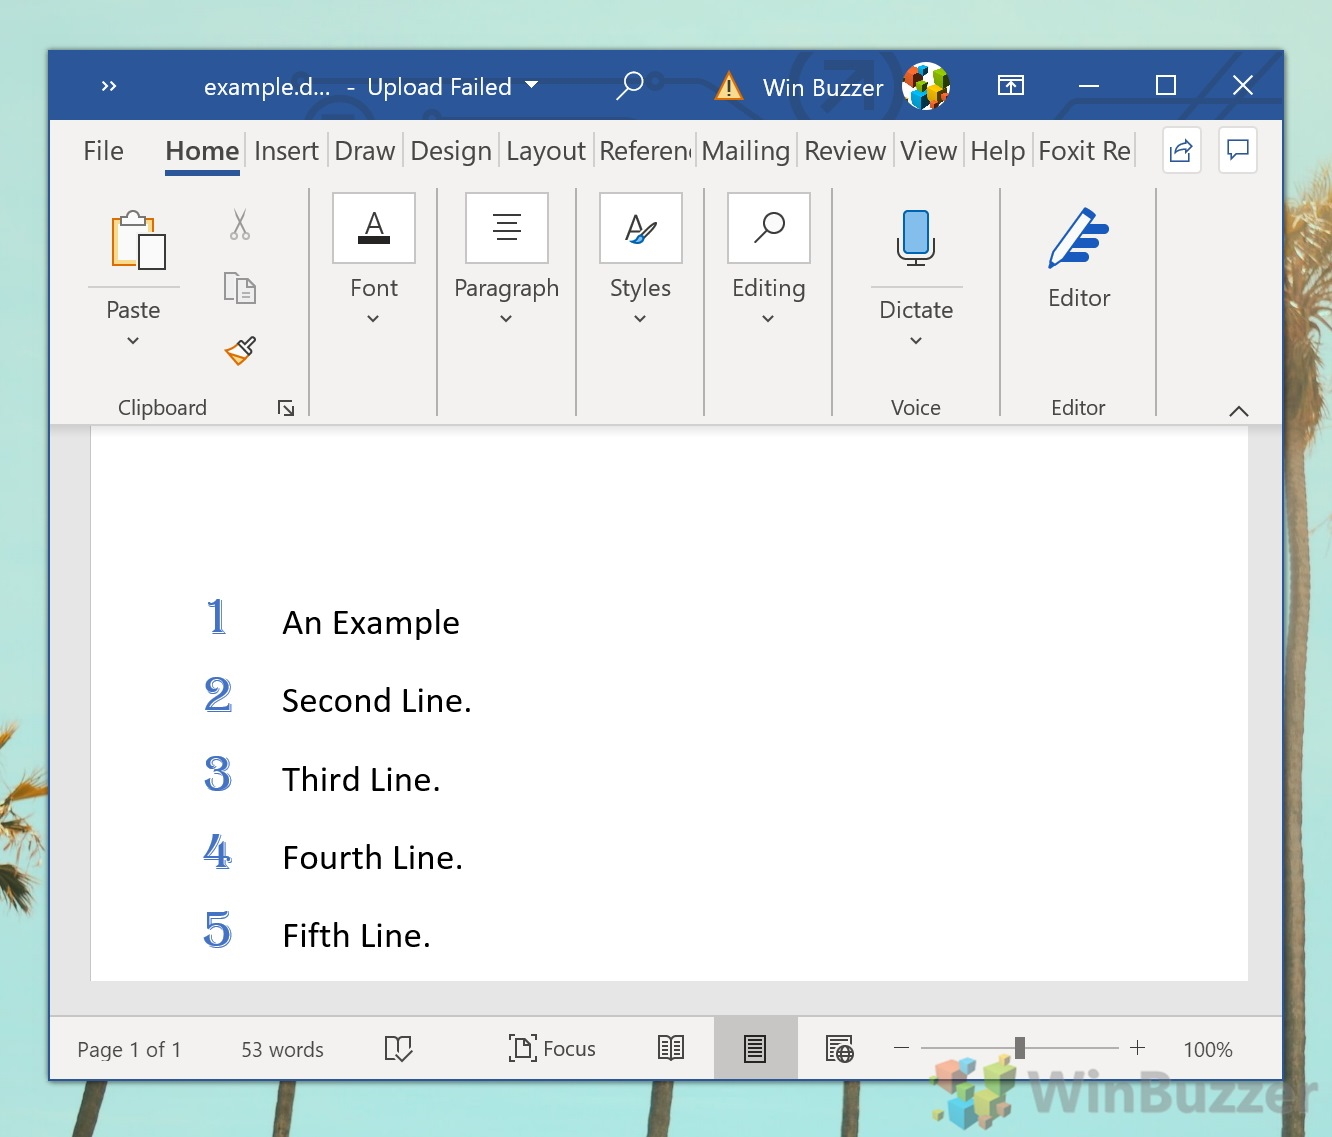
- View your modified line numbers in Word
Back in your main Word document, your line numbers should have automatically updated with the new style.


If you found this tutorial useful, you may also want to learn how to change background color in Word.