
Word for Microsoft 365 Word 2021 Word 2019 Word 2016 Word 2013 Word 2010 More…Less
This article presents basic concepts in Microsoft Word to help new users get started in creating sophisticated, professional-looking documents.
-
Click the Start button
 or press the Windows key on your keyboard to display the Start menu.
 -
In the list of applications, find Word and click it. The startup screen appears and Word starts.
Tip: The first time you start Word, the Microsoft Software License Agreement might appear.
 or press the Windows key on your keyboard to display the Start menu.
To quit Word, click the x button  in the upper-right corner of your screen.
If you made any changes since you last saved the document, a message box appears asking if you want to save changes. To save the changes, click Yes. To quit without saving the changes, click No. If you clicked the x button by mistake, click Cancel.
Top of Page
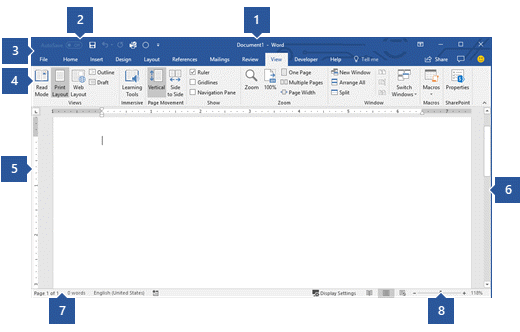
1 Title Bar: Displays the file name of the document that is being edited and the name of the software you are using. It also includes the standard Minimize, Restore, and Close buttons.
2 Quick Access Toolbar: Commands that are frequently used, such as Save, Undo, and Redo are located here. At the end of the Quick Access Toolbar is a pull-down menu where you can add other commonly used or commonly needed commands.
3 File Tab: Click this button to find commands that act on the document itself rather than the content of the document, such as New, Open, Save as, Print, and Close.
4 Ribbon: Commands needed for your work are located here. The appearance of the Ribbon will change depending on the size of your monitor. Word will compress the ribbon by changing the arrangement of the controls to accommodate smaller monitors.
5 Edit Window: Shows the contents of the document you are editing.
6 Scroll Bar: Lets you change the display position of the document you are editing.
7 Status Bar: Displays information about the document you are editing.
8 Zoom slide control: Lets you change the zoom settings of the document you are editing.
Top of Page
In Word, you must save your document so you can quit the program without losing your work. When you save the document, it is stored as a file on your computer or in a network location. Later, you can open the file, change it, and print it.
To save a document, do the following:
-
Click the Save button in the Quick Access toolbar. The Save As window appears.
-
Choose a location where you want to save the document and enter a file name in the File name box. To change the file name, type in a new file name.
-
Click Save.
You can open a Word document to resume your work. To open a document, do the following:
-
Open File Explorer, and click Documents. A list of documents appears.
-
If the document you want to work on is on the list, click the file name to open the document. If the document isn’t on the list, navigate to the location where you stored your file, and double-click the file. The Word startup screen appears, and then the document is displayed.
Tip: You can also open a document from within Word by clicking the File tab and then clicking Open. To open a document you saved recently, click Recent.
Top of Page
Before you edit or format text, you must first select the text. Follow the steps below to select text.
-
Place the curser at the beginning of the text you’d like to edit or format and then press the left mouse button.
-
While holding down the left mouse button, move it to the right (called “dragging”) to select the text. A background color is added in the location of the selected text to indicate the selection range.
You can find most text formatting tools by clicking the Home tab and then choosing from the Font group.
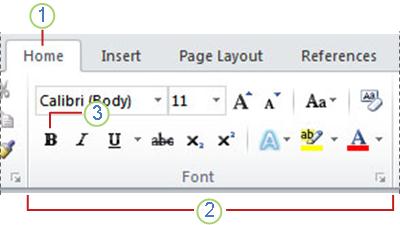
1 This is the Home tab.
2 This is the Font group on the Home tab.
3 This is the Bold button. See the table below for the names and functions of all the buttons in the Font group.
|
Button |
Name |
Function |
|---|---|---|
|
|
Font |
Changes the font. |
|
|
Font Size |
Changes the size of the text. |
|
|
Grow Font |
Increases the text size. |
|
|
Shrink Font |
Decreases the text size. |
|
|
Change Case |
Change all the selected text to uppercase, lowercase, or other common capitalizations. |
|
|
Clear Formatting |
Clears all formatting for the selected text, leaving only the plain text. |
|
|
Bold |
Makes the selected text bold. |
|
|
Italic |
Italicizes the selected text. |
|
|
Underline |
Draws a line under the selected text. Click the dropdown arrow to select the type of underline. |
|
|
Strikethrough |
Draws a line through the middle of selected text. |
|
|
Subscript |
Creates subscript characters. |
|
|
Superscript |
Creates superscript characters. |
|
|
Text Effects |
Apply a visual effect to selected text, such as shadow, glow, or reflection. |
|
|
Text Highlight Color |
Makes text look like it was marked with a highlighter pen. |
|
|
Font Color |
Changes the text color. |


Top of Page
Styles allow you to quickly format major elements in your document, such as headings, titles, and subtitles. Follow the steps below to apply styles to the text in your document.
-
Highlight the text you want to change.
-
On the Home tab in the Styles group, pause the pointer over any style to see a live preview directly in your document. To see the complete list of styles, click the More arrow to open the Styles pane.
-
To apply the style that’s most appropriate for your text, just click it.
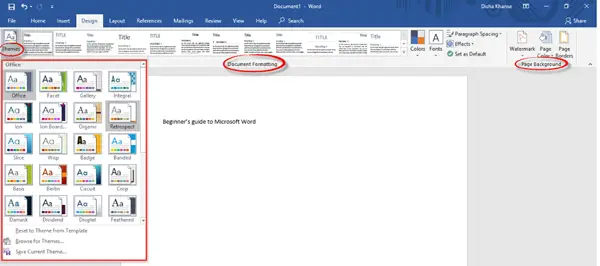
When you’re done applying styles to the individual elements, Word lets you use a style set to change the look of your whole document all at once.
-
On the Design tab, in the Document Formatting group, choose one of the predefined style sets, such as Basic or Casual. Pause the pointer over any style set to see a live preview directly in your document. To see more predefined style sets, click the down arrow on the right side of the Document Formatting group.
-
To apply the style set that’s most appropriate for your text, just click it.
Top of Page
With Word, you can easily change the spacing between lines and paragraphs in your document.
-
On the Design tab, click Paragraph Spacing to see a drop-down list of paragraph spacing options. Pause the pointer over any paragraph spacing style to see a live preview directly in your document.
-
When you find the look you want, click it.
Tip: To define your own paragraph spacing, choose Custom Paragraph Spacing.
Top of Page
It’s easy to preview what the layout of your document will look like when printed without actually printing.
-
Click the File tab.
-
Click Print to see a preview of your document.
-
Review the Settings for any properties you might want to change.
-
When the properties for your printer and document appear the way that you want them to, click Print.

Top of Page
To use Word, look for the Word icon in the Start menu and click it.
-
Click the Start button
to display the Start menu. -
Point to All Programs, Microsoft Office, and then clickMicrosoft Word 2010.
-
The startup screen appears, and Word starts.
 to display the Start menu.
Tip: The first time you start Word, the Microsoft Software License Agreement might appear.
To quit, choose the Exit command on the File tab.
-
Click the File tab.
-
Choose Exit.
If you made any changes since you last saved the document, a message box appears asking if you want to save changes. To save the changes, click Yes. To quit without saving the changes, click No. If you clicked the Exit button by mistake, click Cancel.
Top of Page
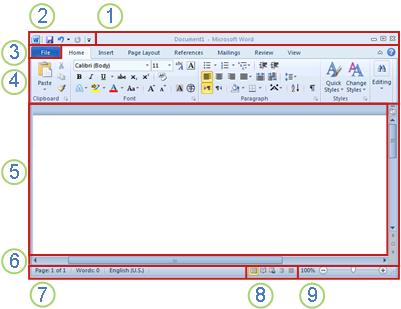
1 Title Bar: Displays the file name of the document that is being edited and the name of the software you are using. It also includes the standard Minimize, Restore, and Close buttons.
2 Quick Access Toolbar: Commands that are frequently used, such as Save, Undo, and Redo are located here. At the end of the Quick Access Toolbar is a pull-down menu where you can add other commonly used or commonly needed commands.
3 File Tab: Click this button to find commands that act on the document itself rather than the content of the document, such as New, Open, Save as, Print, and Close.
4 Ribbon: Commands needed for your work are located here. The appearance of the Ribbon will change depending on the size of your monitor. Word will compress the ribbon by changing the arrangement of the controls to accommodate smaller monitors.
5 Edit Window: Shows the contents of the document you are editing.
6 Scroll Bar: Lets you change the display position of the document you are editing.
7 Status Bar: Displays information about the document you are editing.
8 View Buttons: Lets you change the display mode of the document you are editing to fit your needs.
9 Zoom slide control: Lets you change the zoom settings of the document you are editing.
Top of Page
In Word, you must save your document so you can quit the program without losing your work. When you save the document, it is stored as a file on your computer. Later, you can open the file, change it, and print it.
To save a document, do the following:
-
Click the Save button in the Quick Access toolbar.
-
Specify the location where you want to save the document in the Save in box. The first time you save your document, the first line of text in the document is pre-filled in as the file name in the File name box. To change the file name, type in a new file name.
-
Click Save.
-
The document is saved as a file. The file name in the Title Bar changes to reflect the saved file name.
You can open a Word document to resume your work. To open a document, do the following:
-
Click the Start button, and then click Documents.
-
Navigate to the location where you stored your file, and double-click the file. The Word startup screen appears, and then the document is displayed.
Tip: You can also open a document from within Word by clicking the File tab and then clicking Open. To open a document you saved recently, click on Recent
.
Top of Page
Before you edit or format text, you must first select the text. Follow the steps below to select text.
-
Place the curser at the beginning of the text you’d like to edit or format and then press the left mouse button.
-
While holding down the left mouse button, move it to the right (called “dragging”) to select the text. A background color is added in the location of the selected text to indicate the selection range.
Most text formatting tools are found by clicking the Home tab and then choosing from the Font group.
1 This is the Home tab.
2 This is the Font group on the Home tab.
3 This is the Bold button. See the table below for the names and functions of all the buttons in the Font group.
|
Button |
Name |
Function |
|---|---|---|
|
|
Font |
Changes the font. |
|
|
Font Size |
Changes the size of the text. |
|
|
Grow Font |
Increases the text size. |
|
|
Shrink Font |
Decreases the text size. |
|
|
Change Case |
Change all the selected text to uppercase, lowercase, or other common capitalizations. |
|
|
Clear Formatting |
Clears all formatting for the selected text, leaving only the plain text. |
|
|
Bold |
Makes the selected text bold. |
|
|
Italic |
Italicizes the selected text. |
|
|
Underline |
Draws a line under the selected text. Click the dropdown arrow to select the type of underline. |
|
|
Strikethrough |
Draws a line through the middle of selected text. |
|
|
Subscript |
Creates subscript characters. |
|
|
Superscript |
Creates superscript characters. |
|
|
Text Effects |
Apply a visual effect to selected text, such as shadow, glow, or reflection. |
|
|
Text Highlight Color |
Makes text look like it was marked with a highlighter pen. |
|
|
Font Color |
Changes the text color. |
Top of Page
Styles allow you to quickly format major elements in your document, such as headings, titles, and subtitles. Follow the steps below to apply styles to the text in your document.
-
Highlight the text you want to change.
-
On the Home tab in the Styles group, pause the pointer over any style to see a live preview directly in your document.
-
To apply the style that’s most appropriate for your text, just click it.
When you’re done applying styles to the individual elements, Word 2010 lets you change the look of your whole document all at once.
-
On the Home tab, in the Styles group, click Change Styles.
-
Point to Style Set to find predefined style sets. Pause the pointer over any style set to see a live preview directly in your document.
-
When you find the look you want, click it.
Top of Page
With Word 2010, you can easily change the spacing between lines and paragraphs in your document.
-
On the Home tab, in the Styles group, click Change Styles.
-
Point to Paragraph Spacing to find a selection of built-in paragraph spacing styles. Pause the pointer over any paragraph spacing style to see a live preview directly in your document.
-
When you find the look you want, click it.
Tip: To define your own paragraph spacing, choose Custom Paragraph Spacing.
Top of Page
It’s easy to preview what the layout of your document will look like when printed without actually printing.
-
Click the File tab.
-
Click Print to see a preview of your document.
-
Review the Settings for any properties you might want to change.
-
When the properties for your printer and document appear the way that you want them to, click Print.
Top of Page
Need more help?
Want more options?
Explore subscription benefits, browse training courses, learn how to secure your device, and more.
Communities help you ask and answer questions, give feedback, and hear from experts with rich knowledge.
Things You Should Know
- To create a basic document, choose a template from the list provided or start with a blank document.
- Use the File tab to open, save, and start documents, and the Insert tab to add any images, symbols, or other media to your document.
- Highlight your text and play around with formatting options in the «Home» tab. You can change the font, italicize/bold/underline your words, and play around with font size.
-
1
Open the Microsoft Word application. Do this by double-clicking the Microsoft Word icon.
-
2
Review the available templates. On the right side of the screen, you’ll see several templates of interest:
- Blank document — A blank document with default formatting.
- Creative Resume/Cover Letter — A clean, pre-formatted resume (and accompanying cover letter) document.
- Student Report with Cover Photo — A document format geared toward an academic demographic.
- Fax Cover Sheet — A document to preface fax reports.
- You can also search for specific templates online from within Word by using the search bar at the top of this screen.
Advertisement
-
3
Choose a template. Doing so will open the template in Word with whatever pre-determined formatting applies to it. Now that your document is open, you’re ready to review your Toolbar options.
- When in doubt, open a blank document.


Advertisement
-
1
Click the File tab. It’s in the top left side of the screen (or in the menu bar for Mac users). From here, you have several useful options on the far left side of your screen:
- Info (PC only) — Click this to review the documents statistics, such as when it was last modified, as well as any potential issues with the document.
- New — Click this to bring up the «New Document» page that lists all of the pre-formatted templates. Opening a new document will prompt you to save your old one.
- Open — Click this to review a list of recently-opened documents. You can also select a directory (e.g., «This PC») in which to search.
- Save — Click this to save your document. If this is your first time saving this particular document, you’ll be prompted to enter a name, save location, and preferred file format as well.
- Save As — Click this to save your document «as» something (e.g., a different name or file format).
- Print — Click this to bring up your printer settings.
- Share — Click this to view sharing options for this document, including email and cloud options.
- Export — Click this to quickly create a PDF or change the file type.
-
2
Click ← in the top left corner of your screen. If you’re using a Mac, you won’t have this option—simply click your document to exit the «File» menu.
-
3
Review the Home tab to see your formatting options. At the top of your screen—from left to right—are five sub-sections of this tab:
- Clipboard — Whenever you copy text, it is saved on your clipboard. You can view copied text by clicking the Clipboard option here.
- Font — From this section, you can change your font style, size, color, formatting (e.g., bold or italic), and highlighting.
- Paragraph — You can change aspects of your paragraph formatting—such as line spacing, indentation, and bullet formatting—from this section.
- Styles — This section covers different types of text for various situations (e.g., headings, titles, and subtitles). You’ll also see the popular «No Spacing» option here, which removes excess spaces between lines of text.
- Editing — A couple of commonly-used tools—such as «Find and Replace», which allows you to quickly replace all appearances of one word with another—live here.
-
4
Click the Insert tab to review the types of media you can place in your document. Insert is to the right of the Home tab. The Insert tab allows you to add things like graphics and page numbers to your document. From left to right, a couple of notable options include the following:
- Table — Clicking this option will allow you to create an Excel-style table right in your document.
- Pictures — Use this feature to insert a picture into your document.
- Header, Footer, and Page Number — These options are all essential for writing in MLA- or APA-style formatting. The Header places a space at the top of the document for comment, while the Footer goes at the bottom—page numbers are customizable.
- Equation/Symbol — These options use special formatting to accurately display simple equations. You can select these equations or symbols from the pertinent drop-down menu.
-
5
Click the Design tab to create your own template. It’s to the right of the Insert tab.
- The Design tab contains pre-designed themes and formats listed across the top of the page.
-
6
Click the Layout tab to customize your page’s formatting. This tab contains options for changing the following aspects of your document:
- Margins
- Page orientation (vertical or horizontal)
- Page size
- Number of columns (defaults to one)
- Location of page breaks
- Indentation
-
7
Click the References to manage your citations. If you have a bibliography page, you can also manage it from here.
- For quick bibliography formatting, click the Bibliography drop-down menu and select a template.
- In the «Citations & Bibliography» group of options, you can change your bibliography formatting from APA to MLA (or other citation styles).
- The «Captions» group has an option to insert a table of figures. This is useful for scientific review papers or similar documents in which statistical data is prioritized over quotations.
-
8
Click the Mailings tab to review your document sharing options. You can review your email settings and share your documents from within this section.
- You can also print an envelope or label template by clicking the pertinent option in the top left corner of your screen.
- The Select Recipients drop-down menu allows you to choose Outlook contacts as well as an existing contact list within Word.
-
9
Click the Review tab. The Review section is geared towards editing, so it includes options for marking up documents and proofreading. A couple of important options include:
- Spelling & Grammar — Click this option (far left corner) to underline any spelling or grammatical errors.
- The «Changes» section — This is to the far right of the toolbar. From here, you can enable the «Track Changes» feature which automatically formats any additions or deletions you make in a document to appear in red print.
-
10
Decide on the set of options that best apply to your work. If you’re a student, for example, you’ll likely use the Insert and References tab often. Now that you’re familiar with the toolbar options, you can format your first Word document.


Advertisement
-
1
Open a new Blank Document in Word. If you have an existing document, you can open that instead.
-
2
Enter text. Do this by clicking on the blank section of the document and typing away.
- If you opened an existing document, be sure to save your work before re-formatting.
-
3
Highlight a section of text. To do this, click and drag your cursor across your writing, then let go when you’ve highlighted the section you wish to edit.
-
4
Consider what you want to do to the writing. Some potential options include:
- Quickly format your writing. Do this by right-clicking (or two-finger clicking) your highlighted text and then selecting an option from the right-click menu.
- Change the font of your selection. You can do this by clicking the drop-down bar at the top of the «Font» section (Home tab) and then selecting a new font.
- Bold, italicize, or underline your highlighted section. To do this, click the B, I, or U in the «Font» section of the Home tab.
- Change your document’s spacing. This is easiest to accomplish by right-clicking your selected text, clicking Paragraph, and modifying the «Line Spacing» value in the bottom right corner of this window.
-
5
Continue working with Word. Your preferred options for your documents will differ based on the intention behind creating them, so the more you work within your own particular format, the more proficient you’ll become.


Advertisement
Add New Question
-
Question
How do I copy and paste?

To copy a certain piece of text, highlight it and press Ctrl + C. Then click the spot you want to place the copied text and press Ctrl + V to paste.
-
Question
How do I place a logo in MS Word?
Press the Insert tab and then press the Pictures button. You will then be allowed to select the image.
-
Question
How can I save a document to a specific location?
Click File —> Save As… and you’ll be allowed to select the destination location (and filename and format) of the file.
Ask a Question
200 characters left
Include your email address to get a message when this question is answered.
Submit
Advertisement
-
A red line under a word means the word is misspelled, a green underline suggests a grammatical error, and a blue underline pertains to formatting.
-
If you right-click (or two-finger click) an underlined word, you’ll see a replacement suggestion at the top of the right-click menu.
-
You can quick-save your document by holding down Control (or Command on Mac) and tapping S.
Thanks for submitting a tip for review!
Advertisement
-
Don’t forget to save your work before closing Word.
Advertisement
About This Article
Article SummaryX
1. Create blank documents or from templates.
2. Format text colors, fonts, and sizes.
3. Insert media like photos and animations.
4. Insert data like tables, page numbers, headers, and equations.
5. Customize the on-screen and print layouts.
6. Add references and citations.
Did this summary help you?
Thanks to all authors for creating a page that has been read 213,472 times.
Is this article up to date?
This Microsoft Word beginner guide provides free & basic lessons, tutorials & fundamentals for learning MS Office Word software. Microsoft Word is everyone’s favorite text editor. With so many features, it can meet all your requirements. It may look complicated to use initially, but once you get the hang of it, things start falling in place. This blog post is for those who want to learn the basic functions and features and know more about Microsoft Word.
To start the Microsoft Word application, click on the START button > Microsoft Office > Word or simply search for ‘Word’ in the search box and then click on the result. Once it is opened, select New document.
This is how the opened blank Microsoft Word document will look like.

Now let us take a look at the features that it has to offer.
1] Title and the Quick Access Toolbar
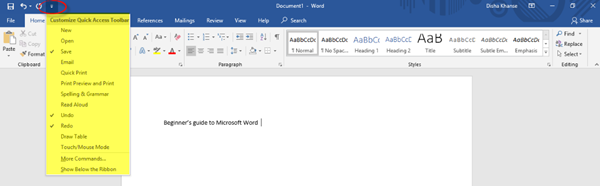
At the top, you have the Title of the document, the Quick Access Toolbar and a few other functions such as Minimize, Restore Down / Maximize, Close and Ribbon Display Options.
In the Quick Access Toolbar to the left of the Title Bar, you will find the Save button (Ctrl+S), wherein you can save the document in the desired folder; the Undo Typing button (Ctrl+Z); the Repeat Typing button (Ctrl+Y); and the Customize Quick Access Toolbar, wherein you have the various commands as shown in the image below.
In the Ribbon Display Options, it is possible to Auto-hide the ribbon, show the ribbon tabs only or show the tabs and commands all the time. Refer to the image below.
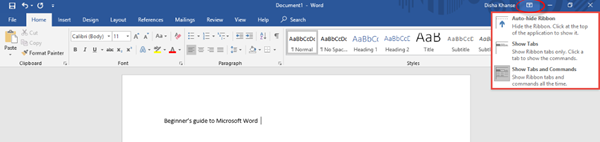
Below the Title Bar, you will see what is called the Ribbon which consists of various tabs such as File, Home, Insert, Design, Layout, References, Mailings, Review, View, Help, Search. Now let us go through every Tab and its commands.
2] Home
The Home tab is the default tab in Microsoft Word. This tab comprises of features related to the clipboard, font, paragraph, styles, and editing.
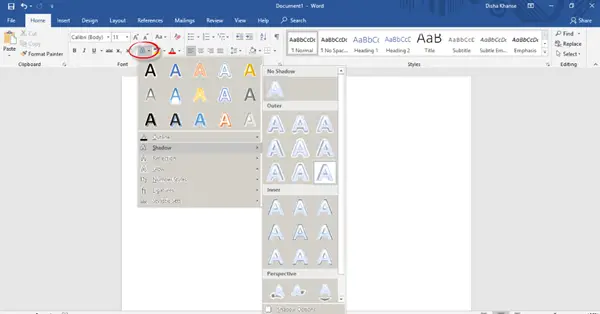
In the Clipboard section, you will find commands such as copy, cut and paste. Next, we have the Font section. Here you can change the font and the font size for your text, change the case, apply bold or italic formatting, underline, change the font color and highlight text and also add various text effects and typography. Go ahead and explore all the different options to make your text look great and innovative!

The Paragraph section includes the alignment options where you can choose to align your text in the center, left, right or justify it (that is, evenly distribute the text between the margins).
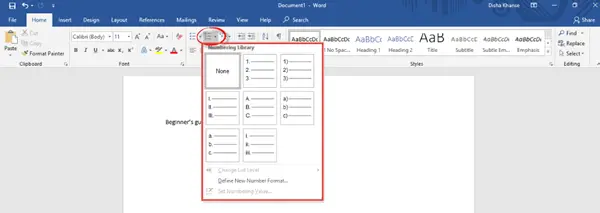
You can add or remove borders, increase or decrease indent, adjust the line and paragraph spacing, and also add bullets and numbers from the bullets and numbering libraries.
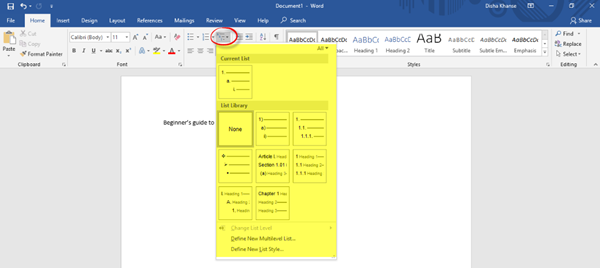
You can also create a multilevel list to organize items or create an outline.
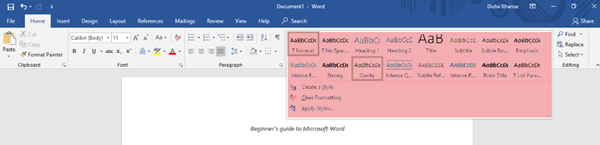
From the Styles section, you can select any style of your choice to change the way your document looks. In the Editing section, you can find text or any content in the document and also replace a specific word or text with something else.
3] Insert
The next tab is the Insert tab.

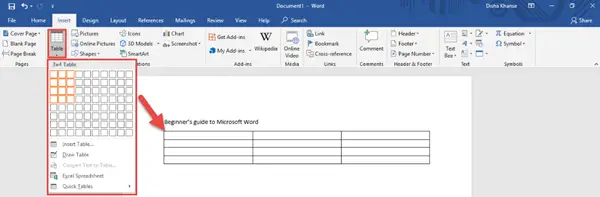
You can add a stylish cover page from the numerous styles available to make your document look more professional and also add a blank page from the Pages section. Another important feature is inserting a table, a picture from your picture gallery, an online picture from the web, shapes, 3D models, charts, SmartArt and screenshots from the Tables and the Illustrations section. Refer to the images below for guidance.
You can insert Tables.
You can insert Shapes.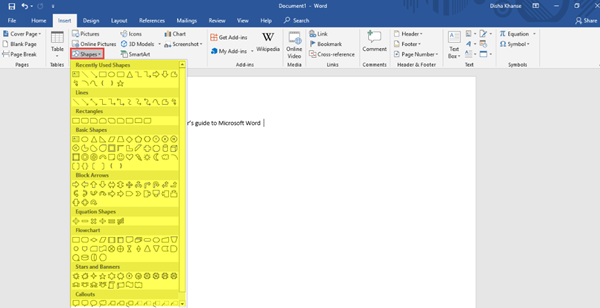
You can insert SmartArt – and more!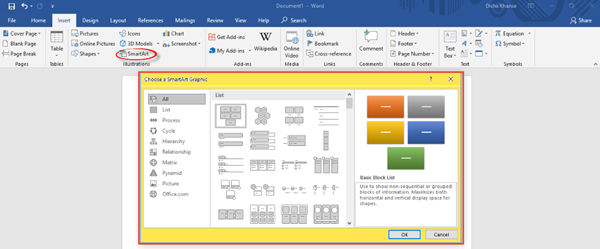
In the Header & Footer section, you can add a built-in header and a footer or from online sources. You can also add page numbers to your document.
Similarly, there are a lot of other features and commands in the Add-ins, Media, Links, Comments, Text and Symbols sections.
4] Design
The Design tab comprises of commands related to Document Formatting and Page Background. To make your document look more consistent and classy, choose the right theme of your liking from the various options available. Additional features include colors, fonts, effects, and paragraph spacing.
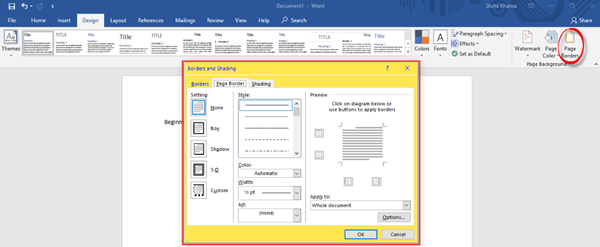
If you wish to go for a splash of color for the document background, you can change the page color as well, add Watermark and page borders.
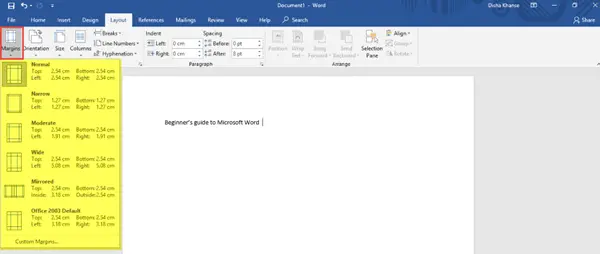
5] Layout
In this tab, in the Page Setup section, you can adjust margins for the entire document or for a particular section; and also customize it. You can change the Page Orientation to Landscape or Portrait; choose the page size for your document, and add or remove columns.
You can also decide the Size for the document.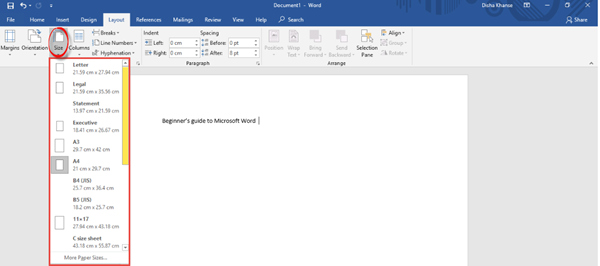
Find the settings to increase or decrease the Indent and Spacing in the Paragraph section.
Other features related to the placement of text and pictures, grouping multiple images and rotation options will be found in the Arrange section.
6] References
In the References tab, you will find different commands related to the table of contents, footnotes, research, citations and bibliography, captions, index and table of authorities.

7] Mailings
Here, you will find settings that will help you to create envelopes and labels, start the mail merge wherein you can send it to multiple recipients, write and insert fields, preview results and finish mail merge.

8] Review
The Review tab includes various functions related to proofing, speech, accessibility, language, comments, tracking, changes, compare, protect and ink. Out of all these, the Spelling and Grammar function (F7) is of utmost importance. Do check for spelling and grammatical errors after you are done writing your document.

9] View
In the View tab, you can change the views such as Read Mode, Print Layout, Web Layout, etc. Feel free to explore the additional features from the immersive, page movement, show, zoom, window, macros, and SharePoint sections.

10] Help
In the Help tab, you can contact an office support agent and give feedback.

11] Search
In the Search tab, you can type any feature that you are looking for and get help.
12] File
In the File tab, you can save the document, print and share the document, and also publish it.

In this post, I have tried to cover all the basic and useful features and functions of Microsoft Word.
This is my first blog post and I hope it was helpful to you. Your suggestions are most welcome.
Do try out all these features in order to make your MS Word document absolutely presentable and perfect!
Next, you might want to take a look at our Microsoft Word Tips And Tricks post.

Microsoft Office Word является программным инструментом для написания и обработки текста. Данная программа очень распространена в повседневной офисной работе. Зачастую у сотрудников, которым приходится работать с текстом, требуют минимальных навыков работы в Офисе. В печати текста ничего сложного нет, но для его обработки и правильного оформления нужны определённые знания.
Содержание
- Основы работы в Microsoft Word
- Набор текста в документ
- Сохранение готового документа
- Работаем со шрифтом
- Выравнивание содержимого документа
- Изменение начертания текста
- Вставка изображения в документ Word
С помощью Ворда можно создавать тексты разного типа: рефераты, курсовые работы, документы и прочее. Предоставляется возможность оформления текста с помощью изменения внешнего вида, добавления картинок, таблиц и других необходимых элементов.
Скачать программу Microsoft Word
Набор текста в документ
Открыв программу с рабочего стола или меню «Пуск», нас встретит чистый белый лист бумаги формата A4. Формат листа можно изменить под любой другой стандартный, об этом немного позже.

Прокручивать страницы можно с помощью специального ползунка справа от листа A4, либо колёсиком компьютерной мыши.
![]()
Чтобы начать печать текста, используя левую кнопку мыши, установите курсор на начало предполагаемого текста вверху страницы.
Если вы случайно что-то сделали не так либо удалили фрагмент текста, можно вернуть действие назад. Для этого используйте комбинацию клавиш «Ctrl + Z».
Сохранение готового документа
Для сохранения ваших трудов, написанных на чистом листе электронной «бумаги», в полноценный файл для его дальнейшего использования или обработки, существует несколько вариантов действий:
- Сохранение с помощью нажатия на отведённую под это клавишу в меню «Файл». Нажимаем на кнопку «Файл» в левом верхнем углу экрана, затем выбираем пункт «Сохранить как».

Высветится окно, в котором будет предложено выбрать название документа и место, где он разместится после сохранения для доступа к нему.

Сохранение методом «Сохранить как» возможно также нажатием комбинации клавиш, установленных в настройках программы. У версий разных годов выпуска эти комбинации по умолчанию могут отличаться. Комбинацией может быть как «Ctrl + Shift + S» так и «Shift + F12».
- Быстрое сохранение возможно с помощью комбинации клавиш «Ctrl + S» либо с помощью специальной кнопки над меню «Файл». Как и в пункте перед этим, вам будет предложено выбрать место хранения файла и его будущее местоположение. Если до этого файл уже существовал или вы производили его сохранение, окно высвечиваться не будет, а новое содержимое заменит старое.


Программа Microsoft Word по умолчанию устанавливает параметр автоматического сохранения документа. Отключить данный параметр можно по пути: «Файл» — «Параметры» — «Сохранение». В этом меню можно выбрать как возможность отключения автосохранения, так и интервал времени, через который данная функция будет сохранять изменённый файл автоматически. Очень полезная функция для людей, забывающих сохранять свои документы вручную.

При работе с важными для вас документами не отключайте функцию автоматического сохранения во избежание потери данных. Причиной аварийного завершения программы может быть что угодно: случайное закрытие программы, аварийное завершение работы компьютера из-за погодных условий и прочее.
Работаем со шрифтом
Визуальное восприятие текста очень важно для читателя. Порой, из-за неправильного оформления у человека, читающего текст, пропадает всякое желание его дочитывать, каким интересным он бы не был. Для презентабельного вида набранного потока букв и символов существуют встроенные в программу инструменты.
Чем сложнее выглядит оформление текста, тем меньше желания его читать будет у пользователей документа. Принято при выборе внешнего вида текста использовать шрифт «Times New Roman» 14-го размера. Для заголовков используется 16-й размер.
Если вы всё же решились использовать другой шрифт на своё усмотрение, Ворд предлагает своим пользователям готовый список из шрифтов, предустановленных вместе с операционной системой. В случае, когда вам предоставленного количества недостаточно, вы можете установить скачанные или купленные в интернете шрифты дополнительно.
Шрифт имеет два основных параметра, это тип шрифта и его размер. Помимо них существуют также другие, дополнительные параметры для более оригинального оформления текста. Чтобы применить любой из параметров, сначала нужно выделить определённый фрагмент документа для его обработки. Для этого зажимаем левой кнопкой мыши на начало фрагмента и тянем до его конца. Чтобы выделить сразу всех документ, жмём комбинацию клавиш «Ctrl + A».

-
- Для изменения типа достаточно нажать на панели на его название и выбрать из списка новый шрифт. При наведении на желаемый вариант вы сможете предварительно просмотреть, как будет выглядеть текст перед окончательным выбором. Листать список можно с помощью колёсика мыши либо нажатием ползунка, который появился справа в открытом окне.

-
- Чтобы изменить размер шрифта, нажмите на цифровое значение справа от названия шрифта и таким же способом сможете подобрать размер букв и символов.

Дополнительно, можно изменять размер шрифта, не выбирая цифровой параметр, а лишь нажимая на две отвечающие за это кнопки. Левая кнопка увеличивает размер букв на одну ступень, а правая, соответственно, уменьшает.

-
- Порой требуется масштабное изменение регистра текста по всему документу. Сам регистр отвечает за прописную и заглавную букву в тексте, какой именно она будет выглядеть. Пользователь может написать большой символ с помощью зажатия клавиши «Shift» и желаемой буквы либо включением «Caps Lock». Если нужно изменить регистр большого объема материала без переписывания, приходит на помощь функция «Регистр».

При нажатии на данную кнопку нам предоставляются несколько параметров, выбор которых зависит от ваших предпочтений. Их действие можно увидеть на примерах, указанных в строках выбора. Как и в случае с изменением шрифта, перед применением параметра необходимо выделить фрагмент текста для обработки.
- Порой требуется масштабное изменение регистра текста по всему документу. Сам регистр отвечает за прописную и заглавную букву в тексте, какой именно она будет выглядеть. Пользователь может написать большой символ с помощью зажатия клавиши «Shift» и желаемой буквы либо включением «Caps Lock». Если нужно изменить регистр большого объема материала без переписывания, приходит на помощь функция «Регистр».


Выравнивание содержимого документа
Существует четыре функции для выравнивания содержимого в документе по листу:
- Выравнивание по левому краю (комбинация клавиш «Ctrl + L»);
- Выравнивание по центру (комбинация клавиш «Ctrl + E»);
- Выравнивание по правому краю (комбинация клавиш «Ctrl + R»);
- Выравнивание по ширине (комбинация клавиш «Ctrl + E»).
Если с тремя первыми функциями всё понятно, тогда в чём же заключается суть выравнивания по ширине? Всё предельно просто. Данный параметр обязателен при приёме документов в некоторых организациях, поскольку после его применения текст регулярно заполняет лист с обеих сторон. Чтобы понять это, посмотрим его действие на примере:
-
- Выравнивание по левому краю:

-
- Выравнивание по ширине:

На примере видно, что во втором варианте текст с правой стороны разместился более аккуратно, ближе к краю. Именно таким должен быть формат официального материала, когда речь касается выравнивания.
Изменение начертания текста
Практически в любом редакторе есть возможность изменения стиля текста, и эта функция, конечно же, не обошла легендарный Word. Для этих параметров также есть комбинации клавиш для быстрого оформления материалов.
В редакторе Ворд представлены три основных функции для изменения начертания. Доступ к ним открыт в верхней панели управления, в том же окне, что и выбор шрифта.

-
- Полужирный (комбинация клавиш «Ctrl + B»);

-
- Курсив (комбинация клавиш «Ctrl + I»);

-
- Подчёркнутый (комбинация клавиш «Ctrl + U»).

Данные параметры можно совмещать между собой. Так будет выглядеть текст с применёнными к нему тремя параметрами начертания, упомянутыми выше:

Вставка изображения в документ Word
-
- Чтобы вставить элемент в документ, необходимо в первую очередь открыть подменю «Вставка» в верхней панели программы.

-
- В галерее программы Ворд уже есть определённый набор изображений для их вставки в документ. Для просмотра данных файлов нажимаем кнопку «Картинка».

-
- В появившемся окне справа производим поиск по галерее с пустым запросом, то есть, ничего не вводя в строку поиска.

Если картинки уже есть, искать их больше нет необходимости, достаточно прокрутить колёсиком мыши и выбрать желаемое изображение.
- Если же вы желаете вставить собственное изображение, сохранённое на компьютере, нажимаем кнопку левее с надписью «Рисунок».
- В появившемся окне справа производим поиск по галерее с пустым запросом, то есть, ничего не вводя в строку поиска.


В появившемся окне ищем желаемое изображение среди файлов на вашем компьютере.

Как видим, выполнять основную работу в офисной программе Word не сложно, главное привыкнуть к интерфейсу и приноровиться к функциям для понимания их назначения.
Как работать в Word для чайников
![]()
Автор:
Обновлено: 29.04.2018
Microsoft Word — это текстовой редактор, который может быть частью пакета Microsoft Office или программой, установленной на вашем компьютере отдельно. Программа может использоваться для записи писем и различных типов документов, которые могут включать в себя графику и изображения. В этом руководстве объясняется, как открыть Microsoft Word, запустить, создать и сохранить новый документ с использованием операционной системы Windows 7.
Не стоит бояться, что что-то может не получиться или пойти не так. Эта программа создавалась для пользователей, и она продумана до мелочей, чтобы вам было максимально удобно использовать ее. И конечно же в каждом деле главное тренировка, не бойтесь делать ошибок. Если вы случайно нажали не туда, в левом верхнем углу всегда есть изогнутая стрелка, которая позволяет отменить последнее действие. Сделать это можно также используя сочетание клавиш Ctrl и Z.

Как работать в Word для чайников
Последний совет перед началом подробных инструкций по использованию текстового редактора от Windows — не забывайте сохранять файл. Это особенно важно при работе с объемными текстами или серьезной документацией. Бывает всякое: могут отключить электричество, ноутбук может разрядиться и выключиться, да и от поломок никто не застрахован. Терять важные файлы и потом тратить часы на их восстановление — не самое приятное занятие. Все, что вам нужно — время от времени нажимать на дискету в левом верхнем углу.
Содержание
- Как создать документ
- Навигация по программе
- Как выбрать (выделить) текст
- Меняем размер и шрифт
- Выравнивание текста
- Как выделить текст жирным шрифтом, курсивом или подчеркиванием
- Копируем и вставляем
- Как создать нумерованный или маркированный список
- Вставляем таблицу
- Видео — Word для начинающих
Как создать документ
Программу можно найти в меню «Пуск» в разделе «Microsoft Office». Следуйте этим пошаговым инструкциям, чтобы запустить документ в Microsoft Word.
- Шаг 1. На рабочем столе или в меню «Пуск» откройте Microsoft Word.

Открываем Microsoft Word
- Шаг 2. Microsoft Word откроется и предложит вам выбрать шаблон документа или пустой документ.

Выбираем шаблон
- Шаг 3. Если вы не хотите использовать какой-либо из отображаемых шаблонов, щелкните пустой документ.
Щелкаем пустой документ
- Шаг 4. Новый пустой документ откроется для вас, чтобы начать вводить текст.


Навигация по программе
- Шаг 1. Мигающий курсор (указатель мыши) в документе сообщает вам, где вы печатаете. Где бы ни находился мигающий курсор, буквы, которые вы вводите, будут вставлены в эту точку. Когда вы начинаете пустой документ, мигающий курсор будет в начале вашего документа, это значит, что он готов для начала ввода.

Мигающий курсор
- Шаг 2. По мере ввода курсор также перемещается с каждой буквой. Это показывает вам, где находится фокус для ввода.

Где находится фокус для ввода
- Шаг 3. Переместите указатель мышью туда, где вы хотите изменить или добавить текст. Щелкните мышью. Мигающий курсор будет перемещен в то место, где вы нажали, для редактирования или вставки текста.
- Шаг 4. Перемещаться по документу можно с помощью стрелок. Нажатие этих клавиш со стрелками перемещает мигающий курсор вверх, вниз по строкам текста, и направо/налево по одному символу.

Перемещаться по документу можно с помощью стрелок


Как выбрать (выделить) текст
Выбор или выделение текста позволяет вам изменять выделенный фрагмент с точки зрения стиля, шрифта и/или цвета и даже заменять слова, если это необходимо. Следуйте этим пошаговым инструкциям, чтобы выбрать текст в документе.
Шаг 1. Для выбора текста используется мышь. При перемещении указатель будет меняться.
Шаг 2. Переместите указатель на начало необходимого фрагмента. Нажмите и удерживайте левую кнопку мыши. Выполняя это, переместите указатель туда, где необходимо остановить выбор. При перемещении мыши текст будет выделяться. Когда вы закончите свой выбор, отпустите левую кнопку мыши.

Выделение текста с помощью мыши
Выбранный текст теперь может быть отформатирован или изменен.
Скопировать текст можно с помощью клавиш Ctrl+C. Удалить текст — Backspace.

Backspace
Меняем размер и шрифт
Следующие действия могут помочь сделать ваш текст более интересным и привлекательным. Текст может быть изменен по-разному.
- Шаг 1. Для начала фрагмент текста нужно выделить, вы уже умеете это делать.
- Шаг 2. Чтобы поменять вид шрифта, щелкните на стрелку рядом со стилем шрифта в панели инструментов.

Меняем вид шрифта
- Шаг 3. Выберите стиль шрифта из раскрывающегося списка.

Выбираем стиль шрифта
- Шаг 4. Рядом с полем стиля шрифта находится поле, содержащее число и стрелку. Оно изменяет размер шрифта. Нажмите на стрелку. Выберите размер так же как и стиль из раскрывающегося списка опций. Итак, выбрав шрифт Bad Scrit и размер — 16, мы получим следующее.


Пример шрифта Bad Scrit и размера -16
Выравнивание текста
Иногда создаваемый документ может требовать разное расположение абзацев. По умолчанию текст выравнивается по левому краю. Однако текст может выравниваться и по правому краю и по центру.

Выравнивание текста по левому краю
На заметку! Выделить весь текст Ctrl + A.
- Шаг 1. Чтобы изменить макет вашего текста, выделите текст, любым удобным для вас способом.
- Шаг 2. Чтобы выровнять его по центру, щелкните значок «Выровнять по центру» на ленте форматирования в верхней части документа.
Выравнивание текста по центру
- Шаг 3. Чтобы выровнять выделенный текст по правому краю, щелкните следующий значок в этом ряду.
- Шаг 4. Чтобы «обосновать» текст так, чтобы он был выровнен как справа, так и слева, щелкните значок «Выравнивание по ширине».

Изменить выбранный текст можно, используя комбинацию сочетаний клавиш, что иногда бывает проще:
- По центру — выделите текст, нажмите клавишу Ctrl + E.
- По правому краю — Ctrl + R.
- По ширине — Ctrl + J.
- По левому краю — Ctrl + L.

Горячие клавиши word
Как выделить текст жирным шрифтом, курсивом или подчеркиванием
Возможность изменить стиль шрифта может сделать ваш документ более интересным. Различные стили текста, такие как полужирный или курсив, могут выделять его. Подчеркивание может быть полезно для заголовков.
- Шаг 1. Как обычно, выделите необходимый вам фрагмент текста.
- Шаг 2. Чтобы изменить выделенный шрифт на полужирный, нажмите «Ж» на панели форматирования.
Чтобы изменить выделенный шрифт на полужирный, нажмите «Ж»
- Шаг 3. Чтобы изменить выделенный шрифт на курсив, нажмите «К» в ленте форматирования.
- Шаг 4. Чтобы изменить выделенный текст так, чтобы он был подчеркнут, нажмите «Ч» на ленте форматирования.

Чтобы текст был подчеркнут, нажмите Ч
- Шаг 5. Также можно изменить выделенный текст, используя сочетания клавиш:


- полужирный — Ctrl + B;
- курсив — Ctrl + I;
- подчеркивание — Ctrl + U.
Копируем и вставляем
Говорить о важности этих двух функций не приходится. Они значительно экономят наше время, позволяют вставлять текст из сторонних источников, не перепечатывая его, как это было во времена печатных машинок.
- Шаг 1. Выделите нужный вам фрагмент.
- Шаг 2. Щелкните по значку копирования в левой части ленты форматирования. Текст тут же скопируется в буфер обмена вашего компьютера.
Кнопка копирования
- Шаг 3. Переместите курсор и нажмите «Вставить».

Сделать это можно и с помощью горячих клавиш. Все как и в прошлый раз: нажмите одновременно Ctrl и С, чтобы скопировать текст, и Ctrl и V, чтобы вставить.
Как создать нумерованный или маркированный список
Использование нумерованных или маркированных списков может помочь выделить элементы или показать важные шаги, иерархию или последовательность чего-либо.
- Шаг 1. Чтобы создать нумерованный список, щелкните значок нумерации.

Создаем нумерованный список
- Шаг 2. В тексте появится первый пункт.

Первый пункт
- Шаг 3. Начните вводить свой текст. По окончании ввода нажмите на кнопку «Ввод» на вашей клавиатуре. Появится второй пункт. И так далее.

Второй пункт


Чтобы остановить добавление новых элементов и вернуться к стандартному тексту, щелкните значок нумерации еще раз в верхней части документа.
Маркированный список создается по такому же принципу, единственное отличие заключается в 1 шаге. Вместо кнопки «Нумерация» нажмите на кнопку «Маркеры», она расположена правее.
Есть еще один способ создания списка. Сначала пользователем вводятся все пункты списка, каждый обязательно с новой строки. Когда все пункты набраны выделите их все и нажмите либо на нумерацию, либо на маркеры, в зависимости от того какой именно список вам нужен.

Создание нумерованного списка с помощью выделения
У вас получится тот же результат. Это разные способы и здесь нет правильного или неправильного, главное, что цель достигнута. Используйте удобный вам способ.

Пример нумерованного списка
Вставляем таблицу
Таблицы помогают структурировать информацию, подавать ее в более презентабельном виде. Без этого навыка не обойтись.
- Шаг 1. В верхней панели инструментов перейдите на вкладку «Вставка».
- Шаг 2. Нажмите на значок таблицы. Перед вами откроется окно, в котором нужно выбрать количество ячеек. Сделать это можно и вписав цифры вручную. Для этого на появившейся панели нажмите на область «Нарисовать таблицу».

Вставляем таблицу
Вам останется лишь заполнить поля. Если вам вдруг понадобятся дополнительные строки или колонки, вам не придется переделывать ее целиком. Щелкните левой кнопкой мыши в области таблицы. В появившемся меню нажмите «Вставить» и выберите подходящий вариант.

Добавление необходимых столбцов в таблицу
Эти основные знания должны сформировать у вас основные принципы работы с текстом. Выделим основные:
- Текст вводится туда, где находится мигающий курсор и никуда больше.
- Чтобы изменить символ, слово, строку, абзац или весь текст, его в первую очередь нужно выделить. Необходимо, чтобы компьютер понимал над чем именно он должен производить действия.
- Выделив текст с ним можно делать все что угодно. Вы можете потренироваться, выделить фрагмент и поочередно нажимать на кнопки, которые расположены на вкладке «Главная». Вы заметите, какие функции могут использоваться совместно, а какие являются взаимоисключающими.
- Не забывайте сохранять изменения, так вы обезопасите себя.
- Используйте те способы решения стоящей перед вами задачи, которые удобны именно вам.
Видео — Word для начинающих
Рекомендуем похожие статьи