
Changing the Measurement Units for Your Word Documents (Inches to Centimeters or Vice Versa)
by Avantix Learning Team | Updated January 10, 2021
Applies to: Microsoft® Word® 2010, 2013, 2016, 2019 and 365 (Windows)
You can easily change the measurement system units in Microsoft Word for all of your documents. If you’d prefer to work in inches rather than cm (centimeters) or vice versa, simply change the measurement system in Word’s Options. You can choose inches, centimeters, millimeters, points or picas. Changes in the measurement system will affect Word’s Ruler as well as various dialog boxes (including the Paragraph dialog where you can change paragraph indents).
Unless the client or publication has a specific requirement for a type of measurement, most Microsoft Word users measure in inches or centimeters. Word and most graphic design programs support points, picas and other units and it is easy to convert from one unit to another.
Recommended article: How to Hide Comments in Word (or Display Them)
Do you want to learn more about Microsoft Word? Check out our virtual classroom or in-person Word courses >
Changing the measurement system in Microsoft Word
To change the measurement system in Microsoft Word from centimeters to inches or to another unit of measure:
- Click the File tab in the Ribbon.
- Click Options.
- Click Advanced in the categories on the left.
- Scroll down to the Display group in the panel on the right.
- Beside Show measurements in units of, choose inches, centimeters, millimeters, points or pics from the drop-down menu.
- Click OK.
Below is the Word Options dialog box with the option to change measurement settings:

Below is the Ruler in Microsoft Word in inches:
![]()
Below is the Ruler in Microsoft Word in centimeters (cm):
![]()
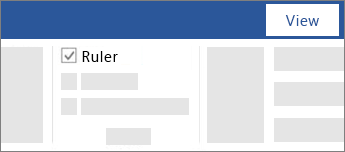
If the Ruler is not displayed, click the View tab in the Ribbon and ensure the Ruler check box is checked.
Understanding points and picas
The two units of measurement most commonly used for typesetting and design are points and picas.
A point is equal to 1/72 inch (72 points in an inch). To be more precise, 1 point is equal to .013836 inch so 72 points are actually .996264 inch. This is rounded up for practical reasons. Points are the measurement unit most often used in printed publications created by graphic designers to indicate the size of type (font size) as well as the space between lines (this would be line spacing in Word but is called leading in many other programs). Points are often abbreviated as «pt». Typographers would have traditionally referred to a type setting as 12/16 which would mean a 12 point type with 16 point leading or line spacing.
A pica is slightly less than 1/6 inch and contains 12 points. Picas are often used for fixed horizontal measurements (most often column width). They are commonly used by graphic designers when designing newspapers, magazines, newsletters and ads. Picas are often abbreviated as «p» (such as 16p). For example, the standard width for one column of text on a three-column grid on an 8.5″ x 11″ document is 14 picas and 4 points (normally abbreviated as 14p4).
Although most Microsoft Word users tend to use inches or centimeters as their preferred measurement system, points are used for font size and the space before and after paragraphs (in the Paragraph dialog box).
Subscribe to get more articles like this one
Did you find this article helpful? If you would like to receive new articles, join our email list.
More resources
How to Insert a Line in Word (3+ Ways)
How to Number Pages in Word (Step-by-Step)
How to Compress Images in Microsoft Word to Reduce File Size
How to Insert or Type the Degree Symbol in Word (5 Ways to Insert °)
How to Create a Table of Contents in Microsoft Word (Insert, Format and Update a TOC)
Related courses
Microsoft Word: Intermediate / Advanced
Microsoft Word: Styles, Templates and Tables of Contents
Microsoft Word: Designing Dynamic Word Documents Using Fields
Microsoft Word: Long Documents Master Class
Microsoft Word: Accessible Word Documents
Microsoft PowerPoint: Intermediate / Advanced
VIEW MORE COURSES >
Our instructor-led courses are delivered in virtual classroom format or at our downtown Toronto location at 18 King Street East, Suite 1400, Toronto, Ontario, Canada (some in-person classroom courses may also be delivered at an alternate downtown Toronto location). Contact us at info@avantixlearning.ca if you’d like to arrange custom instructor-led virtual classroom or onsite training on a date that’s convenient for you.
Copyright 2023 Avantix® Learning
Microsoft, the Microsoft logo, Microsoft Office and related Microsoft applications and logos are registered trademarks of Microsoft Corporation in Canada, US and other countries. All other trademarks are the property of the registered owners.
Avantix Learning |18 King Street East, Suite 1400, Toronto, Ontario, Canada M5C 1C4 | Contact us at info@avantixlearning.ca
19
19 people found this article helpful
How to Show the Ruler in Word
Use it to adjust margins, tabs, and more
What to Know
- In Print Layout: On the View tab, select Print Layout. Choose the Ruler check box to display the rulers.
- In Draft Layout: On the View tab, select Draft. Choose the Ruler check box to display the rulers.
- With the rulers enabled in the print or draft layout, you can change the margins and tabs.
This article explains how to display the ruler in Microsoft Word—and how to use the ruler to change margins and create tabs.
How to Show the Ruler in Word
Word has a ruler feature that enables you to do reasonably accurate layout work right within a Word document. If you want to set a tab, or see how big your text box or headline will be when you print a document, you can use the ruler to measure where on the page you want those elements to fall and see how big they will be when printed.
If you don’t see the ruler while working on a document, it’s probably turned off. Here’s how to show the ruler in Word.
-
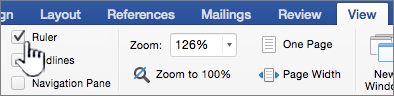
If you want a ruler that appears horizontally and vertically, first make sure you’re working in the Print Layout view. With your document open, select Print Layout on the View tab.
-
Select the Ruler check box. In the Ribbon, it’s located at the top of the column that also contains Gridlines and Navigation Pain.
-
The ruler will appear above your document, as well as vertically on the left side in the Print Layout.
-
With the rule enabled, you can use tabs and margins, measure the size and placement of text boxes, and more in the Print Layout view.
-
To turn the ruler off, uncheck the Ruler check box.
How to Display the Microsoft Ruler in the Draft Layout in Word
If you prefer to work in the Draft layout, rather than the Print layout, the ruler works similarly in that view. While the ruler will not appear along the vertical margin of your document in the Draft layout, it will display along the top. It works much the same way as it does in the Print layout.
-
First make sure your document is open and you’re looking at it in the Draft view. To do this, Select Draft on the View tab.
-
Select the Ruler check box on the Ribbon. It’s in the same column on the ribbon as Gridlines and Navigation Pane.
How to Use the Microsoft Word Ruler
With the Ruler is enabled in either the Print Layout or in the Draft Layout, you can use it to change the margins and tabs, or to see the size and placement of graphic or type elements.
Using the Ruler to Change the Margins
-
Hover the mouse over the double tab at the left margin. Your mouse will turn to a double arrow and “Left Margin” will display as hover text. The part of the document outside the margin — the the left — is shaded grey.
-
Select and drag the left margin icon to increase your left margin.
-
On the right end of the ruler is the right margin. Hover your mouse over it until your mouse turns into a two-way arrow with «Right Margin» appearing over it.
-
Select and drag the right margin icon to see how it changes your right margin.
How to Create a Tab Using the Ruler
-
Place your cursor on the line where you want to place the tab.
-
Select the ruler in the spot where you want the tab. This will create a small corner-shaped icon representing your tab.
-
Press the Tab key to place a tab in your document, then drag along to ruler to change the tab’s placement.
Thanks for letting us know!
Get the Latest Tech News Delivered Every Day
Subscribe
Show the ruler

-
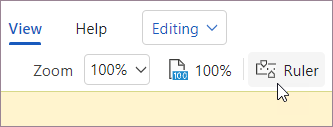
Go to View and select Ruler.

-
To show the vertical ruler
-
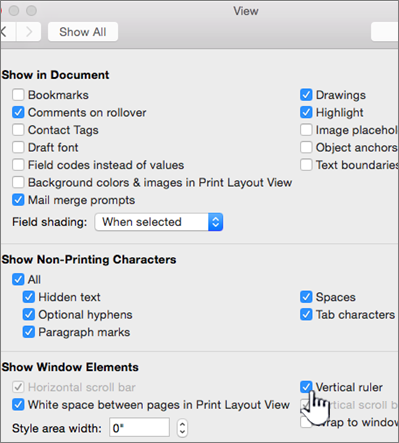
Go to File > Options > Advanced.
-
Select the Show vertical ruler in Print Layout view under Display.
-
Show the rulers
-
Go to View and select Ruler.
-
If the vertical ruler doesn’t show, make sure you’re in Print Layout view. If it still doesn’t show, you might need to turn the ruler on.
-
Go to Word > Preferences > View (under Authoring and Proofing Tools).
-
Then, in the View dialog box, select the Vertical ruler box.
-
Change the unit of measure
You can change the unit of measurement displayed on the rulers, to do this:
-
Go to Word > Preferences > General (under Authoring and Proofing Tools).
-
In Show measurement in units of, select the unit of measurement you want to use.
-
Go to View and select Ruler.
Need more help?
 Please Note:
This article is written for users of the following Microsoft Word versions: 2007, 2010, 2013, 2016, 2019, and Word in Microsoft 365. If you are using an earlier version (Word 2003 or earlier), this tip may not work for you. For a version of this tip written specifically for earlier versions of Word, click here: Changing Measurement Units.
![]()
Written by Allen Wyatt (last updated February 9, 2019)
This tip applies to Word 2007, 2010, 2013, 2016, 2019, and Word in Microsoft 365
Word allows you to modify your work environment extensively. One of the changes you can make involves the default units of measurement used in dialog boxes and on the ruler. By default, Word uses inches, but you can customize the program so it will use centimeters, picas, points, or millimeters.
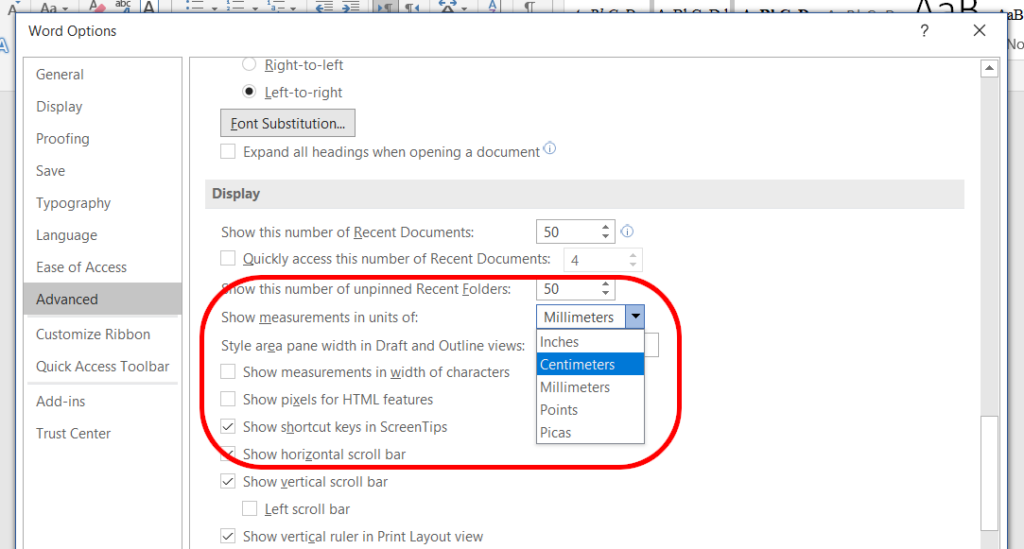
To change the default measurement units, follow these steps:
- Display the Word Options dialog box. (In Word 2007 click the Office button and then click Word Options. In Word 2010 or a later version display the File tab of the ribbon and then click Options.)
- Click Advanced at the left side of the dialog box.
- Scroll through the available options until you see the Display section. (See Figure 1.)
- Using the Show Measurements in Units Of drop-down list, select the units of measurement you want used by default.
- Click on OK.
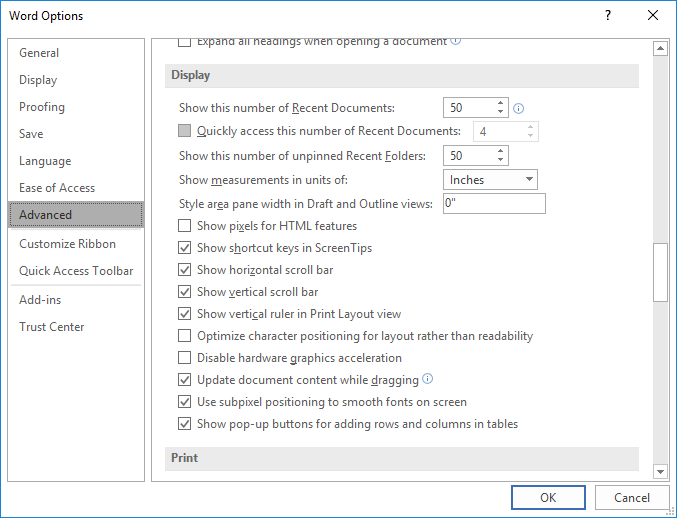
Figure 1. The Display section of the Advanced options in the Word Options dialog box.
WordTips is your source for cost-effective Microsoft Word training.
(Microsoft Word is the most popular word processing software in the world.)
This tip (6698) applies to Microsoft Word 2007, 2010, 2013, 2016, 2019, and Word in Microsoft 365. You can find a version of this tip for the older menu interface of Word here: Changing Measurement Units.
Author Bio
With more than 50 non-fiction books and numerous magazine articles to his credit, Allen Wyatt is an internationally recognized author. He is president of Sharon Parq Associates, a computer and publishing services company. Learn more about Allen…
MORE FROM ALLEN
Drawing a Table
There are several ways you can create tables in a document, but one of the most unique (and perhaps most fun) is to …
Discover More
Turning Off Hyperlink Activation
Does it bother you when you enter a URL and it becomes «active» as soon as you press Enter? Here’s how you can turn off …
Discover More
Displaying Multiple Filtered Colors
The filtering capabilities of Excel are quite helpful in taming a large amount of data. While you can filter by color, …
Discover More
More WordTips (ribbon)
Showing Text Boundaries for Pages, not for Paragraphs
Word allows you to configure how your document is displayed rather extensively. One configuration that has been around …
Discover More
Changing the Maximum Undo Levels
Want to change the number of «undo» steps available when editing? You can’t, because Word doesn’t’ really have a maximum. …
Discover More
Typing in Boxes
Do you have bothersome boxes appear around the text in your document? Here’s how you can get rid of them and make your …
Discover More

Do you prefer to work in centimeters rather than inches? Or vice versa? Or maybe you want to see measurements in points or picas? Not a problem! It’s easy to change the units of measurement used in Microsoft Word.
Let’s take a look at how to do this in Word for Windows and Word for Mac.
Units of Measurement in Word for Windows
To change the units of measurement in Microsoft Word for Windows:
- Click File tab on the ribbon and select Options.
- Go to the Advanced tab and scroll down to the Display section.
- Select an option from the Show measurements in units of menu.
- Click OK to save your selection.
This will change the unit of measurement used for various measures in your document, including the margins, indentation options, and the ruler tool.
In addition, your choice of unit will be applied to all other documents, including any new documents you create. As such, you will need to change the unit of measurement again if you want to use a different unit in a different document.
Units of Measurement in Word for Mac
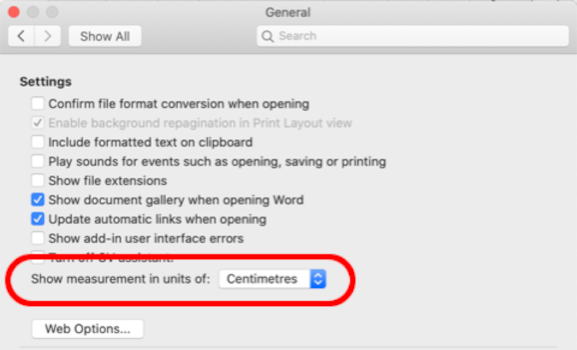
If you are using Microsoft Word for Mac, you’ll need to:
Find this useful?
Subscribe to our newsletter and get writing tips from our editors straight to your inbox.
- Go to Word > Preferences via the toolbar.
- Select General under Authoring and Proofing Tools.
- Select a unit of measurement from the Show measurements in units of menu.
- Close the preferences pane to save your changes.
As with Word for Windows, this will change the unit displayed in all documents for various measurements, including the margins, indentations, and the ruler.
Points and Picas
Finally, a quick note on the units available. Most will be familiar (e.g., inches, centimeters, millimeters). But there are two typographic units you might not know:
- Points (pt) – A point in typography is a unit of measurement roughly equivalent to ⅙ of an inch. This unit is typically used to indicate the size of type (i.e., font size) as well as the spaces between the lines in text (i.e., line spacing).
- Picas (p) – Twelve “points” make up one “pica.” This unit is also used for measurements in typography, but tends to be used for things like the length of lines, margin sizes, and the width and depth of columns.
You may not need to use these units very often (unless you’re a typographer). Nevertheless, if desired, you can select them via the process described above.
Expert Formatting Services
If you want to be sure your documents look perfect, our formatting services could be exactly what you need. Simply upload a document, add formatting at checkout, and let us know what types of formatting you want applied in your work.