
Create your own word games and logic puzzles to test friends, students, and strangers with these free websites.

Do you know what’s more fun than playing word games and logic puzzles? Creating your own games to test friends and strangers, which you can do with these free websites.
Puzzles have been scientifically proven to be good for your brain in various ways, including building memory, improving problem-solving skills, and enhancing your mood. The next step in the journey is to make your own games and quizzes. And it’s easier than ever with several free sites offering ways to create your own custom puzzle.
1. My Wordle (Web): Make Your Own Wordle Game
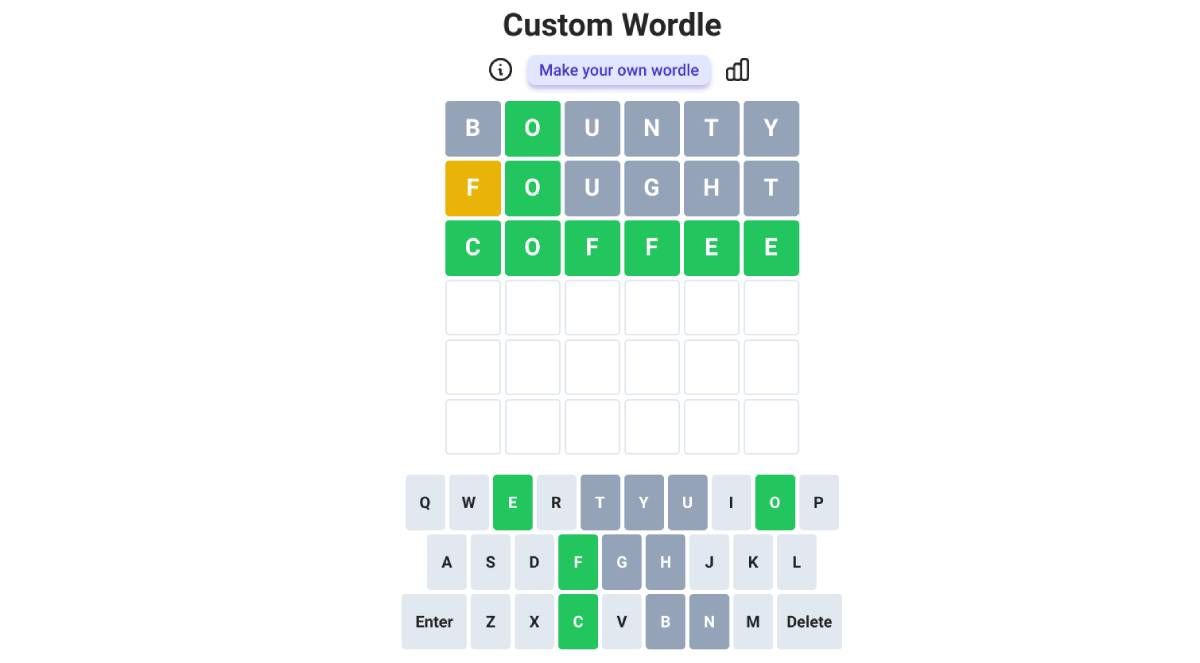
Who knew a simple 5-letter word guessing game would take the internet by storm? But Wordle has gone viral, with people posting their daily scores as emojis on every type of social media. Well, you can now make your own Wordle to test your friends with this simple app.
Visit the web page, and you’ll be prompted to type in a 5-letter or 6-letter word, which then generates a custom URL you can share with friends. In fact, the rest of the rules are the same as Wordle. Recipients have to guess the correct word in five attempts (or six in the case of a six-letter word). Wrong letters turn grey, correct letters turn yellow if on the wrong tile, and green if on the right tile.
Like the original, the app also generates shareable emojis of your winning turn. You can view your solving percentage statistics at any point, as long as you’re using the same browser each time. And no one needs to sign up to use the site.
2. ProProfs (Web): Create Your Own Word Games for Free
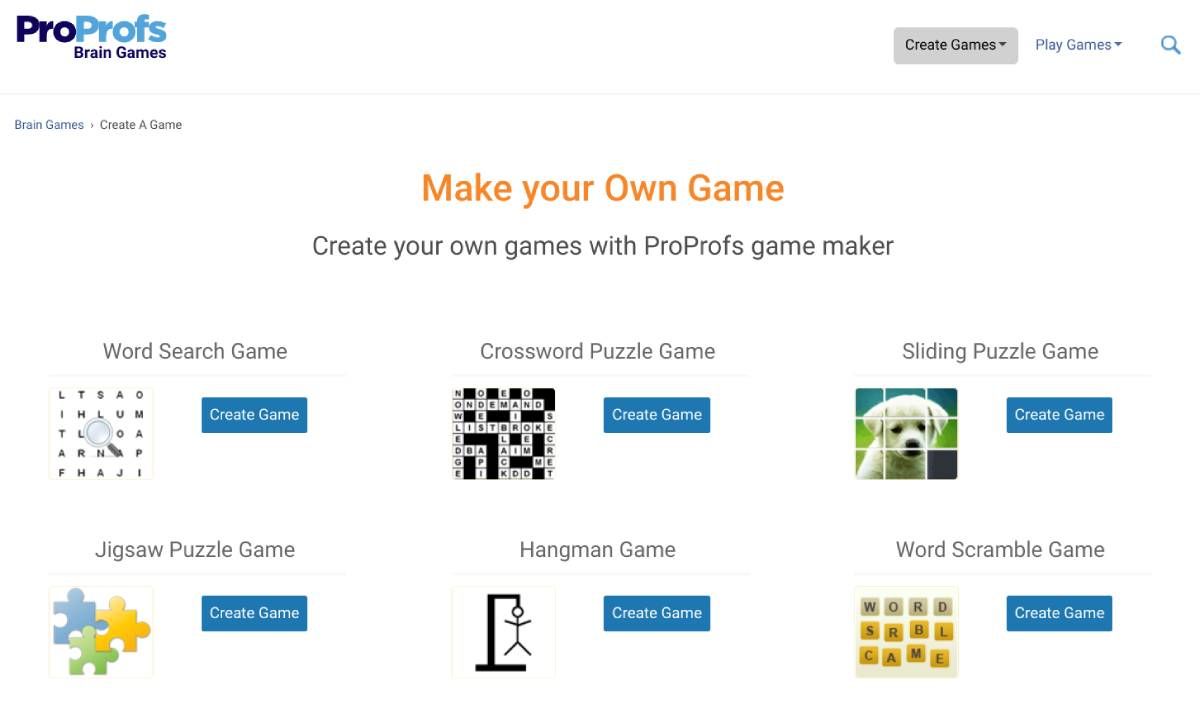
ProProfs is a simple website to create your own word games that anyone can play. Unlike several other free online puzzle makers, ProProfs doesn’t limit how many puzzles you can make at a time or how many people can play it.
Currently, you can create seven types of puzzles on ProProfs:
- Word Search: List all the words you want, set a time limit, and give it a description for participants to begin their word search.
- Crossword: Simply add the intended word and the hint for it. ProProfs will figure out the placement of the tiles.
- Sliding puzzle: Add an image, choose how many pieces to break it up in, and ProProfs will create an online sliding puzzle where players unjumble the scrambled piece.
- Jigsaw: A standard jigsaw puzzle maker where you can add the original image.
- Hangman: Add a list of words for a five-chance words of Hangman.
- Word Scramble: Add a word and a hint for players to solve an anagram and guess the original
- Brain Teasers: A multimedia quiz where you can add an image and a text question (as well as a hint), and then an image and text answer.
While the variety is great, ProProfs doesn’t offer a lot of customization in the games. It’s probably ideal for teachers to make games for students rather than adults trying to challenge other adults.
3. Maze Generator (Web): Create a Custom Maze as Big as You Want
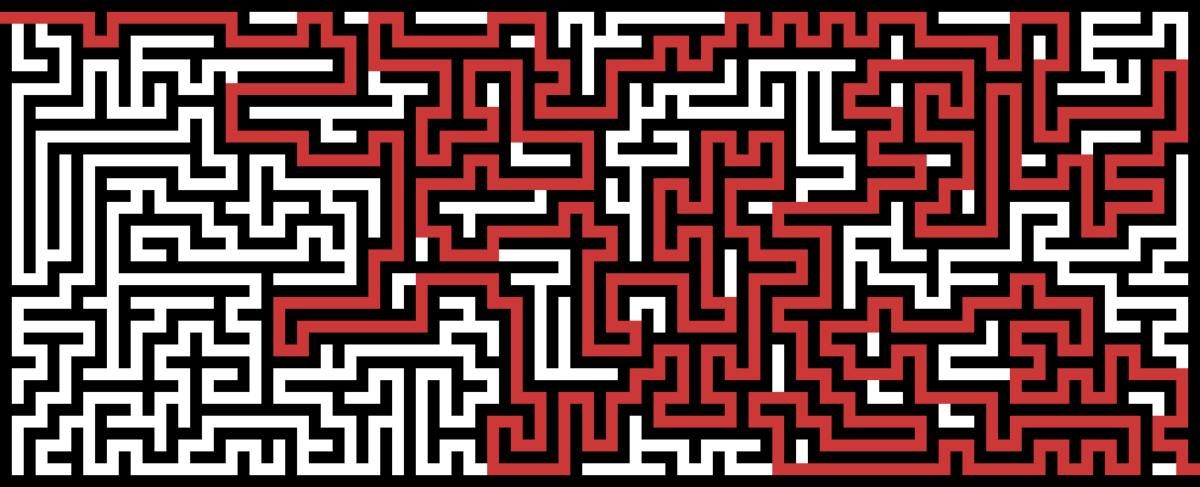
Who doesn’t love solving a maze puzzle? It’s one of those activities you start doing as a kid, and you can continue doing as an adult. But naturally, you want it to be more difficult. Maze Generator will let you create a custom maze as large and as difficult as you want.
Four main factors determine the difficulty and size of your maze. Columns and rows define how wide and how tall the maze will be. In general, a 20×20 grid is moderately challenging for an adult, but if you really want to push yourself, try a 50×50 grid. Next, choose your entry and exit points (corners, left and right, or top and bottom).
The fourth point of difficulty comes with a bias, which determines how the maze walls will be laid. So, for instance, if you want a lively challenge, you could set top and bottom entries, horizontal bias, and really crank up the columns. Plus, you can customize the background color, the maze color, and the thickness of the walls. And yes, you can download and print it for free.
4. My Word Search and Crossword Hobbyist (Web): Best Custom Word Search and Crossword Makers
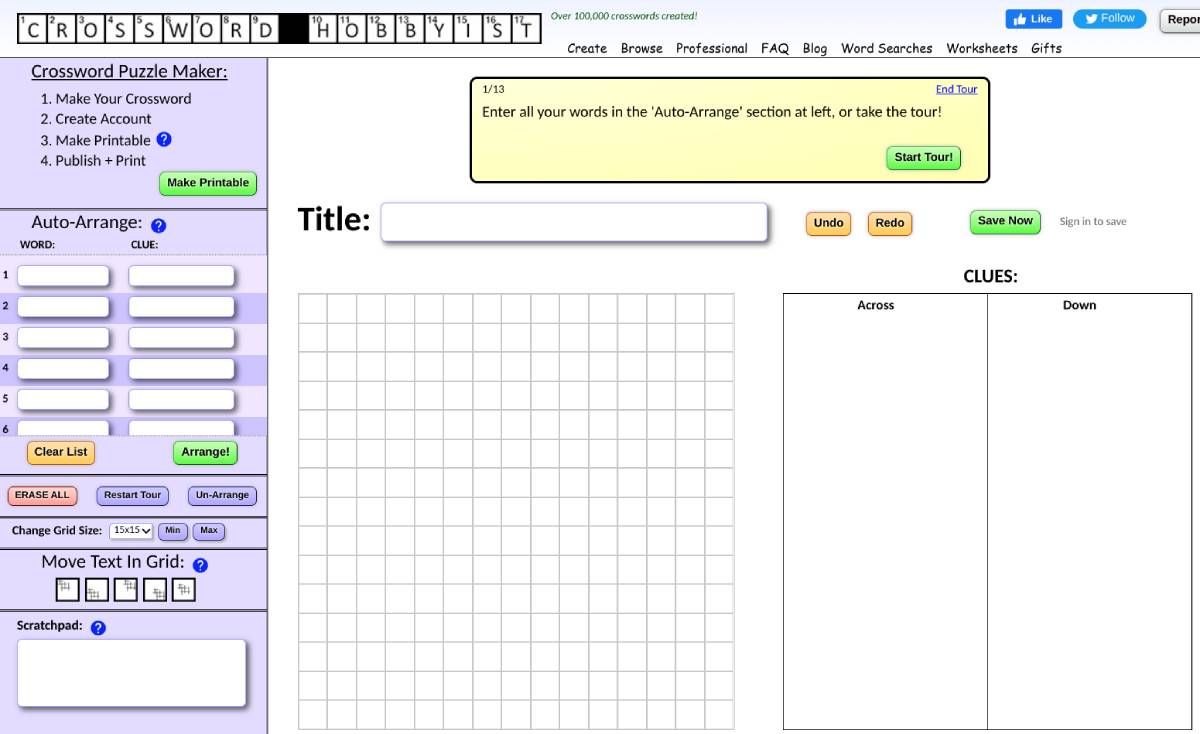
While ProProfs lets you make your own word search or crossword puzzle, it’s a really basic version that doesn’t offer much customization. The best word game makers on the internet are My Word Search (MWS) and Crossword Hobbyist (CH), both from the same developers. They’re free for 30 days, after which you’ll have to buy a premium version (but there’s a discount to buy them together).
MWS has some really funky options, like choosing different puzzle shapes such as a flower, snowman, spiral, and other shapes apart from the usual square. You can set the puzzle size and the directions in which the words will appear. Once that’s set, just add your list of words, and you’re good to go.
Crossword Hobbyist makes crosswords in two ways. You can type your words and clues and have it auto-arrange for you, or you can set a grid and type directly in it. Registered users can also save their progress in any crossword, which is essential for crossword lovers. You’ll also be able to preview your crossword as you make it, and adjust on the go.
5. PuzzleScript (Web): Make Your Own Sokoban-Type Tile Puzzle Game
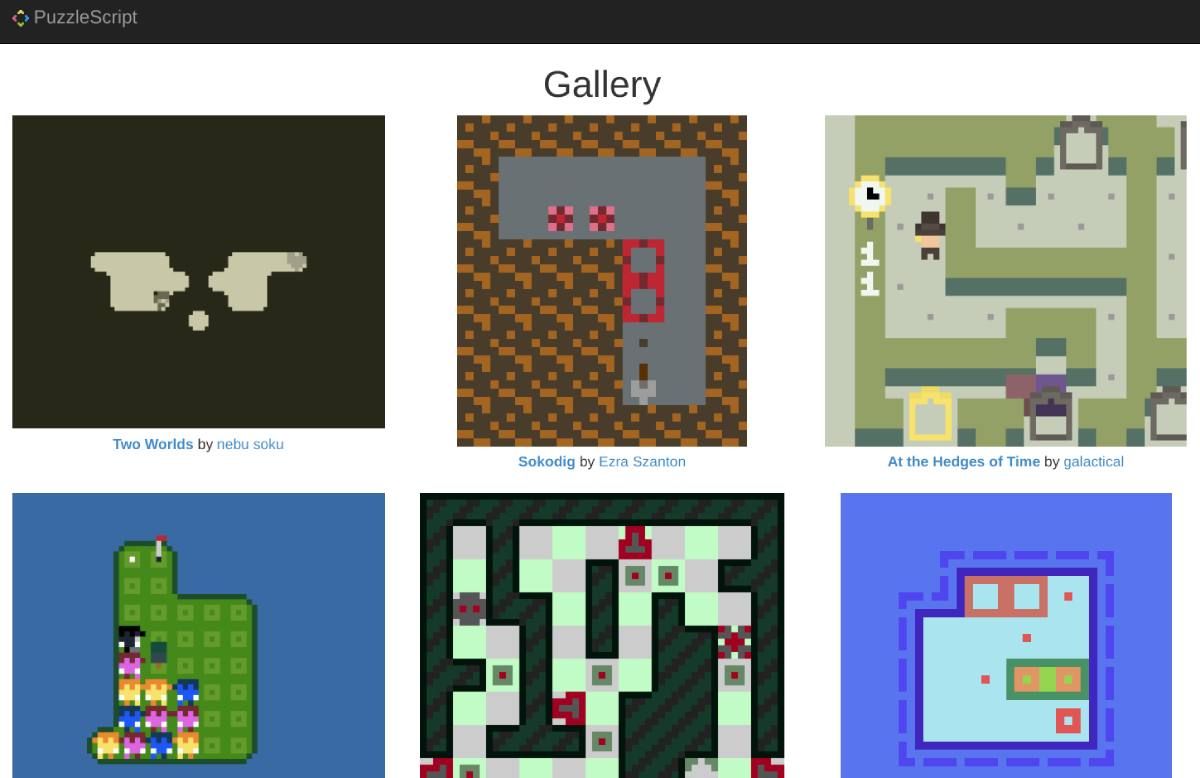
Sokoban is one of Japan’s oldest and most popular puzzle video games. The simple puzzle is about the player pushing crates to their designated place in a warehouse, but each level makes this more difficult. With PuzzleScript, anyone can make their own version of a Sokoban-type tile-based puzzle game with little to no coding knowledge.
Check the PuzzleScript How To section to learn the basic commands for all the ways in which your player can interact with the tile. It’s a pretty simple way to move crates either by pushing or pulling, which you can then use in the PuzzleScript editor. The engine also adds a few extra game features like an eyeball, a block, a sumo wrestler, a sprite, a kitty, and a fruit. Use them how you want to create a custom game.
You can check the gallery of games made with the PuzzleScript engine for inspiration and even import their code to start as a base for your game. It’s one of the easiest ways to create your own puzzle video game for free.
Don’t Be Oversmart
Whether you’re making a crossword puzzle or a maze, it’s tempting to try to do the hardest logic puzzle to challenge your players. But resist this and instead, choose a difficulty level less than what you think your players will enjoy. The key to making a great puzzle is not to make it impossible to solve but solvable after some thought and effort.
In this section, we will create a word guessing game with Unity, with the following features:
- A word will be picked at random from an existing list.
- The letters of the word will be hidden.
- The players will try to guess each letter by pressing a letter on their keyboard.
- Once a letter has been discovered it will then be displayed onscreen.
- The player has a limited number of attempts to guess the word.
So, after completing this tutorial, you will be able to:
- Read words from a text file.
- Pick a random word.
- Process and assess the letters pressed by the player.
- Display the letters that were correctly guessed by the player.
- Track and display the score.
- Check when the player has used too many guesses.

Figure 1: The final game
Creating the interface for the game
So, in this section, we will start to create the core of the word guessing game; it will consist of text fields initially blank, and located in the middle of the screen.
So, let’s get started:
- Please launch Unity and create a new Project (File | New Project).

Figure 2: Creating a new project
- In the new window, you can specify the name of your project, its location, as well as the 2D mode (as this game will be in 2D).

Figure 3: Specifying the name and location for your project
- Once this is done, you can click on the button called Create project (located at the bottom of the window) and a new project should open.
- Once this is done, you can check that the 2D mode is activated, based on the 2D logo located in the top right-corner of the Scene view, as illustrated in the next figure.

Figure 4: Activating the 2D mode
First, we will remove the background image for our Scene. If you look at your Game view, it may look like the following figure.

Figure 5: The initial background
If it is the case, then please do the following:
- From the top menu, select: Window | Lighting.
- Then delete the Default Skybox that is set for the attribute called SkyBox (i.e., click on the attribute to the right of the label Skybox and press DELETE on your keyboard).

Figure 6: Lighting properties
- Once this is done, your Game view should look like the following.

Figure 7: The Game view after deleting the SkyBox
We will now create a text field that will be used for the letters to be guessed.
- From the top menu, please select GameObject | UI | Text. This will create a UI Text object called text, along with a Canvas object.
- Please rename this text object letter.

Figure 8: Creating a new letter
Select this object (i.e., letter) in the Hierarchy, and using the Inspector window, please set its attributes as follows:
- For the component Rect Transform: Position = (0,0,0); Width = 100 and Height = 100.
- For the component Text: Font-size = 80; Color = white; Text = please empty the text.
- For the component Text: vertical alignment = center; horizontal alignment = middle.
Once this is done, we will create a prefab from this object, so that we can instantiate it later on (i.e., create objects based on this prefab).
- Please drag and drop the object letter from the Hierarchy window to the Project window.
- This will create a new prefab called letter.
Next, we will create a gameManager object; this object will be in charge of setting the layout for the game and processing the user’s entries; in other words, it will be responsible for running and managing the game.
- Please create a new empty object (GameObject | Create Empty).
- Rename this new object gameManager.
Next, we will create a script that will be attached to the gameManager object; this script will be in charge of running the game (e.g., displaying letters, processing user inputs, etc.).
- From the Project window, select Create | C# Script.
- Rename the new script GameManager.
- You can then open this script.
In this script, we will display several letters in the middle of the screen.
- Please add this code at the beginning of the class.
public GameObject letter;
In the previous code we create a new public variable called letter; it will be accessible from the Inspector since it is public, and it will be set (or initialized) with the letter prefab that we have created earlier. This variable will be used to generate new letters based on that template (i.e., prefab).
- Please check that the code is error free in the Console window.
- Drag and drop the script GameManager from the Project window on the object called gameManager located in the Hierarchy.

Figure 9: Adding a script to the game manager
- Once this is done, you can select the object called gameManager in the Hierarchy.
- Using the Inspector window, you will see this object now includes a new component called GameManager with an empty field called letter.

Figure 10: A new component added to the game manager
- Please drag and drop the prefab called letter from the Project window to this empty field in the Inspector window, as described in the next figure.
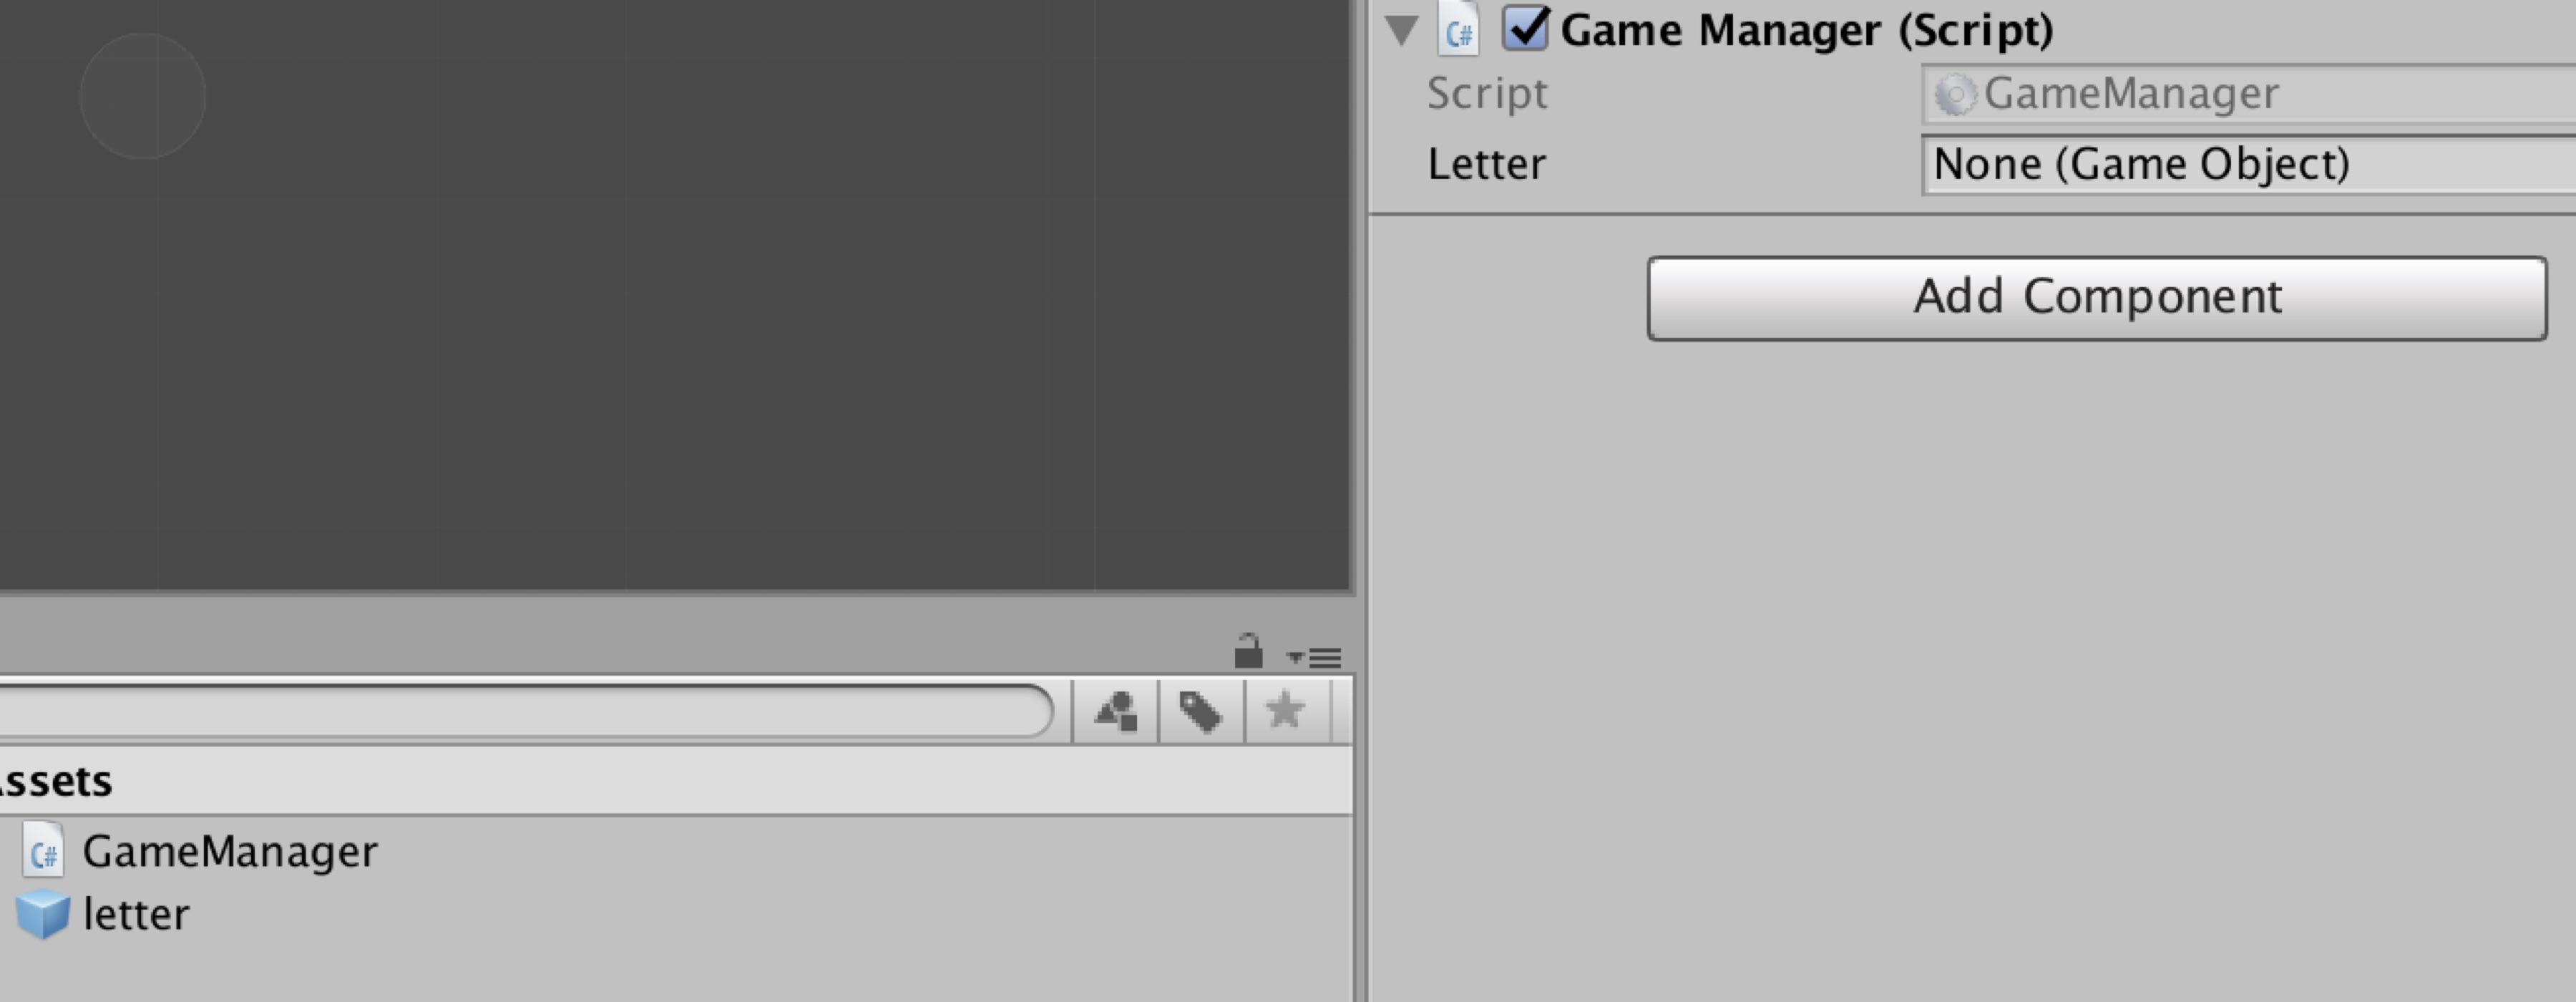
Figure 11: Initializing the letter variable with a prefab
Once this is done, we can start to write a function that will create the new letters.
- Please open the script GameManager.
- Add the following code at the end of the class (just after the function Update).
void initLetters()

{

int nbletters = 5;

for (int i = 0; i < nbletters; i++) {

Vector3 newPosition;

newPosition = new Vector3 (transform.position.x + (i * 100), transform.position.y, transform.position.z);

GameObject l = (GameObject)Instantiate (letter, newPosition, Quaternion.identity);

l.name = "letter" + (i + 1);

l.transform.SetParent(GameObject.Find ("Canvas").transform);

}

}
In the previous code:
- We define that we will display five letters using the variable nbLetters; this number is arbitrary, for the time being, so that we can ensure that we can display letters onscreen; this number of letters will, of course, vary later on, based on the length of the word to be guessed.
- We then create a loop that will loop five times (once for each letter).
- In each iteration, we define the position of the new letter using the variable newPosition.
- This position of the letter is calculated by combining the position of the object gameManager that is linked to this script (i.e., transform.position) plus the size of the letter (i.e., 100; this size/width was set-up earlier-on with the Inspector using the width attribute) multiplied by the variable i; so the position of the first letter on the x-axis will be transform.position + 0, the second one will be at the x position transform.position + 100, and so on.
- We instantiate a letter and also set its name.
- Finally, we set the parent of this new object to be the object called Canvas; this is because, as a UI Text object, this object needs to be associated to a canvas in order to be displayed onscreen; this is usually done by default as you create a new UI Text object with the editor in Unity; however, this needs to be done manually as this object is created and added to the Scene from a script.
Finally, please add the following code to the Start function.
initLetters();
As you play the Scene, you should see that new letters have been created in the Hierarchy.
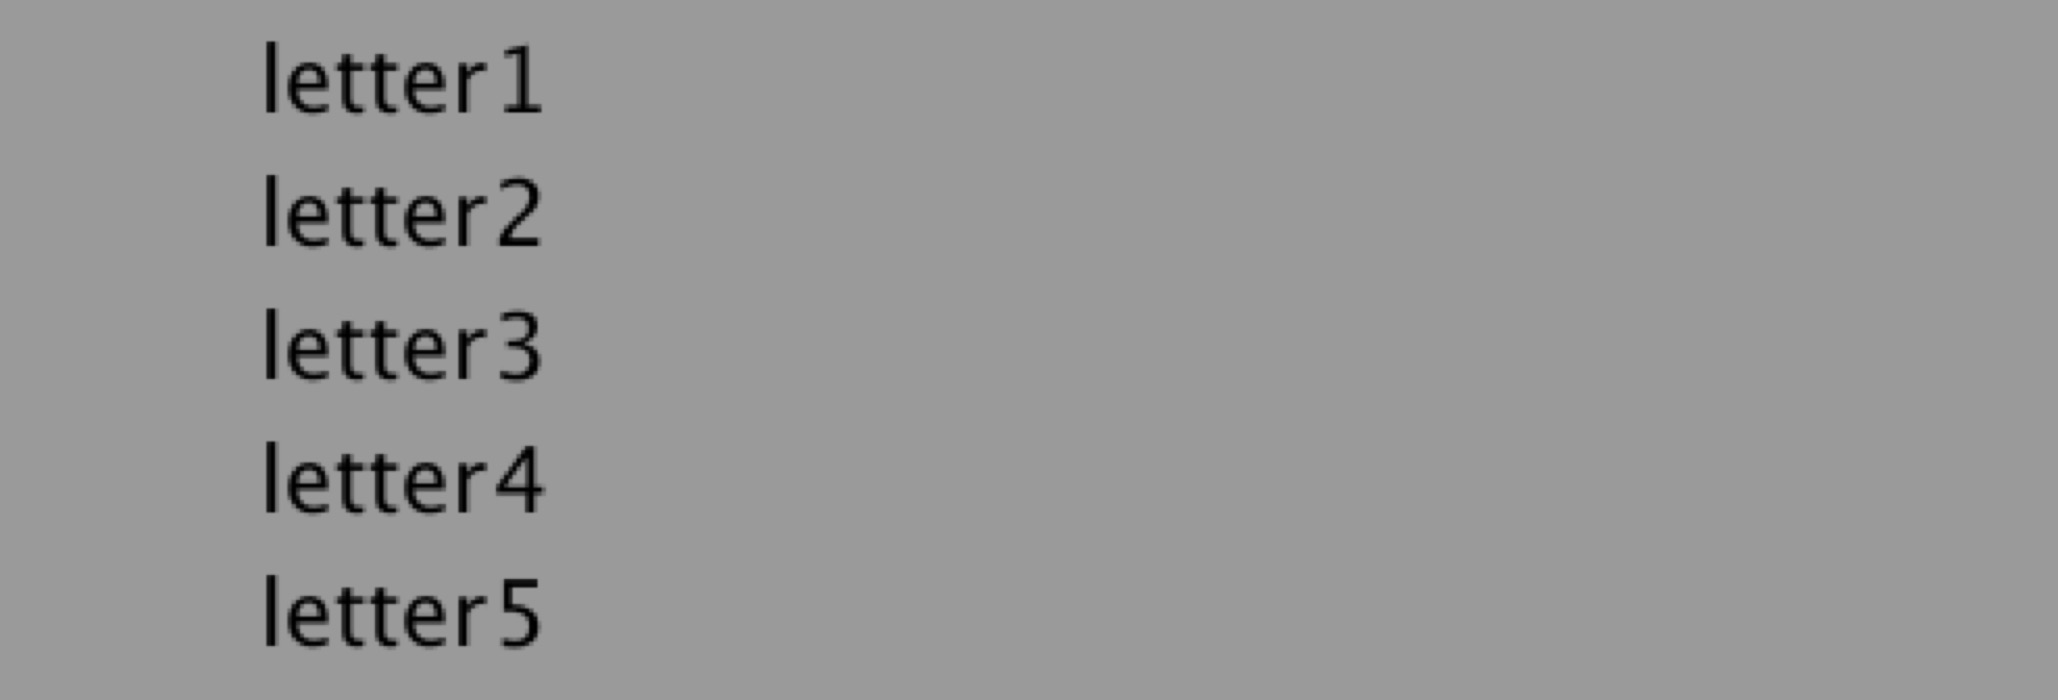
Figure 12: The newly-created letters
If you double-click on one of them (e.g., letter1) in the Hierarchy, you should see where they are located and their layout in the Scene view.

Figure 13: The layout of the letters
Now, because the position of the letters is based on the position of the game manager, you may notice, as for the previous figure, that the letters are not centered properly. So we need to ensure that these letters are properly aligned vertically and horizontally. For this purpose, we will do the following:
- Create an empty text object located in the middle of the screen.
- Base the position of each letter on this object.
- Ensure that all letters are now properly aligned.
So let’s proceed:
- Please create a new UI Text object (GameObject | UI | Text) and rename it centerOfScreen.
- Select this object in the Hierarchy.
- Using the Inspector, in the component called RectTransform, change its position to PosX=0 and PosY=0; you can leave the other attributes as they are.

Figure 14: Changing the position attributes
Because this object is a UI object, setting its position to (0,0) will guarantee that it will be displayed in the center of the screen; this is because the coordinate of the UI object (for the component RectTransform) are based on the view/camera. So PosX=0 and PosY=0, in this case, corresponds to the center of the screen; using an empty object would have been different as the coordinates would be world coordinates and not related to the screen/view.
- Using the Inspector, in the component called Text, delete the default text, so that this UI Text is effectively an empty field.

Once this is done, we can modify the code in the script GameManager to center our letters.
- Please open the script GameManager.
- Add the following code to the start of the class (new code in bold).
public GameObject letter;
public GameObject cen;
void Start () {

cen = GameObject.Find ("centerOfScreen");

initLetters ();

}
- In the previous code, we declare a new variable called cen that will be used to refer to the object centerOfScreen.
- In the function initLetter that we have created earlier-on, please modify this line
newPosition = new Vector3 (transform.position.x + (i * 100), transform.position.y, transform.position.z);
… with this code…
newPosition = new Vector3 (cen.transform.position.x + (i * 100), cen.transform.position.y, cen.transform.position.z);
In the previous code, we mow base the position of our letter on the center of the screen.
- Please save your script, and check that it is error-free.
- Play the Scene, and you should see, in the Scene view, that the letters are now aligned vertically; however, they are slightly offset horizontally.
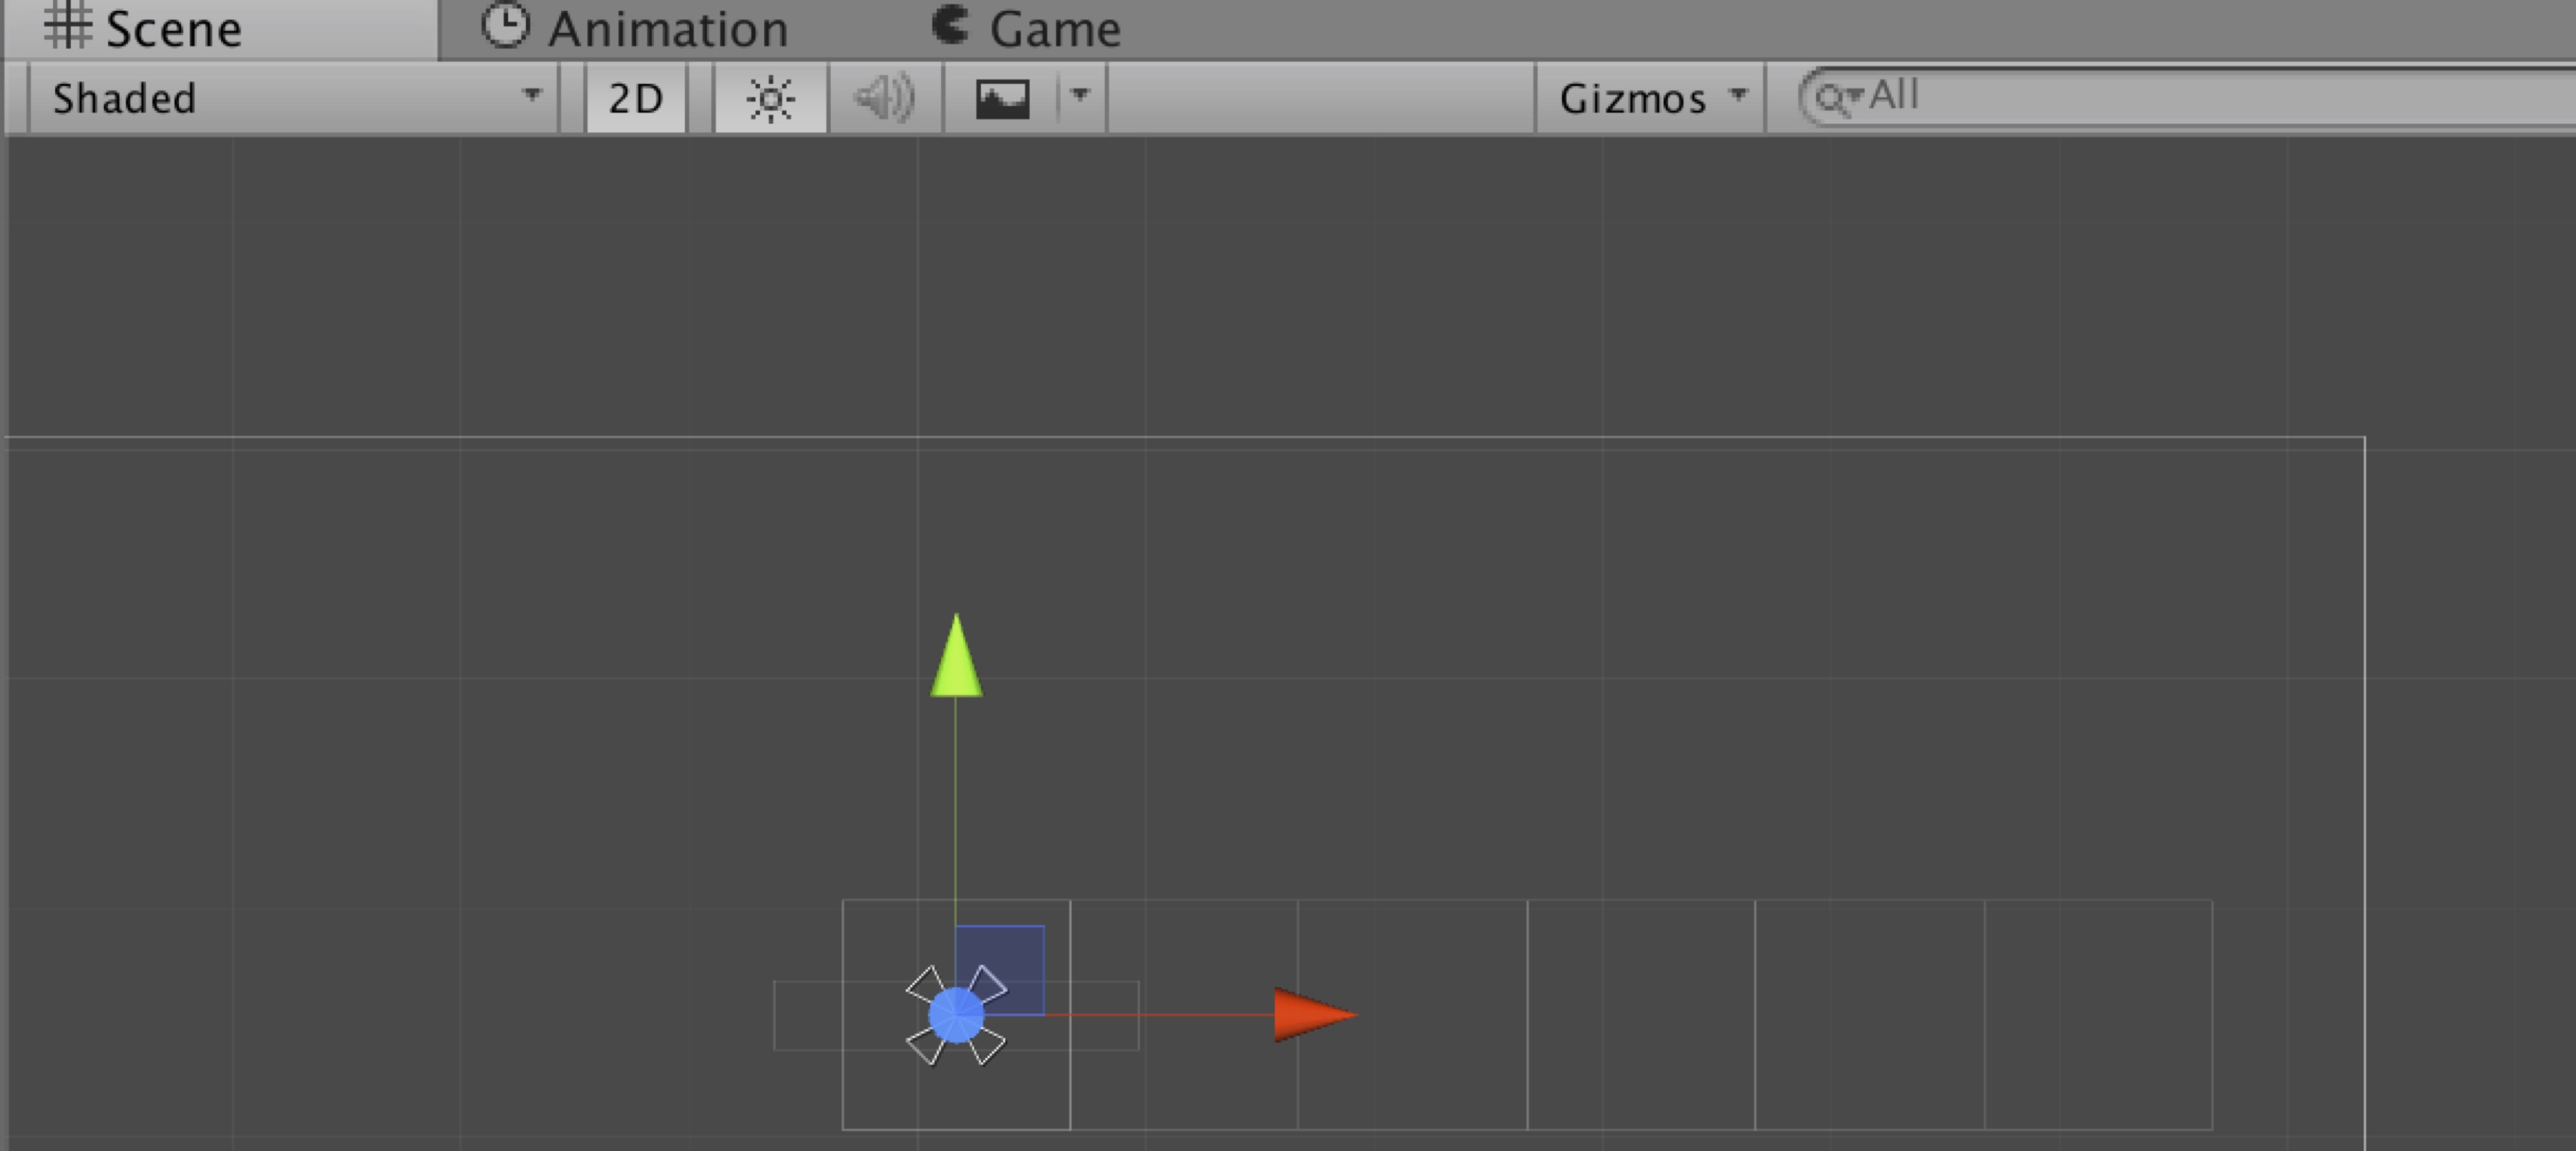
Figure 15: Aligning the letters
So there is a last change that we can include in our script, so that each letter is centered around the center of the screen; this will consist in offsetting the position of each letter based on the center of the screen as follows, so that the middle of the word matches with the center of the screen.
- Please open the script GameManager and, in the function called initLetter, replace this line:
newPosition = new Vector3 (cen.transform.position.x + (i * 100), cen.transform.position.y, cen.transform.position.z);
with this line…
newPosition = new Vector3 (cen.transform.position.x + ((i-nbletters/2.0f) *100), cen.transform.position.y, cen.transform.position.z);
In the previous code, we offset the position of each letter based on the center of the screen; so the x-coordinate of the first letter will be -250, the x-coordinate of the second letter will be -150, and so on.
You can save your script, play the Scene, and look at the Scene view; you should see that the letters are now properly aligned, as illustrated on the next figure.

Figure 16: The letters are now properly aligned
If you would like to see what the letters would look like, you can, while the game is playing, you can select each newly-created letter in the Hierarchy and modify its Text attribute in the Inspector (using the component Text), as illustrated in the next figure.

Figure 17: Changing the text of each letter at run-time
Detecting and processing user input
Perfect. So at this stage, we have a basic interface for our game, and we can display letters onscreen. So, in this section we will implement the main features of the game, that is:
- Create a new word to be guessed.
- Count the number of letters in this word.
- Display corresponding empty text fields.
- Wait for the user to press a key (i.e., a letter) on the keyboard.
- Detect the key that the user has pressed.
- Display the corresponding letters in the word to be guessed onscreen.
So let’s start.
- Please open the script called GameManager.
- Add the following code at the start of the class (new code in bold).
public GameObject letter;

public GameObject cen;

private string wordToGuess = "";

private int lengthOfWordToGuess;

char [] lettersToGuess;

bool [] lettersGuessed;
In the previous code:
- We declare four new variables.
- wordToGuess will be used to store the word to be guessed.
- lengthOfWordToBeGuessed will store the number of letters in this word.
- lettersToGuess is an array of char (i.e., characters) including every single letter from the word to be discovered by the player.
- letterGuessed is an array of Boolean variables used to determine which of the letters in the word to guess were actually guessed correctly by the player.
Next, we will create a function that will be used to initialize the game.
- Please add the following function to the class.
void initGame()

{

wordToGuess = "Elephant";

lengthOfWordToGuess = wordToGuess.Length;

wordToGuess = wordToGuess.ToUpper ();

lettersToGuess = new char[lengthOfWordToGuess];

lettersGuessed = new bool [lengthOfWordToGuess];

lettersToGuess = wordToGuess.ToCharArray ();

}
In the previous code:
- We declare a function called initGame.
- In this function, we initialize the variable wordToGuess; this will be the word Elephant for the time being.
- We then capitalize all letters in this word; as we will see later in this chapter, this will make it easier to match the letter typed by the user (which usually is upper-case) and the letters in the word to guess.
- We then initialize the array called lettersToGuess and lettersGuessed.
Note that for Boolean variables, the default values, if they have not been initialized, is false. As a result, all variables in the array called lettersGuessed will initially be set to false (by default).
- Finally, we initialize the array called lettersToGuess so that each character within corresponds to the letters in the word to guess; for this, we convert the word to guess to an array of characters, which is then saved into the array called lettersToGuess.
Once this function has been created, we will need to process the user’s input; for this purpose, we will create a function that will do the following:
- Detect the letter that was pressed by the player on the keyboard.
- Check if this letter is part of the word to guess.
- In this case, check if this letter has not already been guessed by the player.
- In this case, display the corresponding letter onscreen.
Let’s write the corresponding code.
- Please add the following function to the script GameManager:
void checkKeyboard()

{

if (Input.GetKeyDown(KeyCode.A))

{

for (int i=0; i < lengthOfWordToGuess; i++)

{

if (!lettersGuessed [i])

{

if (lettersToGuess [i] == 'A')

{

lettersGuessed [i] = true;

GameObject.Find("letter"+(i+1)).GetComponent().text = "A";

}

}

}

}

}
In the previous code:
- We declare the function called checkKeyBoard.
- We then create a loop that goes through all the letters of the word to be guessed; this is done from the first letter (i.e., at the index 0) to the last one.
- We check if this letter has already been guessed.
- If it is not the case, we check if this letter is A.
- If this is the case, we then indicate that this letter (i.e., the letter A) was found.
- We then display the corresponding letter onscreen.
Last but not least, we just need to be able to call these two functions to initialize the game and to also process the user’s inputs.
- Please add the following code to the Start function (new code in bold).
void Start () {

cen = GameObject.Find ("centerOfScreen");

initGame ();

initLetters ();
}
Please make sure that the function initGame is called before initLetters (as illustrated in the previous code) in the Start function; this is because, as we will see later, the function initLetters will use some of the information that has been set in the function initGame (i.e., the number of letters). So in order for our game to work correctly, the function initGame should be called before initLetters.
- Please add the following code to the Update function.
void Update () {

checkKeyboard ();

}
The last change we need to add now is linked to the number of letters to be displayed; as it is, the number is set to 5 by default; however, we need to change this in the function called initLetters, so that the number of UI Text objects that corresponds to the letters in the word to be guessed reflects the length of the word that we have just created.
- Please modify the function initLetters as follows (new code in bold).
void initLetters()

{

<b>int nbletters = lengthOfWordToGuess;</b>
So at this stage, we have all the necessary functions to start our game; so you can save the script, check that it is error free and play the Scene. As you play the Scene, if you press the A key on the keyboard, the letter A should also be displayed onscreen, as it is part of the word Elephant.

Figure 18: Detecting the key pressed
So, this is working properly, and we could easily add more code to detect the other keys; this would involve using the code included in the function checkKeyboard, and copying/pasting it 25 times to be able to detect the other 25 keys/letters, using the syntax Input.GetKeyDown, once for each key. So the code could look as follows:
if (Input.GetKeyDown(KeyCode.A))

{

...

}

if (Input.GetKeyDown(KeyCode.B))

{

...

}

if (Input.GetKeyDown(KeyCode.Z))

{

...

}
Now, this would be working perfectly, however, this would also involve a lot of repetitions (copying 24 times the same code); so to make the code more efficient, we will use a slightly different way of detecting the key pressed by the player. This method will involve the following:
- Check if a key was pressed.
- Check if this key is a letter.
- Process as previously to check whether this letter is part of the word to be guessed.
Please create a new function called checkKeyBoard2, as follows:
void checkKeyboard2()

{

if (Input.anyKeyDown)

{

char letterPressed = Input.inputString.ToCharArray () [0];

int letterPressedAsInt = System.Convert.ToInt32 (letterPressed);

if (letterPressedAsInt >= 97 && letterPressed <= 122)

{

for (int i=0; i < lengthOfWordToGuess; i++)

{

if (!lettersGuessed [i])

{

letterPressed = System.Char.ToUpper (letterPressed);

if (lettersToGuess [i] == letterPressed)

{

lettersGuessed [i] = true;

GameObject.Find("letter"+(i+1)).GetComponent().text = letterPressed.ToString();

}

}

}

}

}

}
In the previous code:
- We detect whether a key has been pressed using the keyword Input.anykeyDown.
- If this is the case, we save the key (i.e., the letter) that was pressed into the variable called letterPressed. For this, given that any key pressed on the keyboard is stored as a string, we need to convert this string value to a character; the character recorded in the variable letterPressed will effectively be the first character of the string that corresponds to the key pressed by the player.
- Once this is done, we convert the letter pressed (i.e., character) to an integer value.
- We then check, using the integer value associated with the key pressed, that the key is a letter; this corresponds to an integer value between 97 and 122.
- Once this final check is complete, we do the exact same as we have done earlier in the function checkBoard that we have created previously (i.e., this is the same code).
The last thing we need to do is to call the function chekBoard2 instead of the function checkBoard by amending the Update function as follows (new code in bold):
void Update () {

<b>     //checkKeyboard ();</b>

<b>     checkKeyboard2 ();</b>

}
That’s it!
Once this is done, please save your code, check that it is error-free and test the Scene. As you press the keys E, L, P and A, you should see that they now appear onscreen.
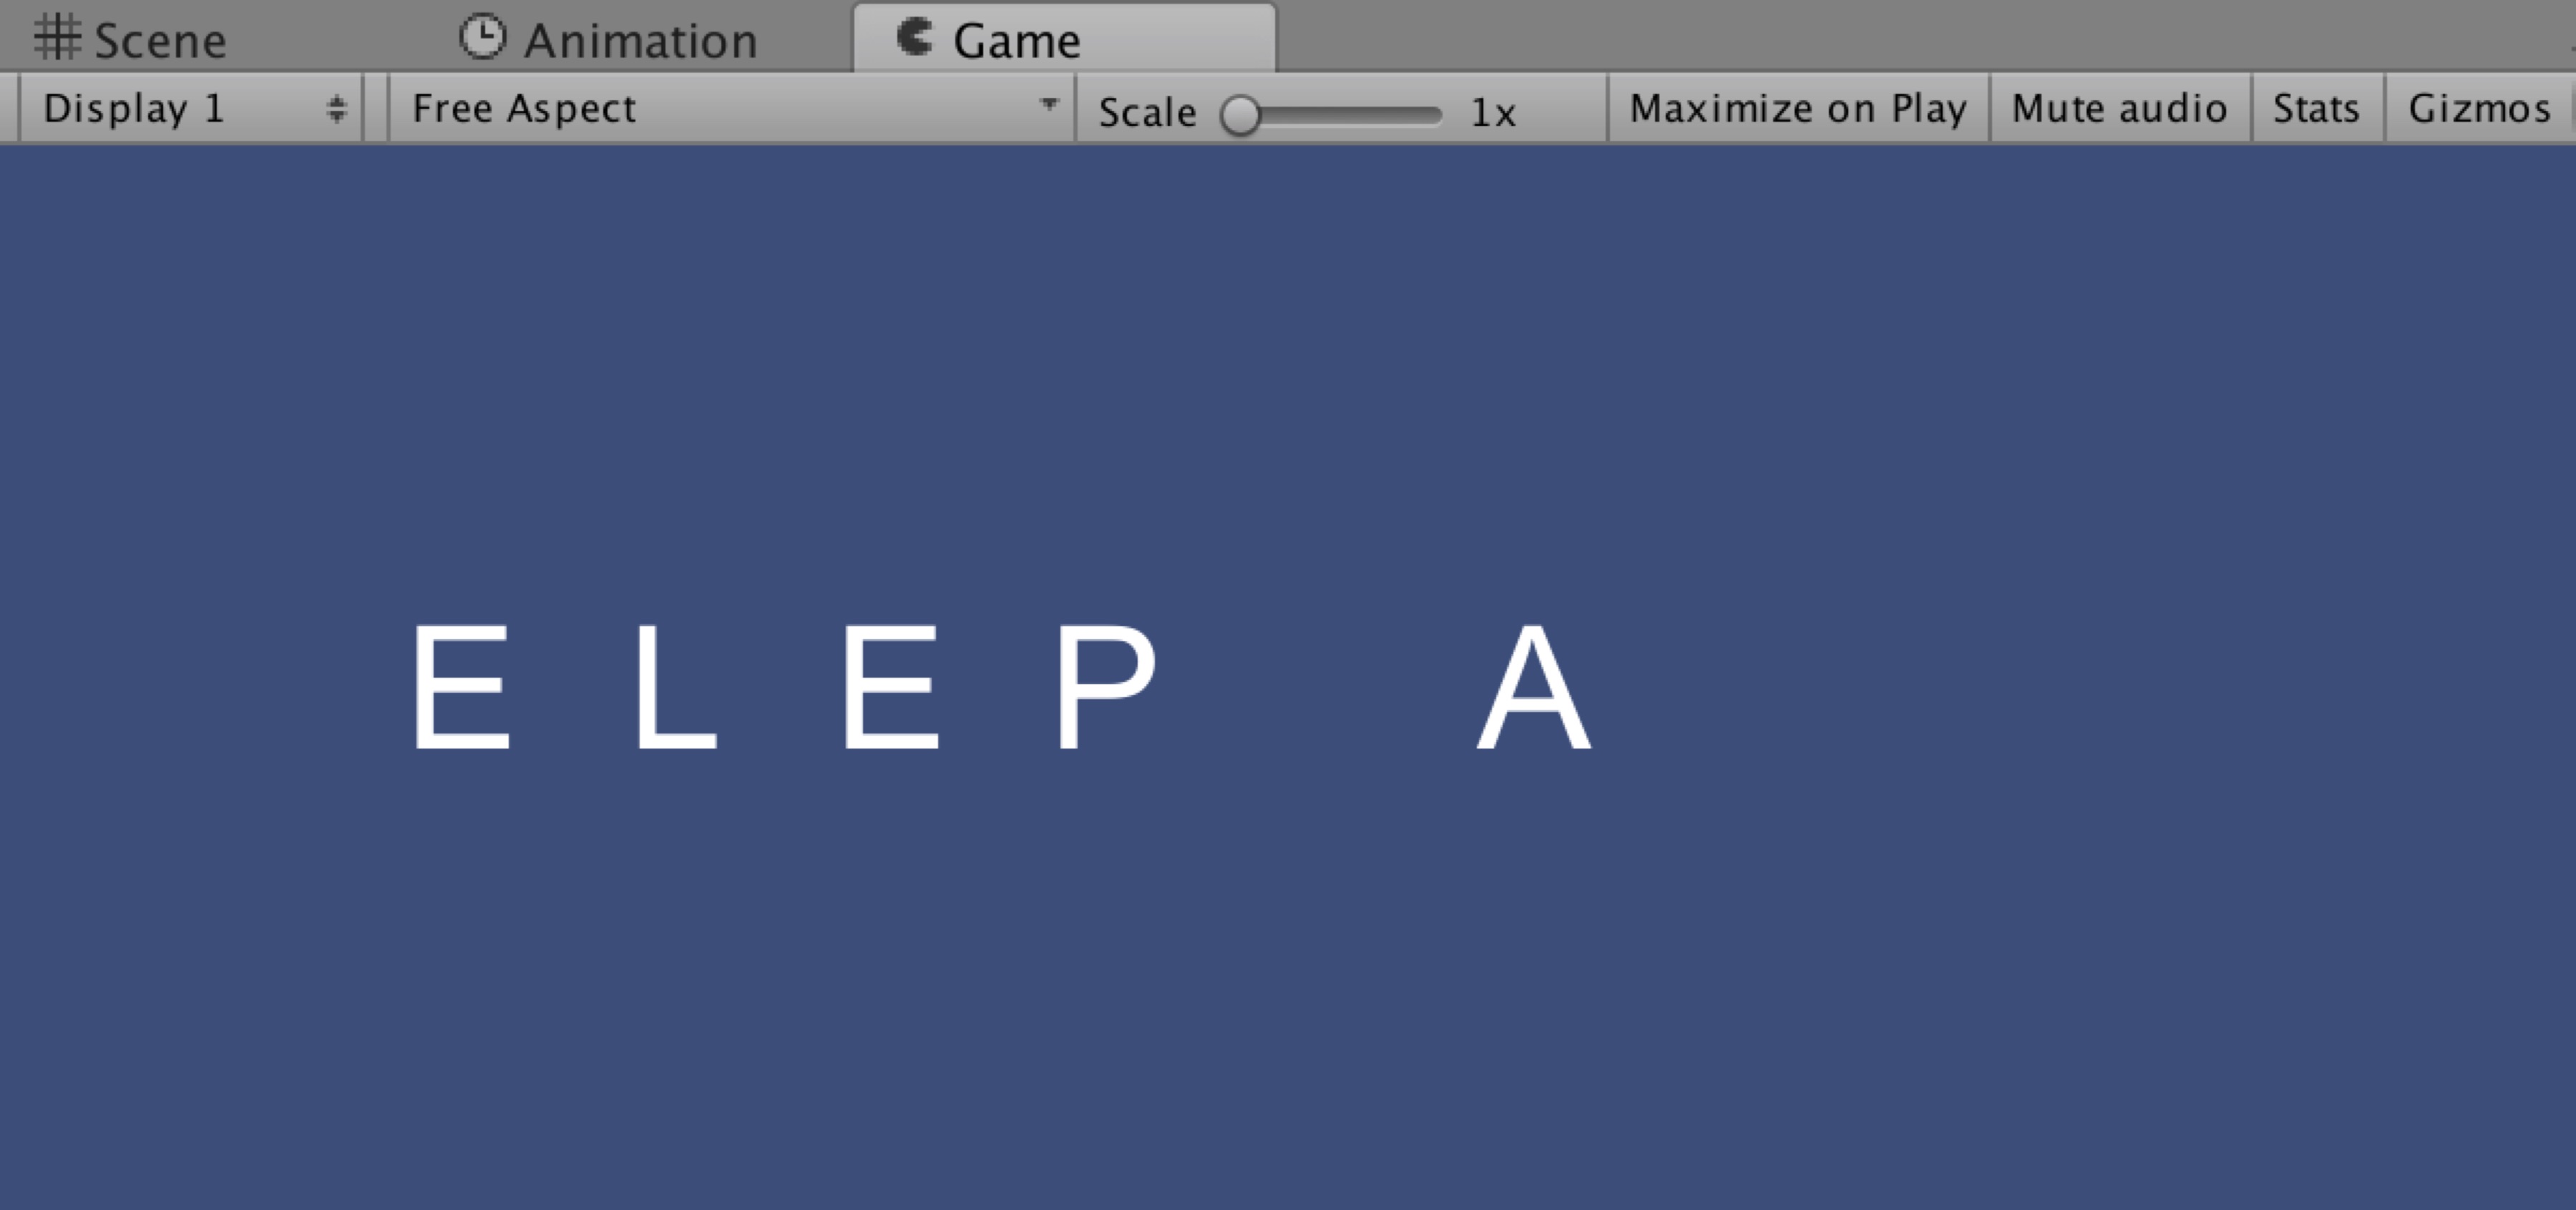
Figure 19: Detecting all the keys pressed
Choosing random words
At this stage, the game works properly and the letters that the player has guessed are displayed onscreen; this being said, it would be great to add more challenge by selecting the word to guess at random from a list of pre-defined words. So in the next section, we will learn to do just that; we will start by choosing a word from an array, and then from a text file that you will be able to update yourself without any additional coding.
So let’s get started.
- Please open the script GameManager.
- Add the following code at the beginning of the class.
private string [] wordsToGuess = new string [] {"car", "elephant","autocar" };
- In the previous code, we declare an array of string variables and we add three words to it.
- Add the following code to the function initGame (new code in bold).
//wordToGuess = "Elephant";

int randomNumber = Random.Range (0, wordsToGuess.Length - 1);

wordToGuess = wordsToGuess [randomNumber];
In the previous code:
- We comment the previous code.
- We create a random number that will range from 0 to the length of the array – 1. So in our case, because we have three elements in this array, this random number will range from 0 to 2 (i.e., from 0 to 3-1).
- We then set the variable called wordToGuess to one of the words included in the array called wordsToGuess; this word will be picked at random based on the variable called randomNumber.
You can now save you script, and check that it is error-free.
There is a last thing that we could do; because the word is chosen at random, the player will not have any idea of the length of this word; so to give an indication of the number of letters to be guessed, we could display questions marks, for all the letters to be guessed, onscreen as follows:
- Please select the prefab called letter from the Project window.
- Using the Inspector, and the component called Text change its text to ?, as described in the next figure.

Figure 20: Changing the default character for letters
- Lastly, we can also deactivate the object called letter that is in the Hierarchy.

Figure 21: Deactivating the letter object
You can now play the Scene, and you should see questions marks where letters need to be guessed.

Figure 22: Displaying question marks
Want to learn more about Puzzle Games: try this!
Last week we went through lots of examples of game mechanics and published games that make players feel smart. This week’s article is on how to make a great word game, and not surprisingly, ties in well to many of the same game mechanics we looked at in last week’s article.
We should first start by defining what a word game is. Most games do involve words in some way, and there some games like Codenames and Just One that are about guessing words. However, I think of word games a little differently.
What I’m really talking about here are word-building games.
I like to define word games as those that are all about trying to come up with words based on the letters you have available, which are really all about problem-solving, just in a way you might not have thought of before. When you come up with a great word, you feel smart and really good about yourself.
But at the same time, word games can be very think-y and may lead players to analysis paralysis (AP).
So, we’re going to look at examples of how to make a great word game, along with what game mechanics to avoid.
Some Things to Avoid
Scrabble is probably the world’s best-selling and well-known word game. It originally was released in 1938 at a time where there weren’t a ton of board games available and it was the only one all about making words with the letters you had available.

However, when you analyze Scrabble, you see that it has some flaws.
One of the biggest issues is downtime. It can often take a player several minutes to come up with not only a word but also a location on the board that they can place it. That’s because they have 7 letters to work with and many different locations on the board that a word can be placed. They also have to be able to build off at least one letter on the board to make that word.
This can cause quite a bit of analysis paralysis (AP). Not only that, but while other players can look at their letters and think about what they might do with them, the board state will often change considerably by the time it comes around to their turn. They will often no longer be able to place their letters as they had planned. This leads to a lot more thinking by the current player and much more waiting by all the other players.
Many of these negatives could be avoided by having separate boards or play areas for each player rather than a common board, as well as speeding up turns by allowing for simultaneous play and a smaller space for decision-making.
Still, modern word games might not have existed if it weren’t for Scrabble. We must give credit to those who have come before and set the stage.
Let’s look now at how word games have evolved and the game mechanics they have employed to create a more engaging experience.
Modern Word Games
Word games have evolved a lot since the days of Scrabble. While not considered “modern” anymore, Boggle was released in 1973 and introduced a fast, simultaneous word game with players writing down all the words they saw in a short period.

Much like Karuba, Scarabia, Cartographers, and Number 9, all mentioned in my previous article, in Boggle, all players have the exact same information to work with but will see things differently and will come up with their own unique words. In fact, only unique words will score. If you write down the same word as any other player, it gets crossed off and you won’t score any points.
Wordsy (originally released as Prolix), uses a system where all players are trying to make the best word they can with the eight consonant cards in front of them and any vowels they require. Similar to Scrabble, letters are worth different values, so you’re trying to score the highest point word each round.

Bananagrams is like Scrabble on speed. All players build their own crossword-like setup, using the letter tiles that they draw. Everyone plays simultaneously and the faster you go the harder you make it on your opponents, as they must draw an additional tile every time any other player places their last tile.

Word games continued to evolve, making use of cards with letters represented on them and allowing players to build words with what they have available. Tim Fowers added a twist when he created Paperback and Hardback, which incorporate deckbuilding, something normally reserved for more strategic card games like Dominion and Star Realms.

I discovered Letter Jam at Fan Expo in 2019 and recently picked up a copy when the memory of playing it came to my mind. I remembered enjoying playing this and since it was a relatively cheap game to buy, I couldn’t say no!

Letter Jam is a rare co-operative word game where you’re trying to guess the letter in front of you, which only other players can see. You first come up with a five-letter word (one letter per card), shuffle your cards, and pass them to the player on your left.
Then everyone displays one letter in front of them and your teammates come up with words based on the letters in front of each other, as well as some non-player letters. It’s up to you to determine what letter is missing in that word so that you can figure out your own letter.
You do this multiple times to try to uncover the five letters in your word and then you have to unscramble them to come up with the original word that your teammate passed to you at the start of the game.
It’s not the easiest game to describe in words. You really have to try it out and see it in action. But I can say it’s a whole lot of fun! It uses clues, guessing, and hidden information to create a fun and challenging experience.
What word game do you love and what game mechanics does it use to create an engaging experience?
Please share this with me and other readers by leaving a comment.
Next week we’ll be looking at ways to ensure your players are engaged.
Update 11/5: We have updated this post for iOS 8 and Swift – check out the updated version!
Are you a seasoned iOS developer who is thinking of creating an iOS game, but have no experience programming games? Maybe learning OpenGL ES makes you uncomfortable, or maybe you’ve just never crossed paths with Cocos2d for iPhone?
Well, good news! UIKit is a power tool for game developers. Its high-end frameworks provide you with the means to create all of your game logic, from creating animations (including frame-animation) to playing audio and video.
This 3-part tutorial series will guide you through the process of building a board game for the iPad, where you create words with letters. You’ll also learn about best practices for creating solid, modular iOS apps. And as a bonus, you’ll get a crash course in audio-visual effects with UIKit!
This tutorial series is designed for readers who are already somewhat familiar with Objective-C, and thus won’t go over details like primitive types or syntax. If your Obj-C knowledge is rusty, I recommend checking out our Objective-C Crash Course.
Click through to get your game on!
Getting Started: Introducing Anagrams
The letter / word game with UIKit you will be making in this tutorial is about anagrams.
An anagram is a word or phrase formed by rearranging the letters of another word or phrase. For example, the word cinema can be rearranged into the word iceman. Your game will challenge the player to create anagrams from words and phrases you provide.
The finished game will look something like this:

As you can see, there is a row of letter tiles on the lower end of the screen that makes up the initial phrase. In the screenshot above it is the word admirer, minus the M tile, which the player has dragged to the upper row.
The player’s job is to drag the letters from admirer to form a different word, using the same letters.
Can you guess what it is? I’ve already given you a hint… it starts with an M!
The correct answer is married. Did you figure it out? If so, give yourself a high-five!
So anyway, this is the game you will be making. As you build this game, you will learn about the following foundational topics:
- Proper model-view-controller (MVC) game structure.
- Loading level configuration from config files.
- Organizing your game controller logic.
- Writing a simple audio controller for UIKit with AV Foundation.
- Using QuartzCore for static visual effects.
- Using UIAnimation to smooth in-game movements.
- Using UIKit particles to add visual effects.
- Building separate HUD and game layers.
- Using game fonts to improve the look and polish.
- Upgrading default UIKit components to game-like components.
- Also included: discussion of the software tools I use along the way when I’m creating a game. :]
Oh, and there will be explosions. :] Let’s dig in!
The Starter Project
To get you straight to the good stuff – using UIKit to build an iOS game – this tutorial provides a ZIP file that includes a starter XCode project and all game assets (images, fonts, audio and config files).
Download the Anagrams Part 1 starter file, unzip it and open it up in Xcode.
Have a look at what’s bundled in the starter project. The project file browser on the left should look something like this:

Here’s a quick summary of what you see:
- config.h: Your code configs in one place.
- Levels: A folder with three .plist files to define the game’s three difficulty levels.
- Classes/models: This is where you’ll add your data models.
- Classes/views: This is where you’ll create your custom view classes.
- Classes/controllers: This is where you’ll create your controllers.
- Assets/Fonts: A custom TTF font for the game HUD.
- Assets/Particles: There is a single PNG file to use for particle effects.
- Assets/Audio: Creative Commons-licensed audio files.
- Assets/Images: These are all the images you’ll use to create the game.
- MainStoryboard.storyboard: Open up the storyboard and you’ll see there’s only one screen with the background set to a faint woodgrain image, which is included in the project assets.
- credits.txt: Includes links to the sources of all the assets used in the project.
Poke around, play the sounds and browse the images. Then run the project.

It’s much better than an empty app window, isn’t it?
In this first part of the series, your goal is to display the initial anagram and target boxes on the screen. In future tutorials, you’ll add the ability to drag the tiles, and the gameplay logic.
There’s a lot involved to get this first part working. But don’t worry, you’ll break down this epic task into 8 small steps:
- Load the level config file.
- Create a game controller class.
- Create an onscreen view.
- Create a tile view.
- Deal the tiles on the screen.
- Add the letters.
- Slightly rotate the letters randomly.
- Add the targets.
Let’s go over these one step at a time.
1) Load the Level Config File
Select the level1.plist file in the project file browser. Have a look what’s inside:

There are three top-level keys:
- pointsPerTile: the points awarded for each correctly-placed tile.
- timeToSolve: The number of seconds the player will have to solve the puzzle.
- anagrams: A list of anagrams, each anagram containing two items, an initial and a final phrase.
Don’t bother for the moment with the first two and focus on anagrams. It’s an array of array-elements and each element has two string elements. You’re now going to build a data model to load this configuration in Objective-C.
Create a new Objective-C class file in the Anagrams/Classes/models folder. Call the new class Level and make it a subclass of NSObject.
Open up Level.h and in between the @interface and @end lines, add the following properties and method for your Level class:
//properties stored in a .plist file
@property (assign, nonatomic) int pointsPerTile;
@property (assign, nonatomic) int timeToSolve;
@property (strong, nonatomic) NSArray* anagrams;

//factory method to load a .plist file and initialize the model
+(instancetype)levelWithNum:(int)levelNum;
The properties match the structure of the .plist file, so you are simply going to load the data and populate the properties. You also declare a factory method to produce Level class instances for a given difficulty level. These will range from 1 to 3, going from easiest to most difficult.
Now add the code to power-up the Level data model class. Inside the class implementation in Level.m, add the method body of the factory method to create Level instances:
+(instancetype)levelWithNum:(int)levelNum;
{
    //1 find .plist file for this level
    NSString* fileName = [NSString stringWithFormat:@"level%i.plist", levelNum];
    NSString* levelPath = [[[NSBundle mainBundle] resourcePath] stringByAppendingPathComponent:fileName];

    //2 load .plist file
    NSDictionary* levelDict = [NSDictionary dictionaryWithContentsOfFile:levelPath];

    //3 validation
    NSAssert(levelDict, @"level config file not found");

    //4 create Level instance
    Level* l = [[Level alloc] init];

    //5 initialize the object from the dictionary
    l.pointsPerTile = [levelDict[@"pointsPerTile"] intValue];
    l.anagrams = levelDict[@"anagrams"];
    l.timeToSolve = [levelDict[@"timeToSolve"] intValue];

    return l;
}
There are four small sections in the method body – four small steps towards the goal of the method, if you will:
- Determine the path to the appropriate level config file (level1.plist, level2.plist, etc), based on the
levelNumvalue passed into the method. - Load the file’s contents into an
NSDictionary. Fortunately, theNSDictionaryclass knows how to parse .plist files! - Validate that there’s something loaded in
levelDict. I useNSAssertoften for errors that should never happen in a shipped app. (I.e., if they EVER happen during development I want the app to stop and crash, so I can fix it before doing anything else.) - Create a new instance of
Level. - Copy the values from the
NSDictionaryto theLevelobject’s properties.
Now let’s give the class a try and validate your achievement of the first step towards the goal!
Open up ViewController.m and add at the top:
#import "Level.h"
And at the end of viewDidLoad:, add:
Level* level1 = [Level levelWithNum:1];
NSLog(@"anagrams: %@", level1.anagrams);
In the Xcode console you will see the list of anagrams for Level 1. Nice!

Now you can remove the NSLog line from viewDidLoad to keep the console tidy.
That’s one task knocked down. Ready to move ahead to the next one?
2) Create a Game Controller Class
Often people who are not experienced with MVC before jumping into iOS development confuse a controller and a UIViewController.
- A controller is simply a class that focuses on some part of your app’s logic, separate from your app’s data and the classes used to display that data.
- A class that subclasses
UIViewControlleris just a controller managing the presentation of a particularUIView. (AndUIViews are used to display something on the screen.) You can read up more on the MVC pattern here.
For this tutorial, you are going to create a controller class to manages your game’s logic. Let’s try this out.
Create a new Objective-C class file in the Anagrams/Classes/controllers folder. Call the new class GameController and make it a subclass of NSObject.
Open GameController.h and add the following import:
#import "Level.h"
Then add the following to the GameController interface:
//the view to add game elements to
@property (weak, nonatomic) UIView* gameView;

//the current level
@property (strong, nonatomic) Level* level;

//display a new anagram on the screen
-(void)dealRandomAnagram;
I bet you’ve already spotted the building blocks of your current goal:
-
gameView: The view you’ll use to display game elements on the screen. -
level: TheLevelobject that stores the anagrams and other settings for the current game level. -
dealRandomAnagram: The method you will call to display the current anagram on the screen.
The code so far is pretty simple. Switch to GameController.m and add this placeholder version of dealRandomAnagram:
//fetches a random anagram, deals the letter tiles and creates the targets
-(void)dealRandomAnagram
{
    //1
    NSAssert(self.level.anagrams, @"no level loaded");

    //2 random anagram
    int randomIndex = arc4random()%[self.level.anagrams count];
    NSArray* anaPair = self.level.anagrams[ randomIndex ];

    //3
    NSString* anagram1 = anaPair[0];
    NSString* anagram2 = anaPair[1];

    //4
    int ana1len = [anagram1 length];
    int ana2len = [anagram2 length];

    //5
    NSLog(@"phrase1[%i]: %@", ana1len, anagram1);
    NSLog(@"phrase2[%i]: %@", ana2len, anagram2);
}
Here’s what happening in the code above:
- You check to make sure this method is only called after the
levelproperty is set and that itsLevelobject contains anagrams. - You generate a random index into the anagram list, then grab the anagram at this index.
- You store the two phrases into
anagram1andanagram2. - Then you store the number of characters in each phrase into
ana1lenandana2len. You’ll do more with this information later. - Finally, you print the phrases to the console. This will suffice for testing.
Your app is already set up to load the storyboard MainStoryboard.storyboard at start up. This storyboard creates a single screen using the ViewController class.
Since your game will only have one screen, you will add all initialization inside the init method of ViewController. For games that include more than one view controller, you may want to do your initialization someplace else, such as the AppDelegate class.
Open up ViewController.m and at the top, add an import for your new class:
#import "GameController.h"
Replace the private class interface with the following:
@interface ViewController ()
@property (strong, nonatomic) GameController* controller;
@end
Finally, in the implementation add a new initializer method:
-(instancetype)initWithCoder:(NSCoder *)decoder
{
    self = [super initWithCoder:decoder];
    if (self != nil) {
        //create the game controller
        self.controller = [[GameController alloc] init];
    }
    return self;
}
The above method initWithCoder: is called automatically when the app initializes itself from its storyboard.
There it is! You’ve created a GameController class and you have an instance of it in your ViewController implementation, ready to go off and spill some letter tiles on the screen at any moment. :]
3) Create an Onscreen View
The next step is also quite easy: you need to create a view on the screen and connect your GameController to it.
Open up config.h and look at the first two defines inside the file: kScreenWidth and kScreenHeight. These are just two shortcuts, which also take care of the swapped dimensions of the screen in Landscape mode. You are going to use these defines to create your game view.
Switch back to ViewController.m and add the following code at the end of viewDidLoad::
//add one layer for all game elements
UIView* gameLayer = [[UIView alloc] initWithFrame:CGRectMake(0, 0, kScreenWidth, kScreenHeight)];
[self.view addSubview: gameLayer];

self.controller.gameView = gameLayer;
In the above code chunk, you create a new view with the dimensions of the screen and add it to the ViewController‘s view. Then you assign it to the gameView property of your GameController instance. This way the GameController will use this view for all game elements (except for the HUD – you’ll take care of that later).
Having now created your model and controller classes, you’ve come to the point where you need your first custom view class for the Anagrams game to display the tiles.
4) Create a Tile View
In this section, you are going to build a view to show tiles like these:

For now, you’ll focus on just creating the tile squares with the background image. Later, you’ll add the letters on top.
Inside the file group Anagram/Classes/views, create a new class called TileView and make it a subclass of UIImageView. This is already a good start – the UIImageView class provides you with the means to show an image, so you’ll only need to add a label on top of the image later on.
Open TileView.h and add the following to the interface:
@property (strong, nonatomic, readonly) NSString* letter;
@property (assign, nonatomic) BOOL isMatched;

-(instancetype)initWithLetter:(NSString*)letter andSideLength:(float)sideLength;
Here’s what you’ve just created:
-
letter: A property that will hold the letter assigned to the tile. -
isMatched: A property that will hold a Boolean indicating whether this tile has already been successfully “matched” to a target on the top of the screen. -
initWithLetter:andSideLength: a custominitmethod to set up an instance of the class with a given letter and tile size.
Why do you need to set the size of the tile, you might ask?
Look at the these two setups:

The first example shows a short word that requires large tiles to fill the screen. The latter example shows a phrase that requires smaller tiles because it has almost double the tile count. You can see why the tile view needs to be resize-able so that you can show different size tile depending on how many tiles you need on the screen at a time.
Your controller will calculate the phrase length, divide the screen width by the number of characters and decide on a tile size. You’ll implement that soon, but first, get cracking on the code for the tiles.
Switch to TileView.m and replace the contents with this basic class skeleton:
#import "TileView.h"
#import "config.h"

@implementation TileView

//1
- (id)initWithFrame:(CGRect)frame
{
    NSAssert(NO, @"Use initWithLetter:andSideLength instead");
    return nil;
}

//2 create new tile for a given letter
-(instancetype)initWithLetter:(NSString*)letter andSideLength:(float)sideLength
{
    //the tile background
    UIImage* img = [UIImage imageNamed:@"tile.png"];

    //create a new object
    self = [super initWithImage:img];

    if (self != nil) {

        //3 resize the tile
        float scale = sideLength/img.size.width;
        self.frame = CGRectMake(0,0,img.size.width*scale, img.size.height*scale);

        //more initialization here
    }

    return self;
}

@end
This is a long chunk of code, but if you look closely, you’ll see it doesn’t do much: it’s all about defining placeholders so you can build up the tile functionality later on. There are a few different sections in the code, so let’s go by the numbers:
-
You override
initWithFrame:. Since you have a custom initialization method, you don’t ever want to callinitWithFrame:. Instead, you add anNSAssertthat will fail every single time. This means there is less of a chance that you will ever create a tile that isn’t properly initialized.In such a small app, this is just a way to protect yourself from yourself. But in a larger app, or when working as part of a team, this sort of precaution can help reduce errors by keeping anyone from calling this method. (In order to really protect yourself from yourself, you would want to create similar implementations for each of the following methods:
init,initWithCoder:,initWithImage:andinitWithImage:highlightedImage:. You can do those later by yourself.) -
initWithLetter:andSideLength:is your custom method that will initialize tile instances. It loads the tile.png image and makes an instance ofTileViewby callinginitWithImage:on the parent class (UIImageViewin this case). - You then calculate by how much you need to scale the default tile so that you get a size that will fit your board for the given word or phrase. To do that, you just adjust the
frameof theTileView.UIImageViewresizes its image automatically to match its frame size.
Sweet! That code is already enough to show tiles containing just the default empty tile.png image.
Now is a good time to implement more functionality of the game controller, so you can at least see some empty tiles lining up on the screen.
5) Dealing the Tiles on the Screen
Switch back to GameController.m – your dealRandomAnagram method already loads the data you need, but it still does not do much. Time to fix that!
Add the following imports with the others at the top of GameController.m:
#import "config.h"
#import "TileView.h"
Now you’ll have access to your TileView class and any shared settings you store in config.h.
Add the following private variables to the @implementation section:
@implementation GameController
{
    //tile lists
    NSMutableArray* _tiles;
    NSMutableArray* _targets;
}
So what’s up with these variables?
-
_tilesis an array to hold theTileViewsthat will display the tiles at the bottom of the screen. These tiles contain the initial phrase of the anagram. -
_targetsis an array to hold the target views that will display the spaces at the top of the screen where the player has to drag tiles to form the second phrase of the anagram.
Before you continue, you also need a constant for the space between the tiles. Jump over to config.h and add the following define:
#define kTileMargin 20
Some of you might already be protesting, “Can’t I just use 20 where I need it and be done?” It’s a good point, but there is a reason for predefining in the config file.
My experience shows that you will have to tweak any numbers you have in your code when it comes time to fine-tune the gameplay. So the best practice is to externalize all numbers to a config file and give those variables meaningful names. This will pay off especially well if you are working in a team and you need to hand the game to a game designer for fine-tuning. :]
OK, back in GameController.m, get ready to add some code to the end of dealRandomAnagram. You have the number of characters in both phrases, so it’s easy to calculate what size tiles you need. Add this code at the end of the method:
//calculate the tile size
float tileSide = ceilf( kScreenWidth*0.9 / (float)MAX(ana1len, ana2len) ) - kTileMargin;
You take 90% of the width of the screen and divide it by the number of characters. You use the phrase that has more characters – remember, the number of spaces can vary! You decrease the result by kTileMargin to account for space between tiles.
Next find the initial x position of the first tile. It will depend on the length of the word and the tile size you just calculated. Once again, add the following at the end of dealRandomAnagram:
//get the left margin for first tile
float xOffset = (kScreenWidth - MAX(ana1len, ana2len) * (tileSide + kTileMargin))/2;

//adjust for tile center (instead of the tile's origin)
xOffset += tileSide/2;
You take the screen width, subtract the calculated width of the word tiles and find where the first tile should be positioned on the screen. Wouldn’t it be nice if there were a simpler way to “center” the tiles!

Continuing in the same method, add the following code to display the tiles:
//1 initialize tile list
_tiles = [NSMutableArray arrayWithCapacity: ana1len];

//2 create tiles
for (int i=0;i<ana1len;i++) {
    NSString* letter = [anagram1 substringWithRange:NSMakeRange(i, 1)];

    //3
    if (![letter isEqualToString:@" "]) {
        TileView* tile = [[TileView alloc] initWithLetter:letter andSideLength:tileSide];
        tile.center = CGPointMake(xOffset + i*(tileSide + kTileMargin), kScreenHeight/4*3);

        //4
        [self.gameView addSubview:tile];
        [_tiles addObject: tile];
    }
}
Here’s what’s happening above:
- First you initialize a fresh copy of your
_tilesmutable array and ensure it is large enough to hold all of the letters in the initial phrase. It’s important to start with a clear array here because this method will be called multiple times during a run of your app. Since spaces are skipped, if you didn’t clear out the array then, where there should be spaces, there might instead be old tiles left over from a previous phrase. - You then loop through the phrase and create a new
NSStringfor each character. This is stored asletter. - You check each letter and if it is not a space, it’s a go! You create a new tile and position it using
xOffset,tileSideandkTileMargin. Here you are calculating the position based on that letter’s position in the phrase, which is represented byi. So ifiis 5, this math will figure out how much space five tiles take up and add the new tile to the right of that space.You position the tiles vertically at 3/4ths of the screen height.
- Finally, you add the tile to the
gameViewand to the_tilesarray. The first actually shows the tile on the screen, while the latter helps you loop faster over the tiles later on.
Alrighty! Time for the final touch – you need to load the level data and call dealRandomAnagram. Switch to ViewController.m and add these two lines at the end of viewDidLoad::
self.controller.level = level1;
[self.controller dealRandomAnagram];
Remember that you already have a Level object – you created it at the top of this method – so you just pass it on to your GameController and call dealRandomAnagram.
It’s been a long time in coming, but build and run to check out the result! Your Simulator should look something like this:
![]()
Awesome, it works! It’s alive!!!
Note: Your view probably won’t look exactly like this because the app is choosing a random anagram each time it runs. Run it a few times to see how the app sizes the tiles differently for different phrases.
You are closing in on the finish line for the first part of this tutorial series.
6) Add the Letters
Switch to TileView.m. This is where you’re going to add letters to those tiles. Find the comment in initWithLetter:andSideLength saying «//more initialization here» and just below it, add the following code:
//add a letter on top
UILabel* lblChar = [[UILabel alloc] initWithFrame:self.bounds];
lblChar.textAlignment = NSTextAlignmentCenter;
lblChar.textColor = [UIColor whiteColor];
lblChar.backgroundColor = [UIColor clearColor];
lblChar.text = [letter uppercaseString];
lblChar.font = [UIFont fontWithName:@"Verdana-Bold" size:78.0*scale];
[self addSubview: lblChar];
The above code creates a new UILabel and adds it to the tile view. Because you want the letter to be as easy to read as possible, you create the label to be as large as the tile itself. You then align the letter to show up in the center of the tile.
You ensure the letter is uppercase by calling [letter uppercaseString]. Using capital letters will ease the game play, as they are easier to recognize, specifically by children. Always think about your game’s target audience!
Finally you reuse the scale factor you calculated earlier. For the full-size tile a Verdana font with char size of 78pts fits well, but for other sizes you need to scale the font size accordingly.
Add these last few lines of initialization to the end of initWithLetter:andSideLength:
//begin in unmatched state
self.isMatched = NO;

//save the letter
_letter = letter;
The above code sets the tile’s isMatched flag to NO, indicating this tile has not yet been matched to a target at the top of the screen. It also saves the letter to the tile’s letter property.
Build and run the project. As I said, you’re now moving fast towards your goal. Good job! :]

Once again, your screen probably won’t look just like this one. But that just means your game controller is doing what’s it’s supposed to do and dealing a random anagram. Nice!
Have another look at the image above. Right now the tiles look like they were put on the board by a pedantic robot – they are perfectly aligned. Now comes the time to add a pinch of randomization!
7) Slightly Rotate the Letters Randomly
Randomization is one of the keys to building a successful computer game. You want to randomize your game as much as possible. For example, no player enjoys enemies that all do the same thing every time the game runs.
In the case of the Anagrams game, you can randomize the placement of each tile so that they look more natural on the game board, as if a human put them down without trying too hard to align them properly:

In order to accomplish this randomization, add the following method to the interface in TileView.h:
-(void)randomize;
Inside TileView.m, add the following implementation of randomize:
-(void)randomize
{
    //1
    //set random rotation of the tile
    //anywhere between -0.2 and 0.3 radians
    float rotation = randomf(0,50) / (float)100 - 0.2;
    self.transform = CGAffineTransformMakeRotation( rotation );

    //2
    //move randomly upwards
    int yOffset = (arc4random() % 10) - 10;
    self.center = CGPointMake(self.center.x, self.center.y + yOffset);
}
This code does two things:
- It generates a random angle between -0.2 and 0.3 radians (using the helper function
randomfdefined in config.h). Then it callsCGAffineTransformMakeRotationto create a new transform for the tile view that will rotate it around its center by that random angle. - It generates a random value between -10 and 0 and moves the tile up by that offset.
Note: You might want to replace all of these numbers with constants you define in config.h so you can fine-tune the tile appearance more easily.
Now you just need to call this method. Inside GameController.m, edit dealRandomAnagram by adding the following line of code just after the line that begins with tile.center = ...:
[tile randomize];
And that’s all it takes! Hit run again to see the randomized tiles on the board:

Using what you’ve already achieved, you can also quickly add the targets to the game board. Let’s do that before wrapping up this part of the tutorial.
 Add the Targets
 Add the Targets
The target views are pretty similar to the tile views. They also subclass UIImageView and show a default image, and they also are assigned a letter. The difference is that they don’t show a label with that letter and can’t be dragged around. This means the code you need for the targets is similar to what you did before – but simpler!
Create a new class in Anagrams/Classes/views called TargetView and make it a subclass of UIImageView.
Open up the freshly created TargetView.h and inside the interface declaration add the following two properties and method:
@property (strong, nonatomic, readonly) NSString* letter;
@property (assign, nonatomic) BOOL isMatched;

-(instancetype)initWithLetter:(NSString*)letter andSideLength:(float)sideLength;
Yes, these are exactly the same properties and method name you used for the TileView! As you see, now you can move quickly. You already know what the above are for, so you can move straight to the implementation.
Switch to TargetView.m and delete the provided methods. Replace them with:
- (id)initWithFrame:(CGRect)frame
{
    NSAssert(NO, @"Use initWithLetter:andSideLength instead");
    return nil;
}

//create a new target, store what letter should it match to
-(instancetype)initWithLetter:(NSString*)letter andSideLength:(float)sideLength
{
    UIImage* img = [UIImage imageNamed:@"slot"];
    self = [super initWithImage: img];

    if (self != nil) {
        //initialization
        self.isMatched = NO;

        float scale = sideLength/img.size.width;
        self.frame = CGRectMake(0,0,img.size.width*scale, img.size.height*scale);

        _letter = letter;
    }
    return self;
}
Once again, this is the same code you started with in TileView.m. You resize the image according to the provided side length and assign the letter – that’s all.
Now to display the targets on the screen. Open up GameController.m and add the following import:
#import "TargetView.h"
Then add the following code inside dealRandomAnagram, just before the comment that reads «//initialize tile list»:
// initialize target list
_targets = [NSMutableArray arrayWithCapacity: ana2len];

// create targets
for (int i=0;i<ana2len;i++) {
    NSString* letter = [anagram2 substringWithRange:NSMakeRange(i, 1)];

    if (![letter isEqualToString:@" "]) {
        TargetView* target = [[TargetView alloc] initWithLetter:letter andSideLength:tileSide];
        target.center = CGPointMake(xOffset + i*(tileSide + kTileMargin), kScreenHeight/4);

        [self.gameView addSubview:target];
        [_targets addObject: target];
    }
}
This is almost the same code you used to deal the tiles on the board, except this time you grab the letters from the phrase stored in anagram2 and you don’t randomize their position. You want the target views to look nice and neat, after all!
Why does the target initialization have to come before the tile initialization? Subviews are drawn in the order they are added to their parent view, so adding the target views first ensures that they will appear behind, or below, the tiles.
If you did want to add the target views after the tile views, there are other ways to get them behind the tiles, such as UIView‘s sendSubviewToBack: method. But adding them first is the most efficient solution.
Build and run again to see that your board is already close to being finished!

Waaaaaait a secoooond!!!
These two phrases don’t match. Below you have three tiles followed by four tiles, while the targets at the top are four tiles following by three tiles!
Don’t worry, you should actually expect this behavior. After all, the anagrams consist of two phrases which might each have different word counts. They just need to have an equal number of total characters (not including white spaces). So it’s all good!
Where to Go from Here?
Click here to download the full source code for the project up to this point.
Congrats, you’ve achieved a lot today! Let’s see what you’ve done so far:
- You’ve created a model to load the level configuration.
- You’ve connected the game controller, game view and model.
- You have two custom views, one for tiles and one for targets.
- You’ve finished the initial board setup.
You now have a sound foundation on which to build. Stay tuned for Part 2 of the series, where you’ll begin interacting with the player and building up the gameplay.
In the meantime, if you have any questions or comments about what you’ve done so far, drop by the forums to contribute your two tiles’ worth. :]
i puzzle time image by Christopher Hall from Fotolia.com
Despite the rise of the video game, many people still like to play simple games on paper. There are many different kinds, but one of the most popular is called the «word find» puzzle. In this puzzle, words are hidden inside a rectangular array of letters. The object is to find these words and circle them. Some of these puzzles come with the words listed on the side so you know what to look for, while others expect you to find the words without hints. If you want to make your own «word find» puzzle, you easily can do so using Microsoft Word.
Step 1
Select «Table» from the menu in Microsoft Word and click «Insert Table.» In the dialog box that pops up, enter as many columns and rows as you want. The number of columns is the number of letters you want going across the puzzle and the number of rows is the number of letters you want going down the puzzle. Click «OK.»
Step 2
Hover the cursor arrow over the lines separating the cells. Drag them together to make each cell just large enough to hold one letter.
Step 3
Click inside the first cell of the first row. In the options at the top, choose the font type and size you want and type in the first letter of the puzzle. Continue typing in the letters for that row, placing one or two words within the set of letters..
Step 4
Repeat Step 3 for the other rows, but in those rows create words downward as well. As a variation, enter words backwards or diagonally, although this takes more planning.
Step 5
Select «File» and click «Save.» Name your file and save it. To print your puzzle, select «File» and click «Print.»
Writer Bio
Daniel Ketchum holds a Bachelor of Arts from East Carolina University where he also attended graduate school. Later, he taught history and humanities. Ketchum is experienced in 2D and 3D graphic programs, including Photoshop, Poser and Hexagon and primarily writes on these topics. He is a contributor to sites like Renderosity and Animotions.
The following list is yet another excellent resources for ESL/EFL teachers that will surely increase student engagement in the class. I am talking about easy-to-use, free word games generator online where teachers can easily create vocabulary games for review or warm up activities. I chose these websites because they focus only on one or two games thus they are specialized, very user-friendly and so convenient to use that you will be done making your games in seconds!
If you are not familiar with these warm up games, you may check out this post.
Free Word Games Generator

Spelling City
VocabularySpellingCity is an award-winning educational website focusing on spelling and vocabulary used by millions of teachers and parents worldwide. You can quickly start by creating your own word list and then choose an activity type for your students to play such as Spelling, Writing, Phonics, Vocabulary and more.
FlipQuiz
Are you familiar with Jeopardy? FlipQuiz is another free word games maker that does just that! It provides educators with a quick way to create your own game show-style boards for test reviews in the classroom. Traditionally, these are created tediously, using poster board, chalkboards, PowerPoint or dry-erase markers on overhead slides. The review questions themselves are usually written on a separate sheet of paper.
With FlipQuiz, questions are displayed on-screen and boards are saved for later use. Combined with a beautiful board, students are more likely to be interested and stay engaged with the test review process.
Puzzle Makers
There are many types of vocabulary puzzles for all ages including adults! I like the fact that I can have a number of different unique vocabulary puzzles created to printout on the same topic. So when we are studying a topic in English, say “Family and Friends”, I can print out six different sets then split the class into six groups and give them each a unique puzzle to solve.
Riddles
Riddle is an activity in which you must find out a word according to some given clues. Educaplay Riddles are quick games that can help the player review concepts through definitions, sounds and images. You can easily create your own riddle game when you register for a free account!
ALSO READ: Activities to End a Lesson
Brain Boosters
I love giving my kids brain booster activities! Discovery Education offers a wide selection of brain boosters that are fun and challenging! You can choose from different categories such as Logic, Reasoning, Word and Letter Play, and more! If your lesson finishes earlier than planned, you can easily go to the website and read out some brain boosters to your students!
Or you can simply download this ready-to-play Brain Teasers I made using PowerPoint.
Connect Fours
This fun and free word games generator is from my favorite ClassTools website! Students are shown 16 words. They need to group them into 4 rows of 4 connected items. This game is great for reviewing categories and making inference.
Bingo Baker
Bingo Baker makes it easy to create bingo cards. You can generate hundreds of random cards and print them using the printer-friendly PDF (with no ads or watermarks). You can also save paper (and waste electricity instead) by playing your bingo game online (it works on the iPad).
Instructions: Just type your words into the grid on the left. You can give your game a title and can change the BINGO column headings too.
Then click the Generate button and you are good to go!
HANGMAN.NO
The best site to create and play the classic letter guessing game hangman. Challenge your kids to guess as many secret words as they can before the time runs out. My students love the cool tune and slick animation!
THE WORD SEARCH
Let your students find hidden words in a grid of jumbled letters using this simple to use Word Search maker. You can create your very own or use their 100% free online collection of word search puzzles.
TABOO GAME
This website lets you create your own taboo cards by entering the word to be guessed in the top field and the taboo words in the bottom fields.
YOU MAY ALSO LIKE: Classroom Speaking Activities for Any Language Class
JEOPARDY LABS
This lets teachers create their own online games of Jeopardy by using their simple online editor. No powerpoint and no registration is required, and each game has its own unique url address so this really stands out for me.
If you prefer doing it offline, then check out my ELA Jeopardy Game!
WORD SCRAMBLE
Make your own set of jumbled words using this cool word scrambler. It allows you to give hints and the game comes with a timer.
MATCH THE MEMORY
Help your students improve not only their English but also their concentration skills with this powerful memory matching game creator! Make your own custom memory game using pictures, words, videos and more!
WHO WANTS TO BE A MILLIONAIRE
Create a fun, free review game in the style of Who Wants to be a Millionaire with up to 15 questions and whatever values you choose for each round. The graphics and sounds used in this game are similar to that of the television show making this review game more exciting!
WORD GENERATOR
I love this super convenient tool that generates words for your guessing game. All you need to do is choose the kind of guessing game you want to play, the category and level of difficulty and you are good to go – the word generator will give you a game word from the list and you can play!
QUIZLET LIVE
Quizlet Live is an online classroom vocabulary game tool where teams of three or four students work together to be first to match vocabulary terms with their correct definitions. It is free and easy to use, allowing teachers to create customized flash cards with text, images and audio. Similar to Quizlet Live is the interactive game maker Kahoot.
Not tech savvy? Try: ESL Warm Up Games with Free PowerPoint Downloads
Are you on Pinterest? Save this post!

What would you add to these? Let us know in the comments!
[facebook_comment url=”http://englishteaching101.com/online-vocabulary-games-generator/” width=”100%” number=”50″ color=”light”]