
Create a document in Word

With Word on your PC, Mac, or mobile device, you can:
-
Create documents from scratch, or a template.
-
Add text, images, art, and videos.
-
Research a topic and find credible sources.
-
Access your documents from a computer, tablet, or phone with OneDrive.
-
Share your documents and work with others.
-
Track and review changes.
Create a document
-
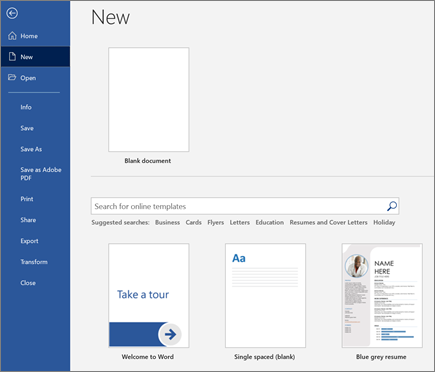
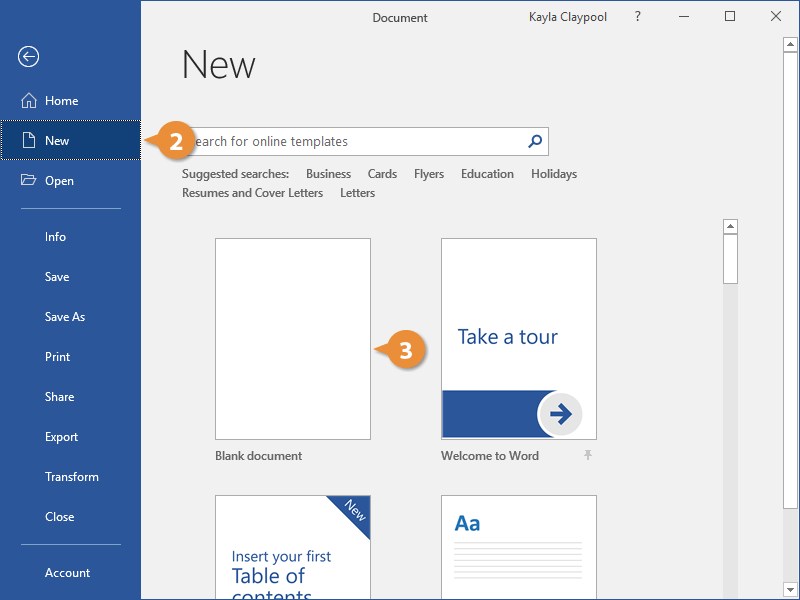
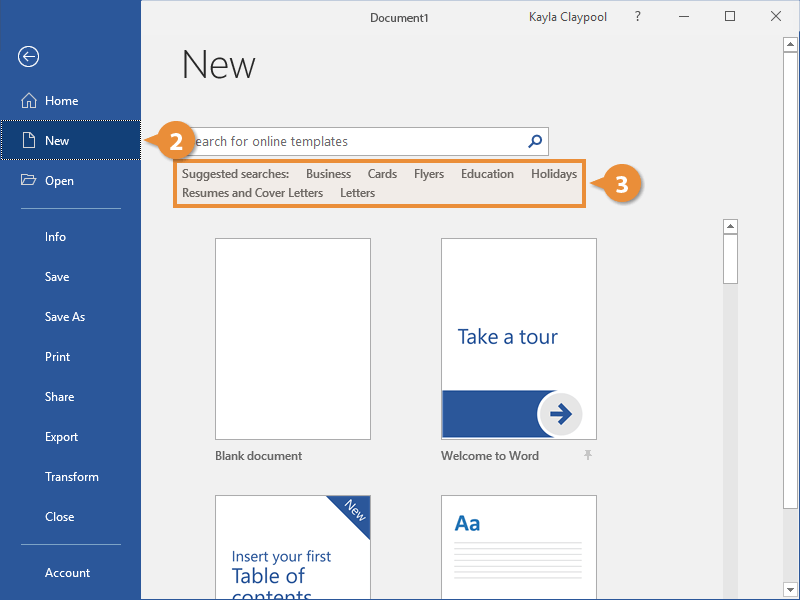
On the File tab, click New.
-
In the Search for online templates box, enter the type of document you want to create and press ENTER.
Tip: To start from scratch, select Blank document. Or, for practice using Word features, try a learning guide like Welcome to Word, Insert your first table of contents, and more.
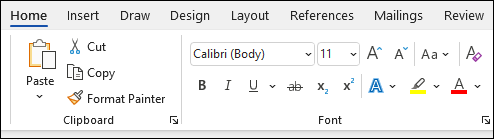
Add and format text
-
Place the cursor and type some text.
-
To format, select the text and then select an option: Bold, Italic, Bullets, Numbering, and more.
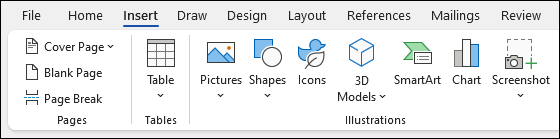
Add Pictures, Shapes, SmartArt, Chart, and more
-
Select the Insert tab.
-
Select what you want to add:
-
Tables — select Table, hover over the size you want, and select it.
-
Pictures — select Pictures, browse for pictures from your computer, select a stock image, or even search Bing.
Note:
Older versions of Word may have Online Pictures on the ribbon next to Pictures. -
Shapes — select Shapes, and choose a shape from the drop-down.
-
Icons — select Icons, pick the one you want, and select Insert.
-
3D Models — select 3D Models, choose from a file or online source, go to the image you want, and select Insert.
-
SmartArt — select SmartArt, choose a SmartArt Graphic, and select OK.
-
Chart — select Chart, select the chart you want, and select OK.
-
Screenshot — select Screenshot and select one from the drop-down.
-
Next:
Save your document to OneDrive in Word
Need more help?
Things You Should Know
- To create a basic document, choose a template from the list provided or start with a blank document.
- Use the File tab to open, save, and start documents, and the Insert tab to add any images, symbols, or other media to your document.
- Highlight your text and play around with formatting options in the «Home» tab. You can change the font, italicize/bold/underline your words, and play around with font size.
-

1
Open the Microsoft Word application. Do this by double-clicking the Microsoft Word icon.
-
2
Review the available templates. On the right side of the screen, you’ll see several templates of interest:
- Blank document — A blank document with default formatting.
- Creative Resume/Cover Letter — A clean, pre-formatted resume (and accompanying cover letter) document.
- Student Report with Cover Photo — A document format geared toward an academic demographic.
- Fax Cover Sheet — A document to preface fax reports.
- You can also search for specific templates online from within Word by using the search bar at the top of this screen.
Advertisement
-
3
Choose a template. Doing so will open the template in Word with whatever pre-determined formatting applies to it. Now that your document is open, you’re ready to review your Toolbar options.
- When in doubt, open a blank document.


Advertisement
-
1
Click the File tab. It’s in the top left side of the screen (or in the menu bar for Mac users). From here, you have several useful options on the far left side of your screen:
- Info (PC only) — Click this to review the documents statistics, such as when it was last modified, as well as any potential issues with the document.
- New — Click this to bring up the «New Document» page that lists all of the pre-formatted templates. Opening a new document will prompt you to save your old one.
- Open — Click this to review a list of recently-opened documents. You can also select a directory (e.g., «This PC») in which to search.
- Save — Click this to save your document. If this is your first time saving this particular document, you’ll be prompted to enter a name, save location, and preferred file format as well.
- Save As — Click this to save your document «as» something (e.g., a different name or file format).
- Print — Click this to bring up your printer settings.
- Share — Click this to view sharing options for this document, including email and cloud options.
- Export — Click this to quickly create a PDF or change the file type.
-
2
Click ← in the top left corner of your screen. If you’re using a Mac, you won’t have this option—simply click your document to exit the «File» menu.
-
3
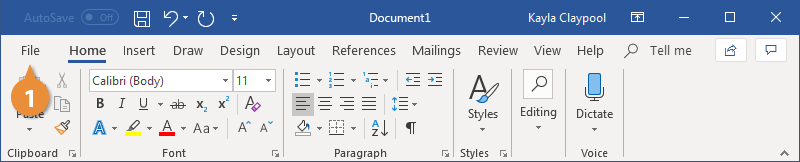
Review the Home tab to see your formatting options. At the top of your screen—from left to right—are five sub-sections of this tab:
- Clipboard — Whenever you copy text, it is saved on your clipboard. You can view copied text by clicking the Clipboard option here.
- Font — From this section, you can change your font style, size, color, formatting (e.g., bold or italic), and highlighting.
- Paragraph — You can change aspects of your paragraph formatting—such as line spacing, indentation, and bullet formatting—from this section.
- Styles — This section covers different types of text for various situations (e.g., headings, titles, and subtitles). You’ll also see the popular «No Spacing» option here, which removes excess spaces between lines of text.
- Editing — A couple of commonly-used tools—such as «Find and Replace», which allows you to quickly replace all appearances of one word with another—live here.
-
4
Click the Insert tab to review the types of media you can place in your document. Insert is to the right of the Home tab. The Insert tab allows you to add things like graphics and page numbers to your document. From left to right, a couple of notable options include the following:
- Table — Clicking this option will allow you to create an Excel-style table right in your document.
- Pictures — Use this feature to insert a picture into your document.
- Header, Footer, and Page Number — These options are all essential for writing in MLA- or APA-style formatting. The Header places a space at the top of the document for comment, while the Footer goes at the bottom—page numbers are customizable.
- Equation/Symbol — These options use special formatting to accurately display simple equations. You can select these equations or symbols from the pertinent drop-down menu.
-
5
Click the Design tab to create your own template. It’s to the right of the Insert tab.
- The Design tab contains pre-designed themes and formats listed across the top of the page.
-
6
Click the Layout tab to customize your page’s formatting. This tab contains options for changing the following aspects of your document:
- Margins
- Page orientation (vertical or horizontal)
- Page size
- Number of columns (defaults to one)
- Location of page breaks
- Indentation
-
7
Click the References to manage your citations. If you have a bibliography page, you can also manage it from here.
- For quick bibliography formatting, click the Bibliography drop-down menu and select a template.
- In the «Citations & Bibliography» group of options, you can change your bibliography formatting from APA to MLA (or other citation styles).
- The «Captions» group has an option to insert a table of figures. This is useful for scientific review papers or similar documents in which statistical data is prioritized over quotations.
-
8
Click the Mailings tab to review your document sharing options. You can review your email settings and share your documents from within this section.
- You can also print an envelope or label template by clicking the pertinent option in the top left corner of your screen.
- The Select Recipients drop-down menu allows you to choose Outlook contacts as well as an existing contact list within Word.
-
9
Click the Review tab. The Review section is geared towards editing, so it includes options for marking up documents and proofreading. A couple of important options include:
- Spelling & Grammar — Click this option (far left corner) to underline any spelling or grammatical errors.
- The «Changes» section — This is to the far right of the toolbar. From here, you can enable the «Track Changes» feature which automatically formats any additions or deletions you make in a document to appear in red print.
-
10
Decide on the set of options that best apply to your work. If you’re a student, for example, you’ll likely use the Insert and References tab often. Now that you’re familiar with the toolbar options, you can format your first Word document.


Advertisement
-
1
Open a new Blank Document in Word. If you have an existing document, you can open that instead.
-
2
Enter text. Do this by clicking on the blank section of the document and typing away.
- If you opened an existing document, be sure to save your work before re-formatting.
-
3
Highlight a section of text. To do this, click and drag your cursor across your writing, then let go when you’ve highlighted the section you wish to edit.
-
4
Consider what you want to do to the writing. Some potential options include:
- Quickly format your writing. Do this by right-clicking (or two-finger clicking) your highlighted text and then selecting an option from the right-click menu.
- Change the font of your selection. You can do this by clicking the drop-down bar at the top of the «Font» section (Home tab) and then selecting a new font.
- Bold, italicize, or underline your highlighted section. To do this, click the B, I, or U in the «Font» section of the Home tab.
- Change your document’s spacing. This is easiest to accomplish by right-clicking your selected text, clicking Paragraph, and modifying the «Line Spacing» value in the bottom right corner of this window.
-
5
Continue working with Word. Your preferred options for your documents will differ based on the intention behind creating them, so the more you work within your own particular format, the more proficient you’ll become.


Advertisement
Add New Question
-
Question
How do I copy and paste?

To copy a certain piece of text, highlight it and press Ctrl + C. Then click the spot you want to place the copied text and press Ctrl + V to paste.
-
Question
How do I place a logo in MS Word?
Press the Insert tab and then press the Pictures button. You will then be allowed to select the image.
-
Question
How can I save a document to a specific location?
Click File —> Save As… and you’ll be allowed to select the destination location (and filename and format) of the file.
Ask a Question
200 characters left
Include your email address to get a message when this question is answered.
Submit
Advertisement
-
A red line under a word means the word is misspelled, a green underline suggests a grammatical error, and a blue underline pertains to formatting.
-
If you right-click (or two-finger click) an underlined word, you’ll see a replacement suggestion at the top of the right-click menu.
-
You can quick-save your document by holding down Control (or Command on Mac) and tapping S.
Thanks for submitting a tip for review!
Advertisement
-
Don’t forget to save your work before closing Word.
Advertisement
About This Article
Article SummaryX
1. Create blank documents or from templates.
2. Format text colors, fonts, and sizes.
3. Insert media like photos and animations.
4. Insert data like tables, page numbers, headers, and equations.
5. Customize the on-screen and print layouts.
6. Add references and citations.
Did this summary help you?
Thanks to all authors for creating a page that has been read 213,472 times.
Is this article up to date?
Microsoft Word – текстовый редактор с широчайшими пожалуй возможностями, с которыми постепенно будем знакомиться на страницах нашего блога. В этой публикации мы рассмотрим базис работы с этой программой. Мы поговорим о том, как в Microsoft Word создать документ, как его сохранить, какие в текстовом редакторе есть основные возможности, на которые на первых порах знакомства с ним нужно обратить внимание новичкам. Работу редактора мы рассмотрим на примере его последней ритейл-версии Microsoft Word 2019, которая во многом с двумя другими версиями идентична из числа актуальных — Microsoft Word 2016 и 2013.
Содержание
- Создание документа
- Сохранение документа
- Основные функции в процессе набора текста
- Форматирование текста
- Режимы отображения документа
Создание документа
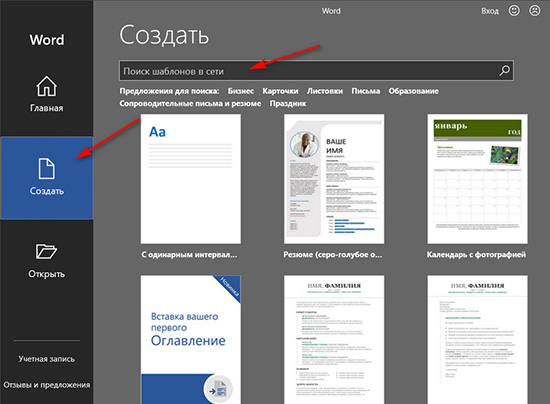
Работа с Microsoft Word начинается либо с открытия существующего документа, либо с создания, соответственно, нового. Создать новый документ можно прямо на главной вкладке приветственного окошка программы. Это будет у нас пустой документ, чистый лист формата А4.
А во вкладке «Создать» у нас будет возможность с вами создать документ Word с использованием коллекции шаблонов. Если образца нужного типа документа не найдется, тогда можно попытаться поискать его в сети.
Сохранение документа
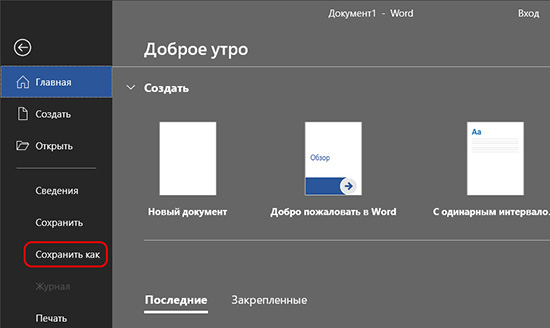
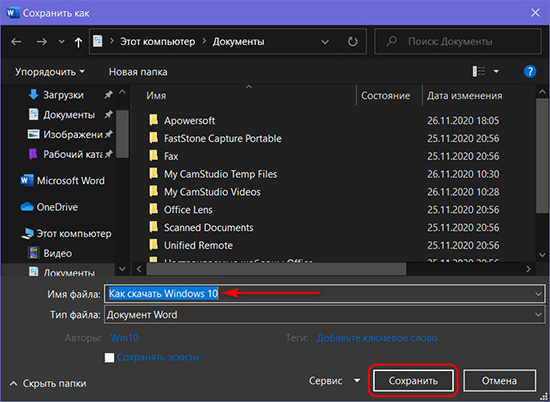
Созданный документ, и неважно, выберем ли мы просто пустой документ, либо же это будет готовый шаблон, нам нужно сохранить его под своим названием в нужном месте компьютера. Жмём «Файл».
Выбираем «Сохранить как».
Далее – «Обзор».
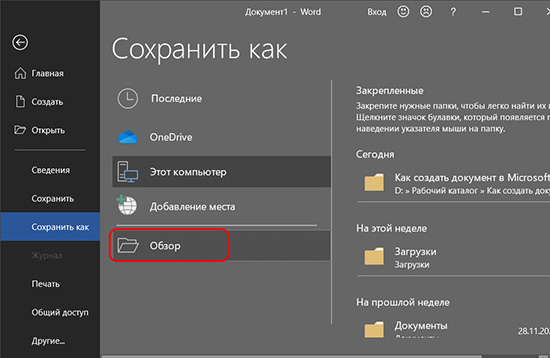
Выбираем путь сохранения на диске компьютера и жмём «Сохранить».
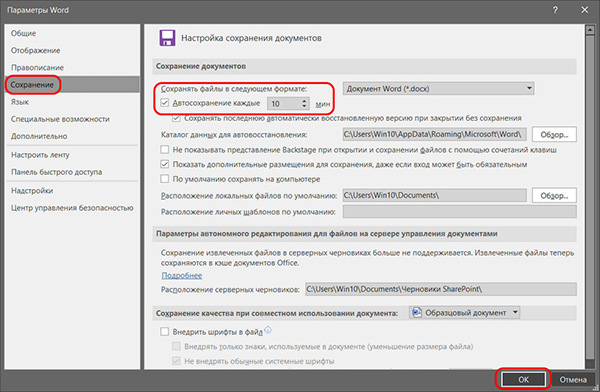
Приступая к работе с Microsoft Word в первый раз на каждом новом компьютере или же в новом профиле ОС Windows, важно сразу настроить под себя параметры автосохранения документов. Это нужно на будущее, чтобы при непредвиденном аварийном завершении работы текстового редактора как можно большая часть проделанной в нём работы осталась сохранённой. Нажмём меню «Файл», внизу слева выберем «Параметры». В окне параметров зайдем в раздел «Сохранение». И указываем самый оптимальный для нас промежуток времени автосохранения документов. По умолчанию в Microsoft Word выставлено 10 минут, но это будет, конечно, мало. Можно выставить минут 5. Выставляем и нажимаем «Ок».
Помимо настройки автосохранения, в процессе работы с текстовым редактором можем вручную сохранять документ. Для этого жмём кнопку в виде дискетки на панели быстрого доступа или клавиши Ctrl+S.
Основные функции в процессе набора текста
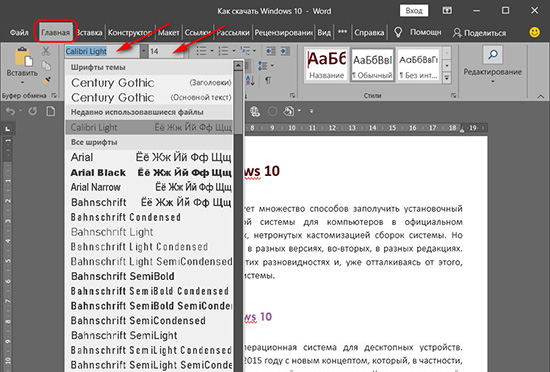
Непосредственно работу над пустым документом начинаем с выбора шрифта и его размера в главном меню программы.
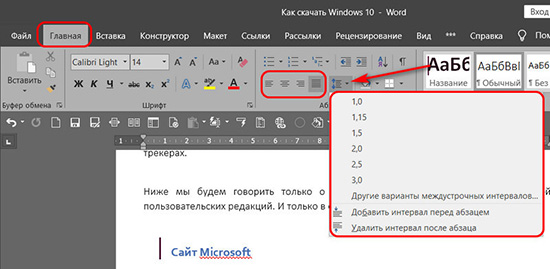
Далее выбираем выравнивание текста – по правому/левому краю, посредине, по ширине. Можем выбрать другой, нежели предустановленный, междустрочный интервал. И при необходимости убрать или добавить интервалы до или после абзаца. Но можно и просто делать между абзацами отступы двойным отбитием клавиши Enter.
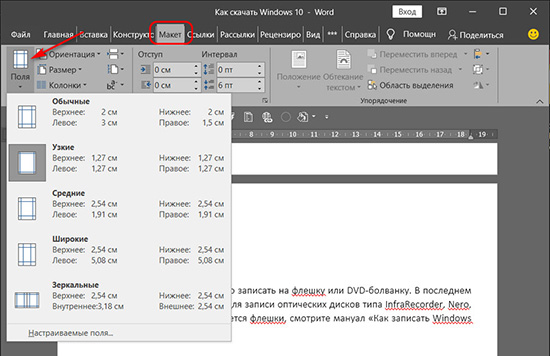
Если нам нужно изменить параметры самого листа документа, в меню «Макет» можем задать размеры полей, размер (формат) – А4, А3, А5 и т.п., книжную или альбомную ориентацию.
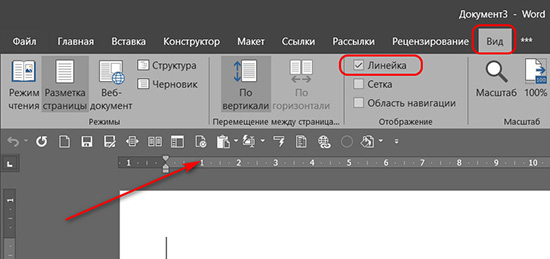
А в меню «Вид» при необходимости включается отображение линейки.
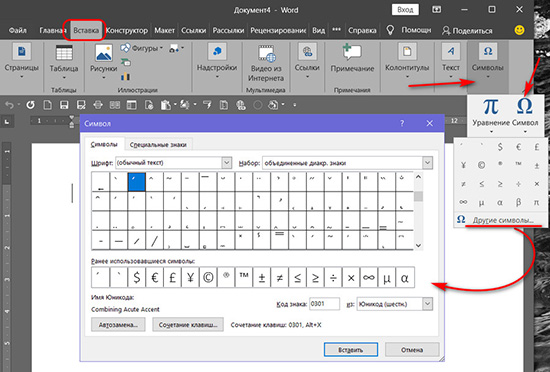
В Microsoft Word действуют общие правила компьютерного набора текста. Если в процессе набора текста нам нужно использовать какие-то символы, которых нет на клавиатуре, ищем их в меню программы «Вставка». Кликаем «Символ» и, если нужный нам символ есть в небольшом перечне, выбираем его. А если нет, открываем полный перечень символов «Другие символы» и ищем то, что надо.
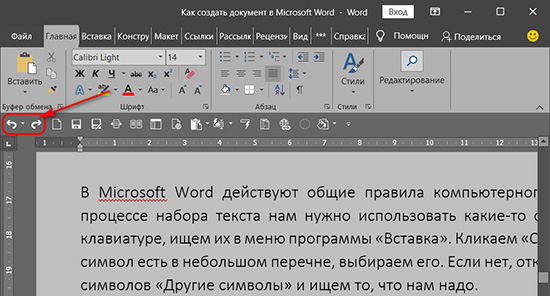
При наборе текста для удобства можно пользоваться функциями отмены ввода, если мы что-то удалили нужное и хотим вернуть это обратно. И также можно использовать повторение ввода – функцию, обратную отмене ввода. Их кнопки размещены на панели для быстрого доступа, и также эти функции можно всегда задействовать клавишами, соответственно, Ctrl+Z и Ctrl+Y.
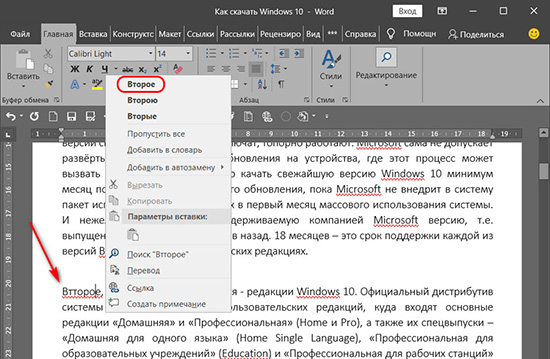
По умолчанию в программе Microsoft Word включена проверка орфографии. Все грамматические ошибки отмечены красным подчёркиванием, пунктуационные и стилистические – синим. В контекстном же меню на подчёркнутых словах и фразах мы можем посмотреть, как, возможно, правильно пишется то или иное слово, либо как правильно нужно ставить знак препинания. Однако стоит иметь в виду, что автоматизированное средство для проверки правописания Microsoft Word ещё далеко от идеальной реализации, и сомнительные какие-то моменты всегда нужно перепроверять.
Форматирование текста
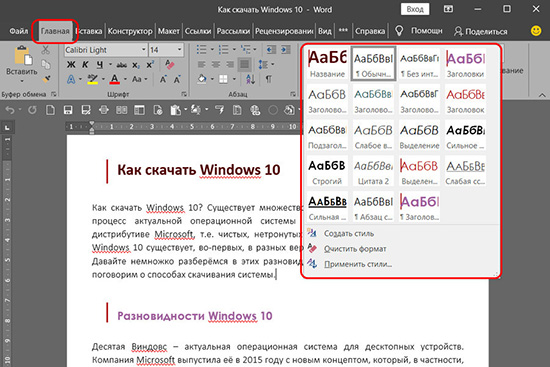
Программа Microsoft Word может предложить нам огромнейшие возможности в плане форматирования текста. К тексту можем применять различные шрифты, выделение жирным, курсивом, нижним подчёркиванием, цветным маркером и блоком. Можем буквы сделать любого цвета и стиля, в том числе объёмного. Все эти операции есть в главном меню программы. И также в нём есть коллекция из разнообразных стилей форматирования. Это стили, которые можно применять к определённому тексту – названиям, заголовкам, подзаголовкам, цитатам, а также акцентным выделениям и т.п. У каждого шаблона имеются разные стили форматирования, прямо в коллекции в главном меню у нас есть возможность эти стили редактировать на свой вкус и создавать новые.
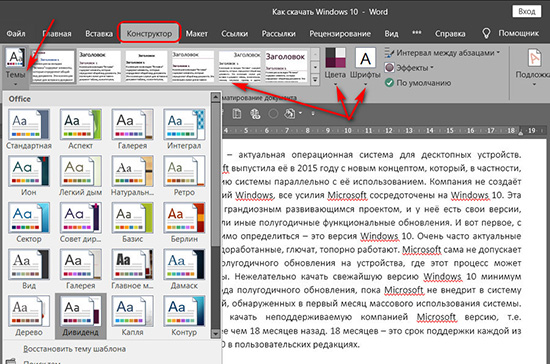
Но это ещё не всё, существующую тему стилей для форматирования во вкладке программы «Конструктор» можем сменить на другую. И для выбранной темы можем сменить образцы заголовков, их шрифт и цвета.
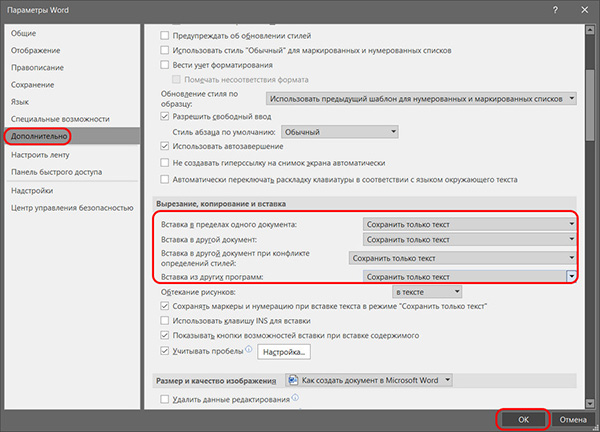
Ещё по умолчанию в Microsoft Word настроена вставка текста, скопированного из другого источника, с сохранением форматирования этого другого источника (другой программы, веб-страницы в браузере и т.п.). Такое форматирование в себя включает шрифт, его размер, цвет, применённые эффекты, вставленные картинки. Во многих случаях форматирование из другого источника не нужно, нужно вставить только сам текст. И вот чтобы нам не нарушать формат текста, который был задан в документе Microsoft Word, форматом источника, где мы позаимствовали текст, вставлять нужно текст очищенным от форматирования. Делается это не обычной комбинацией клавиш Ctrl+V, а уже Ctrl+Shift+V. Либо же можно использовать параметры вставки в главном меню текстового редактора, в выпадающем списке кнопки «Вставить».
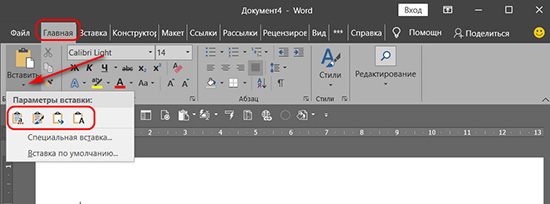
Но можно сделать и так, чтобы у нас по клавишам Ctrl+V и кнопкой «Вставить» вставлялся очищенный от форматирования текст. Для этого нам необходимо в параметрах Microsoft Word, во вкладке «Дополнительно» выставить 4 значения вставки «Сохранить только текст».
Режимы отображения документа
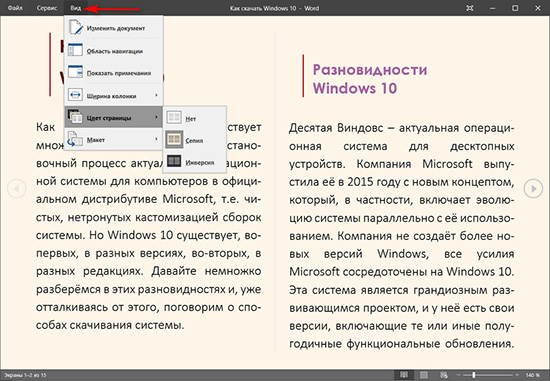
У Microsoft Word есть несколько режимов отображения документа, их кнопки для переключения находятся внизу справа. Двое из режимов предназначены для набора текста – это режим обычного документа и режим веб-страницы. Между ними можно переключаться и выбирать, какой из них для какой ситуации нам больше подходит.
И есть ещё режим чтения, он предназначен для чтения книг и прочих текстовых материалов. Ну и, соответственно, его можно использовать для вычитки разных документов. В режиме чтения нельзя редактировать текст. Но данный режим у нас настраивается: можем выбрать тему, макет, ширину колонки.
Вот это только основные возможности Microsoft Word по созданию документов. Ну а все остальные возможности текстового редактора мы уже узконаправленно рассмотрим в других статьях блога.
- Free Courses
- Microsoft Word
- How to Create a Word Document

How to Create New Documents in Word

Creating a new document is one of the most basic commands you need in Word. You can create a new blank document, or you can create a new document based on a template.
Create a Blank Document
- Click the File tab.

- Click New.
- Select Blank document.

A new, blank document is created in a new window.
Press Ctrl + N to open a new blank document.
Create a Document from a Template
- Click the File tab.
- Click New.
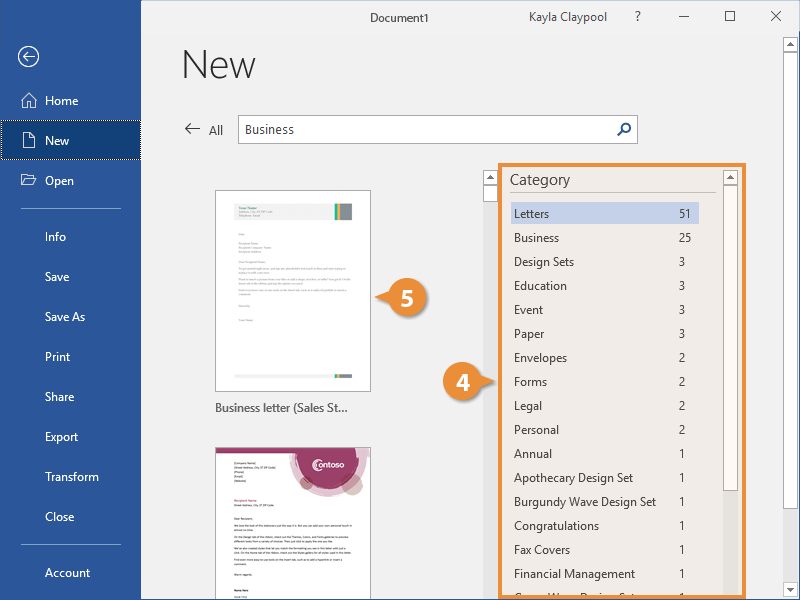
The New screen has a few ways for you to select a template.
First, several featured templates will appear, after the Blank document template.
You can also search for a template using the search field or select a template category from the suggested searches.
- (Optional) Select or search for a template category.
Preview images of the templates will appear for the selected category, along with a Category list.
- (Optional) Select or search for a template category.
Selecting additional categories allows you to narrow your template search even more. Only templates that fit into all the selected categories will appear.
- Select a template.
A larger preview of the template appears, along with a description.
- Click Create.
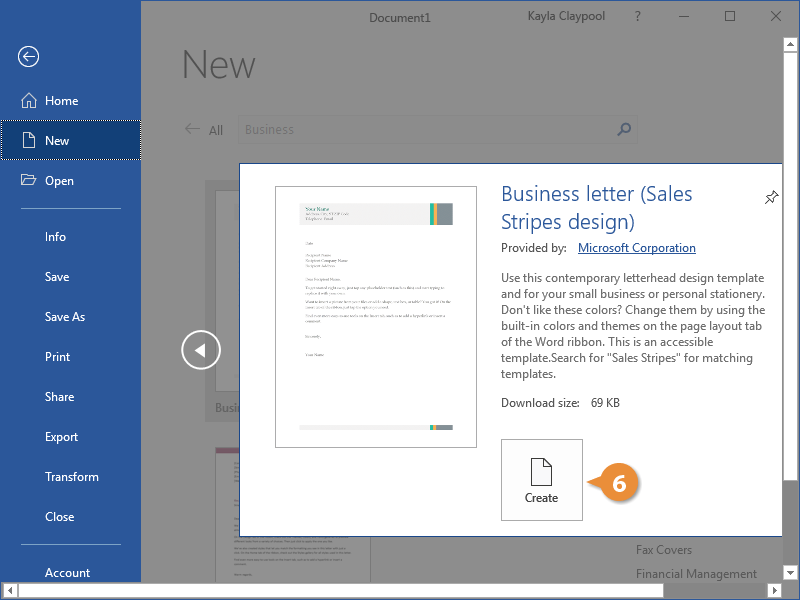
A new document from the template is created. Now, just fill in the placeholders.

FREE Quick Reference
Click to Download
Free to distribute with our compliments; we hope you will consider our paid training.

There was a time when you had to have Microsoft Office installed to create, edit, or even view a Microsoft Word document. Thankfully, that’s no longer the case. There are a number of free alternatives for working with those Word documents people occasionally send you.
Word Online

Word Online is Microsoft’s own cloud-based solution for working with Word files. It’s part of the Microsoft Office Online suite, and you can access it without a subscription. You just have to sign in with a free Microsoft account.
The interface of the Word Online is similar to the desktop version of Microsoft Word, so if you’re familiar with Word, you’ll feel right at home.
Documents you create with Word Online are saved automatically to your OneDrive folders. Word Online also integrates with the desktop version of Microsoft Word, and you can seamlessly switch to the desktop app with the click of a button. All the changes you make to one version are automatically synced to the other. However, you cannot work in the web-app and the desktop app simultaneously.
Word Online also features real-time collaboration that lets multiple people work on the same document at the same time. This feature works with Word Online, the Windows and Mac desktop apps, and the mobile apps. The iOS and Android app are also free and allow you to view and edit documents on the go.
Word Online is probably your best bet for working with Word documents (other than actually using the desktop app), because it does a good job of maintaining the original formatting of the Word documents. For viewing and editing documents, it’s a great solution.
That said, there are a few disadvantages. You have to be online for it to work; there’s no way to edit a local file offline. Not all the features of the desktop version of Word are present, either. All the basics are there, but you won’t be able to some of the more advanced stuff like create captions and bibliographies, create or apply styles, or use advanced reviewing tools. You can view all those things if they’re already present in the document; you just can’t work with them.
Word Online also has a few restrictions on printing, and you might not be able to fine-tune your prints as you would in the desktop app.
Google Docs
Much like Word Online, Google Docs works in your browser. You can use it to create new document files and collaborate with other users. By default, you can’t work directly with a Word file in Google Docs. Instead, you have to upload the file to Google Drive, and then open it in Google Docs—a process that converts it to a Google Docs file.
For simple, mostly text documents, that might be fine, especially if the document is something you’re just going to be using yourself. However, Google Docs doesn’t do a great job at retaining most formatting that can go along with a Word document. And, if it’s a document you need to edit and return to someone else that uses Word, converting it and then reconverting it isn’t ideal.
The good news is that if you use the Chrome browser, Google makes an extension that lets you open Microsoft Office files (Word, Excel, and PowerPoint) directly into their Google counterparts (Docs, Sheets, and Slides) without converting them. The extension is named Office Editing for Docs, Sheets, and Slides—a bit on the nose, but whatever—and it’s free from the Chrome Web Store.
Unfortunately, that leaves users of other browsers out in the cold, unless they can install Chrome extensions. If you need to edit Word documents semi-regularly and want to use Google Docs to do it, it might be worth installing Chrome just for that purpose.
RELATED: How to Install Any Chrome Extension in Firefox
On the features front, Google Docs does fall a bit behind Word Online, but only power users will feel the pinch.
By default, Google Docs works only when you are online. If you want offline access, then you’ll need to install a Chrome extension that enables offline viewing and editing of files. For mobile access, Google offers apps for both iOS and Android devices. Both platforms’ apps support offline file access with editing features, as well.
Zoho Writer
If you’re not a fan of using Word Online or Google Docs, but still want an online solution, Zoho Writer is a free online word processor that lets you import Word documents, without needing to convert them. The only real catch with Zoho Writer is that you can only upload Word documents up to 10 MB in size. That’s big enough to accommodate most documents, but if you’ve got something larger than that, you’ll need another solution.
Zoho Writer supports all the recent Word file formats, and it does a really good job of maintaining the layout of the original Word file. You can also save and export the document to many other formats, such as ODT, RTF, txt, HTML, ePub, and PDF.
Apart from the web app, Zoho also offers mobile apps for Writer which are available for Android and iOS. Both apps also support collaboration and offline editing features.
Libre Office
So far, we’ve looked at several free online services for working with Word documents. LibreOffice is a full desktop app suite that aims to be a free, open source replacement for Microsoft Office. And it’s a capable app. It’s not quite as full-featured as Word itself, but it’s easily out-features any of the online solutions we’ve talked about. It’s available for Windows, Mac, and Linux operating systems.
While LibreOffice is primarily designed to work with local documents, it does support services that you can use to edit remote documents, as well.
Unless you’re a real Word power user (in which case, you’d likely have Word, anyway) or you have very specific needs, you should find that LibreOffice can do almost all of what you need when editing a Word document. It even retains formatting pretty well, and supports native Word formats—so, no conversion needed. That said, it can sometimes have issues with image placement in Word documents, especially those documents created in the newer versions of Word.
Libre Office does have a mobile app, but only for Android, and it can only be used to view documents. The app is rough around the edges, so expect some bugs and user experience issues.
Of course, there are other alternatives out there that you can use to to edit Word Documents, but these are the ones that we believe offer the most diverse feature set. If you prefer a specific application, do let us know!
READ NEXT
- › How to Automatically Save Microsoft Word Documents to OneDrive
- › How to Turn Off Track Changes in Word
- › How to Turn Off Dark Mode in Microsoft Word
- › How to Save a Microsoft Word Document as a Web Page
- › Google Chrome Is Getting Faster
- › Expand Your Tech Career Skills With Courses From Udemy
- › The New NVIDIA GeForce RTX 4070 Is Like an RTX 3080 for $599
- › BLUETTI Slashed Hundreds off Its Best Power Stations for Easter Sale