
Use the button below to copy and paste the bullet point symbol. For more options to insert or type this symbol in Word, keep gliding down the page.
The table below contains some useful information about this symbol.
| Symbol Name | Bullet |
| Symbol | • |
| Alt Code | 0149 |
| Shortuct | Alt+0149 |
You’ll love this guide if you are looking for ways you can insert a bullet point symbol in Microsoft Word.
There are several methods you can use to perform this task. I’ll go through each one of them beginning with the simple ones. However, below is a quick solution:
To insert a bullet point symbol in Word, place the insertion pointer at where you want to insert the symbol, hold down the Alt key, then press 0149 on the numeric keypad, then release the Alt key – this will insert a bullet point symbol into your Word document.
Insert using the Insert Symbol dialog
The bullet point symbol is not readily available on the keyboard.
Therefore, inserting this symbol into Word becomes difficult for some people.
With the help of the Insert Symbol dialog box, you can easily
insert this symbol into your Word document.
Without further ado, below are the steps involved:
- Place the insertion pointer at where you want to
insert the symbol. - Go to the Insert tab.
- In the Symbols group, click on the Symbols button then choose More Symbols from the drop-down.

The Symbol dialog box will appear. This dialog is a
library of all symbols in Microsoft Word.
- Locate the bullet point symbol from the library
of symbols.
To easily locate this symbol, use the Subset dropdown list to display specific types of symbols. You can find the bullet or point symbol in the General punctuation subset.

- Click to select the symbol then click on the Insert button.

As soon as you click on the insert button, a bullet point symbol will be inserted into your Word document.
- Click on the Cancel button to dismiss the
dialog box.
This is how you may insert this and any other symbol in Word using the Symbol Dialog Box.
Copy and Paste
One of the easiest ways to insert this symbol into your Word document is a simple copy and paste.
Below is the symbol if you wish to copy and paste it into your document:
Bullet Symbol Copy & Paste
•
For more interesting options on how to insert this symbol,
read further.
Sometimes, Microsoft Word senses that you’re typing a
bulleted list and uses its AutoFormat As You Type feature to help you.
Thus, if you want to insert a point or bullet at the beginning
of paragraph, place the insertion pointer at the beginning of the new
paragraph, then press the Tab key once, type an asterisk (Shift+8), then
press the Tab key again, Word will convert the asterisk to a bullet or
point.
Alternatively, if you want to add bullet points to your list,
obey the following instructions:
- Type your list. Make sure each item begins a new line.

- Highlight all the list options.

- Go to the Home tab, in the Paragraph group, select the down arrow next to the Bullets option.

- A dropdown list of options will appear, select the Bullet list style to apply it to the selected text.
These steps will insert a bulleted point to the select text
making it a bulleted list.
Insert bullet point in Word using Alt Code (Shortcut)
All the symbols in Microsoft Word have a unique code that can be used to insert the symbols into Word. These codes are known as Alt code.
The Alt code for the Bullet Point Symbol is 0149.
To insert the bullet point symbol into Word using the Alt
Code, please obey the instructions below:
- Place the insertion pointer at where you want to insert the symbol.
- Whilst holding down the Alt key, press the alt code (0149) on the numeric keypad.
- Now release the Alt key.
As soon as you release the Alt key, the bullet point symbol
will be inserted into your Word document at exactly where the insertion pointer
was placed.
Insert Bullet Point symbol using AutoCorrect
Yet, another way you can use to insert the Bullet Point
symbol in Word is through the AutoCorrect feature in Word.
It is a facility designed for correcting spelling mistakes
like thsi to this.
Using this trick, you can assign a shortcut to the bullet point symbol (such as bpsym).
This way, whenever you type the text bpsym, Word will think
that you actually wanted to type • and will convert it into a bullet point automatically.

What makes this approach interesting is that you can assign
any code you want to the symbol and Word will be more than glad to insert the
symbol for you whenever you type the assigned code.
Without further ado, below are the steps you can use to type
Bullet Point symbol in Word using AutoCorrect.
- On the Insert tab, click Symbol and then click
More Symbols… The Symbol dialog appears. - Locate the Bullet Point symbol, then click to
select it.
- Click on the AutoCorrect… button to display the AutoCorrect dialog.

- In the AutoCorrect dialog box, enter the
following:
Replace: BPSYM
With: •

- Click Add, then click OK.
Word will automatically insert the Bullet Point symbol into
your document whenever you type BPSYM.
However, below are some things to note when you are using the AutoCorrect Method to insert the Bullet Point sign.
- If there is any text before or after the
AutoCorrect text, Word will consider the AutoCorrect text as part of the text
and hence will not convert it to the Bullet Point symbol. For example, XBPSYM
will not get converted, but X BPSYM will get converted to X •.
(Note: This guide on how to add bullet points in Word is suitable for all MS Word versions including Office 365)
Microsoft Word is a very effective software used for documentation purposes and also helps in keeping track of lists. Instead of just having the items one after the other without any visual cues, it’d be better if you could have some bullet points to emphasize the points.
Bullet points help pinpoint certain important information and help the reader understand important points easily. In this article, I will tell you how to add bullet points in Word using 4 easy methods.
You’ll Learn:
- How to Add Bullet Points in Word?
- Add Bullet Points to an Existing List
- Add Bullet Points to a New List
- Add Bullet Points Using Symbols
- Add Bullet Points in Word Using Keyboard Shortcut
- Using the Alt Key
- Using Asterisk or Number
- Define a New Bullet
Related Reads:
How to Insert Watermark in Word? 3 Easy Ways
How to Double Space in Word? 4 Easy Ways
How to Wrap Text in Word? 6 Wrap Text Options Explained
How to Add Bullet Points in Word?
Add Bullet Points to an Existing List
When you download or copy any data, the data might not have bullet points. Also, when you create a list of points in a hurry, you might not have the patience to add bullet points to each entry in the list. In such cases, you can add bullet points to an existing list using this method.
Consider a Word document that has a list of colors.
- To add bullet points, first, select the data.
- Then, navigate to Home. Under the Paragraph section, click on Bullets or Numbering based on your choice.

Note: Instead of navigating between tabs, you can add bullet points to the list using the toolbar which pops up when you select the data.
- When you click on the bullets option, only the default bullet pointer (•) gets added to the list. If you want to add a different bullet to the list, select the data and click on the dropdown from Bullets.
- Then, select the bullet you want to add.

If you want to add more entries to the list, press Enter. This adds a bullet point onto a new line and you can type in the next entry.
To exit the bullet mode, press Enter twice. This will revert the list from bullet mode to normal paragraph mode.
Add Bullet Points to a New List
If you want to add bullet points to a list as you create them, you can easily do that using this method.
- First, place the cursor where you want to add bullet points.
- Then, navigate to Home. Under the Paragraph section, select the default bullet point or any bullet point from the dropdown. In this case, let us add the square bullet point.

- Once you click on the bullet point, the indented pointer appears with the cursor next to it.
- You can then type in the data you want to add to the list.
- To add another point or list, press Enter.
- The cursor moves to a new line and a new bullet point is added where you can add your data.

By pressing Enter as you input the data, you can easily create a list in Word. And if you want to stop adding bullet points to the list, press Enter twice.
Add Bullet Points Using Symbols
This is one way to add a variety of bullet points to your lists.
- First, place the cursor where you want to add the bullet point.
- Navigate to Insert. Click on the dropdown from Symbols and select More Symbols.
- This opens up a Symbols dialog box. In the dialog box, scroll up and down, and choose the symbol of your choice for the bullet points.
- Select the symbol and click Insert.

- This adds the selected bullet point to the list.
- Now, you can copy and paste the bullet point to add them anywhere you want in the list.

Suggested Reads:
How to Recover a Word Document ? 4 Proven Ways
How to Convert Speech to Text in Word? A step-by-Step Guide
How to Add Columns in Microsoft Word? All You Need to Know
Add Bullet Points in Word Using Keyboard Shortcut
There is a keyboard shortcut for almost every operation. In Word, using the shortcut keys to add bullet points is easy and effective. There are two ways to add bullet points in Word using shortcut keys.
Using the Alt Key
- Place the cursor in the destination where you want to add the bullet point.
- Now, hold the Alt key and press the Numpad keys 0, 1, 4, and 9 one after the other, i.e. Alt+0149.
- Once you leave the Alt key, the bullet point appears.

Unlike other methods to add the bullet points, pressing Enter won’t add a bullet point in the next line.
Though this method is easy, you cannot add bullet points using shortcut keys to an existing list and can only be added using number keys in the Numpad. You can only use the shortcut keys to insert a bullet point and then add the list.
Note: The number 0149 is the code for the default bullet pointer. If you want to use another symbol for the bullet pointer, navigate to Insert. Click on the dropdown from Symbol and select More Symbols. In the dialog box, click on the symbol you want and remember the shortcut key given below.

Using Asterisk or Number
Using the Alt key and codes is one way to insert bullet points, but there is an easier method to add them.
- If you want to add bullet points, first, place the cursor in the destination.
- Enter an asterisk (*) and press Space.
- This inserts the bullet point in the location.
- In the same way, if you want to insert a numbered list, enter any number and press Space.
- This adds the number pointers to the list.

- You can press Enter and add bullets one after the other.
- And, if you want to exit the bullet mode, press the Enter button twice.
Note: This method works with a new list or an existing list, but the cursor should be placed at the start of the new line for this method to work.
Define a New Bullet
If you take a particular liking to a bullet point, you can add it to the bullet point repository and use them whenever you like with just the click of a button.
- To define a new bullet, navigate to Home. Click on the dropdown from bullet points and select Define New Bullet.

- This opens up a Define New Bullet dialog box.
- From the dialog box, select either the symbol, picture, or font option and choose the bullet point.
- You can also see the preview of how the bullet point will appear in the Preview pane.
- Click OK.

- Now, your selected bullet gets added to the repository.
When you need to use the bullet, just click on the dropdown and select the bullet point.
Also Read:
How to Find and Replace in Word? 7 Simple Methods
How to Superscript in Word? 4 Easy Methods
How to Make a Checklist in Word? 3 Simple Steps
Frequently Asked Questions
How to add bullet points in Word?
First, select the data that you want to list and then navigate to Home. Under the Paragraph section, click on Bullets or Numbering based on your choice. This helps you to add bullet points in Word in an easy way.
What is the shortcut key for adding the bullet points in Word?
Place the cursor in the destination where you want to add the bullet point. Now, hold the Alt key and press the Numpad keys 0, 1, 4, and 9 one after the other i.e. Alt+0149. Once you leave the Alt key, the bullet point appears.
How to add bullet points in Word on Mac?
Place the cursor in the destination where you want to add a bulleted or numbered list. Navigate to Home, click the arrow next to Bullets or Numbering. Click on a bullet to insert it into the destination.
Closing Thoughts
Bullet points and numbered lists are very powerful visual cues to help the user easily ascertain and categorize the information.
In this article, we have seen how to add bullet points in Word in 4 easy ways. You can either choose to add the bullets to an existing list or while creating a new list. You can also use a variety of symbols and shortcut keys to add bullet points in Word.
For more high-quality guides on MS Word or Excel, please visit our free resources section.
SimonSezIT has been effectively teaching Excel for 15 years. We have a very comprehensive set of courses with in-depth training modules covering all major business software.
You can access all these 140+ courses for a low monthly fee. Please visit our courses section for more information about our offers.

Simon Calder

Chris “Simon” Calder was working as a Project Manager in IT for one of Los Angeles’ most prestigious cultural institutions, LACMA.He taught himself to use Microsoft Project from a giant textbook and hated every moment of it. Online learning was in its infancy then, but he spotted an opportunity and made an online MS Project course — the rest, as they say, is history!
This wikiHow teaches you how to create a bulleted list in Microsoft Word.
Steps
-

1
Open Microsoft Word. You’ll find it in the Windows menu (Windows) or in the Applications folder (macOS).
-
2
Type the information you want to have in bullet form.
- For example, if you want to make a bulleted list, you may type a list item on its own individual line, press ↵ Enter or ⏎ Return, type the next item, press ↵ Enter or ⏎ Return, etc.
-
3
Highlight the parts you want bulleted. To highlight, click and hold the mouse button before the first letter in the first line, then drag the mouse to the end of the selection. You can lift your finger when you’re done highlighting the area.
-
4
Click the bulleted list button. It’s near the top of the screen in the “Paragraph” tab. It looks like very tiny bulleted list. This add bullets to the beginning of each list item.
- To use a different type of bullet, such as a square or arrow, click the downward-pointing arrow next to the bulleted list button, then click your desired bullet.


Ask a Question
200 characters left
Include your email address to get a message when this question is answered.
Submit
About this article
Article SummaryX
1. Open Word.
2. Type your list.
3. Highlight your list.
4. Click the bulleted list button.
Did this summary help you?
Thanks to all authors for creating a page that has been read 1,851 times.
Is this article up to date?
Bullet point is a symbol that is used to introduce separate items present in a vertical list, sentences, or paragraphs. It is also used to write important information within a document.
The advantage of bullet points is that it allows readers to quickly read and understand the important part of the document, important heading, and more.
A bullet point contains a variety of symbols, including black dots, open circles, rectangles, squares, diamonds, dashes, checkmarks, asterisk, arrows, and more.
Example:
A list of fruit containing black dot bullet points —
- Mango
- Apple
- Grapes
- Papaya
There are the following methods to insert bullet points in Word document —
Method 1: Using the Home Tab
Follow the below mentioned easiest and quickest steps to insert bullet points —
Step 1: Open the new or an existing Word document.
Step 2: Highlight or select the list of items in which you want to insert bullet points.

Note: If the list is not created earlier, then first create a list of items.
Step 3: Go to the Home tab on the Ribbon and click on the Bullets drop-down icon associated with the Bullets in the Paragraph section.

Note: To insert numbering, click on the numbering drop-down icon next to the Bullets icon.
Step 4: A list of Recently Used Bullets dialog box will appear on the screen. Select the bullet point that you want to insert in the Bullet Library.
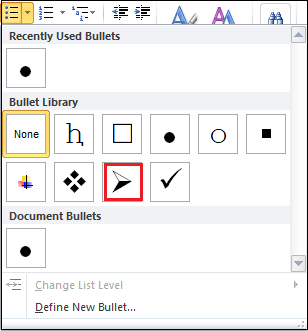
The screenshot below shows that bullet points are inserted to the Word document —

Method 2: Using the Symbol tab
You can also insert bullet points using the Symbol tabs. The Symbol tab contains the various option of bullet points.
Follow the below steps to insert bullet points —
Step 1: Open the new or an existing Word document.
Step 2: Place cursor in the document where you want to insert a bullet point.
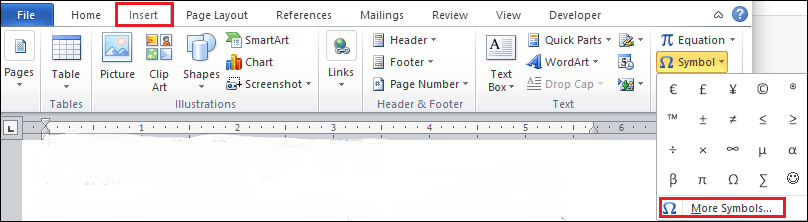
Step 3: Go to the Insert tab on the Ribbon and click on the drop-down menu associated with the Symbols icon in the Symbols section. Click on the More Symbols.
Step 4: A list of the symbols dialog box will appear on the screen. Select a symbol according to your requirement and click on the Insert button at the bottom of the screen.
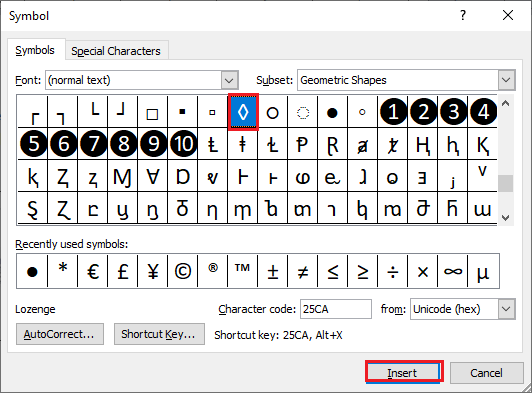
Now, you can see that Symbol (bullet point) is inserted into the selected place.
Note: Once you insert the symbol in the document, you can use the same symbol from the Home Tab. To access the inserted symbol, go to the Home tab and click on the Bullets drop-down icon in the Paragraph section.
Method 3: Using Keyboard Shortcut Keys
This is the simplest method to insert bullet points using the MS-Word keyboard shortcut keys —
Follow the below instructions to insert bullet point using the keyboard shortcut keys —
- Open the Word document.
- Place the cursor before the text where you want to insert a bullet point.
- Press and hold the Alt key and type Alt code 0149 from the Keyboard.
- Release the Alt key from the Keyboard.
Now, you can see that bullet point (• javaTpoint) is inserted before the text.
Method 4: Create a multi-column bullet list in Word document
Follow the below steps to create a multi-column bullet list in Word document —
Step 1: Open the Word document and type the items on the list.
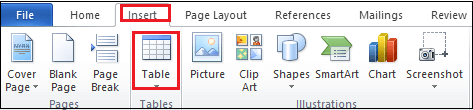
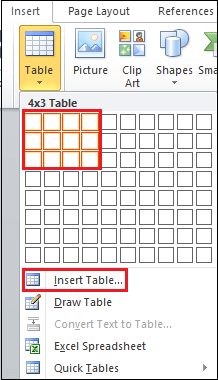
Step 2: Go to the Insert tab on the Ribbon and click on the Table option in the Tables section.
Step 3: An Insert table dialog box will appear on the screen. Select the number of rows and columns, as per your requirement, or you can also click on the Insert Table… option to insert the number of rows and columns manually.
Step 4: Once the Table is inserted to the document, select the table, go to the Home tab, and click on either Bullet or Numbering option in the Paragraph section.
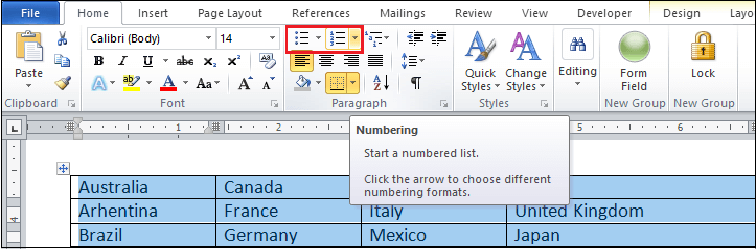
Note: In our case, we are going to use the Numbering option.
Step 5: Now, you can see that numbering is inserted to the table.

Step 6: If you want to the remove border form the table, then select the table, Go to the Design tab on the Ribbon, and click on the No Broder option from the drop-down menu, as shown in the screenshot below.
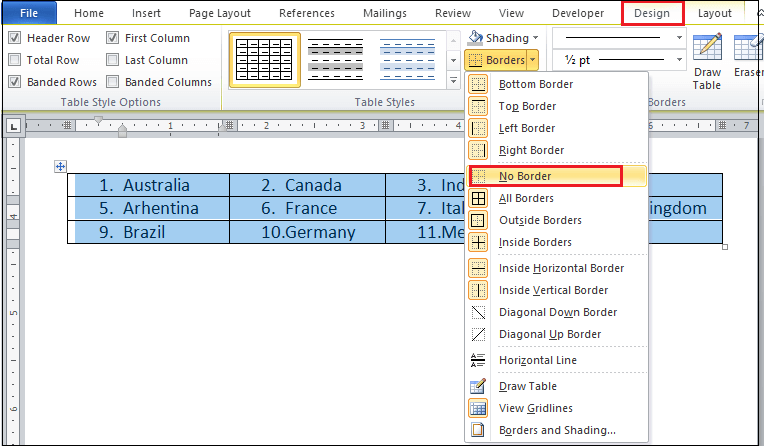
Now, you can see that a multi-column bullet list is inserted to the Word document.
Word’s bullet point function is essential for breaking up vast piles of text, especially if you can’t use graphics or photos in your documents. Word’s standard list of bullets will cover many situations, but making custom bullet points can add polish or humor to your content.
Create your document first and use placeholders for your bullets, such as asterisks or hyphens. (Tip: Use bullets for your lists when the items in the series are of equal importance. Use numbers if the items in the list are prioritized.)
Once the document is complete, experiment with different bullet designs. We’ll start with Word’s default bullets to introduce the process.
Default Bullets
1. Select the content for which you wish to insert bullet points.
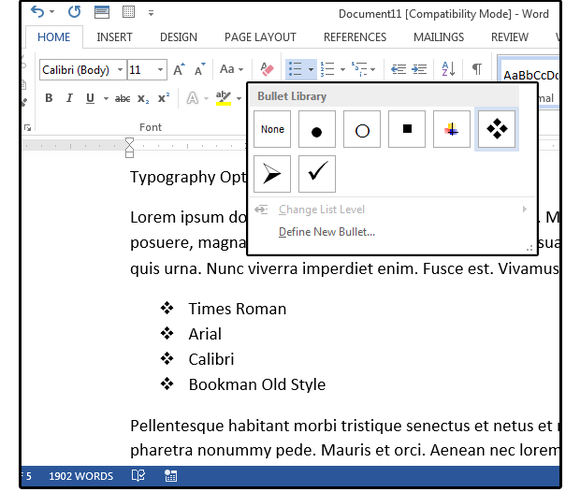
2. Go to Home > Paragraph. Locate the bullet icon at top left and click the down-arrow at the right side of that icon. Note: If you hit the icon itself, a bullet will appear wherever your cursor is in your document.
3. From the Bullet Library menu, choose a bullet design, and the new bullet design will appear at your cursor location. If you don’t like the first bullet you choose, click the Undo icon and try another one. Note: Word remembers the last six (or so) bullets used, so after you define a bullet the first time, it appears on the new list.
 JD Sartain
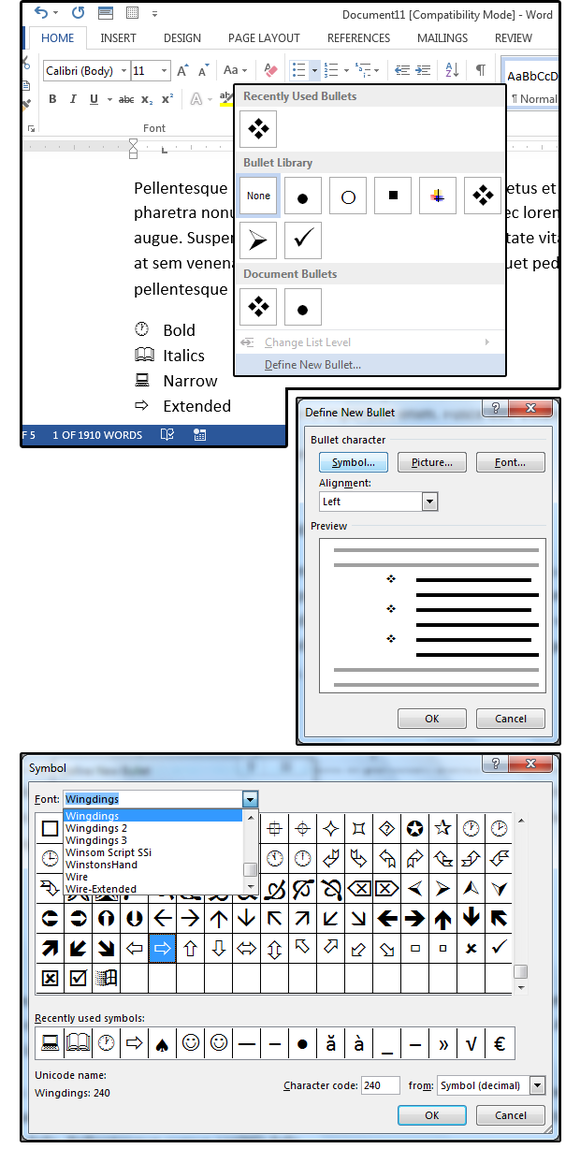
B. Define New Bullets
Creating custom bullets can add some creativity or branding to your content, such as clocks for timesheets, books for reports, or computers for data logs.
1. Highlight the content to which you want to add bullets.
2. Go to Home > Paragraph and select the down-arrow next to the bullet icon.
3. From the Bullet Library menu, scroll down to the bottom, then click the Define New Bullet button.
4. In the Define New Bullet dialog, click the Symbol… button.
5. When the Symbol dialog box opens, notice the font. Word remembers the last font used, and that font shows onscreen.
6. If it’s a text-only font, click the down arrow next to the Font field box. Scroll through the list of fonts and choose one of the Bullet fonts, such as Wingdings, Wingdings 2, Wingdings 3, or Webdings.
7. The selected font fills the boxes in the window with interesting, graphical bullets. Scroll through the list and choose a bullet design.
9. Click the bullet, then click OK, and OK again.
10. Repeat steps 1, 2, and 3 from the Default Bullets section above to change the remaining bullets in this section.
Note: When you select Symbol from the Define New Bullets menu option, your bullet design options are based on the fonts you have installed. Microsoft Word has a few bullet typefaces, and some versions include Wingdings. If you don’t have an acceptable bullet font installed, Google “Bullet Fonts” to find an untold number of free bullet fonts. Select an appropriate site, review the available fonts, then download to your computer.
Fonts are installed through Windows (not Word). Once the bullet font is installed, right-click the font, then choose Install from the popup menu. If it doesn’t show up in Word, close the program, then restart it.
 JD Sartain
C. Bullets from Fonts
If you prefer actual fonts (other than the font you’re using in your document) instead of symbols, you can select your bullet design from the Font button. You can also change the font from the Font group, or use the Define New Bullet dialog’s Font button to change the color or attributes of your bullets.
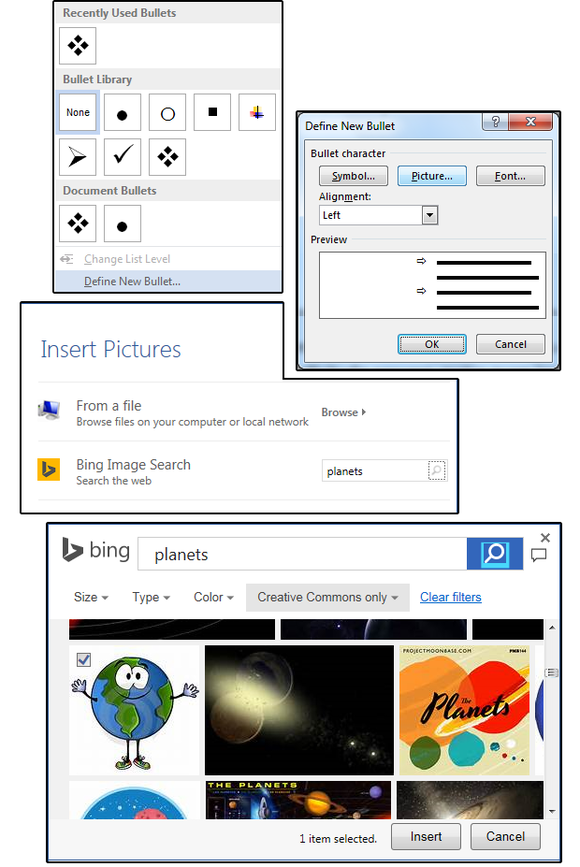
D. Create custom bullets
This is where the fun begins. You can actually create custom bullets from any image that exists. Because bullets are so small, detailed images may appear as dark blobs, so consider choosing simple images with minimal lines.
1. Highlight the content to which you want to add bullets.
2. Go to Home > Paragraph and select the down-arrow next to the bullet icon.
3. From the Bullet Library menu, scroll down to the bottom, then click the Define New Bullet button.
4. In the Define New Bullet dialog menu, click the Picture… button.
5. When the Insert Pictures dialog appears, click Browse to choose an image from your computer, or enter a search condition in the Bing Image Search field box.
6. When the Bing Image window opens, scroll through the pictures, select one for your bullets, and click the Insert button. In this example, which is for a document on “green” topics, I chose a caricature of planet Earth.
 JD Sartain
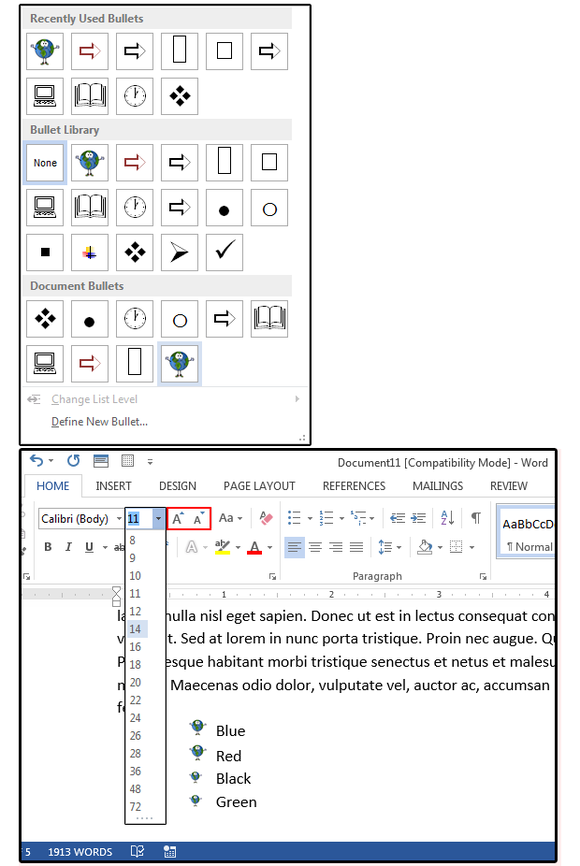
7. After the first custom bullet is created, click the Bullets button again, and select the same custom bullet from the Recently Used Bullets menu list.
If the bullets are too small, you can increase the font size on the bullet without affecting the font size of the following text. Highlight your custom image bullet and choose a new size from the Font group; or click the tiny up-arrow above the letter A beside the Font Size box. Here’s the fastest way: Highlight the bullet and enter the combination shortcut key Ctrl+ > (press and hold the Control key, then press the “greater than” symbol key, then release both keys).
There’s a little trick here: You have to hit the Shift key before this key combination to get the “greater than” symbol. It doesn’t show in the shortcut menus, but if you don’t use the Shift key, it won’t work.
Note: When an image is imported as a bullet, it’s treated like a font—as opposed to a graphic—regarding the size, so there are no sizing handles available to rescale it. You must use the font’s point size to alter the image, but notice that the other font attributes do not apply.
 JD Sartain

To enhance your Word documents when creating bullet point lists, here’s a look at how to use customized bullet points instead of the standard black dots.
If you use Microsoft Word to create documents, chances are you’ve used the bullet point function to break up lists. Most of us usually use the standard points, which is fine, but you might want to make your documents more elegant. Here’s a look at how to enhance your documents by using customized bullet points instead.
If you’re running an earlier version of Microsoft Office, make sure to check out our article on creating custom bullet points in Word 2010.
Using Custom Bullet Points in Word 2016 and Word 2013
When you come to the point in your document where you want to create a bullet point list, highlight the text you need. Here you might typically just click the Bullets button from the Mini Toolbar (unless you disabled it) to add the standard bullet points that everyone uses.

Of course, you can select the bullet button from the Ribbon under the Home tab in the Paragraph section, too.

But, you can select the bullet drop-down menu to choose one of the designs from the Bullet Library for a few more options.

Now, to create a more customized look, select Define New Bullet from the drop-down list.

Then in the Define New Bullet screen select either Symbol, Picture, or Font — we’ll take a look at each one.

Symbol brings up a character map where you can choose whichever one you like. Note that you can choose any font that you have installed on your computer.

If you choose Font, you can format your bullet with color, emphasis, etc.

Pictures will bring up an “Insert Pictures” screen. Here you can browse for images on your PC, Bing, Facebook, Flickr, or OneDrive. Note that if you use a picture, it’s treated as a font so there isn’t any way to resize them like traditional graphics. You need to use the font point size to change it.

In the following example, I chose an image of my dog from my local machine. I increased the text size to help you see it better. I found that using actual images can be rather difficult versus symbols or icons. But feel free to try out other options and find the perfect image; be creative and have fun!

Every time you add a new bullet it will be stored in the Bullet Library so you can easily access them again.
What are some of your favorite customized bullets? Leave a comment below and let us know.
![]()
Bullet point is a common type of word style to display a list in an easy to organize manner. Bullet points are everywhere but they tends to waste a lot of blank space on the document, roughly half of the page is served just for the list.
But you can make the most of it by making the list(s) appear side by side. This practice is extremely helpful if you have multiple lists or a list that has tons of points. That way, the document would look more dense and organized.
Here are the tips to make bullet points in Microsoft Word positioned side by side in one page.
1. First, write the list. It could be a single list or multiple lists.

2. Then, select the list (blockquote).

3. Now, go to Layout > Columns > Two.

4. Now the lists appear side by side equally.

The beauty of this method is it won’t affect the rest of the document since only selected text that converted into columns. Therefore, it won’t suddenly turn your document into a mess.

The guide you just see above is just a basic tip of using the Columns feature on Microsoft Word. You can explore many of its combinations by visiting Layout > Columns > More Columns…